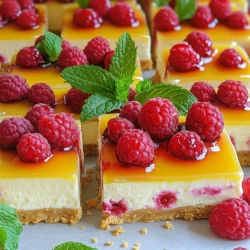
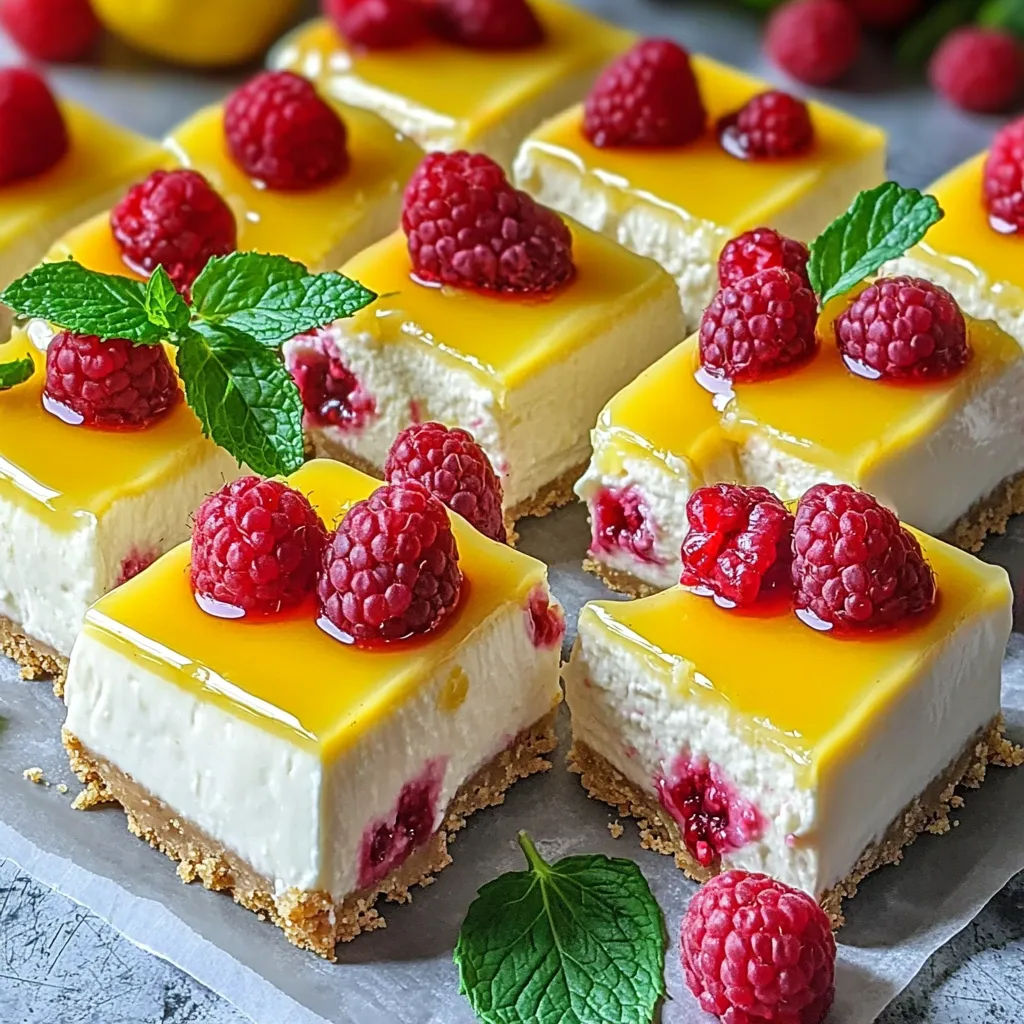
Are you ready to indulge in a sweet treat that’s both easy and delicious? My No-Bake Lemon Raspberry Cheesecake Bars are perfect for any occasion. With bright lemon flavor and fresh raspberries, these bars are sure to please your taste buds. Plus, you won’t need to turn on the oven! Let’s get started on making this delightful dessert that everyone will love. Trust me, you’ll want to keep this recipe handy!
Ingredients
List of Ingredients
To make the no-bake lemon raspberry cheesecake bars, you need the following:
– 1 ½ cups graham cracker crumbs
– ½ cup unsalted butter, melted
– 2 cups cream cheese, softened to room temperature
– 1 cup powdered sugar, sifted
– Zest of 1 medium lemon
– ⅓ cup fresh lemon juice (about 2 lemons)
– 1 teaspoon pure vanilla extract
– 1 cup fresh raspberries, plus more for topping
– 1 cup whipped cream, gently folded in
Tips for Choosing Fresh Raspberries
When you pick raspberries, look for bright red berries. They should be plump and firm to the touch. Avoid any that are mushy or have dark spots. Fresh raspberries should smell sweet, showing they are ripe. If you can, try to buy them from local farms or markets. Freshly picked berries taste the best and have more flavor.
Substitutes for Cream Cheese
If you need a cream cheese substitute, try using Greek yogurt. It gives a nice tangy flavor. You could also use mascarpone cheese for a richer taste. For a dairy-free option, use cashew cream. Just blend soaked cashews with lemon juice for a smooth mix. Each of these options will change the taste a bit, but they work well in this recipe.
Step-by-Step Instructions
Preparation of the Crust
To make the crust, start with graham cracker crumbs. You need 1 ½ cups of them. In a medium bowl, mix these crumbs with ½ cup of melted unsalted butter. Stir until it feels like wet sand. Press this mixture into the bottom of an 8×8 inch pan. Use your hands or a flat bottom to make it even. Make sure it is packed tightly. This step gives your bars a strong base. After pressing, set it aside and chill it in the fridge.
Making the Filling
Now, let’s make the filling. Begin with 2 cups of softened cream cheese. Place it in a large bowl. Use an electric mixer on medium speed to beat it until smooth. Gradually add 1 cup of sifted powdered sugar, the zest of one lemon, ⅓ cup of fresh lemon juice, and 1 teaspoon of vanilla extract. Continue mixing until everything is well combined. Next, you need 1 cup of whipped cream. Gently fold it into the cream cheese mixture. The goal is to keep it light and fluffy. Finally, add 1 cup of fresh raspberries. Be careful not to crush them while mixing.
Assembling and Chilling the Bars
Spread the raspberry filling over the chilled crust. Use a spatula to smooth it out evenly. Cover the pan with plastic wrap. Place it in the fridge for at least 4 hours. This time helps the bars set properly. Once they are firm, lift them out using the parchment paper. Cut them into squares. You can serve them with extra fresh raspberries on top. Enjoy these tasty no-bake lemon raspberry cheesecake bars!
Tips & Tricks
How to Avoid a Crumbly Crust
To keep your crust from crumbling, use the right butter amount. For this recipe, you need ½ cup of melted butter mixed well with 1 ½ cups of graham cracker crumbs. This mix should feel like damp sand. If it feels dry, add more melted butter. Press the mixture firmly into your pan. This step is key. If you don’t press hard enough, the crust will break apart when you cut the bars.
Best Practices for Folding Whipped Cream
Folding whipped cream into your filling makes it light and airy. Start with one scoop of whipped cream. Gently mix it into the cream cheese mix with a spatula. Use a folding motion, not stirring. This keeps the air in the whipped cream. Add the rest of the whipped cream slowly. Continue folding until you see no white streaks. Be careful not to smash the cream.
Timing Tips for Optimal Chilling
Chilling is very important. After you pour the filling over the crust, cover the pan with plastic wrap. Chill the bars in the fridge for at least four hours. This time helps the filling set up well. If you can, chill them overnight. The longer they chill, the easier they will be to cut. When you’re ready to serve, use the overhanging parchment paper to lift them out. This makes cutting easier and keeps them neat.
Variations
Adding Flavor Variations (e.g., Lime or Strawberry)
You can switch up the flavor of these bars easily. If you want a twist, try lime instead of lemon. Just replace lemon juice with lime juice. Use lime zest for a fresh touch. If you like strawberries, blend fresh strawberries into the filling. You can also mash them lightly for a fun texture. This gives a sweet and fruity vibe that everyone will love.
Alternative Toppings (e.g., Chocolate Drizzle, Nuts)
Toppings can make your cheesecake bars even more special. A drizzle of chocolate adds a rich flavor. Just melt dark or white chocolate and drizzle it over the bars before serving. You can also sprinkle chopped nuts, like almonds or walnuts, for a crunchy bite. Fresh mint leaves work well too. They add color and a refreshing taste.
Gluten-Free Options for the Crust
If you need a gluten-free crust, don’t worry; it’s easy to adapt. Use gluten-free graham crackers or almond flour instead. Mix the almond flour with melted butter like you would with graham cracker crumbs. This keeps the crust tasty and gives it a nice texture. Your bars will still taste amazing, and everyone can enjoy them!
Storage Info
Best Practices for Storing Leftovers
To keep your no-bake lemon raspberry cheesecake bars fresh, store them in the fridge. Use an airtight container to prevent drying out. You can also cover the bars with plastic wrap. This helps keep the flavors intact. Make sure to keep them in the main part of the fridge, not on the door. They will stay best this way.
How to Freeze Lemon Raspberry Cheesecake Bars
If you want to freeze these bars, first cut them into squares. Wrap each piece tightly in plastic wrap. Then place them in a freezer-safe bag or container. Label the bag with the date. You can freeze them for up to three months. When you’re ready to enjoy, just move them to the fridge for a few hours or overnight to thaw.
Shelf Life and Reheating Instructions
These bars can last about five days in the fridge. If you freeze them, they will last longer. You don’t need to reheat them. They taste great cold and creamy. For the best taste, enjoy them chilled. If you want to add a fresh touch, top with more raspberries just before serving.
FAQs
Can I use low-fat cream cheese?
Yes, you can use low-fat cream cheese in this recipe. It may change the texture a bit. The bars might be softer compared to those made with full-fat cream cheese. You may need to chill them longer to set properly. The taste will still be great, just lighter.
How can I make these bars dairy-free?
To make these bars dairy-free, substitute cream cheese with a dairy-free cream cheese alternative. Use coconut cream instead of whipped cream. For the crust, ensure the graham crackers are dairy-free or swap them for crushed nuts mixed with a bit of coconut oil. This gives you a tasty, creamy treat without dairy.
What is the best way to serve the cheesecake bars?
I recommend serving these cheesecake bars chilled for the best flavor. Place them on a nice platter for a pretty look. You can top each piece with extra fresh raspberries or a mint leaf for color. A drizzle of lemon curd can add a fun twist too!
In this post, we explored ingredients for lemon raspberry cheesecake bars. We discussed choosing fresh raspberries and cream cheese substitutes. I shared step-by-step instructions for making the crust and filling. We also covered tips for a smooth texture and variations for extra flavor. Don’t forget storage tips to keep leftovers fresh!
With these insights, you can make delicious cheesecake bars that impress everyone. Enjoy your baking journey!