Skip to content
DisclaimerTerms Of UseGDPR PolicyCookie Policy

spoonfulsavory

  • Home
  • Drinks
  • Appetizers
  • Dinner
  • Dessert
  • About
  • Contact
  • Privacy Policy
DisclaimerTerms Of UseGDPR PolicyCookie Policy

Sarah

To make these yummy peanut butter cup blondies, you'll need simple, easy-to-find ingredients. Here’s what you will gather: - 1 cup creamy peanut butter - 1/2 cup unsalted butter, melted - 1 cup brown sugar, packed down - 2 large eggs, at room temperature - 1 teaspoon vanilla extract - 1 cup all-purpose flour - 1/2 teaspoon baking powder - 1/4 teaspoon salt - 1 cup chocolate peanut butter cups, coarsely chopped - 1/2 cup chocolate chips (optional) Each ingredient plays a key role. The creamy peanut butter gives these blondies their rich flavor and chewy texture. The unsalted butter adds moisture and helps create a soft crumb. Brown sugar adds sweetness and a hint of caramel taste. Eggs bind everything together and give the blondies structure. The vanilla extract adds a warm aroma and flavor. Flour, baking powder, and salt work together to create the right texture and lift. Finally, the chocolate peanut butter cups add bursts of chocolate and peanut flavor. You can also add chocolate chips for extra chocolatey goodness. Gather these ingredients, and you are ready to start making something special! {{ingredient_image_2}} First, you need to preheat your oven to 350°F (175°C). Grab a 9x9 inch baking pan. You can either grease it with some butter or line it with parchment paper. This makes it easy to remove the blondies later. In a large bowl, add 1 cup of creamy peanut butter and 1/2 cup of melted unsalted butter. Use a whisk or spatula to mix them together. Keep mixing until the mixture is smooth and well blended. Next, add 1 cup of packed brown sugar into the bowl. Stir it in well. Make sure it mixes nicely with the peanut butter mixture. Then, add 2 large eggs, one at a time. Mix well after each egg. Don’t forget to add 1 teaspoon of vanilla extract for flavor! In a separate bowl, whisk together 1 cup of all-purpose flour, 1/2 teaspoon of baking powder, and 1/4 teaspoon of salt. Once mixed, slowly fold this dry mixture into your wet ingredients. Use a rubber spatula or wooden spoon. Be careful not to overmix; stop as soon as you see no dry flour. Now, gently fold in 1 cup of coarsely chopped chocolate peanut butter cups. If you want extra chocolate, you can add 1/2 cup of chocolate chips. Make sure they are spread evenly in the batter. Pour the thick batter into your prepared pan. Use a spatula to spread it evenly. Place the pan in the oven and bake for 20-25 minutes. Check if they are done by inserting a toothpick into the center. It should come out clean or with a few moist crumbs. Once baked, let the blondies cool in the pan for about 10 minutes. Then, transfer them to a wire rack to cool completely. To get that chewy yet soft texture, mix your batter carefully. Overmixing can make the blondies tough. After adding the flour, only stir until you see no dry flour. The batter should be thick but smooth. If you want extra gooeyness, add more chocolate peanut butter cups. Keep your blondies fresh by storing them in an airtight container. They stay great at room temperature for about three days. If you want them to last longer, refrigerate them. Just remember to let them come back to room temperature before serving to enjoy their full flavor. Cut the blondies into even squares for a nice look. Place them on a colorful platter to catch the eye. For a special touch, drizzle melted chocolate on top. You can also add a scoop of vanilla ice cream next to them for a delightful dessert experience. Pro Tips Use Room Temperature Eggs: This helps the batter to emulsify better, resulting in a smoother texture and more even baking. Don’t Overmix the Batter: Once you combine the dry and wet ingredients, mix just until incorporated to avoid tough blondies. Cool Completely Before Cutting: Allow the blondies to cool fully to ensure clean cuts and prevent them from crumbling. Experiment with Mix-Ins: Feel free to add nuts, dried fruits, or different types of chocolate for a personalized twist on the recipe. {{image_4}} You can make these blondies vegan by swapping the eggs. Use 1/4 cup of unsweetened applesauce for each egg. This keeps the blondies moist and tasty. Also, choose a vegan butter and dairy-free chocolate peanut butter cups. The flavor stays rich and creamy, just like the original. For a gluten-free treat, swap the all-purpose flour for a gluten-free blend. Many brands work well in baking. Look for blends that include a mix of rice flour and tapioca starch. This change gives you the same great texture without the gluten. Always check labels to ensure your chocolate peanut butter cups are also gluten-free. Get creative with your blondies! You can add chopped nuts like walnuts or pecans for crunch. If you want more chocolate, toss in some chocolate chips. Dried fruits, like cranberries or cherries, can add a fun twist. For a fun topping, drizzle melted chocolate over the cooled blondies for a sweet finish. Enjoy mixing and matching to find your perfect flavor! You can keep peanut butter cup blondies at room temperature. Place them in an airtight container. They stay fresh for about three days. Make sure to keep them in a cool and dry place. If you add chocolate drizzle, let it set before storing. If you want to keep the blondies longer, refrigerate them. They last up to a week when stored this way. Use an airtight container to prevent them from drying out. Before serving, let them sit at room temperature for a bit. This makes them soft again. To freeze blondies, first cut them into squares. Wrap each square in plastic wrap. Then, place the wrapped blondies in a freezer-safe bag or container. They can stay frozen for up to three months. When ready to eat, thaw them in the fridge overnight. You can warm them in the oven or microwave for a gooey treat. Yes, you can use natural peanut butter. It will change the texture slightly. Natural peanut butter is often less sweet and more oily. You may want to add a bit more sugar or adjust the flour to keep the batter thick. Check the edges of the blondies. They should look golden brown. Insert a toothpick in the center. If it comes out with a few moist crumbs, they are ready. If it’s wet, bake for a few more minutes. You can use flax eggs as a substitute. Mix one tablespoon of ground flaxseed with three tablespoons of water. Let it sit for five minutes. This will help bind the blondies like eggs do. Absolutely! You can add chopped nuts or other candies. Some great choices are walnuts, pecans, or M&M's. Just be sure to keep the total mix-ins balanced so the batter stays thick. To reheat, place a blondie in the microwave for about 10-15 seconds. This warms it up without drying it out. You can also warm them in the oven at 350°F for about five minutes. Enjoy them warm! In this post, I shared a detailed look at making delicious peanut butter cup blondies. You learned about the key ingredients, step-by-step instructions, and helpful tips. We also explored tasty variations and storage methods. If you crave a sweet and rich treat, these blondies deliver. Enjoy experimenting with your own twists, and remember that baking should be fun! Make these blondies your way and share them with friends and family. They'll love every bite!

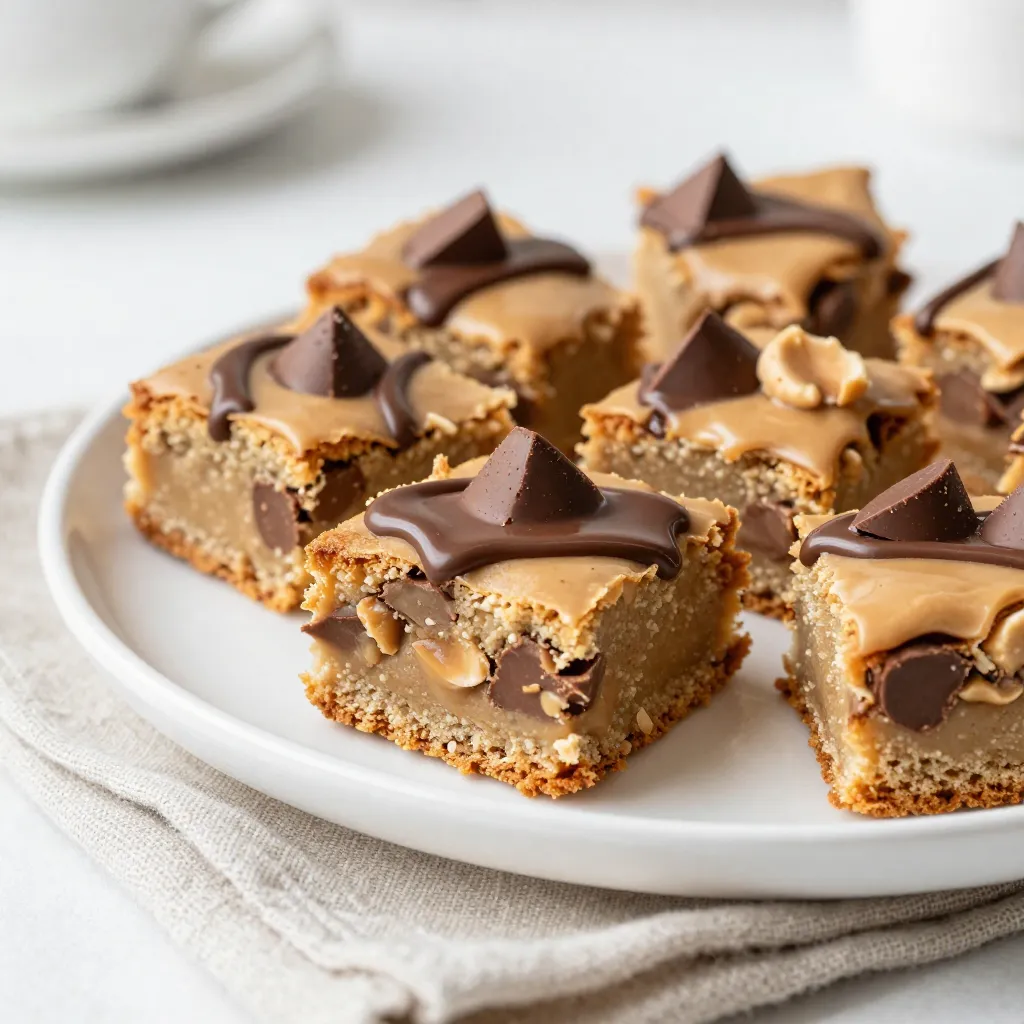
Peanut Butter Cup Blondies Irresistible Dessert Treat

If you love peanut butter and chocolate, you’ll adore these Peanut Butter Cup Blondies! This sweet treat brings a chewy,

- 1 bunch of broccolini, trimmed - 3 tablespoons olive oil, divided - 4 cloves garlic, minced - Zest of 1 lemon - Juice of 1 lemon - 1/4 teaspoon red pepper flakes (optional for added heat) - Salt and freshly ground black pepper to taste - 1/4 cup pine nuts, toasted - 2 tablespoons grated Parmesan cheese (optional, for a savory finish) I love using fresh broccolini for this dish. It has a sweet, mild flavor. Olive oil adds richness, while garlic gives depth. The zest and juice of lemon brighten the taste. Red pepper flakes can add a kick if you like heat. Salt and black pepper are key to enhancing all the flavors. If you want an extra crunch, try adding toasted pine nuts. They bring a nice texture. Grated Parmesan cheese is a tasty option too. It melts slightly and adds a savory touch. These ingredients come together for a vibrant and tasty side dish that pairs well with any meal. {{ingredient_image_2}} Start by washing the broccolini under cold water. This step removes dirt and bacteria. Trim off any thick ends. This helps the broccolini cook evenly. After cleaning, set the prepared broccolini aside. Heat 2 tablespoons of olive oil in a large skillet over medium heat. Wait until the oil shimmers. Next, add the minced garlic to the skillet. Sauté the garlic for about 30 seconds. Stir it frequently until it turns fragrant and golden. Be careful not to burn the garlic; burnt garlic tastes bitter. Quickly add the trimmed broccolini to the skillet. Toss it in the garlic oil. Cook for 2-3 minutes. This allows the broccolini to brighten and soften slightly, while still being crisp. If you like heat, sprinkle in the red pepper flakes now. Next, add the lemon zest and juice. Toss the mixture well to coat the broccolini evenly. Season it with salt and freshly ground black pepper. Continue cooking for another 2-3 minutes. This helps the broccolini reach your desired tenderness while keeping its crunch. While the broccolini cooks, prepare the toasted pine nuts. In a small skillet, add the pine nuts. Toast them over medium heat, stirring frequently for 3-4 minutes. They should turn golden brown and fragrant. Watch them closely; they can burn quickly. Once cooked, transfer the broccolini to a serving dish. Sprinkle the toasted pine nuts on top. If you want, add grated Parmesan cheese for extra flavor. Drizzle the last tablespoon of olive oil over the dish before serving. To get the best texture for your broccolini, focus on two key areas: crispiness and timing. - Ensuring crispiness: Start with fresh broccolini. This helps keep the crunch. Avoid overcooking it. You want it bright green and tender but still crisp. - Timing for sautéing: Sauté the broccolini for just 2-3 minutes after adding it to the skillet. This short cooking time allows it to stay vibrant and crunchy. Garlic adds great flavor, but it can be tricky. Here are some tips to avoid common mistakes. - Avoiding burnt garlic: Sauté the minced garlic for only 30 seconds. Stir it often to keep it from burning. Burnt garlic becomes bitter and ruins the dish. - Flavor variations: If you want a twist, try roasting the garlic instead. Roasted garlic is sweet and rich, adding a different depth to your dish. How you serve your broccolini can make a big difference in how it looks and tastes. - Serving ideas: Use a bright bowl to serve the broccolini. This makes the colors pop. - Garnishing for visual appeal: Add a lemon wedge on the side. This not only looks nice but also gives a fresh touch when squeezed over the dish. Sprinkle the toasted pine nuts on top for added crunch and flavor. Pro Tips Choose Fresh Broccolini: Select vibrant, firm broccolini with no yellowing leaves for the best flavor and texture. Watch the Garlic: Keep a close eye on the garlic while sautéing; it should be golden but not brown to avoid bitterness. Customize the Crunch: Feel free to substitute pine nuts with other nuts or seeds for a different crunchy texture. Serve Immediately: Broccolini is best served fresh and hot to maintain its vibrant color and crispness. {{image_4}} For those following a vegan diet, you can easily modify this recipe. Simply skip the Parmesan cheese. The lemon and garlic still bring great flavor. You can replace the cheese with nutritional yeast for a cheesy taste without dairy. If you need a nut-free option, just leave out the pine nuts. You won’t lose much flavor. Instead, try sunflower seeds for a crunchy twist. They add a nice texture without any nuts. You can change up the flavors by adding different cheeses. Feta or goat cheese can give a nice tang. If you want to skip cheese, consider using a sprinkle of nutritional yeast for a savory touch. Herbs and spices can also enhance your dish. Fresh basil, thyme, or oregano work well with broccolini. If you like heat, add more red pepper flakes or try some chili powder for a different kick. Grilling broccolini gives it a smoky flavor. Brush it with olive oil and grill for about 5 minutes. This makes it crispy and adds a nice char. If you prefer a healthier approach, steaming broccolini is great too. Steam until bright green and tender, then toss with your lemon-garlic mix. This method keeps the nutrients intact while still being tasty. To store your leftover Lemon Garlic Broccolini, let it cool first. Place it in an airtight container. This keeps it fresh for about three days. For best quality, use glass or plastic containers. They help keep moisture in and prevent odors from escaping. You can reheat broccolini in several ways. The microwave is quick but can make it soggy. Try reheating in a skillet over medium heat. Add a splash of olive oil to keep it crisp. Stir it gently until warmed through. This method helps maintain its bright color and crunchy texture. Yes, you can freeze cooked broccolini! However, it’s best to freeze it before adding any toppings. To freeze, let it cool down completely. Place it in a freezer-safe bag or container, removing as much air as possible. It can last up to three months in the freezer. When you're ready to eat it, thaw in the fridge overnight before reheating. Broccolini is a mix of broccoli and Chinese broccoli. It has long, thin stalks and small florets. Its taste is sweeter than regular broccoli. It cooks faster and has a more tender bite. Broccolini vs. broccoli: - Broccolini is smaller and more delicate. - Broccoli has larger florets and thicker stalks. - Both are nutritious, but broccolini has a milder flavor. To make Lemon Garlic Broccolini gluten-free, focus on the ingredients. Check any packaged items for gluten. Use gluten-free Parmesan cheese if you want to add cheese. This keeps the dish safe for gluten-free diets. Gluten-free ingredient options: - Use gluten-free soy sauce if adding sauces. - Choose fresh ingredients without additives. Yes, you can prepare broccolini ahead of time. Wash and trim it first. Store it in the fridge for up to two days. You can also cook it and keep it in an airtight container. Tips for meal prep and advanced cooking: - Cook broccolini lightly to keep it crisp. - Reheat quickly in a pan to preserve texture. - Add fresh lemon juice right before serving for flavor. In this blog post, we covered how to prepare a tasty broccolini dish. We explored key ingredients like broccolini, olive oil, and garlic, and discussed flavor enhancers and optional additions. You learned step-by-step instructions, helpful tips, and variations to suit your needs. Remember, following these instructions leads to a delicious meal. Broccolini's bright flavor and crisp texture make it a favorite. Keep experimenting with flavors and cooking methods. Enjoy your cooking journey and share this tasty recipe with others!

Lemon Garlic Broccolini Flavorful and Easy Recipe

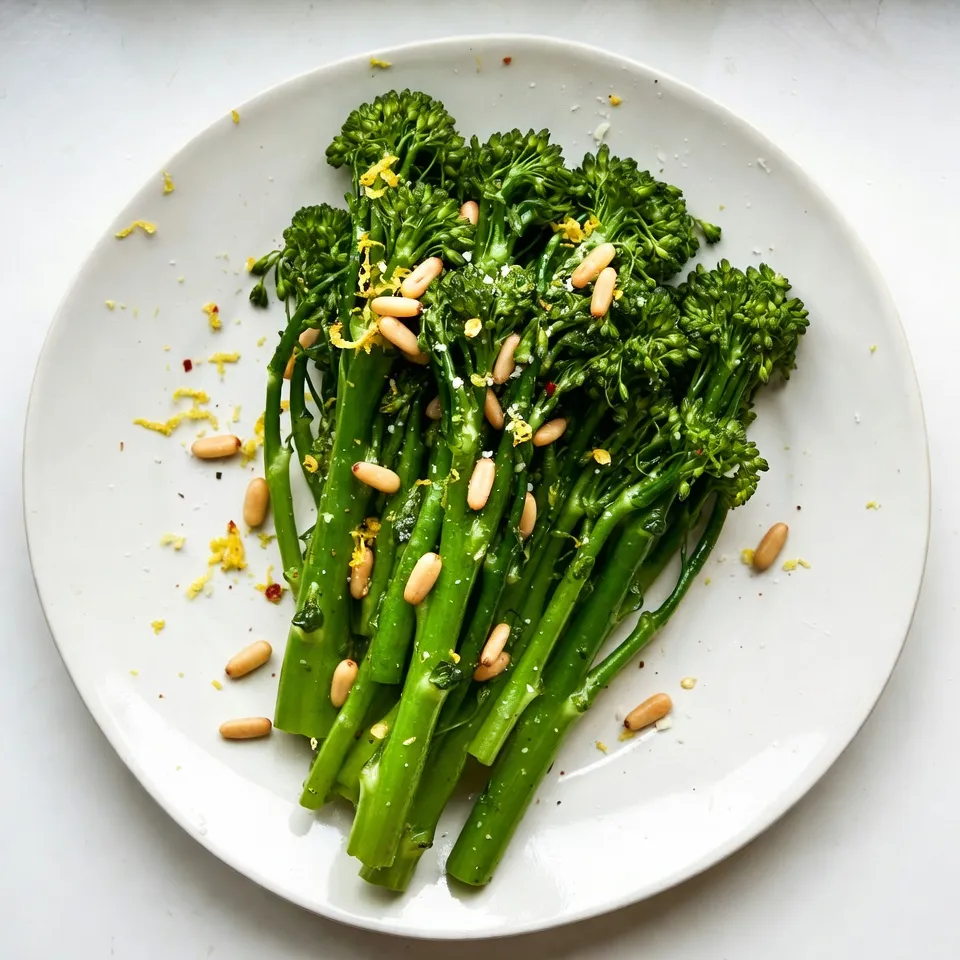
Looking to add a burst of flavor to your meals? Try my Lemon Garlic Broccolini recipe! This simple dish combines

- 1.5 lbs chicken breast, cut into 1-inch cubes - 1 red bell pepper, cut into 1-inch pieces - 1 green bell pepper, cut into 1-inch pieces - Skewers (wooden or metal) - 2 tablespoons chipotle peppers in adobo sauce, finely minced - 3 tablespoons freshly squeezed lime juice - 2 tablespoons extra virgin olive oil - 2 cloves garlic, finely minced - 1 teaspoon ground cumin - 1 teaspoon smoked paprika - Salt and freshly ground black pepper, to taste - Fresh lime wedges - Sprigs of cilantro - Dipping sauce of your choice The key to great flavor in Chipotle Lime Chicken Skewers is the marinade. It combines bold chipotle peppers, fresh lime juice, and rich olive oil. This mix brings life to the chicken. I like to use fresh ingredients for the best taste. The chicken pairs well with colorful bell peppers, adding a nice crunch. For garnish, fresh lime and cilantro brighten the dish. You can also serve a tasty dipping sauce on the side. This makes the meal more fun and interactive! {{ingredient_image_2}} First, grab a large mixing bowl. In this bowl, whisk together two tablespoons of minced chipotle peppers and three tablespoons of fresh lime juice. Next, add two tablespoons of olive oil and two cloves of finely minced garlic. Sprinkle in one teaspoon each of ground cumin and smoked paprika. Then, add salt and black pepper to taste. Mix everything until it blends well. This marinade will give your chicken a tasty kick. Now, take your chicken breast. Cut it into 1-inch cubes. Place these cubes into the marinade, making sure each piece gets coated. Cover the bowl with plastic wrap. For the best flavor, let it marinate in the fridge for at least 30 minutes. If you can wait, two hours is even better! If you use wooden skewers, soak them in water for about 30 minutes. This step keeps them from burning on the grill. Preheat your grill to medium-high heat. While the grill heats up, thread the marinated chicken cubes onto the skewers. Alternate them with pieces of red and green bell peppers. This adds color and crunch. When the grill is hot, place the skewers on it. Cook for about 10 to 12 minutes. Turn them now and then to cook evenly. The chicken is done when it reaches an internal temperature of 165°F (75°C). Once the skewers are grilled, take them off the heat. Let them rest for a few minutes. This helps the juices settle. For a nice presentation, arrange the skewers on a wooden platter. Add lime wedges and fresh cilantro for color. You can also serve a small bowl of your favorite dipping sauce on the side. Enjoy your delicious Chipotle Lime Chicken Skewers! To create a great marinade, balance is key. The chipotle peppers bring heat, while lime juice adds brightness. I suggest adjusting the lime juice to your taste. If you like more tang, add extra lime juice. Mix well to ensure the flavors blend. Let the marinade sit for a few minutes before adding the chicken. This step helps the flavors deepen. Grilling the skewers on medium-high heat is essential. Be sure to preheat the grill first. This helps the chicken cook evenly and adds nice grill marks. Turn the skewers every few minutes to avoid burning. Use a meat thermometer to check for doneness. Aim for an internal temperature of 165°F (75°C). Let the skewers rest after grilling. This step helps keep the chicken juicy. Serving your skewers can elevate the meal. Use a rustic wooden platter for a nice touch. Arrange the skewers with fresh lime wedges and cilantro. This adds color and freshness to the dish. For extra flavor, offer a dipping sauce on the side. A simple yogurt or avocado dip works well. Enjoy your beautiful and tasty creation! Pro Tips Marination Time: For the best flavor, allow the chicken to marinate for at least 2 hours. This will help the spices penetrate the meat more deeply. Skewer Technique: When threading the chicken and vegetables onto the skewers, make sure to leave a little space between each piece. This allows for better heat circulation and even cooking. Grill Temperature: Preheat your grill to medium-high heat to achieve perfect grill marks and caramelization. A hot grill is essential for locking in the juices. Resting Period: After grilling, let the skewers rest for a few minutes before serving. This gives the juices time to redistribute, resulting in a juicier bite. {{image_4}} You can switch up the protein in these skewers. Try using shrimp or tofu. Both options work great with the marinade. Shrimp cooks fast and adds a nice taste. Tofu absorbs flavors well and is perfect for a meatless meal. Just make sure to cut the shrimp into similar sizes. For tofu, press it to remove extra water before marinating. Adding veggies can make your skewers colorful and healthy. Bell peppers are classic, but you can also use zucchini or cherry tomatoes. Cut zucchini into thick rounds to keep them from falling apart. Cherry tomatoes add a burst of flavor when grilled. Feel free to mix and match your favorites for a fun twist! You can change the marinade to match your taste. Try adding a bit of honey for sweetness. This balances the heat of the chipotle. If you want more zest, mix in some orange juice. For a spicy kick, add more chipotle peppers or jalapeños. Experiment with different herbs like cilantro or oregano to create your unique flavor. After cooking, let the skewers cool down. Place them in an airtight container. Store in the fridge for up to three days. This keeps the flavor fresh and the meat safe to eat. To reheat, you can use the microwave. Simply place the skewers on a microwave-safe plate. Heat for about one to two minutes. Check that the chicken is hot all the way through. You can also reheat them in a skillet. Heat on medium for about five minutes, turning often. This helps keep the chicken juicy. If you want to save some for later, freezing is a great option. Wrap the skewers tightly in plastic wrap and then in foil. This prevents freezer burn. They can last in the freezer for up to three months. When you're ready to eat, thaw them in the fridge overnight before reheating. You should marinate the chicken for at least 30 minutes. If you want more flavor, let it sit for 2 hours. The longer the chicken sits, the better it tastes. Yes, chicken thighs work well too. They stay juicy and tender during cooking. Just cut them into 1-inch cubes like the breasts. Great sides include rice, corn salad, or grilled veggies. A fresh green salad also adds a nice touch. You want sides that balance the spicy flavors. Absolutely! These skewers are great for meal prep. You can make them ahead and store them in the fridge. Just reheat when you're ready to eat. They taste just as good! You learned how to make Chipotle Lime Chicken Skewers. We covered key ingredients, marinade tips, and grilling steps. I shared ideas for serving and storing leftovers. This dish is great if you want flavor and ease. You can even change the protein or add veggies. Use these tips to impress your family or friends. Enjoy your skewers, and happy cooking!

Chipotle Lime Chicken Skewers Savory and Simple Recipe

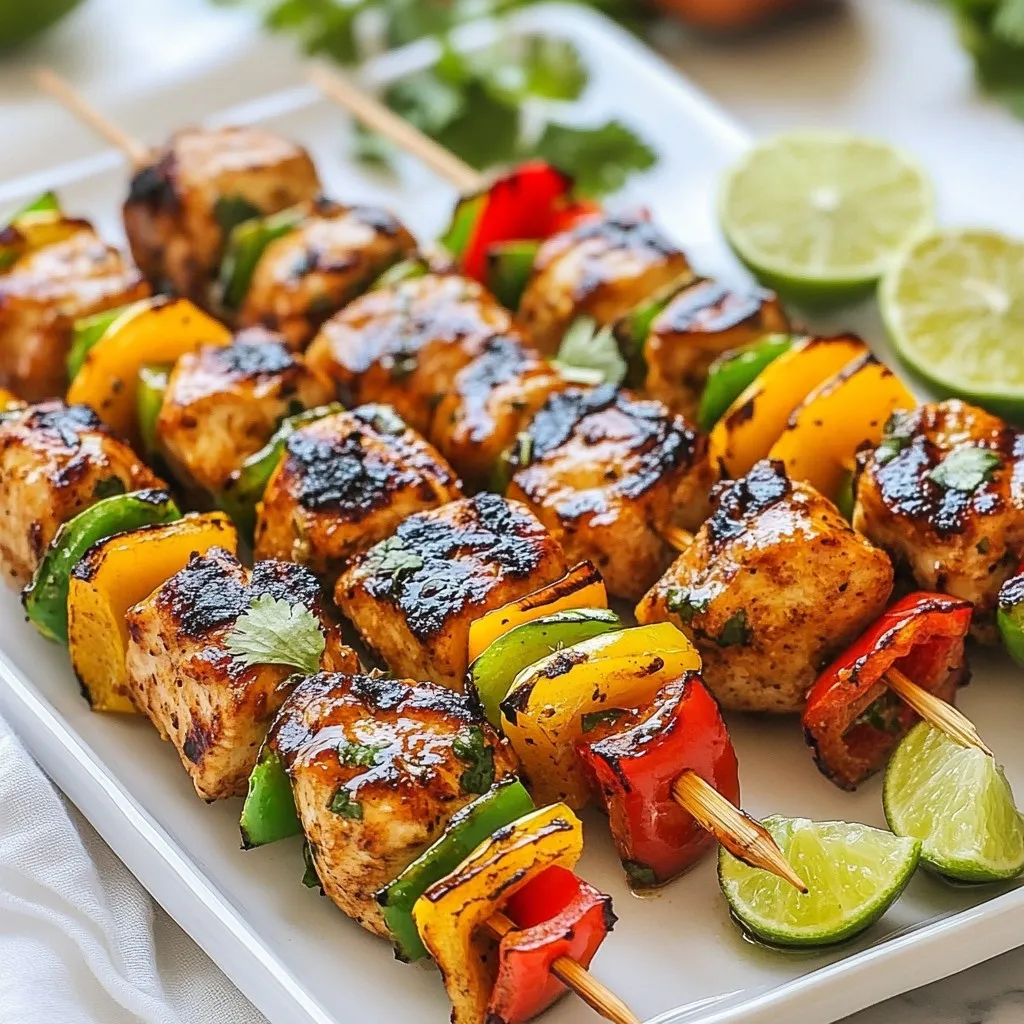
Are you ready to spice up your meals? These Chipotle Lime Chicken Skewers are both savory and simple to make!

- 1.5 lbs boneless, skinless chicken breasts - 1/4 cup honey - 1/4 cup freshly squeezed lime juice - 1 red bell pepper - 1 green bell pepper - 1 large red onion - 2 tablespoons extra virgin olive oil - 3 cloves garlic, finely minced - 1 teaspoon ground cumin - 1/2 teaspoon smoked paprika - Salt and freshly cracked black pepper, to taste - You can use wooden or metal skewers. - Soak wooden skewers in water for 30 minutes before grilling. This keeps them from burning. {{ingredient_image_2}} To start, grab a large mixing bowl. In it, whisk together the honey, lime juice, olive oil, minced garlic, ground cumin, smoked paprika, salt, and pepper. Mix until smooth. This marinade is key. It adds flavor and helps tenderize the chicken. Letting the marinade sit for a bit allows the flavors to blend. I recommend letting it rest for about 10 minutes. Take your cubed chicken pieces and add them to the bowl. Make sure each piece is coated well in the marinade. This step is crucial for great taste. Cover the bowl with plastic wrap or a lid. Place it in the fridge. For the best flavor, marinate for at least 30 minutes. If you have time, letting it sit for up to 2 hours works wonders. While the chicken marinates, preheat your grill or grill pan over medium-high heat. It should be nice and hot when you're ready to cook. Now, assemble your kebabs. Start by taking a skewer and threading on a piece of chicken. Then add a piece of red pepper, followed by a piece of green pepper, and a wedge of onion. Repeat this pattern. It makes the kebabs colorful and fun! Once your grill is hot, place the kebabs on it. Cook them for about 10 to 12 minutes. Turn them often to ensure even cooking. This helps achieve those beautiful grill marks. You want the chicken to reach an internal temperature of 165°F (75°C). Use a meat thermometer for accuracy. After removing the kebabs from the grill, let them rest for about 5 minutes. This step is important. It allows the juices to redistribute, making the meat juicy and tender. For serving, arrange the kebabs on a large platter. Garnish with lime wedges and fresh cilantro for a bright look. A cool yogurt dip or tzatziki pairs nicely, too! To get the best grill marks, preheat your grill to medium-high heat. Place the kebabs on the grill and don’t move them for a few minutes. This helps create those lovely marks. Turn the kebabs every few minutes for even cooking. To ensure chicken is fully cooked, check its internal temperature. Use a meat thermometer to make sure it reaches 165°F (75°C). This keeps the chicken safe and juicy. Marination is key to great flavor. The honey and lime juice work together to tenderize the chicken. This makes it juicy and full of taste. Marinate for at least 30 minutes, but for the best flavor, try overnight. You can use a zip-lock bag to make it easy. Arranging kebabs nicely can impress your guests. Place them on a large platter, with lime wedges and fresh cilantro on the side. This adds color and freshness. For an extra touch, serve with a cool yogurt dip or tzatziki. It pairs well and adds a nice contrast to the sweet and tangy chicken. Pro Tips Marinate Longer for More Flavor: For the best flavor, marinate the chicken for at least 2 hours, or even overnight if possible. This allows the spices and the honey-lime mixture to penetrate the meat deeply. Skewer for Easy Grilling: When threading the kebabs, alternate chicken pieces with vegetables to ensure even cooking and a vibrant presentation. This also helps the veggies to soak up the marinade flavors. Check for Doneness: Always use a meat thermometer to check that the chicken reaches an internal temperature of 165°F (75°C). This ensures the chicken is fully cooked and safe to eat. Rest Before Serving: Allow the kebabs to rest for about 5 minutes after grilling. This helps to redistribute the juices, resulting in a juicier and more flavorful chicken. {{image_4}} You can switch the chicken with shrimp or tofu. Shrimp cooks quickly and adds a nice flavor. Tofu absorbs the marinade well, making it tasty for vegetarians. For veggies, try zucchini, cherry tomatoes, or mushrooms. Each brings a unique twist to the dish. Feel free to mix and match your favorites for a fun kebab experience! Want to spice things up? Add chili powder for heat. It gives a nice kick without overpowering the dish. You can also try different marinades. Teriyaki sauce adds a sweet and savory touch. Soy sauce with ginger and garlic offers a great alternative too. Experiment with herbs like cilantro or basil for bright flavors. These small changes can make a big difference! Grilling is fun, but you can bake the kebabs in the oven too. Set your oven to 400°F (200°C) and cook for about 20 minutes. Broiling is another option for indoor cooking. Place the kebabs under the broiler for 10-12 minutes, turning halfway through. Each method offers a unique flavor and texture. Choose what works best for you! To keep your honey lime chicken kebabs fresh, store them properly. First, let them cool down to room temperature. Then, place the kebabs in an airtight container. This keeps moisture in and prevents odors from other foods. You can also wrap them tightly in plastic wrap. Refrigerate your leftovers right away. They will stay good for about 3 to 4 days. When reheating, you have two options: microwave or oven. The microwave is quick but can dry out the chicken. If you use it, heat in short bursts and check often. The oven is a better choice for juicy kebabs. Preheat it to 350°F (175°C). Place the kebabs on a baking sheet, cover them with foil, and heat for about 10 minutes. This helps keep them moist and flavorful. If you want to store kebabs for longer, freezing is great. Wrap each kebab in plastic wrap, then place them in a freezer bag. Be sure to remove as much air as possible. This helps avoid freezer burn. When you’re ready to eat them, take the kebabs out of the freezer and thaw overnight in the fridge. Reheat them using the oven method for the best taste. I suggest marinating the chicken for at least 30 minutes. For deeper flavor, let it sit for up to 2 hours. The longer the chicken marinates, the more the flavors blend. Honey and lime add a sweet and tangy taste that really enhances the chicken. Yes, you can use other meats! Shrimp, pork, or even tofu work great. Each option brings its own unique taste. Just adjust the marination time. Shrimp needs less time, while pork may need longer. Try serving the kebabs with rice, quinoa, or a fresh salad. Grilled vegetables also complement the flavors well. You could also add a cool yogurt dip or tzatziki for extra zest. To check if the chicken is ready, use a meat thermometer. The internal temperature should reach 165°F (75°C). If you don’t have a thermometer, cut into a piece. The meat should be opaque and juices should run clear. Yes, you can prepare the kebabs ahead. Marinate the chicken and assemble the kebabs. Store them in the fridge for up to 24 hours before grilling. This saves time and lets the flavors develop even more. This guide covered everything from ingredients to methods for perfect honey lime chicken kebabs. Preparing your marinade, marinating the chicken, and grilling with care led to delicious results. Remember, the right marinade makes a big difference in flavor. You can also play around with ingredients for fun variations. Store your leftovers wisely for tasty meals later. Enjoy these kebabs with your favorite sides, knowing you’ve mastered a great dish!

Honey Lime Chicken Kebabs Flavorful Grilling Delight

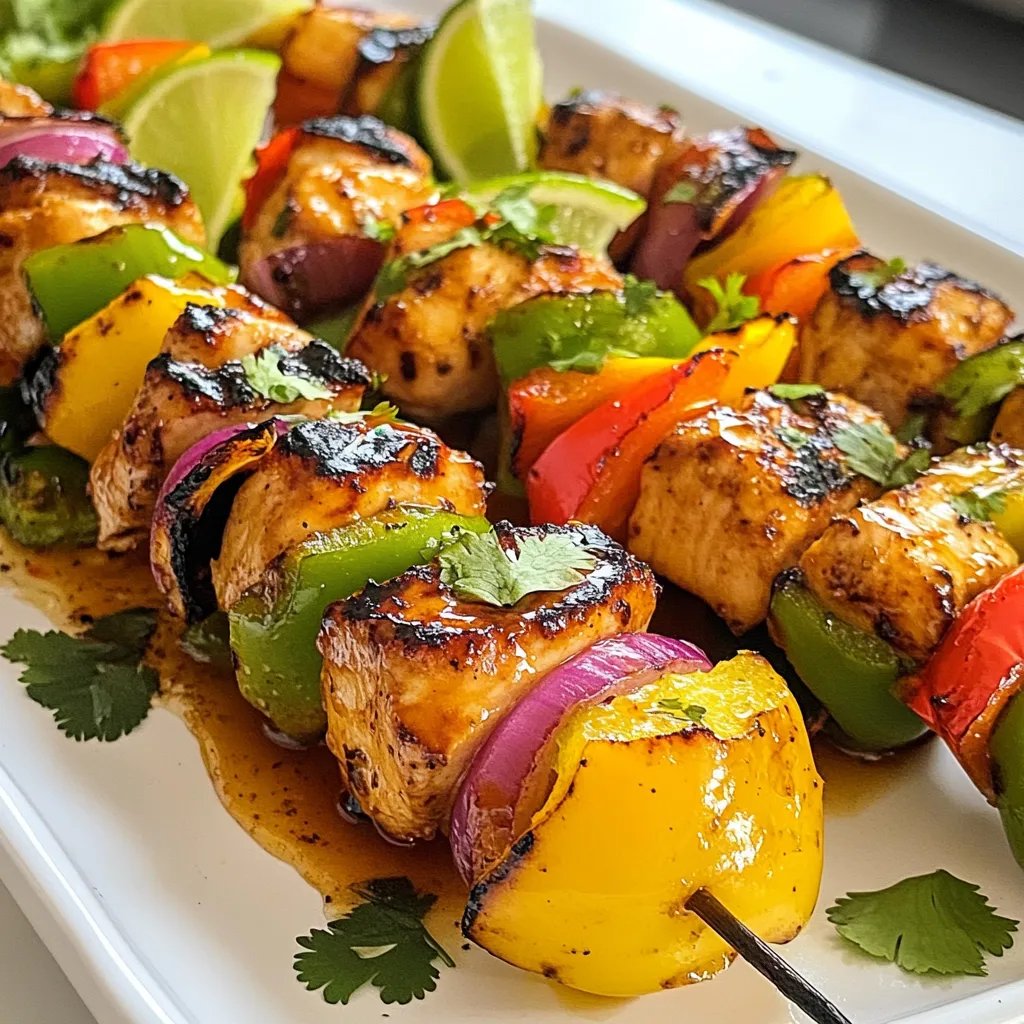
Looking to impress at your next cookout? Dive into the delicious world of Honey Lime Chicken Kebabs! This dish combines

- 2 cups cooked chicken, shredded - 1/2 cup basil pesto - 1 cup shredded mozzarella cheese - 1/2 cup sun-dried tomatoes, finely chopped - 1 small red onion, finely chopped - 1 tablespoon olive oil - 1 loaf of crusty Italian bread - Salt and freshly ground black pepper to taste The main ingredients in pesto chicken stuffed bread come together for a tasty meal. The cooked chicken provides protein, while the basil pesto adds a fresh, herbal flavor. The mozzarella cheese melts beautifully and gives that gooey texture we all love. Sun-dried tomatoes add a sweet, tangy punch, and red onion brings a mild crunch. Olive oil helps blend all these flavors and adds richness. Don't forget the salt and pepper to enhance the taste. - Fresh basil leaves for garnish - Extra pesto for drizzling Garnishes can make your dish look even more inviting. Fresh basil leaves add color and a burst of flavor. Drizzling extra pesto on top can elevate the dish, making it look restaurant-quality. - Use rotisserie chicken if you're short on time. - Swap mozzarella for provolone or cheddar cheese. - Replace sun-dried tomatoes with roasted red peppers or olives. - Use whole-wheat bread for a healthier option. If you don’t have an ingredient, you can easily swap it out. Rotisserie chicken works great and saves time. Different cheeses can change the taste while keeping it delicious. You can also use roasted red peppers or olives instead of sun-dried tomatoes for a new twist. Whole-wheat bread gives a healthier choice without losing flavor. {{ingredient_image_2}} First, preheat your oven to 375°F (190°C). In a large bowl, mix 2 cups of shredded chicken and 1/2 cup of basil pesto. Add 1 cup of shredded mozzarella cheese, 1/2 cup of finely chopped sun-dried tomatoes, and 1 small red onion, finely chopped. Drizzle in 1 tablespoon of olive oil. Season with salt and black pepper. Use a spatula to blend everything well. Make sure the chicken gets a nice coat of pesto. Now grab your loaf of crusty Italian bread. Slice it lengthwise down the center. This creates a top half and a bottom half. Carefully scoop out some soft bread from both halves. Leave enough crust to hold the filling. This makes sure the bread won’t break when you fill it. Spoon the chicken and pesto mixture into the hollowed-out bread. Pack the filling tightly to fill every space. Place both halves on a baking sheet and wrap them in aluminum foil. This keeps the crust from burning. Bake for 25-30 minutes. The bread will turn golden and crispy, and the filling will become hot. Once it’s done, take it out of the oven and let it cool for a few minutes. Slice the stuffed bread and garnish with fresh basil leaves. Enjoy your tasty creation! To get the best texture for your pesto chicken stuffed bread, focus on the bread. Use a crusty Italian loaf. This gives a nice crunch outside and a soft, warm inside. Hollow it out carefully. Leave enough bread on the sides to support your filling. When you bake, wrap the loaf in foil. This keeps it moist and prevents burning. Bake until golden. This way, the filling gets hot and bubbly while the crust stays perfect. A few simple tools make this recipe easier. First, grab a sharp knife for slicing the bread. A large mixing bowl helps combine all your filling ingredients. Use a spatula or wooden spoon to mix well. A baking sheet is essential for placing the stuffed bread in the oven. Lastly, aluminum foil helps protect the crust while baking. These tools help you create a tasty dish with less fuss. If you have leftovers, store them right to keep them fresh. Wrap the stuffed bread tightly in plastic wrap or foil. This keeps it from drying out in the fridge. You can also place it in an airtight container. Enjoy your leftovers within three days for the best taste. Reheat in the oven at 350°F (175°C) for about 10-15 minutes. This revives the crisp crust and warms the filling nicely. Pro Tips Use Fresh Ingredients: For the best flavor, opt for fresh basil pesto and high-quality sun-dried tomatoes. Fresh ingredients will elevate the taste of your stuffed bread. Customize Your Fillings: Feel free to add other ingredients such as spinach, grilled vegetables, or different cheeses to suit your taste preferences. Keep It Warm: If you're serving this dish at a gathering, keep the stuffed bread warm in the oven at a low temperature until ready to serve. Pairing Suggestions: Serve your stuffed bread with a light salad or a side of marinara sauce for dipping to complement the flavors of the dish. {{image_4}} You can make this dish vegetarian by swapping chicken for vegetables. Use roasted bell peppers, zucchini, or mushrooms. These veggies add a nice flavor. Mix them with basil pesto and cheese. This change keeps the dish hearty and tasty. Cheese makes this bread special. While mozzarella is great, try other choices. Cheddar adds sharpness. Feta gives a tangy kick. Goat cheese provides creaminess. Mix different cheeses to find your favorite blend. It’s fun to experiment with flavors. Want to spice things up? Add herbs and spices for more taste. A pinch of red pepper flakes gives heat. Dried oregano or thyme adds earthiness. Fresh herbs, like parsley, can brighten the dish. Tailor the seasonings to your liking for a unique twist. Each serving of Pesto Chicken Stuffed Bread has about 400 calories. This can vary based on the bread you choose. The chicken and cheese add a nice amount of calories too. This dish is a great source of protein. One serving has around 30 grams of protein. The fiber content is about 3 grams per serving, thanks to the bread and tomatoes. Both protein and fiber help keep you full longer. - Chicken: This lean meat is rich in protein. It helps build muscles and keeps your body strong. - Pesto: Made from basil, pesto is full of antioxidants. Basil can help reduce stress and support heart health. - Mozzarella: This cheese provides calcium, which is good for bones and teeth. - Sun-dried tomatoes: These are packed with vitamins A and C. They also contain lycopene, which is great for heart health. - Red onion: This adds flavor and has anti-inflammatory properties. It can also help with digestion. Yes, you can choose different breads. A French baguette adds a nice crunch. Brioche gives a soft, sweet touch. Whole grain bread is a healthy swap too. Just make sure it can hold the filling well. You can keep leftovers in the fridge for up to three days. Store them in an airtight container. To reheat, wrap in foil and bake at 350°F (175°C) for about 10 minutes. This keeps the bread crispy and the filling warm. This dish pairs well with a fresh salad. A light Caesar or mixed greens works great. You can also serve it with roasted veggies for a hearty side. A simple dipping sauce, like balsamic glaze, adds a nice touch too. This blog covered the key ingredients for Pesto Chicken Stuffed Bread and how to prepare it. We also looked at tips for texture and storage, plus tasty variations and health facts. With these steps, you can make a dish that is both fun and satisfying. Enjoy experimenting with flavors and ingredients. A delicious meal awaits!

Pesto Chicken Stuffed Bread Flavorful Dinner Choice

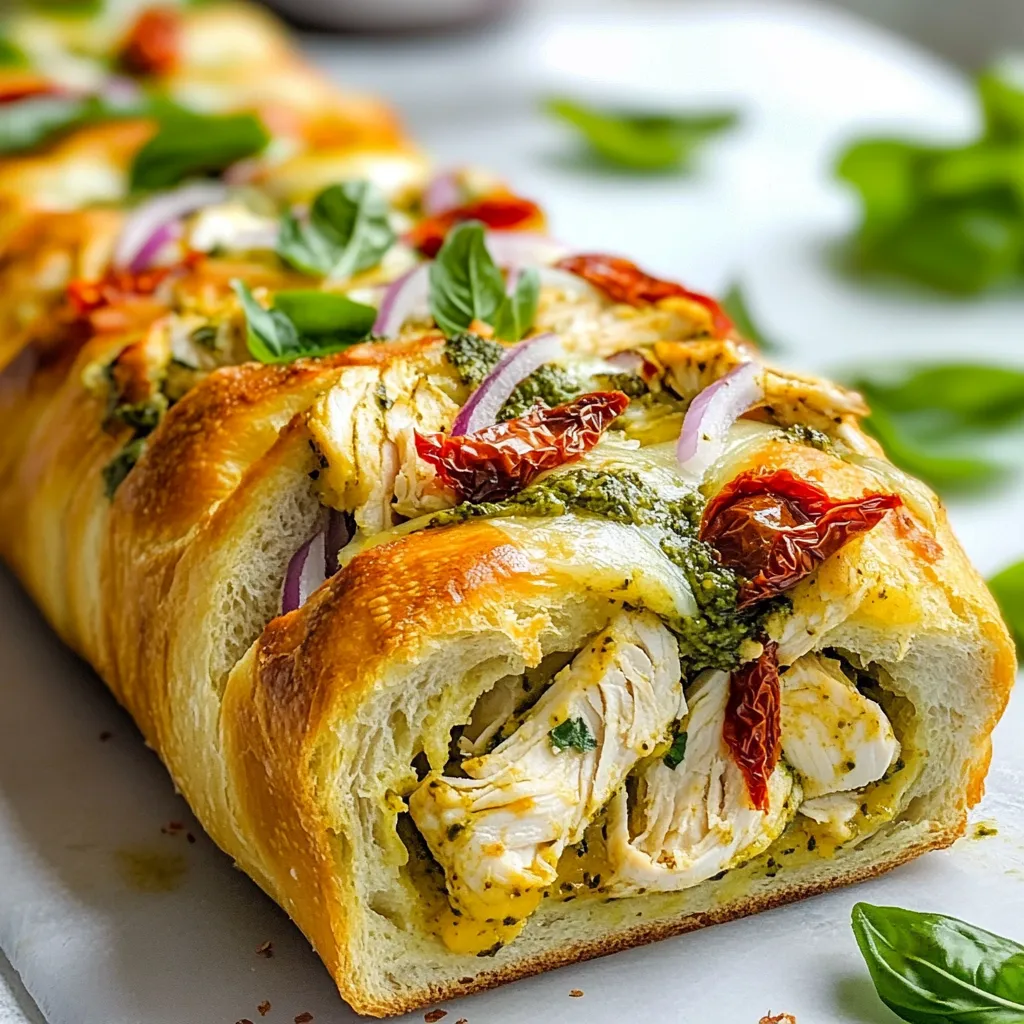
Looking for a tasty meal that stands out? Pesto Chicken Stuffed Bread is your answer! It combines juicy chicken with

To make a great Strawberry Kiwi Agua Fresca, you need fresh fruits. Here’s what you’ll need: - 2 cups fresh strawberries, hulled and sliced - 3 ripe kiwis, peeled and roughly chopped - 4 cups cold water - Juice of 1 fresh lime These ingredients create a bright and fruity drink. Fresh strawberries add sweetness. Ripe kiwis bring a tangy kick. The lime juice adds a zesty flavor that elevates the drink. Sweeteners can enhance the taste. I suggest using: - 2 tablespoons agave syrup - Honey (to taste) Agave syrup is a great choice. It blends well without overpowering the fruits. Honey is a delicious alternative too. You can adjust the sweetness to suit your taste. Garnishing adds flair to your drink. Consider these options: - Fresh mint leaves - Ice cubes Mint leaves not only look pretty but also add a cool aroma. Ice cubes keep your drink chilled and refreshing. These small touches elevate the experience of your Strawberry Kiwi Agua Fresca. {{ingredient_image_2}} Start by gathering your fresh fruits. You need 2 cups of strawberries and 3 ripe kiwis. First, hull the strawberries and slice them. Then, peel the kiwis and chop them roughly. This helps them blend better. Fresh fruits give the best flavor. Now, put the strawberries and kiwis into a blender. Pour in 2 cups of cold water. Blend on high speed until it is smooth. Next, use a fine mesh sieve to strain the mixture into a large pitcher. This step is optional. If you like a thicker drink, skip straining. After straining, add the remaining 2 cups of cold water, 2 tablespoons of agave syrup, and the juice of 1 lime. Stir well to mix everything. Place the pitcher in the fridge for about 30 minutes. This chilling time helps the flavors blend. When ready to serve, fill glasses with ice cubes. Pour the chilled agua fresca over the ice. For a lovely touch, garnish each glass with fresh mint leaves. Enjoy your refreshing drink! To make your Strawberry Kiwi Agua Fresca just right, taste as you go. Start with 2 tablespoons of agave syrup. Blend it with your fruit and water. After mixing, taste the drink. If you want it sweeter, add more syrup or honey. Mix again and taste. This way, you control the sweetness. You can also use fresh fruit for natural sweetness. Fresh ingredients make this drink shine. Choose ripe strawberries and kiwis. They should smell sweet and look vibrant. Store fruits in the fridge until you are ready to use them. If you need to prep ahead of time, slice your fruits but keep them in an airtight container. This keeps them fresh for longer. If you have a party, you can prep this drink early. Blend the fruit and water, then strain it. Store the liquid in the fridge for up to 24 hours. When you’re ready to serve, add the sweetener, lime juice, and ice. This will keep your drink fresh and tasty. Plus, it saves time when guests arrive! Pro Tips Use Ripe Fruits: Make sure your strawberries and kiwis are perfectly ripe for the best flavor. Ripe fruits will provide natural sweetness and vibrant taste to your agua fresca. Adjust Sweetness: Everyone's taste preferences vary, so start with the recommended amount of agave syrup or honey and adjust according to your liking. Taste as you go for the perfect balance! Chill Before Serving: Allow your agua fresca to chill in the refrigerator for at least 30 minutes. This not only makes it refreshing but also helps the flavors to blend beautifully. Add a Twist: For an extra layer of flavor, consider adding a splash of coconut water or even a hint of ginger for a unique twist on this classic drink. {{image_4}} You can mix up your strawberry kiwi agua fresca in fun ways. Try adding fruits like mango, pineapple, or peach. Each fruit brings unique taste and sweetness. Blend them the same way as the strawberries and kiwis. You can also add a touch of cucumber for a cool twist. The options are endless! If you want to change the sweetener, try maple syrup or coconut sugar. These add different flavors to your drink. You can also use stevia for a sugar-free option. Always taste as you go. Adjust the sweetness to what you like best. This helps you create a drink that fits your taste. Herbs and spices can make your agua fresca special. Fresh mint or basil add a nice twist. Just muddle them gently before mixing. You can also try a hint of ginger for a spicy kick. Cinnamon can add warmth and depth too. Be creative and explore flavors that excite you! After you make this drink, you may have some left. To store your agua fresca, pour it into a clean, airtight container. This helps keep the drink fresh. Place the container in the fridge. It is best to drink it within a few days for the best taste. Strawberry kiwi agua fresca tastes best when fresh. If stored well, it can last about 3 to 5 days. The flavor may fade after that. To keep it tasty, avoid adding ice to the pitcher. Ice can dilute the flavor as it melts. Instead, add ice to your glass when serving. You can freeze agua fresca for later use. Pour it into ice cube trays or freezer-safe containers. This way, you can enjoy it even after a few weeks. When you want a drink, just thaw the cubes in the fridge. You can also blend frozen cubes into smoothies for a new twist! Agua fresca is a light, refreshing drink. It comes from Mexico. The name means “fresh water.” It mixes fruits, water, and sweeteners. You can use many fruits like strawberries, kiwis, and more. This drink is perfect for hot days. Yes, you can use frozen fruits. Frozen fruits work well in agua fresca. They give a nice chill to the drink. Just let them thaw a bit before blending. This helps them blend smoothly. The flavor stays great, but the texture may change slightly. To make a sugar-free version, skip the sweeteners. Use fresh fruits that are ripe and sweet. You can also add a splash of lemon or lime juice. This adds a tasty zing without any sugar. If you want extra sweetness, try using a sugar-free sweetener. Strawberry Kiwi Agua Fresca is a fun and tasty drink. We explored fresh ingredients, sweeteners, and ways to garnish. The simple steps make preparation easy. You can tweak sweetness to your taste and enjoy variations with herbs or spices. Remember to store leftovers correctly for the best flavor. In the end, this drink refreshes any day. Enjoy it at home or share with friends. You now have all the tools to make the perfect batch. Cheers to making delicious memories!

Strawberry Kiwi Agua Fresca Refreshing Summer Drink

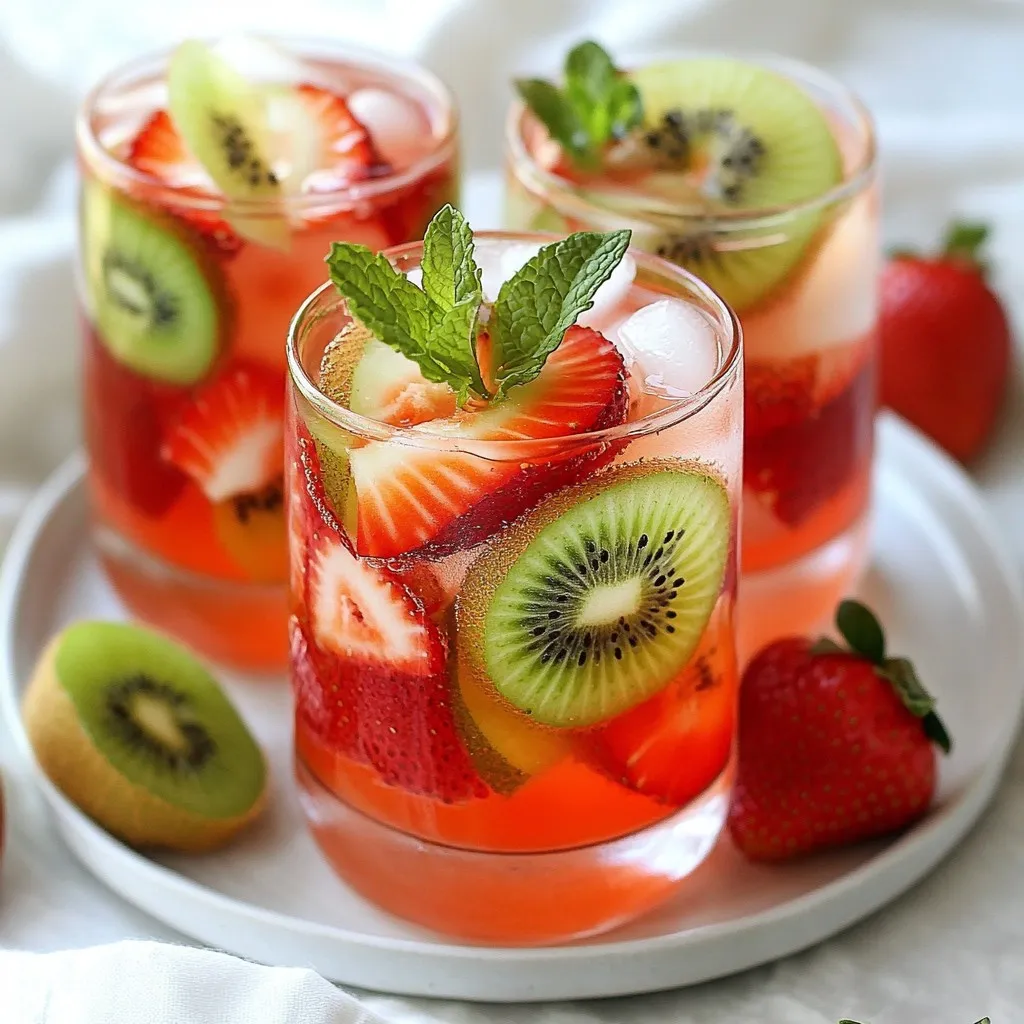
Looking for a cool, tasty drink to beat the summer heat? Strawberry Kiwi Agua Fresca is refreshing, fruity, and easy

Cooking garlic herb roasted cauliflower steaks is simple and fun. Here are the main ingredients you will need: - 1 large head of cauliflower - 4 tablespoons extra virgin olive oil - 4 cloves garlic, finely minced - 1 teaspoon dried thyme - 1 teaspoon dried rosemary - ½ teaspoon smoked paprika - Salt and pepper to taste - Fresh parsley for garnish - Lemon wedges for serving Each ingredient plays a key role in creating flavor. The cauliflower serves as the base. Olive oil adds richness. Garlic brings a nice kick. Thyme and rosemary add depth, while smoked paprika gives a hint of warmth. Salt and pepper enhance all the flavors. Fresh parsley adds a pop of color and brightness. Finally, lemon wedges allow you to add a fresh zing when serving. Gather these items to start your cooking adventure! {{ingredient_image_2}} - Preheat the oven to 425°F (220°C). - Remove the outer leaves from the cauliflower head. - Trim the base but keep the core intact. - Cut the cauliflower into ¾-inch thick steaks. Preparing the cauliflower correctly helps keep it whole. Aim for 2-3 good slices from the center. You can save any leftover florets for snacks or future meals. - In a bowl, mix 4 tablespoons of olive oil and 4 minced garlic cloves. - Add 1 teaspoon of dried thyme, 1 teaspoon of dried rosemary, and ½ teaspoon of smoked paprika. - Season with salt and freshly ground black pepper. - Whisk well until combined. This mixture brings great flavor to the cauliflower. Make sure each steak is well coated to soak up all the taste. - Arrange the coated cauliflower steaks on a baking sheet. - Roast for 20-25 minutes, flipping them halfway through. Flipping ensures even cooking and browning. You want a golden exterior and a tender inside. After roasting, let them cool for a few minutes. This step makes them easier to handle. Enjoy the delightful aroma that fills your kitchen! To get the best slices, start with a large head of cauliflower. Remove the outer leaves gently. Trim the base but keep the core. This helps hold the steaks together. Cut the cauliflower into ¾-inch thick steaks. Aim for 2-3 steaks from the center. How do you know when it’s done? Look for a golden brown color on the outside. You want the inside to be tender. Roasting for 20-25 minutes does the trick. Flip the steaks halfway for even cooking. Want to boost the taste? Try adding spices like cumin or chili powder. These can add a nice kick. Pair your cauliflower steaks with dips like tahini or yogurt sauce. These add creaminess and extra flavor. Drizzle with balsamic glaze for a sweet touch. The options are endless! Pro Tips Choose the Right Cauliflower: Select a firm and fresh head of cauliflower with tightly packed florets for the best texture and flavor. Don't Skip the Resting Time: Allow the cauliflower steaks to rest for a few minutes after roasting to enhance their flavor and texture. Experiment with Herbs: Feel free to customize the herb mixture by adding your favorite fresh or dried herbs for a unique flavor profile. Perfectly Golden Brown: Keep an eye on the steaks in the oven; flipping them halfway ensures an even, golden-brown finish. {{image_4}} You can make garlic herb roasted cauliflower steaks even better. Try adding some nutritional yeast for a cheesy flavor. Cheese also works well; sprinkle some Parmesan on top before roasting. You can also switch up the herbs. Instead of thyme and rosemary, try basil or oregano for a fresh twist. A dash of cumin can add warmth, while chili flakes can bring some heat. Experiment with your favorite flavors to make this dish your own. Cauliflower steaks pair well with many dishes. Serve them alongside grilled chicken or fish for a hearty meal. They also make a great side for a fresh salad or a grain bowl. If you have leftovers, don’t worry! You can chop the steaks and mix them into pasta or a stir-fry. They can even be blended into a creamy soup. This versatility helps you enjoy them in new ways! Store leftover garlic herb roasted cauliflower steaks in an airtight container. This helps keep the flavors fresh. You can refrigerate them for up to 3 days. If you want to keep them longer, consider freezing them. They will stay good in the freezer for about a month. Just make sure to let them cool before you pack them away. To reheat without losing flavor, I recommend using the oven. Preheat it to 350°F (175°C). Place the cauliflower steaks on a baking sheet and cover them with foil. This method keeps them moist. Heat for about 10-15 minutes or until warm. If you're short on time, you can use a microwave. Place the cauliflower on a microwave-safe plate. Cover it with a damp paper towel to add moisture. Heat in short bursts of 30 seconds until hot. However, this may not keep the texture as nice as the oven does. Cauliflower steaks are thick slices cut from a whole head of cauliflower. Each steak comes from the center of the cauliflower. They hold together well when cooked and have a nice texture. Yes! This recipe is already vegan. It uses olive oil and herbs, making it plant-based. Just ensure your ingredients are all vegan-friendly. To add heat, try these options: - Mix in red pepper flakes with the garlic herb oil. - Use spicy paprika instead of smoked paprika. - Add a dash of hot sauce before serving. You can prep the cauliflower steaks ahead. Cut and coat them with the garlic herb mixture. Store in the fridge for up to 24 hours before roasting. Just remember to let them sit at room temperature for about 15 minutes before roasting. This article covered how to make delicious roasted cauliflower steaks. We discussed the key ingredients, step-by-step instructions, and tips for perfecting your dish. You can try different flavors and ideas for serving too. Remember, roasting brings out the natural sweetness of the cauliflower. Enjoy experimenting with this tasty and healthy option!

Garlic Herb Roasted Cauliflower Steaks Simple Delight

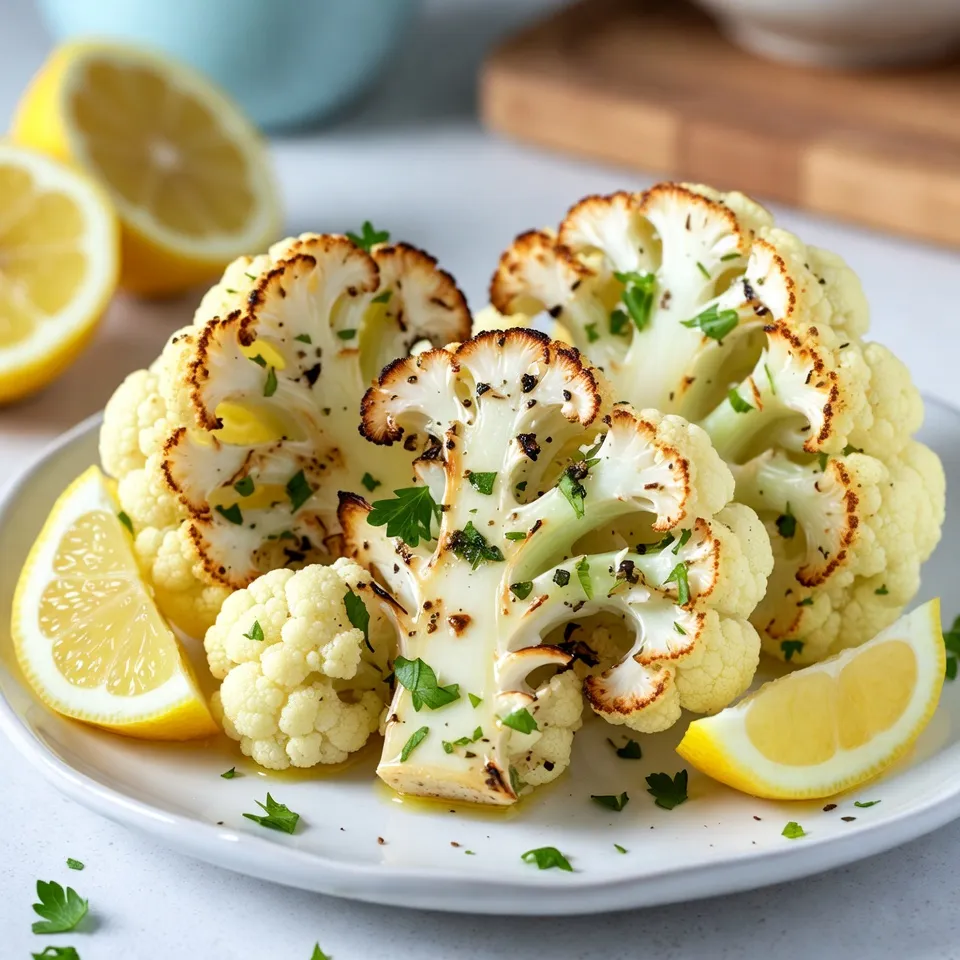
Looking to impress with a side dish that’s both simple and delicious? Look no further! My Garlic Herb Roasted Cauliflower

- 1 cup unsalted butter, softened to room temperature - 3/4 cup granulated sugar - 3/4 cup packed brown sugar - 2 large eggs, at room temperature - 1 teaspoon pure vanilla extract - 2 1/4 cups all-purpose flour - 1 teaspoon baking soda - 1/2 teaspoon salt - 1 cup white chocolate chips - 1/2 cup crushed peppermint candies (plus extra for garnish) Each ingredient has a special role in these cookies. - Unsalted butter adds moisture and a rich flavor. - Granulated sugar gives sweetness and helps with browning. - Brown sugar adds a hint of caramel flavor and keeps cookies soft. - Eggs bind the dough and add richness. - Vanilla extract brings warmth and depth to the taste. - All-purpose flour gives structure to the cookies. - Baking soda acts as a leavening agent for a light texture. - Salt balances the sweetness and enhances flavors. - White chocolate chips provide creamy sweetness in each bite. - Crushed peppermint candies add a refreshing crunch and festive flair. Gather these ingredients to create a batch of irresistible white chocolate peppermint cookies. {{ingredient_image_2}} First, preheat your oven to 350°F (175°C). This step warms the oven and helps the cookies bake evenly. While the oven heats, line two baking sheets with parchment paper. This prevents cookies from sticking and makes cleanup easy. In a large bowl, beat the softened butter, granulated sugar, and brown sugar together. Use an electric mixer on medium speed for about 3-5 minutes. You want the mixture to be light, fluffy, and pale in color. This step adds air and creates a nice texture. Next, add the eggs one at a time. Make sure each egg mixes in fully before adding the next. After that, stir in the pure vanilla extract. This will add a warm flavor to your cookies. Take a separate bowl and whisk together the flour, baking soda, and salt. Gradually mix this dry mixture into the wet ingredients. Use low speed to avoid overmixing. Just mix until combined, and it will keep the cookies soft. Now, it’s time to fold in the white chocolate chips and crushed peppermint candies. Use a spatula or wooden spoon for this. Make sure these treats are evenly mixed into the dough for bursts of flavor in every bite. Use a cookie scoop or tablespoon to scoop heaping tablespoons of dough. Place them on the lined baking sheets, leaving about 2 inches of space between each cookie. This space helps them spread while baking. Bake the cookies in the oven for 10-12 minutes. The edges should be lightly golden, while the centers stay soft. After baking, let the cookies cool on the sheets for about 5 minutes. This helps them set. Then, transfer them to a wire rack to cool completely. While they are still warm, sprinkle extra crushed peppermint on top. This adds a festive touch and extra flavor. - Avoid overmixing the dough: Mix the dry and wet ingredients until just combined. Overmixing can lead to tough cookies. - Ensuring proper cookie spacing on the baking sheet: Leave about 2 inches between each scoop of dough. This helps them spread evenly while baking. - Incorrect oven temperature: Always use an oven thermometer to check the heat. A too hot oven can burn your cookies. - Not chilling the dough if needed: If the dough feels too soft, chill it for 30 minutes. Chilling helps cookies hold their shape. - Best pairings and serving ideas: These cookies are great with a glass of cold milk or hot cocoa. Serve them at holiday parties or as gifts in a pretty tin. Pro Tips Chill the Dough: For thicker cookies, chill the dough in the refrigerator for at least 30 minutes before baking. This helps prevent spreading and keeps them chewy. Use Fresh Peppermint: For an even more intense flavor, use fresh peppermint extract instead of the candies in the dough, and keep the crushed candies for garnish. Storage Tips: Store cookies in an airtight container at room temperature for up to one week, or freeze them for up to three months for longer storage. Customize the Chocolate: Feel free to mix in dark or milk chocolate chips along with the white chocolate for a richer flavor profile! {{image_4}} If you need to adjust for dietary needs, don't worry! You can use gluten-free flour instead of all-purpose flour. This keeps the cookies tasty. If you want to cut down on sugar, replace some of the granulated sugar with a sugar substitute. You can also use dairy-free white chocolate chips for a vegan version. Want to mix things up? Add nuts like chopped walnuts or pecans for crunch. Dried fruits such as cranberries or cherries can add a nice touch too. These additions enhance the cookie flavor and texture. Experimenting lets you find your favorite twist! Make your cookies even more fun! Drizzle melted white chocolate on top for a fancy look. You can also use festive cookie cutters to create fun shapes. Sprinkling extra crushed peppermint on top makes every cookie feel like a treat. These little touches impress guests and make the cookies special! To keep your cookies fresh, store them in an airtight container. Place parchment paper between layers to avoid sticking. You can keep them at room temperature for up to a week. If you want to keep them longer, try the fridge. This will help maintain their soft texture. You can freeze both cookie dough and baked cookies. For dough, scoop it into balls and freeze on a baking sheet. Once frozen, transfer them to a freezer bag. This way, you can bake fresh cookies anytime. Baked cookies can also go in a freezer bag. Just make sure they cool completely before freezing. When stored properly, these cookies last about one week at room temperature. If you freeze them, they can stay fresh for up to three months. Always check for any signs of freezer burn before eating. Enjoy your cookies any time you crave a sweet treat! You can use dark chocolate chips or semi-sweet chocolate chips if you prefer. Milk chocolate chips also work well. If you're looking for a healthier option, try using carob chips. For a sugar-free choice, opt for sugar-free white chocolate or dark chocolate. Each option brings a unique taste to your cookies. Look for a light golden edge on the cookies. The centers should look soft and slightly underbaked. If they are too shiny, they need more time. Use a toothpick to test if they are done. Insert it into the center; if it comes out clean, they are ready. Yes, you can! You can store the dough in the fridge for up to three days. Just wrap it tightly in plastic wrap. You can also freeze the dough for up to three months. To bake, let it thaw in the fridge overnight and scoop onto baking sheets. If you bake them ahead, store the cookies in an airtight container for freshness. Try adding nuts like pecans or walnuts for crunch. Dried cranberries or cherries give a fruity twist. You could also use orange zest for a citrus flavor. For a spiced version, add cinnamon or nutmeg. These ideas can give your cookies a festive flair for the holidays! You’ve learned how to bake delicious cookies with white chocolate and peppermint. Each step is key to the perfect treat, from measuring ingredients to cooling cookies. Remember to avoid common mistakes and try new flavors. Store your cookies to keep them fresh, and don’t forget to share with friends. Baking is fun, and these cookies will impress everyone. Enjoy the process, and happy baking!

White Chocolate Peppermint Cookies Irresistible Treat

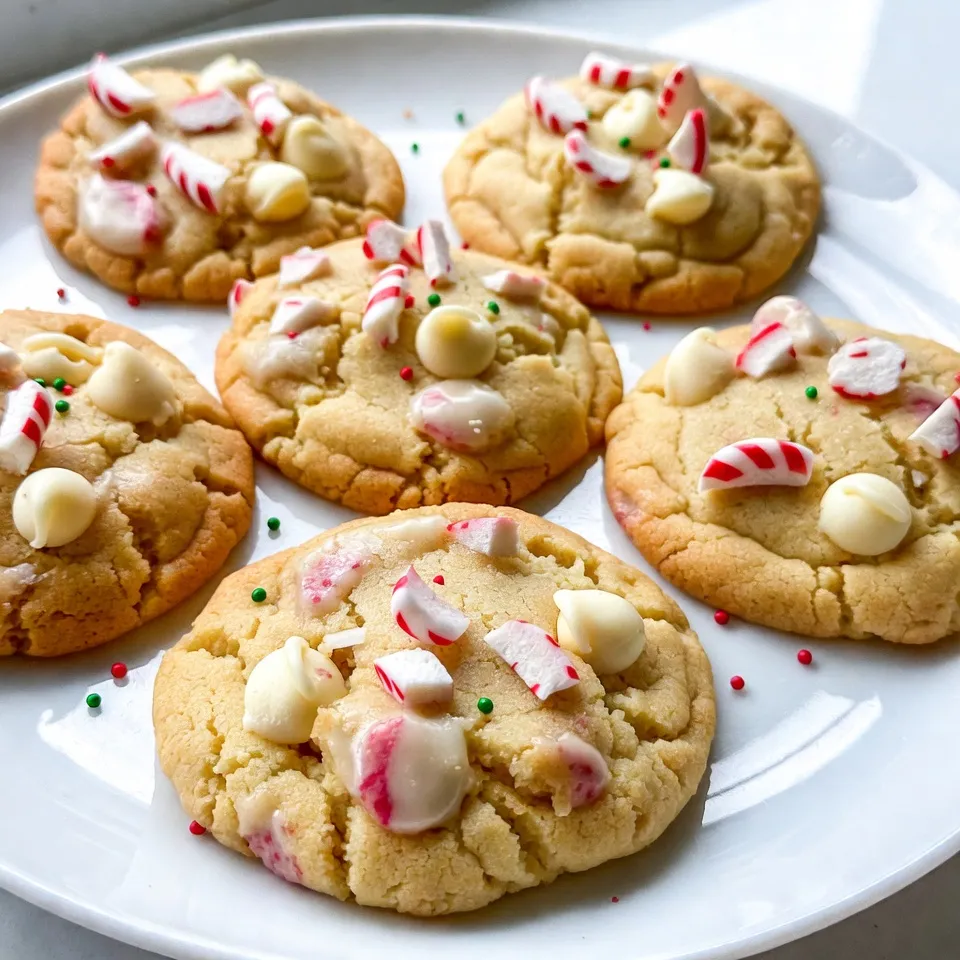
If you love the sweet taste of the holidays, you’re in for a treat! My White Chocolate Peppermint Cookies are

To make this peach cobbler mug cake, you will need: - 1 medium ripe peach, diced into small pieces - 4 tablespoons all-purpose flour - 4 tablespoons granulated sugar - 1/4 teaspoon baking powder - 1/4 teaspoon ground cinnamon - A pinch of salt - 3 tablespoons milk (any type) - 1 tablespoon vegetable oil - 1/2 teaspoon vanilla extract - 1 tablespoon packed brown sugar (for topping) If you want to switch things up, try these alternatives: - Use canned peaches instead of fresh ones. Just drain them well. - Swap all-purpose flour for almond flour for a nutty taste. - Replace granulated sugar with coconut sugar for a different sweetness. - Use any non-dairy milk if you prefer a vegan option. You may need to adjust some ingredients based on what you have: - If you run out of baking powder, mix 1/8 teaspoon of baking soda with 1/4 teaspoon of vinegar. - For oil, melted butter or coconut oil works well too. - If you don’t have vanilla extract, you can use almond extract or skip it altogether. These simple swaps make it easy to create a peach cobbler mug cake that fits your taste. {{ingredient_image_2}} First, grab a microwave-safe mug. You will mix all your ingredients right in it. Start by adding the diced peach, flour, sugar, baking powder, cinnamon, and salt. Use a fork or whisk to blend them well. This helps the flavors mix nicely. Next, pour in the milk, vegetable oil, and vanilla extract. Stir until you have a smooth batter. If you want more peach flavor, fold in extra peach pieces gently. Be careful not to overmix, as this can make the cake tough. Now, sprinkle brown sugar on top of the batter. This will create a sweet, caramelized crust when it cooks. Place the mug in the microwave and cook it on high for 1 minute and 30 seconds. Remember, microwaves can cook differently, so keep an eye on it. If your mug cake looks wet in the center after the first round, it needs more time. You can add 10 to 15 seconds more cooking time. Watch closely to avoid overcooking. Each microwave is unique, so adjust as needed. Cooking time can change based on your mug's size and the wattage of your microwave. To check if your mug cake is ready, look for a firm center. It should not jiggle or look wet. You can insert a toothpick in the middle. If it comes out clean, your cake is done. If you see batter on the toothpick, return it for more time. Always be careful when taking the mug out of the microwave; it can get very hot. Let it cool for a minute before enjoying your peach cobbler mug cake. To get the best texture in your mug cake, mix well. Make sure the dry ingredients blend fully before adding wet ones. This step helps avoid lumps. When you add the milk, oil, and vanilla, stir gently. Overmixing can make the cake tough. You want it light and fluffy. Adding extra ingredients can boost flavor. Try adding more peaches for a fruitier taste. You can also mix in chopped nuts for a crunchy bite. A few chocolate chips can add sweetness too. If you love spice, add a dash of nutmeg or ginger. Each of these changes can make your mug cake unique. A common mistake is not checking cooking time. Every microwave is different; watch your cake closely. If it looks wet in the center, give it a few more seconds. Another error is using too much flour or sugar. Stick to the measurements to keep the right balance. Lastly, do not forget the brown sugar topping. It creates a lovely crust that adds flavor and texture. Pro Tips Use Ripe Peaches: For the best flavor and sweetness, ensure your peaches are perfectly ripe. This will enhance the overall taste of your mug cake. Adjust Microwave Time: Microwaves can vary significantly in power. Start with the suggested time and add extra seconds as needed to avoid overcooking. Experiment with Flavors: Consider adding a pinch of nutmeg or a splash of almond extract for a unique twist on the traditional peach flavor. Serving Suggestions: Elevate your dessert by serving it with a scoop of ice cream or a drizzle of caramel sauce for an indulgent treat. {{image_4}} You can swap peaches for other fruits. Use ripe strawberries, blueberries, or apples. Each fruit adds its own flavor. Try mixing fruits for a fun twist. For example, peaches and blueberries work great together. This gives a unique taste and colorful look. Get creative with what you have at home! Beyond fruit, you can add different flavors. Mix in a pinch of nutmeg for warmth. You can also try almond extract instead of vanilla. It's a subtle change but gives a nice touch. Add chocolate chips for a sweet surprise. You will love how they melt into the cake. Try these combos to find your favorite mix! Want a vegan option? Just switch cow's milk for almond or oat milk. You can use coconut oil instead of vegetable oil. For a gluten-free mug cake, replace all-purpose flour with almond flour or a gluten-free blend. These changes still make a tasty cake. You won't miss the original version! If you have leftover peach cobbler mug cake, don't worry! You can save it for later. Allow the mug cake to cool completely. Cover the mug with plastic wrap or transfer it to an airtight container. This keeps it fresh and tasty. Store it in the fridge for up to two days. When you're ready to enjoy your mug cake again, simply reheat it. Place the mug in the microwave. Heat it for about 20 to 30 seconds. Check if it’s warm enough. If not, add more time in small increments. Be careful! The mug may be hot. To keep your mug cake fresh, only make what you can eat in one sitting. If you do have leftovers, always store them properly. Avoid leaving it out at room temperature for too long. This helps prevent spoilage and keeps those delicious flavors intact. Enjoy your peach cobbler mug cake at its best! Yes, you can use frozen peaches! Just thaw them first. Make sure to drain excess water. Frozen peaches work well and add great flavor. They might be softer than fresh ones, but that’s okay. You want that juicy taste in your cake. To make more than one mug cake, you need more mugs. Simply multiply each ingredient by the number of cakes you want. Mix the dry ingredients in a big bowl first. Then, divide that mix into each mug. Add the wet ingredients to each mug. This keeps the cakes cooking evenly in the microwave. Just watch the time, as you may need to cook them a little longer. Most mug cakes cook well in a microwave with 800 to 1200 watts. If your microwave is less powerful, you may need a bit more time. Start with 1 minute and 30 seconds. Check the cake, and add more time if needed. Always be careful; the mug will be hot! In this blog post, we explored making the perfect mug cake. We discussed the key ingredients, how to cook it, and tips for the best texture. You can try fun variations and learn how to store leftovers. Remember, small changes can lead to big flavor! Enjoy your mug cake journey, and don't forget to share your creations. Making the perfect mug cake is simple and fun!

Peach Cobbler Mug Cake Simple and Tasty Recipe

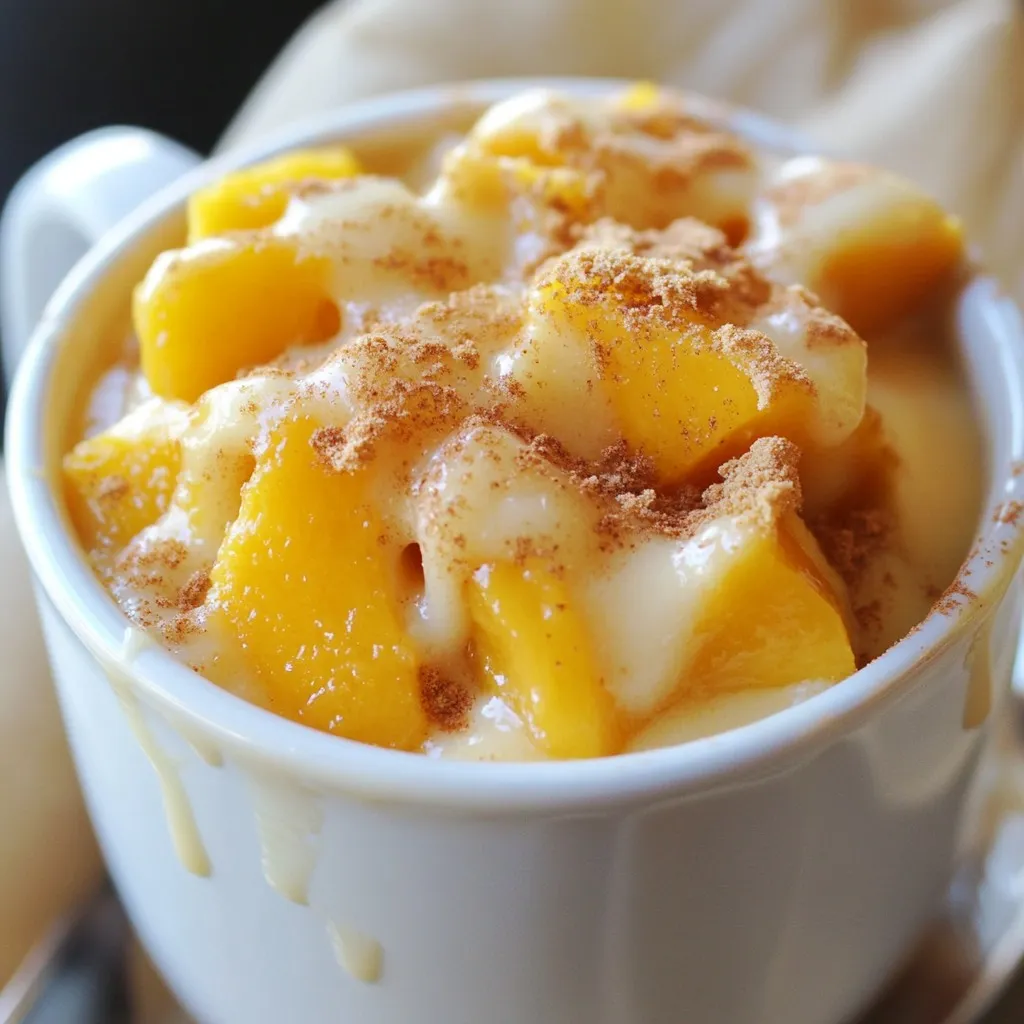
Craving something sweet but short on time? Try my Peach Cobbler Mug Cake! This easy recipe helps you whip up

- 1 ½ cups all-purpose flour - ½ cup granulated sugar - ¼ cup packed brown sugar - 1 tablespoon baking powder - ½ teaspoon ground nutmeg - ½ teaspoon ground cinnamon - ½ teaspoon salt - 1 large egg - 1 cup whole milk - ¼ cup unsalted butter, melted - 1 teaspoon vanilla extract - ½ cup maple syrup (for glazing) - 1 cup powdered sugar (for glazing) Gathering the right ingredients is key for your Maple Glazed Donut Muffins. Start with the dry ingredients. You need all-purpose flour for texture and structure. Granulated and brown sugars add sweetness and depth. Baking powder gives your muffins that lovely rise. Ground nutmeg and cinnamon bring warmth and spice, while salt balances the flavors. Next, let’s move to the wet ingredients. A large egg helps bind everything together. Whole milk keeps the muffins moist and fluffy. Melted unsalted butter adds richness, while vanilla extract brings a lovely aroma. For the glaze, we use maple syrup and powdered sugar. This will create a sweet, sticky topping that is hard to resist. Make sure to measure everything carefully. This will help your muffins turn out perfect every time. {{ingredient_image_2}} First, preheat your oven to 350°F (175°C). This step is key for even baking. Next, prepare your muffin tin. You can grease it with non-stick spray or use muffin liners. This makes it easy to take out the muffins later. In a big bowl, add the following dry ingredients: - 1 ½ cups all-purpose flour - ½ cup granulated sugar - ¼ cup packed brown sugar - 1 tablespoon baking powder - ½ teaspoon ground nutmeg - ½ teaspoon ground cinnamon - ½ teaspoon salt Whisk these ingredients well. This helps to mix them evenly. Getting this right makes sure every muffin tastes great. Now, take another bowl. Crack one large egg into it. Add 1 cup whole milk, ¼ cup melted unsalted butter, and 1 teaspoon vanilla extract. Whisk these together until the mix is smooth. This step adds flavor and moisture to the muffins. Carefully pour the wet mix into the dry mix. Use a spatula or wooden spoon to stir. Only mix until you see no dry flour. Over-mixing can make the muffins tough instead of light and fluffy. Use a spoon or ladle to fill each muffin cup about ¾ full with batter. This helps them bake evenly. Place the muffin tin in the oven. Bake for 18-20 minutes. A toothpick should come out clean when done. While the muffins bake, make the maple glaze. In a small bowl, whisk together ½ cup maple syrup and 1 cup powdered sugar. Keep whisking until it is smooth and lump-free. After baking, let the muffins cool in the tin for about 5 minutes. Then, move them to a wire rack. While they are still warm, dip the tops into the maple glaze. Let any extra glaze drip back into the bowl. For a sweet twist, sprinkle a mix of cinnamon and sugar on top while the glaze is still wet. To make your muffins light, focus on mixing. Start with fresh ingredients. When you mix dry and wet items, do it gently. Over-mixing leads to dense muffins. Just mix until you see no dry flour. This keeps air in the batter. To keep your muffins fresh, store them in an airtight container. They stay good for up to three days at room temperature. If you want them to last longer, freeze them. Wrap each muffin in plastic wrap. Place them in a freezer bag or container. They will keep for about three months. Pair your maple glazed donut muffins with coffee or tea. The warm flavors match perfectly. For a fun twist, serve them with fresh fruit or berries. This adds color and freshness to your plate. You can even drizzle leftover glaze on top for extra sweetness. Pro Tips Use Fresh Ingredients: For the best flavor, ensure your baking powder is fresh and your spices are not past their prime. Don’t Overmix: Mix the batter until just combined to keep the muffins light and fluffy. Overmixing can lead to dense muffins. Cool Before Glazing: Allow the muffins to cool slightly before dipping in the glaze to prevent it from melting off. Experiment with Flavors: Feel free to add chocolate chips or nuts to the batter for an extra flavor twist! {{image_4}} You can easily add flavors to your maple glazed donut muffins. Mix in some nuts for a crunch. Chopped walnuts or pecans work well. You can also add chocolate chips for sweetness. Dark or milk chocolate both taste great. Try adding ½ cup of your choice to the batter before baking. This makes each bite even more exciting! While maple glaze is delicious, you can try different glazes. A chocolate glaze brings a rich taste. To make it, melt ½ cup of chocolate chips with a little cream. For a vanilla glaze, mix 1 cup of powdered sugar with 2 tablespoons of milk and a splash of vanilla. Each glaze gives a unique twist to the muffins. If you need to make these muffins gluten-free, swap the all-purpose flour with a gluten-free blend. Ensure it has a good binding agent. For a vegan version, replace the egg with a flax egg. Mix 1 tablespoon of flaxseed meal with 2.5 tablespoons of water. Let it sit until it thickens. Use almond or oat milk instead of whole milk. These adjustments keep your muffins tasty for everyone! Maple glazed donut muffins taste best when fresh. You can store them at room temperature. They will stay good for about 2-3 days. To keep them fresh, place muffins in an airtight container. You can also use a zip-top bag. Make sure to remove as much air as possible. This helps prevent them from getting dry. If you live in a hot or humid place, store them in the fridge. This keeps them fresh a bit longer. Freezing is a great way to save leftover muffins. To freeze them, first let them cool completely. Then, wrap each muffin in plastic wrap. After that, place them in a freezer bag. Label the bag with the date. Muffins can last up to 3 months in the freezer. When you want to eat one, take it out and let it thaw at room temperature. You can also warm it in the microwave for 10-15 seconds. Enjoy the sweet taste again! To make your muffins moist, add a bit of sour cream or yogurt. These ingredients boost moisture and add creaminess. You can also try using buttermilk instead of whole milk. It makes the muffins tender and rich. Lastly, be sure not to over-bake them. Overbaking dries them out. Yes, you can make these muffins ahead of time. Bake them and let them cool completely. Then, store them in an airtight container. You can keep them at room temperature for up to two days. For longer storage, freeze them. Just thaw at room temperature when ready to enjoy. If you don’t have maple syrup, you can use honey or agave nectar. Both options will provide sweetness. You could also use a simple glaze made of powdered sugar and milk. Just mix them until smooth for a quick substitute. These muffins last about two days at room temperature. If you store them in the fridge, they last about a week. For best results, keep them in an airtight container. If frozen, they can last up to three months. Just remember to thaw them before serving. In this blog post, I discussed how to make light and fluffy muffins. We covered essential dry and wet ingredients and included step-by-step baking instructions. I shared tips to keep your muffins fresh and tasty while offering fun variations and storage tips. In my final thoughts, remember that baking is about joy and creativity. Experiment with flavors and techniques to make these muffins your own. Enjoy the tasty results and share them with friends!

Maple Glazed Donut Muffins Tasty and Simple Recipe

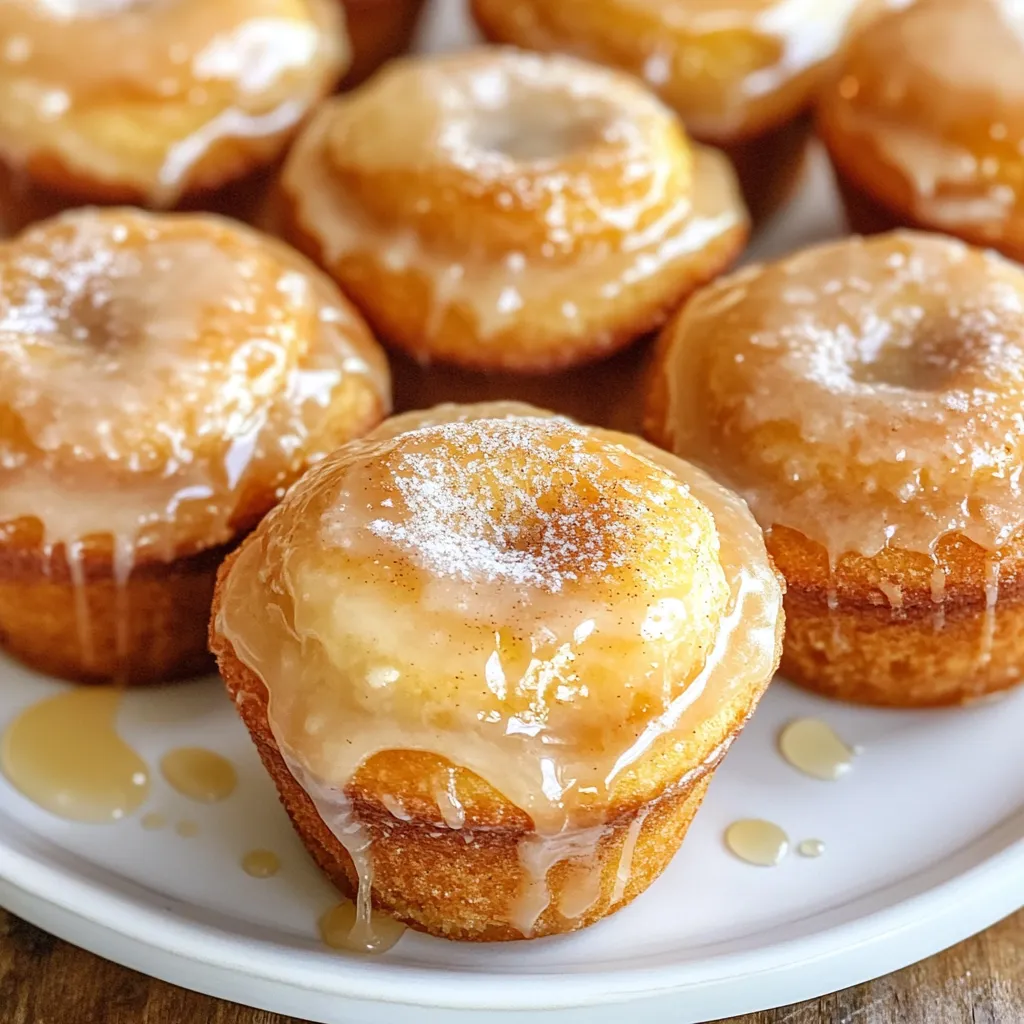
If you love sweet treats, you’ll adore these Maple Glazed Donut Muffins. They are soft, sweet, and topped with a

Older posts
Newer posts
← Previous Page1 … Page106 Page107 Page108 … Page111 Next →

dsad

© 2025 spoonfulsavory • Built with GeneratePress

Our Policies

  • Copyright Policy
  • Cookie Policy
  • GDPR Policy
  • Privacy Policy
  • Disclaimer
  • Terms Of Use

More Information

  • Home
  • About
  • Contact
  • Appetizers
  • Dessert
  • Dinner
  • Drinks
©2025, spoonfulsavory About Back To Top