Skip to content
DisclaimerTerms Of UseGDPR PolicyCookie Policy

spoonfulsavory

  • Home
  • Drinks
  • Appetizers
  • Dinner
  • Dessert
  • About
  • Contact
  • Privacy Policy
DisclaimerTerms Of UseGDPR PolicyCookie Policy

Sarah

- 3 medium sweet potatoes, peeled and cubed into 1-inch pieces - 2 large apples (such as Honeycrisp or Granny Smith), cored and diced into similar-sized chunks - 1/4 cup pure maple syrup for natural sweetness - 2 tablespoons olive oil for a rich flavor - 1 teaspoon ground cinnamon to warm the dish - 1/2 teaspoon ground nutmeg for an aromatic hint - Salt and pepper to taste for seasoning - 1/4 cup chopped pecans (optional, for added crunch) - Fresh thyme leaves, finely chopped, for a delightful garnish You can swap sweet potatoes with butternut squash for a different taste. If you cannot find Honeycrisp apples, try Fuji or Gala apples instead. Both bring sweetness. For a lower sugar option, use agave syrup in place of maple syrup. Olive oil can be replaced with coconut oil for a fun twist. Choose sweet potatoes that feel firm and smooth. Avoid any with dark spots or soft spots. For apples, go for those that are firm with a bright color. Smell for a sweet scent. Fresh apples will have a crisp bite, which adds to the dish's texture. {{ingredient_image_2}} Start by preheating your oven to 400°F (200°C). This step is key for getting your sweet potatoes and apples perfectly roasted. A hot oven helps caramelize the sugars, making the dish sweet and rich. Next, peel and cube three medium sweet potatoes into 1-inch pieces. This size helps them cook evenly. Then, take two large apples, like Honeycrisp or Granny Smith, and core them. Dice the apples into similar-sized chunks. Mixing sweet potatoes with apples creates a great balance of flavors. In a large mixing bowl, combine the sweet potatoes and diced apples. Drizzle in 1/4 cup of pure maple syrup and 2 tablespoons of olive oil. These ingredients add natural sweetness and rich flavor. Sprinkle in 1 teaspoon of ground cinnamon, 1/2 teaspoon of ground nutmeg, and some salt and pepper. Toss everything well with a spatula or your hands until all pieces are coated. This will ensure every bite is full of flavor. Transfer the mixture to a large baking sheet, spreading it out evenly. This helps them roast well in a single layer. Bake for 25-30 minutes, stirring halfway through. If using pecans for crunch, add them in the last 10 minutes of roasting. Once done, let it cool briefly, then transfer to a serving dish. Garnish with fresh thyme to finish it off. Enjoy your sweet and savory Maple Roasted Apple Sweet Potatoes! To get sweet potatoes that are soft and apples that are caramelized, follow these steps: - Cut uniform chunks: Aim for 1-inch pieces. This helps them cook evenly. - Spread them out: Use a large baking sheet. Give each piece space to roast. - Stir halfway: Turn the mixture at 15 minutes. This promotes even browning. You can boost the taste of Maple Roasted Apple Sweet Potatoes with some simple changes: - Try different spices: Add ginger for warmth or allspice for a unique twist. - Use fresh herbs: Rosemary or sage gives a fresh flavor that contrasts nicely. - Add a splash of citrus: A squeeze of lemon or orange juice brightens the dish. Serving your Maple Roasted Apple Sweet Potatoes is a chance to impress: - Use a colorful dish: A bright serving platter makes the dish pop. - Garnish with fresh thyme: Sprinkle thyme leaves on top for a lovely touch. - Serve warm: This dish tastes best fresh from the oven. Enjoy it with friends and family! Pro Tips Choose the Right Apples: Use sweet and slightly tart apples like Honeycrisp or Granny Smith to balance the sweetness of the sweet potatoes. Uniform Sizing: Ensure that your sweet potato and apple chunks are cut to the same size for even cooking and consistent texture. Monitor Roasting Time: Keep an eye on the roasting process; ovens can vary, so check for fork-tenderness and caramelization to avoid overcooking. Fresh Herbs for Flavor: Garnish with fresh thyme just before serving to enhance the dish's aroma and elevate its presentation. {{image_4}} You can add cranberries for a tart twist. They balance the sweet apples and syrup. Dried cranberries work well too. They add a chewy texture and rich flavor. You might also try pears during fall. Pears bring a soft sweetness and juicy bite. Each fruit option makes the dish unique. This dish is easy to adjust for diets. To make it vegan, use maple syrup only. Skip the pecans if you have nut allergies. You can also replace the olive oil with coconut oil. For a gluten-free option, this recipe is already safe. Just check any added ingredients, like spices. Adding other veggies can boost flavor. Carrots add a nice crunch and sweetness. Brussels sprouts roast well and add depth. You can mix in cauliflower for a creamy texture. Each veggie brings its own flair. Experiment with what you have on hand. Enjoy the fun of creating your own version! To keep your maple roasted apple sweet potatoes fresh, store them in an airtight container. This keeps moisture in and prevents them from drying out. Make sure they are cool before you seal them. If you want to avoid strong smells, place a piece of paper towel inside to absorb excess moisture. You can keep the leftovers in the fridge for up to 3 days. If you want to save them longer, freeze them for up to 2 months. Just remember to label your container with the date. This way, you will know when to use them. For the best taste, reheat your maple roasted apple sweet potatoes in the oven. Preheat the oven to 350°F (175°C). Spread the leftovers on a baking sheet and heat for about 10-15 minutes. If you are in a hurry, you can use the microwave. Just make sure to cover the dish to keep the moisture. Heat in short bursts, stirring often to avoid hot spots. Yes, you can use other apples. Good choices include Fuji, Gala, or Braeburn. These apples add a nice sweetness and flavor. Just make sure they have a firm texture. Softer apples can turn mushy when baked. Mixing different apple types can also boost flavor. Pair these sweet potatoes with grilled chicken or pork. The sweet flavors balance well with savory meats. You can also serve them with a fresh salad. A mix of greens, nuts, and vinaigrette works great. For a cozy meal, add a warm soup on the side. You can prep the sweet potatoes and apples a day ahead. Cut and store them in the fridge. Mix the maple syrup and spices in a separate bowl. When ready to cook, combine everything and roast. This saves time during busy days while keeping the flavors fresh. This recipe for maple roasted apple sweet potatoes is simple and delicious. You learned about the best ingredients, tips for prepping, and how to achieve a perfect roast. We highlighted ways to store leftovers and answered common questions. Get creative with flavors and ingredients to make this dish your own. Enjoy making this tasty side at your next meal. It’s easy, fun, and sure to impress. Happy cooking!

Maple Roasted Apple Sweet Potatoes Delightful Dish

Welcome to the world of Maple Roasted Apple Sweet Potatoes! This delightful dish brings comfort and warmth to your table.

- 2 cups fresh spinach, finely chopped - 1 cup cream cheese, softened to room temperature - ½ cup sour cream - 1 cup finely grated Parmesan cheese - ½ cup shredded mozzarella cheese - 2 cloves garlic, minced - 1 tablespoon olive oil - ½ teaspoon red pepper flakes (optional) - Salt and freshly ground pepper to taste For cream cheese, I suggest using Philadelphia or any good quality brand. Look for fresh Parmesan cheese that you can grate yourself. This adds a richer taste. For mozzarella, I like to use part-skim. It melts well and gives a nice stretch. You can swap the cream cheese for Greek yogurt for a lighter dip. If you don’t have sour cream, use plain yogurt instead. For the cheeses, try using Gouda or cheddar if you want a twist. Spinach can be replaced with kale for a different flavor. If red pepper flakes are too spicy, feel free to leave them out. {{ingredient_image_2}} To start, gather all your ingredients. You will need: - 2 cups fresh spinach, finely chopped - 1 cup cream cheese, softened - ½ cup sour cream - 1 cup finely grated Parmesan cheese - ½ cup shredded mozzarella cheese - 2 cloves garlic, minced - 1 tablespoon olive oil - ½ teaspoon red pepper flakes (optional) - Salt and freshly ground pepper to taste Make sure the cream cheese is soft. This helps the dip mix well. 1. In a large skillet, heat the olive oil over medium heat. 2. Once the oil shimmers, add the minced garlic. Sauté for 1 minute. Stir often. You want the garlic fragrant but not brown. 3. Next, add the chopped spinach. Cook for 3-4 minutes. Stir occasionally until the spinach wilts. 4. Remove the skillet from heat and let it cool slightly. 5. In a mixing bowl, combine the cream cheese, sour cream, and grated Parmesan. Mix until smooth. 6. Gently fold in the sautéed spinach and garlic mixture. 7. Mix in the shredded mozzarella cheese and red pepper flakes if you like a kick. Season with salt and pepper. 8. Transfer the creamy mixture to a greased baking dish. Smooth the top with a spatula. 9. Preheat your oven to 375°F (190°C). 10. Once heated, bake the dip for 20-25 minutes. Look for a golden, bubbly top. 11. After baking, let it cool for 5 minutes before serving warm. This dip is perfect for parties. Enjoy it with crunchy crackers, baguette slices, or fresh veggies! For a smooth dip, start with room temperature cream cheese. Cold cream cheese is hard to blend. Mix the cream cheese, sour cream, and Parmesan until smooth. Use a hand mixer for best results. Fold in the spinach gently. This keeps the dip light and creamy. Taste as you go. Start with a pinch of salt. Add black pepper for warmth. The red pepper flakes are optional but add a nice kick. Balance the flavors by adjusting the salt and pepper. Freshly ground pepper is best for a bright flavor. Serve the dip warm for the best taste. It should be bubbly and golden on top. If it cools, the texture changes. You can reheat it in the oven. Just bake at 350°F (175°C) until warm. Enjoy it fresh out of the oven with crackers or veggies. Pro Tips Choose Fresh Spinach: Always opt for fresh spinach over frozen for a vibrant color and better texture in your dip. Adjust the Cheese: Feel free to mix in other cheeses like cream cheese or cheddar for a unique flavor twist. Serve Warm: This dip is best enjoyed warm, so make sure to serve it immediately after baking for the creamiest texture. Perfect Pairings: Pair this dip with a variety of dippers like pita chips, crusty bread, or fresh vegetables to enhance the tasting experience. {{image_4}} You can switch up the cheese in your dip. Try Gouda for a smoky taste. Use cream cheese and cheddar for a rich flavor. Mixing feta adds a tangy twist that pairs well with spinach. Each cheese gives a new spin on the classic dip, so feel free to experiment. Want to add more flavor? Fresh herbs work wonders. Chopped basil or parsley brightens the dip. For a kick, add some cayenne pepper or smoked paprika. You can also mix in chopped sun-dried tomatoes for a sweet touch. Each of these adds depth and makes your dip unique. Baked dip is a crowd-pleaser, but cold dip has its charm too. Serve it cold with fresh veggies for a crunchy snack. If you bake it, let it cool a bit before serving. This allows the flavors to settle. Pair it with crusty bread or tortilla chips for fun. Each way brings a new vibe to your gathering. After enjoying your creamy spinach parmesan dip, let it cool first. Once it cools, transfer it to an airtight container. Make sure to seal it tightly. Store it in the fridge. It will last for about 3-4 days. Keep an eye on it to ensure freshness. You can freeze this dip for later use. To do this, place the cooled dip in a freezer-safe container. Leave some space at the top for expansion. Label the container with the date. It can stay frozen for up to 3 months. When you want to eat it, just thaw it in the fridge overnight. To reheat the dip, you can use the oven or microwave. If using an oven, preheat it to 350°F (175°C). Transfer the dip to a baking dish and cover it with foil. Bake for about 15-20 minutes or until it’s heated through. If using a microwave, heat it in short bursts of 30 seconds. Stir in between to avoid hot spots. Enjoy the warm, creamy goodness! The dip will last about 3 to 5 days in the fridge. Store it in an airtight container. This keeps it fresh and safe to eat. If you notice any change in smell or color, it's best to throw it away. Yes, you can make the dip ahead of time. Prepare it a day before your party. Just cover it and keep it in the fridge. When you’re ready, bake it as directed. This lets the flavors blend well, making it even tastier! You can serve this dip with many tasty options. Here are some ideas: - Crunchy crackers - Thinly sliced baguette - Fresh vegetable sticks like carrots or celery - Pita chips - Toasted bread rounds These sides add fun and flavor to your dip experience! This blog post covered all you need for a great spinach parmesan dip. We discussed key ingredients, brands, and helpful substitutions. Next, I provided a step-by-step guide for easy preparation and cooking. You also learned tips for a creamy texture and best serving practices. We explored tasty variations like different cheese combos and herbs. Finally, I shared storage tips and answers to common questions. Enjoy making and sharing your delicious dip. The right ingredients and techniques make all the difference!

Creamy Spinach Parmesan Dip Savory Party Favorite

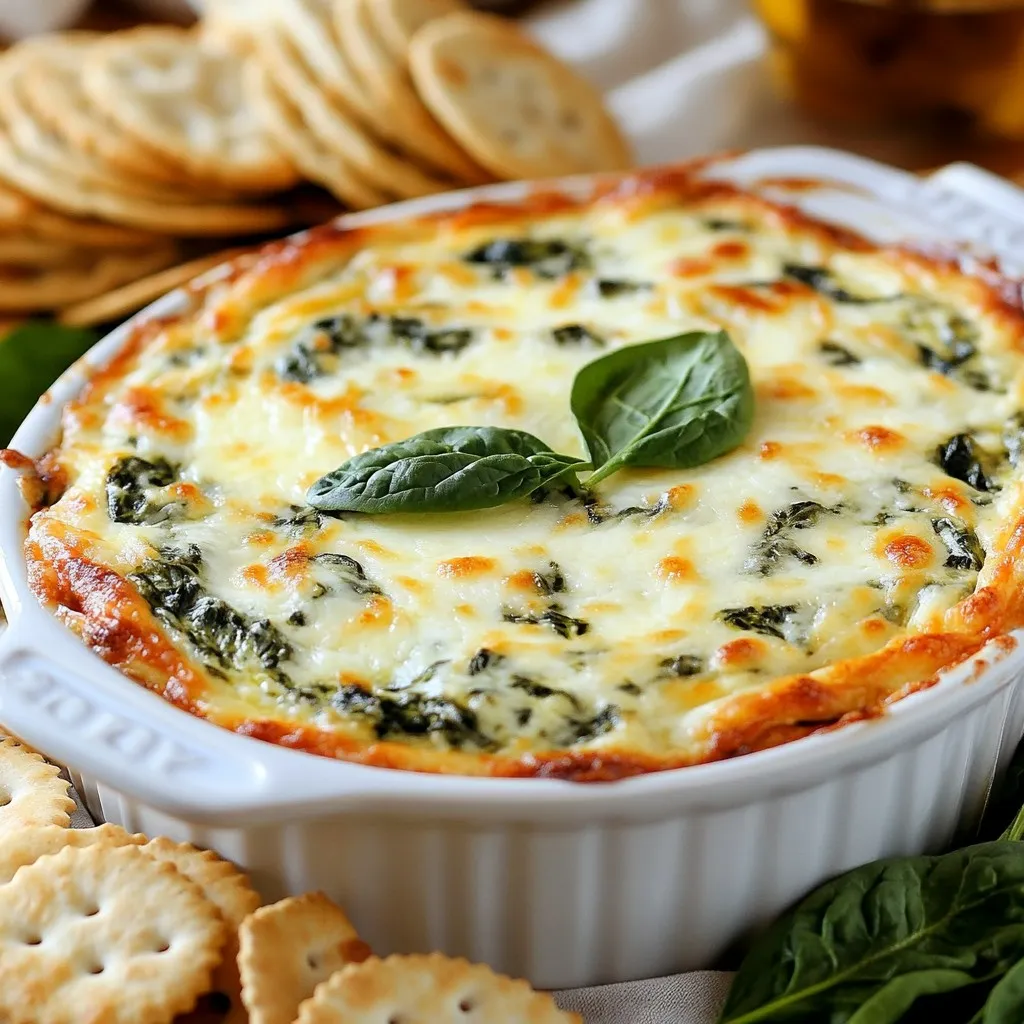
Looking for a crowd-pleasing dish for your next party? This Creamy Spinach Parmesan Dip is sure to impress! With rich

- 1 cup rolled oats - 1/2 cup natural peanut butter - 1/4 cup honey or maple syrup - 1/2 cup chocolate chips - 1/4 cup ground flaxseed - 1/2 teaspoon pure vanilla extract - Pinch of sea salt You can adjust measurements to fit your tastes. If you want a sweeter bar, add more honey or syrup. For a nut-free option, use sun butter instead of peanut butter. Feel free to swap chocolate chips for dried fruit, nuts, or seeds. Adjust the amount of flaxseed if you want a different texture. Each bar packs a punch of energy. They offer healthy fats from peanut butter and fiber from oats and flaxseed. With chocolate chips, they bring a sweet treat without refined sugar. Each bar has about 150 calories, making it a perfect snack. {{ingredient_image_2}} First, gather all your ingredients. You will need: - 1 cup rolled oats - 1/2 cup natural peanut butter - 1/4 cup honey or maple syrup - 1/2 cup chocolate chips - 1/4 cup ground flaxseed - 1/2 teaspoon pure vanilla extract - Pinch of sea salt In a large bowl, mix the rolled oats, ground flaxseed, and sea salt. Use a wooden spoon or spatula. Stir until they blend well. This mix is the base for your bars. Now, take another bowl. Combine the peanut butter, honey (or maple syrup), and vanilla extract. Whisk this mixture until it is smooth and creamy. This step is key. The creamy texture helps bind the bars together. Next, pour the wet mix into the dry ingredients. Make sure all oats and flaxseed get coated. Stir with a spatula until you form a thick, sticky dough. After that, gently fold in the chocolate chips. Make sure they spread evenly without breaking. Grab an 8x8-inch baking dish. Line it with parchment paper. Leave some paper hanging over the sides. This helps with easy removal later. Transfer your mixture into the dish. Press it down firmly. Use a measuring cup or your hands for an even surface. Now, place the dish in the refrigerator. Let it set for at least 1 hour. This helps the bars hold their shape. After an hour, lift the mixture out using the parchment paper. Place it on a cutting board and slice it into bars or squares. Store your energy bars in an airtight container in the fridge for up to a week. If you want them to last longer, freeze them. Place them in a single layer, then move to a freezer-safe container. Enjoy your homemade bars! To get the best texture in your energy bars, follow these steps: - Use rolled oats. They provide the right chewiness. - Mix the wet and dry ingredients well. This helps bind them together. - Press the mixture firmly into the pan. A tight pack helps the bars hold shape. If your bars are too crumbly, add a bit more peanut butter or honey. This will make them stick better. You can choose between honey and maple syrup. Both work well in this recipe. - Honey gives a nice sweetness and chewy texture. - Maple syrup adds a unique flavor. If you want a lower-sugar option, try using ripe mashed bananas. This adds natural sweetness without extra sugar. Want to make your energy bars even more delicious? Here are some ideas: - Add nuts like almonds or walnuts for crunch. - Toss in dried fruit like cranberries or raisins for a chewy bite. - Try spices like cinnamon or nutmeg for warmth. Experiment with these add-ins to create your perfect flavor! Pro Tips Use Old-Fashioned Rolled Oats: They provide a great texture and hold up well in energy bars, making them chewy and satisfying. Experiment with Nut Butters: While peanut butter is delicious, try almond or cashew butter for a different flavor profile! Customize Sweetness: Adjust the amount of honey or maple syrup according to your taste preference; you can always start with less and add more. Store Properly: For maximum freshness, wrap each bar individually in parchment paper before storing in an airtight container. {{image_4}} You can swap peanut butter for other nut butters. Almond butter or cashew butter work well. You can even try sunflower seed butter for a nut-free option. Each nut butter brings its own flavor to the bars. Think outside the box when adding flavors. Try mixing in dried fruits like cranberries or apricots. Coconut flakes add a fun texture. You can also use spices like cinnamon or nutmeg for warmth. Experiment to find your favorite mix! To make these bars gluten-free, use certified gluten-free oats. For a vegan version, replace honey with maple syrup. This keeps the bars sweet and plant-based. Always check labels to ensure all ingredients meet your dietary needs. To keep your energy bars fresh, place them in an airtight container. Store the bars in the refrigerator. This method helps them stay firm and tasty. If you want to enjoy them later, follow the freezing tips below. If you want to save some for later, freezing is a great option. First, lay the bars in a single layer on a baking sheet. Freeze them for about two hours. Once frozen, transfer the bars to a freezer-safe container. You can stack them, but place parchment paper between layers. To thaw, take out the number of bars you need and let them sit at room temperature for about 30 minutes. These energy bars stay fresh for about one week in the fridge. If you freeze them, they can last for up to three months. Always check for any signs of spoilage before eating. If they smell off or look strange, it is best to throw them out. Enjoy your tasty snack! Yes, you can use maple syrup instead of honey. Both sweeteners work well. Maple syrup adds a nice flavor. You could also try agave nectar for a different taste. These energy bars last up to a week in the fridge. Keep them in an airtight container. If you want them to last longer, freeze them. They can stay fresh in the freezer for up to three months. Absolutely! These bars are great for kids. They have healthy ingredients like oats and peanut butter. Plus, kids love the taste of chocolate chips. They make a perfect snack for school or playtime. Yes, you can add protein powder. It boosts the nutrition in these bars. Start with 1/4 cup of protein powder. Mix it with the dry ingredients for even distribution. For a gluten-free option, use gluten-free oats. You can also use ground almonds or quinoa flakes. These swaps keep the texture and flavor delicious while being gluten-free. You now have a complete guide to making energy bars. We covered the key ingredients, detailed steps, and helpful tips. You also learned about variations to fit your taste and dietary needs. Storing your bars properly will keep them fresh longer. Remember, feel free to experiment with flavors and ingredients. Enjoy your energy bars that are not only tasty but also packed with goodness. You can customize them to fit your lifestyle. Happy snacking!

Peanut Butter Chocolate Chip Energy Bars Easy Recipe

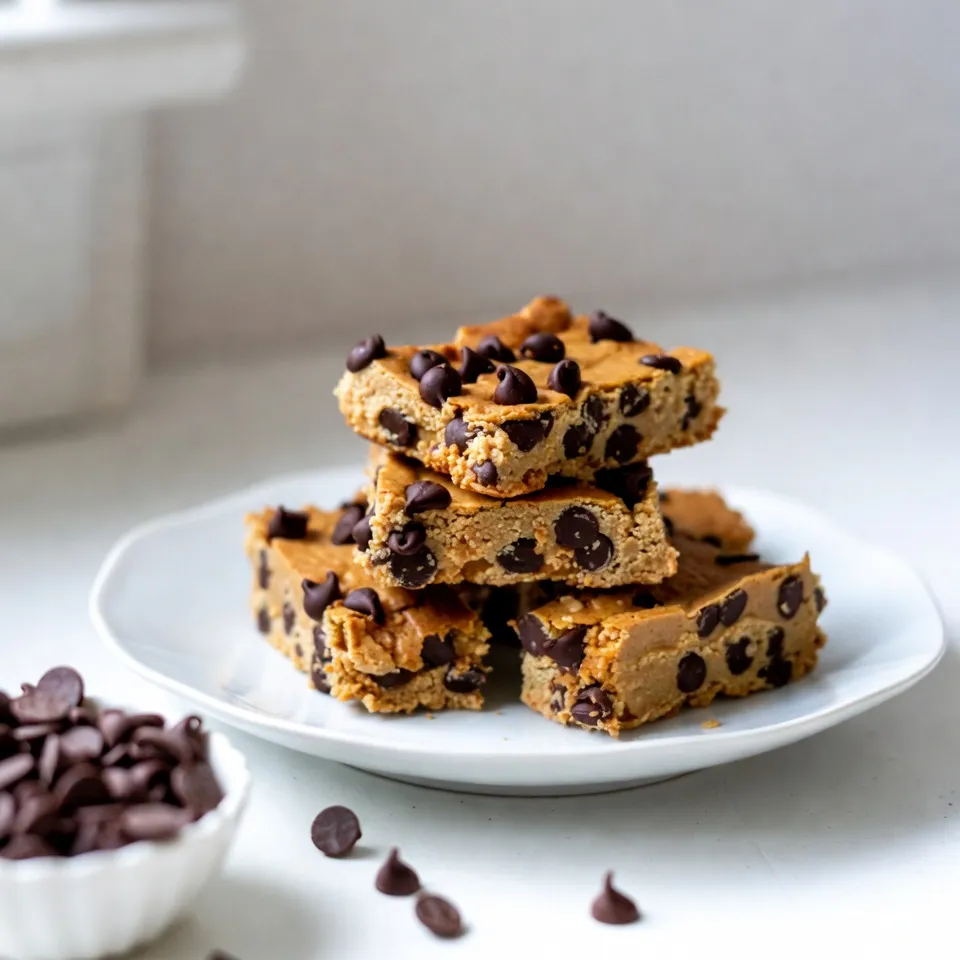
Looking for a quick and tasty snack? You’ve come to the right place! My Peanut Butter Chocolate Chip Energy Bars

Here are the ingredients you'll need to make Chocolate Cherry Granola. Each one adds flavor and crunch: - 3 cups rolled oats - 1 cup chopped almonds - 1/2 cup sunflower seeds - 1/2 cup unsweetened cocoa powder - 1/2 cup pure maple syrup - 1/4 cup melted coconut oil - 1 cup dried cherries, roughly chopped - 1 teaspoon pure vanilla extract - 1/2 teaspoon sea salt - 1/2 cup dark chocolate chips Each ingredient plays a vital role. Rolled oats form the base, giving a hearty texture. Chopped almonds add crunch and healthy fats. Sunflower seeds provide extra protein and a delightful bite. The cocoa powder infuses rich chocolate flavor, making this treat special. Pure maple syrup acts as a natural sweetener, while melted coconut oil helps bind the mix. Dried cherries add a tart sweetness, balancing the chocolate. Vanilla extract enhances all these flavors, making it more aromatic. Finally, sea salt brings out the sweetness and richness. This blend of ingredients creates a delicious, crunchy snack. You can enjoy it on its own or as a topping for yogurt or milk. {{ingredient_image_2}} - Step 1: Preheat the oven and prepare the baking sheet. Set your oven to 350°F (175°C). Line a large baking sheet with parchment paper. This step helps with easy cleanup and prevents sticking. - Step 2: Mix dry ingredients in a large bowl. In a big mixing bowl, combine 3 cups of rolled oats, 1 cup of chopped almonds, 1/2 cup of sunflower seeds, 1/2 cup of unsweetened cocoa powder, and 1/2 teaspoon of sea salt. Stir them well to mix everything evenly. - Step 3: Whisk together wet ingredients. In another bowl, whisk 1/2 cup of pure maple syrup, 1/4 cup of melted coconut oil, and 1 teaspoon of pure vanilla extract. Mix until smooth and blended, so it’s ready to combine with the dry mix. - Step 4: Combine wet and dry mixtures. Pour the wet mix over the dry ingredients. Gently stir until all the oats and nuts are coated in that delicious chocolatey mixture. - Step 5: Bake the granola mixture. Spread the granola out evenly on your prepared baking sheet. Bake for 25-30 minutes. Stir halfway through for even cooking. It’s done when it smells great and looks slightly crispy. - Step 6: Cool granola and add mix-ins. After baking, take the sheet out and let it cool for about 10 minutes. This helps it clump together nicely. - Step 7: Store properly in an airtight container. Once cool, toss in 1 cup of chopped dried cherries and 1/2 cup of dark chocolate chips. Mix gently. Let it cool completely before moving it to an airtight container. This keeps your granola fresh and crunchy. - To bake this granola evenly, spread it out well. This keeps it crispy. - Stir the granola halfway through cooking, so it browns evenly. Cooling is key for clumps. After baking, let it sit for 10 minutes. This helps the clusters form. You can serve this granola in many ways. It’s great with yogurt or milk. Just add a scoop on top for crunch. For a lovely gift, use a clear glass jar. It looks pretty and shows off the colors. You could also tie a ribbon around it for extra flair. Pro Tips Storage Solution: Store your granola in an airtight container to maintain its crunchiness and freshness for longer. Mix and Match: Feel free to substitute the dried cherries with other dried fruits like cranberries or apricots for a different flavor profile. Chocolate Variations: Experiment with different types of chocolate chips, like milk chocolate or white chocolate, to customize the sweetness of your granola. Serving Suggestions: Enjoy your granola as a topping for smoothie bowls or oatmeal, or simply eat it as a healthy snack on its own. {{image_4}} You can easily adjust this recipe to fit your taste. Here are some ideas: - Nut and seed variations: If you don’t have almonds, walnuts or pecans work great. You can swap sunflower seeds for pumpkin seeds for a new twist. Both options add a crunchy texture. - Alternative sweeteners: Maple syrup is sweet, but honey or agave syrup are good substitutes. Each sweetener gives a unique flavor that can change your granola's taste. Adding different flavors can make your granola even more fun! - Suggested spices and extracts: Try adding cinnamon or nutmeg for warmth. A touch of almond extract can give a nice, nutty kick. These spices can elevate the overall taste. - Additional fruits or nuts: Consider adding dried apricots or cranberries for a fruity burst. You can also mix in walnuts or cashews for added crunch. These additions make your snack more exciting and colorful. Oats are a great choice for breakfast or snacks. They provide fiber that helps digestion. Fiber keeps you full longer, which can help with weight management. Oats also support heart health by lowering cholesterol levels. Almonds are packed with nutrients. They contain healthy fats that are good for your heart. Eating almonds can help boost your brain health too. They provide protein, which is important for muscle repair and growth. Dark chocolate adds a touch of indulgence. It contains antioxidants that can improve heart health. Eating dark chocolate in moderation may lift your mood as well. Cherries are rich in vitamins and minerals. They help reduce inflammation and provide vitamin C, which supports your immune system. Each serving of Chocolate Cherry Granola has about 250 calories. This is a good balance for a snack. The protein content is around 7 grams per serving. This helps build and repair tissues. You’ll find about 35 grams of carbohydrates in each serving. Carbs give you energy for your busy day. The fat content is around 10 grams, mostly from healthy sources like almonds and coconut oil. This mix of nutrients makes Chocolate Cherry Granola a delicious and healthy choice! Store Chocolate Cherry Granola in an airtight container. This keeps it fresh and crunchy. A glass jar works well for storage. You can also use a sealed bag. Keep it in a cool, dry place to avoid moisture. Yes, this granola can be gluten-free. Use gluten-free rolled oats if needed. Always check labels, as some oats may contain gluten. This makes it safe for those with gluten sensitivities. Absolutely! You can skip the nuts or swap them out. Try using seeds like pumpkin or more sunflower seeds instead. This keeps the crunch while making it nut-free. Chocolate Cherry Granola lasts about two weeks. If stored well in an airtight container, it stays fresh longer. You can also freeze it for up to three months. Just remember to thaw it before enjoying! This blog post covered how to make delicious Chocolate Cherry Granola. You learned the needed ingredients, step-by-step instructions, and helpful tips. We also discussed ingredient variations and the health benefits of your ingredients. Granola is a great snack or breakfast choice. It’s easy to customize for your taste. Making it at home means fresh flavors and less sugar. Enjoy your granola, share it, and feel good about what you eat!

Chocolate Cherry Granola Crunchy and Healthy Snack

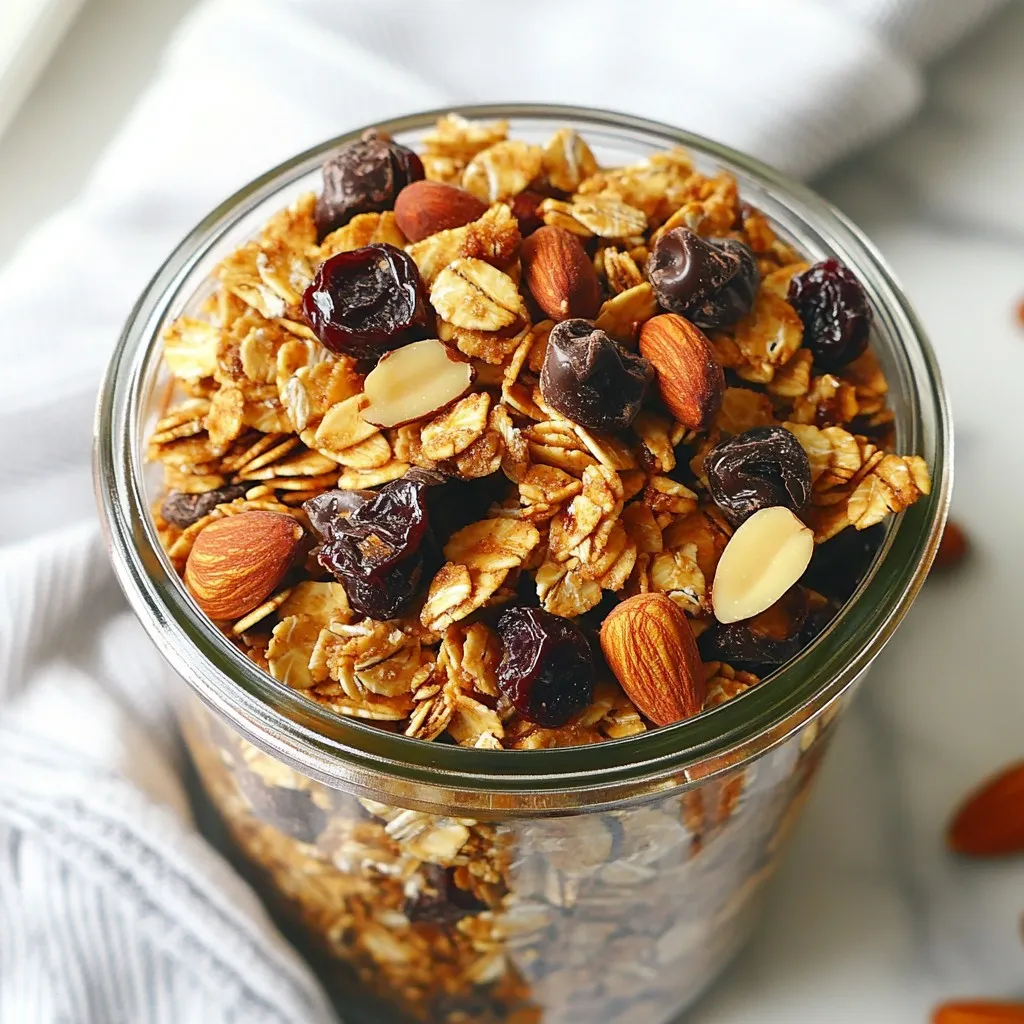
Are you looking for a tasty yet healthy snack? My Chocolate Cherry Granola combines crunchy oats, sweet cherries, and rich

To make Spicy Thai Peanut Cauliflower Rice, you will need these fresh ingredients: - Cauliflower - Coconut oil - Bell pepper (red or yellow) - Small carrot - Snap peas - Green onions - Garlic - Fresh ginger - Smooth peanut butter - Soy sauce (or tamari) - Fresh lime juice - Sriracha - Fresh cilantro - Crushed peanuts Each of these adds a special touch to the dish. Cauliflower gives a light base. The coconut oil adds a hint of sweetness, while bell peppers bring color and crunch. Carrots add sweetness and snap peas add a fresh crunch. Garlic and ginger provide a zesty kick. Peanut butter makes the dish creamy and rich. Soy sauce or tamari gives a savory umami flavor. Lime juice brightens the dish with acidity, while sriracha adds the heat you crave. Finally, cilantro and crushed peanuts offer freshness and texture. These ingredients work together to create a beautiful bowl of flavors. Each bite gives you a taste of Thailand. You will love how easy and fun it is to make this dish! {{ingredient_image_2}} To start, take a medium head of cauliflower. Remove the leaves and stem. Cut the cauliflower into smaller florets. You can use a food processor to pulse these florets until they look like rice. If you don’t have a food processor, a box grater works too. Just grate the florets until they resemble grains of rice. Next, grab a large skillet or wok. Melt one tablespoon of coconut oil over medium heat. Once the oil is hot, add two minced cloves of garlic and one tablespoon of minced fresh ginger. Sauté for about one to two minutes. You want them to be fragrant and slightly golden, which adds depth to the dish. Now, add one diced bell pepper, either red or yellow, and one small grated carrot to the skillet. Sauté these for another three to four minutes. They should soften and start to look tender. This step brings out their natural sweetness and adds color. It’s time to add the riced cauliflower. Toss in half a cup of snap peas, trimmed and cut in half, along with the cauliflower. Mix everything well to combine. Cook this mixture for about five to seven minutes. Stir occasionally, ensuring the cauliflower is tender but still has a slight bite. We want to avoid mushy rice! While the vegetables cook, prepare the peanut sauce. In a small bowl, mix together a quarter cup of smooth peanut butter, two tablespoons of soy sauce, one tablespoon of fresh lime juice, and one to two teaspoons of sriracha. Adjust the sriracha based on your heat preference. Whisk everything until smooth. If it’s too thick, add a splash of water to thin it out. Pour the peanut sauce over the cauliflower rice mixture in the skillet. Stir well to coat all the veggies and cauliflower evenly. Let this cook for an additional two to three minutes. This allows all the flavors to meld together beautifully, making each bite flavorful. Finally, remove the skillet from heat. Gently fold in three sliced green onions, saving some for garnish later. This adds a fresh crunch to the dish. Now, you have a colorful and tasty meal ready to serve! To get the best texture, use a food processor. Cut the cauliflower into small florets first. Pulse until it looks like rice, but not mushy. If you don’t have a food processor, use a box grater. Grate slowly to keep the pieces even. You want the cauliflower to be light and fluffy. Avoid overcooking it in the pan. Stir often and remove it when still slightly firm. Spice is key in this dish. If you love heat, add more sriracha. Start with one teaspoon, then taste. You can always add more, but can’t take it out! If you prefer milder flavors, just skip the sriracha or use less. Another option is to add a splash of coconut milk to cool it down. Lime juice also helps balance the spice. Using the right tools makes cooking easier. A large skillet or wok works best for this dish. It gives you room to stir well. A good food processor is also helpful for ricing cauliflower. You should have a whisk for mixing the peanut sauce. For chopping, a sharp knife saves time and effort. Lastly, keep measuring cups handy for accuracy. Pro Tips Choose Fresh Ingredients: Always opt for fresh vegetables and herbs to enhance the flavor and nutritional value of your dish. Adjust Spice Level: Customize the heat by adjusting the amount of sriracha in the peanut sauce according to your personal preference. Meal Prep Friendly: This recipe can be made in advance and stored in an airtight container in the fridge for up to 3 days, making it perfect for meal prep. Experiment with Add-Ins: Feel free to add other vegetables like zucchini or broccoli, or even protein such as tofu or chicken, to make the dish more filling. {{image_4}} You can make this dish heartier by adding protein. Tofu is a great choice. Use firm tofu and press it to remove excess water. Cut it into cubes and pan-fry until golden. If you prefer chicken, use diced chicken breast. Cook it in the skillet before adding the vegetables. Both options blend well with the spicy sauce and make this dish more filling. Feel free to swap out the vegetables for what you have on hand. Zucchini, broccoli, or even corn work well. Just make sure to chop them into small pieces. This keeps the cooking time short and ensures even cooking. Each vegetable will bring its own flavor, making it unique every time. To make this dish vegan, simply use tofu instead of chicken. Also, ensure your soy sauce is gluten-free if needed. Many brands offer vegan peanut butter, but check the label to be sure. This way, you can enjoy all the flavors without any animal products. To keep your spicy Thai peanut cauliflower rice fresh, store it in an airtight container. Allow the dish to cool down before sealing it. This helps prevent condensation, which can make the rice soggy. Ideally, you should eat leftovers within three days for the best taste and quality. When reheating, you can use a microwave or a skillet. For the microwave, place the rice in a bowl and cover it with a damp paper towel. Heat in short bursts, stirring in between, until hot. In a skillet, add a splash of water to the rice and heat it over medium-low heat. Stir often to avoid burning. This keeps it moist and tasty. If you want to freeze your cauliflower rice, pack it tightly in a freezer-safe bag. Squeeze out as much air as possible. This prevents freezer burn. You can store it for up to a month. When you're ready to eat, thaw it overnight in the fridge. Reheat as mentioned earlier for a quick meal. Cauliflower rice is simply cauliflower chopped into tiny pieces. You can make it by grating or processing cauliflower. It looks like rice but has fewer carbs. This makes it a great substitute for regular rice in many dishes. Yes, you can make this dish ahead of time. Cook the spicy Thai peanut cauliflower rice, let it cool, and store it in the fridge. It lasts for about three days. Reheat it in a pan or microwave when you're ready to enjoy. To add more heat, increase the sriracha. You can start with one teaspoon and taste it. If you want even more spice, add chopped fresh chili peppers or a dash of chili flakes. Just be careful not to overdo it! Yes, you can use tamari instead of soy sauce. Tamari is a gluten-free soy sauce option. It has a similar flavor, so it works well in this recipe. Always check the label to ensure it's gluten-free. This dish pairs well with grilled chicken, shrimp, or tofu for added protein. You can also serve it with a fresh salad or spring rolls. Garnishing with extra cilantro and crushed peanuts adds a nice touch! This blog post shared how to create a delicious Spicy Thai Peanut Cauliflower Rice. You learned about key ingredients, step-by-step cooking methods, and helpful tips. Variations allow for personal touches, and storage info keeps leftovers fresh. Cooking should be fun and easy. Experiment with flavors and enjoy your meals! With this guide, you have the tools to make a healthy dish that suits your taste. Go ahead and spice up your kitchen adventures!

Spicy Thai Peanut Cauliflower Rice Flavorful Delight

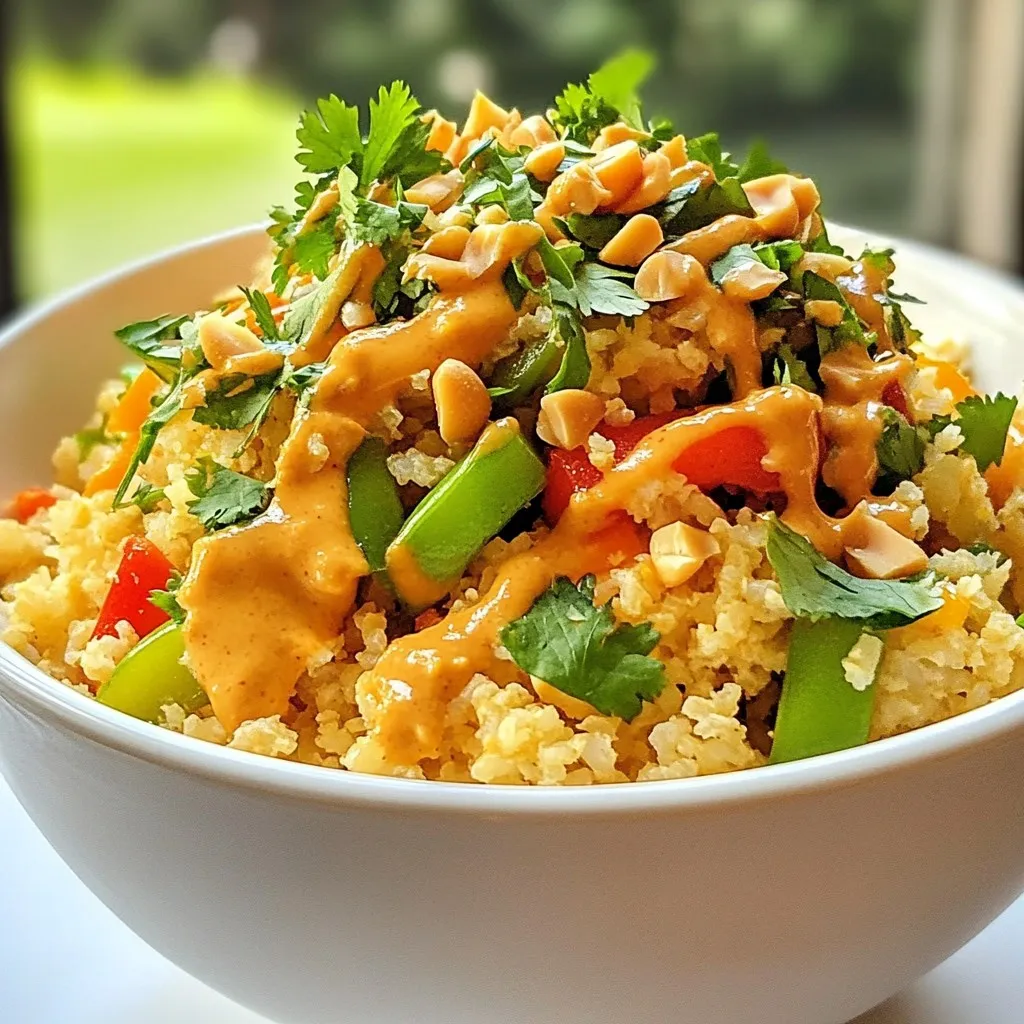
If you crave bold flavors and healthy meals, you’re in the right place! My Spicy Thai Peanut Cauliflower Rice is

To make a Berry Almond Yogurt Parfait, gather these tasty items: - 2 cups Greek yogurt (choose between plain or vanilla) - 1 cup mixed berries (a delightful mix of strawberries, blueberries, and raspberries) - 1/2 cup granola (your choice of store-bought or homemade for personalization) - 1/4 cup sliced almonds (for that delightful crunch) - 2 tablespoons honey or maple syrup (optional, for added sweetness) - 1 teaspoon vanilla extract (especially if using plain yogurt) - Fresh mint leaves (optional, for a refreshing garnish) These ingredients come together to create a vibrant, tasty treat. You can pick your favorite yogurt to match your mood. The berries add pops of color and flavor, while granola and almonds give a nice crunch. Sweetness can be adjusted with honey or maple syrup. This parfait is not just pretty; it’s also packed with nutrition! {{ingredient_image_2}} To start, decide if you want plain or vanilla yogurt. If you choose plain, add one teaspoon of vanilla extract. Mix well until the vanilla is blended. This simple step makes a big difference. It adds a nice flavor to your yogurt base. Next, gather your mixed berries. You can use strawberries, blueberries, and raspberries. If you want your berries sweeter, drizzle them with honey or maple syrup. This step is optional. Use about two tablespoons of your chosen sweetener. Gently fold the berries to coat them. Be careful not to mash them. You want whole, beautiful berries in your parfait. Now, it’s time to layer your parfait. Start with a generous layer of yogurt at the bottom of your glass or bowl. Next, add a layer of mixed berries. Spread them evenly over the yogurt. After that, sprinkle granola on top of the berries. This adds a nice crunch. Then, add a tablespoon of sliced almonds for extra texture. Continue layering until you fill the glass. Finish with a top layer of yogurt. Add more berries and a sprinkle of granola and almonds for a pretty look. For a fresh touch, place a few mint leaves on top. This makes your parfait look even more appealing. Serve these parfaits right away for the best taste. If you want a cool treat, chill them in the fridge for about an hour. Enjoy your Berry Almond Yogurt Parfait! You can easily adjust the sweetness of your parfait. Start with Greek yogurt that suits your taste. If you want it sweeter, add honey or maple syrup. Drizzle it over the berries or mix it into the yogurt. You can also use other sweeteners like agave or stevia. Remember to taste as you go to find your perfect level. Make your parfait look as good as it tastes. Use clear glasses to show off the layers. You can layer the yogurt, berries, and granola beautifully. Top with a few almonds and a mint leaf for extra flair. This makes your parfait not just tasty but also a feast for the eyes. Prepping your parfait in advance is a great idea. You can assemble the layers but leave out the granola until you're ready to serve. This keeps it crunchy. Store your parfaits in the fridge in airtight containers. They stay fresh for a day or two. If you want to enjoy them chilled, let them sit in the fridge for about an hour before serving. Pro Tips Choose Your Yogurt Wisely: Opt for full-fat Greek yogurt for a creamier texture, or low-fat for a lighter option. Vanilla yogurt can add extra flavor without the need for additional sweeteners. Berry Selection: Use fresh, seasonal berries for the best flavor. If using frozen berries, allow them to thaw and drain excess liquid to prevent sogginess. Granola Crunch: For an added crunch, try toasting your granola in the oven for a few minutes before layering. This enhances its flavor and texture. Make Ahead Option: Prepare the yogurt and berries in advance and layer them just before serving to maintain the granola's crunchiness and avoid sogginess. {{image_4}} You can change the fruit in your parfait based on the season. In summer, try peaches or cherries. In fall, apples and pears work great. You can also mix other berries, like blackberries or cranberries. They add unique flavors and colors. If you want to make this parfait dairy-free, swap Greek yogurt for a non-dairy alternative. Almond, coconut, or soy yogurt are good choices. For granola, look for gluten-free options. This keeps the parfait safe for those with gluten sensitivities. Add spices to your yogurt for extra flavor. A pinch of cinnamon or nutmeg can change the taste profile. You might also mix in nut butter, like almond or peanut butter. This adds creaminess and a nutty taste that pairs well with the berries. I recommend chilling your berry almond yogurt parfait for about one hour before serving. This will help the flavors blend well and create a refreshing treat. To store parfaits in the fridge, simply cover them with plastic wrap or a lid. This keeps them fresh and ready to enjoy later. Use airtight containers to keep your parfaits fresh and tasty. Glass jars or plastic containers work well. Avoid using containers that allow air in, as this can make your parfait soggy. If you plan to store them for longer, layer the ingredients in separate containers. This method keeps the granola crunchy and the berries fresh. Before serving, if the parfaits have been in the fridge, give them a gentle stir. This helps to mix the ingredients again. You can also refresh the parfaits by adding a bit more yogurt or extra berries on top. If you have any leftovers, get creative! Mix them into smoothies or use them as a topping for pancakes. Berry almond yogurt parfaits stay fresh in the fridge for about 2 to 3 days. Proper storage is key. Keep them in an airtight container to avoid spoilage. If you use fresh berries, check them often for any signs of mold. Yes, you can freeze berry almond yogurt parfaits. However, freezing may change the texture. To freeze, layer the parfait in a freezer-safe container. When ready to enjoy, thaw it in the fridge overnight. Avoid refreezing once thawed, as it may affect the taste. You can add many fun toppings to your parfait. Consider these options: - Chia seeds for added nutrition - Coconut flakes for a tropical twist - Dark chocolate shavings for a sweet touch - Additional fruits like bananas or peaches - Nut butters for creaminess and flavor Feel free to mix and match toppings to create your perfect berry almond yogurt parfait! You learned how to make berry almond yogurt parfaits. We discussed ingredients, step-by-step instructions, tips for the best results, and storage ideas. These parfaits are easy to customize for any taste. You can mix fruits, adjust sweetness, and add fun toppings. Enjoy this tasty treat as a healthy snack or breakfast. With a little prep, you can make a fresh and colorful dish your family will love. Keep experimenting with flavors and enjoy every bite!

Berry Almond Yogurt Parfait Delightful Layered Treat

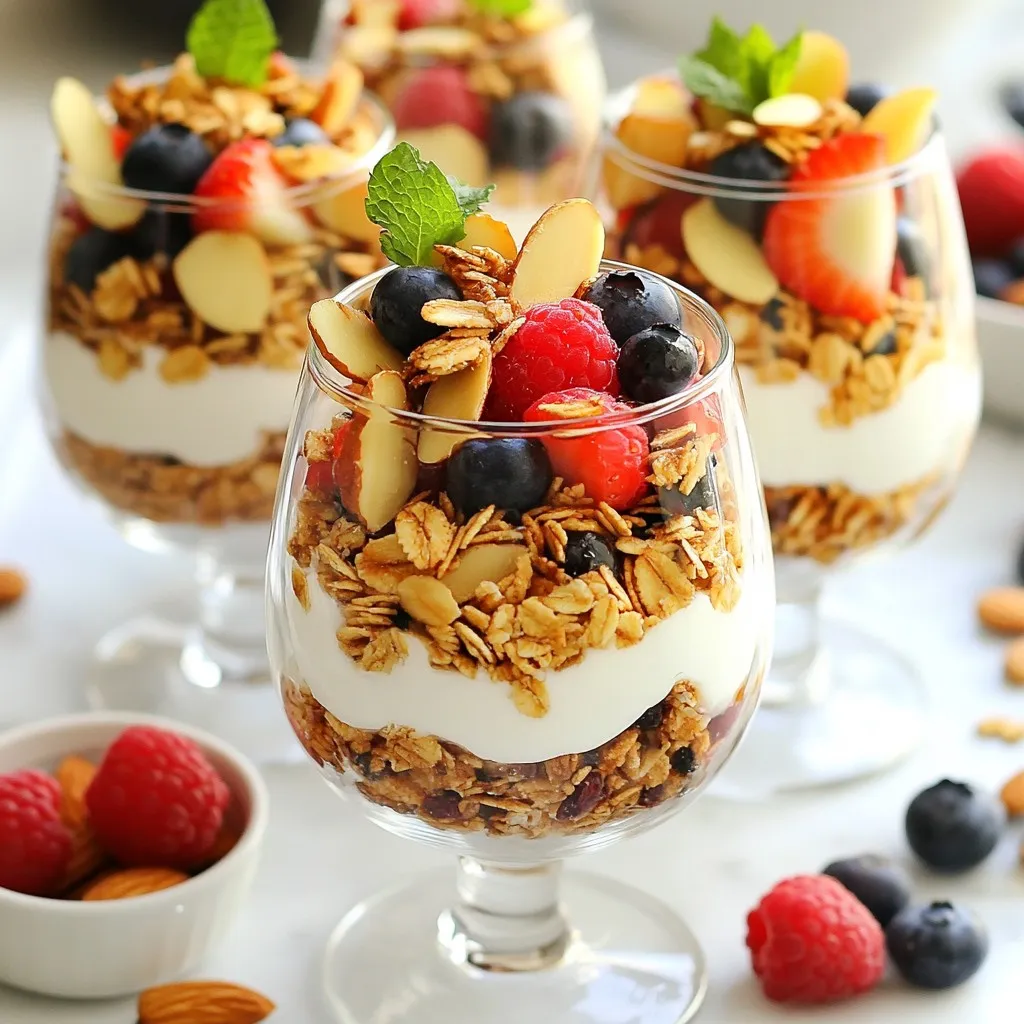
Get ready to treat your taste buds with a Berry Almond Yogurt Parfait! This delightful layered treat combines creamy yogurt,

To make a tasty Mediterranean Orzo Salad, gather the following ingredients: - 1 cup orzo pasta - 1 cup cherry tomatoes, halved - 1 cucumber, diced into bite-sized pieces - 1/2 red onion, finely chopped - 1/2 cup Kalamata olives, pitted and sliced - 1/2 cup feta cheese, crumbled for creaminess - 1/4 cup fresh parsley, chopped for freshness - 1/4 cup extra virgin olive oil for richness - 2 tablespoons freshly squeezed lemon juice for zest - 1 teaspoon dried oregano for aromatic flavor - Salt and freshly ground pepper to taste You can easily swap ingredients for different flavors or dietary needs. Here are some ideas: - Orzo Pasta: Use quinoa or farro for a gluten-free option. - Cherry Tomatoes: Substitute with diced bell peppers or sun-dried tomatoes for a unique twist. - Cucumber: Zucchini or radishes make crunchy alternatives. - Red Onion: Use green onions or shallots for a milder taste. - Kalamata Olives: Any type of olives will work. Try green olives for a different flavor. - Feta Cheese: Use goat cheese or a vegan cheese for dairy-free options. - Fresh Parsley: Basil or mint can add a fresh kick. - Extra Virgin Olive Oil: Avocado oil provides a different richness. - Lemon Juice: Lime juice can also add a zesty touch. - Dried Oregano: Italian seasoning gives a similar flavor profile. This salad is not just delicious; it’s also nutritious! Here’s a quick look at what you get per serving: - Calories: Approximately 280 - Protein: 8g - Carbohydrates: 30g - Fat: 14g - Fiber: 3g - Sodium: 350mg (varies with added salt) This dish is a great way to get healthy fats, fresh veggies, and satisfying carbs. Enjoy its taste and the good nutrients it offers! {{ingredient_image_2}} To cook orzo, start by boiling a large pot of salted water. Use a generous amount of water; this helps the orzo cook evenly. Once the water reaches a rolling boil, add one cup of orzo pasta. Cook it according to the package instructions. You want it to be al dente, which means it should still have a slight bite. This usually takes about 8 to 10 minutes. After cooking, drain the orzo in a colander. Rinse it under cold water to stop the cooking process and cool it down. This step is crucial for a fresh salad. Set the orzo aside to cool completely before mixing it with the vegetables. While the orzo cooks, prep your vegetables. First, take a cup of cherry tomatoes. Cut each tomato in half. This will help release their juice into the salad. Next, grab one cucumber. Dice it into bite-sized pieces. Aim for uniformity to make every bite delightful. Then, finely chop half a red onion. This adds a nice crunch and flavor. After that, slice half a cup of Kalamata olives. Finally, chop a quarter cup of fresh parsley. This will add a pop of color and freshness to your salad. Make sure all your veggies are ready before mixing. To make the dressing, grab a small bowl. Whisk together a quarter cup of extra virgin olive oil. Add two tablespoons of freshly squeezed lemon juice for brightness. Then, sprinkle in one teaspoon of dried oregano for flavor. Finally, add salt and freshly ground pepper to taste. Taste the dressing and adjust as needed. If it’s too tangy, add a bit more olive oil. If it needs more zest, squeeze in extra lemon juice. The goal is a balanced dressing that enhances the salad's flavors. This dressing will tie all the ingredients together beautifully. To cook orzo pasta well, start with lots of salted water. Use a big pot for this. Bring the water to a boil before adding the orzo. Cook it according to the package's time to get that perfect al dente bite. After draining, rinse it with cold water. This stops the cooking and keeps it firm. Let it cool down completely. This step ensures your salad does not get mushy. Add extra zest to your Mediterranean orzo salad! Try mixing in different herbs, like fresh basil or mint. These herbs add a nice twist. You can also use sun-dried tomatoes for a deeper flavor. For a bit of heat, add some crushed red pepper flakes. If you want a creamy touch, a bit more feta cheese can help. Taste as you go to find what you love best! Meal prep makes this salad quick and easy. Cook the orzo and chop the veggies ahead of time. Keep them in separate containers in the fridge. Make the dressing in advance too. Store it in a jar, and shake before using. When you’re ready to eat, just mix everything together. This way, you can enjoy a fresh Mediterranean orzo salad anytime! Pro Tips Cook Orzo Perfectly: To achieve the best texture, ensure that the orzo is cooked al dente. This will prevent it from becoming mushy when combined with the other ingredients. Fresh Ingredients Matter: Use the freshest vegetables and herbs you can find. They will enhance the flavor and overall appeal of your salad. Customize Your Add-Ins: Feel free to add other Mediterranean ingredients like bell peppers, artichokes, or even grilled chicken to make this salad your own. Chill for Flavor: Allowing the salad to chill for at least 30 minutes lets the flavors meld together, making each bite even more delicious. {{image_4}} You can easily add protein to your Mediterranean orzo salad. Chicken, shrimp, or chickpeas work well. For chicken, grill or roast it first. Dice it into bite-sized pieces before mixing it in. If shrimp is your choice, sauté it with garlic and lemon. Cook until just pink, then toss it in. Chickpeas are a great vegan option. Just rinse and drain canned chickpeas, then add them straight in. All these options make the salad hearty and satisfying. This salad is great year-round, but you can change ingredients based on the season. In spring, try adding artichoke hearts or asparagus. These vegetables add a fresh crunch. For summer, consider sweet corn or bell peppers for a pop of color. You can also use fresh herbs like basil or mint. These add bright flavors and make the salad feel light and refreshing. Seasonal changes keep your dish exciting and tasty. If you're looking for vegan options, you can swap out the feta cheese. Try using crumbled tofu or a store-bought vegan feta. These alternatives give you a similar texture without dairy. For dressings, replace the regular olive oil with a plant-based option. You can use tahini or avocado oil. Both add unique flavors while keeping everything vegan. This way, everyone can enjoy the dish, no matter their diet. To keep your Mediterranean Orzo Salad fresh, store it in an airtight container. This helps prevent any odors from other foods in your fridge. If you plan to enjoy it later, do not add the dressing until you're ready to serve. The dressing can make the orzo soggy over time. Keep the salad in the fridge and eat it within three days for the best taste. Freezing Mediterranean Orzo Salad isn’t the best choice. The vegetables will lose their crunch and become mushy upon thawing. However, if you want to freeze it, separate the orzo from the veggies and dressing. You can freeze plain orzo for up to three months. When ready to use, thaw it in the fridge overnight and mix it with fresh vegetables and dressing. If you've stored your salad in the fridge and want to enjoy it warm, you can reheat the orzo. Heat a small pot over low heat and add a splash of water or olive oil. Add the orzo and stir until warmed through. Avoid reheating the vegetables or feta, as they taste best when fresh. After reheating, mix everything back together and serve immediately for a delicious meal. Mediterranean Orzo Salad stays fresh in the fridge for about three to five days. Keep it in an airtight container to preserve its flavors. After a few days, the veggies may soften, but it will still taste good. Yes, you can make Mediterranean Orzo Salad ahead of time. I often prepare it a day before serving. The salad tastes even better after sitting in the fridge. The flavors meld together, making each bite delicious. This salad pairs well with grilled chicken or fish for protein. You can also serve it with warm pita bread or hummus for a fun twist. For a vegetarian option, add roasted vegetables or chickpeas to your meal. Mediterranean Orzo Salad brings fresh flavors to your table with easy steps. We covered ingredients, cooking tips, and meal variations. You learned how to store and reheat leftovers effectively. Remember, this dish can adapt to your taste and what’s in season. Enjoy making this salad and share it with friends. It’s a fun way to eat healthy and delicious food. Keep exploring new ideas to make it your own. Happy cooking!

Mediterranean Orzo Salad Fresh and Flavorful Dish

Looking for a bright and tasty dish that makes your meals shine? Mediterranean Orzo Salad is the answer! Packed with

- 2 boneless, skinless chicken breasts - 2 teaspoons Cajun seasoning - 1 tablespoon extra virgin olive oil - 4 cups fresh romaine lettuce, chopped - 1 cup cherry tomatoes, halved - ½ cup crunchy croutons - ¼ cup freshly grated Parmesan cheese - ¼ cup creamy Caesar dressing - Salt and black pepper, to taste - Fresh parsley, finely chopped (for garnish) The main star of this dish is the chicken. Choose two boneless, skinless chicken breasts for easy cooking. The Cajun seasoning adds a bold, spicy kick. You can find this in most grocery stores or even make your own mix at home. You’ll need fresh vegetables to bring color and crunch. Romaine lettuce is perfect for this salad, as it stays crisp. Cherry tomatoes add sweetness and a juicy bite. Feel free to cut them in half for easier eating. Next, we have the toppings. Crunchy croutons give texture, while freshly grated Parmesan cheese adds a savory depth. The creamy Caesar dressing ties it all together, giving the salad its classic taste. Don’t forget to season with salt and black pepper to enhance all those flavors. Finally, add a sprinkle of fresh parsley on top. It not only looks nice but also adds a hint of earthiness. Together, these ingredients create a flavorful and easy Cajun Chicken Caesar Salad that anyone can enjoy! {{ingredient_image_2}} First, preheat your grill or skillet over medium-high heat. This gives you a nice sear on the chicken. While it heats, season each chicken breast with two teaspoons of Cajun seasoning. Don’t forget to add salt and black pepper to taste. This adds extra flavor to your chicken. Once your grill or skillet is hot, pour in one tablespoon of olive oil. Let it heat for a moment, then place the seasoned chicken breasts on the surface. Sear each side for about 6-7 minutes. You want the chicken to turn golden brown. Always check that the internal temperature reaches 165°F (75°C). This ensures your chicken is safe to eat. After cooking, remove the chicken from heat and let it rest for five minutes. This helps the juices stay inside. While your chicken rests, prepare the salad base. In a large mixing bowl, combine four cups of chopped romaine lettuce and one cup of halved cherry tomatoes. Toss them gently to mix. Next, slice the grilled chicken into strips or cubes. Add the chicken to the salad bowl. Then, toss in half a cup of crunchy croutons and sprinkle a quarter cup of freshly grated Parmesan cheese over the top. Finally, drizzle a quarter cup of creamy Caesar dressing on everything. Gently toss to coat all ingredients well. For a vibrant touch, serve portions on individual plates. Garnish with finely chopped fresh parsley for a beautiful finish. Grilling gives your chicken a smoky taste. It also adds beautiful grill marks. Skillet cooking offers a nice, crispy outer layer. Both methods cook the chicken well if done right. To achieve a perfect sear, ensure your grill or skillet is hot. Lay the chicken gently on the surface. Avoid moving it too much; let it sear. After about 6-7 minutes, flip it only when golden brown. This creates a tasty crust. Don’t hesitate to play with spices. Besides Cajun seasoning, try paprika or garlic powder. Fresh herbs like thyme or oregano add depth too. For dressings, you can experiment. A tangy balsamic vinaigrette gives a nice twist. Or try a spicy chipotle ranch for some heat. Serving is key to a great meal. Use large, shallow bowls for a nice look. It makes the salad feel fancy. For garnishing, sprinkle fresh parsley on top. Add a lemon wedge for color and flavor. It brightens the dish and looks appealing. Pro Tips Marinate for More Flavor: For an extra layer of flavor, marinate the chicken in Cajun seasoning and olive oil for at least 30 minutes before grilling. Perfectly Grilled Chicken: Ensure your grill is hot before adding the chicken to achieve a nice sear, which locks in the juices. Fresh Ingredients Matter: Use the freshest romaine lettuce and cherry tomatoes for the best taste and crunch in your salad. Customizable Dressing: Feel free to adjust the amount of Caesar dressing based on your preference; you can also try a lighter dressing for a healthier option. {{image_4}} If you want to change the protein, you have great choices. You can use shrimp or salmon for a seafood twist. They cook fast and add a nice flavor. Tofu is a tasty option for vegetarians. It soaks up flavors well and adds protein. You can switch up the greens in your salad. Spinach or kale can be tasty choices. You can also mix in arugula for a peppery kick. Add-ins like bell peppers, cucumbers, or radishes can add crunch and color. Nuts or seeds can give extra flavor and health benefits. If you want to try a homemade Caesar dressing, start with yogurt or tahini. These options are creamy and healthy. You can also use ranch dressing or a spicy vinaigrette for a Cajun twist. Each choice brings its own unique taste to the salad. To keep your Cajun Chicken Caesar Salad fresh, store it in an airtight container. This helps prevent moisture loss. Make sure to place the chicken and salad in separate containers if possible. This way, the salad stays crisp. - Refrigeration: Store leftovers in the fridge right away. - Shelf life: You can keep it for 2-3 days. The chicken may dry out after a few days. So, eat it sooner for the best taste. When you reheat the chicken, aim to keep it moist. I suggest using a microwave. Place a damp paper towel over the chicken to trap steam. Heat it for short intervals, about 30 seconds at a time. - Salad integrity: Avoid reheating the salad. The lettuce will wilt and lose crunch. Instead, enjoy the salad cold. You can add fresh dressing before serving for extra flavor. This keeps your meal tasty and appealing! Yes, you can prepare this salad ahead of time. For meal prep, cook the chicken and cool it before storing. You can chop the lettuce and tomatoes in advance too. Keep the salad dressing separate until you are ready to serve. This keeps the lettuce crisp. You can store leftovers in the fridge for up to three days. Just remember to add the croutons right before serving to keep them crunchy! Cajun Chicken Caesar Salad pairs well with several side dishes. Consider serving it with: - Garlic bread for a tasty crunch - Roasted vegetables for extra color - A light soup like tomato or vegetable - Potato wedges for a heartier meal These sides complement the rich flavors of the salad without overpowering them. This recipe has a nice kick from the Cajun seasoning. If you prefer less heat, you can adjust the spice levels. Use less Cajun seasoning on the chicken. You can also mix in mild spices like paprika. If you want more heat, try adding cayenne pepper or hot sauce to the dressing. Just taste as you go to find the right balance for you! This blog post covered how to make a tasty Cajun Chicken Caesar Salad. You learned about the main ingredients, step-by-step cooking, and helpful tips. We discussed grilling and skillet methods, along with different protein and dressing options. Don't forget to store leftovers properly for later enjoyment. Now, you have all the tools to prepare this salad and impress yourself or your guests. Enjoy your cooking adventure!

Cajun Chicken Caesar Salad Flavorful and Easy Recipe

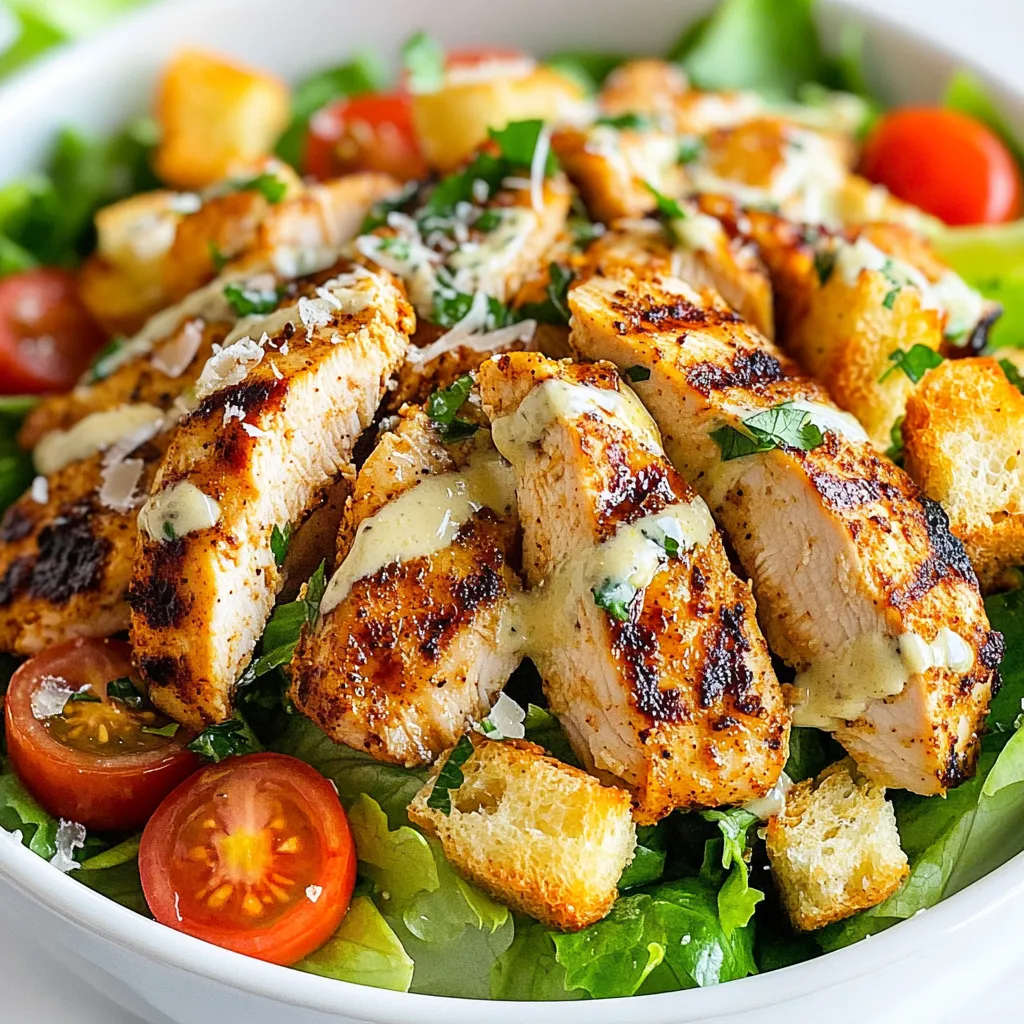
Looking for a zesty twist on a classic salad? This Cajun Chicken Caesar Salad combines tender, seasoned chicken with fresh

To make Garlic Parmesan Knotted Breadsticks, gather the following ingredients: - 2 cups all-purpose flour - 1 packet (2 ¼ teaspoons) active dry yeast - 3/4 cup warm water (about 110°F) - 1 tablespoon sugar - 1 teaspoon salt - 2 tablespoons olive oil - 4 cloves garlic, minced - 1/4 cup grated Parmesan cheese - 1 tablespoon Italian seasoning - 1 tablespoon melted butter - Additional grated Parmesan and chopped parsley for garnish These simple ingredients create a delightful treat. The flour gives structure, while the yeast makes them rise. Warm water helps the yeast wake up. Sugar feeds the yeast, helping it grow. Salt adds flavor, and olive oil keeps the bread soft. Garlic and Parmesan provide that tasty kick. Italian seasoning brings in a blend of herbs. Finally, melted butter adds richness, and the parsley makes it look fresh. Each ingredient plays a role in the final flavor and texture. {{ingredient_image_2}} To start, you need to activate the yeast. In a small bowl, pour 3/4 cup of warm water. You want the water to be around 110°F. Add 1 tablespoon of sugar and the packet of active dry yeast. Stir gently and let it sit for 5-10 minutes. When it’s frothy, the yeast is ready. This means it will help the dough rise well. Next, you will make the dough. In a large mixing bowl, whisk together 2 cups of all-purpose flour and 1 teaspoon of salt. Create a small well in the center. Pour in the 2 tablespoons of olive oil and the frothy yeast mixture. Mix everything until it forms a cohesive dough. If the dough feels too sticky, add a little more flour. Now, it's time to knead the dough. Place it on a floured surface. Knead it for about 5-7 minutes. You want the dough to be smooth and elastic. If it sticks, sprinkle more flour. Once kneaded, shape it into a ball and place it in a greased bowl. Cover it with a damp cloth. Let it rise in a warm spot for about 1 hour, until it doubles in size. While the dough rises, prepare the garlic mixture. In a small pan, melt 1 tablespoon of butter over medium heat. Once the butter melts, add 4 minced garlic cloves. Sauté for 1-2 minutes until it smells great, but be careful not to brown the garlic. Remove from heat and let it cool slightly. After the dough has risen, gently punch it down. This releases air. Divide the dough into 12 equal pieces. Roll each piece into a long rope about 8-10 inches long. Tie each rope into a knot. This gives them their fun shape. Place the knotted breadsticks on a parchment-lined baking sheet. Make sure to space them apart. Cover them lightly with a cloth and let them rise for another 20-30 minutes. While they rise, preheat your oven to 375°F. Once puffed, brush the breadsticks with the garlic butter. Sprinkle with grated Parmesan and Italian seasoning. Bake for 12-15 minutes until golden brown and aromatic. Enjoy these warm treats! To get soft and chewy breadsticks, knead the dough well. Kneading mixes the flour and yeast, making gluten. This helps your breadsticks rise and hold their shape. Knead for about 5-7 minutes. If the dough sticks to your hands, add a little flour. Don’t be afraid to use your body weight. A firm push will help. You can add more flavor to your breadsticks. Try adding herbs like rosemary or thyme. These herbs give a nice twist to the garlic and cheese mix. You can also mix in sun-dried tomatoes or olives for extra taste. If you love heat, add some red pepper flakes for a spicy kick. Some mistakes can ruin your breadsticks. If your dough is too dry, they may turn out hard. Always check the water temperature. It should be warm, not hot. Also, don’t skip the second rise. This step makes your breadsticks light and fluffy. Lastly, avoid opening the oven door too soon. This can cause them to collapse. Follow these tips to enjoy perfect breadsticks every time. Pro Tips Use Fresh Garlic: Freshly minced garlic will provide a more robust flavor compared to pre-minced or jarred options. Perfecting the Knot: For a uniform look, try to make each knot about the same size, ensuring they bake evenly. Let Them Rise: Don't rush the rising process; allowing the dough to rise adequately will result in fluffier breadsticks. Extra Seasoning: Feel free to customize the seasoning by adding red pepper flakes or other herbs to the melted butter for added flavor. {{image_4}} You can switch up the cheese to make these breadsticks even better. Try using mozzarella for a gooey inside. You can also mix in cheddar for a sharp bite. For a fancy twist, use feta or goat cheese. Mixing different cheeses can bring new flavors to your breadsticks. Just keep the total amount of cheese similar to the original recipe. Adding fresh herbs can really boost the taste. You can mix in chopped basil or parsley for a fresh touch. Thyme and rosemary work well too. Just chop the herbs finely and add them to the dough. You can also sprinkle herbs on top before baking for an extra flavor layer. To make these breadsticks gluten-free, use gluten-free flour. Look for a blend that can replace all-purpose flour. You might need to adjust the liquid a bit. Also, check that your yeast is gluten-free. Follow the same steps in the recipe, and enjoy warm breadsticks that fit your diet. To keep your garlic Parmesan knotted breadsticks fresh, store them in a sealed bag or container. Place a piece of parchment paper between layers to avoid sticking. Keep them at room temperature for up to two days. For longer storage, refrigerate them, but this may change their texture. Reheat breadsticks in the oven for the best results. Preheat your oven to 350°F (175°C). Place the breadsticks on a baking sheet and cover them with foil. Heat for about 10 minutes. This keeps them soft and warm. You can also use a microwave, but this may make them chewy. If using a microwave, heat for 10-15 seconds at a time until warm. Freezing breadsticks is easy and great for meal prep. Allow them to cool completely. Wrap each breadstick in plastic wrap, then place them in a freezer bag. This keeps them fresh and prevents freezer burn. They can last up to three months in the freezer. To enjoy, thaw them in the fridge overnight, then reheat as mentioned above. Yes, you can use instant yeast. Instant yeast works faster than active dry yeast. You do not need to activate it in warm water. Just mix it with flour and other dry ingredients. This saves you some time, making the process quicker. Garlic Parmesan knotted breadsticks stay fresh for about 2 days at room temperature. Keep them in a sealed bag or a container. For longer storage, place them in the fridge for up to 5 days. They may lose some crispness but will still taste great. Yes, you can make the dough ahead of time. Prepare the dough and let it rise. After the first rise, you can store it in the fridge. Cover it well to prevent drying out. Use it within 24 hours for the best results. Serve these breadsticks with marinara sauce or garlic butter for dipping. They also pair well with soups or salads. You can even enjoy them with your favorite pasta dishes. The flavors complement each other well. The breadsticks are done when they turn golden brown. The edges should look crisp and the center should be soft. You can also check by tapping them; they should sound hollow. This means they are perfectly baked and ready to enjoy. You learned how to make delicious garlic Parmesan knotted breadsticks. We covered ingredients, methods, and tips for perfecting texture. Remember to activate your yeast well and knead properly for the best results. You can tailor the flavors with different cheeses or herbs. Proper storage keeps them fresh longer. Enjoy baking this recipe, serving it with your favorite dishes, or simply snacking on warm breadsticks. You now have the tools to impress friends and family. Happy baking!

Garlic Parmesan Knotted Breadsticks Irresistible Treat

If you’re craving an amazing snack, Garlic Parmesan Knotted Breadsticks are the answer! These soft, chewy treats packed with garlic

- 1 cup creamy peanut butter - 1 cup semi-sweet chocolate chips - 1 cup sweetened condensed milk (divided) - 1 teaspoon vanilla extract (divided) - 1/4 teaspoon salt (divided) - 1/2 cup chopped nuts (walnuts or almonds) - Additional chocolate chips or melted chocolate for topping The key to a rich Peanut Butter Chocolate Swirl Fudge lies in the balance of flavors. Each ingredient plays a vital role. The creamy peanut butter gives that classic taste. Semi-sweet chocolate chips add a nice sweetness. Sweetened condensed milk brings it all together with a smooth texture. You can use vanilla extract for extra flavor. A pinch of salt enhances all the sweetness. You can customize the fudge with optional ingredients. If you love crunch, add walnuts or almonds. Want more chocolate? Extra chips or a drizzle of melted chocolate on top will do the trick. Choose high-quality ingredients for the best results. Trust me, it makes a difference! {{ingredient_image_2}} Start by preparing your baking dish. Line an 8-inch square baking dish with parchment paper. Leave some paper hanging over the sides. This will help you lift out the fudge later. It also makes for easy clean-up. Next, measure all your ingredients accurately. Use measuring cups and spoons to ensure you get the right amounts. This makes your fudge taste just right. Now it’s time to melt the chocolate. In a medium saucepan, add the semi-sweet chocolate chips and 1/2 cup of sweetened condensed milk. Set the heat to low. Stir the mixture continuously. This helps the chocolate melt evenly and stay smooth. Once melted, take the pan off the heat. Mix in 1/2 teaspoon of vanilla extract and a pinch of salt. This step adds great flavor to your fudge. In a separate bowl, combine the remaining creamy peanut butter, the other 1/2 cup of sweetened condensed milk, another 1/2 teaspoon of vanilla extract, and a pinch of salt. Stir until it’s creamy and well-mixed. This will create that rich peanut butter flavor. Let’s layer the fudge! Pour half of the melted chocolate mixture into your prepared baking dish. Use a spatula to spread it evenly across the bottom. Then, scoop the peanut butter mixture on top of the chocolate layer. Smooth it out evenly. Finally, dollop the rest of the chocolate mixture over the peanut butter layer. To create the swirl effect, take a toothpick or skewer. Gently swirl the layers together. Be careful not to mix them too much. You want to keep the layers visible for a pretty look. Now it’s time to chill the fudge. Place the dish in the refrigerator for at least 3 hours. This will let the fudge set and become firm. Once set, lift the fudge out of the baking dish using the parchment paper overhang. Cut it into squares or rectangles. Use a sharp knife to ensure clean cuts for even pieces. Enjoy your delicious fudge! Chilling time is key for great fudge. You need at least three hours in the fridge. This helps the fudge set perfectly. If you rush this step, your fudge may be soft. To avoid graininess in your chocolate, melt it slowly over low heat. Stir constantly to keep it smooth. Adding a little salt enhances the flavor while helping to keep the texture creamy. When serving, arrange the fudge squares neatly on a plate. Use a decorative dish to make it look fancy. You can drizzle melted chocolate or peanut butter sauce over the top for extra flair. A few whole nuts make a nice garnish and add crunch. If your fudge is too soft, it may need more chilling time. You can also return it to the fridge for a bit longer. If it’s still soft, consider adding more melted chocolate to help it set. If your chocolate isn’t melting well, check the heat. Low and slow is the best way. If it clumps, add a splash of sweetened condensed milk to smooth it out. Stir until it becomes silky and smooth. Pro Tips Use High-Quality Chocolate: Choosing good quality semi-sweet chocolate chips will enhance the flavor of your fudge, making it richer and more indulgent. Don’t Overmix the Swirl: When creating the swirl effect, be gentle and avoid overmixing to maintain distinct layers and a beautiful marbled appearance. Chill Overnight for Best Results: For the best texture and flavor, consider chilling the fudge overnight. This allows all the flavors to meld beautifully. Experiment with Flavors: Feel free to add extracts like almond or coconut to the peanut butter mixture for a unique twist on this classic treat. {{image_4}} You can make this fudge even more special by adding extracts. Almond extract gives a nutty twist, while coffee extract adds depth. Just a few drops can change the taste. You can also switch up the chocolate. Try dark chocolate for a richer flavor, or use white chocolate for a sweet contrast. Each type brings its own charm to the fudge. If you need gluten-free options, this fudge is already safe! For a vegan version, swap the sweetened condensed milk for coconut cream. You can also use dairy-free chocolate chips. Need to avoid nuts? Just leave out the peanut butter and use sun butter instead. This way, everyone can enjoy a piece. Add fun mix-ins to surprise your taste buds. Chopped fruits like dried cherries or diced apples can add sweetness. You might also enjoy adding seeds like chia or pumpkin for crunch. For toppings, try crushed pretzels for a salty kick or shredded coconut for a tropical flair. These little changes can make a big difference! To keep your fudge fresh, store it in an airtight container. This helps prevent air from drying it out. You can use a glass or plastic container with a tight lid. If you do not have one, wrap the fudge tightly in plastic wrap. You can store fudge at room temperature, but refrigeration is best for longer freshness. If you choose room temperature, keep it away from heat and direct sunlight. Fudge can last a few days this way. However, refrigeration can extend its life. In the refrigerator, your fudge lasts about two weeks. It will stay fresh and tasty if stored well. Look out for signs that your fudge has gone bad. If it develops a dry or hard texture, it may not taste good. Also, check for any off smells or discoloration. These signs mean it’s time to toss it out. Freezing is a great option if you want to keep fudge longer. Wrap the fudge in plastic wrap and then in aluminum foil. This double layer helps prevent freezer burn. Store it in a freezer-safe bag or container for best results. When you want to enjoy your frozen fudge, take it out of the freezer. Let it thaw in the fridge for a few hours or overnight. This will keep the texture nice. Once thawed, cut and serve as you wish. Frozen fudge usually maintains its flavor and texture quite well! To make this fudge vegan, you need to swap out the dairy items. Use coconut milk or almond milk instead of sweetened condensed milk. Choose dairy-free chocolate chips for a rich, creamy texture. This way, you can still enjoy the delicious flavors without any animal products. Yes, you can use crunchy peanut butter! It will change the texture of the fudge, making it a bit more textured and chewy. The flavor will still shine through, but you'll get little bits of peanut in each bite, adding more character and fun to the fudge. Serve this fudge on a nice plate for a special treat. You can pair it with a scoop of vanilla ice cream for a tasty contrast. Drizzle some melted chocolate or peanut butter on top for an extra touch. Adding fresh fruit, like strawberries, can also balance the rich flavors. Yes, you can double the recipe! Just use a larger baking dish, like a 9x13 inch. Keep the cooking times the same, but check for firmness. You want the fudge to set well. If it’s not firm after chilling, give it a bit more time in the fridge. Absolutely! You can use coconut cream or cashew cream as a substitute. These alternatives will give you a similar creamy texture. You can also try using a mix of maple syrup and nut butter. This will add sweetness and keep the fudge soft and tasty. This blog post guides you to make delicious Peanut Butter Chocolate Swirl Fudge. You learned about essential ingredients, like creamy peanut butter and chocolate chips. The step-by-step instructions help you prepare, melt, and layer the fudge perfectly. I shared tips for the best texture and how to troubleshoot common issues. With storage info and fun variations, you'll keep things fresh. Remember, the right mix-ins and toppings can make your fudge unique. Enjoy your fudge-making journey and share it with friends and family!

Peanut Butter Chocolate Swirl Fudge Decadent Dessert Recipe

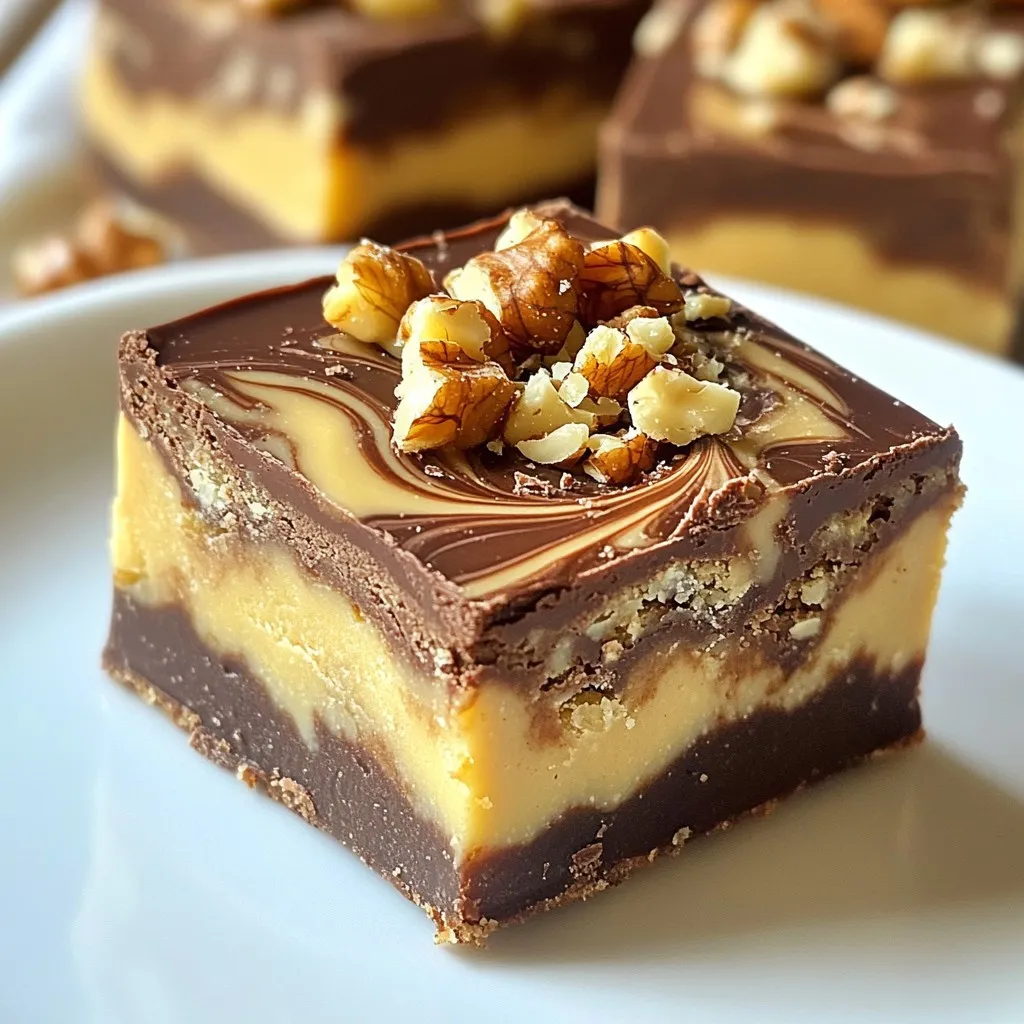
If you love creamy, dreamy desserts, you’re in for a treat! This Peanut Butter Chocolate Swirl Fudge recipe combines rich

Older posts
Newer posts
← Previous Page1 … Page107 Page108 Page109 … Page111 Next →

dsad

© 2025 spoonfulsavory • Built with GeneratePress

Our Policies

  • Copyright Policy
  • Cookie Policy
  • GDPR Policy
  • Privacy Policy
  • Disclaimer
  • Terms Of Use

More Information

  • Home
  • About
  • Contact
  • Appetizers
  • Dessert
  • Dinner
  • Drinks
©2025, spoonfulsavory About Back To Top