Skip to content
DisclaimerTerms Of UseGDPR PolicyCookie Policy

spoonfulsavory

  • Home
  • Drinks
  • Appetizers
  • Dinner
  • Dessert
  • About
  • Contact
  • Privacy Policy
DisclaimerTerms Of UseGDPR PolicyCookie Policy

Sarah

To make this fudge, you need these ingredients: - 1 cup creamy peanut butter - 1 cup semi-sweet chocolate chips - 1 cup powdered sugar - 1 teaspoon pure vanilla extract - 1/4 cup unsalted butter, softened at room temperature - A pinch of fine sea salt Each ingredient plays a key role. The creamy peanut butter brings that rich taste. The semi-sweet chocolate chips melt down to create a smooth texture. Powdered sugar helps sweeten and thicken the fudge. The vanilla extract adds a nice hint of flavor. Butter keeps the fudge soft and creamy. Finally, sea salt balances the sweetness. You can add some fun toppings to your fudge. Consider using: - Finely chopped peanuts - Delicate chocolate shavings These toppings add crunch and flavor. Just sprinkle them on top before chilling the fudge. Press them in gently to make sure they stick. If you don't have certain ingredients, here are some swaps: - Use natural peanut butter for a different taste. - Swap semi-sweet chocolate chips for dark chocolate for a richer flavor. - If you want less sweet, use less powdered sugar. These changes can still yield a great fudge. Feel free to get creative based on what you have at home! {{ingredient_image_2}} Start by getting an 8x8-inch baking dish. Line it with parchment paper. Make sure to leave some paper hanging over the edges. This helps you lift the fudge out later. Grab a microwave-safe bowl. Add the semi-sweet chocolate chips and the softened unsalted butter. Microwave for 30 seconds at a time. Stir well between each time until everything is melted. The mixture should be smooth and shiny. Be careful not to overheat it. In a large bowl, mix together the creamy peanut butter, powdered sugar, vanilla extract, and a pinch of sea salt. Use a spatula or spoon to blend these ingredients. Keep mixing until the mix is smooth and no powder is left. Now, pour that melted chocolate into the peanut butter mix. Stir well and make sure both mixtures blend completely. The combined mix should feel thick and warm, giving you a rich, creamy texture. Transfer the fudge mixture into the lined baking dish. Use a spatula to spread it evenly. Smooth out the top so it looks nice and neat. Place the dish in the fridge for about 2 hours. Let it chill until it feels firm. Once set, lift the fudge out using the parchment paper. Place it on a cutting board and slice it into squares. Enjoy this rich, tasty treat! When making chocolate peanut butter fudge, watch out for a few common errors: - Overheating Chocolate: If you heat the chocolate too long, it can seize. Always heat in short bursts. - Not Mixing Well: Ensure you mix the chocolate and peanut butter fully. Unblended layers will affect taste and texture. - Skipping the Salt: A pinch of salt enhances the flavor. Don’t skip it for balance. - Ignoring the Chill Time: Letting the fudge set is key. Don’t rush this step; it needs time to firm up. To get that perfect fudge texture, follow these tips: - Use Room Temperature Butter: This helps the chocolate blend smoothly without lumps. - Stir Vigorously: When combining mixtures, stir until it’s thick and creamy. This creates a nice, uniform texture. - Test the Warmth: The combined mix should feel slightly warm. If it’s too hot, let it cool before spreading. - Chill Appropriately: Allow at least two hours in the fridge. This is crucial for the right firmness. Serving chocolate peanut butter fudge can be fun and creative: - Use a Decorative Plate: Present the fudge on a colorful plate for a nice touch. - Add a Drizzle: Drizzle melted chocolate on top for added flair and flavor. - Garnish with Toppings: Sprinkle nuts or chocolate shavings for texture and beauty. - Cut into Fun Shapes: Instead of squares, consider cutting the fudge into fun shapes for parties. These tips will help you create a treat that looks as good as it tastes! Pro Tips Use Quality Chocolate: Opt for high-quality semi-sweet chocolate chips for a richer flavor and smoother texture in your fudge. Room Temperature Ingredients: Ensure your peanut butter and butter are at room temperature to help them blend seamlessly and create a creamy fudge. Chill Thoroughly: Allow the fudge to chill completely in the refrigerator to ensure it sets perfectly; this will help you achieve clean, neat slices. Customize Toppings: Feel free to experiment with different toppings like sea salt flakes, crushed cookies, or even a drizzle of white chocolate for added flair. {{image_4}} To make vegan chocolate peanut butter fudge, swap regular butter for a plant-based version. Use coconut oil or vegan butter for a smooth texture. Choose dairy-free chocolate chips to keep it vegan-friendly. The rest of the recipe stays the same. You’ll create a rich fudge that everyone can enjoy. For a keto-friendly version, replace powdered sugar with a sugar substitute like erythritol or stevia. Use unsweetened chocolate instead of semi-sweet chocolate chips. This change cuts down on carbs and keeps the taste delightful. Follow the same steps from the original recipe, and you’ll have a treat that fits your diet. Get creative with your fudge! Add a pinch of cinnamon or a splash of espresso powder for a flavor boost. You can also mix in chopped nuts, mini marshmallows, or dried fruit. For a fun twist, try adding swirls of caramel or cookie butter. These additions make your fudge unique and exciting to share. Store your fudge in an airtight container. This keeps it fresh and moist. You can layer pieces with parchment paper to prevent sticking. Make sure to close the lid tightly. If you want to keep it longer, refrigerate it. Chocolate peanut butter fudge lasts about one week at room temperature. If you store it in the fridge, it can last up to two weeks. You can also freeze it for up to three months. To freeze, wrap each piece in plastic wrap. Then, place them in a freezer-safe bag or container. Thaw in the fridge before enjoying. Choose containers that seal well. Glass or plastic containers work great. If you use a plastic bag, ensure it is sturdy and airtight. For freezing, use heavy-duty freezer bags. This helps keep your fudge safe from freezer burn. Yes, you can use natural peanut butter. It may change the texture a bit. Natural peanut butter is less sweet and may be a bit oily. You might need to adjust the sugar to get the right taste. If you prefer it creamy, stir the oil back in before use. To make your fudge firmer, you can use less butter or add more powdered sugar. You can also chill it longer. If you want a firmer fudge, keep it in the fridge for an extra hour. Cutting it into smaller pieces can help it feel firmer too. You can try dark chocolate or white chocolate. Each kind will give a different flavor. Dark chocolate adds richness, while white chocolate offers sweetness. Just make sure to keep the same amount of chocolate chips to get the right texture. Fudge will last around one week in the fridge. Keep it in an airtight container. If you want it to last longer, you can freeze it. Frozen fudge can last up to three months. Just thaw it in the fridge before you eat it. This blog post covered how to make rich and creamy chocolate peanut butter fudge. We explored the right ingredients, tips for perfect texture, and fun variations. Remember to watch out for common mistakes to ensure success. You can enjoy this treat in vegan or keto forms, making it fit your diet. Store fudge properly for fresh taste. I hope you feel inspired to create your own fudge masterpiece. Enjoy every bite!

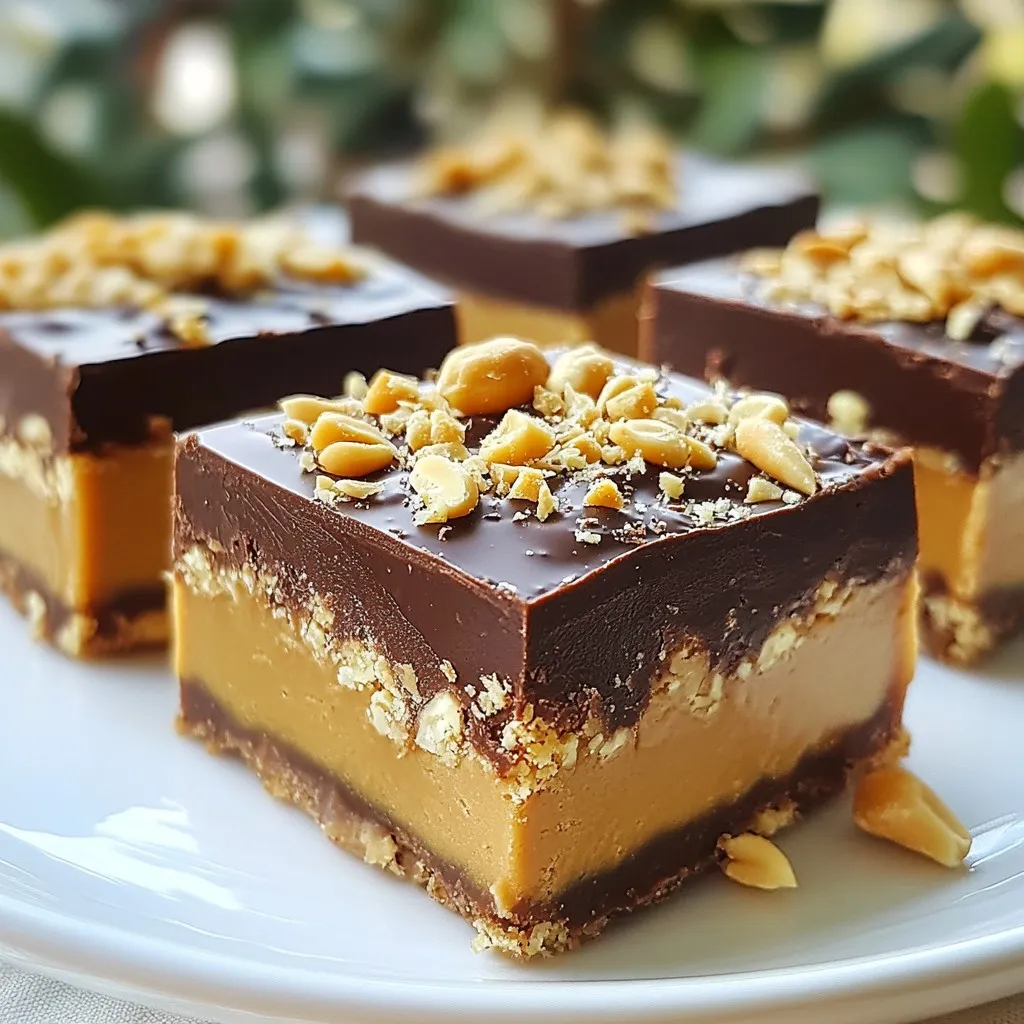
Chocolate Peanut Butter Fudge Rich and Irresistible Treat

Are you ready to whip up a treat that will satisfy your sweet cravings? This Chocolate Peanut Butter Fudge is

To make Spicy Cajun Dirty Rice, you will need: - 1 cup long-grain white rice - 2 cups chicken broth - 1 pound ground beef or chicken - 1 onion, finely diced - 1 bell pepper (green or red), finely diced - 2 stalks of celery, finely diced - 3 cloves garlic, minced - 2 tablespoons Cajun seasoning - 1 teaspoon dried thyme - 1 teaspoon smoked paprika - 1/2 teaspoon cayenne pepper (adjust to your desired spice level) - 1 cup frozen peas - 2 green onions, sliced (for garnish) - Salt and pepper to taste - 2 tablespoons olive oil For this dish, I suggest using long-grain white rice. This rice cooks well and stays fluffy. You can also try jasmine rice for a fragrant twist. Avoid short-grain rice, as it tends to be sticky. You can customize your dirty rice with fun add-ins. Consider adding: - Diced sausage for extra flavor - Chopped mushrooms for a hearty texture - Corn for a sweet bite - Hot sauce for an extra kick Feel free to experiment! Each add-in can change the taste and make it your own. {{ingredient_image_2}} First, gather all your ingredients. You will need: - 1 cup long-grain white rice - 2 cups chicken broth - 1 pound ground beef or chicken - 1 onion, finely diced - 1 bell pepper (green or red), finely diced - 2 stalks of celery, finely diced - 3 cloves garlic, minced - 2 tablespoons Cajun seasoning - 1 teaspoon dried thyme - 1 teaspoon smoked paprika - 1/2 teaspoon cayenne pepper - 1 cup frozen peas - 2 green onions, sliced - Salt and pepper to taste - 2 tablespoons olive oil Next, rinse the rice under cold water. This helps remove starch. The water should run clear. Drain the rice well and set it aside. Heat the olive oil in a large skillet over medium heat. Once hot, add the diced onion, bell pepper, and celery. Sauté these veggies for about 5-7 minutes. They should soften and smell great. Now, stir in the minced garlic. Cook it for one more minute. Be careful not to let the garlic burn. Add the ground beef or chicken next. Use a spatula to break it up. Cook until browned, about 5-8 minutes. Drain any excess fat if needed. Sprinkle in the Cajun seasoning, dried thyme, smoked paprika, cayenne pepper, salt, and pepper. Mix well to coat the meat and veggies evenly. Gently fold in the rinsed rice. Make sure it mixes well with the meat and veggies. Then, pour in the chicken broth and stir. Bring this mixture to a boil. Once boiling, lower the heat to a simmer. Cover the skillet with a lid. Let it simmer for 20-25 minutes. The rice will absorb the liquid and become tender. Stir occasionally to avoid sticking. In the last 5 minutes of cooking, fold in the frozen peas. Cover the skillet again to heat them through. When done, fluff the rice with a fork. Taste and add more salt or pepper if needed. Serve hot, garnished with sliced green onions for extra color and flavor. To achieve the perfect rice texture, rinse your rice well. Rinsing removes excess starch and prevents clumping. Use cold water until it runs clear. After rinsing, let the rice drain completely. This small step makes a big difference. When cooking, do not lift the lid often. This keeps steam inside and helps the rice cook evenly. Use the right amount of broth; two cups for one cup of rice works well. Cajun dirty rice is known for its bold flavor. If you want less spice, reduce the cayenne pepper. Start with a pinch and taste as you go. You can add more if you like heat. For a milder flavor, try adding more veggies, like bell peppers or peas. They balance the spices nicely. If you want a unique twist, add a splash of hot sauce at the end for extra kick. Using the right tools can make cooking easier. A large skillet or Dutch oven is best for this recipe. They allow for even cooking and plenty of space. A good spatula helps you mix everything without sticking. For rinsing rice, a fine-mesh strainer is ideal. It keeps the rice from slipping through. Lastly, a lid is important for simmering. It traps steam and helps the rice cook perfectly. Pro Tips Rinse Your Rice: Rinsing the rice removes excess starch, preventing it from becoming gummy and ensuring a fluffier texture. Adjust Spice Levels: Feel free to modify the amount of cayenne pepper based on your spice tolerance; start with less and add more if desired. Use Fresh Herbs: Adding fresh herbs like parsley or cilantro at the end can enhance the flavor and add freshness to the dish. Let It Rest: After cooking, let the rice sit covered for a few minutes. This helps to absorb any remaining moisture and improves the texture. {{image_4}} You can make a tasty vegetarian version of spicy Cajun dirty rice. Use vegetable broth instead of chicken broth. Replace the meat with a mix of mushrooms and lentils. Mushrooms give a nice texture and flavor. Lentils add protein. You can also add diced carrots or zucchini for extra veggies. This change keeps the dish hearty and satisfying. If you want to switch up the protein, there are many options. Ground turkey or sausage works well. You can also use shredded chicken for a different taste. For a unique twist, try diced shrimp or andouille sausage. Each protein brings its own flavor to the dish. Adjust the cooking time as needed to ensure everything is cooked through. To elevate the flavor, consider adding fresh herbs. Chopped parsley or cilantro adds a fresh touch. You can also mix in some diced tomatoes for a juicy burst. A splash of hot sauce can kick up the heat even more. For a smoky flavor, replace some olive oil with bacon grease. Each of these options enhances the dish and keeps it exciting. After you enjoy your Spicy Cajun Dirty Rice, store leftovers in an airtight container. Make sure it cools to room temperature first. This keeps it fresh longer. You can keep it in the fridge for up to four days. When you're ready to eat leftovers, reheat them on the stove or in the microwave. If using the stove, add a splash of chicken broth to keep it moist. Heat it on medium-low until warm. For the microwave, cover the rice with a damp paper towel. This helps it steam and avoid dryness. Heat it in one-minute bursts, stirring in between. To freeze Spicy Cajun Dirty Rice, let it cool completely. Then, divide it into individual portions. Use freezer-safe bags or containers. Squeeze out as much air as you can. It can be stored in the freezer for up to three months. When you're ready to eat, thaw it overnight in the fridge before reheating. This keeps the flavors rich and tasty! Dirty rice is a classic dish from Louisiana. It features rice cooked with ground meat and spices. The dish gets its name from the color of the rice, which turns dark from the meat and seasonings. You can use ground beef, chicken, or even sausage. The mix of veggies adds flavor and texture. It’s a hearty meal that fills you up! Yes, you can make dirty rice ahead of time. It stores well in the fridge. Just let it cool down first. Then, place it in an airtight container. It will stay fresh for about three days. You can also freeze it for up to three months. Just thaw it in the fridge before reheating. This makes it a great option for meal prep! To reduce spice, skip the cayenne pepper. You can also use less Cajun seasoning. Another option is to add more rice or broth to balance flavors. If you want some heat, try mild pepper instead. You can also serve it with a dollop of sour cream or yogurt to cool it down. Enjoy your meal without the burn! This article covered all you need for making dirty rice. We explored the key ingredients, including rice types and fun add-ins. I shared step-by-step cooking instructions to help you succeed. Tips on texture and spice adjustments will guide you as you cook. You can try different variations based on your taste. Finally, remember the best ways to store and reheat your leftovers. With this guide, you can create a flavorful dish that satisfies everyone. Enjoy your cooking journey and have fun experimenting with dirty rice!

Spicy Cajun Dirty Rice Flavorful Meal Anyone Can Enjoy

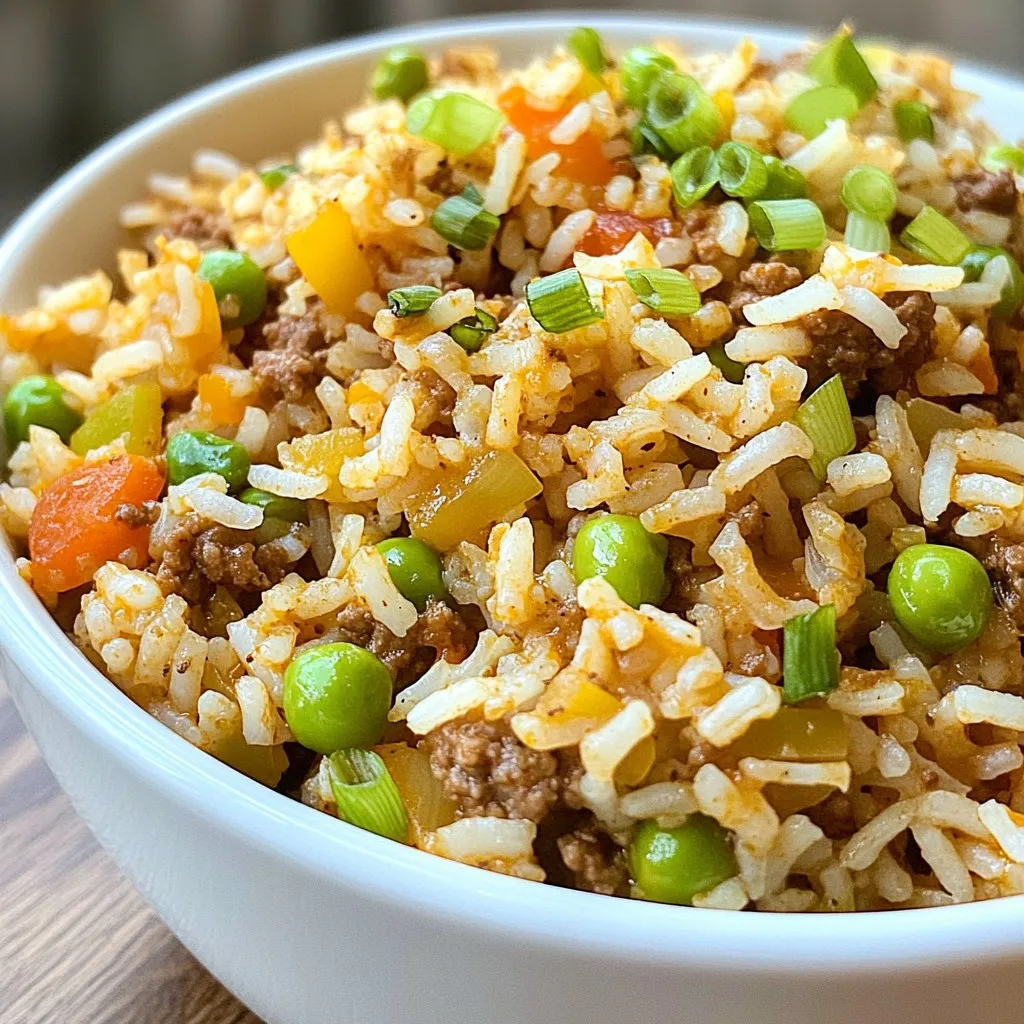
Are you ready to spice up your dinner routine? This Spicy Cajun Dirty Rice is a fun and flavorful meal

- 6 cups of stale bread, torn into bite-sized pieces - 2 cups of fresh blueberries, rinsed and drained - 4 large eggs, beaten - 2 cups of whole milk, at room temperature - 1 cup of granulated sugar, adjusted to taste - 1 tablespoon of fresh lemon zest, from about 2 lemons - 1/4 cup of freshly squeezed lemon juice - 1 teaspoon of pure vanilla extract - 1 teaspoon of ground cinnamon - 1/4 teaspoon of fine salt - 2 tablespoons of unsalted butter, melted, for greasing the baking dish - Powdered sugar, for dusting (optional) I love using brioche or challah for this recipe. They add a rich flavor and soft texture. Stale bread works best because it soaks up the egg mixture well. You can also use French bread or even sourdough if you like a tangy taste. For a special touch, dust the finished bread pudding with powdered sugar. You can also serve it with vanilla ice cream or whipped cream. Fresh blueberries and lemon slices make great garnishes. They add color and a burst of flavor, making your dish look and taste amazing! {{ingredient_image_2}} Start by preheating your oven to 350°F (175°C). Take a 9x13-inch baking dish and generously grease it with melted butter. Make sure to coat all the corners. This step helps the bread pudding not stick and ensures easy serving later. In a large mixing bowl, combine 4 beaten eggs, 2 cups of whole milk, and 1 cup of granulated sugar. Add 1 tablespoon of lemon zest, 1/4 cup of lemon juice, 1 teaspoon of vanilla extract, 1 teaspoon of ground cinnamon, and 1/4 teaspoon of fine salt. Whisk all these ingredients together until the mixture is smooth and well-blended. Next, gently add 6 cups of torn stale bread into the egg mixture. Fold the bread in carefully until every piece is coated. Let the mixture rest for about 10 minutes. This helps the bread soak up all the tasty flavors. After that, fold in 2 cups of fresh blueberries, making sure they spread evenly. Pour the mixture into the prepared baking dish. Spread it out evenly to help it bake well. Place the dish in the oven and bake for 45-55 minutes. The pudding is ready when the top is golden brown, and a toothpick comes out clean from the center. Once baked, take the dish out of the oven and let it cool for 10-15 minutes. This cooling time helps the flavors meld together. If you like, you can dust the top with powdered sugar for a sweet touch. Serve warm, and consider adding a scoop of vanilla ice cream or whipped cream for an extra treat. Garnish with fresh blueberries and a slice of lemon for a pop of color. When picking blueberries, look for ones that are firm and plump. Choose berries that are deep blue, not red or green. The skin should be smooth, with a slight bloom. This bloom shows they are fresh and haven't been washed away. Avoid any that are mushy or have wrinkles. Fresh blueberries burst with flavor and add a great pop to your bread pudding. Many people use too much bread. Stick to six cups; it keeps the pudding moist. Don’t skip letting the bread soak. This step is key for flavor. If you rush it, the bread won’t absorb enough liquid. Another mistake is not folding in the blueberries gently. You want to keep them whole for bursts of flavor. Lastly, remember to grease the baking dish well. This helps in easy serving. Serve the bread pudding warm for the best taste. A scoop of vanilla ice cream on top adds creaminess. You can also add a dollop of whipped cream for extra richness. For a fresh touch, sprinkle more blueberries and a slice of lemon on the plate. This makes the dish look bright and inviting. Dusting with powdered sugar adds a sweet finish. These simple touches make your dessert even more special. Pro Tips Use Day-Old Bread: Using stale bread is key for the best texture. It absorbs the custard mixture without becoming mushy, ensuring a delightful bite. Adjust Sugar to Taste: Depending on the sweetness of your blueberries, you may want to adjust the sugar level to suit your preferences. Experiment with Add-Ins: Feel free to add nuts, such as chopped pecans or walnuts, or other fruits like raspberries or strawberries for a twist on this classic dish. Let It Rest: Allowing the bread pudding to cool for at least 10-15 minutes before serving helps the flavors meld and makes it easier to cut into neat portions. {{image_4}} You can change up this recipe by adding other fruits. Peaches, raspberries, or strawberries work well. Just make sure to adjust the sugar based on the fruit's sweetness. You can also mix two or more fruits together for a fun twist. This adds new flavors and colors to your bread pudding. Adding nuts or spices can boost the taste even more. Walnuts or pecans add a nice crunch. If you like warmth, try adding a pinch of nutmeg or cardamom. These spices blend well with the lemon and blueberries. You can also use almond extract instead of vanilla for a unique flavor. If you need a gluten-free version, use gluten-free bread. Many stores offer gluten-free options today. Make sure to check the label for other ingredients. This way, you can enjoy the same great taste without gluten. Enjoy this delicious treat with no worries! To store your leftover blueberry lemon bread pudding, let it cool completely first. Then, cover it tightly with plastic wrap or foil. You can also place it in an airtight container. This will keep it fresh for up to three days in the fridge. When you are ready to enjoy your leftover bread pudding, preheat your oven to 350°F (175°C). Place the portion you want on a baking dish. Cover it with foil to prevent it from drying out. Heat for about 15-20 minutes. You can also use the microwave. Heat it in short bursts, about 30 seconds at a time, until warm. If you want to store your bread pudding for longer, freezing is a great option. Cut it into individual portions and wrap each piece tightly in plastic wrap. Then, place them in a freezer-safe bag. This will keep it good for about two months. To thaw, place it in the fridge overnight. Then, reheat it in the oven or microwave as mentioned earlier. Enjoy your delicious treat anytime! You can use fresh bread, but stale bread works best. Stale bread soaks up the egg mixture better. It helps create a softer texture. If you only have fresh bread, let it sit out for a few hours to dry. This will mimic stale bread's texture. You can keep Blueberry Lemon Bread Pudding in the fridge for up to four days. Store it in an airtight container. When you're ready to eat, simply reheat it in the oven or microwave. This will help keep it moist. Yes, you can make this recipe ahead of time. Prepare it the night before and cover it. Let it sit in the fridge overnight. The next day, bake it right before serving. This saves time and helps the flavors blend. The best way to serve bread pudding is warm. You can top it with a scoop of vanilla ice cream or a dollop of whipped cream. Dusting it with powdered sugar adds sweetness and a nice touch. Fresh blueberries and a lemon slice make it look pretty too. You learned about making Blueberry Lemon Bread Pudding today. We covered ingredients, step-by-step instructions, and helpful tips. You can add fruits and spices to make it your own. Remember to store leftovers correctly for later enjoyment. Always avoid common mistakes for the best results. This dish is perfect for any meal or gathering. Now, it’s time to get creative in your kitchen. You have the recipes and tips you need to succeed! Enjoy your baking adventure.

Blueberry Lemon Bread Pudding Tasty and Easy Recipe

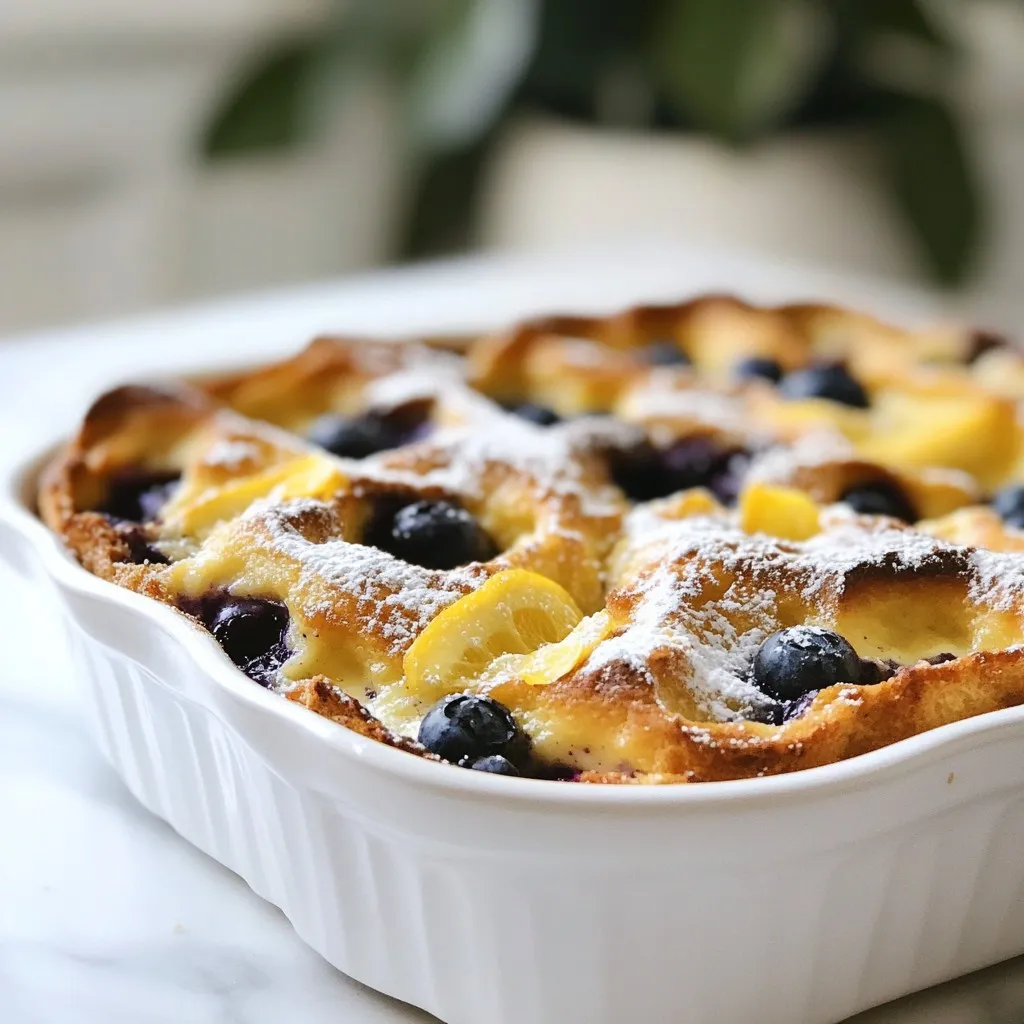
Welcome to my kitchen! If you love sweet treats, you’ll enjoy this Blueberry Lemon Bread Pudding recipe. It’s easy to

To make vegan chocolate peanut butter fudge, gather these simple ingredients: - 1 cup natural peanut butter (creamy or crunchy) - 1/2 cup pure maple syrup - 1/4 cup coconut oil, melted - 1/2 cup unsweetened cocoa powder - 1 teaspoon pure vanilla extract - 1/4 teaspoon sea salt - 1/4 cup dairy-free dark chocolate chips - Optional: Chopped nuts or a sprinkle of sea salt for topping If you need substitutes, here are some ideas: - Instead of peanut butter, use almond or cashew butter. - Maple syrup can be replaced with agave syrup or brown rice syrup. - For coconut oil, try using vegan butter or cocoa butter. - Use carob powder as an alternative to cocoa powder for a different taste. - Vanilla extract can be swapped with almond extract for a unique twist. Choosing the right brands can make a difference. Here are some I trust: - Peanut Butter: Look for brands like Justin’s or MaraNatha. They offer high-quality natural peanut butter options. - Chocolate Chips: Enjoy Life and Lily's are excellent for dairy-free dark chocolate chips. They melt well and taste great. These choices help ensure your fudge turns out delicious and rich in flavor. Enjoy the process of making this tasty treat! {{ingredient_image_2}} To start, grab a large bowl. Add 1 cup of natural peanut butter, creamy or crunchy. Pour in 1/2 cup of pure maple syrup. Then, add 1/4 cup of melted coconut oil. Use a whisk or spatula to mix well. You want this to be smooth and lump-free. Next, add 1/2 cup of unsweetened cocoa powder. Don’t forget to include 1 teaspoon of pure vanilla extract and 1/4 teaspoon of sea salt. Stir again until everything is blended. It should look like a rich chocolate mix, and it will smell amazing! Now we get to the fun part! Take 1/4 cup of dairy-free dark chocolate chips. Gently fold them into the fudge mixture. Use a spatula, and be careful not to stir too hard. You want to keep the chocolate chips whole for bursts of flavor. Make sure they are spread out evenly. This way, every bite has a little chocolate surprise. Get an 8x8 inch square baking dish. Line it with parchment paper, letting some paper hang over the edges. This makes it easy to pull out the fudge later. Pour the fudge mixture into the dish and spread it evenly with a spatula. If you like, sprinkle on chopped nuts or a bit of sea salt for extra flavor. Now, place the dish in the freezer. Let it freeze for at least 1-2 hours until firm. Once set, lift the fudge out using the parchment paper. Use a cutting board to slice it into 16 squares. Enjoy your delicious vegan treat! To get the best texture for your fudge, use creamy peanut butter. It blends smoothly with the other ingredients. If you prefer crunch, go for crunchy peanut butter. Make sure to mix the peanut butter, maple syrup, and coconut oil well. You want a smooth, lump-free mixture. Incorporate cocoa powder slowly to avoid clumps. This makes the fudge rich and chocolatey. Avoid using too much cocoa powder or coconut oil. Too much cocoa makes it dry, while extra oil can make it greasy. Also, don’t skip the sea salt. It enhances the flavor of chocolate and peanut butter. Be careful when folding in the chocolate chips. Stir gently to keep the fudge thick and creamy. Lastly, let it set in the freezer long enough. If you cut it too soon, it may fall apart. For a lovely presentation, place fudge squares on a decorative plate. Drizzle some melted chocolate over the top for a fancy touch. You can also sprinkle chopped nuts or sea salt to add flair. Serve with fresh fruit, like berries or apple slices. This adds color and a refreshing taste that balances the richness of the fudge. Pro Tips Use high-quality cocoa powder: The richness of your fudge greatly depends on the quality of cocoa powder you use. Opt for a premium brand for a more intense chocolate flavor. Experiment with nut butter: While peanut butter is delicious, feel free to switch it up with almond or cashew butter for a different flavor profile. Adjust sweetness to taste: If you prefer a sweeter fudge, add more maple syrup gradually, tasting as you go until you reach your desired sweetness. Store properly: To maintain freshness, store the fudge in an airtight container in the refrigerator. It can also be frozen for extended shelf life. {{image_4}} You can change the taste of your fudge by adding flavors. For a minty twist, mix in 1/2 teaspoon of peppermint extract. This gives it a fresh and cool taste. If you love coffee, add 1 tablespoon of instant coffee granules. This enhances the chocolate flavor and adds depth. Both options are easy and fun! If you need a nut-free fudge, don’t worry. You can use sun butter or soy nut butter instead of peanut butter. Both options work well and still taste great. Make sure to check for allergies if you share with others. This way, everyone can enjoy your rich treat. Want to boost the nutrition in your fudge? Try adding superfoods! You can mix in a tablespoon of chia seeds or ground flaxseed. These add fiber and omega-3s. You can also stir in a bit of spirulina or matcha powder for extra vitamins. These options keep your fudge tasty and healthy! To keep your vegan chocolate peanut butter fudge fresh, store it well. Use an airtight container or wrap it tightly in plastic wrap. This keeps moisture out and helps it last longer. I prefer to line the container with parchment paper. This way, you can lift the fudge out easily. When stored correctly, your fudge can last up to two weeks in the fridge. If you keep it at room temperature, it may last about five days. Always check for any signs of spoilage, like changes in texture or smell. If it looks good, it’s likely still tasty! Freezing is the best option if you want to keep fudge for months. To freeze, cut the fudge into squares. Place the pieces in an airtight container, separated by parchment paper. This prevents them from sticking together. When you’re ready to enjoy, let it thaw in the fridge. Refrigerating is great for short-term storage. Just remember, the fudge may become a bit firmer in the fridge. But it will still taste delicious! Enjoy your fudge however you choose to store it. Yes, you can make this fudge without coconut oil. You can use other healthy fats instead. Here are some options: - Almond oil - Avocado oil - Vegan butter Each option will change the taste a bit. Choose one that you like. If you need a substitute for maple syrup, many options work well. Try these: - Agave nectar - Brown rice syrup - Date syrup These sweeteners will keep your fudge sweet and tasty. Use the same amount as the maple syrup in the recipe. You will know the fudge is set when it is firm to the touch. Here’s what to look for: - The edges pull away from the pan. - It feels solid but not hard. - It holds its shape when you cut into it. For best results, let it freeze for at least 1-2 hours. This ensures a perfect fudge texture. You now have all the tools to make delicious fudge. We explored ingredients, step-by-step instructions, and storage tips. You learned how to avoid mistakes and add fun variations. Remember, it’s all about flavor and texture. Don’t hesitate to experiment with different mixes. With practice, you’ll create amazing treats that everyone will love. Enjoy your fudge-making journey!

Vegan Chocolate Peanut Butter Fudge Simple Treat

Are you ready to satisfy your sweet tooth without any animal products? My Vegan Chocolate Peanut Butter Fudge is a

- 4 rice cakes - 1/2 cup creamy peanut butter - 1/2 cup dark chocolate chips - 1 tablespoon coconut oil - 1/4 cup sliced almonds (for topping) - Sea salt, to taste These main ingredients create the perfect balance of taste and texture. The rice cakes provide a light, crunchy base. Creamy peanut butter adds richness and protein. The dark chocolate melts beautifully, giving a sweet touch. Almonds add a nice crunch, while sea salt enhances the flavors. - 1 tablespoon chia seeds - 1 tablespoon hemp seeds Adding chia or hemp seeds boosts the nutrition of these snacks. Chia seeds provide fiber and omega-3s. Hemp seeds add protein and healthy fats. These options make your treats even better without changing the taste much. When choosing rice cakes, consider brands like Lundberg, Quaker, or Kallo. They offer good quality and taste. Look for options that are low in added sugars. Always check labels to ensure they meet your needs. Quality rice cakes make a big difference in your final snack. {{ingredient_image_2}} To make these snacks, gather your ingredients first. You need rice cakes, creamy peanut butter, dark chocolate chips, coconut oil, and toppings like sliced almonds and sea salt. This process is simple and fun. You will create a tasty treat in no time. 1. Lay Out Rice Cakes: Place four rice cakes on a clean surface or cutting board. This makes them easy to reach. 2. Mix Peanut Butter: In a small bowl, blend 1/2 cup of creamy peanut butter with optional chia or hemp seeds. Mix until smooth. 3. Spread Peanut Butter: Use a spatula to spread the peanut butter mix on each rice cake. Make sure to cover them well. 4. Melt Chocolate: In a microwave-safe bowl, add 1/2 cup of dark chocolate chips and 1 tablespoon of coconut oil. Heat this in the microwave in 30-second intervals. Stir in between each heating. Stop when the chocolate is smooth. 5. Drizzle Chocolate: Carefully drizzle the melted chocolate over the peanut butter layer on each rice cake. Let some chocolate drip over the edges for a nice look. 6. Add Toppings: Sprinkle sliced almonds on top. Then, add a pinch of sea salt to boost the flavors. 7. Set in Fridge: Place the rice cakes in the fridge for 15-20 minutes. This helps the chocolate harden. 8. Cut or Serve Whole: Once set, you can cut the rice cakes into quarters or leave them whole. Enjoy your delicious snacks! To melt chocolate well, use a microwave-safe bowl. Make sure it’s dry. Chocolate burns easily, so heat it slowly. Stir between each 30-second session. If you see any lumps, keep stirring until it’s smooth. This way, your chocolate will be perfect for drizzling. To get that perfect peanut butter layer, use a spatula. Start with a big scoop of peanut butter. Place it in the center of the rice cake. Spread it outwards, covering the whole surface. Make sure to keep the layer even. This way, each bite has the same great taste. If you want a thicker layer, add more peanut butter. You can make your snacks even better with toppings. Sliced almonds add a nice crunch. They also give a nutty flavor that pairs well with chocolate. For a fun twist, try chia seeds or hemp seeds. They boost nutrition and add texture. A sprinkle of sea salt on top balances the sweetness. Get creative! Use whatever you like to make your snack special. These rice cake snacks are great for any time of day. Serve them as a quick snack after school. They make a perfect dessert after dinner. You can cut them into quarters for small bites. Or, keep them whole for a more filling treat. For a pretty presentation, place them on a nice platter. A drizzle of leftover chocolate on top looks amazing. Enjoy these treats with friends or family for a fun time! Pro Tips Use Quality Chocolate: Opt for high-quality dark chocolate for a richer flavor. The better the chocolate, the more indulgent your treats will taste. Experiment with Toppings: Feel free to get creative with toppings! Try adding dried fruits, coconut flakes, or even a sprinkle of cinnamon for a unique twist. Chill for Best Results: Allow the rice cakes to chill longer if you prefer a firmer chocolate coating. This will enhance the overall texture and make them easier to handle. Make Ahead: These treats can be made ahead of time and stored in an airtight container in the fridge for up to a week, making them a convenient snack option. {{image_4}} You can switch peanut butter for other nut butters. Almond butter gives a mild taste. Cashew butter is creamy and sweet. Sunflower seed butter is great for nut-free diets. Each nut butter adds its own flavor. Experiment to find your favorite! Want to make it healthier? Try fresh fruits like banana slices or strawberries. You can also use seeds like pumpkin or sunflower seeds for crunch. Don’t forget about coconut flakes; they add a tropical twist. These toppings boost nutrition and flavor. You can mix sweet and savory flavors. Add a sprinkle of cinnamon for warmth. A dash of chili powder can add a fun kick. Try drizzling honey or maple syrup for extra sweetness. These twists make each bite exciting and unique! Store your chocolate peanut butter rice cake snacks in an airtight container. This keeps them fresh and tasty. Place a piece of parchment paper between layers if you stack them. This prevents sticking and mess. Make sure to keep them in a cool, dry place. These snacks last about 3 to 5 days at room temperature. If you store them in the fridge, they can last up to a week. However, the chocolate may lose some shine over time. You can still enjoy them, but they taste best fresh. To freeze the rice cake snacks, wrap each one in plastic wrap. Place them in a freezer bag or container to avoid freezer burn. They can last for up to 2 months in the freezer. When you want to eat them, let them thaw in the fridge overnight. Enjoy them cold or pop them in the microwave for a few seconds! Yes, you can use milk chocolate. It will make the snacks sweeter. Dark chocolate has a rich taste, while milk chocolate is creamier. Choose what you like best! Yes, these snacks can fit a vegan diet. Use dairy-free chocolate and ensure your peanut butter has no animal products. This way, you enjoy a tasty treat without any animal ingredients. Peanut butter is a good source of protein. It helps you feel full and gives you energy. It also has healthy fats and vitamins. These nutrients can support your heart and muscles. To make these snacks gluten-free, use rice cakes that are certified gluten-free. Most rice cakes are gluten-free, but check the label. This way, you can enjoy your treats without worries. Absolutely! You can add chia seeds, hemp seeds, or even dried fruit. Try different nuts or seeds for extra crunch. Get creative with your toppings to make these snacks your own! This blog covered how to create tasty chocolate peanut butter rice cake snacks. You learned about key ingredients, step-by-step instructions, and useful tips. I shared variations to suit your taste and storage info to keep snacks fresh. Enjoy experimenting with flavors and ingredients. These snacks are easy to make and fun to share. With simple steps, you can create a treat loved by all!

Chocolate Peanut Butter Rice Cake Snacks Delightful Treat

Looking for a quick and tasty snack? You’ve hit the jackpot! Chocolate peanut butter rice cake snacks are simple to

- 1 cup long-grain white rice - 2 cups vegetable broth - 2 cups fresh broccoli florets - 1 cup shredded cheddar cheese - 1 cup cream of mushroom soup - 1/2 cup sour cream - 1/2 teaspoon garlic powder - 1/2 teaspoon onion powder - Salt and pepper, to taste - 1/2 cup breadcrumbs - 2 tablespoons olive oil - 1/4 cup grated Parmesan cheese (optional) Gathering quality ingredients makes a big difference. I love using fresh broccoli florets for this casserole. They add bright color and a nice crunch. Long-grain white rice is perfect as it cooks evenly. The broth gives a warm flavor that pairs well with the cheese. I often choose cream of mushroom soup to add creaminess and depth. Sour cream gives a nice tang, which helps balance the flavors. For seasoning, garlic and onion powder boost the taste. A dash of salt and pepper rounds it all out. Adding breadcrumbs on top makes the dish crunchy and fun. Drizzling olive oil on the breadcrumbs helps them crisp up nicely in the oven. If you want even more cheese, sprinkle some grated Parmesan on top. It adds a tasty, extra layer of flavor. These ingredients come together to create a cozy and delicious meal. Each bite is packed with cheesy goodness and bright broccoli. This is a dish my family loves, and I’m sure yours will too! {{ingredient_image_2}} - Preheat the oven to 350°F (175°C). - In a medium pot, bring 2 cups of vegetable broth to a boil. - Stir in 1 cup of long-grain white rice. - Cover the pot and lower the heat. - Let it simmer for 15-20 minutes until the rice is tender. - While the rice cooks, take 2 cups of fresh broccoli florets. - Place them in a pot with a small amount of water. - Cover and steam for 3-4 minutes. - The broccoli should be bright green and tender. - Drain any extra water and set the broccoli aside. - In a large bowl, mix the rice, steamed broccoli, and cheese. - Add 1 cup of cream of mushroom soup and 1/2 cup of sour cream. - Season with 1/2 teaspoon of garlic powder and onion powder. - Add salt and pepper to taste. - Stir until everything is well combined. - Grease a 9x13 inch baking dish with olive oil. - Pour the mixture into the dish, spreading it evenly. - In a small bowl, mix 1/2 cup of breadcrumbs with 2 tablespoons of olive oil. - Sprinkle this breadcrumb mix over your casserole. - If you like, top it with 1/4 cup of grated Parmesan cheese. - Place the dish in the oven and bake for 25-30 minutes. - Look for a golden brown and bubbly top. - Once done, let it rest for about 5 minutes before serving. To get the best rice and broccoli, monitor them closely. Cook the rice until it’s tender. This usually takes about 15-20 minutes. Make sure all the broth is absorbed. For the broccoli, steam it just until it turns bright green and is tender. This should take around 3-4 minutes. If you overcook it, it will lose its color and crunch. Bake the casserole for 25-30 minutes. You want the top to be golden brown and bubbly. This will give you a nice crispy layer on top. Keep an eye on it toward the end to avoid burning. If you need a substitute for cream of mushroom soup, try cream of chicken soup. You can also make a simple white sauce with milk and flour. For those who want a dairy-free option, use vegan cream cheese or coconut cream. They work well in this dish. For cheese, if you need a dairy-free option, try using cashew cheese or almond cheese. They melt nicely and add flavor. You can also use nutritional yeast for a cheesy taste without dairy. To boost the flavor, add herbs and spices. Thyme, basil, or even a pinch of cayenne can bring new life to the dish. You could also add a squeeze of lemon juice right before serving for a fresh taste. For serving, think about pairing this casserole with a crisp green salad. A simple side of fresh herbs like parsley can brighten up your plate. It adds color and flavor, making your meal look and taste better. Pro Tips Use Fresh Broccoli: For the best flavor and texture, always opt for fresh broccoli florets instead of frozen. Fresh broccoli will provide a vibrant color and crunch to your casserole. Customize the Cheese: Feel free to mix different types of cheese for added flavor. A combination of sharp cheddar and mozzarella can create a delightful cheesy layer. Make it Ahead: This casserole can be prepared a day in advance. Assemble it, cover with foil, and refrigerate. Bake it fresh when you’re ready to serve. Add Protein: For a heartier meal, consider adding cooked chicken or turkey to the rice and broccoli mixture before baking. {{image_4}} You can easily add protein to your casserole. Cooked chicken or turkey works great. Just chop them into small pieces and mix them in. If you prefer a vegetarian option, try adding chickpeas. They add a nice texture and boost the protein. Feel free to swap out the broccoli. Spinach is a tasty choice that wilts well. You can also use cauliflower for a different flavor. Mixed veggies add color and nutrients. Think about seasonal vegetables too, like asparagus in spring or squash in fall. They can really change the dish. Cheese makes this casserole super creamy. You can explore different types of cheese, like mozzarella or pepper jack. They melt well and add unique flavors. For extra cheesiness, layer some cheese in between the rice and broccoli. This makes every bite special and gooey. To store leftovers, let the casserole cool first. Then, cover it tightly with plastic wrap or foil. Place it in the fridge for up to three days. You can also freeze the casserole for longer storage. To freeze, cut it into portions and wrap each piece in plastic wrap. Then, place them in a freezer-safe bag. This way, you can enjoy it later! When reheating, you have two main options: the oven or the microwave. For the oven, preheat it to 350°F (175°C). Place the casserole in an oven-safe dish and cover it with foil. Bake for about 20 minutes. This method keeps the texture nice and creamy. For the microwave, use a microwave-safe dish. Heat it in short bursts of two minutes, stirring in between. This helps the casserole heat evenly without drying out. In the fridge, the casserole stays good for about three days. In the freezer, it lasts up to three months. Make sure to label your containers with the date you stored them. This helps you keep track of how long they’ve been in there! Yes, you can make Cheesy Broccoli Rice Casserole ahead of time. This saves you time on busy days. To prep the night before, follow these steps: - Cook the rice and steam the broccoli. - Mix all ingredients as per the recipe. - Store the mixture in the fridge overnight. - When ready, pour it into a baking dish and bake as usual. Yes, you can make this casserole gluten-free with a few easy swaps. Use gluten-free breadcrumbs instead of regular ones. You can also check your cream of mushroom soup for gluten. Many brands offer gluten-free options. This makes it simple for gluten-sensitive eaters to enjoy. This casserole pairs well with many side dishes. Here are some great ideas: - A crisp green salad for freshness. - Roasted chicken or turkey for protein. - Garlic bread for a comforting touch. - Steamed veggies for extra nutrients. These sides enhance your meal and add variety to your plate. In this blog post, we explored a tasty Cheesy Broccoli Rice Casserole recipe. We covered key ingredients, step-by-step instructions, and helpful tips to make it perfect. You now know how to add protein or swap veggies for variety. Remember to store leftovers properly for best results. This dish is simple, comforting, and great for sharing. I hope you feel inspired to try it yourself or with loved ones. Enjoy making and savoring this delicious casserole!

Cheesy Broccoli Rice Casserole Quick Family Meal

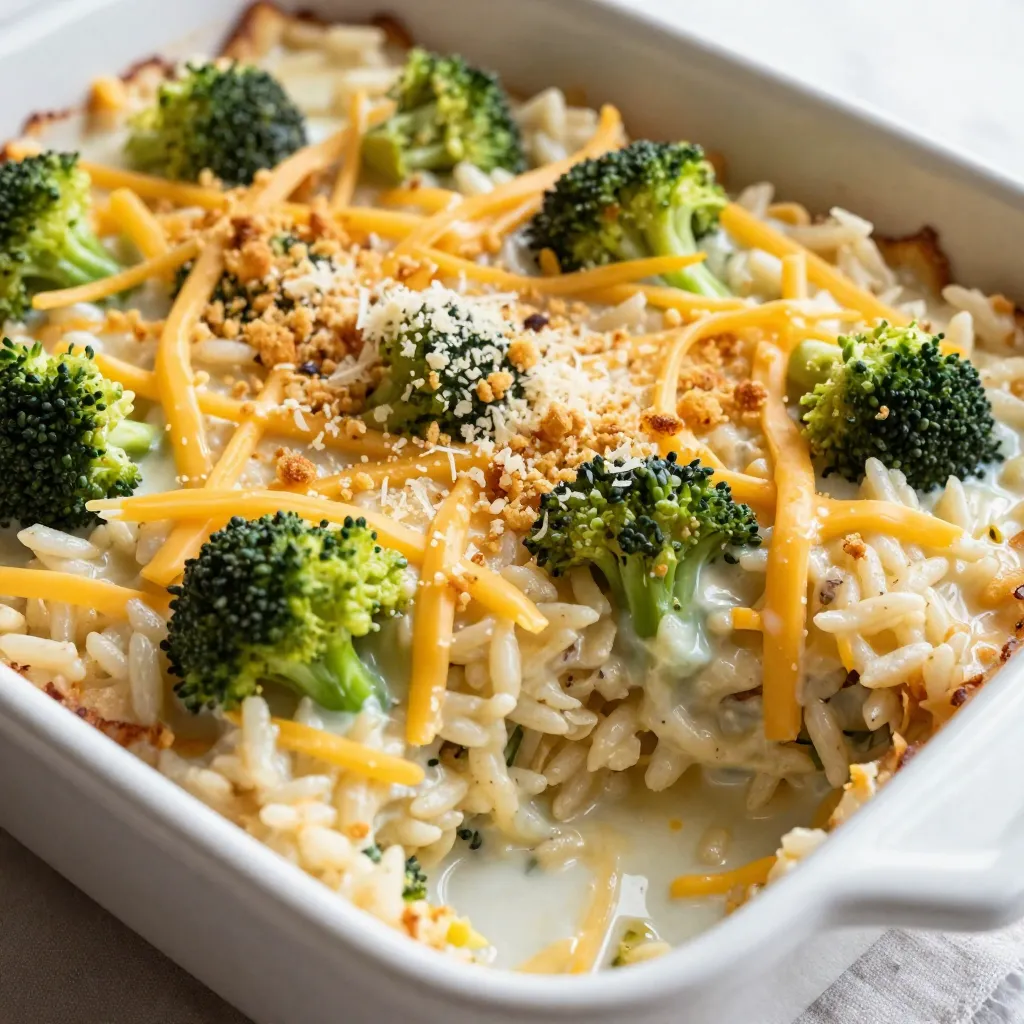
Are you looking for a simple, tasty meal your whole family will love? My Cheesy Broccoli Rice Casserole is the

- 1 lb ground turkey or beef - 1 packet taco seasoning - 1 can black beans, drained and rinsed - 1 cup corn kernels (fresh or frozen) - 1 large head romaine lettuce, chopped into bite-sized pieces - 1 cup cherry tomatoes, halved - 1 ripe avocado, diced To create a great loaded taco salad, the main ingredients are key. Ground turkey or beef brings protein and flavor. I prefer ground turkey for a lighter option. Black beans and corn add texture and fiber, making this salad filling. Romaine lettuce gives a nice crunch, while cherry tomatoes and avocado add freshness. - 1 cup shredded cheese (cheddar or Mexican blend) - 1/2 cup sour cream or Greek yogurt - 1/4 cup fresh cilantro, finely chopped - Juice of 1 lime Toppings make your salad shine. Cheese adds richness, and I like using cheddar or a Mexican blend. Avocado and sour cream provide creaminess. Fresh herbs like cilantro bring bright flavor. A squeeze of lime juice ties everything together with a zesty touch. - Tortilla chips for added crunch - Additional seasonings for extra flavor - Substitute proteins or vegan options Optional add-ins can take your salad to the next level. Crunchy tortilla chips add texture that everyone loves. You can try adding more seasonings if you like bold flavors. If you want a vegan option, use beans or tofu instead of meat. {{ingredient_image_2}} First, heat a large skillet over medium heat. Add one pound of ground turkey or beef. Cook until the meat turns brown and is no longer pink, which takes about seven to ten minutes. If you see excess fat, gently drain it off. Next, sprinkle in one packet of taco seasoning. Pour in about two-thirds of a cup of water as the packet directs. Stir well to mix everything together. Let it simmer on low heat for five minutes. This lets the flavors blend nicely. Once done, take it off the heat and set it aside. In a big mixing bowl, combine the chopped romaine lettuce, one can of drained and rinsed black beans, and one cup of corn kernels. You can use fresh or frozen corn, depending on what you have. Then, add one cup of halved cherry tomatoes and one diced ripe avocado. Stir gently to mix the veggies without mashing the avocado. When the meat has finished cooking, add it to the bowl with the veggies. Carefully stir to combine all the tasty ingredients. In a separate small bowl, whisk together half a cup of sour cream or Greek yogurt with the juice of one lime. This adds a nice zing. Season the dressing with salt and pepper to taste. This step is key for flavor. Drizzle the creamy dressing over the salad and gently toss all the ingredients. Make sure everything is well coated and ready to serve. To ensure even cooking of meat, use medium heat. Break the meat into small pieces as it cooks. This helps it brown nicely. If you see excess fat, drain it off to keep the dish light. For seasoning, sprinkle the taco mix evenly while the meat cooks. This way, every bite gets great flavor. When mixing the salad, gently fold the ingredients together. This keeps the avocado from getting mushy. A mixed salad distributes flavors well, but layers can look pretty. You can build layers of lettuce, beans, corn, and meat for a fun presentation. For serving, use large salad bowls. This makes it easy for everyone to dig in. Add extra slices of avocado on top for color. A few whole tortilla chips nestled in the salad add crunch. Finish with a lime wedge on the side for a fresh touch. Pro Tips Fresh Ingredients: Use the freshest produce possible for the best flavor in your salad. Look for vibrant, crisp lettuce and ripe avocados. Customize Your Protein: Feel free to substitute ground turkey or beef with shredded chicken, tofu, or a plant-based meat alternative for a different twist. Layer Flavors: Consider adding additional spices or hot sauce to the meat mixture for a bolder flavor profile that suits your taste. Make Ahead: Prepare the salad components in advance and store them separately in the fridge. Combine and dress just before serving to keep everything fresh. {{image_4}} You can switch up the protein in your loaded taco salad. Ground turkey or beef works great, but chicken or tofu can also shine. - For chicken, grill or sauté it until golden brown. Shred it and mix it in. - Tofu offers a great vegetarian option. Press it, cube it, and sauté until crispy. For those going meatless, try using lentils or quinoa instead. They add texture and protein too. Dressing can make or break your salad. While I love the creamy sour cream, there are many ways to mix it up. - Try ranch dressing for a different flavor. - A zesty vinaigrette can add a tangy punch. You can also customize flavors with spices. Add chili powder for heat or garlic powder for depth. Just a pinch can change everything. Make your taco salad fresh by adding seasonal veggies. - In summer, add cucumber or bell peppers for crunch. - In fall, roasted sweet potatoes can bring warmth and sweetness. Changing ingredients based on availability keeps the salad exciting. Use what’s fresh at the market. This way, every salad is a new adventure! Store your loaded taco salad in an airtight container. This keeps it fresh and tasty. Place it in the fridge right after serving. It will stay good for about 3 days. You can enjoy it again for lunch or dinner! If you want to keep it longer, you can freeze it. Yes, you can freeze loaded taco salad. However, some components do not freeze well. The lettuce and avocado may become mushy. To freeze, store the meat and beans separately. Use a freezer-safe bag or container. When you are ready to eat, thaw it in the fridge overnight. To reheat, warm the meat mixture in a skillet. Do not reheat the salad with fresh veggies. Add fresh toppings after reheating to keep them crunchy. You can prepare many of the ingredients ahead of time. Cook the meat and mix the beans and corn. Store these in the fridge for up to 3 days. Wash and chop the lettuce, tomatoes, and avocado right before serving. Keep the components separate for the best flavor. This way, you can mix them together fresh. It makes your salad taste great every time! You can make your own taco seasoning at home. Mix these spices for a tasty blend: - 1 tsp chili powder - 1 tsp cumin - 1 tsp paprika - 1/2 tsp garlic powder - 1/2 tsp onion powder - 1/2 tsp oregano - Salt and pepper to taste If you want different flavors, try using chili flakes or smoked paprika. You can also use store-bought spice mixes labeled for tacos. They work well in a pinch. Yes, you can prep the salad ahead of time. Keep the veggies fresh by storing them separately. Here are some tips: - Use airtight containers for veggies. - Chop lettuce and store it dry. - Mix beans and corn in another container. Add toppings right before serving. This keeps everything crunchy and fresh. Save the creamy dressing in a small jar. Pour it just before you eat. Yes, loaded taco salad can be gluten-free. Choose gluten-free taco seasoning and check all labels. Here are some tips to ensure your meal stays gluten-free: - Use certified gluten-free tortilla chips. - Check the labels on canned beans and corn for gluten. Avoid cross-contamination by washing all utensils and cutting boards. This keeps your salad safe and delicious! This loaded taco salad blends ground turkey or beef, beans, and fresh veggies. Topped with cheese, avocado, and zesty dressing, it’s a crowd-pleaser. Remember to mix flavors and colors for the best presentation. Consider trying protein alternatives or seasonal veggies to keep it fresh. Storage tips help you save leftovers, and meal prep makes it easy during busy weeks. Experiment with your own flair, and enjoy a delicious meal that fits your taste perfectly!

Loaded Taco Salad Flavorful and Easy Meal Idea

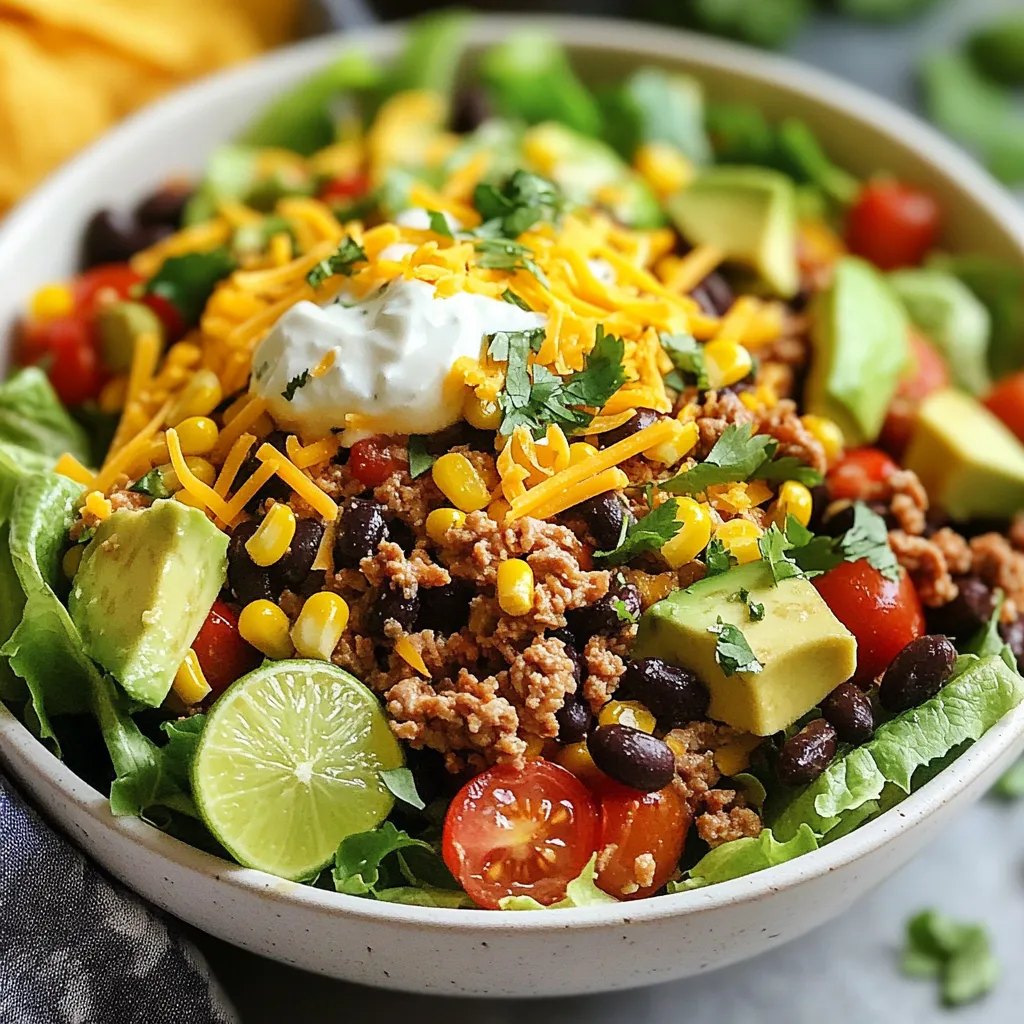
Looking for a tasty, filling meal that’s easy to make? My Loaded Taco Salad is just the ticket! With ground

- 1 cup (227g) unsalted butter, melted - 1 cup (220g) packed brown sugar - 1/2 cup (100g) granulated sugar - 2 large eggs - 2 tsp pure vanilla extract - 1 cup (120g) all-purpose flour - 1/2 cup (50g) unsweetened cocoa powder - 1/2 tsp baking soda - 1/2 tsp salt - 1 cup (175g) semi-sweet chocolate chips - 1 cup (about 150g) soft caramel candies, unwrapped (or 1/2 cup caramel sauce) - Sea salt for sprinkling (optional) To enhance your cookies, you can use flavored caramel or mix in nuts. For a richer taste, try dark chocolate chips instead of semi-sweet. Feel free to experiment with different toppings or fillings. The key is to have fun and enjoy the process while making these delightful cookies! {{ingredient_image_2}} - Preheat your oven to 350°F (175°C). - Line two baking sheets with parchment paper for easy cleanup. - In a large bowl, combine melted butter, brown sugar, and granulated sugar. - Whisk until smooth and mixed well. - Add in eggs one at a time, mixing thoroughly after each addition. - Stir in vanilla extract until the mix comes together. - In another bowl, whisk together flour, cocoa powder, baking soda, and salt. - Make sure no lumps remain in the dry mix. - Gradually add the dry mix to the wet ingredients. - Stir gently until combined, but avoid overmixing. - Fold in chocolate chips evenly into the dough. - Take a spoonful of dough and flatten it in your hand. - Place a few pieces of caramel in the center. - Take another spoonful of dough, flatten it, and place it on top of the caramel. - Pinch the edges to seal the caramel and roll into a ball. - Place the balls on your baking sheets. - Bake in the preheated oven for about 10-12 minutes. - The cookies should look slightly underbaked in the center. - Allow them to cool on the baking sheet for 5 minutes, then move them to a wire rack. - For extra flavor, sprinkle with sea salt while still warm. To avoid overmixing, mix the wet and dry ingredients gently. Stir just until you see no dry flour. Overmixing makes cookies tough. Slightly underbaked cookies are key for a chewy texture. Bake them until they look set but soft in the middle. They will firm up as they cool. For extra flavor, try adding one teaspoon of espresso powder. You can also use almond or hazelnut extract instead of vanilla. Sea salt plays a big role in this recipe. It balances the sweetness of the caramel. A light sprinkle on top makes a tasty contrast. A good set of measuring cups and spoons is essential. Accurate measurements lead to better results. Use a mixer for the wet ingredients to save time. A spatula helps fold in the dry mix without overdoing it. A cookie scoop ensures even sizes for baking. Pro Tips Chill the Dough: For an even richer flavor and better texture, chill the cookie dough in the refrigerator for at least 30 minutes before baking. This helps the cookies maintain their shape and enhances the chocolate flavor. Use Quality Ingredients: The flavor of your cookies will greatly depend on the quality of the chocolate and caramel used. Opt for high-quality chocolate chips and soft caramels for the best results. Don’t Overbake: To achieve that chewy texture, be careful not to overbake the cookies. They should look a bit soft in the center when you take them out of the oven, as they will continue to cook on the baking sheet. Experiment with Fillings: Feel free to get creative with the caramel filling! You can try adding a mix of chocolate or even a sprinkle of sea salt inside for a delightful flavor contrast. {{image_4}} You can play with the filling in your caramel stuffed brownie cookies. Using flavored caramels adds a fun twist. Try sea salt caramel for a sweet and salty mix. You can also use caramel sauce instead of candies. This makes the filling extra gooey. Switching up the chocolate adds more fun. Use dark chocolate for a richer taste. White chocolate can give a sweet contrast to the caramel. Each type of chocolate adds its own flavor, so feel free to experiment! If you need a gluten-free version, it's simple. Just swap the all-purpose flour for gluten-free flour. Make sure to choose a blend that works well for baking. This change lets everyone enjoy these cookies without worry. Keep in mind that gluten-free flour can absorb more liquid. You might need to adjust the wet ingredients slightly. Watch the dough's texture; it should remain soft and pliable. To make these cookies vegan, you can easily change a few ingredients. Use a plant-based butter instead of regular butter. Replace eggs with flaxseed meal or applesauce. Both options work well and keep the cookies moist. For the chocolate chips, choose dairy-free chocolate. This keeps the cookies vegan-friendly while still being delicious. With these swaps, everyone can enjoy a bite of these tasty treats! To keep your caramel stuffed brownie cookies fresh, follow these tips: - Let the cookies cool completely before storing. - Use an airtight container to prevent them from drying out. - Place parchment paper between layers to avoid sticking. - Store at room temperature for up to one week. A clear plastic or glass container works best. Make sure it has a tight seal. This keeps moisture in and air out. If you want to save some cookies for later, freezing is a great option: 1. Freeze Baked Cookies: Allow the cookies to cool fully. Then, place them in a single layer on a baking sheet. Freeze for about an hour. This helps them keep their shape. 2. Transfer: After they are frozen, move them to a freezer bag or airtight container. Be sure to label the bag with the date. 3. Thawing Tips: To thaw, take out the cookies and leave them at room temperature for about 30 minutes. You can also warm them in the oven at 300°F (150°C) for 5-10 minutes. This restores the soft texture and warm caramel center. Caramel stuffed brownie cookies last for about five days. Store them in an airtight container. Keep them at room temperature to maintain freshness. If you want them to last longer, consider freezing them. They can sit in the freezer for up to three months. Just make sure to wrap them well. Yes, you can use different types of chocolate. Dark chocolate adds a rich flavor. Milk chocolate offers a sweeter taste. You can also mix chocolate types for a unique flavor blend. Try using white chocolate chips for a fun twist. Just ensure the chocolate you choose melts well. If the caramel leaks, it might be due to overfilling the cookies. Make sure to use a small amount of caramel. Seal the edges tightly to prevent leaks. If it happens, don’t worry! The cookies will still taste great. You can also bake them on a lined sheet to catch drips. Yes, these cookies are great for shipping! Allow them to cool completely before packing. Use a sturdy box and layer them with parchment paper. This helps to keep them safe during transit. Avoid packing them too tightly to prevent breakage. They will stay fresh if stored properly during shipping. You learned how to make delicious caramel stuffed brownie cookies. We covered all the needed ingredients, plus tips to enhance flavor. I shared steps to prepare the dough and bake the treats perfectly. You can also try variations like gluten-free or vegan options. Baking is fun and rewarding. Keep these tips in mind to create your perfect batch. Enjoy experimenting, and don't hesitate to share your cookie creations!

Caramel Stuffed Brownie Cookies Delightful and Sweet

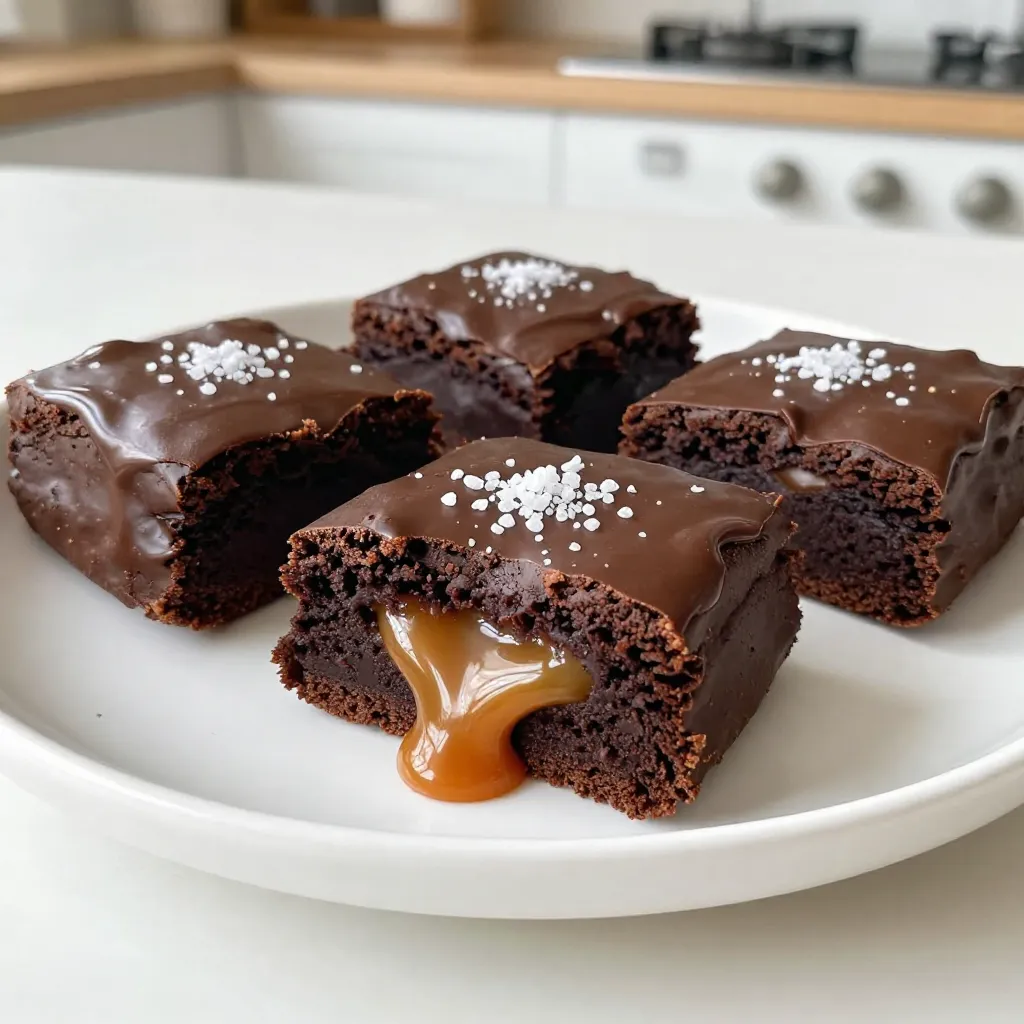
If you love sweet treats that surprise and delight, you’ll adore these Caramel Stuffed Brownie Cookies. Imagine biting into a

- 1 cup warm water (approx. 110°F) - 1 packet active dry yeast (2 1/4 teaspoons) - 1/4 cup granulated sugar (for the dough) - 1/2 teaspoon salt - 2 1/4 cups all-purpose flour - 1/4 cup baking soda (for boiling) - 2 tablespoons unsalted butter, melted (for brushing) - 1/2 cup granulated sugar (for coating) - 1 tablespoon ground cinnamon - Coarse sea salt (for topping) - Caloric content per serving: Each serving has about 120 calories. - Macronutrient breakdown: Each bite has around 2g protein, 21g carbs, and 4g fat. - Dietary considerations: These pretzel bites contain gluten from flour. For gluten-free options, use a gluten-free flour blend. {{ingredient_image_2}} Start by warming your water. The best temperature is around 110°F. This warmth helps the yeast wake up. If it's too hot, it can kill the yeast. Mix the warm water, yeast, and 1/4 cup of sugar in a bowl. Let this sit for about 5 minutes. You will know the yeast is ready when it becomes frothy. This means the yeast is active and ready to help your dough rise. Once your yeast is ready, add the salt. Gradually mix in the all-purpose flour. Use your hands or a spatula to combine everything. When it forms a sticky dough, transfer it to a floured surface. Knead the dough for about 5 minutes. This makes the dough smooth and elastic. If it's too sticky, add a little more flour. After kneading, shape the dough into a ball. Place it in a greased bowl and cover it with a kitchen towel. Let it rise in a warm spot for about 1 hour. It should double in size. While the dough rises, preheat your oven to 425°F. Bring 8 cups of water to a gentle boil in a large pot. Carefully add 1/4 cup of baking soda to the boiling water. This step is important. Boiling helps create that classic pretzel crust. Once the dough has risen, punch it down gently. Divide it into small pieces, like golf balls. Roll each piece into a rope shape and twist to make pretzel bites. Drop them into the boiling water for about 30 seconds. Use a slotted spoon to take them out. Place them on a baking sheet lined with parchment paper. Brush melted butter over the warm bites. Mix the remaining sugar and cinnamon in a bowl. Sprinkle this mix over the pretzel bites while they are still warm. Finish by adding a little coarse sea salt on top. Bake them for 12-15 minutes until golden brown. Enjoy the tasty aroma that fills your kitchen! To get soft and chewy pretzels, the type of flour you use matters. I recommend using all-purpose flour. It gives you a nice balance of chewiness and fluffiness. If you want to experiment, you can try bread flour. It has more protein, which can make your pretzels chewier. Boiling the pretzel bites is vital. It helps create that shiny, golden crust. When you boil them in water with baking soda, it changes the dough’s surface. This process makes the pretzels crisp on the outside and soft inside. Don't skip this step if you want the best results! You can play with the sugar and cinnamon ratios to suit your taste. If you love sweet flavors, add more sugar. For a stronger cinnamon taste, increase the cinnamon in your mix. Just remember to keep a good balance. For dips, I suggest creamy options like cream cheese. Chocolate sauce also pairs well for a sweet treat. Present your warm pretzel bites in a cute basket lined with parchment paper. This adds charm and makes them more inviting for guests. Pro Tips Perfect Water Temperature: Ensure the water is around 110°F to properly activate the yeast without killing it. Don’t Skip the Boiling: Boiling the pretzel bites in the baking soda solution is crucial for that classic pretzel texture and flavor. Brush with Butter While Warm: Brushing the warm pretzel bites with melted butter ensures the cinnamon sugar coating sticks better. Enjoy Fresh: For the best taste and texture, serve the pretzel bites warm right out of the oven. {{image_4}} If you want to make gluten-free cinnamon sugar pretzel bites, use a good gluten-free flour blend. Look for blends with xanthan gum, which helps mimic the stretch of wheat flour. Some popular brands are Bob's Red Mill 1-to-1 and King Arthur Gluten-Free Measure for Measure. These blends work well in this recipe and will give you a nice texture. To create a vegan version, you can replace the butter with a plant-based option. Use coconut oil or vegan butter instead. For the egg, you can mix 1 tablespoon of ground flaxseed with 2.5 tablespoons of water. Let this sit for a few minutes to thicken. This mix will help bind the dough and keep it rich in flavor. You can get creative with flavor infusions. Adding a splash of vanilla extract to the dough gives a sweet aroma. If you want a hint of spice, mix in a touch of nutmeg. Both additions will elevate your pretzel bites and give them a unique twist that everyone will love. To keep your pretzel bites fresh, store them at room temperature. Place them in a paper bag or an open container. This method helps keep the bites soft while allowing air circulation. If you want to store them longer, you can put them in the fridge. However, refrigeration may make them a bit tougher. To restore the softness of your pretzel bites, use the oven. Preheat it to 350°F (175°C). Place the bites on a baking sheet and cover them with foil. Heat for about 5-7 minutes. This method helps keep the outside crispy while warming the inside. You can also microwave them for about 15-20 seconds if you are in a hurry. Just be careful not to overheat, or they will become chewy. To freeze pretzel bites, first allow them to cool completely. Then, place them in a single layer on a baking sheet. Freeze them for about an hour until firm. After that, transfer the bites to a freezer-safe bag. Seal it tightly to prevent freezer burn. When you are ready to enjoy them, thaw in the fridge overnight. Reheat in the oven as mentioned above for the best texture. To make pretzel bites softer, use more water in the dough. You can also knead the dough longer. This helps create a smooth texture. Letting the dough rise properly is key. A warm, humid spot is best for rising. Cover the dough with a towel to keep it warm. Yes, you can use instant yeast instead of active dry yeast. Instant yeast works faster and doesn’t need to be activated. You can mix it directly with the flour. Just use a bit less than the active dry yeast called for in the recipe. Serve cinnamon sugar pretzel bites warm for the best taste. Place them in a basket lined with parchment paper. You can also offer dips like cream cheese or chocolate sauce. This adds a fun twist to the snack and makes it more enjoyable. Cinnamon sugar pretzel bites are a treat, not a health food. They contain sugar and butter, which add calories. However, they can be part of a balanced diet when enjoyed in moderation. You can also make them healthier by using whole wheat flour and less sugar. Cinnamon sugar pretzel bites last about 2-3 days at room temperature. Store them in an airtight container to keep them fresh. You can also refrigerate them for longer shelf life. For best taste, eat them warm or reheat them in the oven. This post covers all you need for perfect cinnamon sugar pretzel bites. You learned about ingredients, steps, and variations. Each part helps you create delicious treats at home. Remember, it’s key to activate the yeast correctly and boil the dough for the best texture. Final thoughts: Enjoy experimenting with flavors and storing your pretzel bites. They are fun to make and taste great! Share them with friends or keep them all to yourself.

Cinnamon Sugar Pretzel Bites Easy and Tasty Recipe

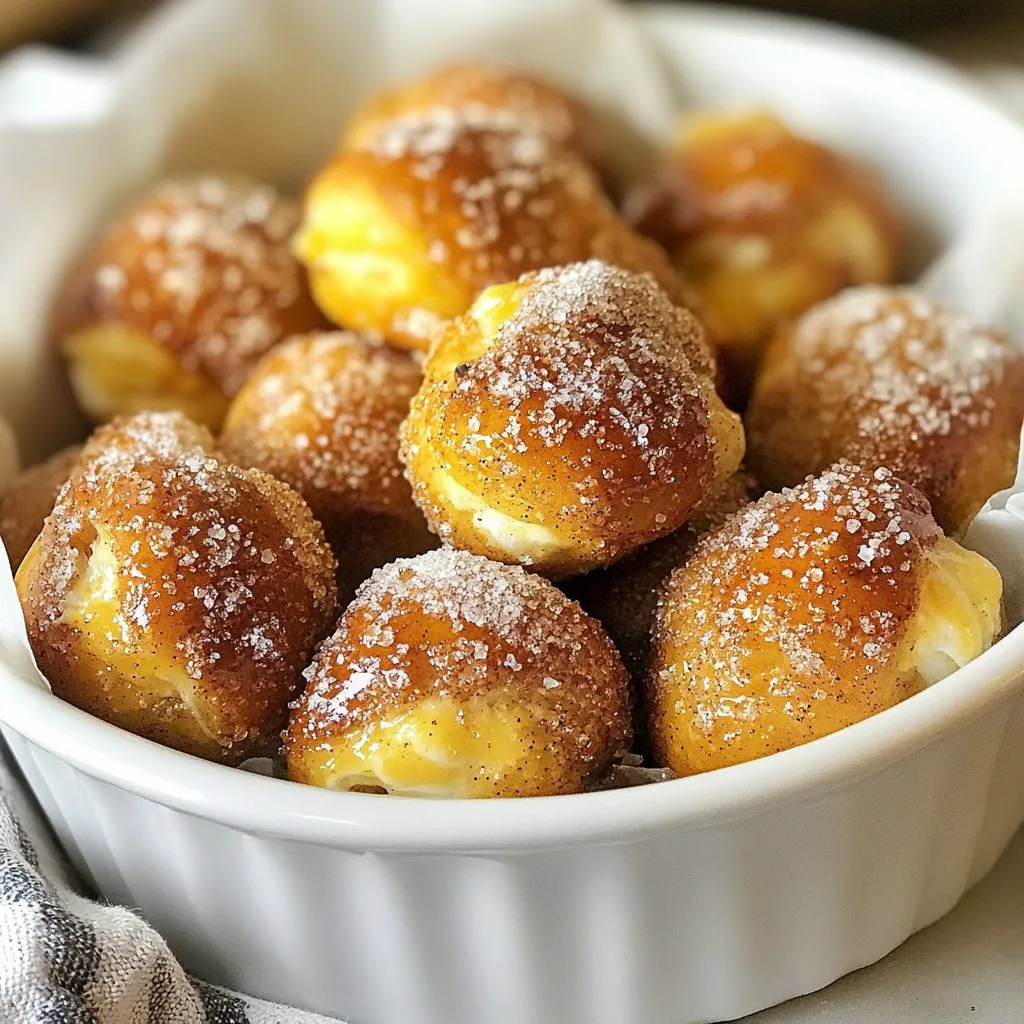
Craving a warm, sweet treat? Look no further! Let’s make Cinnamon Sugar Pretzel Bites that are not only easy but

To make these Peanut Butter Chocolate Chip Energy Bars, you will need the following ingredients: - 1 cup natural peanut butter (preferably smooth) - 1/2 cup honey or maple syrup (your choice for sweetness) - 1 cup rolled oats (old-fashioned for best texture) - 1/2 cup protein powder (choose vanilla or chocolate for flavor) - 1/2 cup dark chocolate chips (semi-sweet or bittersweet) - 1/4 cup chopped nuts (almonds or walnuts work well) - 1 teaspoon pure vanilla extract - 1/2 teaspoon salt These ingredients work together to create a tasty and nutritious snack. The peanut butter adds creaminess and protein, while the honey or maple syrup adds sweetness. Rolled oats give the bars a chewy texture. Protein powder boosts the protein content, and dark chocolate chips add a yummy chocolate flavor. Chopped nuts add crunch, and vanilla extract enhances the taste. Finally, salt balances the sweetness. Each ingredient plays a key role in making these bars delicious and satisfying. {{ingredient_image_2}} 1. Start by mixing the natural peanut butter and honey or maple syrup. Use a large bowl. Whisk them together until smooth and creamy. Make sure there are no lumps. 2. Next, add the pure vanilla extract and salt. Stir these in well so they blend evenly into the mix. 3. Gradually incorporate the rolled oats and protein powder. Fold them in gently. Mix until all dry ingredients are fully combined with the wet mixture. You want a nice, even consistency. 4. Now, it’s time to fold in the dark chocolate chips and chopped nuts. Gently stir to spread them throughout the mixture. This ensures you get a bit of chocolate and nuts in every bite. 1. Prepare your baking dish by lining it with parchment paper. An 8x8 inch dish works best. This lining helps with easy removal later. 2. Transfer the energy bar mixture into the lined dish. Use a spatula or your hands to press it down firmly. Make sure it is packed tightly to avoid crumbling. 3. Cover the dish with plastic wrap or a lid. Place it in the refrigerator for at least 1 hour. This helps the mixture firm up, making it easier to cut into bars. 4. After chilling, lift the mixture out using the parchment paper edges. Place it on a cutting board. Cut into bars of your preferred size. Enjoy your tasty and healthy snack! Alternatives for peanut butter If you need a change, try almond butter or sunflower seed butter. Both options give a nice flavor and texture. They also work well in this recipe. Sweetener options You can swap honey for agave syrup or brown rice syrup. These sweeteners add a unique taste. Feel free to adjust the amount based on your sweetness preference. Types of protein powder Choose a protein powder that fits your taste. Vanilla or chocolate are great choices. If you're vegan, look for plant-based protein options. Ensuring proper mixing Mix the wet ingredients well to avoid lumps. This helps the bars hold together better. A smooth mix makes for a tasty bar. Techniques for packing the mixture When you press the mixture into the dish, use your hands or a spatula. Make sure to pack it tightly. This prevents the bars from crumbling when you cut them. Cutting and serving tips Use a sharp knife when cutting the bars. This gives you clean edges. Store them in parchment paper for easy grabbing. You can also drizzle extra peanut butter on top for a fun twist! Pro Tips Storage Solution: Keep the energy bars in an airtight container in the refrigerator for up to a week to maintain freshness. Nut Butter Variation: Experiment with different nut butters like almond or cashew for a unique flavor twist! Protein Boost: Add a scoop of your favorite superfood powder, such as spirulina or maca, to enhance the nutritional profile. Flavor Enhancer: Mix in a pinch of cinnamon or a dash of cocoa powder for an extra layer of flavor in your bars. {{image_4}} You can make these bars even more fun! Try adding mix-ins like dried fruits or seeds. - Dried Fruits: Chopped dates, raisins, or cranberries add natural sweetness and chewiness. - Seeds: Chia seeds or pumpkin seeds give a nice crunch and boost nutrition. You can also switch nut butters for a new taste. Almond butter, cashew butter, or sunflower seed butter work great. Each choice brings a unique flavor and texture. If you want vegan options, substitute honey with maple syrup. This keeps the sweetness while making it plant-based. For gluten-free bars, make sure to use certified gluten-free oats. This keeps the bars safe for those with gluten allergies. You can enjoy these tasty treats no matter your diet! To keep your Peanut Butter Chocolate Chip Energy Bars fresh, use proper storage methods. For short-term storage, place the bars in an airtight container. This keeps them moist and tasty for about a week at room temperature. If you plan to store them long-term, consider freezing. Wrap each bar in plastic wrap, then place them in a freezer bag. This method helps prevent freezer burn and keeps flavors intact. How long do these energy bars last? When stored at room temperature, they last about one week. If you freeze them, they can stay fresh for up to three months. Freezing is a great option for meal prep. Just take out a bar when you need a quick snack or energy boost. Always let them thaw at room temperature for the best texture. Can I substitute ingredients in the recipe? Yes, you can swap some ingredients. Use almond butter or sunflower seed butter for a different flavor. Maple syrup works as a sweetener if you prefer it over honey. For oats, quick oats can replace rolled oats in a pinch. How to make these bars nut-free? To make nut-free bars, use sunflower seed butter instead of peanut butter. You can also skip the chopped nuts entirely. This keeps the taste great while making it safe for those with nut allergies. What is the calorie count per bar? Each bar has about 150-200 calories. The total depends on the ingredients you use, especially the sweetener and protein powder. Are these energy bars healthy? Yes, these bars are healthy! They contain good fats, protein, and fiber. The oats provide energy, while dark chocolate adds antioxidants. Enjoy them as a snack or post-workout boost. Where to buy pre-packaged versions? You can find pre-packaged energy bars at grocery stores or health food shops. Check the snack aisle or the organic section for various options. Recommended brands for energy bars Some great brands include RXBAR, Larabar, and KIND. They offer tasty bars with clean ingredients. Always check the label to find what fits your needs best. You learned how to make delicious energy bars using simple ingredients. We discussed mixing natural peanut butter, honey, and oats to create a tasty treat. You can customize your bars with different flavors and ingredients. Remember, proper storage keeps them fresh longer. With these tips and tricks, you can enjoy healthy snacks whenever you want. Try making your own energy bars and see how easy and fun it can be!

Peanut Butter Chocolate Chip Energy Bars Recipe Guide

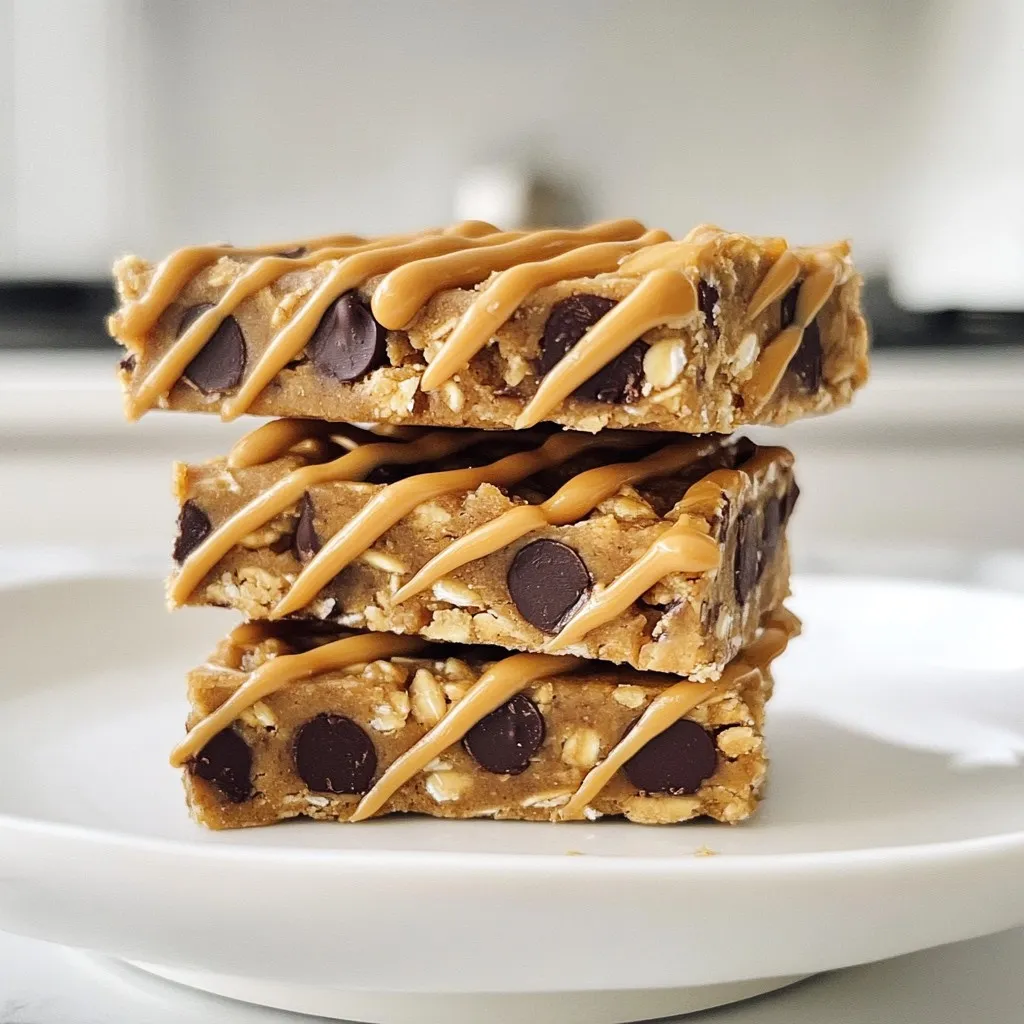
Looking for a tasty pick-me-up that fuels your day? You’re in the right place! In this Peanut Butter Chocolate Chip

Older posts
Newer posts
← Previous Page1 … Page108 Page109 Page110 Page111 Next →

dsad

© 2025 spoonfulsavory • Built with GeneratePress

Our Policies

  • Copyright Policy
  • Cookie Policy
  • GDPR Policy
  • Privacy Policy
  • Disclaimer
  • Terms Of Use

More Information

  • Home
  • About
  • Contact
  • Appetizers
  • Dessert
  • Dinner
  • Drinks
©2025, spoonfulsavory About Back To Top