Skip to content
DisclaimerTerms Of UseGDPR PolicyCookie Policy

spoonfulsavory

  • Home
  • Drinks
  • Appetizers
  • Dinner
  • Dessert
  • About
  • Contact
  • Privacy Policy
DisclaimerTerms Of UseGDPR PolicyCookie Policy

Sarah

To make Greek stuffed chicken breast, you need simple and fresh ingredients. Here’s a list to help you gather everything: - 4 boneless, skinless chicken breasts - Filling ingredients: - 1 cup fresh spinach, finely chopped - 1 cup feta cheese, crumbled - 1/2 cup sun-dried tomatoes, roughly chopped - 1/4 cup Kalamata olives, pitted and coarsely chopped - 2 cloves garlic, finely minced - 1 teaspoon dried oregano - 1 tablespoon extra virgin olive oil - Seasoning ingredients: - Sea salt and freshly ground black pepper, to taste - Cooking tools: - Toothpicks or kitchen twine These ingredients create a burst of flavor. The mix of spinach, feta, and olives adds a unique taste. This filling is hearty and satisfying. Make sure to use fresh spinach and high-quality feta for the best flavor. The Kalamata olives give a nice briny kick. Don't forget the garlic and oregano; they bring out the Mediterranean essence. Gather these items, and you’ll be ready to create a delicious meal. {{ingredient_image_2}} 1. Preheat your oven to 375°F (190°C). This helps the chicken cook evenly. 2. In a medium bowl, mix the filling. Combine the chopped spinach, feta cheese, sun-dried tomatoes, Kalamata olives, minced garlic, dried oregano, and olive oil. Add sea salt and black pepper to taste. Stir well until everything blends nicely. 1. Place the chicken breasts on a cutting board. Use a sharp knife to cut a pocket into each breast. Be careful not to cut all the way through. The pocket needs to be deep enough for the filling. 2. Stuff each chicken breast with the filling. Make sure to pack it in well for great flavor. Use toothpicks or kitchen twine to secure the openings. This keeps the filling inside while cooking. 1. Heat a drizzle of olive oil in an oven-safe skillet over medium heat. When hot, add the stuffed chicken breasts. Sear them for 4–5 minutes on each side. Look for a golden-brown crust to form. 2. After searing, transfer the skillet to the preheated oven. Bake for 20–25 minutes. The chicken should reach an internal temperature of 165°F (75°C) to be safe to eat. 3. Once done, take the skillet out of the oven. Let the chicken rest for a few minutes. This helps keep it juicy. Remove the toothpicks or twine before serving. 4. For a beautiful presentation, slice each stuffed chicken breast in half. Show off the colorful filling inside! To keep your chicken juicy, don’t skip the resting step. After baking, let it rest for a few minutes. This helps the juices stay inside. Use a meat thermometer to check the chicken’s internal temperature. The safe temp is 165°F (75°C). This ensures your chicken is cooked but not dry. For the best sides, serve Greek stuffed chicken with lemon-herb quinoa or roasted veggies. These pair well and add color to your plate. To garnish, sprinkle freshly chopped parsley on top. Add a lemon wedge for a fresh and bright touch. It makes your dish look inviting and tasty! Pro Tips Use Fresh Ingredients: Whenever possible, opt for fresh spinach and high-quality feta cheese to enhance the flavor of your dish. Fresh ingredients provide a vibrant taste that dried alternatives can't match. Experiment with Fillings: While the Mediterranean filling is delicious, feel free to try different combinations, such as sun-dried tomatoes with basil or goat cheese, for a unique twist on this classic recipe. Let Chicken Rest: After baking, allow the chicken to rest for a few minutes. This step is crucial for retaining juices, ensuring your chicken remains moist and flavorful when you slice into it. Perfectly Secure: Use toothpicks or kitchen twine to securely close the chicken pockets. This prevents the filling from leaking out during cooking, allowing you to enjoy every bite of the delicious stuffing. {{image_4}} You can easily change some ingredients to fit your taste. For cheese, consider using goat cheese instead of feta. Goat cheese adds a creamy texture and a tangy flavor that pairs well with the other ingredients. For greens, try using kale or arugula. Both options will add a different taste and texture. Kale brings a hearty crunch while arugula offers a peppery bite. Feel free to mix these into your stuffing based on what you have or what you like. You don't have to bake this chicken if you want a different flavor. Grilling is a fun way to cook it. Just make sure to preheat your grill. Grill the stuffed chicken for about 6–7 minutes on each side. This will give a nice smoky flavor and keep the chicken juicy. Another option is using a slow cooker. This method is great for meal prep. Stuff the chicken, place it in the slow cooker, and let it cook on low for about 4 hours. The slow cooker will keep all the flavors locked in and make the chicken super tender. To keep your leftover Greek stuffed chicken fresh, use proper storage containers. A good option is a tight-sealing glass or plastic container. This helps prevent moisture loss. Store the chicken in the refrigerator. Your leftovers will last for about 3 to 4 days. If you want to keep them longer, consider freezing. To freeze stuffed chicken, wrap each piece tightly in plastic wrap. This helps protect it from freezer burn. Then, place the wrapped chicken in a freezer-safe bag. You can keep the chicken in the freezer for up to 3 months. When you're ready to eat, thaw the chicken in the refrigerator overnight. For reheating, bake it at 350°F (175°C) until heated through. Enjoy your delicious meal without waste! How do I know when the chicken is done? The chicken is done when it reaches 165°F (75°C). Use a meat thermometer to check the thickest part. This ensures the chicken is safe to eat. The meat will also look white and the juices should run clear. Can I prepare the chicken in advance? Yes, you can prepare the chicken ahead of time. Stuff it and secure it with toothpicks. Then, cover and store it in the fridge for up to a day before cooking. This saves time on busy nights. Is this recipe gluten-free? Yes, this recipe is gluten-free. All the ingredients, like chicken, spinach, and feta, do not contain gluten. Just ensure any added ingredients or sides are also gluten-free. Can it be made dairy-free? Yes, you can make this dish dairy-free. Simply replace feta cheese with a dairy-free cheese or omit it entirely. The other flavors will still shine through. In this post, I shared how to make Greek stuffed chicken. We covered the key ingredients, step-by-step instructions, and various cooking tips. You can enjoy this tasty dish with different fillings or cooking methods. Remember to store leftovers properly for later use. This meal fits many diets, so try it your way. Cooking is fun, and this recipe shows that you can create something special with ease. Now, get cooking and enjoy a flavorful meal!

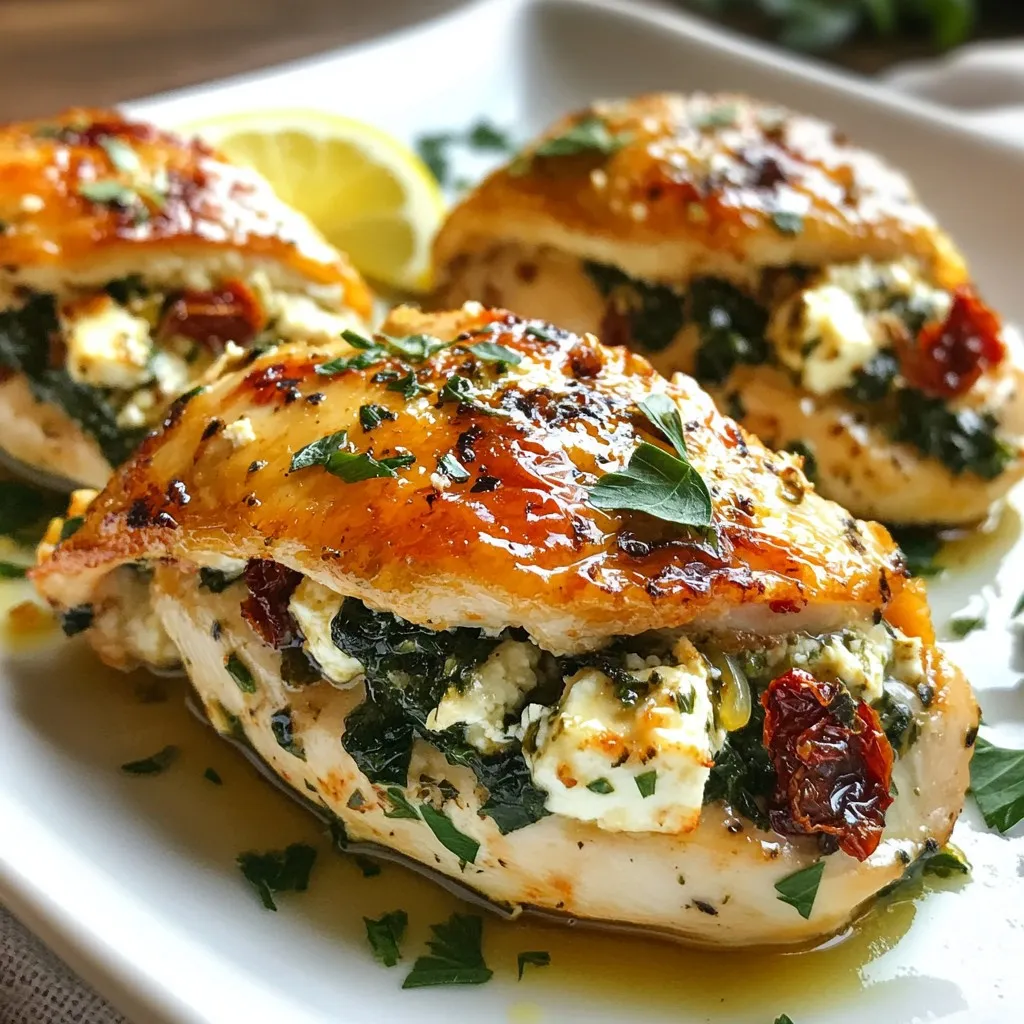
Greek Stuffed Chicken Breast Flavorful Dinner Recipe

Looking for a delicious dinner idea that will impress your family? Try my Greek Stuffed Chicken Breast! This recipe fills

To make Chocolate Mint Oreo Brownies, gather these simple ingredients: - 1 cup unsalted butter, melted - 2 cups granulated sugar - 4 large eggs - 1 teaspoon vanilla extract - 1 cup all-purpose flour - 1 cup unsweetened cocoa powder - 1/2 teaspoon baking powder - 1/4 teaspoon salt - 1 cup mint chocolate chips - 12 Oreo cookies, roughly chopped - 1/2 cup chocolate ganache (optional for topping) Each ingredient adds a special touch to the brownies. The butter gives them a rich taste. The granulated sugar helps to sweeten the mix. Eggs keep the texture soft and chewy. Vanilla adds a warm flavor that pairs well with chocolate. Flour and cocoa powder create the base. Baking powder helps the brownies rise just right. Salt balances the sweetness and enhances all the flavors. Mint chocolate chips bring a fresh burst of mint in every bite. Chopped Oreos add a delightful crunch and creaminess. You can add chocolate ganache for an extra layer of flavor. This optional topping makes the brownies even more decadent. With these ingredients, you can create a treat that will impress anyone. {{ingredient_image_2}} First, set your oven to 350°F (175°C). This helps the brownies bake evenly. Next, take a 9x13 inch baking pan. Grease it lightly or line it with parchment paper. This makes it easier to remove the brownies later. In a large bowl, pour in 1 cup of melted butter. Add 2 cups of granulated sugar. Use a whisk to combine them well until the mix is smooth. Next, crack 4 large eggs into the bowl, one at a time. Mix well after each egg. Finally, add 1 teaspoon of vanilla extract and blend it in. In another bowl, mix together 1 cup of all-purpose flour, 1 cup of unsweetened cocoa powder, 1/2 teaspoon of baking powder, and 1/4 teaspoon of salt. Whisk these dry ingredients together. Slowly fold this mix into the wet ingredients. Be gentle; overmixing can make the brownies tough. Now, it’s time to add some fun! Fold in 1 cup of mint chocolate chips and 12 roughly chopped Oreo cookies. Make sure they spread evenly throughout the batter. This gives each bite a delightful surprise. Pour the brownie batter into your prepared baking pan. Spread it out evenly with a spatula. Place the pan in the oven and bake for 25-30 minutes. To check if they are done, insert a toothpick into the center. If it comes out with a few moist crumbs, they are ready! After baking, let the brownies cool in the pan on a wire rack for at least 15 minutes. Then, carefully transfer them to the rack to cool fully. If you want to make them extra special, drizzle 1/2 cup of chocolate ganache on top after they cool. Let it set before cutting them into squares. - Use fresh ingredients. Fresh eggs and butter give the best taste. - Don’t overmix. Mix the batter until just combined for fudgy brownies. - Check doneness. A toothpick should come out with a few moist crumbs. - Let them cool. Cooling helps the brownies firm up for better cutting. - Cut the brownies into equal squares for a nice look. - Use a decorative plate to display your brownies. - Add a sprig of fresh mint on top for color. - Dust lightly with cocoa powder to enhance the design. - Preheat your oven. This ensures even baking and the right texture. - Use parchment paper. It helps with easy removal from the pan. - Rotate the pan. Halfway through baking, rotate for even heat. - Store them properly. Keep brownies in an airtight container to stay fresh. Pro Tips Use Room Temperature Eggs: For better incorporation, let your eggs sit at room temperature for about 30 minutes before adding them to the batter. Don’t Overmix: Mix the batter just until the dry ingredients are incorporated to maintain a fudgy texture in your brownies. Chill for Better Cutting: If you chill the brownies for an hour or two after baking, they will be easier to cut into neat squares. Garnish Creatively: For a stylish presentation, top with a few crushed Oreos or a sprinkle of sea salt along with the chocolate ganache. {{image_4}} You can change up the mix-ins for fun. Try adding peanut butter chips or white chocolate. You can also swap out the mint chocolate chips for regular chocolate chips. This gives you a richer chocolate flavor. If you want a crunch, consider using nuts like walnuts or pecans. They add a nice texture and a nutty taste. Frosting can make your brownies even better. Instead of chocolate ganache, you could use cream cheese frosting. This adds a tangy flavor that pairs well with the chocolate. A simple buttercream can also work well. Just mix butter, powdered sugar, and a splash of vanilla. For a mint twist, add peppermint extract to your frosting. This will enhance the minty flavor of the brownies. To make these brownies gluten-free, swap the all-purpose flour with gluten-free flour. Many brands work well as a direct substitute. Just check that the flour blend has xanthan gum. This helps the brownies hold together. You can still enjoy the same rich taste and texture without gluten. To keep your Chocolate Mint Oreo Brownies fresh, store them in an airtight container. Place a piece of parchment paper between layers to prevent sticking. This method helps retain moisture and flavor. You can also wrap them tightly in plastic wrap for extra protection. When stored properly, these brownies last about 3 to 5 days at room temperature. If you want to extend their life, refrigerate them. In the fridge, they can last up to a week. Just remember to bring them to room temperature before serving for the best taste. If you want warm brownies, reheating is easy. Preheat your oven to 350°F (175°C). Place the brownies on a baking sheet and cover them with foil. Heat for about 10 minutes. This method keeps them soft and gooey. You can also microwave a single brownie for about 15 seconds if you prefer. Enjoy them warm! You can check if your brownies are done by using a toothpick. Insert it into the center of the brownies. If it comes out with a few moist crumbs, they are ready. If it comes out wet with batter, bake them a bit longer. The baking time is usually around 25-30 minutes. Yes, you can use different types of chocolate chips. Dark chocolate chips, white chocolate chips, or even peanut butter chips work well. Each will give a unique taste to your brownies. Mix and match to find your favorite flavor. To make your brownies mintier, add more mint chocolate chips. You can also add mint extract. Start with 1/4 teaspoon and taste the batter. Be careful, as mint extract is strong. A little goes a long way! Serve your brownies warm with a scoop of vanilla ice cream. You can also top them with whipped cream or chocolate ganache. For a fun twist, add crushed mint candies or a sprinkle of sea salt. Garnish with fresh mint leaves for a nice touch. Yes, you can freeze these brownies. First, let them cool completely. Then, wrap them tightly in plastic wrap. Place them in an airtight container or freezer bag. They can last up to three months in the freezer. When ready to eat, thaw them in the fridge or at room temperature. In this post, we covered how to make delicious Chocolate Mint Oreo Brownies. We went through the ingredients and detailed the steps to bake them perfectly. I shared tips for great results and suggested variations to try. Remember, the secret lies in mixing well and baking at the right time. Enjoy your brownies fresh, store them properly, and don’t be shy to experiment. Happy baking!

Chocolate Mint Oreo Brownies Delightful and Decadent

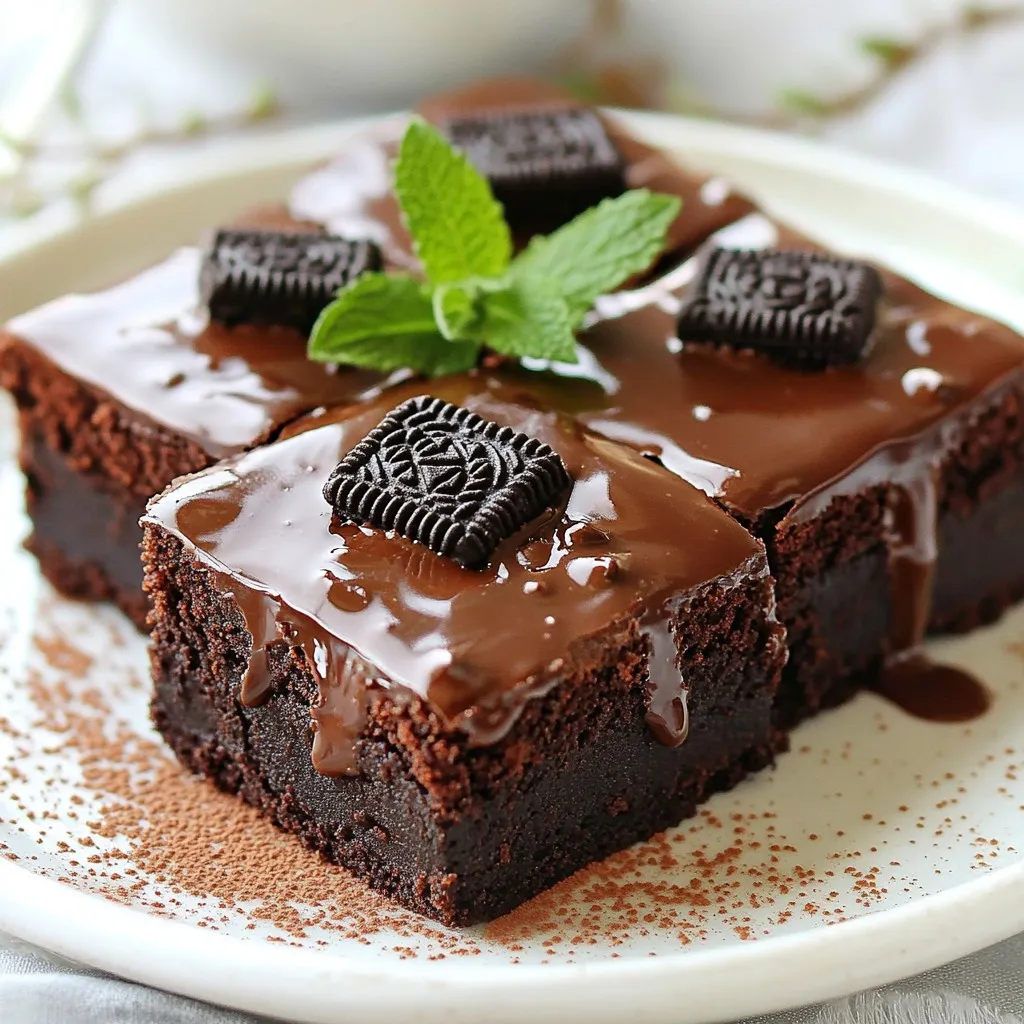
Are you ready to satisfy your sweet tooth? These Chocolate Mint Oreo Brownies are a game-changer! With a rich, chocolatey

- 300g pasta (fettuccine or penne) - 2 chicken breasts, diced into bite-sized pieces - 1 cup fresh spinach, roughly chopped - 1 cup mushrooms, thinly sliced (button or cremini) - 1 small onion, finely diced - 3 cloves garlic, minced - 1 cup heavy cream - ½ cup freshly grated parmesan cheese - 2 tablespoons extra-virgin olive oil - 1 teaspoon dried oregano - Salt and freshly ground black pepper to taste - Fresh basil leaves for garnish When you gather your ingredients, think about the fresh flavors you will create. I love using fettuccine for its creamy sauce-hugging shape, but penne works great too. The chicken adds heartiness, while spinach brings a burst of color and nutrition. Mushrooms, onion, and garlic create a lovely base for the sauce. Heavy cream and parmesan cheese join forces to make the dish rich and indulgent. Don't forget the seasoning! Dried oregano, salt, and pepper elevate the taste. Lastly, fresh basil leaves make for a beautiful garnish. Each ingredient plays a role in this dish, ensuring every bite is packed with flavor. {{ingredient_image_2}} This blog post covers making a creamy pasta dish from start to finish. We explored key ingredients like pasta, chicken, and fresh veggies. I detailed step-by-step cooking instructions and shared tips for perfecting your sauce. You can also find variations and storage tips to suit your needs. Cooking is fun, and this dish is sure to impress. With practice, you can make it your own. Enjoy experimenting with flavors and ingredients to create your perfect plate!

Creamy Spinach Mushroom Chicken Pasta Delightful Dish

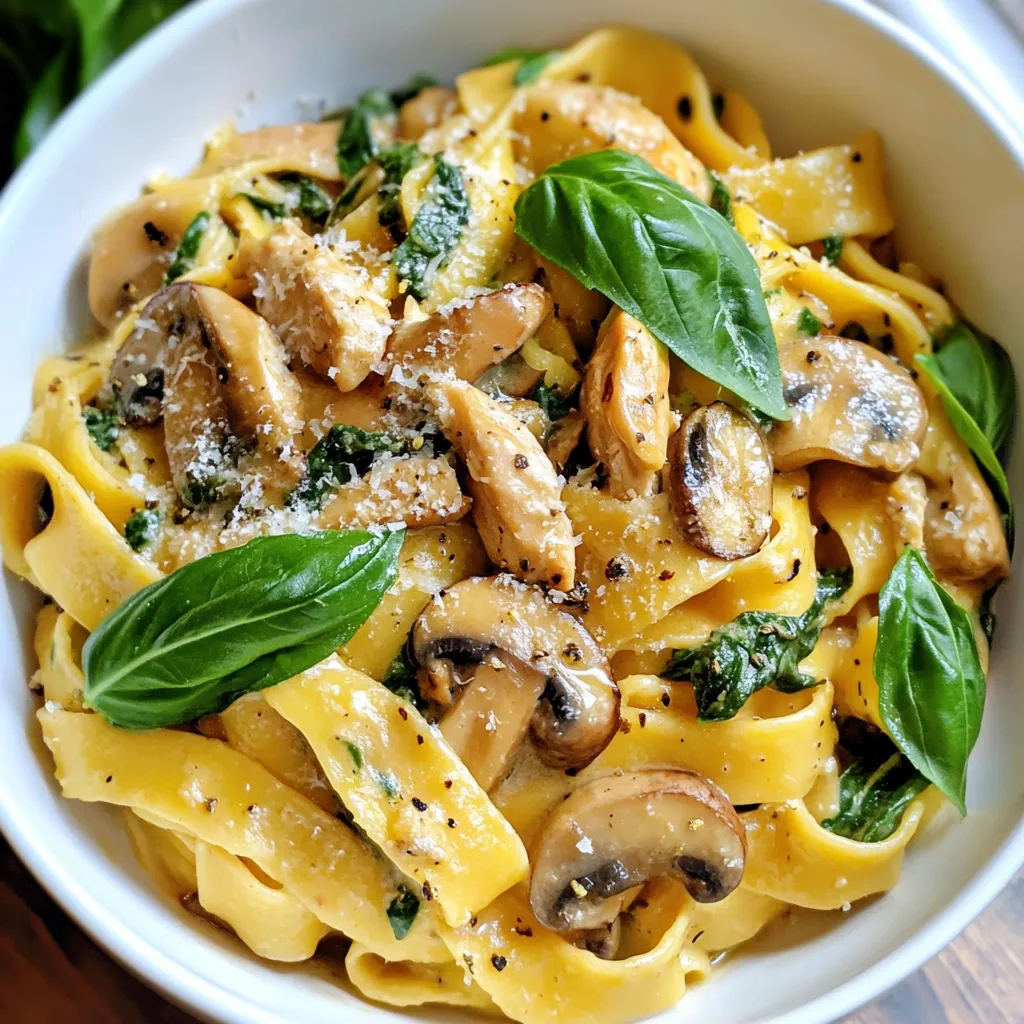
Dive into the world of creamy comfort with my delicious Creamy Spinach Mushroom Chicken Pasta! This dish combines tender chicken,

To make this tasty cranberry orange fudge, you will need: - 2 cups white chocolate chips - 1 can (14 oz) sweetened condensed milk - 1 cup dried cranberries, roughly chopped - Zest of 1 large orange - 1 tablespoon freshly squeezed orange juice - ½ teaspoon vanilla extract - Pinch of salt These ingredients come together to create a rich and creamy fudge with bright citrus notes. If you want to add more flavor and crunch, consider these optional ingredients: - ¼ cup chopped walnuts or pecans Nuts give the fudge a nice texture and deepen the flavor. You can skip them if you prefer a smoother fudge. When choosing your ingredients, look for high-quality white chocolate chips. They should melt well and taste sweet. For cranberries, select ones that are soft and plump. Fresh oranges are best for zest and juice, as they add a vibrant flavor. If you go for nuts, pick ones that are fresh and unsalted to keep the flavor balanced. {{ingredient_image_2}} Start by preparing your baking dish. Use an 8x8 inch dish for the fudge. Line it with parchment paper. Make sure the paper hangs over the sides. This will help you lift the fudge out later. It’s an easy way to cut it into pieces. In a medium saucepan, add the white chocolate chips. Pour in the sweetened condensed milk too. Place the saucepan on low heat. Stir often as it melts. You want the mixture to be smooth and creamy. This part is fun! The aroma will fill your kitchen. Once the chocolate melts, take the saucepan off the heat. Now, add the chopped dried cranberries. Toss in the orange zest, orange juice, vanilla extract, and a pinch of salt. Stir well until everything blends together. If you want nuts, fold in the chopped walnuts or pecans. These add a nice crunch. Pour the fudge mixture into your prepared baking dish. Use a spatula to spread it out evenly. Make sure the top is smooth. Then, place the dish in the fridge. Chill for 2-3 hours. When it feels firm to the touch, it’s ready. Lift the fudge out using the parchment paper. Place it on a cutting board and cut it into squares. Enjoy your sweet treat! Texture is key for great fudge. You want it to be smooth and creamy. When melting, stir continuously. This helps prevent lumps. If it feels too thick, add a splash of milk. A perfect fudge should be firm but not hard. It should melt in your mouth with a slight chew. Common mistakes can ruin your fudge. First, don’t rush the melting process. Heat should be low to avoid burning. If you burn the chocolate, start over. Next, make sure to mix well. If ingredients are not combined, the fudge may not set right. Lastly, always chill it for enough time. Patience is key for the best results. Presentation makes your fudge look special. Cut it into even squares for a neat look. Serve it on a colorful platter. Sprinkle extra orange zest on top for a pop of color. For gifts, wrap each piece in cellophane. It makes a sweet treat for friends or family. A little care in serving goes a long way! Pro Tips Use Quality Chocolate: Opt for high-quality white chocolate chips for a smoother and richer fudge texture. Chill Thoroughly: Ensure the fudge is completely chilled for at least 2-3 hours to achieve the best firmness and sliceability. Customize Flavors: Experiment with different nuts or even a splash of almond extract for a unique twist on the classic flavor. Gift Presentation: Wrap individual pieces in festive cellophane and tie with a ribbon for an attractive homemade gift. {{image_4}} You can change the flavors of cranberry orange fudge easily. Try using dark chocolate instead of white chocolate. This will give your fudge a rich taste. You can also swap cranberries for dried cherries or blueberries. These fruits add unique flavors. If you want a twist, add a pinch of cinnamon or nutmeg. This will warm up the taste. You can even mix in a bit of peppermint extract for a holiday vibe! If you want nut-free fudge, just skip the nuts. The fudge will still be creamy and tasty without them. If you like a crunchy texture, add crispy rice cereal. This will give you that crunch without the nuts. Always check ingredient labels to ensure no hidden allergens are present. To make this fudge vegan, replace white chocolate chips with dairy-free chocolate chips. Also, use coconut milk instead of sweetened condensed milk. This will keep it creamy and delicious. For gluten-free fudge, ensure that all your ingredients are labeled gluten-free. Most dried fruits and chocolate chips are safe, but it's wise to double-check. These small changes will let anyone enjoy this sweet treat! To keep your cranberry orange fudge fresh, use an airtight container. This seals in moisture and flavor. Line the container with parchment paper for easy removal. Avoid stacking fudge pieces directly on top of each other. This prevents sticking and keeps each piece intact. When stored properly, cranberry orange fudge lasts up to two weeks in the fridge. The sweetened condensed milk helps preserve its rich taste. You might notice the fudge gets firmer over time. This is normal, so don’t worry. Just let it sit out for a few minutes to soften slightly before serving. You can freeze this fudge for up to three months. Cut it into squares before freezing. Wrap each piece tightly in plastic wrap, then place them in a freezer-safe bag. To thaw, move the fudge to the fridge overnight. This keeps it from getting too soft. Enjoy your tasty treat whenever you want! Yes, you can use other types of chocolate. Dark chocolate or milk chocolate work well too. Each type adds a different flavor. Dark chocolate gives a rich taste, while milk chocolate is sweeter. Adjust the sweetness if you choose dark chocolate. To adjust the sweetness, you can change the type of chocolate. Try using semi-sweet chocolate chips. You can also use less sweetened condensed milk. If you want it sweeter, add more chocolate or sugar. Taste as you go to get it just right. Absolutely! You can make this fudge days in advance. Just follow the recipe and let it chill. After it sets, cut it into pieces. Store it in an airtight container in the fridge. It stays fresh for up to two weeks. You can find premade Cranberry Orange Fudge at specialty candy shops. Some bakeries sell it too. Look at local farmers' markets or gourmet stores. Online retailers also offer this fudge for delivery. Check the reviews for the best options. This blog post covered how to make delicious cranberry orange fudge. We explored key ingredients, step-by-step instructions, and tips for success. You learned about variations and how to store your fudge well. In the end, making this fudge can be fun and easy. Don't hesitate to try new flavors or share your fudge with friends. A little effort leads to a treat that everyone will love. Enjoy your sweet creations!

Cranberry Orange Fudge Delightful Sweet Treat Recipe

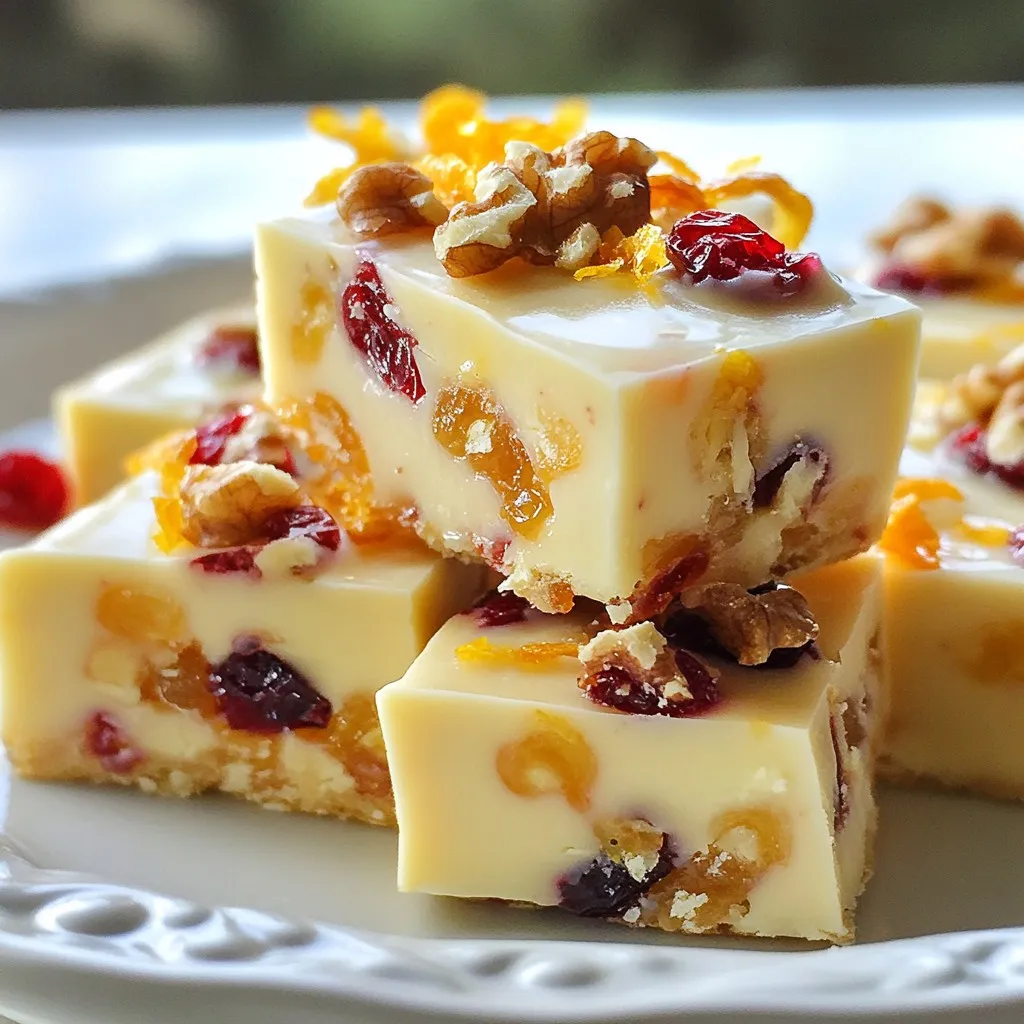
Are you ready to indulge in a sweet treat that bursts with flavor? This Cranberry Orange Fudge is both easy

To make these triple chocolate brownie cookies, you need these key ingredients: - 1 cup unsalted butter, melted - 1 cup packed brown sugar - 1/2 cup granulated sugar - 2 large eggs, at room temperature - 2 teaspoons pure vanilla extract - 1 cup all-purpose flour - 1/2 cup unsweetened cocoa powder - 1/2 teaspoon baking powder - 1/4 teaspoon fine sea salt - 1 cup semisweet chocolate chips - 1/2 cup white chocolate chips - 1/2 cup dark chocolate chunks You can adjust flavors by using different chocolate types. For a nutty crunch, add chopped nuts. If you want a gluten-free option, use a gluten-free flour blend. For tools, gather the following: - Large mixing bowl - Whisk - Sifter - Baking sheets - Parchment paper - Cookie scoop or tablespoon These tools help make the process easy and fun! {{ingredient_image_2}} 1. Start by preheating your oven to 350°F (175°C). This ensures even baking. Line two baking sheets with parchment paper. This helps keep the cookies from sticking and makes cleanup easy. 2. In a large bowl, combine 1 cup of melted unsalted butter, 1 cup of packed brown sugar, and 1/2 cup of granulated sugar. Whisk these together until smooth. Make sure the sugars mix well into the butter. 3. Crack 2 large eggs into the bowl, adding them one at a time. Whisk after each egg until fully mixed in. Then, stir in 2 teaspoons of pure vanilla extract. This adds a lovely flavor to your cookies. 4. In another bowl, sift together 1 cup of all-purpose flour, 1/2 cup of unsweetened cocoa powder, 1/2 teaspoon of baking powder, and 1/4 teaspoon of fine sea salt. Sifting helps to remove lumps. Gradually add this dry mix to the wet mixture. Stir gently until just combined. Be careful not to overmix. 5. Now, fold in 1 cup of semisweet chocolate chips, 1/2 cup of white chocolate chips, and 1/2 cup of dark chocolate chunks. Make sure these goodies are evenly spread throughout the dough. 6. Use a tablespoon or cookie scoop to drop generous balls of dough onto the baking sheets. Leave about 2 inches of space between each cookie. This allows them to spread nicely while baking. 1. Place the baking sheets in the preheated oven. Bake for 10-12 minutes. The edges should look set, but the centers may look slightly underbaked. This keeps the cookies chewy. 2. To check if they are done, look for set edges and a soft center. They will firm up as they cool. 1. Once baked, take the cookies out of the oven. Let them cool on the sheets for about 5 minutes. This helps them firm up a bit. 2. After 5 minutes, transfer the cookies to a wire rack. Let them cool completely. 3. For serving, arrange the cookies on a nice platter. You can dust them with powdered sugar or drizzle with melted chocolate for a fancy touch. Consider serving them with whipped cream or a scoop of vanilla ice cream for extra delight. To create the best cookies, you need to know how to control texture. For chewy cookies, use less flour and bake them for a shorter time. If you want cakey cookies, add a bit more flour. Bake them longer to let them rise. To prevent overmixing, combine your wet and dry ingredients gently. Mix until just combined. This helps keep the cookies soft and chewy. If you overmix, your cookies can become tough. To boost the chocolate richness, consider using different types of cocoa powder. Dark cocoa gives a deeper flavor. You could also add more chocolate chips for extra bursts of chocolate. Nuts can add a nice crunch. Try walnuts or pecans for a great texture. For spices, a pinch of cinnamon can add warmth. You can also use sea salt to enhance the chocolate taste. Pro Tips Use Room Temperature Eggs: Make sure your eggs are at room temperature before adding them to the batter. This helps create a smoother mixture and results in a better texture for your cookies. Don’t Overmix the Dough: When combining the wet and dry ingredients, mix until just combined to keep your cookies tender and chewy. Overmixing can lead to tough cookies. Chill the Dough: For extra thick cookies, consider chilling the dough for at least 30 minutes before baking. This helps the flavors meld together and prevents spreading. Perfect Baking Time: Keep an eye on your cookies as they bake. They should look slightly underbaked in the center when you take them out. They’ll continue to cook on the baking sheet as they cool. {{image_4}} You can switch up the chocolate in these cookies. Try using milk chocolate for a sweeter treat. Dark chocolate gives a nice depth of flavor, too. You could also use chocolate with sea salt for a fun twist. For extra flavor, add a bit of espresso powder to the dough. If you want to make these cookies gluten-free, swap the all-purpose flour for a gluten-free blend. For a vegan option, use a plant-based butter and replace the eggs with flaxseed meal. Just mix one tablespoon of flaxseed meal with three tablespoons of water. Let it sit until it thickens. Holidays are a great time to add festive flavors. You can mix in peppermint extract for a wintery taste. Adding pieces of holiday candies can also be fun. For fall, try using pumpkin spice to give your cookies a warm flavor. For special occasions, think about adding nuts like walnuts or pecans. You can also fold in dried fruits, like cherries or cranberries. These tweaks make the classic cookie feel fresh and exciting. To keep your Triple Chocolate Brownie Cookies fresh, store them in an airtight container. This helps seal in moisture and flavor. Use a container that fits the cookies without squishing them. You can layer them with parchment paper if you stack them. These cookies stay fresh for up to one week at room temperature. If you want to keep them longer, consider freezing them. Freezing your cookie dough or baked cookies is easy. For dough, shape it into balls and place them on a baking sheet. Freeze them for about two hours until firm. Then transfer the balls to a freezer-safe bag. This way, you can bake fresh cookies anytime. To freeze baked cookies, let them cool completely first. Then, layer them in an airtight container with parchment paper between layers. They can last up to three months in the freezer. When you’re ready to enjoy them, thaw the dough or cookies in the fridge overnight. For warm cookies, reheat them in the oven at 350°F for about 5-7 minutes. This brings back that fresh-baked taste and texture. Can I substitute ingredients in the recipe? Yes, you can substitute some ingredients. Use coconut oil for butter if needed. You can also swap brown sugar with white sugar. However, this may change the flavor and texture a bit. How long do the cookies take to bake? These cookies bake in 10 to 12 minutes at 350°F (175°C). Look for set edges and soft centers. What should I do if my dough is too sticky? If your dough is sticky, add a little more flour. Start with one tablespoon at a time until it feels right. You can chill the dough for 30 minutes to help too. Tips for preventing spreading during baking To prevent cookies from spreading too much, chill the dough before baking. Also, ensure you use the right amount of flour. Too little flour can cause spreading. How to achieve a gooey center in cookies To get a gooey center, underbake the cookies slightly. Take them out when the edges are set, but the middle looks soft. They will firm up as they cool. In this post, I covered all you need for making Triple Chocolate Brownie Cookies. You learned how to prepare the dough, bake, cool, and serve your treats. I shared tips for achieving great texture and flavor, along with fun variations to try. Storing your cookies properly keeps them fresh for longer. Follow these steps, and you’ll enjoy delicious cookies every time. Embrace the joy of baking and make these cookies your own!

Triple Chocolate Brownie Cookies Delightful and Rich

Are you ready to indulge in the ultimate chocolate treat? My Triple Chocolate Brownie Cookies are both delightful and rich,

- 1 cup rolled oats - 1/2 cup creamy peanut butter - 1/2 cup honey or maple syrup - 1/2 cup unsweetened cocoa powder - 1/4 cup unsweetened shredded coconut (optional) - 1/2 teaspoon vanilla extract - 1/4 teaspoon salt - 1/2 cup chocolate chips These ingredients come together to make an easy and tasty treat. I love using rolled oats because they give a nice chewy texture. Creamy peanut butter adds richness and depth. You can swap honey for maple syrup if you prefer. Unsweetened cocoa powder gives a chocolatey flavor without too much sweetness. I often add shredded coconut for extra texture. The vanilla extract enhances the overall taste. Don’t forget the salt; it balances the sweetness. Finally, the chocolate chips add little bursts of flavor in every bite. When you gather these ingredients, you set the stage for a delightful no-bake cookie experience. You can vary the chocolate chips based on your taste. Dark, semi-sweet, or even white chocolate chips work great. Each choice offers a unique twist to these cookies! {{ingredient_image_2}} Start by gathering a large mixing bowl. Add 1 cup of rolled oats, 1/2 cup of unsweetened cocoa powder, 1/4 cup of unsweetened shredded coconut (if you like), and 1/4 teaspoon of salt. Mix these dry ingredients well. This blend gives your cookies texture and flavor. Next, take a small saucepan and set it over low heat. Add 1/2 cup of creamy peanut butter, 1/2 cup of honey or maple syrup, and 1/2 teaspoon of vanilla extract. Stir this mixture continuously. You want it to become smooth. This warm mix will help bind the cookies. Carefully pour the warm peanut butter mixture into the bowl with your dry ingredients. Mix everything together well. Ensure all the oats are coated in the peanut butter mix. This step is key for flavor and texture. Using a spoon or a cookie scoop, drop rounded tablespoons of the dough onto a baking sheet lined with parchment paper. Space the cookies about 2 inches apart. With the back of a spoon, gently flatten each cookie to your desired thickness. This helps them hold their shape when they set. Now, refrigerate the cookies for about 30 minutes. This step firms them up. Once they feel firm to the touch, they are ready to enjoy. You can store any leftovers in an airtight container in the fridge for freshness. For the best cookies, aim for a thickness of about half an inch. This size helps them hold together well while still being chewy. If you make them too thick, they may not set properly. The chilling time is key here. Make sure to refrigerate the cookies for about 30 minutes. This step allows them to firm up and makes them easier to handle. You can boost the flavor with a few simple additions. Try mixing in half a teaspoon of cinnamon for warmth. A splash of almond extract can also add a nice twist. Both options can elevate the taste and make your cookies unique. Feel free to experiment with other spices or extracts that you enjoy! Presentation matters, especially with no-bake cookies. Arrange your cookies neatly on a pretty plate. To make them pop, sprinkle a little cocoa powder or shredded coconut on top. This small touch makes a big difference and impresses your guests. Enjoy sharing your delicious treats! Pro Tips Use Natural Sweeteners: While honey and maple syrup are great, consider using agave syrup for a lower glycemic index option that still provides sweetness. Mix and Match Nut Butters: For a unique flavor profile, try substituting almond butter or cashew butter for the peanut butter. Chill for Better Texture: Allow the cookies to chill for a bit longer than 30 minutes for a firmer texture that's easier to bite into. Customize with Add-Ins: Feel free to add in your favorite mix-ins like chopped nuts, dried fruits, or even protein powder for an extra nutritional boost! {{image_4}} You can make these cookies even better with nuts and seeds. I love adding chopped almonds or walnuts. They add a nice crunch and flavor. Chia seeds are a great choice too. They provide extra fiber and nutrition. Just stir in about 1/4 cup of your favorite nut or seed before you mix in the chocolate chips. This simple change makes the cookies more filling and gives them a fun twist. If you want to make these cookies vegan, it’s easy! Swap honey for maple syrup. Both sweeteners work well, but maple syrup is plant-based. For the nut butter, you can use almond or sunflower seed butter. This keeps the cookies creamy and delicious. Just remember to check that your nut butter is free of added sugars or oils for the best results. To spice things up, try using different chocolate chips. You can choose dark, semi-sweet, or even white chocolate. Each type brings a new taste to the cookies. You can also add dried fruits. Chopped raisins, cranberries, or even apricots work well. Add about 1/2 cup of dried fruit for a burst of sweetness and texture. Play with flavors and find your favorites! To keep your no-bake chocolate oatmeal cookies fresh, use an airtight container. This method keeps moisture out and prevents your cookies from becoming hard. Traditional methods, like using a simple plate or bowl, won’t protect them as well. Air can make your cookies stale quickly. An airtight container is a must for best results. You can store these cookies in the refrigerator for about one week. They stay tasty and fresh for this time. If you want the best flavor, eat them within the first few days. After that, the taste may change. Always check for any signs of spoilage before enjoying. To freeze your no-bake cookies, first let them cool completely. Then, place them in a single layer on a baking sheet and freeze for about one hour. Once firm, transfer the cookies to an airtight container. You can stack them with parchment paper between layers to prevent sticking. To thaw, just leave them out at room temperature for a few minutes. Enjoy them whenever you want! Yes, you can try other sweeteners. Agave syrup works well. You can also use brown sugar. If you use brown sugar, melt it with the peanut butter. Adjust the amount based on your taste. Remember, different sweeteners may change the cookie's texture. I recommend using rolled oats for this recipe. Rolled oats have a great texture that holds up well. Quick oats can also work but may result in a softer cookie. Steel-cut oats are too coarse and won't blend well. Stick with rolled oats for the best results. These cookies take about 30 minutes to set in the fridge. This time helps them firm up nicely. If you want them firmer, you can chill them longer. Just remember to keep an eye on them so they don't freeze. Yes, you can make these cookies without peanut butter. Try using almond butter or sunflower seed butter instead. You can also use coconut oil for a nut-free option. Each substitute will change the flavor a bit, but they'll still be tasty! These no-bake cookies are easy and fun to make. By mixing oats, peanut butter, honey, cocoa, and chocolate chips, you create a tasty treat. Remember to chill them to get the best texture. Feel free to add nuts, fruits, or spices for extra flavor. Store them in an airtight container for freshness. Whether you opt for classic or creative variations, these cookies satisfy cravings. Enjoy making and sharing these delightful bites with family and friends. Happy baking!

No-Bake Chocolate Oatmeal Cookies Easy and Delicious

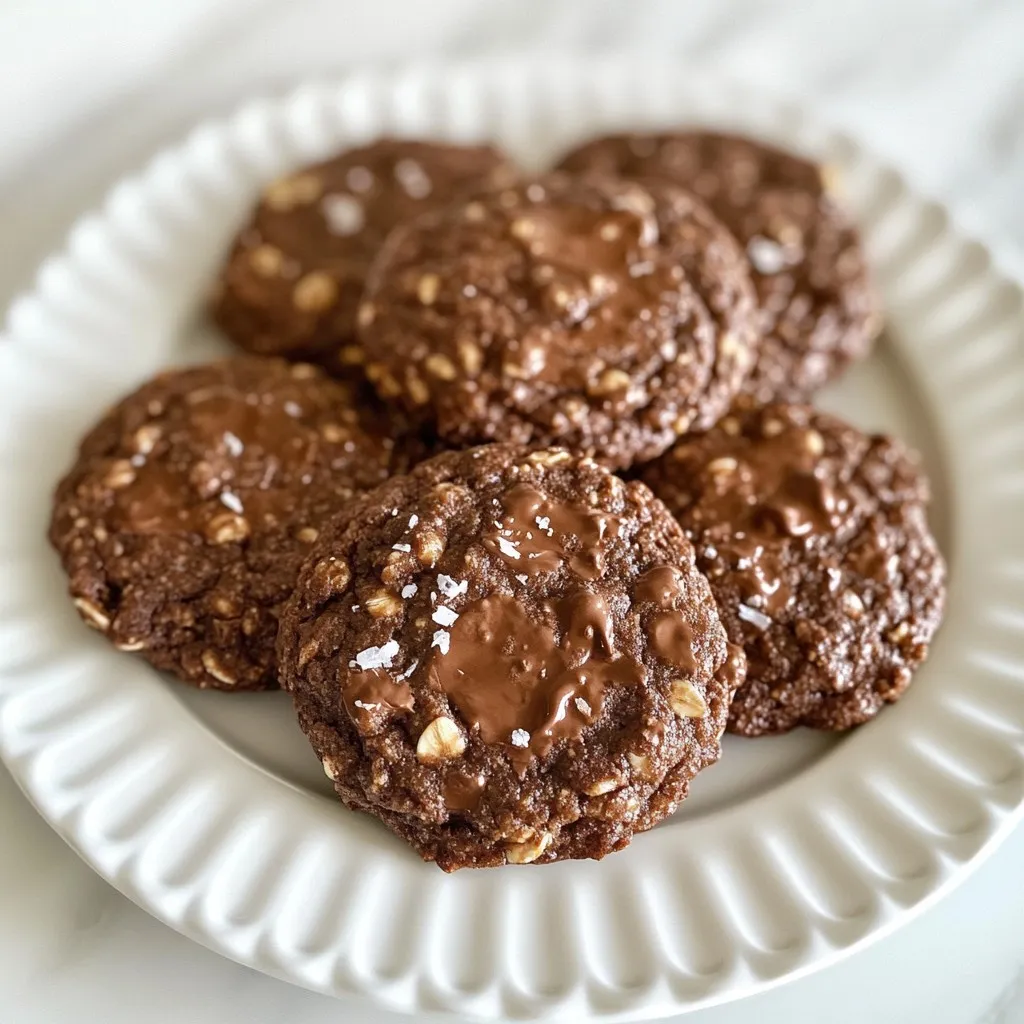
Looking for a sweet treat that’s quick and easy? No-Bake Chocolate Oatmeal Cookies are your answer! You’ll love how simple

- 4 medium Russet potatoes - 1/2 cup unsalted butter, melted - 4 cloves garlic, finely minced - 1 teaspoon dried thyme - 1 teaspoon smoked paprika - 1/2 cup freshly grated Parmesan cheese - Sea salt and freshly cracked black pepper to taste - Fresh parsley, finely chopped (for garnish) For this recipe, use four medium Russet potatoes. Medium potatoes weigh about 5 to 7 ounces each. The butter should be unsalted and melted, measuring half a cup. You will need four cloves of garlic, finely minced, which gives a strong flavor. Use one teaspoon each of dried thyme and smoked paprika for depth. Freshly grated Parmesan should total half a cup for best taste. Finally, season with sea salt and freshly cracked black pepper according to your preference. When choosing potatoes, go for firm ones without any blemishes. Fresh garlic is key, so select heads that feel heavy and firm. For butter, unsalted is best to control the saltiness. The Parmesan should be freshly grated for that rich, creamy flavor. Smoked paprika adds a nice warmth, so pick a high-quality brand. Fresh parsley should be vibrant and green to add a lovely garnish. Using quality ingredients makes these potatoes truly shine! {{ingredient_image_2}} Start by preheating your oven to 425°F (220°C). This step ensures the oven is hot when you bake. Next, rinse the Russet potatoes under cold water. Scrub them well to remove dirt. After that, pat them dry with a kitchen towel. A dry potato roasts better and gets crispier. Now, take a sharp knife and slice each potato crosswise. Make 1/4-inch thick slices. Be careful to stop about 1/4 inch from the bottom. This keeps the potato intact. A handy trick is to place each potato between two chopsticks. This way, you won’t cut all the way through. In a small bowl, mix the melted unsalted butter with minced garlic. Add dried thyme, smoked paprika, sea salt, and freshly cracked black pepper. Stir until everything blends well. This garlic butter adds rich flavor to the potatoes. Drizzle the garlic-butter mixture over each potato. Make sure to get some in the slices. You can use a basting brush for this task. Next, sprinkle freshly grated Parmesan cheese over the potatoes. Let some cheese fall into the crevices to create a tasty crust. Place the potatoes on a parchment-lined baking sheet. Roast them in the oven for 45-50 minutes. Bake until the edges turn golden and crispy. The insides should be tender and fluffy. After roasting, take the potatoes out of the oven. Let them cool for about 2-3 minutes. This allows the flavors to settle. Just before serving, sprinkle fresh, chopped parsley on top. It adds color and freshness. For presentation, serve the potatoes on a wooden cutting board. Drizzle any remaining garlic butter from the baking sheet over the top. This extra touch boosts flavor and makes the dish look beautiful. To get crispy potatoes, start with Russet potatoes. They have a high starch content, which makes them perfect for this dish. Slice them thinly, about 1/4 inch apart, but stop slicing before reaching the bottom. This keeps them intact. Brush them with garlic butter, letting it seep into the cuts. Bake at 425°F for 45-50 minutes. This high heat helps create that golden crust. One mistake is cutting the potatoes too deep. If you cut through, they will fall apart. Another common error is not drying the potatoes well. Moisture can make them soggy. Use fresh garlic for the best flavor, as dried garlic won't give the same taste. Don’t skip the sea salt and black pepper. They enhance the flavor a lot. You need a few tools for this recipe: - Sharp chef's knife - Cutting board - Parchment paper - Mixing bowl - Basting brush Using chopsticks or wooden spoons while slicing can help prevent cutting all the way through. These tools make the process easy and fun. Enjoy your cooking! Pro Tips Slice with Care: Use a sharp knife and stop cutting about 1/4 inch from the bottom to keep the potato intact while creating beautiful, crispy layers. Season Generously: Don’t skimp on the garlic-butter mixture; ensure it seeps into the cuts for maximum flavor throughout the potato. Choose the Right Cheese: Opt for fresh grated Parmesan instead of pre-grated for a richer flavor and better melting quality. Rest Before Serving: Allow the potatoes to cool for a few minutes after roasting, which helps the flavors settle and makes them easier to handle. {{image_4}} You can make cheesy garlic Hasselback potatoes by adding more cheese. Use a mix of mozzarella and cheddar for a gooey texture. After you drizzle the garlic butter, layer some cheese into the cuts. This extra cheese melts and creates a beautiful, cheesy crust. The combination of flavors will make your taste buds sing! For herb-infused Hasselback potatoes, try adding fresh herbs to the butter mix. You can use herbs like rosemary, basil, or oregano. Just chop them finely and mix them with the garlic butter. This adds a fresh taste that works well with the buttery and cheesy elements. Each bite will burst with flavor, giving you a garden-fresh experience. If you like heat, make spicy garlic Parmesan Hasselback potatoes. Add a teaspoon of red pepper flakes to the garlic butter mix. This gives the dish a nice kick. The spicy flavor pairs perfectly with the garlic and Parmesan. You can also drizzle some hot sauce after baking for an extra punch. Enjoy the blend of flavors that dance on your palate! After enjoying your garlic Parmesan Hasselback potatoes, store any leftovers in an airtight container. Make sure they are completely cool before sealing them. This helps keep them fresh. Your leftovers can last in the fridge for about 3 to 4 days. If you want to keep them longer, consider freezing. To reheat your Hasselback potatoes, preheat your oven to 350°F (175°C). Place the potatoes on a baking sheet. Cover them loosely with foil to prevent drying out. Heat for about 15 to 20 minutes, or until heated through. You can also reheat them in a microwave, but the oven helps keep them crispy. To freeze your Hasselback potatoes, first let them cool completely. Wrap each potato in plastic wrap, then place them in a freezer-safe bag. They can last for up to 3 months in the freezer. When you’re ready to eat, thaw them overnight in the fridge. Then, reheat as described above. Enjoy your tasty side dish even after a few months! Yes, you can use other potatoes. Yukon Golds or red potatoes work well. They add different flavors and textures. Just make sure they are similar in size for even cooking. Reheat your leftovers in the oven. Set it to 350°F (175°C). Place the potatoes on a baking sheet. Cover them loosely with foil to keep them moist. Heat for about 15-20 minutes or until warm. You can add your favorite herbs or spices. Try rosemary or oregano for a fresh taste. You can also use different cheeses like cheddar or feta. This makes the dish unique every time you make it. Hasselback potatoes can fit into a healthy diet. They contain fiber and vitamins from the potatoes. Use less butter or cheese if you want a lighter option. Enjoy them as a side with balanced meals. In this blog post, we covered how to make tasty Hasselback potatoes. We looked at the best ingredients, step-by-step cooking tips, and ways to add flavor. I shared common mistakes to avoid and gave you ideas for storage and reheating. Perfect Hasselback potatoes can add fun to any meal. You can try different toppings or herbs to match your taste. Remember, cooking can be a great adventure. Enjoy your time in the kitchen!

Garlic Parmesan Hasselback Potatoes Tasty Side Dish

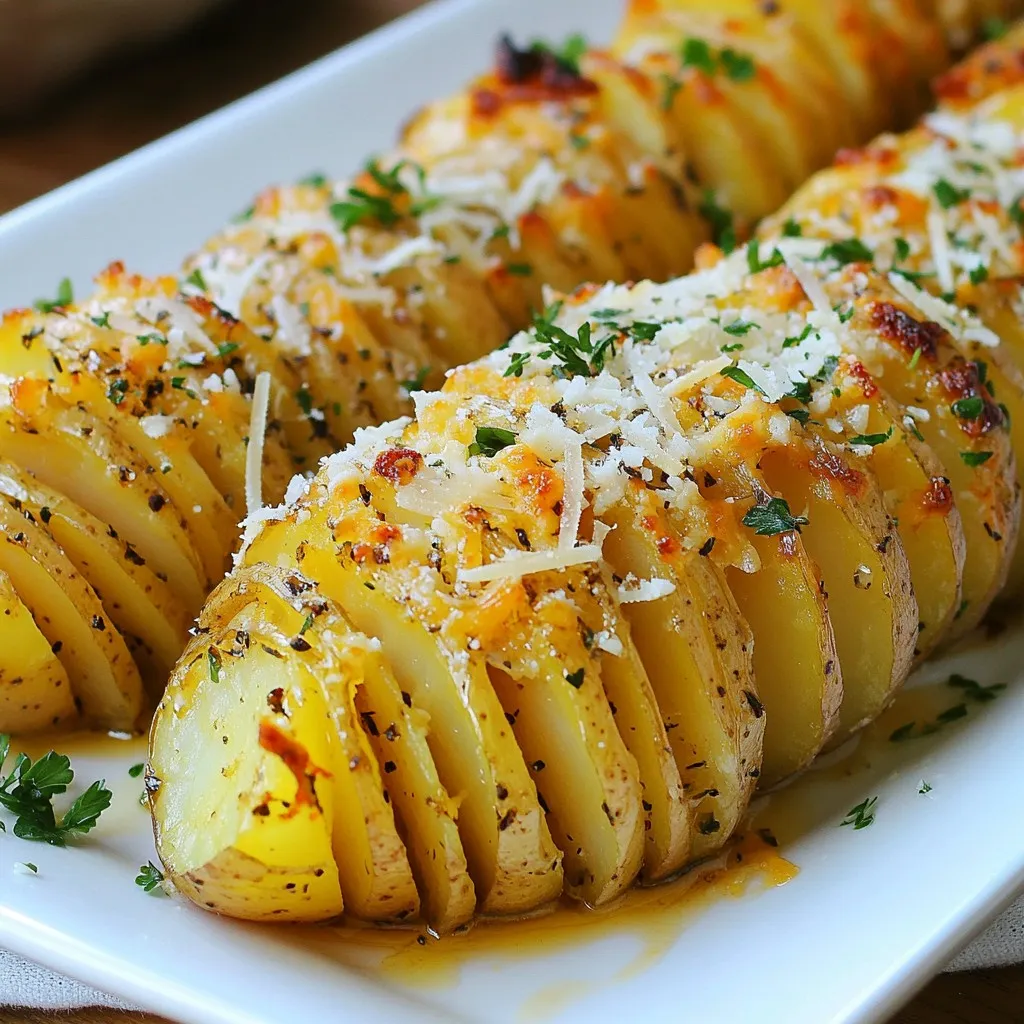
If you want a side dish that wows, try my Garlic Parmesan Hasselback Potatoes! Crispy, buttery, and loaded with flavor,

- 4 salmon fillets (approximately 6 ounces each) - 1/4 cup pure maple syrup - 2 tablespoons Dijon mustard - 1 tablespoon extra-virgin olive oil - 2 garlic cloves, finely minced - 1 teaspoon fresh thyme leaves (or 1/2 teaspoon dried thyme) - Salt and freshly ground black pepper, to taste - Lemon wedges, for serving To make Maple Dijon Glazed Salmon, you will need fresh salmon fillets. I prefer using wild-caught salmon for its rich flavor. The glaze comes from a mix of maple syrup and Dijon mustard. This balance gives a sweet and tangy taste. You also need extra-virgin olive oil to help the glaze stick. Minced garlic adds a nice kick to the flavor. Fresh thyme offers a hint of earthiness that pairs well with the fish. Don't forget salt and pepper; they enhance all the flavors. Finally, lemon wedges bring a refreshing finish to each bite. - Baking sheet - Parchment paper - Mixing bowl - Whisk - Spoon or brush For this recipe, you will need a few simple tools. Start with a baking sheet lined with parchment paper. This helps with clean-up and keeps the fish from sticking. A mixing bowl is essential for whisking the glaze. A whisk works best to combine the ingredients smoothly. If you don’t have a whisk, a fork will do the trick. You will also need a spoon or brush to spread the glaze over the salmon. These tools make the process easier and more enjoyable. {{ingredient_image_2}} - Preheat your oven to 375°F (190°C). This helps the salmon cook evenly. - Line a baking sheet with parchment paper. This prevents sticking and makes cleanup easy. - In a medium bowl, whisk together: - 1/4 cup pure maple syrup - 2 tablespoons Dijon mustard - 1 tablespoon extra-virgin olive oil - 2 minced garlic cloves - 1 teaspoon fresh thyme leaves - Salt and pepper to taste - Whisk until smooth. The glaze should blend well and be glossy. - Arrange the salmon fillets on the baking sheet. Place them skin-side down. - Generously pour the maple Dijon glaze over each fillet. Use a spoon or brush for even coating. - Bake the salmon for 12-15 minutes. Check doneness by using a fork. If it flakes easily, it’s ready. - For a caramelized finish, switch on the broiler for the last 2-3 minutes. Stay close to watch for burning. - Remove the salmon and let it rest for a couple of minutes before serving. This helps keep it juicy. - Serve with lemon wedges for a fresh burst of flavor. - Ensuring the right cooking temperature: Cook salmon at 375°F (190°C) for even results. This temperature helps the fish cook through without drying out. - How to tell if salmon is done: Check if the salmon flakes easily with a fork. If it does, it’s ready! The fish should look opaque and lose its raw color. - Suggestions for additional spices or herbs: Try adding a pinch of paprika or smoked paprika for a deeper flavor. Fresh dill also pairs well and adds a bright note. - Tips on glazing consistency: Make sure your glaze is smooth and not too thick. If it’s too thick, whisk in a bit of water or extra olive oil for ease of application. - Garnishing ideas: Top your salmon with fresh thyme or parsley for a burst of color. You can also add thin lemon slices for a bright touch. - Side dish pairings: Serve with roasted vegetables or a fresh salad to complete your meal. Quinoa or rice also makes a great base to soak up the glaze. Pro Tips Marinate for More Flavor: Allow the salmon to marinate in the glaze for up to 30 minutes before baking to enhance the flavor profile. Use Fresh Ingredients: Opt for fresh thyme and high-quality maple syrup for the best taste. Fresh herbs elevate the dish significantly. Check Doneness Carefully: Salmon can dry out quickly; check for doneness at the lower end of the cooking time to maintain moisture. Experiment with Glaze Variations: Try adding a splash of soy sauce or a pinch of cayenne pepper to the glaze for an exciting flavor twist. {{image_4}} You can change the fish type in this recipe. While salmon is great, try using trout or halibut. Both work well with the glaze. Each fish brings its own flavor and texture. You might enjoy the subtle taste of trout or the firm bite of halibut. For sweeteners, maple syrup shines, but you can swap it for honey or agave. Each option gives a unique taste. If you want less sweetness, use mustard only. It will still taste great! Grilling or baking are both excellent for this dish. Grilling adds a smoky flavor and nice grill marks. To grill, preheat your grill and cook the salmon for about six minutes per side. Baking is easy and less messy. It allows the glaze to caramelize gently. Just follow the oven steps from the recipe. You can also cook on a stovetop. Heat a pan over medium heat, add oil, and sear the fillets for 4-5 minutes on each side. This method gives a crispy skin and keeps the inside moist. Pair your Maple Dijon Glazed Salmon with sides for a complete meal. Roasted vegetables are a great option. Try asparagus or Brussels sprouts, seasoned simply. A fresh salad with lemon vinaigrette also works well. If you're looking to add more flavor, try sauces or toppings. A dollop of yogurt with herbs can add creaminess. You could also serve with a tangy salsa or a sweet chutney for extra zing. Enjoy exploring these tasty variations! To keep your Maple Dijon Glazed Salmon fresh, place leftovers in an airtight container. Make sure to cool the salmon to room temperature before storing. In the fridge, it will stay good for up to three days. If you want to keep it longer, consider freezing. To safely reheat your salmon, use the oven or microwave. For the oven, preheat to 350°F (175°C). Place the salmon on a baking sheet and heat for about 10 minutes. This keeps the fish moist. If using a microwave, cover the salmon with a damp paper towel and heat in short bursts of 30 seconds until warm. If you want to freeze the salmon, wrap each fillet in plastic wrap. Then place them in a freezer bag or a container. This method keeps air out and prevents freezer burn. You can freeze the salmon for up to three months. When ready to eat, thaw it overnight in the fridge before reheating. Enjoy your delicious meal again! Yes, you can use frozen salmon. Just make sure to thaw it first. Thawing is best done overnight in the fridge. If you are short on time, you can run it under cold water for 30 minutes. This helps to keep the salmon moist and flavorful. It usually takes about 12 to 15 minutes to cook salmon at 375°F. The exact time may vary based on the thickness of the fillets. Always check for doneness to ensure the salmon is cooked through but still tender. The best way to tell if salmon is cooked is to check if it flakes easily with a fork. You can also look for a color change. Cooked salmon will turn from a bright pink to a light, opaque color. Yes, you can prepare the glaze ahead of time. Whisk the maple syrup, Dijon mustard, olive oil, garlic, thyme, salt, and pepper together. Store it in an airtight container in the fridge for up to three days. Just give it a good stir before using. Maple Dijon Glazed Salmon pairs well with roasted vegetables, a fresh salad, or rice. You can also serve it with quinoa or couscous for a hearty meal. Adding lemon wedges enhances the dish with a fresh burst of flavor. This blog covered how to make Maple Dijon Glazed Salmon. We shared key ingredients, simple steps, and helpful kitchen tools. You learned to create a tasty glaze and bake the salmon to perfection. Remember to check for doneness and try the serving suggestions. Enjoy experimenting with variations and flavors. With practice, you'll impress everyone with your salmon dish. Keep it fun and tasty!

Maple Dijon Glazed Salmon Flavorful and Easy Recipe

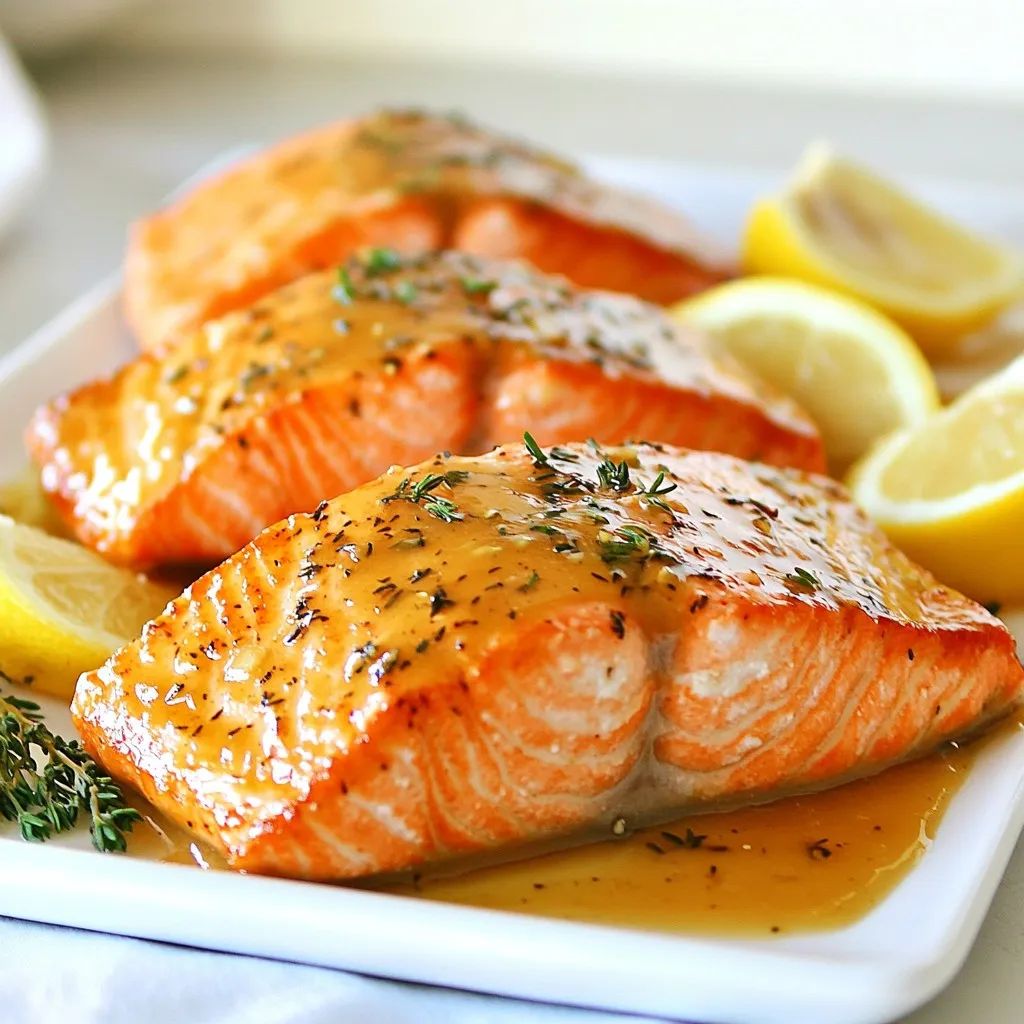
Looking for a quick and delicious meal that’s sure to impress? This Maple Dijon Glazed Salmon recipe is packed with

These coconut chocolate chip granola bars are simple yet tasty. Here’s what you need: - 2 cups rolled oats - 1 cup shredded unsweetened coconut - 1/2 cup almond butter (or any nut butter you like) - 1/2 cup honey or pure maple syrup - 1/2 cup dark chocolate chips - 1/4 cup sunflower seeds - 1/4 cup chopped nuts (like almonds or walnuts) - 1/4 teaspoon sea salt - 1/2 teaspoon vanilla extract (optional, but nice to add) Each ingredient plays a key role. The oats give a hearty base. Coconut adds a tropical twist. Almond butter binds it all together. Honey or maple syrup sweetens the mix. You can switch out ingredients based on your taste or what you have: - Use peanut butter instead of almond butter for a different flavor. - Swap honey for agave syrup to make it vegan. - Choose any nut butter if you want a nut-free option. - Change dark chocolate chips for milk chocolate or white chocolate. Each swap can change the taste and texture, so feel free to experiment! Want to make your bars even more fun? Here are some ideas to consider: - Add dried fruits like cranberries or raisins for sweetness. - Mix in chia seeds or flaxseeds for extra nutrition. - Toss in spices like cinnamon or nutmeg for warmth. - Try protein powder for a protein boost. These add-ins can make your granola bars unique. Customize them to fit your cravings! {{ingredient_image_2}} First, prepare your workspace. Preheat your oven to 350°F (175°C). Grab an 8x8-inch baking pan. Line it with parchment paper, leaving some paper hanging over the sides. This helps you lift the bars out later. Next, let’s mix the dry ingredients. In a large bowl, combine 2 cups of rolled oats, 1 cup of shredded unsweetened coconut, 1/4 cup of sunflower seeds, and 1/4 cup of chopped nuts. Stir everything well to blend the flavors. Now, we need to melt the wet ingredients. In a microwave-safe bowl, add 1/2 cup of almond butter, 1/2 cup of honey or maple syrup, and 1/2 teaspoon of vanilla extract. Microwave this mixture for 30 to 45 seconds. Stir it until it becomes smooth. Pour the melted mixture over the dry ingredients. Use a spatula to mix it all together. Make sure every bit of the dry mix is coated. Then, gently fold in 1/2 cup of dark chocolate chips. Be careful not to break the chips. Transfer the granola mixture to your prepared baking pan. Use the back of your spatula to press it down firmly. This helps the bars stick together. Now, place the pan in the oven. Bake for 20 to 25 minutes. You want the edges to turn a light golden brown. After baking, let the bars cool in the pan for 10 to 15 minutes. Use the parchment paper to lift the bars out. Place them on a wire rack to cool completely. Once cool, cut them into squares or rectangles. Enjoy your tasty granola bars! To get the right texture, follow these tips. Use rolled oats, not instant or quick oats. Rolled oats give a nice chew. Press the mixture firmly into the pan. This helps the bars hold their shape. Bake until the edges are golden. This step adds a crunchy bite. If you want softer bars, bake for a shorter time. Store the bars in an airtight container. They stay fresh for up to a week. For longer storage, wrap bars in parchment paper. Then place them in a freezer-safe bag. They stay tasty for up to three months in the freezer. Always allow the bars to cool fully before storing. This keeps them from getting soggy. Serve the bars as a snack or breakfast. Pair them with yogurt or fresh fruit for a balanced meal. Cut them into smaller pieces for kids. You can also crumble them over ice cream for a fun treat. For a pretty presentation, sprinkle extra coconut and chocolate chips on top. Pro Tips Use Fresh Ingredients: For the best flavor, make sure to use fresh rolled oats and coconut. Stale ingredients can affect the texture and taste of your granola bars. Adjust Sweetness: Depending on your preference and dietary needs, feel free to adjust the amount of honey or maple syrup. You can also use agave syrup or a sugar substitute. Customize Your Mix-ins: Don't hesitate to personalize your granola bars! Add different dried fruits, seeds, or spices like cinnamon for a unique twist. Store Properly: To keep your granola bars fresh, store them in an airtight container at room temperature for up to a week, or refrigerate them for longer shelf life. {{image_4}} You can change the flavor of these bars easily. If you want nut-free bars, use sunflower seed butter. For a chocolate-free option, skip the dark chocolate chips. You can add dried fruits like cranberries or raisins for a sweet twist. Try adding spices like cinnamon or nutmeg for extra warmth. Seasonal changes can inspire new flavors. In fall, add pumpkin spice and chopped apples. In winter, consider adding peppermint extract and crushed candy canes. For summer, mix in fresh berries or tropical fruits like mango and pineapple. Each season brings a chance to enjoy different tastes. To make these bars healthier, swap honey with mashed bananas or unsweetened applesauce. You can also reduce the chocolate chips to cut sugar. Use whole grain oats for more fiber. Adding chia seeds or flaxseeds can boost nutrition too. These small changes keep your bars tasty and good for you. These Coconut Chocolate Chip Granola Bars pack a tasty punch. Each bar has about 170 calories. You get around 7 grams of protein, 8 grams of fat, and 21 grams of carbs. These numbers may change based on your exact ingredients. - Rolled oats: They are great for your heart. Oats can lower cholesterol and keep you full. - Shredded unsweetened coconut: This adds healthy fats and fiber. It can boost your energy. - Almond butter: Packed with protein and good fats, this helps with muscle and brain health. - Honey or maple syrup: These natural sweeteners give a quick energy boost. They also have antioxidants. - Dark chocolate chips: They contain antioxidants and can even improve mood. - Sunflower seeds: These are full of vitamins. They help skin and heart health. - Chopped nuts: Almonds or walnuts add healthy fats and protein. They support brain health. To avoid overindulging, cut the bars into smaller pieces. Aim for 1-2 bars as a snack. Store extra bars in an airtight container. This keeps them fresh and ready for your next craving. Enjoy these bars in moderation to balance your diet! Yes, you can use any nut butter you like. Almond butter is tasty, but peanut butter or cashew butter works too. Each nut butter adds a unique flavor. Just make sure it is smooth for easy mixing. This way, your granola bars will still hold together well. To make these bars vegan, swap honey for pure maple syrup. This keeps the sweetness without using any animal products. Also, check that your chocolate chips are dairy-free. Many brands offer great vegan options. With these swaps, everyone can enjoy these tasty treats! These granola bars last up to two weeks when stored in an airtight container. Keep them in a cool, dry place. You can also wrap them individually for easy snacks. If you want them to last longer, store them in the fridge. Just remember to bring them to room temperature before eating. In this blog post, we explored the key ingredients for tasty snacks, from main components to optional add-ins. We detailed step-by-step instructions for preparation, mixing, and baking. You now have tips to enhance texture and keep your food fresh. We also covered flavor variations and health benefits. Remember, you can customize recipes to fit your diet. Experiment with different ingredients to find what you love most. With the right approach, you can create delicious snacks that everyone will enjoy. Your kitchen adventure starts now!

Coconut Chocolate Chip Granola Bars Easy and Tasty Treat

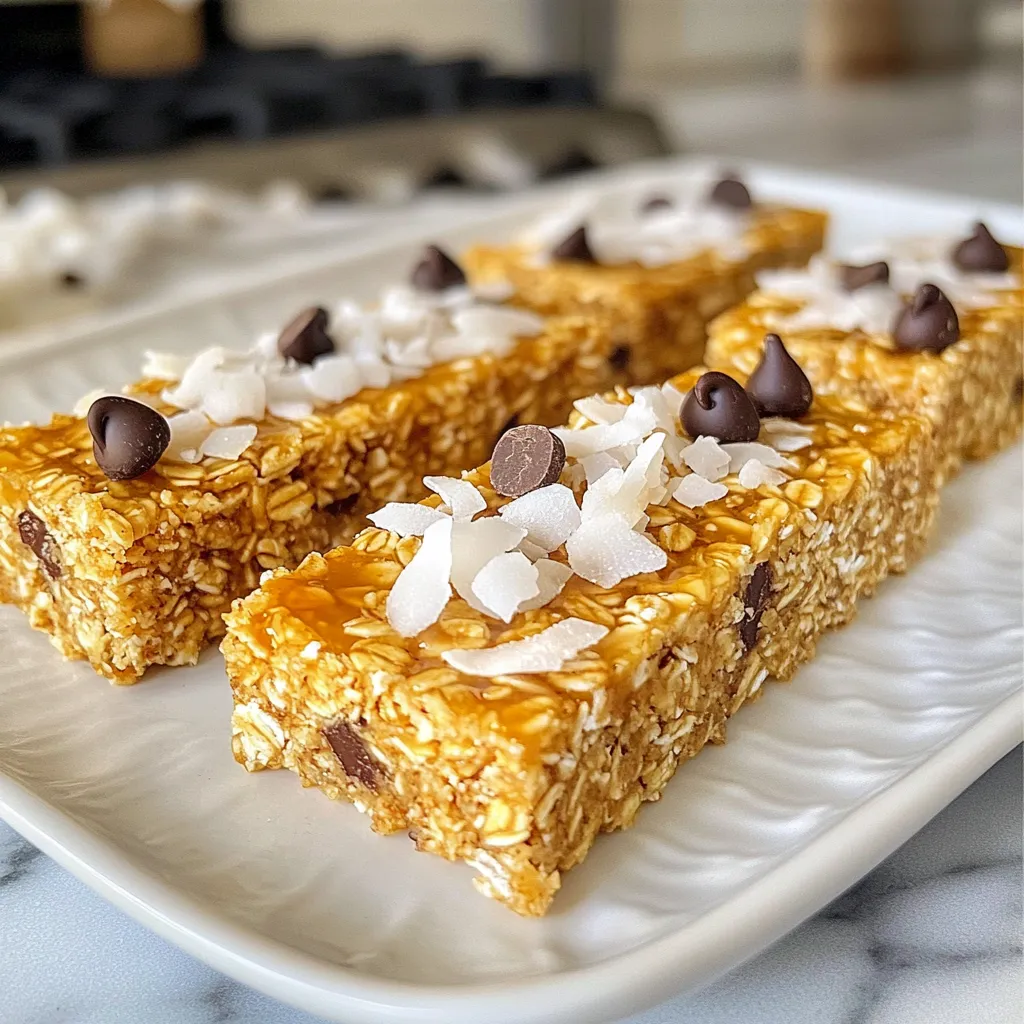
Are you ready for a snack that’s both easy to make and delicious? These Coconut Chocolate Chip Granola Bars are

To make creamy broccoli cheddar soup, you will need: - 2 cups fresh broccoli florets - 1 cup sharp cheddar cheese, finely grated - 1 medium onion, diced - 2 cloves garlic, minced - 3 cups vegetable broth - 1 cup milk (or heavy cream for a richer taste) - 3 tablespoons unsalted butter - 3 tablespoons all-purpose flour - Salt and freshly ground black pepper to taste - A pinch of freshly grated nutmeg (optional) Gather these tools for a smooth cooking process: - A large, heavy-bottomed pot - A wooden spoon for stirring - An immersion blender or a countertop blender - Measuring cups and spoons - A cutting board and knife These tools make the cooking process easier and more enjoyable. This creamy broccoli cheddar soup serves four. Each serving contains: - Calories: Approximately 300 - Protein: 12g - Carbohydrates: 22g - Fat: 18g - Fiber: 3g - Sodium: Varies based on broth and added salt This soup offers a comforting meal rich in flavor and nutrients. {{ingredient_image_2}} Start by melting 3 tablespoons of unsalted butter in a large pot over medium heat. Wait until it foams. Then, add 1 medium diced onion. Cook it for about 5 minutes. Stir often until the onion is soft and clear. Next, add 2 minced garlic cloves. Cook this for one more minute. You want the garlic to smell good but not brown. Now, sprinkle in 3 tablespoons of all-purpose flour. Stir constantly to mix it well. This forms a roux. Cook it for about 2 minutes. The flour should be lightly golden. This base adds a rich flavor. Slowly pour in 3 cups of vegetable broth. Whisk it well to avoid lumps. Turn up the heat a bit and let it simmer gently. Once it starts to bubble, add 2 cups of fresh broccoli florets. Let this cook for about 10 minutes. The broccoli should get tender and bright green. This step gives the soup its fresh taste. After cooking, it’s time to blend. Use an immersion blender to mix the soup until it’s smooth. If you don’t have one, carefully pour the soup into a regular blender. Blend it in batches to get a silky texture. Return the soup to the pot if you used a regular blender. Stir in 1 cup of milk and 1 cup of finely grated sharp cheddar cheese. Heat this over low heat. Keep stirring until the cheese melts. This makes the soup rich and creamy. Finally, season with salt, pepper, and a pinch of freshly grated nutmeg if you like. Taste it and adjust the seasoning to your preference. Now, your creamy broccoli cheddar soup is ready to serve! To get that perfect creamy soup, start with a good roux. Mix flour with butter and cook it until golden. This gives the soup a nice base. Use an immersion blender for a smooth texture. If you don’t have one, you can blend the soup in batches. Add milk or heavy cream slowly while stirring. This helps the cheese melt in nicely. One mistake is cooking the garlic too long. It can turn bitter. Another mistake is not whisking the broth in slowly. This can create lumps in your soup. Also, don't skip seasoning. A little salt and pepper can bring out the flavors. Lastly, avoid overcooking the broccoli. It should be tender but still bright green. Serve the soup hot in beautiful bowls. Top it with extra cheddar for a cheesy finish. Add a few fresh broccoli florets for color. Drizzle with olive oil for a gourmet touch. Pair it with crusty bread for a hearty meal. You can also offer a side salad for freshness. Enjoy your creamy broccoli cheddar soup! Pro Tips Fresh Broccoli is Best: For the most vibrant flavor and texture, use fresh broccoli florets instead of frozen. They will give your soup a lovely green color and a crunchier bite. Cheese Choices Matter: While sharp cheddar is traditional, feel free to experiment with other cheeses like Gruyère or Monterey Jack for a different flavor profile. Adjust the Creaminess: If you want an ultra-creamy texture, consider adding heavy cream instead of milk. This will give your soup a luxuriously smooth finish. Garnish for Presentation: Garnish each bowl with a sprinkle of fresh herbs like parsley or chives, and a drizzle of olive oil to elevate the dish's presentation and flavor. {{image_4}} You can easily make this soup vegan. Use plant-based butter and almond or oat milk. For cheese, try vegan cheese shreds. This keeps the creamy texture and flavor while being dairy-free. If you need a gluten-free option, swap the all-purpose flour for a gluten-free blend. This keeps your soup thick and tasty. To add some heat, toss in red pepper flakes or diced jalapeños. This gives the soup a warm kick. For an herb-infused twist, mix in fresh thyme or rosemary. These herbs add depth and a lovely aroma. You can also squeeze in some fresh lemon juice for brightness. Feel free to experiment with different cheeses. Gruyère or mozzarella can give a unique taste. You can also add more veggies, such as carrots or cauliflower. Just chop them small so they cook evenly. Adding a handful of spinach near the end boosts nutrition and color. Storing leftovers is simple. First, let your soup cool to room temperature. Then, pour it into airtight containers. Make sure to leave some space at the top of the container for expansion. Seal the containers tightly. You can store the soup in the fridge for up to four days. If you want to freeze the soup, use freezer-safe containers. Divide the soup into portions for easy thawing later. It can last for up to three months in the freezer. When you’re ready to eat, thaw it in the fridge overnight. Reheat gently on the stove over low heat. Stir often to keep the texture smooth. If it seems too thick, add a splash of milk or broth. The shelf life of your creamy broccoli cheddar soup is about four days in the fridge. In the freezer, it can last for three months. Always check for any off smells or changes in color before eating. Keeping your soup stored well helps maintain its fresh taste and creamy texture. Yes, you can use frozen broccoli. Frozen broccoli cooks faster than fresh. Just add it to the pot during the simmering step. It will blend into the soup well, keeping the flavor rich. To thicken the soup, you have a few options: - Add more flour: Mix in a bit more flour when making the roux. - Use less broth: Start with less vegetable broth for a creamier base. - Blend more: Blend the soup longer to create a thicker texture. - Add potato: Cook and blend in a peeled potato for natural thickness. Here are some tasty side dishes to consider: - Crusty bread: A nice loaf of bread pairs well with the soup. - Salad: A light green salad adds freshness to your meal. - Grilled cheese: This classic combo makes for a comforting meal. - Savory scones: Cheese or herb scones bring a delightful twist. These sides enhance the comfort of the creamy broccoli cheddar soup. Enjoy your meal! This blog post covered how to make creamy broccoli cheddar soup from start to finish. You learned about the ingredients, tools, and nutritional information needed. I shared handy tips to get that perfect creamy texture and how to avoid common mistakes. We also explored variations to fit different diets and ways to store leftovers. In closing, making this soup at home is fun and rewarding. With these steps and tips, you'll enjoy a tasty meal that can please everyone.

Creamy Broccoli Cheddar Soup Simple and Delicious Recipe

If you crave comfort food, creamy broccoli cheddar soup is a must-try! This simple and delicious recipe combines rich flavors

Older posts
Newer posts
← Previous Page1 … Page109 Page110 Page111 Next →

dsad

© 2025 spoonfulsavory • Built with GeneratePress

Our Policies

  • Copyright Policy
  • Cookie Policy
  • GDPR Policy
  • Privacy Policy
  • Disclaimer
  • Terms Of Use

More Information

  • Home
  • About
  • Contact
  • Appetizers
  • Dessert
  • Dinner
  • Drinks
©2025, spoonfulsavory About Back To Top