Skip to content
DisclaimerTerms Of UseGDPR PolicyCookie Policy

spoonfulsavory

  • Home
  • Drinks
  • Appetizers
  • Dinner
  • Dessert
  • About
  • Contact
  • Privacy Policy
DisclaimerTerms Of UseGDPR PolicyCookie Policy

Sarah

To make creamy garlic Parmesan orzo, gather these items: - 1 cup orzo pasta - 3 cups vegetable broth - 1 tablespoon extra virgin olive oil - 4 cloves garlic, finely minced - 1 small onion, diced - 1 cup heavy cream - 1 cup freshly grated Parmesan cheese - 1 teaspoon garlic powder - 1/2 teaspoon freshly cracked black pepper - Salt, to taste - Fresh parsley, finely chopped (for garnish) You can use any brand of orzo pasta, but I like Barilla for its quality. For vegetable broth, look for low-sodium options from brands like Swanson or Pacific Foods. If you want to adjust the flavor, try chicken broth instead. Heavy cream is best from brands like Horizon or Organic Valley. If you need a lighter version, you can use half-and-half. For those who like more flavor, add extra garlic or use roasted garlic. Fresh ingredients make a big difference in this dish. Fresh garlic gives a stronger taste than jarred. Use fresh parsley for bright color and flavor. Freshly grated Parmesan melts better than pre-grated cheese. This makes your orzo creamy and rich. When you use fresh ingredients, you create a dish that tastes great and looks beautiful. Always choose quality items to make your cooking shine. First, bring the vegetable broth to a gentle simmer in a medium saucepan. This takes just a few minutes over medium heat. Stir it often to help it heat evenly. Once it simmers, add 1 cup of orzo pasta. Cook the orzo according to the package instructions, which is about 8-10 minutes. Stir it gently to stop it from sticking. When done, drain the orzo and set it aside. While the orzo cooks, heat 1 tablespoon of extra virgin olive oil in a large skillet over medium heat. Add 1 small diced onion and sauté for 3-4 minutes. You want the onion to turn soft and see-through. Next, add 4 cloves of finely minced garlic. Sauté for another 1-2 minutes, but be careful not to let the garlic brown. This can make it taste bitter. Lower the heat and pour in 1 cup of heavy cream. Stir well to mix the cream with the onion and garlic. Now, combine the cooked orzo with the creamy mixture in the skillet. Add the orzo along with the broth you cooked it in. Mix everything well until the orzo is coated in the creamy sauce. Gradually fold in 1 cup of freshly grated Parmesan cheese. Add 1 teaspoon of garlic powder, 1/2 teaspoon of black pepper, and salt to taste. Keep stirring for 3-4 minutes until the sauce becomes thick and creamy. If the mixture is too thick, add a splash of reserved broth or water. Once heated through, let it rest for a minute before serving. Garnish with fresh parsley, and enjoy! To get the creamiest texture, use heavy cream. It has a rich fat content that makes your orzo smooth. When you add the cream, lower the heat. This helps prevent the cream from boiling and curdling. Stir the sauce well and keep it warm. This way, the cheese melts perfectly, giving your dish a velvety finish. Timing is key when cooking orzo. Start by cooking the orzo in broth for about 8-10 minutes. Stir it often to keep it from sticking. While the orzo cooks, you can sauté the onion and garlic. This method keeps everything in sync. Once the orzo is ready, mix it into the creamy sauce right away. This keeps the orzo warm and helps it soak up all that flavor. To boost flavor, add freshly grated Parmesan cheese. It melts into the sauce and adds depth. Garlic powder adds an extra punch. Use fresh herbs like parsley for a bright finish. Adjust salt and pepper to taste; this final touch makes a big difference. Don't hesitate to experiment. A splash of lemon juice can add brightness, while red pepper flakes can introduce heat. {{image_4}} You can make this creamy garlic Parmesan orzo even better by adding protein. Chicken works well. Just cook it in the skillet before adding onions. Cut it into small pieces for even cooking. Shrimp is another tasty option. Cook the shrimp until pink and tender. Add it in before mixing the orzo. This adds flavor and makes your meal more filling. Adding vegetables can boost the nutrition of your orzo. Spinach is a great choice. Toss in fresh spinach while the orzo cooks. It wilts down nicely and adds color. Peas are another fun option. Add frozen peas during the last few minutes of cooking. This keeps them bright and sweet. You can use any veggies you enjoy to make this dish your own. If you want a dairy-free version, there are simple swaps. Use coconut cream instead of heavy cream for richness. Nutritional yeast can replace Parmesan cheese. It adds a cheesy flavor without dairy. Look for plant-based butter to use in place of olive oil. These changes keep the dish creamy while meeting dietary needs. To keep your creamy garlic Parmesan orzo fresh, store it in an airtight container. Make sure to let it cool first. You can place it in the fridge for up to three days. If you want to keep it longer, consider freezing it. When you're ready to enjoy your leftovers, reheat the orzo gently. Use a skillet over low heat. Add a splash of broth or water to help it warm up without drying out. Stir often until it’s heated through. You can also use the microwave, but make sure to cover it to keep moisture in. For longer storage, freeze the creamy orzo. Place it in a freezer-safe container or bag. It can last up to three months in the freezer. When you want to eat it, thaw it overnight in the fridge. You can then reheat it as mentioned above. This way, you can enjoy this tasty dish anytime! Yes, you can use other pasta. Options like elbow macaroni or fettuccine work well. Just adjust the cooking time based on the pasta type. For example, smaller pasta cooks faster than orzo, while larger pasta may take longer. Always check the package for specific cooking times. To make this dish gluten-free, simply use gluten-free orzo pasta. Many brands offer this option. The cooking method remains the same. Keep an eye on the cooking time, as gluten-free pasta can cook faster or slower than regular pasta. Always taste your pasta to ensure it's cooked to your liking. Creamy garlic Parmesan orzo pairs well with many dishes. You can serve it alongside grilled chicken, roasted vegetables, or a fresh salad. It also complements seafood, like shrimp or salmon. For a heartier meal, try it with steak or pork chops. The creamy orzo adds a nice balance to these flavors. This blog post covered how to make creamy garlic Parmesan orzo. We discussed key ingredients and brands. I explained cooking steps for the perfect dish. Tips for creaminess and timing rounded out the guide. You can even try fun variations with proteins and veggies. Remember to store your leftovers properly and reheat them well. With these tips, you'll enjoy a tasty orzo dish any time. Happy cooking!

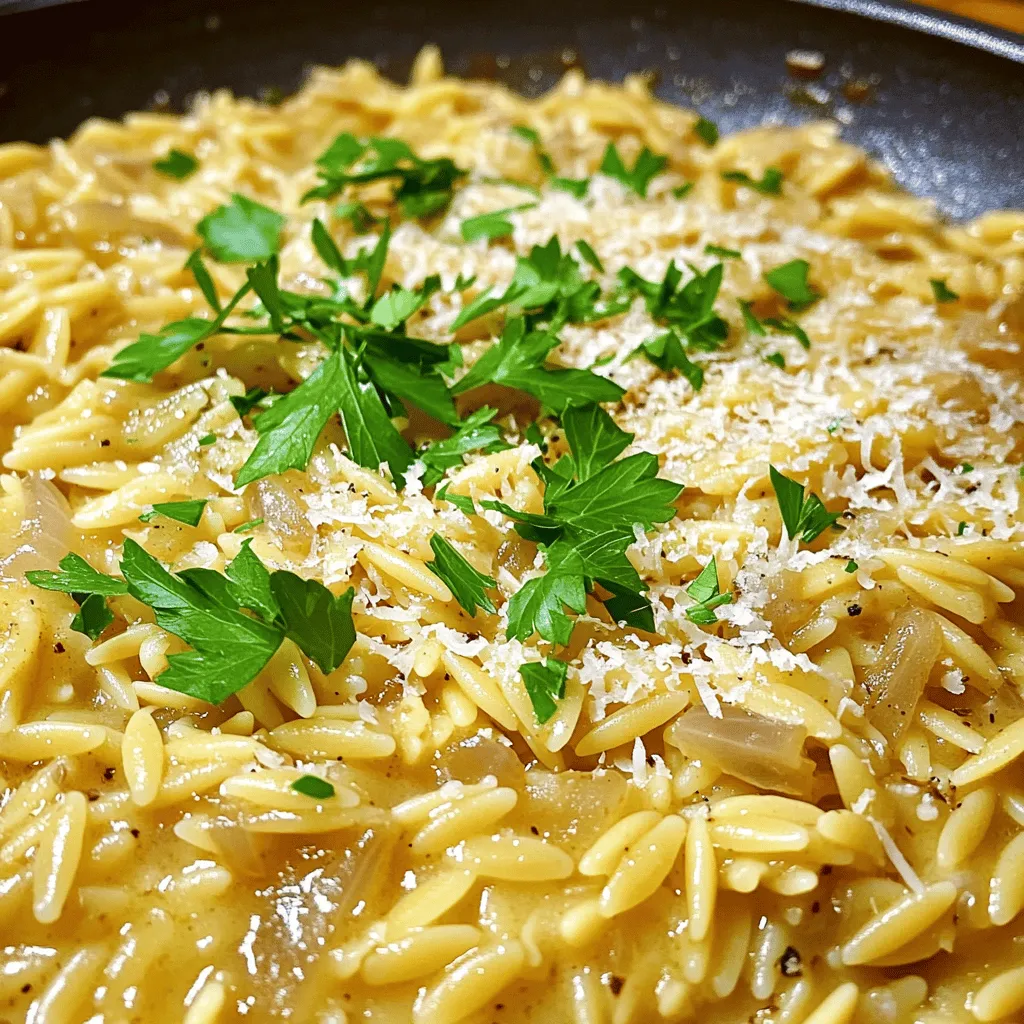
Creamy Garlic Parmesan Orzo Flavorful Side Dish

Creamy Garlic Parmesan Orzo is a side dish that will wow your taste buds! With its rich flavors and smooth

To make taco stuffed avocados, gather these tasty ingredients: - 2 ripe avocados, halved and pitted - 1 cup ground turkey or beef (or a plant-based alternative) - 1 tablespoon taco seasoning - 1/2 cup black beans, rinsed and drained - 1/2 cup corn (fresh, canned, or frozen) - 1 cup diced tomatoes - 1/4 cup red onion, finely chopped - 1/2 cup shredded cheese (cheddar or Mexican blend) - 1/4 cup fresh cilantro, chopped - Juice of 1 lime - Salt and pepper to taste You can make your taco stuffed avocados even better with these toppings: - Sour cream - Sliced jalapeños - Additional cilantro Each serving of taco stuffed avocados provides a great balance of nutrients. They are rich in healthy fats from the avocados. You also get protein from the meat and black beans. Plus, the veggies add fiber and vitamins that are good for your body. This recipe is a fun and healthy meal option, perfect for any day! {{ingredient_image_2}} First, heat a skillet over medium heat. Add 1 cup of ground turkey or beef. Cook the meat for 5-7 minutes. Stir it often until it is browned all over. If there is extra fat, drain it. This keeps the filling light and tasty. In a separate bowl, mix 1/2 cup of rinsed black beans and 1/2 cup of corn. Add 1 cup of diced tomatoes and 1/4 cup of finely chopped red onion. Squeeze the juice of 1 lime into the mix. Season with a pinch of salt and pepper. Toss all the veggies together until they are well mixed. Now, take the cooked meat and add it to the veggie mix. Gently fold everything together. You want a nice, even filling that bursts with flavor. This step makes sure every bite is delicious. Halve 2 ripe avocados and remove the pits. Use a spoon to scoop out a little more flesh if needed. Take the taco filling and stuff it into each avocado half. Don’t be shy! Heap it on for a fun look. Finally, sprinkle 1/2 cup of shredded cheese over the stuffed avocados. Add 1/4 cup of chopped fresh cilantro on top for a fresh touch. If you want, you can also add optional toppings like sour cream or jalapeños. These give extra flavor and make the dish pop. To make taco stuffed avocados shine, start with ripe avocados. A ripe avocado feels slightly soft when you press it gently. Look for avocados with a dark green or black skin. Avoid those with large dark spots or cracks. If you find hard avocados, leave them at room temperature for a few days to ripen. Once ripe, store them in the fridge to slow down spoilage. If you want a lighter option, use ground turkey or a plant-based meat alternative. Cook it over medium heat until browned. This usually takes about 5-7 minutes. Make sure to drain any excess fat. For plant-based options, look for brands that mimic ground meat. They cook similarly and absorb flavors well. Always check the package for specific cooking instructions. Spices can elevate your taco stuffed avocados. Taco seasoning adds a burst of flavor, but you can mix your own too. Use chili powder, cumin, and garlic powder for a custom blend. A pinch of smoked paprika gives a wonderful depth. For more heat, add cayenne pepper. Don't forget to taste as you go; adjust salt and pepper to your liking. Fresh lime juice brightens the dish, so squeeze some over your filling. Pro Tips Choose Ripe Avocados: Make sure your avocados are perfectly ripe for the best flavor and texture. They should yield slightly to gentle pressure when squeezed. If they're not ripe, leave them at room temperature for a few days. Customize Your Seasoning: Feel free to adjust the taco seasoning to your taste. You can add more spices like cumin or chili powder for extra heat or flavor, or even try a pre-made spice blend for convenience. Make it Vegetarian: Substitute the meat with a plant-based alternative such as lentils or crumbled tofu for a delicious vegetarian option. This not only changes the flavor profile but also adds variety to your meals. Serve Immediately: For the best texture and flavor, serve the stuffed avocados immediately after preparation. The avocados can brown quickly, so consider adding lime juice to the exposed flesh to help prevent oxidation. {{image_4}} You can easily make taco stuffed avocados vegetarian or vegan. For a vegetarian option, swap ground meat for lentils or mushrooms. Cook them with taco seasoning just like the meat. For a vegan twist, use black beans or chickpeas. You can also add quinoa for extra protein. These options still pack in flavor and texture. If you want to use different proteins, there are plenty of choices. Ground chicken or pork works well in this recipe. For a lighter option, try shredded rotisserie chicken. You can also use plant-based meat for a good vegan choice. Just remember to cook it the same way as you would ground beef. Switch up the veggie mix for even more fun. You can add diced bell peppers for crunch. Chopped zucchini or corn can add sweetness, too. If you like spice, throw in some diced jalapeños. These additions keep your stuffed avocados fresh and exciting. Feel free to mix and match your favorite veggies. To store leftover stuffed avocados, wrap them tightly in plastic wrap. This helps keep them fresh. Place the wrapped avocados in an airtight container. Store them in the fridge. They are best eaten within one day. For meal prep, consider making the filling in advance. Cook the meat and mix it with the veggies. Store this mixture in a separate container. You can cut the avocados just before serving. This keeps them fresh and green. If you want to reheat the filling, place it in a skillet. Heat it on low until warm. Do not reheat the avocados. They taste best fresh. If you need to enjoy them warm, try stuffing fresh avocados with the heated filling. Yes, you can use any ground meat you like. Ground chicken or pork works well too. For a healthier option, try lean turkey. If you prefer plant-based meals, use lentils or a meat substitute. This makes taco stuffed avocados flexible for everyone's taste. To keep avocados fresh, squeeze some lime juice on the cut sides. The acid slows down browning. You can also store them in an airtight container. If you have leftovers, cover the filling tightly with plastic wrap. This helps keep them looking fresh and green. These tasty treats pair well with many sides. Try serving them with tortilla chips and salsa. A fresh salad or rice also makes a great match. If you want more heat, add jalapeño poppers or spicy nachos. The options are endless, so get creative! Yes, taco stuffed avocados are a healthy choice. They are packed with protein and fiber from the meat and beans. Avocados offer healthy fats that are good for your heart. Plus, you can load them with veggies. This dish can fit into many meal plans, including low-carb diets. You can prepare the filling ahead of time. Store it in the fridge for up to two days. Just wait to stuff the avocados until you're ready to serve. This keeps the avocados fresh and tasty. For the best flavor, enjoy them right after you fill them. You learned about taco stuffed avocados in this post. We covered ingredients, steps, tips, and variations. You now know how to choose ripe avocados and store leftovers properly. These stuffed avocados are tasty, healthy, and flexible. You can adapt them to your taste or dietary needs. Enjoy creating your own version and share it with others. Simple steps lead to delicious meals. Happy cooking!

Taco Stuffed Avocados Flavorful and Simple Recipe

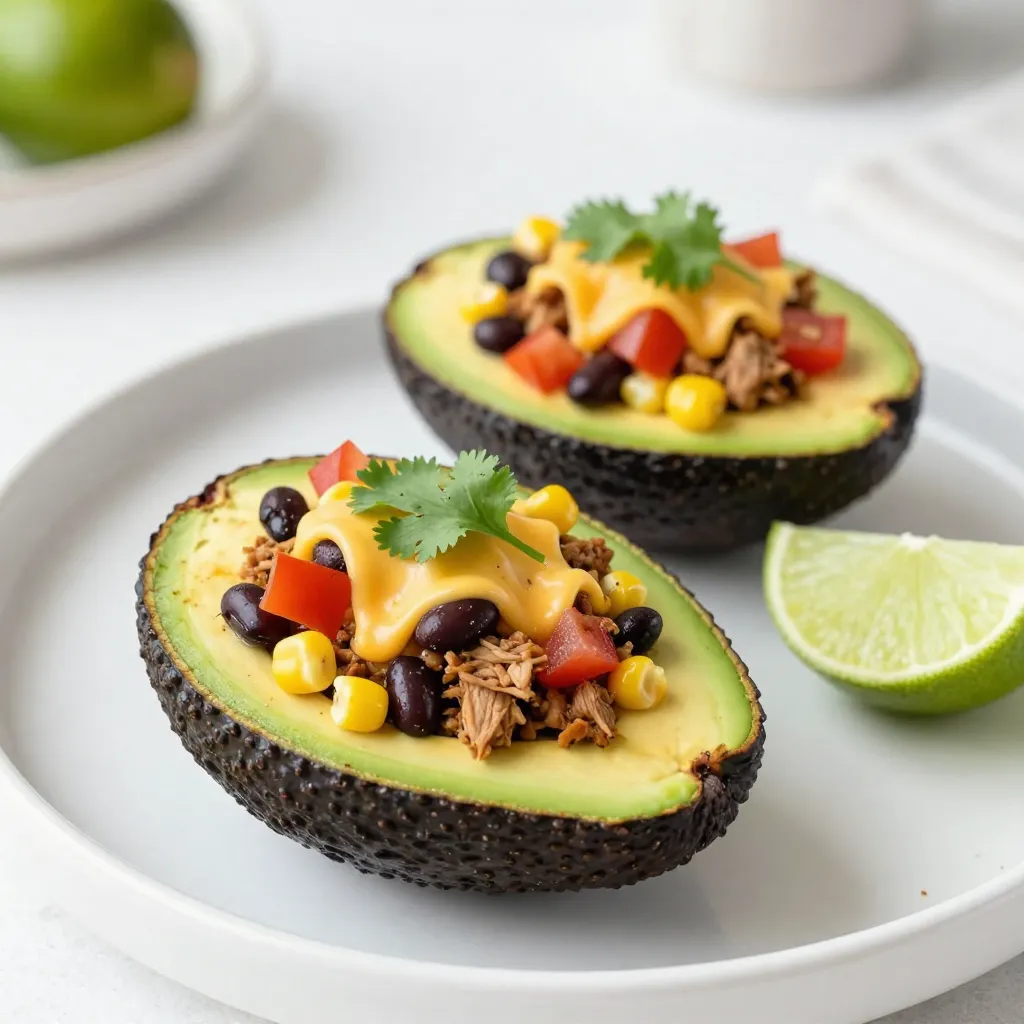
Looking for a fun and tasty twist on taco night? Taco stuffed avocados are your answer! This simple recipe combines

To make Chocolate Coconut Bliss Balls, you will need: - 1 cup medjool dates, pitted - 1 cup unsweetened shredded coconut, plus more for rolling - ½ cup almond flour - ¼ cup unsweetened cocoa powder - 1 tablespoon coconut oil, melted - 1 teaspoon pure vanilla extract - A pinch of sea salt Each bliss ball has about 70 calories. They contain healthy fats from coconut and protein from almond flour. Medjool dates add natural sweetness and fiber. This treat is a good source of energy. With no added sugars, these balls fit well into a balanced diet. Using fresh medjool dates is key. They should be soft and sticky for the best texture. Unsweetened shredded coconut adds flavor without extra sugar. Choose high-quality cocoa powder for a rich taste. Look for pure vanilla extract, as it enhances the overall flavor. Always check for freshness when buying nuts and oils, as quality matters in taste and nutrition. {{ingredient_image_2}} First, grab your food processor. Add the pitted medjool dates. Pulse until they turn into a sticky paste. Make sure there are no big pieces left. This will be the base for our bliss balls. Next, add the unsweetened shredded coconut to the date paste. Then, include the almond flour, cocoa powder, melted coconut oil, vanilla extract, and a pinch of sea salt. Blend until everything combines well. You want a dough-like texture. Scrape down the sides if needed to mix it all in. Now, take a small scoop or use your hands. Grab a teaspoon-sized portion of the mixture. Roll it into a smooth ball about 1 inch wide. After that, roll each ball in more shredded coconut. Press gently to help the coconut stick well. Place the coated bliss balls on a parchment-lined tray. Put them in the fridge for at least 30 minutes. Chilling helps them firm up and brings out their yummy flavor. Enjoy them chilled or at room temperature! You can easily change the taste of your bliss balls. Try adding different nuts or seeds. For a fruity twist, add dried fruits like cranberries or apricots. You can also use flavored extracts, like almond or orange. If you want a spicier kick, add a touch of cinnamon or nutmeg. Experimenting with flavors keeps things fresh and fun! One common mistake is not blending the dates enough. Ensure they form a smooth paste. If the mixture is too dry, add a little more coconut oil. If it's too wet, add more almond flour. Rolling the balls too large can make them hard to eat. Aim for about one inch in diameter for the perfect bite-sized treat. The texture of your bliss balls is key. Use fresh medjool dates for the best stickiness. This helps the balls hold together well. When rolling, press the mixture firmly in your hands. This keeps them from falling apart. After coating with shredded coconut, chill them in the fridge. This helps them firm up and enhances the flavors. Pro Tips Use Fresh Dates: For the best flavor and texture, make sure to use fresh medjool dates. Dried or older dates may not blend well into a paste. Customize Your Coating: Experiment with different coatings like crushed nuts, cacao powder, or even a mix of spices to add variety to your bliss balls. Chill for Flavor: Allowing the bliss balls to chill not only helps them set but also enhances the flavors as the ingredients meld together. Perfect Portioning: Use a small cookie scoop for uniform size and easy portioning, ensuring each bliss ball is the same size for even chilling and presentation. {{image_4}} You can boost your Chocolate Coconut Bliss Balls by adding superfoods. Try adding chia seeds for fiber or hemp seeds for protein. You can also mix in spirulina for a green boost. Superfoods add nutrients and unique flavors. They make your bliss balls even more special and healthy. This recipe is already vegan and gluten-free! The main ingredients, like medjool dates and almond flour, fit these diets. If you want to change the nut base, use oat flour or sunflower seed flour. Both work well and keep the bliss balls tasty. Always check labels to ensure your ingredients are gluten-free. Want to change the flavor? Add a few drops of mint extract for a fresh twist. You can also mix in nut butters like almond or peanut for creaminess. Just remember to cut back on the coconut oil if you add nut butter. These flavor changes keep your treats exciting and new! To keep your chocolate coconut bliss balls fresh, use an airtight container. This helps prevent them from drying out. Store the container in the fridge for the best results. If you want to keep them longer, consider freezing them. These bliss balls will stay fresh in the fridge for up to one week. After that, they may lose their texture and flavor. If you freeze them, they can last for three months. Just remember to wrap them well before freezing. To freeze the bliss balls, first chill them in the fridge. Once they are firm, place them in a single layer on a baking tray. Freeze them for about an hour. After that, transfer them to a freezer-safe bag. This method prevents them from sticking together. When you're ready to eat, just thaw them in the fridge overnight! Yes, you can use other nuts. Cashews or walnuts work well in this recipe. You can also try pecans or hazelnuts. Just chop them finely or grind them to match the almond flour texture. If you need a substitute for almond flour, try using cashew flour or sunflower seed flour. Both will give a nice texture and flavor to the bliss balls. Oat flour is another option if you want something gluten-free. To make chocolate coconut bliss balls sugar-free, use sugar-free chocolate or cocoa powder. Medjool dates are naturally sweet, so you may not need extra sweeteners. Check the labels on any added ingredients for hidden sugars. Yes, adding protein powder is a great idea! It boosts the nutrition of your bliss balls. Use about 1 to 2 tablespoons of your favorite protein powder. This will also enhance the flavor. Absolutely! The medjool dates provide natural sweetness and fiber. The unsweetened shredded coconut adds healthy fats and keeps you full. Almond flour is a good source of protein and vitamin E. Cocoa powder is rich in antioxidants, making these bliss balls a tasty and healthy treat! In this post, we explored key ingredients for bliss balls, their nutrition, and quality tips. I gave you clear steps for preparing, mixing, and chilling them. We covered tips for customizing flavors and avoiding mistakes. Variations lets you add superfoods or make them vegan. Lastly, I shared storage tips for freshness. With these insights, you can make delicious bliss balls that fit your diet and taste. Enjoy creating!

Chocolate Coconut Bliss Balls Simple and Tasty Treat

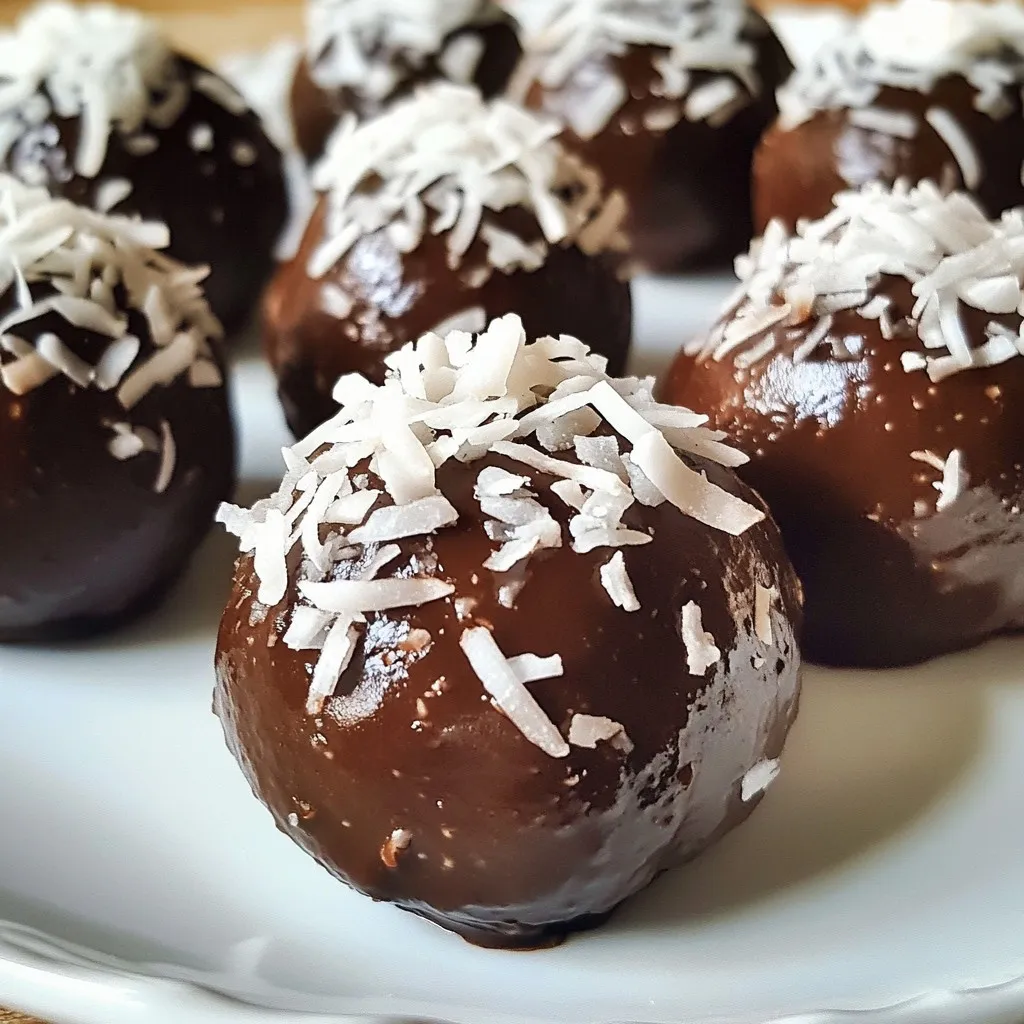
Are you ready to treat yourself to a sweet, healthy snack? These Chocolate Coconut Bliss Balls are not just simple

- 1 cup pitted Medjool dates - 1/2 cup rolled oats - 1/2 cup unsalted pistachios, shelled - 1/2 cup dried cranberries - 2 tablespoons chia seeds - 1 tablespoon honey (or maple syrup for vegan) - 1/2 teaspoon vanilla extract - A pinch of sea salt These key ingredients make up the base of your energy bites. Medjool dates provide natural sweetness and a chewy texture. Rolled oats add fiber and help bind the mixture. Pistachios give a nice crunch. Dried cranberries add tartness and color. Chia seeds are great for extra nutrients. Honey or maple syrup sweetens the mix, while sea salt enhances all the flavors. - Shredded coconut for rolling If you want to add more texture and flavor, consider rolling your energy bites in shredded coconut. It adds a tropical twist and makes them look pretty too. You can also mix in some chocolate chips or a dash of cinnamon for a different taste. - Use almond butter instead of honey for a nutty flavor. - Swap pistachios with almonds or walnuts for variety. - Use agave syrup if you prefer a different sweetener. These substitutions help cater to various dietary needs. If you have nut allergies, stick to seeds like sunflower or pumpkin seeds. This flexibility means everyone can enjoy these tasty bites! {{ingredient_image_2}} Start with 1 cup of pitted Medjool dates. Place the dates in a food processor. Blend them until they turn into a sticky paste. This should take about 1-2 minutes. Once you have the paste, add 1/2 cup of rolled oats. Then, toss in 1/2 cup of shelled pistachios and 1/2 cup of dried cranberries. Add 2 tablespoons of chia seeds, 1 tablespoon of honey or maple syrup, 1/2 teaspoon of vanilla extract, and a pinch of sea salt. Pulse this mix until it combines well but stays a little chunky. If it feels too dry, add a teaspoon of water. Keep pulsing until it forms a dough. When your mixture looks good, it’s time to shape it. Use your hands to scoop out tablespoon-sized portions. Roll each portion into a tight, round ball. Make sure they hold together well. This step is fun and easy, and kids can help too! For a tasty twist, you can roll the balls in shredded coconut. This gives them a nice texture and extra flavor. Just pour some coconut into a bowl, then coat each ball evenly. Once done, place the energy bites on a parchment-lined plate. You can also store them in an airtight container. Refrigerate the bites for at least 30 minutes. This helps them firm up nicely, making them easy to enjoy later. To get the best texture, start with fresh Medjool dates. They should be soft and sticky. When you blend them, aim for a smooth paste. This forms the base that holds everything together. Add your oats, pistachios, and cranberries. Pulse just enough to mix. You want a chunky feel, not a mushy one. If the mix seems dry, add water slowly. This helps it bind without losing texture. Keep your energy bites fresh by storing them in an airtight container. You can refrigerate them for up to a week. For longer storage, place them in the freezer. They can last for three months in the freezer. Just let them thaw in the fridge before you eat. This keeps them tasty and ready for snacking. These energy bites fit many occasions. Serve them as a quick snack after school or before workouts. They also shine at parties. Arrange them on a colorful plate with whole pistachios and cranberries. This adds a nice touch. You can even pack them for a hike or a road trip. They are portable and easy to grab on the go. Pro Tips Use Fresh Dates: Opt for fresh Medjool dates to achieve a smoother texture and natural sweetness in your energy bites. Customize Your Mix-ins: Feel free to experiment with other nuts, seeds, or dried fruits to tailor the flavor profile to your liking! Chill for Better Texture: Allowing the energy bites to chill in the refrigerator enhances their firmness and makes them easier to handle. Storage Tips: Store the energy bites in an airtight container in the fridge for up to one week, or freeze them for longer shelf life. {{image_4}} You can swap out pistachios for other nuts. Almonds, walnuts, or cashews work well. Each nut adds its own taste and texture. For a creamier bite, use cashews. Almonds give a nice crunch. Walnuts add a rich flavor. Feel free to mix and match to find your favorite! If you want to cut sugar, try these sweeteners. Medjool dates are naturally sweet. You can use them alone or add stevia. Maple syrup is another great choice. It gives a rich flavor while keeping it vegan. Just remember, adjust the amount based on your taste. This is where you can get creative! You can add seeds like sunflower or pumpkin. Dried fruits like apricots or raisins work too. For a chocolate twist, add mini chocolate chips. Shredded coconut is a fun option for extra texture. Mix in your favorites to make these bites truly yours! To keep your Cranberry Pistachio Energy Bites fresh, store them in the fridge. Use an airtight container to prevent air from drying them out. This helps maintain their soft and chewy texture. I recommend placing parchment paper between layers if you stack them. This will stop them from sticking together. If you want to store these bites for a longer time, freezing is a great choice. First, let them cool completely after making them. Then, place the energy bites in a single layer on a baking sheet. Freeze them for about an hour. After that, transfer them to a freezer-safe bag or container. This method keeps them from sticking together and makes it easy to grab a bite when you need one. In the fridge, these energy bites can last up to one week. If you freeze them, they stay good for about three months. Just make sure to label your containers with dates. This way, you’ll know how long they’ve been stored. Enjoy your healthy snacks anytime! Cranberry Pistachio Energy Bites are small, tasty snacks made with dates, oats, and nuts. They are packed with good nutrients. The dates provide natural sweetness, while pistachios add crunch. Dried cranberries give a fruity burst. You can eat them anytime for a quick energy boost. Each energy bite has about 100 calories. This can vary based on how big you make them. They are a healthier choice than many snacks. You get natural energy without added sugars. Yes, you can easily make these energy bites vegan. Just replace honey with maple syrup. This swap keeps the bites sweet and tasty. You won’t lose any flavor or texture. Enjoy these bites with peace of mind knowing they fit your diet! Cranberry pistachio energy bites are simple to make and delicious. We covered key ingredients, step-by-step instructions, and tips for perfect texture. We also explored variations and storage methods to keep them fresh. Remember, you can customize these bites to fit your taste and needs. Enjoy making these fun snacks for any occasion! They are not only tasty, but they also pack a nutritional punch. Try making them today, and feel great about your healthy choices!

Cranberry Pistachio Energy Bites Healthy Snack Recipe

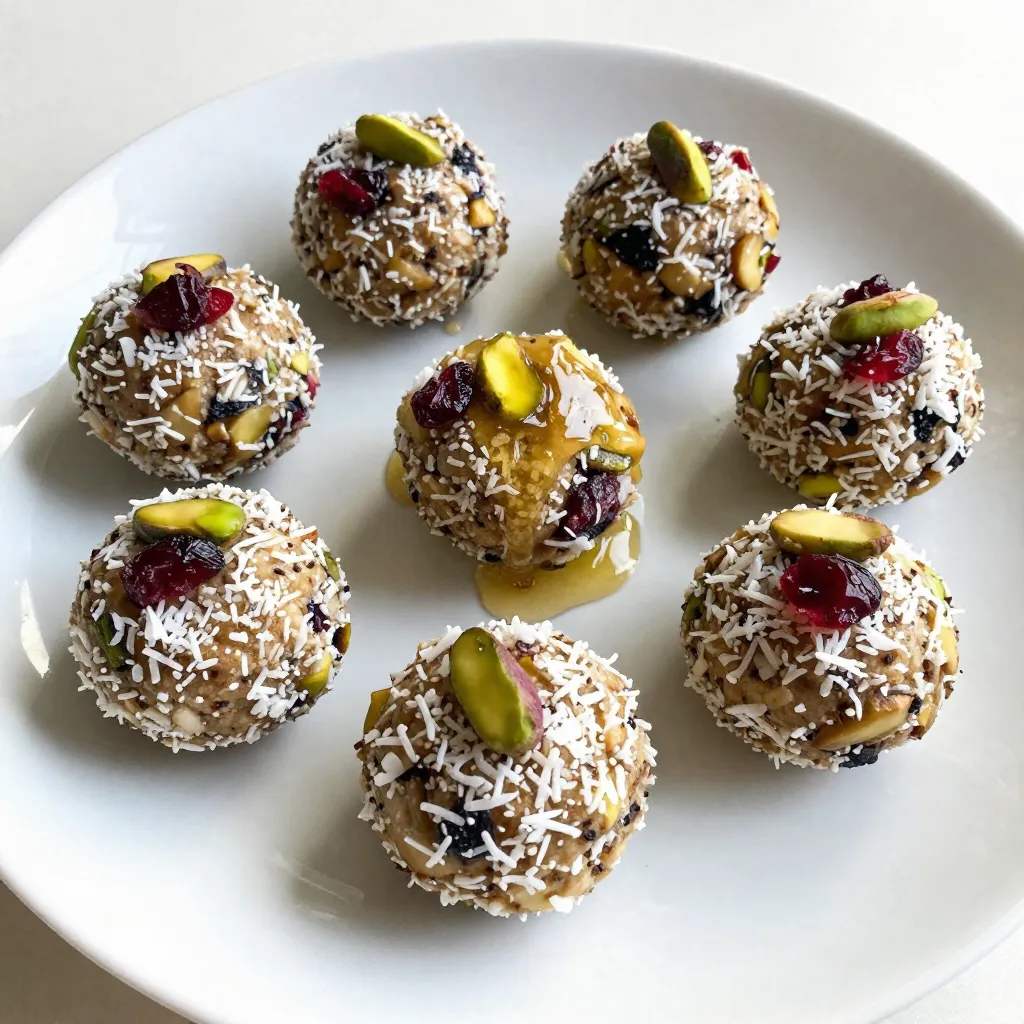
Are you looking for a quick and healthy snack that packs a punch? Look no further! My Cranberry Pistachio Energy

- 8 ounces fettuccine pasta - 1 cup sun-dried tomatoes, chopped - 2 cups fresh baby spinach - 1 cup heavy cream - 1 cup freshly grated Parmesan cheese - 1 tablespoon extra virgin olive oil - 3 cloves garlic, finely minced - Salt and freshly ground black pepper, to taste - Fresh basil leaves for garnish (optional) The main ingredients create a robust base for this dish. Fettuccine pasta offers a chewy texture. The sun-dried tomatoes add a rich, tangy flavor that brightens each bite. Fresh spinach brings color and freshness, making the dish feel light and vibrant. In additional ingredients, heavy cream is key for the sauce's creaminess. Freshly grated Parmesan cheese gives the sauce depth and a nutty flavor. Extra virgin olive oil adds richness and helps sauté the garlic, which forms a fragrant base. For seasoning, minced garlic provides a punch of flavor. Salt and black pepper enhance the dish and balance the richness. Finally, fresh basil leaves add a touch of brightness and a lovely aroma when used as a garnish. This combination of ingredients creates a delicious meal that is simple yet elegant. First, you need to boil salted water in a big pot. It’s important to use enough salt for flavor. Once the water is boiling, add 8 ounces of fettuccine pasta. Cook it until it is al dente, which means it should be firm, not mushy. This usually takes about 8 to 10 minutes. Before you drain the pasta, save ½ cup of the pasta water. This water helps make the sauce creamy later. After saving the water, drain the pasta and set it aside. In a large pan, heat 1 tablespoon of extra virgin olive oil over medium heat. Add 3 cloves of minced garlic and sauté them for about 1 to 2 minutes. You want the garlic to smell nice but not brown. Next, stir in 1 cup of chopped sun-dried tomatoes. Let them cook for 2 minutes. Then, add 2 cups of fresh baby spinach. Stir until the spinach wilts, which should take about 1 to 2 minutes. Now, it’s time to make the Alfredo sauce. Lower the heat and pour in 1 cup of heavy cream. Add 1 cup of freshly grated Parmesan cheese and stir continuously. This helps the cheese melt smoothly into the cream. If the sauce seems too thick, add some of the reserved pasta water a little at a time until you reach the right consistency. Season with salt and freshly ground black pepper to taste. Finally, mix the cooked fettuccine into the sauce. Stir well so the pasta gets coated. Let it heat for another 2 to 3 minutes. Enjoy your creamy Sun-Dried Tomato Spinach Alfredo! To make a great Alfredo sauce, start with high-quality Parmesan cheese. It melts better and gives a richer flavor. Grate it fresh for the best taste. If the sauce becomes too thick, use the reserved pasta water. This water has starch that helps loosen the sauce while keeping it creamy. For an extra kick, add a pinch of red pepper flakes. This brings warmth and depth to the dish. You can also add lemon juice. A splash of lemon brightens the flavors and adds a fresh note. Just a little goes a long way. Be careful not to overcook the spinach. It only needs a minute or two to wilt. Stir continuously when you add the cream. This ensures the sauce blends well and doesn’t separate. Keeping everything moving helps you create a smooth and rich sauce. {{image_4}} You can make your Sun-Dried Tomato Spinach Alfredo even better with proteins. - Grilled chicken: Add juicy grilled chicken slices on top. They add great flavor and texture. Cook the chicken separately, season it, and slice before serving. - Shrimp: For a seafood twist, toss in some shrimp. Sauté them in olive oil till they turn pink. This works well with the creamy sauce. Adding veggies can boost flavor and nutrition. - Broccoli: Steam or blanch broccoli florets. Stir them into the pasta before serving. They add a nice crunch and color. - Peas: Frozen peas are easy to use. Just add them to the sauce for a pop of sweetness. They blend well with the creamy texture. You can switch up the sauce for different tastes. - Vegan Alfredo: Use cashew cream or coconut milk instead of heavy cream. This makes a rich, dairy-free sauce that’s still creamy. - Garlic butter sauce: For a simpler flavor, melt butter with minced garlic. This sauce pairs nicely with the sun-dried tomatoes. Just drizzle it over your dish. Feel free to mix and match these options. Each variation brings its own unique twist to your meal! To store leftovers, let the Sun-Dried Tomato Spinach Alfredo cool first. Place it in an airtight container. This helps keep it fresh. Use glass or plastic containers with tight lids. These will prevent spills and keep flavors intact. The best methods for reheating are the stovetop or microwave. For the stovetop, heat gently in a pan over low heat. Stir often to prevent sticking. If using a microwave, heat in short bursts. Stir between each burst to heat evenly. This keeps the creamy texture smooth and prevents it from separating. Yes, you can freeze Sun-Dried Tomato Spinach Alfredo. However, the texture may change after thawing. To freeze, let it cool completely. Transfer to a freezer-safe container. Leave some space at the top for expansion. When ready to eat, thaw in the fridge overnight. Reheat gently to restore the dish's creamy goodness. You can pair this dish with many sides. Here are some great options: - Garlic bread for a crunchy bite - Steamed broccoli for a healthy touch - Roasted asparagus for a savory flavor - A fresh garden salad for crispness For salads, consider these pairings: - Caesar salad for a classic mix - Caprese salad for fresh tomatoes and basil - Spinach salad with nuts for a crunchy texture Sun-Dried Tomato Spinach Alfredo lasts up to three days in the fridge. Store it in an airtight container for best results. Look for these signs of spoilage: - Unpleasant smell - Mold growth on the surface - Changes in color or texture Yes, you can prepare Sun-Dried Tomato Spinach Alfredo ahead of time. Here are some tips for meal prepping: - Cook the pasta and sauce separately. - Store the sauce and pasta in separate containers. - Combine them just before serving. For reheating, follow these best practices: - Use a microwave-safe dish or stovetop. - Add a splash of cream or pasta water for moisture. - Heat slowly to avoid separation. In this blog post, we explored a delicious Sun-Dried Tomato Spinach Alfredo. We covered the main ingredients like fettuccine, spinach, and sun-dried tomatoes. You learned how to cook the pasta and make the rich sauce. Tips helped you perfect the dish, and we offered tasty variations. Remember, this recipe is flexible. You can add proteins or veggies to suit your taste. Enjoy this creamy, flavorful meal any time!

Sun-Dried Tomato Spinach Alfredo Rich Creamy Delight

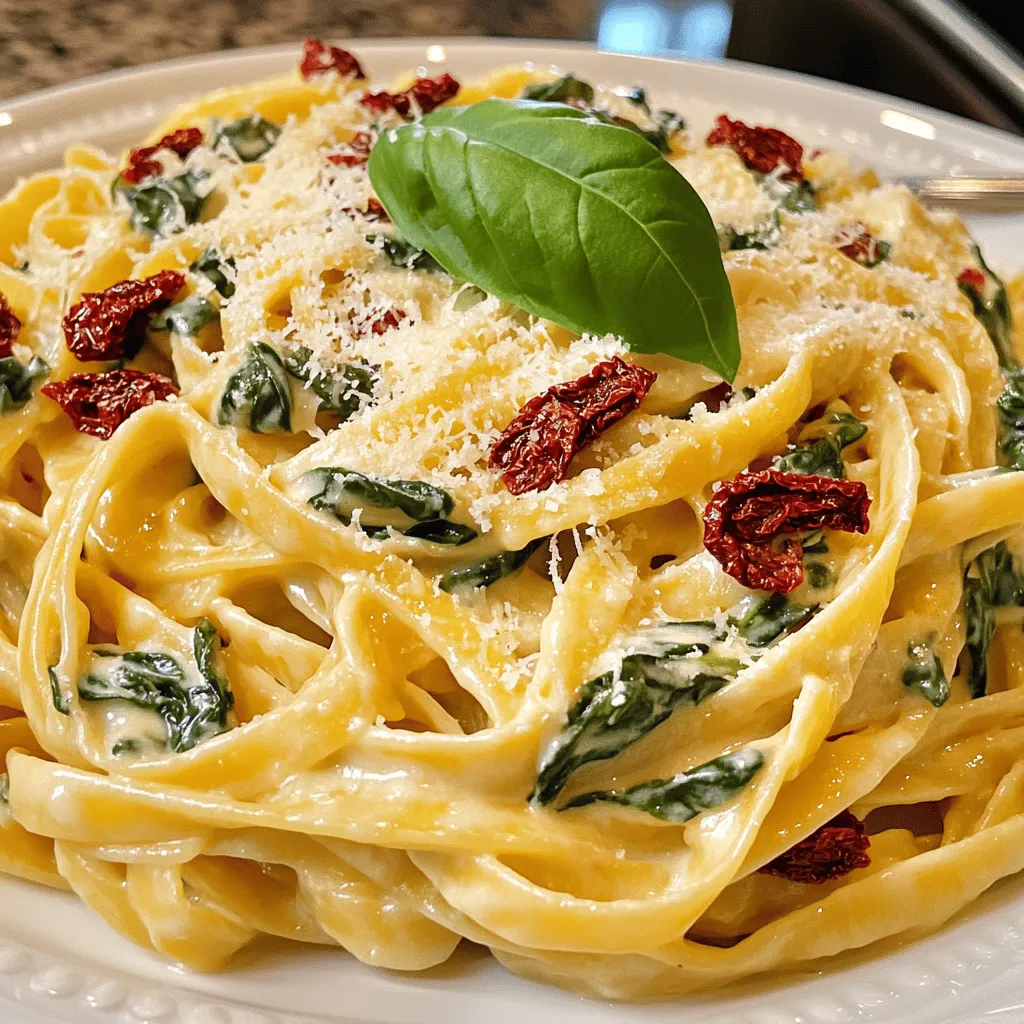
Craving a dish that’s rich, creamy, and bursting with flavor? You’ll fall in love with my Sun-Dried Tomato Spinach Alfredo!

To make these tasty muffins, you need a few key items: - 1 cup canned pumpkin puree - 1/2 cup cream cheese, softened to room temperature - 1/2 cup granulated sugar, divided - 1/4 cup packed brown sugar - 1/2 cup vegetable oil - 2 large eggs, at room temperature - 1 teaspoon pure vanilla extract - 1 1/2 cups all-purpose flour, sifted - 1 teaspoon baking soda - 1/2 teaspoon baking powder - 1 teaspoon ground cinnamon - 1/2 teaspoon ground nutmeg - 1/4 teaspoon ground ginger - 1/4 teaspoon salt These ingredients create a moist muffin with creamy filling and warm spices. When you shop for ingredients, look for the best options: - Pumpkin Puree: Choose 100% pumpkin without additives. - Cream Cheese: Select a full-fat cream cheese for richness. - Spices: Freshly ground spices give more flavor than old ones. - Eggs: Use eggs at room temperature for better mixing. - Flour: Sift all-purpose flour before measuring for light muffins. Quality ingredients make a big difference in taste and texture. You can add fun twists to your muffins: - Chopped nuts: Walnuts or pecans add crunch. - Chocolate chips: For a sweet touch, mix in some chocolate. - Dried fruit: Raisins or cranberries can add sweetness. - Zest: Lemon or orange zest brightens the flavor. Feel free to mix and match these options to create your own unique muffins! First, preheat your oven to 350°F (175°C). This step is key for even baking. Next, get your muffin tin ready. You can use paper liners or grease it with cooking spray. In a large bowl, mix the canned pumpkin puree, vegetable oil, both sugars, eggs, and vanilla extract. Use a whisk to blend everything well. It should look smooth and creamy. Now, take a medium bowl. Beat the softened cream cheese with an electric mixer. Mix it on medium speed until it is nice and creamy. Gradually add 1/4 cup of granulated sugar to the cream cheese. Make sure it is well combined. Set this mixture aside for later. Take your muffin batter and scoop half into each muffin cup. Fill them evenly. Next, add a dollop of the cream cheese mixture on top of the batter in each cup. Cover it with the remaining pumpkin batter. Bake the muffins in the preheated oven for 18-20 minutes. To check if they are done, insert a toothpick into the center. If it comes out clean, they are ready. Let the muffins cool for about 5 minutes in the pan. Then, transfer them to a wire rack to cool completely. To keep your muffins moist, use canned pumpkin puree. It adds moisture and flavor. Make sure your eggs are at room temperature. This helps the batter mix smoothly. Avoid overmixing the batter. Mix just until combined to prevent dryness. You can swap vegetable oil for applesauce. This change reduces fat and adds natural sweetness. Use whole wheat flour instead of all-purpose flour for more fiber. You can also cut the sugar in half. The muffins will still taste great! Don’t skip the spices! They bring warmth and depth. Add a pinch of cloves for extra warmth. If you love nutmeg, increase it slightly for a bolder taste. Experiment with pumpkin pie spice, too. It creates a rich and cozy flavor profile. {{image_4}} You can easily make gluten-free pumpkin cream cheese muffins. Just swap regular flour for gluten-free flour. Look for a blend that works well for baking. Many brands offer a one-to-one substitute. This way, you do not lose taste or texture. To make vegan pumpkin cream cheese muffins, replace the eggs with flax eggs. Mix one tablespoon of ground flaxseed with three tablespoons of water. Let it sit for a few minutes to thicken. Use a non-dairy cream cheese for the filling. Coconut or almond milk can replace the vegetable oil. These swaps make your muffins plant-based and delicious. You can enhance your muffins by adding fun extras. Consider adding chopped walnuts or pecans for crunch. Chocolate chips can make them sweeter and more indulgent. Dried cranberries or raisins add a fruity kick. Just mix in half a cup of your choice before baking. This adds new flavors and textures to every bite. Store your pumpkin cream cheese muffins in an airtight container. This keeps them fresh for longer. Place parchment paper between layers to prevent sticking. Make sure they cool completely before storing. This helps to avoid sogginess. These muffins freeze well. Wrap each muffin in plastic wrap, then place them in a freezer bag. They can last up to three months. To reheat, take a muffin out and let it thaw in the fridge overnight. For a warm treat, microwave it for about 15-20 seconds. I love serving these muffins fresh. Warm them slightly before serving. Dust them with powdered sugar for a pretty touch. Pair them with a cup of coffee or tea for a cozy snack. For a fun twist, try adding a dollop of whipped cream on top. Yes, you can use fresh pumpkin. First, cook the pumpkin until soft. Then, scoop out the flesh and mash it until smooth. Make sure to drain excess water for a thick puree. This may change the taste slightly, but it will be delicious. The best way to measure flour is to use the spoon and level method. First, fluff up the flour in its container. Then, spoon it into a measuring cup. Do not pack it down. Finally, use a straight edge to level off the top. This gives you the right amount. To check if muffins are done, insert a toothpick into the center of a muffin. If it comes out clean or with a few crumbs, the muffins are done. If the toothpick has wet batter, bake for a few more minutes. This ensures they are baked through. These pumpkin cream cheese muffins are a tasty treat. We covered all the key ingredients, from essentials to optional choices. Quality matters when picking your ingredients, so choose wisely. I shared step-by-step baking instructions to help you succeed. You now have tips for moisture, health swaps, and flavor boosts. Plus, I included fun variations like gluten-free and vegan options. Remember to store muffins properly to keep them fresh. Enjoy your baking journey! You’ll create delicious muffins everyone will love.

Pumpkin Cream Cheese Muffins Delightful and Easy Recipe

Are you ready to embrace the fall flavors with a delightful twist? My Pumpkin Cream Cheese Muffins offer the perfect

To make the perfect pumpkin spice latte cheesecake, gather these ingredients: - 1 ½ cups graham cracker crumbs - ½ cup unsalted butter, melted - 2 tablespoons brown sugar - 4 (8-ounce) packages cream cheese, softened - 1 cup granulated sugar - 1 cup pure pumpkin puree - 3 large eggs, at room temperature - 1 teaspoon vanilla extract - 1 teaspoon ground cinnamon - ½ teaspoon ground nutmeg - ½ teaspoon ground ginger - 1 cup heavy whipping cream - ¼ cup powdered sugar - Whipped cream, for topping - Ground cinnamon, for garnish If you need substitutions, here are some easy swaps: - Use crushed cookies instead of graham cracker crumbs for a different crust flavor. - Coconut oil can replace unsalted butter for a dairy-free version. - Maple syrup can replace granulated sugar for a more natural sweetness. - Use silken tofu instead of cream cheese for a vegan option. To enhance the flavor, consider these additions: - Espresso powder adds a rich coffee taste that pairs well with pumpkin spice. - A splash of bourbon can bring depth and warmth to the cheesecake. - Adding chocolate chips can create a delightful contrast to the spices. - Use fresh spices instead of ground for a stronger flavor boost. {{ingredient_image_2}} Start by preheating your oven to 325°F (163°C). This warm-up helps the cheesecake cook evenly. Grease a 9-inch springform pan well. Wrap the outside with aluminum foil. This keeps water from the water bath out. In a medium bowl, mix 1 ½ cups graham cracker crumbs, ½ cup melted unsalted butter, and 2 tablespoons brown sugar. Stir until it feels like wet sand. Press this mix firmly into the bottom of the pan. Bake the crust for 10 minutes. Once baked, let it cool completely. In a large bowl, beat 4 packages of softened cream cheese with 1 cup of granulated sugar. Use an electric mixer on medium speed for 2-3 minutes until creamy. Add 1 cup of pure pumpkin puree, 3 large eggs (one at a time), 1 teaspoon vanilla extract, and spices: 1 teaspoon ground cinnamon, ½ teaspoon ground nutmeg, and ½ teaspoon ground ginger. Mix until smooth, scraping the bowl's sides as needed. Pour the pumpkin filling over the cooled crust. Smooth the top with a spatula. For a water bath, place a larger baking pan on the oven rack below. Fill it with hot water before putting the cheesecake in the oven. Bake for 55-65 minutes. The edges should set, while the center remains slightly jiggly. After baking, turn off the oven. Crack the door open to let heat out. Let the cheesecake cool in the oven for 1 hour. Once it cools, take it out and let it reach room temperature. Refrigerate for at least 4 hours, or overnight for the best flavor. Just before serving, whip 1 cup of heavy cream with ¼ cup powdered sugar until soft peaks form. Spread this over the cheesecake and sprinkle with ground cinnamon. To get a creamy cheesecake, use room-temperature cream cheese. Cold cream cheese makes lumps. Beat it well with sugar until smooth. Adding pure pumpkin puree gives it a rich flavor. Mix until everything is blended, but don’t overdo it. This helps keep your cheesecake light and fluffy. Cracks can ruin the look of your cheesecake. To avoid this, use a water bath when baking. The steam keeps the cheesecake moist. Also, don’t bake it too long. The center should jiggle slightly when you take it out. Let it cool slowly in the oven with the door ajar. This helps prevent sudden temperature changes. For a beautiful presentation, slice the cheesecake and place each piece on a plate. Top with a generous dollop of whipped cream. Sprinkle ground cinnamon on top for a festive touch. You can also add a drizzle of caramel for extra sweetness. This makes each slice look inviting and delicious! Pro Tips Chill the Ingredients: Make sure your cream cheese is at room temperature for easier mixing. This helps create a smoother filling without lumps. Water Bath Importance: Using a water bath prevents the cheesecake from cracking by providing a moist environment during baking. Don’t skip this step! Cool Gradually: Allow the cheesecake to cool slowly in the oven with the door ajar. This gradual cooling helps prevent cracks and keeps the texture creamy. Flavor Boost: For an extra flavor kick, add a pinch of espresso powder to the cheesecake filling. It enhances the pumpkin spice flavor beautifully. {{image_4}} You can change the flavors of your pumpkin spice latte cheesecake to keep it exciting. Here are some ideas: - Chocolate: Add melted chocolate to the filling for a rich twist. Mix in ½ cup of melted dark chocolate with the pumpkin puree. - Caramel: Drizzle caramel sauce on top before serving. This adds a sweet touch to every bite. - Maple: Swap some sugar for pure maple syrup. This will enhance the fall flavor. - Nutty: Mix in chopped pecans or walnuts for added crunch. This gives a unique texture to each slice. You can easily adapt this recipe for different diets: - Gluten-Free: Use gluten-free graham cracker crumbs for the crust. This way, everyone can enjoy it. - Dairy-Free: Substitute cream cheese with a dairy-free option, like cashew cream. You can also use coconut cream instead of heavy cream. - Vegan: Replace eggs with flax eggs and use vegan cream cheese. This makes the cheesecake plant-based. Mini cheesecakes are fun and easy to serve! Here’s how to make them: 1. Use a muffin tin: Line it with cupcake liners. 2. Adjust the crust: Use about 1 tablespoon of crust mixture for each cup. Press it down firmly. 3. Bake time: Bake for 20-25 minutes instead of a full cheesecake. Check for a slight jiggle in the center. 4. Cool and serve: Let them cool completely before adding whipped cream and cinnamon on top. These mini versions make great treats for parties or gatherings. They are cute and easy to grab! To keep your pumpkin spice latte cheesecake fresh, store it in the fridge. Use an airtight container or cover it with plastic wrap. Make sure it stays cool to maintain its creamy texture. This cheesecake can last up to five days in the fridge. If you want to enjoy your cheesecake later, freezing is a great option. Wrap the cheesecake tightly in plastic wrap and then in aluminum foil. This helps to prevent freezer burn. You can freeze it for up to three months. When you’re ready to eat your frozen cheesecake, take it out of the freezer. Place it in the fridge for about 6-8 hours to thaw slowly. This keeps the texture smooth and creamy. Avoid thawing at room temperature, as it may get too soft. You can tell the cheesecake is done when the edges are set. The center should still jiggle a bit. This slight movement means it is creamy and not overcooked. Baking time is about 55-65 minutes at 325°F. Always check around the 55-minute mark to avoid overbaking. Yes, you can make this cheesecake ahead of time. In fact, it tastes better after sitting in the fridge. Make it a day before your event for the best flavor. Just remember to let it chill for at least 4 hours, or overnight is even better. Serve pumpkin spice latte cheesecake chilled. Top it with whipped cream and a sprinkle of ground cinnamon. For a festive look, place each slice on a dessert plate. This makes it special for your guests. You can also add a drizzle of caramel or chocolate for extra flavor. To prevent sticking, grease your springform pan well. Use butter or cooking spray on the sides and bottom. Wrapping the outside with aluminum foil helps too. This keeps water out during the baking water bath. Let the cheesecake cool completely before removing it from the pan for best results. This blog covered making a delicious pumpkin spice latte cheesecake. We explored ingredients, including substitutions for common ones. I shared step-by-step instructions, ensuring you nail the perfect crust and filling. You learned tips to achieve a smooth texture and prevent cracks. Variations allow for unique flavors and dietary needs. Lastly, we discussed storage for leftovers and answered frequent questions. Now, you’re ready to create your own cheesecake masterpiece! Enjoy every bite of this tasty treat.

Pumpkin Spice Latte Cheesecake Irresistible Delight

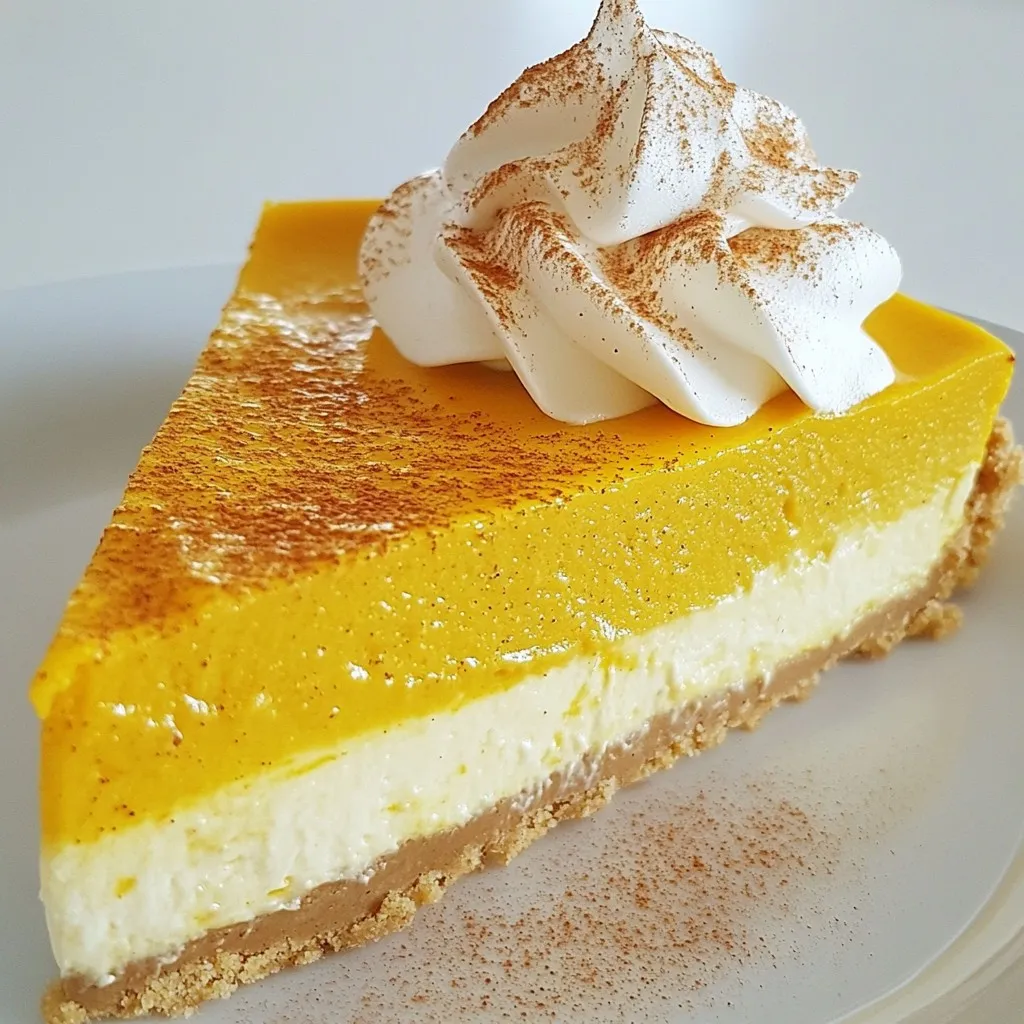
If you love pumpkin spice lattes and cheesecake, you’re in for a real treat! This Pumpkin Spice Latte Cheesecake is

To make a tasty Teriyaki Steak Stir Fry, you'll need a few key ingredients: - 1 lb sirloin steak, thinly sliced against the grain - 2 tablespoons olive oil, divided - 1 bell pepper (your choice of red or green), sliced into thin strips - 1 cup broccoli florets, fresh - 1 cup snap peas, trimmed - 3 green onions, chopped into 1-inch pieces - 3 cloves garlic, finely minced - 1 tablespoon fresh ginger, freshly grated - 1/4 cup low sodium soy sauce - 2 tablespoons honey, or to taste - 1 tablespoon cornstarch - 2 tablespoons cold water - Sesame seeds, for garnish - Salt and freshly ground black pepper, to taste You can elevate your stir fry with some simple garnishes: - Chopped green onions add fresh flavor. - Sesame seeds give a nice crunch. - A drizzle of extra soy sauce can enhance the taste. If you need to swap out any ingredients, here are some ideas: - Use chicken or tofu instead of sirloin steak. - Swap the bell pepper for any color you like. - If you prefer, use frozen vegetables instead of fresh. - Honey can be replaced with maple syrup or agave. - Use low-sodium tamari for a gluten-free option. These choices help make the dish fit your taste and needs while keeping it delicious! {{ingredient_image_2}} To start, gather your ingredients. In a medium bowl, mix together the low sodium soy sauce, honey, cornstarch, and cold water. Whisk it well until the cornstarch dissolves. This gives you a smooth teriyaki sauce. Set this bowl aside for later. Now, heat 1 tablespoon of olive oil in a large skillet or wok over medium-high heat. Once the oil shimmers, add the thinly sliced sirloin steak in a single layer. Season it with salt and freshly ground black pepper. Stir-fry the steak for 2-3 minutes. Cook it until it’s nicely browned and reaches your desired doneness. Remove the steak from the skillet and place it on a plate. In the same skillet, add another tablespoon of olive oil. When it's hot, toss in the finely minced garlic and freshly grated ginger. Stir for about 30 seconds until you smell that great aroma. Next, add the sliced bell pepper, fresh broccoli florets, and trimmed snap peas. Stir-fry these vegetables for 4-5 minutes. You want them to be tender, but still crisp. Return the cooked steak to the skillet with the veggies. Pour the teriyaki sauce over everything. Toss it all together, making sure each ingredient is coated with the sauce. Cook for an additional 1-2 minutes. This helps the sauce heat through and thicken slightly. Finally, remove the skillet from heat. Garnish your stir-fry with chopped green onions and a sprinkle of sesame seeds for extra crunch. Enjoy this flavorful meal! To get a tender steak, slice against the grain. This means cutting the meat in the opposite direction of the muscle fibers. Thin slices cook fast and stay juicy. Use a sharp knife for clean cuts. Avoid overcooking, as it can make the meat tough. Aim for medium-rare to medium doneness for the best texture. Cook each vegetable for the right time to keep them crisp. Start with garlic and ginger for 30 seconds. Then add bell pepper, broccoli, and snap peas. Stir-fry them for about 4-5 minutes. You want them tender but still bright and crunchy. This way, they add great flavor and texture to your dish. Add more depth to your teriyaki stir fry. Try a splash of sesame oil for a nutty taste. Fresh herbs like cilantro or basil can brighten the dish. You can also mix in chili flakes for heat. If you like sweetness, add more honey. These simple tweaks make your meal unique and exciting. Pro Tips Slice Against the Grain: Always slice the steak against the grain for maximum tenderness. This technique breaks down the muscle fibers, making each bite easier to chew. Prep Ingredients Ahead: To streamline your cooking process, prepare and chop all vegetables and marinade ingredients before starting to cook. This ensures a smooth stir-fry without delays. High Heat is Key: Use high heat for stir-frying to achieve that perfect sear and keep the vegetables crisp. Make sure your skillet or wok is hot before adding the ingredients. Customize Your Veggies: Feel free to swap or add your favorite vegetables such as carrots, bell peppers, or zucchini. This dish is very versatile and can be adjusted to your taste preferences. {{image_4}} You can easily make a vegetarian or vegan teriyaki stir fry. Use tofu or tempeh instead of steak. Both absorb flavors well and provide protein. For the sauce, swap honey for maple syrup or agave nectar. This keeps it vegan while adding sweetness. Add more veggies like carrots, mushrooms, and zucchini for variety. These choices make your dish colorful and tasty. Not a fan of steak? No problem! Chicken, shrimp, or pork work great, too. Cut chicken breast into thin strips. For shrimp, use medium or large ones, peeled and deveined. Pork tenderloin is another fantastic option. Just remember to adjust cooking times based on the protein. Chicken and pork need a bit longer, while shrimp cooks quicker. Each protein gives a unique flavor to the stir fry. Feel free to mix up your sauce. Instead of teriyaki, try hoisin sauce for a sweet twist. You could also use a spicy chili sauce for heat. If you like a tangy touch, make a citrus sauce with orange or lime juice. Just blend the juice with soy sauce and a bit of sugar. This variation adds fresh flavors and keeps each meal exciting. To store leftovers, let the teriyaki steak stir fry cool down. Place it in an airtight container. This helps keep the flavors fresh. Store it in the fridge for up to three days. If you want, you can also separate the rice and stir fry for better storage. When you want to eat the leftovers, reheat them in a pan. Add a splash of water or soy sauce to keep it moist. Heat over medium until warm. You can also use the microwave. Just cover the dish with a lid or plastic wrap to avoid drying out. Heat in short bursts of 1-2 minutes, checking often. If you want to freeze it, use freezer-friendly bags. Make sure to remove as much air as possible before sealing. This helps prevent freezer burn. The stir fry can be frozen for up to three months. To thaw, place it in the fridge overnight. Reheat once it’s thawed for a quick meal. Enjoy your tasty stir fry anytime! The best cut of steak for stir-frying is sirloin. Sirloin has a good balance of flavor and tenderness. It cooks quickly and stays juicy when sliced thin. Other great options are flank steak or ribeye. These cuts also work well for stir-frying. Yes, you can use store-bought teriyaki sauce. It saves time and adds great flavor. Look for low-sodium options to control salt. You can also check for natural ingredients. If you want a fresh taste, try making your own sauce. Combine soy sauce, honey, and ginger for a quick blend. To make a low-carb version, swap honey for a low-carb sweetener. Options like stevia or erythritol work well. You can also use cauliflower rice instead of regular rice. This keeps the dish low in carbs while still being filling. Adding more veggies will enhance the meal and keep it healthy. Teriyaki steak stir fry is a tasty dish you can make at home. We explored the best ingredients, from steak to garnishes, and how to prepare them. You learned step-by-step ways to make the sauce, cook the steak, and stir-fry vegetables. Tips for great texture and flavor were also shared, along with fun variations for veggies or different proteins. Keep your leftovers fresh with proper storage. Enjoy making this dish, and know you can always customize it to fit your taste. Happy cooking!

Teriyaki Steak Stir Fry Flavorful and Quick Meal

Looking for a quick and flavorful meal? Teriyaki Steak Stir Fry is your answer! It’s simple to make and packed

- 1 lb large shrimp, cleaned and deveined - 1/4 cup fresh cilantro, finely chopped - 2 tablespoons fresh lime juice - 2 cloves garlic, minced - 1 teaspoon chili powder - 1 teaspoon ground cumin - Salt and pepper, to taste - 8 corn tortillas - 1 ripe avocado, sliced - 1 cup red cabbage, finely shredded - 1 cup pico de gallo - Lime wedges for serving The heart of these tacos is the shrimp. You want them fresh and juicy. Shrimp is quick to cook and full of flavor. The cilantro adds a bright, fresh note. Lime juice gives a zesty kick that balances the dish. Garlic adds depth, while chili powder and cumin bring warmth. Corn tortillas are my choice for this recipe. They hold the shrimp and toppings well. Sliced avocado adds creaminess, and shredded red cabbage gives a nice crunch. Pico de gallo offers a burst of fresh flavors. Don’t forget lime wedges for that extra zing! This mix of ingredients creates a tasty taco that feels light yet satisfying. Each bite is full of flavor and texture. Combine 1 pound of cleaned shrimp with 1/4 cup of chopped cilantro. Add 2 tablespoons of fresh lime juice, 2 minced garlic cloves, 1 teaspoon of chili powder, 1 teaspoon of ground cumin, and salt and pepper to taste. Mix well to coat the shrimp. Cover the bowl and let it sit for 15 to 20 minutes. This step lets the flavors soak in. Preheat a non-stick skillet over medium-high heat. Once hot, add the marinated shrimp in a single layer. Cook the shrimp for 2 to 3 minutes on each side until they turn pink and opaque. Avoid overcrowding the skillet. This helps the shrimp cook evenly. In a separate skillet, heat 8 corn tortillas for about 30 seconds on each side. This warms them up, making them soft and easy to fold. Take a warm tortilla and place a few cooked shrimp on it. Add slices of ripe avocado, a handful of shredded red cabbage, and a spoonful of pico de gallo. Each ingredient brings its own tasty twist, making your taco fresh and exciting. To get the best shrimp, avoid overcooking them. Overcooked shrimp can turn tough and rubbery. Aim for cooking them just until they turn pink. This way, they stay juicy and tender. Cook shrimp in batches for even cooking. This helps keep the skillet hot and gives perfect results every time. For a zestier taste, add lime zest to your shrimp mix. It boosts the fresh lime flavor and makes the dish pop. You can also experiment with different spices. Try adding smoked paprika or cayenne for a fun twist. Each spice can change the flavor and make the dish unique. For a beautiful presentation, garnish your tacos with fresh cilantro. It adds a nice touch and bright color. Serve the tacos on a colorful platter. This makes the dish look inviting. Lime wedges on the side can give your guests a fun way to add more lime juice. Enjoy the bright colors and fresh flavors! {{image_4}} You can easily swap shrimp for other proteins. Fish or chicken work well. Fish gives a light taste, while chicken adds heartiness. Both options taste great with the zingy lime flavor. You might also try using flour tortillas. They offer a different texture that some people prefer. They are soft and chewy, making them fun to eat. Get creative with toppings! You can add mango salsa for a sweet twist. This pairs nicely with the shrimp's bright flavor. Spicy aioli is another great choice. It adds a kick and creamy texture to your taco. If you're looking for a gluten-free option, alternative tortillas are the way to go. Many brands offer gluten-free corn tortillas. They taste great and hold up well with the shrimp and toppings. Enjoy your tacos without worry! You can refrigerate the tacos for up to 2 days. Place them in an airtight container. This keeps them fresh and safe to eat later. To reheat, use a skillet for the best results. Heat the shrimp gently over medium heat. This helps keep them tender. Avoid microwaving, as it can make them soggy. You can freeze the cooked shrimp separately. This way, you can enjoy fresh tacos later. Just assemble the tacos right before serving. This keeps everything crunchy and tasty. To keep shrimp tender, avoid overcooking them. Overcooked shrimp can turn tough and rubbery. Marinating the shrimp for a longer time helps too. The marinade adds flavor and keeps them moist while cooking. You can prep the ingredients ahead of time. Chop the veggies and marinate the shrimp early in the day. However, wait to assemble the tacos until just before serving. This keeps the tortillas soft and fresh. Cilantro lime shrimp tacos pair well with several sides. Consider serving them with fluffy rice, hearty beans, or a fresh salad. These sides add color and balance to your meal. The spice level depends on your taste. The chili powder adds a mild heat. If you want it less spicy, reduce the amount of chili powder. You can also add toppings like sour cream to cool it down. To make tacos kid-friendly, reduce the spices. Keep the salsa mild and skip the chili powder if needed. Adding toppings like sour cream or cheese can make them more appealing to young eaters. For the complete instructions, please refer to the section labeled "Full Recipe." Cilantro Lime Shrimp Tacos are easy and fun to make. We covered the ingredients, marinating, cooking, and assembling steps. You can customize flavors and textures to suit your taste. Remember to store leftovers properly and reheat carefully for the best flavor. Whether you are cooking for a crowd or just yourself, this recipe offers something for everyone. Enjoy these tasty tacos at your next meal!

Cilantro Lime Shrimp Tacos Flavorful and Fresh Dish

Are you ready for a taste sensation? Cilantro Lime Shrimp Tacos bring bold flavors to your table! In this guide,

- 2 cups semi-sweet chocolate chips - 1 cup creamy peanut butter - 1 cup sweetened condensed milk - 1 teaspoon vanilla extract - 1/4 teaspoon salt The main ingredients create a rich and creamy fudge. The semi-sweet chocolate chips give the fudge its deep flavor. Creamy peanut butter adds a smooth texture and nutty taste. Sweetened condensed milk makes it sweet and helps bind the fudge together. The vanilla extract adds a nice hint of flavor, while salt enhances the chocolate and peanut butter notes. - Chopped peanuts - Sea salt for garnish These toppings are not required but add extra fun. Chopped peanuts provide crunch and a burst of peanut flavor. A sprinkle of sea salt on top balances the sweetness. You can mix and match these toppings based on your taste. - Prepare the baking dish: Start by lining an 8x8 inch baking dish with parchment paper. Leave some overhang. This helps lift the fudge out easily later. - Melt the mixture: In a medium saucepan, mix 2 cups of semi-sweet chocolate chips, 1 cup of creamy peanut butter, and 1 cup of sweetened condensed milk. Place the saucepan over low heat. Stir this mix continuously. This keeps it from burning and helps it melt smoothly. - Enhance the flavor: Once the mixture melts and is smooth, remove it from heat. Stir in 1 teaspoon of vanilla extract and 1/4 teaspoon of salt. Mix well until all is combined. - Transfer mixture to dish: Pour the creamy fudge mixture into your prepared baking dish. Use a spatula to spread it evenly. This helps create a uniform thickness. - Add toppings: If you want some crunch, sprinkle chopped peanuts and a light dusting of sea salt on top before it sets. This adds extra flavor and texture. - Cool and set: Let the fudge cool at room temperature for about 30 minutes. Then, transfer it to the fridge. Chill for at least 2 hours or until firm. - Cut and serve: Once the fudge is firm, grab the parchment overhang. Lift the fudge out of the dish and place it on a cutting board. Cut into 16 squares for serving. - Presentation tips: Serve the fudge squares on a decorative platter. For an elegant touch, drizzle with melted chocolate or add more chopped peanuts for garnish. To make your fudge just right, avoid some common mistakes. First, don't rush the melting process. If you heat the mix too fast, it can burn. Always keep the heat low and stir gently. This helps the chocolate chips and peanut butter blend smoothly. If your fudge turns out runny, do not worry. You can fix this! Simply place it back on low heat and stir in a bit more chocolate. Melt it until thick, then pour it back into the dish. This will help it set up nicely when cooled. To keep your fudge fresh, store it in an airtight container. This prevents it from drying out or picking up fridge smells. Make sure to layer parchment paper between the fudge squares. This keeps them from sticking together. For the best freshness, store your fudge in the fridge. It can last up to two weeks this way. If you want to keep it longer, consider freezing it. Wrap it in plastic wrap and then place it in a freezer bag. When you’re ready to eat, just thaw it in the fridge overnight. Enjoy that sweet treat! {{image_4}} You can easily make this fudge vegan. Use dairy-free chocolate chips instead of semi-sweet ones. These chips melt just as well and taste great. Make sure your peanut butter is also dairy-free. This way, you can enjoy a rich treat without any animal products. If you need a gluten-free option, you're in luck! The main ingredients in this fudge are already gluten-free. Just check the labels on your chocolate chips and peanut butter to ensure they don't contain gluten. This fudge can be a safe treat for those with gluten sensitivities. Want to mix things up? You can add different flavor extracts to your fudge. Almond or hazelnut extracts can give your fudge a unique twist. Just a few drops will do. Stir them in after melting the mixture for added depth. You can also get creative with mix-ins. Try adding caramel for a sweet contrast. Chopped marshmallows can add a chewy texture. These mix-ins can make your fudge even more delightful. Let your taste buds guide your choices! Store your fudge in an airtight container. Keep it at room temperature for up to a week. If it's hot, place it in the fridge to avoid melting. The cool air helps maintain the fudge's texture. Make sure the container seals well to keep moisture out and flavors in. To enjoy your fudge longer, freeze it. Cut the fudge into squares and wrap each piece in plastic wrap. Place the wrapped squares in a freezer bag. This keeps them fresh for up to three months. To thaw, take out a piece and let it sit at room temperature for about 15 minutes. The fudge will soften, and you can enjoy it again. Avoid using a microwave, as it may change the texture. Chocolate peanut butter fudge lasts about one week in the fridge. Store it in an airtight container to keep it fresh. You can also leave it at room temperature for three days. Just make sure it stays cool and dry. Yes, you can use chunky peanut butter! It adds a fun texture. The chunks give a nice crunch to each bite. Just remember, this will change the smoothness of the fudge. If you like a bit of texture, go for it! To cut fudge neatly, chill it well first. Use a sharp knife for clean cuts. You can dip the knife in hot water, then dry it off. This helps the knife glide through without sticking. For great presentation, cut into even squares. This blog post covers how to make delicious chocolate peanut butter fudge. You learned about key ingredients, preparation steps, and the best ways to store and serve your treat. I’ve shared tips to help you avoid common mistakes and variations to customize your fudge. Remember, creating your fudge can be fun. With simple steps, you can impress your friends and family with this tasty treat. Enjoy making your fudge, and let your creativity shine!

Chocolate Peanut Butter Fudge Easy Delightful Treat

Looking for a sweet treat that’s both easy to make and utterly delicious? You’ve come to the right place! This

Older posts
Newer posts
← Previous Page1 … Page20 Page21 Page22 … Page113 Next →

dsad

© 2025 spoonfulsavory • Built with GeneratePress

Our Policies

  • Copyright Policy
  • Cookie Policy
  • GDPR Policy
  • Privacy Policy
  • Disclaimer
  • Terms Of Use

More Information

  • Home
  • About
  • Contact
  • Appetizers
  • Dessert
  • Dinner
  • Drinks
©2025, spoonfulsavory About Back To Top