
Savory Sweet Potato Fries with Chipotle Aioli Delight
Craving a tasty snack that’s both healthy and satisfying? You’re in the right place! I’ll show you how to make
Craving a tasty snack that’s both healthy and satisfying? You’re in the right place! I’ll show you how to make
![Creamy Spinach Tortellini is a quick and easy meal. It’s rich, tasty, and comforting. This dish combines cheese-filled pasta with fresh spinach in a creamy sauce. You can make it in just 30 minutes. - 12 ounces cheese-filled tortellini - 2 cups fresh spinach, roughly chopped - 1 tablespoon extra virgin olive oil - 3 cloves garlic, finely minced - 1 cup heavy cream - 1 cup freshly grated Parmesan cheese - 1/2 teaspoon freshly grated nutmeg (if available) - Salt and freshly ground black pepper to taste - Optional: A pinch of crushed red pepper flakes for an extra kick - Fresh basil leaves, for garnish Gather these ingredients for a delightful meal. Each one adds flavor and texture. The tortellini brings a cheesy bite, while spinach adds freshness. Olive oil and garlic create a fragrant base. Heavy cream and Parmesan make the sauce rich and smooth. Nutmeg gives a warm hint, and red pepper flakes add a subtle heat. Fresh basil finishes the dish with a pop of color. Start by boiling water in a large pot. Add a pinch of salt to the water. Once it boils, add 12 ounces of cheese-filled tortellini. Cook it for about 3 to 5 minutes, or until it is al dente. Drain the tortellini and set it aside. It is important to not overcook it. In a large skillet, heat 1 tablespoon of extra virgin olive oil over medium heat. When the oil is hot and shimmering, add 3 cloves of finely minced garlic. Sauté the garlic for about 1 minute until it is fragrant. Be careful not to burn it. Next, add 2 cups of roughly chopped fresh spinach. Stir continuously for about 2 to 3 minutes until the spinach wilts down. Once the spinach wilts, lower the heat. Gradually pour in 1 cup of heavy cream. Stir gently to mix and bring it to a gentle simmer. Keep stirring to avoid sticking. Now, slowly add in 1 cup of freshly grated Parmesan cheese. Stir until the cheese melts and the sauce becomes creamy. At this point, add 1/2 teaspoon of freshly grated nutmeg. Season with salt and freshly ground black pepper to taste. If you like some heat, add a pinch of crushed red pepper flakes. Gently fold the cooked tortellini into the creamy sauce. Make sure each piece is coated well. Remove the pan from heat and let it rest for about a minute to thicken the sauce. To serve, scoop the creamy spinach tortellini onto warm plates. Garnish with fresh basil leaves for a lovely touch. Enjoy your delicious meal! For the complete recipe, check out the Full Recipe. To make the best tortellini, follow the package instructions. Cook until al dente. This means the pasta should be firm but not hard. Drain the tortellini gently. If you rinse them, the sauce will not stick well. For a rich cream sauce, start with quality ingredients. Use fresh garlic and real Parmesan cheese. Grate the cheese yourself for the best flavor. Add freshly grated nutmeg; it boosts the taste. If you like heat, sprinkle in some crushed red pepper flakes. They give a nice kick that pairs well with the cream. Presentation adds joy to your meal. Use warm plates to serve the tortellini. This keeps the dish hot longer. Garnish with fresh basil leaves. They add color and a lovely aroma. You can also sprinkle extra Parmesan on top for a fancy touch. For a pop of color, consider adding a few cherry tomatoes or a drizzle of balsamic glaze. Try these tips for a delightful dining experience. For the full recipe, check the section above. {{image_4}} You can add protein to creamy spinach tortellini easily. Chicken is a great choice. Cook it in the skillet first, then add garlic and spinach. Shrimp works well too. Sauté shrimp until pink before adding the cream and cheese. Both options add flavor and make the dish more filling. If you want to change the veggies, think mushrooms or peas. Mushrooms add a nice earthy taste. Sauté them with the garlic for the best flavor. Peas give a sweet crunch. Toss them in right before serving for a pop of color and taste. You can mix and match your favorites! Need gluten-free tortellini? Many brands offer this now. Look for rice or corn-based tortellini. They taste great and cook just like regular ones. This way, everyone can enjoy creamy spinach tortellini without worry. For the full recipe, check the ingredients and instructions to ensure all choices are gluten-free. After enjoying creamy spinach tortellini, you might have some leftovers. Store them in an airtight container. Make sure to cool the dish to room temperature before sealing. This helps keep the flavors fresh. Place the container in the fridge. These leftovers can last for about 3 to 4 days. When you are ready to eat your leftovers, reheating is easy. You can use the stovetop or microwave. If using the stovetop, place the tortellini in a skillet. Add a splash of cream or water to keep it moist. Heat over low until warmed through. For the microwave, use a microwave-safe bowl. Heat in 30-second intervals, stirring in between. This way, it heats evenly. If you want to save some for later, freezing is a great option. First, let your dish cool completely. Then, portion the tortellini into freezer-safe bags or containers. Remove as much air as possible to prevent freezer burn. Label them with the date. You can freeze creamy spinach tortellini for up to 2 months. When ready to enjoy, thaw in the fridge overnight. Reheat as described earlier for a warm meal. Yes, you can use frozen tortellini. They cook well and save time. Just follow the package instructions. Frozen tortellini usually takes a bit longer to cook. Make sure they are heated through before serving. To lighten up the dish, swap heavy cream for a mix of milk and Greek yogurt. This change keeps the creamy texture but cuts calories. You can also use less cheese or choose a lower-fat version. Adding more spinach boosts nutrition without extra calories. Pair this dish with a fresh salad or garlic bread. A light green salad balances the richness. You can also serve it with steamed vegetables for extra color and nutrition. For a fun touch, add a sprinkle of toasted pine nuts on top. Want the full recipe? Check out the [Full Recipe]. This creamy spinach tortellini recipe is easy and full of flavor. You learned how to cook tortellini, sauté garlic and spinach, make a rich cream sauce, and combine it all. Plus, you have tips for perfecting the dish, adding proteins, or using different veggies. Remember to store leftovers properly for later enjoyment. This meal is not just tasty but also flexible. You can customize it to fit your needs. Enjoy making this dish and share it with your loved ones!](https://spoonfulsavory.com/wp-content/uploads/2025/07/30a8982a-1411-4a07-9fc9-0a00e70630f3.webp)
Looking for an easy weeknight meal that’s both delicious and quick? You’ve hit the jackpot with this Creamy Spinach Tortellini!
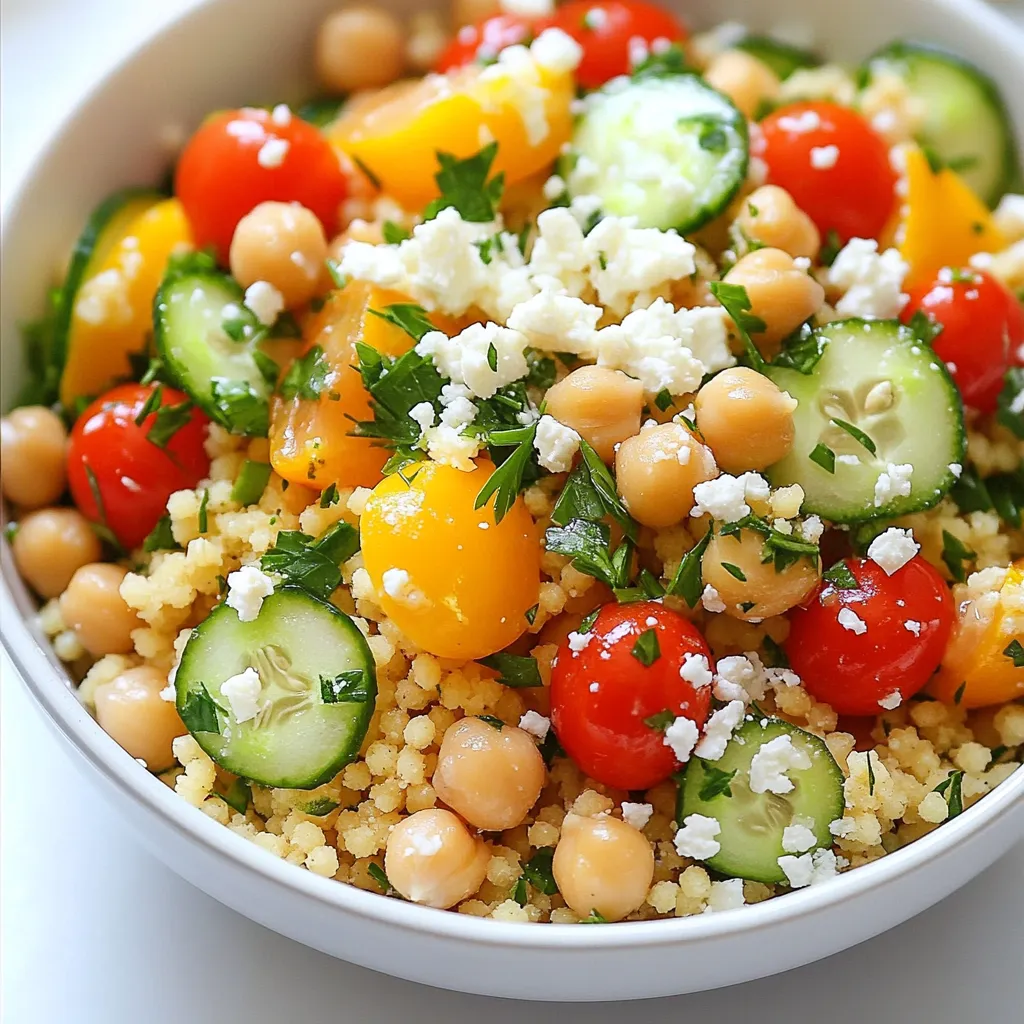
Looking for a quick and tasty meal? Lemon Herb Couscous Bowls are your answer. This vibrant dish is packed with
![For this recipe, you'll need a few key items to make the chicken tenders shine. Gather the following: - 1 pound chicken breast tenders - 1 cup panko breadcrumbs - ½ cup freshly grated Parmesan cheese - 2 large eggs - 2 tablespoons high-quality olive oil These ingredients create a crispy and tasty coating for your chicken tenders. The panko breadcrumbs provide that delightful crunch, while the Parmesan adds a rich, cheesy flavor. Next, we add the seasonings that make these tenders pop. Here’s what you need: - 2 teaspoons garlic powder - 1 teaspoon onion powder - 1 teaspoon dried Italian herbs (a mix of oregano, basil, and thyme) - ½ teaspoon salt - ½ teaspoon freshly ground black pepper These seasonings blend well. They give each bite a burst of flavor. Garlic powder brings a strong, savory taste, while the Italian herbs add a hint of freshness. Lastly, let’s talk about garnishes that make the dish visually appealing. You’ll want: - Fresh parsley, finely chopped This garnish not only adds color but also a fresh flavor. Sprinkling parsley on top just before serving makes the dish look even more inviting. For the full recipe, check out the detailed instructions above. First, preheat your oven to 400°F (200°C). This step is key for crispy chicken. Line a baking sheet with parchment paper. This makes cleanup easy and helps the tenders cook evenly. In a large bowl, mix the panko breadcrumbs, Parmesan cheese, garlic powder, onion powder, dried Italian herbs, salt, and black pepper. Stir well to combine. This mixture gives your chicken a delicious flavor and crispy texture. Take a chicken tender and dip it into the egg mixture. Make sure it gets fully coated. Then, transfer it to the breadcrumb mixture. Press down gently so the crumbs stick well. Repeat this for all the chicken tenders until they are coated. Place the breaded chicken tenders on the lined baking sheet. Space them out to ensure even cooking. Bake them in the preheated oven for about 20-25 minutes. They should be golden brown and cooked through. For extra crispiness, flip them halfway through baking. After baking, let them rest for a few minutes before serving. Sprinkle some freshly chopped parsley on top for a nice touch! For the full recipe, including ingredients and additional tips, check out [Full Recipe]. To get that perfect crispy texture, use panko breadcrumbs. Panko gives a light and airy crunch. Make sure you coat the chicken tenders well with the egg and breadcrumb mix. Press the breadcrumbs onto the chicken firmly. This helps them stick during baking. Bake at a high temperature, around 400°F (200°C). Flipping the tenders halfway through baking can also help them crisp evenly. One common mistake is not preheating the oven. Always preheat your oven to ensure even cooking. Another mistake is overcrowding the baking sheet. Space the chicken tenders apart to let hot air circulate. This helps them get crispy. Avoid using too much oil; just enough to coat the breadcrumbs will do. Too much can make them soggy instead of crispy. Baked garlic Parmesan chicken tenders pair well with many sides. Try serving them with a fresh salad for a light meal. You can also add some roasted veggies for a hearty dinner. Dipping sauces are a must! Marinara sauce or ranch dressing are great choices. For a fun twist, serve with sweet chili sauce for a spicy kick. For the full recipe, check out the detailed instructions! {{image_4}} To add a kick to your meal, try spicy garlic Parmesan chicken tenders. You can mix in some cayenne pepper or crushed red pepper flakes into the breadcrumb mix. Start with a half teaspoon, and taste as you go. This small change makes a big difference. The heat pairs well with the garlic and cheese flavors. You can easily switch up the herbs for a new taste. For a fresh twist, use fresh herbs like rosemary or thyme instead of dried. You can also add fresh minced garlic for more flavor. Mixing in lemon zest gives a bright touch too. Try different combinations to find your favorite mix. Dipping sauces can change the game for your chicken tenders. Instead of marinara, try a spicy ranch or honey mustard. You can also make a garlic aioli by mixing mayonnaise, garlic, lemon juice, and a pinch of salt. Each sauce brings a new flavor to the meal. This way, you can make each bite unique and fun. For the full recipe, check the section above and get cooking! After enjoying your baked garlic Parmesan chicken tenders, you might have some left. Store them in an airtight container. This helps keep them fresh. Make sure to let them cool before sealing. You can keep them in the fridge for up to three days. For best taste, try to eat them sooner. To reheat your chicken tenders, use an oven for the best results. Preheat the oven to 375°F (190°C). Place the tenders on a baking sheet. Heat them for about 10-15 minutes. This keeps them crispy. You can also use a microwave if you’re in a hurry. Just remember, it might not be as crispy. If you want to save some for later, freezing works great. Place the cooled chicken tenders in a freezer bag. Squeeze out as much air as you can. They will stay good for up to three months in the freezer. When you’re ready to eat, thaw them in the fridge overnight. Then, reheat them in the oven for the best taste. Baked chicken tenders can last in the fridge for about three to four days. Make sure to store them in an airtight container to keep them fresh. You can also wrap them tightly in plastic wrap. This will help prevent them from drying out. Yes, you can use regular breadcrumbs instead of panko. However, panko gives a crispier texture. Regular breadcrumbs are more fine and may not create the same crunch. If you want that extra crisp, stick with panko. To reheat chicken tenders, use the oven. Preheat your oven to 375°F (190°C). Place the tenders on a baking sheet and heat for about 10-15 minutes. This method helps keep them crispy. You can also use an air fryer if you have one. It works well and keeps the crunch. Yes, you can make these chicken tenders gluten-free. Simply use gluten-free breadcrumbs instead of panko. Make sure to check labels on all other ingredients, like the chicken and seasonings, to ensure they are gluten-free. This way, everyone can enjoy them! You’ve learned how to make tasty baked chicken tenders from scratch. We covered the key ingredients, step-by-step instructions, and helpful tips for the best results. Remember to try variations for extra flavor and check storage tips for leftovers. With these insights, you can enjoy delicious, crispy chicken tenders anytime. Keep experimenting and have fun in the kitchen!](https://spoonfulsavory.com/wp-content/uploads/2025/07/bb39676c-5611-458a-91a4-ced7c598309b.webp)
Looking for a tasty and easy meal? You’ve found it! This Baked Garlic Parmesan Chicken Tenders recipe is simple and
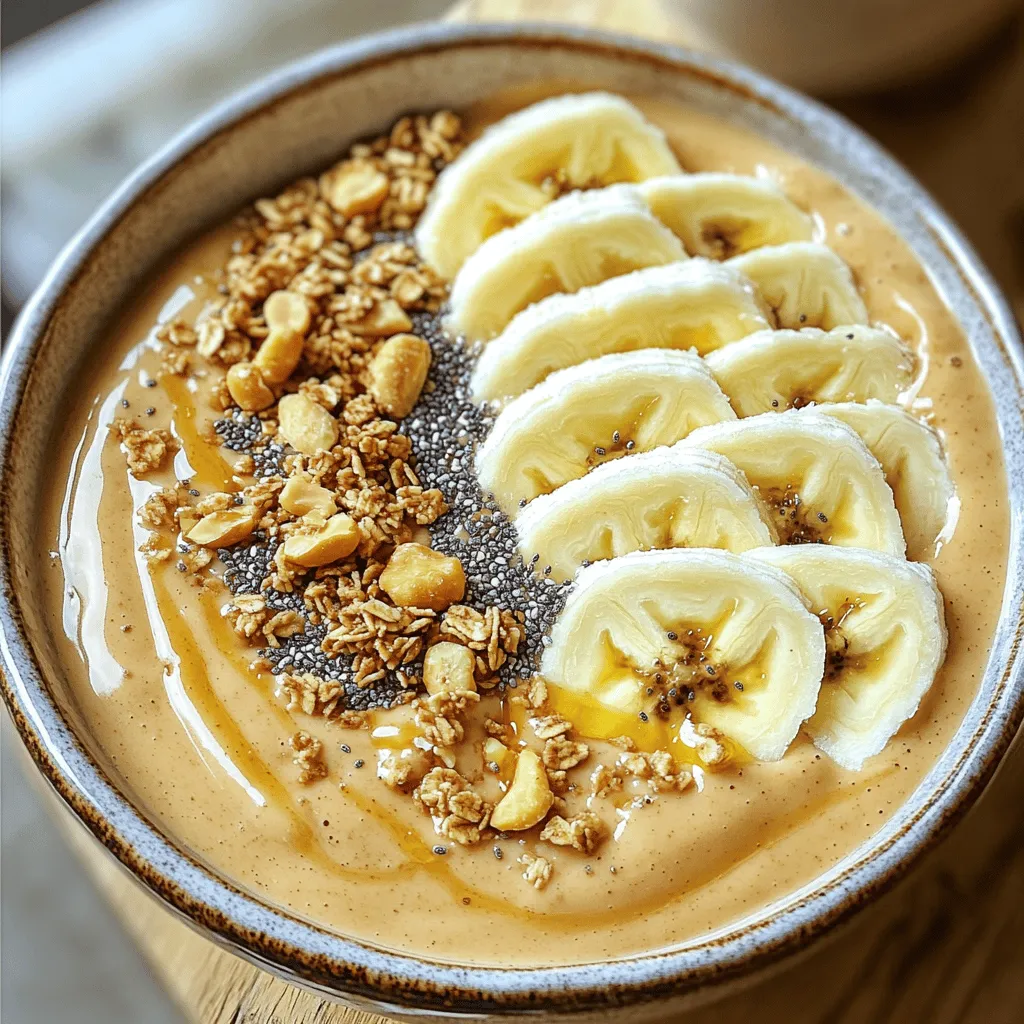
Craving a tasty treat that’s both easy to make and healthy? A Peanut Butter Banana Smoothie Bowl is your answer!
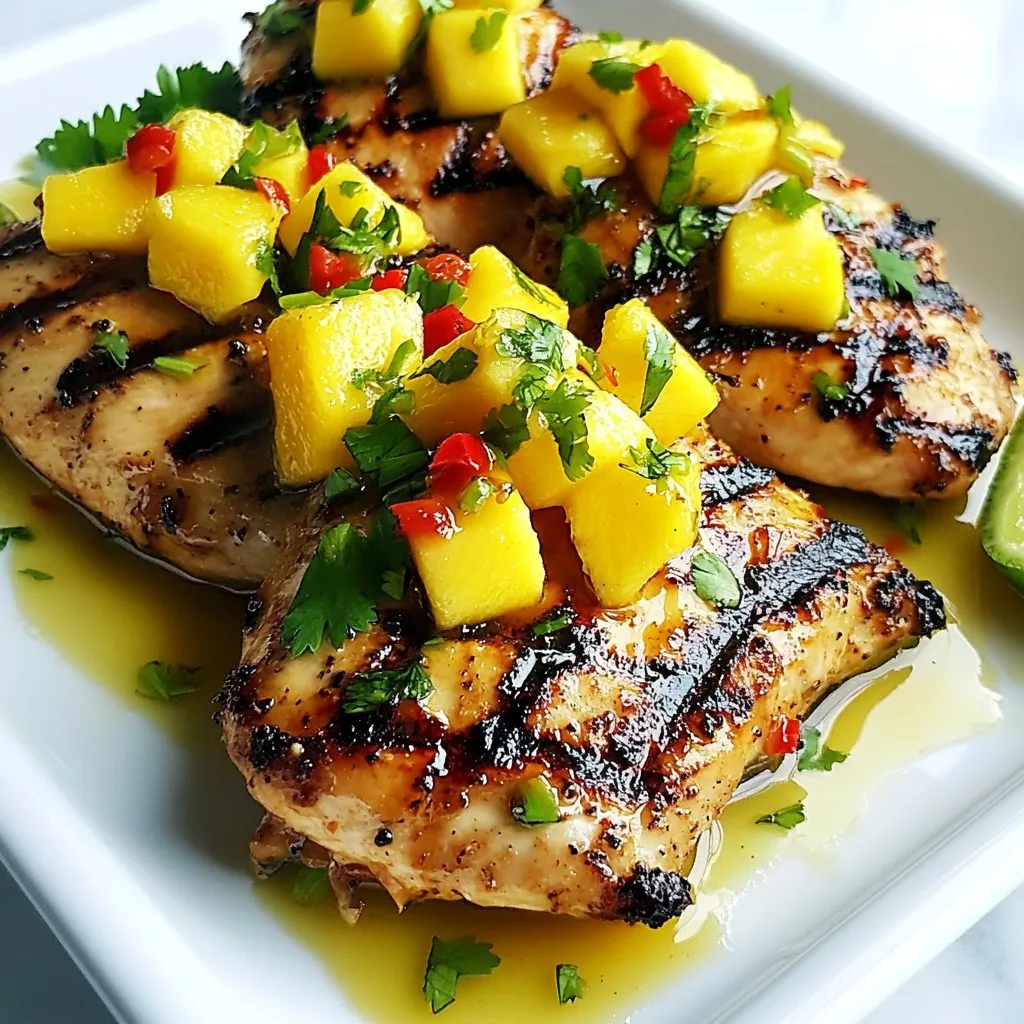
Are you ready to elevate your grilling game? Meet Mango Chili Lime Chicken, your new go-to dish for vibrant flavors
![To make garlic butter steak bites, you need some key ingredients. Here’s what you’ll need: - 1 pound sirloin steak, cut into bite-sized cubes - 4 tablespoons unsalted butter - 4 cloves garlic, finely minced - 1 tablespoon fresh parsley, chopped - Salt and freshly cracked black pepper to taste - 1 teaspoon extra virgin olive oil - ½ teaspoon red pepper flakes (optional, for added heat) These ingredients create a rich and savory dish that bursts with flavor. While the main ingredients shine, you can add more flavor with optional items. Consider these: - Fresh herbs like thyme or rosemary - A splash of Worcestershire sauce - A squeeze of lemon juice for brightness - Other spices, like smoked paprika or cumin These extras can enhance the taste and make your steak bites unique. Using the right cut makes a big difference. I recommend these cuts: - Sirloin: Tender and flavorful, perfect for quick cooking. - Ribeye: Rich and juicy, it adds a nice marbling. - Filet mignon: Super tender, but pricier. Great for special occasions. Choosing the right cut ensures your garlic butter steak bites are juicy and delicious. Check out the [Full Recipe] for all the steps to make these tasty bites! First, gather your ingredients. You need: - 1 pound sirloin steak, cut into bite-sized cubes - 4 tablespoons unsalted butter - 4 cloves garlic, finely minced - 1 tablespoon fresh parsley, chopped - Salt and freshly cracked black pepper to taste - 1 teaspoon extra virgin olive oil - ½ teaspoon red pepper flakes (optional, for added heat) Next, place the cubed steak in a bowl. Season it with salt and freshly cracked black pepper. Make sure each piece has a good coat of seasoning. Heat a large skillet over medium-high heat. Add the olive oil and wait for about one minute. You want it shimmering, not smoking. This step is key for a good sear. Carefully place the seasoned steak bites in the skillet. Do not overcrowd the pan. This keeps the temperature high. You may need to cook in batches. Sear the steak for 2-3 minutes on each side. Look for a rich brown crust. For medium-rare, aim for an internal temperature of 130°F. Once done, take the steak bites out of the skillet. Set them aside on a plate. Let them rest while you make the garlic butter. Lower the heat to medium. In the same skillet, add the unsalted butter. Let it melt completely. Once melted, toss in the minced garlic and red pepper flakes if you want some heat. Stir for 1-2 minutes until the garlic is fragrant and golden. Now, return the seared steak bits to the skillet. Toss them in the garlic butter, making sure each piece gets coated well. Heat everything together for another 1-2 minutes. This warms the steak bites through. Finally, take the skillet off the heat. Sprinkle fresh parsley over the steak bites. Give everything a final toss to mix the flavors. Enjoy the juicy flavor of your garlic butter steak bites! For the full recipe, check the section above. To get a great sear, start with a hot skillet. Choose a heavy pan. This helps keep the heat steady. Make sure to use medium-high heat. Add oil before the steak. Wait until it shimmers. Place the steak in a single layer. Avoid overcrowding the pan. This lets the steak brown well. Flip only once for the best crust. Cook for 2-3 minutes on each side. Here are some tools that make cooking easier: - Heavy-bottomed skillet - Tongs for flipping steak - Meat thermometer for checking doneness - Sharp knife for cutting steak - Mixing bowl for seasoning Using the right tools helps you cook better. They make your kitchen work smoother. Many cooks make simple mistakes. Here are some to watch out for: - Not letting the skillet heat enough - Overcrowding the pan with steak - Flipping the steak too often - Forgetting to rest the steak after cooking Avoid these issues for tasty steak bites. Each step matters for great flavor. Follow the full recipe to nail it! {{image_4}} You can use various cuts for your steak bites. Sirloin is great, but try ribeye for more fat and flavor. Tenderloin offers a softer bite but is pricier. Flank steak works well too, giving a nice chew and beefy taste. Each cut brings its own unique flavor. Choose what suits your taste and budget best. Want to add some heat? Use red pepper flakes in your garlic butter. Start with half a teaspoon for a mild kick. If you love spice, add more! You can also mix in a dash of hot sauce when cooking. This gives your steak bites a zesty twist that will impress your guests. Spice it up to match your mood! Add veggies for color and flavor. Bell peppers, onions, or mushrooms work great. Cut them into bite-sized pieces and sauté them with the steak. They soak up the garlic butter too! This way, you make a balanced meal in one skillet. Plus, it adds more nutrition and makes your dish pop with colors. Try it out for a fun twist on classic steak bites! For the full recipe, check out the details earlier! After enjoying your garlic butter steak bites, you may have some leftovers. To keep them fresh, place them in an airtight container. Make sure the lid seals well. Store the container in the fridge. Your steak bites will stay good for up to three days. Avoid leaving them out at room temperature for long. This helps prevent bacteria from growing. Reheating your steak bites can be tricky. You want to keep them juicy and flavorful. The best method is to use a skillet. Heat a little oil over medium heat. Add the steak bites and cook for about 2-3 minutes. Stir them gently to warm evenly. You can also use the microwave. Place the steak bites on a plate and cover them with a damp paper towel. Heat in short bursts, checking often. This keeps them from becoming tough. If you want to save steak bites for later, freezing is a great option. First, let them cool completely. Then, place them in a freezer-safe bag. Remove as much air as possible before sealing. Label the bag with the date. Steak bites can stay fresh in the freezer for up to three months. When ready to eat, thaw them in the fridge overnight. Reheat them in a skillet for the best taste. For the full recipe, check the earlier sections of this article. The best way to season steak bites is simple. Use salt and freshly cracked black pepper. Start by coating each cube evenly. This gives each bite a strong flavor. You can also add garlic powder or herbs like thyme for extra taste. Remember to season right before cooking. This helps keep the juices in. Garlic butter steak bites can last about three to four days in the fridge. Make sure to store them in an airtight container. This keeps them fresh and tasty. If you notice any off smells or colors, it’s best to discard them. Always trust your senses to judge if food is safe. Yes, you can make garlic butter steak bites in advance. Cook them fully, then cool down. Store them in the fridge for later use. When you’re ready to eat, just reheat them gently. This keeps the bites juicy and flavorful. For the best taste, try not to make them more than a day ahead. For a detailed recipe, check out the Full Recipe. Garlic butter steak bites are simple and tasty. We covered the main ingredients, steps, and techniques to ensure the best bite. Remember to pick the right steak cut for flavor. You can add your twist with spices or veggies. Proper storage keeps leftovers fresh and ready for a quick meal. With these tips, you'll avoid common mistakes and serve perfect steak bites every time. Enjoy experimenting, and savor every bite!](https://spoonfulsavory.com/wp-content/uploads/2025/07/c05b16bb-c7a3-46c0-b0a4-2323b52f1e39.webp)
Garlic Butter Steak Bites are a quick and tasty dish that anyone can make. With just a few simple ingredients,
![To make delicious Raspberry Lemonade Bars, gather these key ingredients: - 1 cup all-purpose flour - 1/4 cup powdered sugar - 1/2 cup unsalted butter, softened at room temperature - 1/4 teaspoon salt - 2 large eggs, at room temperature - 1 cup granulated sugar - 1/4 cup fresh lemon juice - Zest of 1 lemon, finely grated - 1 cup fresh raspberries - 1 tablespoon cornstarch - Additional powdered sugar for dusting These ingredients create a perfect balance of sweet and tart flavors. The fresh raspberries bring a bright taste, while the lemon juice adds a zesty kick. The buttery crust offers a nice contrast to the tangy filling. I recommend using fresh raspberries for the best flavor. If you can’t find fresh ones, frozen raspberries work too. Just make sure to thaw and drain them well before using. The zest of the lemon enhances the flavor. It adds a fragrant touch that pairs well with the other ingredients. You can find zest by grating the lemon’s outer peel. This combination of ingredients makes these bars a true delight. You’ll love how easy they are to prepare. For the full recipe, check the details above. Enjoy making your Raspberry Lemonade Bars! - Preheat the oven to 350°F. - In a bowl, mix together the flour, powdered sugar, butter, and salt. - Use a fork to blend until you see coarse crumbs. - Press this mixture into the bottom of an 8x8 inch baking dish. - Bake the crust for about 15 minutes, until lightly golden. - In a large bowl, whisk together eggs and sugar until smooth. - Add fresh lemon juice and zest, mixing well to combine. - In a small bowl, toss raspberries with cornstarch. - Gently fold the raspberries into the lemon filling without mashing them. - Pour the lemon and raspberry mixture over the cooled crust. - Use a spatula to smooth the filling evenly. - Bake for 20-25 minutes, until the filling is set but jiggles slightly. - Let the bars cool completely in the dish, about 30 minutes. - Once cool, lift the dessert out using the parchment paper. - Cut into neat squares for serving. - Dust with powdered sugar just before serving for a sweet touch. For the complete recipe, check out the [Full Recipe]. To get a great crust, use cold butter. Cut it into small pieces. Mix it with flour and sugar until it looks like sand. This gives a nice crumbly texture. Press it firmly into the baking dish. This helps it hold together after baking. To stop your berries from sinking, coat them in cornstarch. This creates a small barrier around the raspberries. When you fold them into the lemon filling, they will stay suspended. Gently mix them in. Be careful not to crush them. Serve the bars on a pretty plate. Add fresh raspberries and lemon slices for color. You can also sprinkle extra powdered sugar on top. This makes them look even more inviting. Pair your bars with a refreshing drink like lemonade or iced tea. They go well with light salads too. For a fun twist, serve them with whipped cream or vanilla ice cream. This adds a nice creamy touch to the tangy bars. For the complete recipe, check out the Full Recipe link. {{image_4}} You can play with flavors in your raspberry lemonade bars. Adding other fruits can give a new twist. Blueberries or strawberries work well with the lemon and raspberry mix. They add color and taste. You can also adjust the sweetness. If you like it sweeter, add more sugar. For more tartness, use extra lemon juice. This way, you can make the bars just how you like them. If you follow a gluten-free diet, you can swap the flour. Use almond flour or a gluten-free blend instead. This keeps the bars light and yummy. For vegan options, replace the eggs with flaxseed meal. Mix 1 tablespoon of flaxseed with 2.5 tablespoons of water and let it sit. This will help bind the bars. You can also use coconut oil in place of butter. These changes make the bars fit different diets. Check out the Full Recipe for more ideas! To keep your raspberry lemonade bars fresh, store them in the fridge. Use an airtight container to prevent them from drying out. If you have extra bars, you can freeze them. Wrap each bar in plastic wrap, then place them in a freezer bag. This keeps them safe for later. These bars stay fresh for about 5 days in the fridge. If you freeze them, they can last up to 3 months. Check for signs of spoilage like an off smell or mold. If you see either, it’s best to discard them. Enjoy your delicious raspberry lemonade bars while they are at their best! Yes, you can use frozen raspberries. Just thaw and drain them first. This step helps keep the filling from getting too watery. They will still taste great! The bars are done when the filling is set and slightly firm. A slight jiggle in the center is okay. It usually takes about 20-25 minutes in the oven. Yes, you can make them ahead of time. They stay fresh in the fridge for up to three days. Just cover them well to keep them moist. You can use coconut sugar or honey as substitutes. Keep in mind that honey will make the filling more moist. Adjust the amounts to taste, as these sweeteners vary in sweetness. For the full recipe, check out the details above. This blog post covered how to make delicious raspberry lemonade bars using simple ingredients. We explored each step, from preparing the crust to baking and cooling. I shared tips on perfecting texture and serving suggestions to impress your guests. Remember, you can mix in different fruits or adjust sweetness for your taste. These bars will delight everyone. With proper storage, you can enjoy them for days. Now, roll up your sleeves and start baking your tasty treat!](https://spoonfulsavory.com/wp-content/uploads/2025/07/08ae4061-db7f-4147-aada-49657d5d2cdd.webp)
Are you ready to treat your taste buds? My Raspberry Lemonade Bars are a fresh, tangy delight that’s perfect for
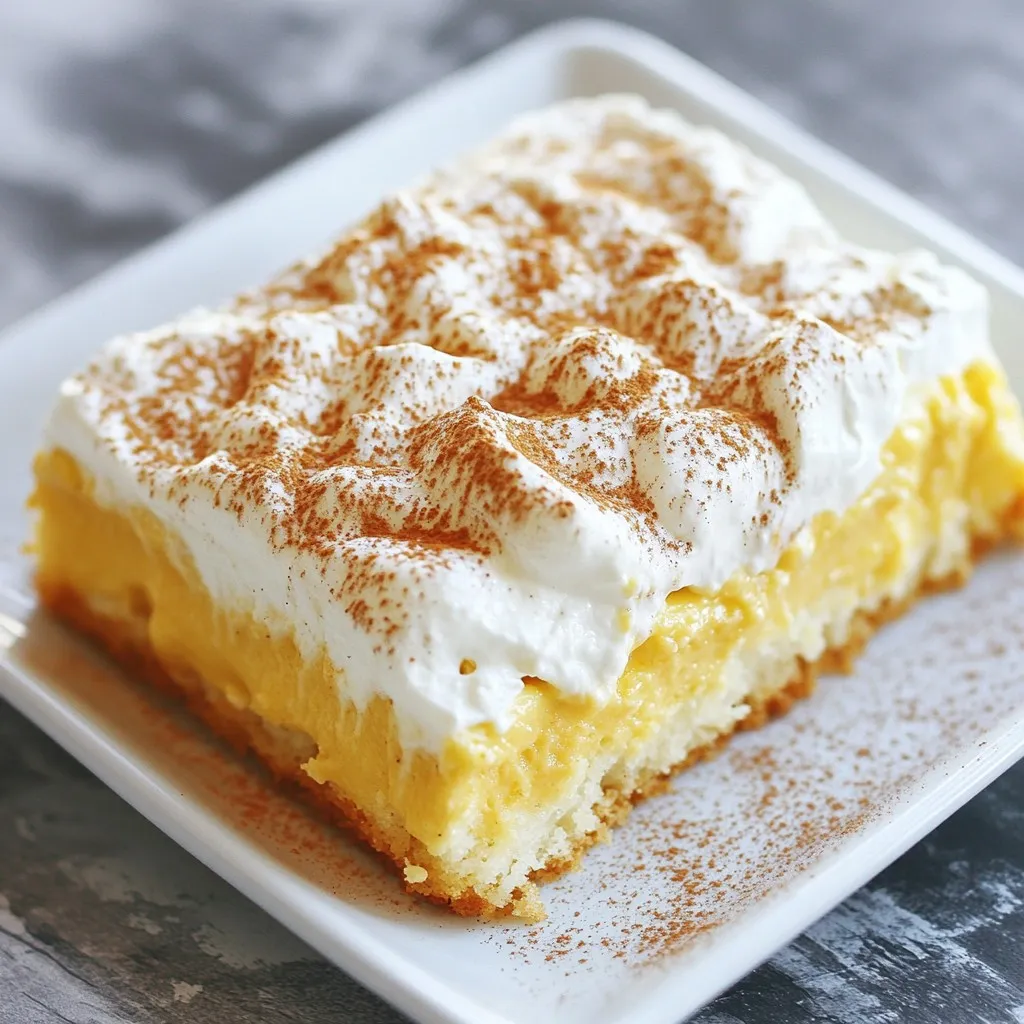
Looking for a festive dessert that’s easy and delicious? Let me introduce you to Eggnog Poke Cake! This delightful holiday
![- 12 large cremini or button mushrooms - 1 cup cream cheese, softened to room temperature - 1/2 cup fresh spinach, finely chopped - 1/4 cup sun-dried tomatoes, minced - 1/2 cup grated Parmesan cheese - Seasonings: garlic powder, onion powder, red pepper flakes, salt, and pepper - 1 tablespoon olive oil - Fresh parsley, chopped, for garnish When I create stuffed mushrooms, I always start with fresh ingredients. The mushrooms are the star of the dish. I choose large cremini or button mushrooms. They hold the filling well. Cream cheese adds a smooth texture and rich taste. Spinach adds color and nutrients while keeping it fresh. For flavor, I love sun-dried tomatoes. They bring a sweet, tangy note. Parmesan cheese adds a salty depth. The seasonings, like garlic powder and red pepper flakes, give a kick. I use just the right amount of salt and pepper to balance the flavors. Finally, I drizzle olive oil on top for moisture. A sprinkle of fresh parsley at the end makes it look bright and inviting. For the full recipe, you can refer to the [Full Recipe]. - Preheat the Air Fryer to 375°F (190°C). - Carefully remove stems from mushrooms and chop finely. To start, set your air fryer to 375°F (190°C). This step warms it up for even cooking. While it heats, take your mushrooms. Gently twist and pull the stems out. Set the caps aside for later. Next, chop those stems into small pieces. You want them finely chopped for the best filling. - Combine chopped stems with cream cheese, spinach, sun-dried tomatoes, Parmesan, and seasonings. - Ensure all ingredients are well mixed. Now, grab a mixing bowl. Add the chopped mushroom stems, a cup of cream cheese, and half a cup of fresh spinach. Toss in a quarter cup of minced sun-dried tomatoes and half a cup of grated Parmesan cheese. Sprinkle in garlic powder, onion powder, and red pepper flakes for a kick. Don’t forget salt and pepper! Mix everything well until it’s creamy and smooth. - Generously fill each mushroom cap with the mixture. - Air fry for 10 to 12 minutes until golden brown. Take each mushroom cap and fill it with the mixture. Press down lightly to pack it in. This helps keep the filling inside as they cook. Once they’re all stuffed, place them in the air fryer basket. Make sure they have space to cook evenly. Air fry for 10 to 12 minutes. You'll know they’re done when the tops are golden brown and slightly crispy. Enjoy this savory treat right away for the best flavor! - Ensure mushrooms are spaced properly in the air fryer. This helps them cook evenly. - Adjust cooking time for different air fryer models if necessary. Some may cook faster or slower. - Serve warm with balsamic reduction for added flavor. The sweetness pairs well with the savory filling. - Presentation tips: arrange on a rustic wooden board. This adds charm to your dish. - Avoid overfilling the mushroom caps. This leads to spillage and mess. - Not preheating the air fryer properly can hurt cooking. Always preheat for best results. For the full recipe, check out the recipe card. Enjoy your cooking journey! {{image_4}} You can switch up the filling in many ways. Instead of using cream cheese, try ricotta or goat cheese. These options add different flavors and textures. For a heartier dish, add cooked sausage or crispy bacon bits. This gives a savory kick and makes the dish more filling. To boost aroma and taste, add fresh herbs. Basil or thyme is a great choice. These herbs bring a fragrant note to your mushrooms. You can also play with different cheeses. Feta or cheddar can add a unique twist. Each cheese brings its own special flavor. If you need a gluten-free dish, use gluten-free bread crumbs as the filler. This simple swap makes the recipe safe for those with gluten sensitivities. For a vegan option, choose dairy-free cream cheese and leave out any cheese. You still get a creamy filling without the dairy. For the [Full Recipe], follow my simple steps to create these tasty stuffed mushrooms. Once you finish eating, let the stuffed mushrooms cool down. Then, transfer them to an airtight container. This helps keep them fresh. You can store them in the refrigerator for up to 3 days. To reheat your stuffed mushrooms, use the air fryer. Heat them for 3 to 5 minutes at 350°F (175°C). This method keeps them crispy. You can also use the oven or microwave, but the air fryer works best. If you want to save stuffed mushrooms for later, freeze them before cooking. They can stay in the freezer for up to 2 months. When you're ready to eat, cook them straight from frozen. Just add a couple of extra minutes to the cooking time for best results. Yes, you can prep the filling in advance. Store it in the fridge. Stuff the mushrooms just before cooking for the best taste. A standard air fryer with a basket capacity of at least 3.5 quarts should work well. This size fits the mushrooms nicely and allows for even cooking. You can add finely chopped bell peppers or zucchini. They give the filling extra texture and flavor. Just make sure to chop them small so they mix well. Yes, you can use dried sun-dried tomatoes. Just ensure to rehydrate them in warm water first. This helps them mix better in the filling and keeps it moist. In this post, we explored a simple way to make Air Fryer Stuffed Mushrooms. We covered essential ingredients like mushrooms, cream cheese, and seasonings. We shared step-by-step instructions and some cooking tips to help you succeed. Lastly, we discussed variations and storage ideas to keep your mushrooms fresh. Now, you have all the tools to create a delicious dish. Enjoy experimenting and sharing these tasty bites!](https://spoonfulsavory.com/wp-content/uploads/2025/07/d637bc15-a8df-4e4b-9164-cf0ecaf188ed.webp)
Ready to impress your guests with a tasty appetizer? Air Fryer Stuffed Mushrooms are the answer! In this simple recipe,
