Skip to content
DisclaimerTerms Of UseGDPR PolicyCookie Policy

spoonfulsavory

  • Home
  • Drinks
  • Appetizers
  • Dinner
  • Dessert
  • About
  • Contact
  • Privacy Policy
DisclaimerTerms Of UseGDPR PolicyCookie Policy

Sarah

To make a great peach cobbler dump cake, gather these simple ingredients: - 4 cups fresh or canned peaches, drained and sliced - 1 cup granulated sugar - 1 cup all-purpose flour - 1 cup almond milk (or your preferred milk) - 1 cup unsalted butter, melted - 1 teaspoon vanilla extract - 1 tablespoon baking powder - 1 teaspoon ground cinnamon - 1/4 teaspoon salt - 1 cup crumbled vanilla cake mix (or yellow cake mix) - Ice cream or whipped cream, for serving (optional) Accurate measuring is key for a great dump cake. Here are some tips: - Use dry measuring cups for flour and sugar. - Spoon flour into the cup and level it off with a knife. - For liquids, use a clear measuring cup for easy reading. - Always pack brown sugar firmly into the cup. If you're missing an ingredient, don't worry! Here are some substitutes: - Use fresh peaches or canned ones in syrup. - Swap almond milk for any milk you like, such as oat or soy. - If you lack cake mix, you can use a simple homemade flour mix. - For a dairy-free option, replace butter with coconut oil. Having the right ingredients makes this peach cobbler dump cake a joy to bake. Let your creativity shine in the kitchen! Making peach cobbler dump cake is easy and fun! You need to gather the ingredients first. This cake comes together quickly and requires little prep time. 1. Preheat the Oven: Set your oven to 350°F (175°C). This helps the cake cook evenly. 2. Prepare the Peaches: In a big bowl, mix 4 cups of peaches with 1 cup of sugar. Let it sit for about 10 minutes. This helps the peaches release their juices. 3. Make the Batter: In another bowl, sift together 1 cup of flour, 1 tablespoon of baking powder, 1 teaspoon of cinnamon, and 1/4 teaspoon of salt. Gradually add in 1 cup of almond milk and 1 cup of melted butter. Stir in 1 teaspoon of vanilla extract until smooth. 4. Layer the Ingredients: Grease a 9x13 inch pan. Spread the peach mixture on the bottom of the pan. Then, pour the batter over the peaches evenly. 5. Add the Cake Mix: Sprinkle 1 cup of crumbled vanilla cake mix on top. Don't mix it in; just let it sit there. 6. Bake: Place the pan in the oven and bake for 35 to 45 minutes. It’s ready when the top is golden brown and a toothpick comes out clean. 7. Cool and Serve: Let the cake cool for a few minutes. You can serve it warm or at room temperature, with ice cream or whipped cream if you like. - Not Draining Peaches Properly: If using canned peaches, make sure to drain them well. Too much juice can make the cake soggy. - Skipping the Resting Time: Letting the peaches sit with sugar is key. This step makes the filling sweeter and juicier. - Mixing the Cake Mix: Remember, do not mix the cake mix into the batter! Let it create a crumbly topping. This simple recipe is a great way to enjoy a sweet dessert with minimal fuss. Try it for your next family gathering! For the full recipe, check out the Full Recipe section. To make your peach cobbler dump cake just right, focus on the layers. Start by mixing the peaches with sugar. Let them sit for a bit. This helps the juices mix well. For the batter, mix the dry ingredients first. Then, add the almond milk and melted butter slowly. This keeps the batter smooth. When you layer the peaches and batter, pour the batter gently. This way, it stays fluffy. In the oven, watch for a golden brown color. A toothpick should come out clean, showing it's cooked well. Serve your cake warm for the best taste. Cut it into squares and place them in bowls. You can add a scoop of ice cream on top. It melts and makes a creamy blend with the warm cake. If you prefer, you can use whipped cream instead. For a special touch, sprinkle a little cinnamon on top. This gives your dessert a lovely aroma and flavor. Enjoy it fresh for the best experience. This peach cobbler dump cake pairs well with many drinks. A cold glass of lemonade works great. You can also try sweet tea for a southern twist. For coffee lovers, a rich coffee complements the dessert nicely. If you want something more fun, consider a fruity cocktail. These drinks balance the sweetness of the cake. Each pairing enhances your dessert experience. {{image_4}} You can switch the peaches for other fruits. This makes the dump cake fun and unique. Try using canned or fresh cherries, blueberries, or apples. Each fruit brings its own flavor. For example, cherry dump cake tastes sweet and tart. Blueberry dump cake is juicy and fresh. Just keep the same amount of fruit. You can make this dessert gluten-free and dairy-free with simple changes. Use gluten-free all-purpose flour instead of regular flour. For the milk, almond milk is a great choice. You can also use coconut milk or oat milk. These swaps keep the cake moist and tasty. Just make sure your cake mix is gluten-free too. Get creative with toppings and mix-ins for your dump cake. You can add nuts like walnuts or pecans for crunch. Sprinkle some shredded coconut for a tropical twist. Consider adding chocolate chips for a sweeter touch. Serve with ice cream or whipped cream for extra fun. These little changes will make your dessert stand out! To keep your peach cobbler dump cake fresh, store it in an airtight container. This helps prevent it from drying out. Place the cooled cake in the fridge. It stays good for about 3 to 5 days. If you plan to eat it later, consider cutting it into portions for easy serving. When you want to enjoy your leftover cake, reheating is key. Preheat your oven to 350°F (175°C). Place a slice of cake in a baking dish. Cover it with foil to keep it moist. Warm it for about 15 to 20 minutes. You can also use the microwave. Heat a slice for about 30 seconds. Check to see if it's warm enough. Add a scoop of ice cream on top for a treat! Freezing is a great way to save your peach cobbler dump cake for later. First, let the cake cool completely. Wrap it tightly in plastic wrap. Then, place it in a freezer-safe bag or container. Label it with the date. It can last up to 2 months in the freezer. To enjoy, thaw it overnight in the fridge. Reheat it as mentioned above. Enjoy your cake just like it was fresh! Yes, you can use frozen peaches. Thaw them first and drain any extra juice. This keeps the cake from getting too soggy. Frozen peaches work well and still taste great in the dump cake. To sweeten the peach filling, add more sugar. You can also mix in honey or maple syrup. Taste the filling before baking. Adjust the sweetness to your liking. Remember, the cake mix adds some sweetness too. Dump cake is easier to make than cobbler. You simply "dump" the ingredients in layers. Cobblers usually have a biscuit or pie crust topping. Dump cakes have a cake mix on top. Both are delicious but differ in texture and preparation. For the full recipe, check out the Peachy Paradise Dump Cake! This post covered essential ingredients, step-by-step instructions, and helpful tips. You learned how to measure accurately and find suitable substitutes. We talked about common mistakes and how to achieve the best texture. You now have ways to store your dish and answers to frequent questions. Remember, experimentation leads to great flavors. Happy cooking!

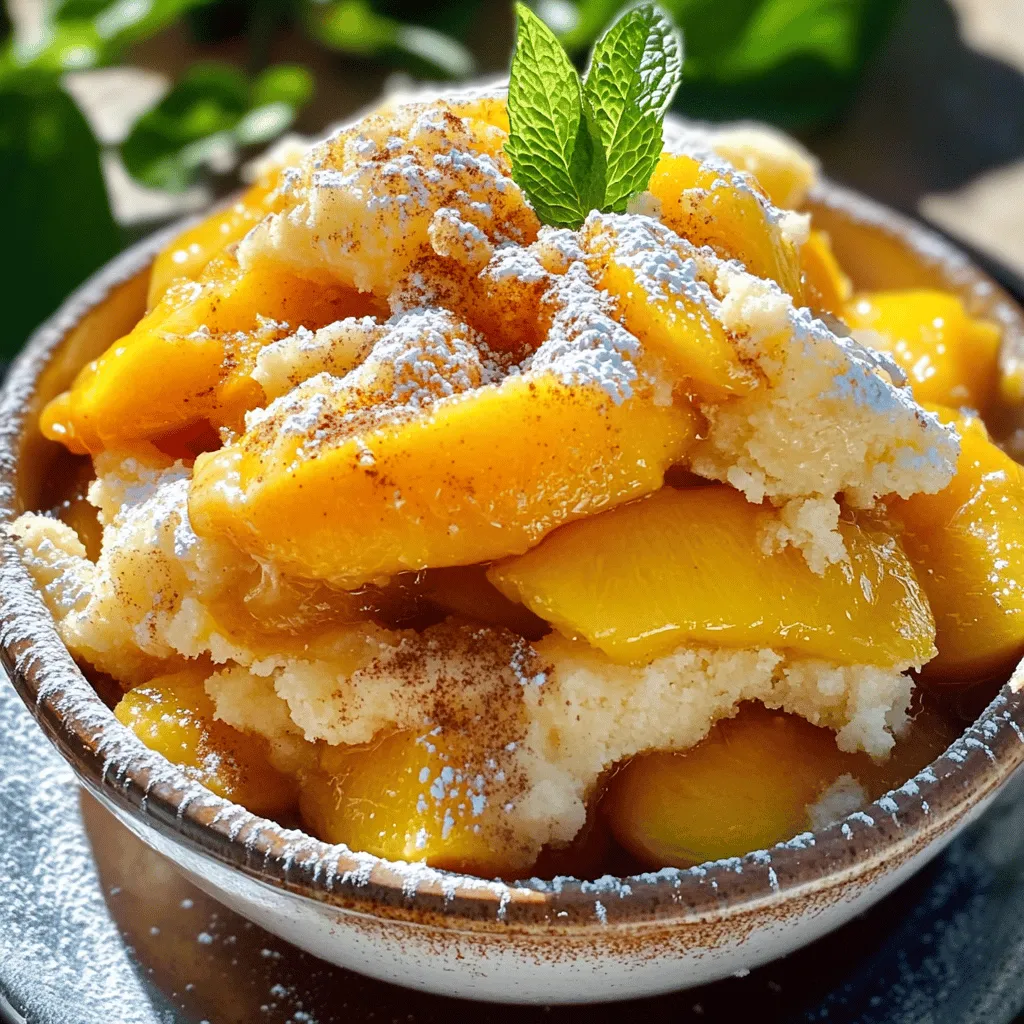
Peach Cobbler Dump Cake Simple and Delicious Dessert

If you’re craving a simple yet delicious dessert, look no further than Peach Cobbler Dump Cake. This treat combines sweet

To make a fresh and tasty mango avocado salsa, you need a few key ingredients. Here is what you will need: - 1 ripe mango, diced into small cubes - 2 ripe avocados, diced into small cubes - 1 small red onion, finely chopped - 1 small jalapeño, deseeded and minced (adjust to taste) - 2 tablespoons fresh lime juice - 1 tablespoon honey (optional, for a touch of sweetness) - 1/4 cup fresh cilantro, finely chopped - Salt and pepper to taste These ingredients create a balance of sweet, creamy, and spicy flavors. The mango brings natural sweetness, while the avocado adds creaminess. The onion and jalapeño provide crunch and heat. You can add more depth to your salsa with a few optional ingredients. Here are some ideas: - Diced red bell pepper for sweetness and color - A splash of orange juice for extra brightness - Chopped garlic for a savory kick - Black beans for added protein and texture Feel free to mix and match these options to suit your taste. They can make your salsa unique and exciting. Having the right tools can make salsa prep easier and faster. Here are some tools I recommend: - A sharp knife for easy cutting - A cutting board for safe chopping - A large mixing bowl to combine all ingredients - A measuring spoon for accurate measurements Using these tools helps you create a delicious mango avocado salsa with ease. You’ll find that they also make cleanup a breeze. For the full recipe, refer to [Full Recipe]. Start by gathering all your fresh ingredients. You need one ripe mango and two ripe avocados. Dice the mango and avocados into small cubes. This size helps mix the flavors well. Place them in a large mixing bowl. Next, finely chop one small red onion. Add it to your bowl for a nice crunch and flavor. Then, take one small jalapeño. Carefully deseed it and mince it finely. This step adds a spicy kick to the salsa. If you like less heat, use less jalapeño or skip it. Now it’s time to mix! Squeeze two tablespoons of fresh lime juice over the diced fruit. This juice keeps the salsa fresh and adds a zesty taste. If you want a touch of sweetness, add one tablespoon of honey. Gently fold all the ingredients together. Be careful not to mash the avocado; you want those creamy bites. Next, add a quarter cup of fresh cilantro, finely chopped. This herb adds a bright, fresh flavor. Season your salsa with salt and pepper to taste. Toss everything together one last time to blend the flavors well. For the best taste, let the salsa sit for about 10-15 minutes. This waiting time helps the flavors mix nicely. When you’re ready to serve, present your colorful salsa in a bright bowl. Garnish it with a sprig of fresh cilantro on top. Try serving your mango avocado salsa with crisp tortilla chips as a starter. You can also pair it with grilled fish or chicken for a tasty main dish. Enjoy making this fresh and flavorful salsa! For the full recipe, check out the Tropical Bliss Mango Avocado Salsa. Choose ripe mangoes and avocados for the best flavor. A ripe mango has a slight give when pressed. Look for a yellowish color with some red. For avocados, pick ones that feel soft but not mushy. They should slightly yield to gentle pressure. This ensures a creamy texture in your salsa. To keep your avocados fresh, use lime juice right after cutting. This helps prevent browning. Store any leftovers in an airtight container. Add an extra layer of lime juice on top before sealing. If you want to keep the avocado pieces intact, leave the pit in the container. This can help slow down oxidation. For a great presentation, use a colorful bowl. Scoop the salsa into the bowl and top it with cilantro. This makes it look fresh and vibrant. Serve the salsa with crispy tortilla chips for a fun snack. You can also pair it with grilled chicken or fish for a tasty meal. The colors and flavors will impress your guests. For the full recipe, check out Tropical Bliss Mango Avocado Salsa. {{image_4}} For those who crave heat, try the spicy version. Start with the base recipe. Add one or two diced jalapeños for a zesty kick. If you want more spice, include a pinch of cayenne pepper. This salsa pairs well with tacos or grilled meats. The heat enhances the sweet mango and creamy avocado. Want a sweeter taste? Add fresh pineapple to the mix. Dice one cup of ripe pineapple and fold it in with the mango and avocado. The pineapple brings a juicy, tropical flavor that brightens your salsa. This twist works great with fish dishes or as a dip for chips. If you want a more filling salsa, add black beans. Rinse and drain one cup of canned black beans. Gently mix them in with the other ingredients. This addition gives your salsa protein and fiber. It makes a perfect topping for salads or grain bowls. Try the full recipe to explore these variations! To keep your mango avocado salsa fresh, store it in an airtight container. This limits air exposure, which can cause browning. Place a piece of plastic wrap directly on the salsa before sealing the lid. This extra step helps maintain its vibrant colors and flavors. I do not recommend freezing this salsa. The texture of mango and avocado changes when frozen. If you try it, the salsa may become mushy after thawing. Instead, enjoy it fresh, as this recipe shines in its original state. When stored properly in the fridge, mango avocado salsa lasts about 2-3 days. It’s best to eat it within this time to enjoy the fresh taste. If you notice browning, give it a gentle stir. You can still enjoy it if it smells and tastes fine. For the best experience, make smaller batches to avoid waste. For the full recipe, check out Tropical Bliss Mango Avocado Salsa. Mango avocado salsa shines with many dishes. I love serving it with grilled chicken or fish. The fresh flavors cut through the richness of the meat. You can also enjoy it with tortilla chips for a fun snack. Try it on tacos for a zesty twist. It adds a burst of flavor to any meal. Yes, you can make it ahead. I suggest preparing it a few hours before serving. This allows the flavors to blend nicely. Keep it in the fridge in a sealed container. However, if you use avocado, it may brown quickly. To avoid this, add lime juice and cover tightly. Adjusting the spice level is easy. If you want less heat, use less jalapeño. You can also remove the seeds for milder flavor. If you enjoy spice, add more jalapeño. Another option is to include diced bell peppers for flavor without the heat. Just taste as you go to find your perfect balance. Mango avocado salsa is fresh, tasty, and easy to make. We covered ingredients, tools, and steps to prepare it. I shared tips on choosing ripe fruit and keeping your salsa fresh. Plus, we explored fun variations and storage tips. You can pair this salsa with many dishes or tweak the spice level to suit your taste. Enjoy this bright, flavorful dish at your next meal!

Mango Avocado Salsa Fresh and Flavorful Recipe

Looking to brighten up your meals? This Mango Avocado Salsa recipe bursts with fresh flavors! Whether you’re hosting a party

To make spinach feta stuffed salmon, gather these ingredients: - 4 salmon fillets (6 oz each) - 2 cups fresh spinach, finely chopped - 1 cup feta cheese, crumbled - ½ cup cream cheese, softened at room temperature - 2 cloves garlic, minced - 1 tablespoon fresh lemon juice - 1 teaspoon dried oregano - 2 tablespoons olive oil, divided - Salt and freshly ground black pepper, to taste - Lemon slices, for garnish You can switch a few ingredients for different flavors or diets. Try these options: - Use goat cheese instead of feta for a tangy taste. - Swap cream cheese for Greek yogurt to cut calories. - Use kale if you want a different green. - Replace salmon with chicken breast for a poultry option. - Choose fresh herbs like thyme or basil instead of oregano for a twist. This dish is not just tasty; it is also good for you. Here’s a rough idea of the nutrition per serving: - Calories: 350 - Protein: 30g - Fat: 23g - Carbohydrates: 4g - Fiber: 1g - Vitamin A: 80% of daily value - Calcium: 25% of daily value These numbers show that spinach feta stuffed salmon packs a healthy punch. This meal gives you protein, healthy fats, and vitamins, making it a great choice for lunch or dinner. For the full recipe, check out the [Full Recipe]. Start by preheating your oven to 375°F (190°C). This step is key for even cooking. While the oven heats, gather your ingredients. You will need salmon fillets, spinach, feta, cream cheese, garlic, lemon juice, oregano, olive oil, salt, and pepper. Make sure everything is ready before you start cooking. In a medium skillet, pour in one tablespoon of olive oil. Set the heat to medium. Add the minced garlic and cook for about one minute. Stir it often to keep it from burning. Next, toss in the chopped spinach. Cook for 2-3 minutes until it wilts. Once it looks nice and green, take it off the heat and let it cool for a minute. Now, in a mixing bowl, combine the cooked spinach with feta, cream cheese, lemon juice, oregano, and a pinch of salt and pepper. Mix it well until you have a creamy filling. Take each salmon fillet and make a slit on the top side. Be careful not to cut all the way through. This creates a pocket for the filling. Now, spoon the creamy spinach and feta mixture into each pocket. Press gently to secure the filling. In the same skillet, add the last tablespoon of olive oil and heat it over medium-high. Place the stuffed fillets in the skillet and sear for about 3-4 minutes until golden brown. Carefully flip the fillets to sear the other side quickly. Then, transfer the skillet to the preheated oven. Bake for 10-12 minutes. The salmon is done when it flakes easily with a fork. After baking, let it rest for a couple of minutes before serving. For a beautiful presentation, serve on a white platter and add lemon slices on top. You can find the full recipe above for all the details. To cook salmon perfectly, I recommend two main methods: searing and baking. Searing gives it a crispy skin while baking ensures it stays moist. Start by heating oil in a skillet. Place the salmon fillets skin-side down. Cook for about 3-4 minutes until golden brown. Flip the fillets and bake them in the oven at 375°F for 10-12 minutes. This mix of methods brings out the best in the fish. If your salmon is overcooked, it can become dry and tough. To avoid this, use a meat thermometer. Aim for an internal temperature of 145°F. If you find your salmon sticking to the pan, ensure the skillet is hot and well-oiled. Also, avoid moving the fish too soon. Let it sear properly before flipping. If your stuffing spills out, make sure to press it in gently when filling. For more flavor, consider adding fresh herbs like dill or parsley to your stuffing. A pinch of red pepper flakes can give it a nice kick. You can also replace some feta with cream cheese for a creamier texture. Drizzling a bit of balsamic reduction on top before serving adds a sweet tang. Each of these tips can turn your dish into a gourmet meal, making it special for any occasion. For the full recipe, check the detailed instructions above. {{image_4}} You can switch the feta cheese for other types. Try goat cheese for a tangy twist. Cream cheese also works well if you want a richer taste. If you love sharp flavors, use aged cheddar. Each cheese brings its own flair to the dish. You can add more veggies to the filling. Consider sun-dried tomatoes for a pop of color and taste. Artichoke hearts also add a nice flavor. If you want more crunch, try diced bell peppers. These options keep the dish exciting and fresh. Spice it up or tone it down based on what you like. Add crushed red pepper flakes for heat. If you prefer milder flavors, skip the spice altogether. You can also mix in fresh herbs like basil or parsley for extra flavor without the heat. Enjoy experimenting! To keep your spinach feta stuffed salmon fresh, store it in an airtight container. Place the salmon in the fridge within two hours of cooking. You can enjoy it for up to three days. If you want to keep it longer, freezing is a great option. When you're ready to enjoy leftovers, reheat your salmon gently. You can use the oven at 350°F (175°C) for about 10-15 minutes. This keeps the salmon moist. You can also use a microwave, but be careful not to overcook it. Heat it in 30-second intervals, checking often. If you plan to freeze your stuffed salmon, wrap each fillet tightly in plastic wrap. After that, place it in a freezer-safe bag or container. This way, it can last for up to three months. When you're ready to eat, thaw it overnight in the fridge before reheating. For more details, check out the full recipe. You should bake Spinach Feta Stuffed Salmon for 10-12 minutes at 375°F (190°C). This time allows the salmon to cook fully while keeping it moist. The fish will flake easily when done. Keep an eye out for a golden-brown color on the top. This dish pairs well with many sides. Here are some tasty options: - Steamed asparagus - Roasted potatoes - Quinoa salad - Garlic bread - Mixed greens with lemon vinaigrette These sides balance the rich flavors of the salmon and add color to your plate. Yes, you can prep this dish ahead. Make the filling and stuff the salmon up to a day in advance. Store it in the fridge, covered tightly. When you're ready, just sear and bake the salmon. This makes dinner quick and easy! For the full recipe, check out the Spinach & Feta Stuffed Salmon Delight. Spinach feta stuffed salmon is a tasty dish packed with nutrients. We covered key ingredients, cooking steps, and useful tips. Variations let you customize it to your taste. Proper storage ensures your meal lasts longer. Using the cooking methods shared can help you avoid common problems. Now, you’re ready to cook and enjoy this dish. Get creative and have fun in the kitchen!

Spinach Feta Stuffed Salmon Flavorful and Healthy Meal

Looking for a healthy and tasty meal? You’ve found it! Spinach Feta Stuffed Salmon is not just packed with flavor;

- 8 oz (220 g) pasta (penne or fusilli recommended) - 2 tablespoons olive oil - 3 cloves garlic, minced - 1 can (14 oz) diced tomatoes (with juices) - 1 cup heavy cream - 2 cups fresh spinach, packed - 1 teaspoon dried Italian seasoning - Salt and pepper to taste - 1/2 cup grated Parmesan cheese - Fresh basil leaves for garnish You can switch up the pasta type. Shells or spaghetti work well too. If you want more flavor, add red pepper flakes for a kick. You can also swap heavy cream for half-and-half for a lighter sauce. Fresh herbs, like thyme or oregano, can enhance the taste even more. For a gluten-free option, use gluten-free pasta. If you want a vegan dish, replace heavy cream with coconut milk or a vegan cream. Nutritional yeast can replace Parmesan cheese for a cheesy flavor without dairy. Always check the labels to ensure all ingredients fit your dietary needs. {{ingredient_image_2}} To start, fill a large pot with water and add salt. Bring the water to a rolling boil. Once it boils, add 8 ounces of your chosen pasta. I recommend penne or fusilli for this dish. Cook the pasta until it is al dente, following the package guide. This usually takes about 8 to 10 minutes. Once done, drain the pasta but keep 1/2 cup of the pasta water. Set the pasta aside for later. Now, grab a large skillet and pour in 2 tablespoons of olive oil. Heat the oil over medium heat. When the oil shimmers, add 3 minced garlic cloves. Sauté the garlic for about 1 minute until it smells great and turns slightly golden. Next, open a can of diced tomatoes (14 oz) and pour them into the skillet, including the juices. Stir well and let this simmer for 5 minutes. This step thickens the sauce and brings out the flavors. Reduce the heat to low and slowly pour in 1 cup of heavy cream. Stir continuously as it warms and blends into a creamy mixture. Let it reach a gentle simmer. Now, add 2 cups of fresh spinach and 1 teaspoon of dried Italian seasoning. Stir until the spinach wilts down and mixes into the sauce. Taste and add salt and pepper as you like. Finally, it’s time to bring everything together. Add your drained pasta to the skillet. Toss until every piece is well coated in the creamy sauce. If the sauce feels too thick, add some reserved pasta water until you reach your desired creaminess. Sprinkle in 1/2 cup of grated Parmesan cheese and stir until it melts into the dish. Serve the creamy tomato spinach pasta on plates, garnished with fresh basil leaves for a lovely touch. To get a rich, creamy sauce, start with heavy cream. This thick cream gives the best texture. Pour it in slowly while stirring. This helps it mix well with the tomatoes. If the sauce feels too thick, add some pasta water. This extra water keeps the sauce smooth and helps it coat the pasta nicely. When it comes to flavor, don’t skip the Italian seasoning. It adds a warm, herby taste to your dish. You can also use fresh herbs if you have them. Basil works great! Always taste and adjust salt and pepper. This small step makes a big difference in how tasty your pasta will be. Serve your creamy tomato spinach pasta with a sprinkle of fresh basil on top. This adds color and flavor. You can also add more grated Parmesan cheese for richness. Pair this dish with a simple salad or garlic bread. These sides complement the pasta well and make your meal complete. Enjoy your delicious creation! Pro Tips Cooking Pasta Perfectly: Always cook pasta in a large pot of boiling salted water to ensure even cooking and to prevent sticking. Choosing Tomatoes: Opt for high-quality canned tomatoes for a richer flavor; San Marzano tomatoes are often the best choice. Adjusting Creaminess: If the sauce is too thick, add reserved pasta water gradually until you reach the desired consistency; it helps the sauce cling better to the pasta. Enhancing Flavor: For an extra layer of flavor, consider adding a pinch of red pepper flakes or a splash of balsamic vinegar to the sauce. {{image_4}} You can easily boost this dish by adding protein. Chicken, shrimp, or even tofu work well. To add chicken, cook it in the skillet before the garlic. For shrimp, toss them into the pan with the tomatoes. If you prefer tofu, use firm tofu, and sauté until golden. Each protein brings a new flavor and texture. To make this recipe vegetarian, simply skip the meat. Use vegetable broth to cook your pasta for added flavor. For a vegan version, swap the heavy cream with coconut milk or cashew cream. Instead of Parmesan cheese, use nutritional yeast for a cheesy taste. These changes keep the dish delicious and plant-based. You can add spices and herbs to make this dish more exciting. Crushed red pepper flakes give it a nice kick. You might also love fresh herbs like parsley or oregano. Stir these in right before serving to keep their flavor bright. Lemon zest can add a fresh twist, too. Experiment with these options to find your favorite flavor. After enjoying your creamy tomato spinach pasta, let it cool. Transfer leftovers to an airtight container. Store in the fridge for up to three days. Keeping the pasta sealed helps it stay fresh. Make sure to label the container with the date so you don’t forget. To reheat, you can use the stove or microwave. If using the stove, add a splash of water or broth to a pan. Heat the pasta over medium-low heat, stirring often until warm. If you prefer the microwave, place pasta in a bowl. Cover with a damp paper towel and heat for 1-2 minutes, stirring halfway through. This keeps the pasta moist. You can freeze creamy tomato spinach pasta for later. First, let it cool completely. Then, portion it into freezer-safe bags or containers. Squeeze out excess air before sealing. This helps prevent freezer burn. Label each bag with the date and contents. You can freeze it for up to three months. To enjoy later, thaw in the fridge overnight. Reheat as mentioned above for the best flavor and texture. Yes, you can make this dish gluten-free. Use gluten-free pasta instead of regular pasta. Many brands offer great options, like rice or corn-based pasta. Just check the package for cooking times. The rest of the ingredients are naturally gluten-free. To lighten this dish, swap heavy cream for a lower-fat option. You can use half-and-half or a mix of Greek yogurt and milk. This will cut calories but still keep it creamy. Use less cheese, or try a dairy-free cheese for fewer calories. Adding more veggies can also make the meal lighter and still filling. You can add many veggies to this pasta. Try bell peppers, zucchini, or mushrooms for added flavor. Broccoli or asparagus works well too. Just sauté them along with the garlic for the best taste. Get creative and use what you have on hand! To sum up, we’ve explored the key ingredients and step-by-step cooking methods for this delicious pasta dish. You learned how to create a creamy sauce, enhance flavors with seasonings, and discover various substitutions for dietary needs. With handy tips on storage and reheating, you can savor this dish longer. Experiment with protein options and fresh herbs to make it your own. Enjoy your cooking journey, and let your creativity shine as you perfect this recipe.

Creamy Tomato Spinach Pasta Easy and Flavorful Meal

If you’re looking for a quick and tasty dinner, you’ve found it! This Creamy Tomato Spinach Pasta is not only

- 20 jumbo pasta shells - 1 pound ground turkey or beef - 1 packet taco seasoning - 1 cup black beans, rinsed and drained - 1 cup corn (frozen or canned) - 1 cup salsa (mild or spicy) - 2 cups shredded cheddar cheese (divided) - 1 cup sour cream - 1/2 cup chopped green onions - 1/4 cup fresh cilantro, chopped (optional) - Salt and pepper to taste When I make Cheesy Taco Stuffed Shells, I focus on fresh ingredients. The jumbo pasta shells are the star of the show. They hold all the good stuff inside. I love using ground turkey for a lighter option, but beef works great too. Taco seasoning adds that classic flavor we all crave. I always rinse and drain my black beans. This step removes excess salt and improves the taste. Corn, whether frozen or canned, brings sweetness and texture. Salsa adds moisture and a kick. You can choose how spicy you want it! For the topping, I use two cups of shredded cheddar cheese. It melts beautifully on top, making it gooey and delicious. Sour cream adds creaminess, while green onions and cilantro give a fresh taste. Don't forget to season with salt and pepper! For the Full Recipe, check the detailed instructions that follow. - Preheat oven to 375°F (190°C). - Cook jumbo pasta shells according to package instructions. Make sure to salt the water for added flavor. - Brown ground turkey or beef in a skillet. Use medium heat and stir often. - Add taco seasoning, black beans, and corn; heat through. This mix will pack a flavorful punch. - Fill pasta shells with the cheesy meat mixture. Be careful not to overfill. - Arrange stuffed shells in a baking dish and cover with salsa and cheese. This will create a delicious topping. - Cover with foil and bake for 20 minutes. This keeps the moisture in. - Remove foil and bake for an additional 10-15 minutes. Look for that golden, melted cheese on top. For the full recipe, refer back to the ingredient list. Enjoy making this tasty dish! To make your Cheesy Taco Stuffed Shells shine, start with the pasta. Ensure the shells are not overcooked. They should be al dente, as they will continue to cook in the oven. This helps keep them firm and holds the filling better. After baking, let the dish cool slightly before serving. This small step makes a big difference. It helps the cheese set and makes serving easier. How you present your food can make it more inviting. Serve the stuffed shells on a big platter. Add lime wedges around the dish for a pop of color. Lime gives a fresh taste and looks bright. Use colorful garnishes like chopped cilantro or green onions on top. This makes the dish fun and appealing. The eye loves a feast just as much as the stomach does! You can easily make these stuffed shells your own. If you want a lighter option, substitute ground turkey with chicken or use meat alternatives. This keeps the dish tasty while changing the flavor. Want more heat? Adjust the spiciness by choosing different salsa options. You can use mild salsa for kids or opt for a spicy version for adults. This way, everyone gets what they like! For the full recipe, don’t forget to check out the link to get every detail right. {{image_4}} For a tasty vegetarian take, swap out meat for lentils or plant-based meat substitutes. Lentils are great for protein and add a nice texture. You can also toss in extra veggies like bell peppers or zucchini for added flavor and nutrition. These options make the dish colorful and nutritious, keeping it healthy. If you love heat, add jalapeños or use a spicy salsa. This gives a kick that many find exciting. For an extra layer of spice, consider mixing in pepper jack cheese. This cheese melts beautifully and brings a creamy, spicy flavor that pairs well with the taco filling. Cheese fans will enjoy mixing in different types of cheese. Monterey jack or mozzarella add new flavors and creaminess. You can also top the dish with more cheese before baking. This creates a rich, gooey layer that will make each bite the ultimate cheesy delight. For more ideas on how to customize this dish, check out the Full Recipe. After enjoying your cheesy taco stuffed shells, you might have some left. To keep them fresh, store them in an airtight container in the refrigerator. This method helps to prevent them from drying out or absorbing other odors. You can safely keep them for up to 3-4 days. If you want to save some for later, freezing works well. You can freeze the shells either unbaked or baked and cooled. Make sure to use freezer-safe containers. It's best to label them with the date so you remember when you made them. This way, you can enjoy a quick meal later without any hassle. When you're ready to enjoy your cheesy taco stuffed shells again, reheating is simple. You can reheat them covered in the oven at 350°F until warm. This method helps keep the cheese melty and the shells tender. Microwaving is also an option if you're in a hurry. Just add a splash of water to keep the shells moist while reheating. Enjoy your tasty meal again! Yes, you can prepare them a day in advance and bake when ready. Just cook the shells and fill them. Then, cover and store them in the fridge. When you are ready, just pop them in the oven. This makes meal prep easy and quick. Serve with a side salad or tortilla chips and guacamole. A fresh salad adds crunch. Tortilla chips bring a nice texture. Guacamole adds a creamy touch. These sides balance the meal well. Absolutely! Ground chicken, pork, or vegetarian options are all great substitutes. You can even use lentils or beans for a meatless dish. This allows you to customize the flavors to fit your family's taste. Cheesy Taco Stuffed Shells are easy and fun to make. You gather simple ingredients, like pasta shells, ground meat, and beans. After prepping, baking, and garnishing, you can enjoy a delicious meal. Don’t forget to customize your dish with your favorite flavors! I hope this recipe inspires you to create a fantastic dinner. Get ready to share these cheesy delights with family and friends. Happy cooking!

Cheesy Taco Stuffed Shells Flavorful Family Meal

Looking for a fun and tasty family meal? Cheesy Taco Stuffed Shells are just the dish you need! Packed with

This One Pan Mediterranean Chicken recipe is simple and full of flavor. You'll love how easy it is to make. With just one pan, you can cook chicken and veggies together. This dish serves four people and is perfect for busy weeknights. To make this dish, you will need the following ingredients: - 4 bone-in, skin-on chicken thighs - 1 cup cherry tomatoes, halved - 1 red bell pepper, sliced into strips - 1 medium zucchini, sliced into half-moons - 1 large red onion, cut into wedges - 3 cloves garlic, finely minced - 1 teaspoon dried oregano - 1 teaspoon dried thyme - ½ teaspoon smoked paprika - Zest and juice of 1 lemon - 3 tablespoons extra virgin olive oil - Salt and freshly ground black pepper to taste - Fresh parsley, finely chopped (for garnish) These ingredients work together to create a tasty and colorful meal. You can add some different flavors to this dish. Here are some great optional add-ins: - Olives for a briny taste - Feta cheese for creaminess - Spinach for extra greens - Artichoke hearts for a unique twist - Capers for a salty kick Feel free to get creative and add your favorite veggies or herbs. This makes the dish even more special! Start by preheating your oven to 400°F (200°C). This helps the chicken cook evenly. In a large bowl, mix together 3 tablespoons of extra virgin olive oil, 3 cloves of minced garlic, the zest and juice of 1 lemon, 1 teaspoon of dried oregano, 1 teaspoon of dried thyme, and ½ teaspoon of smoked paprika. Add salt and black pepper to taste. Whisk until all the ingredients blend well. Next, add 4 bone-in, skin-on chicken thighs to the bowl. Toss the chicken in the marinade until every piece is covered. Let the chicken sit for at least 15 minutes. This allows the flavors to soak in. While the chicken marinates, prepare your vegetables. Cut 1 cup of cherry tomatoes in half. Slice 1 red bell pepper into strips. Cut 1 medium zucchini into half-moons and chop 1 large red onion into wedges. These veggies will add color and taste to your meal. Now, grab a large oven-safe skillet. Place the marinated chicken thighs skin-side up in the pan. Arrange the halved cherry tomatoes, red bell pepper strips, zucchini half-moons, and onion wedges around the chicken. This makes a beautiful, colorful dish. Drizzle any leftover marinade over the vegetables. Sprinkle with extra salt and pepper if desired. Transfer the skillet to your preheated oven and bake for about 35 to 40 minutes. The chicken is ready when the skin looks crispy and golden, and its internal temperature reaches 165°F (75°C). For extra crispy skin, turn on the broiler for the last 2-3 minutes. Watch closely to avoid burning. After cooking, let the skillet rest for a few minutes before serving. Garnish with freshly chopped parsley for a pop of color. Enjoy your One Pan Mediterranean Chicken! To make the best marinade, use fresh ingredients. Fresh garlic and lemon juice add great flavor. Mix olive oil, herbs, and spices well. Let the chicken soak in the marinade for at least 15 minutes. If you have time, marinate it longer for deeper flavor. You can even marinate it overnight for an extra punch. For crispy chicken skin, start with bone-in, skin-on thighs. Pat the skin dry before marinating. The drier the skin, the crispier it gets. When baking, place the chicken skin-side up. If you want extra crunch, broil the chicken for a few minutes at the end. Just watch closely so it doesn’t burn. Cooking time can vary based on your oven and chicken size. Aim for 35-40 minutes at 400°F. Always check the chicken's internal temperature. It should reach 165°F for safety. If you use larger thighs, add a few extra minutes. For smaller pieces, reduce the time to avoid drying out. Adjust cooking time based on how your chicken looks. {{image_4}} You can switch the chicken for other proteins. Try bone-in pork chops for a different taste. They roast well and stay juicy. If you want a lighter option, use skinless chicken breasts. They cook faster but may need a little extra seasoning. You can also use firm tofu for a vegetarian twist. Marinate it just like the chicken for great flavor. Feel free to mix in your favorite veggies. Asparagus and green beans add a nice crunch. Eggplant brings a rich flavor that pairs well with the spices. If you like more color, add yellow bell pepper or sliced carrots. Just remember to cut them into similar sizes for even cooking. You can even toss in some olives for a briny kick. Experimenting with flavors is fun! Add a teaspoon of cumin for a warm, earthy taste. For a spicy kick, toss in some red pepper flakes. If you love fresh herbs, try adding rosemary or basil. A splash of balsamic vinegar can give a tangy twist. Mix and match these ideas to find your perfect blend. For the full recipe, check out the Sunny One Pan Mediterranean Chicken. Store leftover One Pan Mediterranean Chicken in an airtight container. Place it in the fridge within two hours of cooking. It will stay fresh for up to three days. Make sure to separate the chicken from the vegetables if you prefer. This keeps them from getting too soggy. To freeze, let the chicken cool completely. Wrap each piece tightly in plastic wrap. Then, place them in a freezer-safe bag. Remove as much air as possible. You can freeze it for up to three months. Label the bag with the date for easy tracking. When you're ready to enjoy the leftovers, thaw the chicken in the fridge overnight. Reheat it in the oven at 350°F (175°C) for about 20 minutes. This keeps the skin crispy. You can also use a microwave, but the oven is best for texture. For added flavor, drizzle a little olive oil over the chicken before reheating. For the full recipe, check out Sunny One Pan Mediterranean Chicken. To add spice, you can use red pepper flakes. Start with half a teaspoon and taste. If you want more heat, add more. Another option is to use a spicy marinade. You can also mix in some diced jalapeños with the veggies. They will give a nice kick to each bite. This dish pairs well with many sides. Try serving it over fluffy rice or creamy mashed potatoes. You can also serve it with a fresh green salad for crunch. Crusty bread is great for soaking up the juices. For a Mediterranean twist, consider a side of couscous or quinoa. Yes, you can use boneless chicken thighs. They will cook faster than bone-in thighs. Reduce the baking time to about 25-30 minutes. Check that the internal temperature reaches 165°F (75°C) for safety. Boneless thighs stay moist and are easy to eat. They are a great choice for a quick meal. For the full recipe, refer to the earlier section. This blog post covered all you need for One Pan Mediterranean Chicken. We explored ingredients, including essential and optional add-ins. You learned step-by-step instructions for preparing chicken and veggies. The tips helped you perfect the marinade and achieve crispy skin. We also discussed fun variations and how to store leftovers properly. In closing, enjoy making this dish your own. The options are endless, and sharing it can create great meals for family and friends. Happy cooking!

One Pan Mediterranean Chicken Flavorful and Easy Meal

Looking for a simple, tasty meal? One Pan Mediterranean Chicken is your answer! This dish brings together juicy chicken and

To make these tasty sesame garlic noodles, gather the following ingredients: - 8 oz. egg noodles - 3 tablespoons sesame oil - 4 cloves garlic, minced - 2 tablespoons soy sauce - 1 tablespoon rice vinegar - 1 tablespoon honey or maple syrup - 1 teaspoon red pepper flakes (adjust for spice level) - 2 green onions, chopped - 1 tablespoon toasted sesame seeds - Fresh cilantro for garnish This dish is not just tasty; it’s also nutritious! Each serving provides a good mix of carbs and healthy fats. Here is a quick look at the nutrition per serving: - Calories: Approximately 300 - Protein: 8g - Fat: 14g - Carbohydrates: 40g - Fiber: 2g - Sugar: 3g You can easily adapt this recipe based on what you have. Here are some great swaps: - Instead of egg noodles, try rice noodles or whole wheat noodles for a different texture. - Use olive oil if you don’t have sesame oil, but the flavor will change slightly. - If you need a soy-free option, tamari works well. - For a vegan choice, swap honey with maple syrup or agave nectar. - If you want less spice, reduce the red pepper flakes or skip them entirely. These simple substitutions help you tailor the dish to your taste and pantry! Start by filling a large pot with water. Add a generous pinch of salt. Bring the water to a rolling boil. Once boiling, add 8 ounces of egg noodles. Cook them according to the package instructions. This usually takes about 5-7 minutes. You want the noodles to be al dente. When done, drain them in a colander. Let them cool slightly while you prepare the sauce. In a small mixing bowl, combine 3 tablespoons of sesame oil with 4 minced garlic cloves. Add 2 tablespoons of soy sauce, 1 tablespoon of rice vinegar, and 1 tablespoon of honey or maple syrup. If you like spice, mix in 1 teaspoon of red pepper flakes. Taste the sauce. Adjust the sweetness or spice to fit your taste. This sauce brings all the flavor to the noodles. Next, heat a large skillet over medium heat. Add the drained noodles to the skillet. Pour the sauce over the hot noodles. Use tongs or a spatula to toss the noodles. Make sure each strand gets coated in that tasty sauce. Sauté the noodles for about 3-4 minutes. Stir often to prevent sticking. Cook until the noodles are heated through and the sauce thickens slightly. Remove the skillet from heat. Stir in 2 chopped green onions and 1 tablespoon of toasted sesame seeds. Give it a taste and add a splash of soy sauce if you want more flavor. Serve your sesame garlic noodles in bowls. Garnish with fresh cilantro and extra sesame seeds for a nice touch. Check out the Full Recipe for more details! To cook noodles perfectly, start with plenty of water. Use a large pot and add salt. This helps flavor the noodles. Stir the noodles often as they cook. This keeps them from sticking. Test the noodles a minute or two early. They should be firm but not hard. Drain them quickly and rinse with cold water. This stops the cooking process. Want to make your Sesame Garlic Noodles pop? Add extra garlic or ginger for more depth. Try using low-sodium soy sauce for a lighter taste. You can switch honey for agave syrup if you prefer. If you love heat, add more red pepper flakes. For a rich flavor, sprinkle in some crushed peanuts or cashews. Fresh herbs, like basil or mint, can also brighten the dish. Serve your noodles warm and fresh. A sprinkle of green onions adds a nice crunch. Pair the noodles with grilled chicken or shrimp for more protein. You can also serve them with a side of steamed veggies. For a complete meal, try a light salad on the side. These noodles are great for lunch or dinner. For more details, check out the Full Recipe for perfect results. {{image_4}} You can easily make sesame garlic noodles vegetarian or vegan. Simply swap the egg noodles for vegetable noodles. Use rice noodles or soba noodles if you prefer. For a vegan sauce, replace honey with maple syrup. This keeps the sweetness while making it plant-based. You still get that rich flavor with just a few changes. Want to boost the protein? You can add tofu, chicken, or shrimp. For tofu, press it to remove water, then cube and sauté until golden. If using chicken or shrimp, cook them in the skillet before adding the noodles. This way, you get that tasty sauce coating on everything. It adds depth to every bite. Noodles come in many types, and each brings a unique texture. Egg noodles are classic, but you can use rice noodles for a gluten-free option. Soba noodles add a nutty flavor, while udon noodles give a chewy bite. Experiment with your favorite types to find the perfect match for your taste. Each noodle type offers a new twist on this delicious dish. For the full recipe, check out the complete details above. After you enjoy your sesame garlic noodles, store leftovers in an airtight container. Keep them in the fridge for up to three days. Make sure the noodles cool off before you seal them. This helps to avoid extra moisture that can make them soggy. To reheat, you can use a microwave or stovetop. If using a microwave, place the noodles in a bowl. Add a splash of water or soy sauce to keep them moist. Heat for about one to two minutes, stirring halfway through. If using the stovetop, warm them in a pan over medium heat. Stir often and add a little sesame oil to keep them flavorful. You can freeze sesame garlic noodles, but they may lose some texture. Place cooled noodles in a freezer-safe bag. Squeeze out excess air before sealing. They can last up to two months. When you're ready to eat, thaw in the fridge overnight. Reheat thoroughly before serving. For best results, eat them within a month. You can change the spice level by adding or reducing red pepper flakes. If you want less heat, use one-fourth of a teaspoon. For more kick, add an extra teaspoon. You can also try adding some sriracha or chili oil for a different flavor. Yes, you can use gluten-free noodles. Rice noodles or gluten-free pasta work well. Just cook them according to the package instructions. The sauce will blend nicely with these noodles too. To prepare this dish ahead of time, cook the noodles and sauce separately. Store them in the fridge in airtight containers. When ready to serve, simply heat both together in a skillet over medium heat. This method keeps the noodles from getting mushy. Sesame garlic noodles pair well with grilled chicken or shrimp. You can also serve them with sautéed vegetables like bok choy or broccoli. For a light meal, add a simple cucumber salad. These choices enhance the dish and add variety. Sesame garlic noodles are quick and tasty. They are perfect for busy days. You can whip them up in just 20 minutes. This dish is a crowd-pleaser, and it is easy to make. What do you need? Here are the ingredients: - 8 oz. egg noodles - 3 tablespoons sesame oil - 4 cloves garlic, minced - 2 tablespoons soy sauce - 1 tablespoon rice vinegar - 1 tablespoon honey or maple syrup - 1 teaspoon red pepper flakes (adjust for spice level) - 2 green onions, chopped - 1 tablespoon toasted sesame seeds - Fresh cilantro for garnish How do you make it? First, cook the noodles in salted water. They should be al dente. Drain them and set aside. Next, make the sauce. Mix sesame oil, garlic, soy sauce, rice vinegar, honey, and red pepper flakes. Taste it! Adjust the sweetness or spice to your liking. Now, heat a skillet over medium heat. Add the noodles and pour the sauce on top. Toss the noodles well so they are coated with the sauce. Sauté the noodles for about 3-4 minutes. This warms them and makes the sauce stick. Finally, stir in green onions and sesame seeds. Taste again and add more soy sauce if you want. Plate the noodles and garnish with cilantro and sesame seeds. Enjoy! For the full recipe, refer to the section above. In this blog post, we explored how to make delicious Sesame Garlic Noodles. We covered ingredients, cooking steps, and smart tips. You found out how to choose substitutes, cook noodles, and make the sauce. We also discussed variations, from vegetarian options to protein boosts. Remember to store leftovers properly and reheating the noodles for best taste. Keep these tips in mind as you enjoy and share this dish. Cooking can be fun and simple, so dive into your next meal with confidence!

Savory Sesame Garlic Noodles Quick and Easy Recipe

Looking for a simple, tasty dinner idea? Try my Savory Sesame Garlic Noodles! This dish combines rich flavors with quick

- Greek yogurt options: You can use plain or vanilla Greek yogurt. Plain gives a tangy taste, while vanilla adds sweetness. - Types of berries: For the best flavor, use a mix of strawberries, blueberries, and raspberries. Each berry brings its own taste and color. - Sweeteners: Honey or maple syrup work well. You can adjust the amount to fit your taste. - Additional flavor enhancers: A teaspoon of pure vanilla extract adds depth. A pinch of salt enhances the flavors too. These ingredients come together for a refreshing treat. The blend of yogurt and berries makes a perfect popsicle. Plus, you can find the [Full Recipe](#) with all the details to make it easy! 1. Start by blending the berry mixture. - Add 1 cup of mixed berries and 2 tablespoons of honey or maple syrup into a blender. - Blend until smooth. Leave some berry bits for texture if you like. 2. Next, prepare the yogurt mixture. - In a bowl, mix 2 cups of Greek yogurt with 1 teaspoon of pure vanilla extract and a pinch of salt. - Stir until creamy and well combined. 3. Now, layer the mixtures in popsicle molds. - Take half of the berry blend and fold it gently into the yogurt. - This creates a lovely marbled look. - Use a spoon to alternate layers of yogurt and the remaining berry puree in your molds. - Freeze the popsicles for about 4 to 6 hours. - For the best results, let them freeze until they are solid. - To remove popsicles from molds easily, run warm water over the outside for a few seconds. - This trick will help loosen them for a smooth pull. For the full recipe, visit the recipe section above! Enjoy your berry yogurt popsicles! To make your popsicles just right, you can adjust the sweetness. If you like it sweeter, add more honey or maple syrup. For a less sweet treat, use less sweetener. This gives you control over the flavor. When it comes to texture, you have options. You can blend the berry mixture until smooth for a creamy popsicle. If you prefer some berry chunks, blend it less. This adds a fun texture to each bite. Presentation matters too! Serve your popsicles on a bright platter. You can add fresh mint leaves and whole berries around them. This makes your treats look inviting and fresh. The visual appeal enhances the tasting experience. Enjoy your beautiful creation! For the full recipe, be sure to check the detail above! {{image_4}} You can get creative with berry yogurt popsicles. Try mixing different berries like strawberries, blueberries, and raspberries. These berries bring sweet and tart notes. You can also add bananas or peaches for a twist. Bananas add creaminess, while peaches add a light, juicy flavor. If you want to enjoy these pops without dairy, use coconut or almond yogurt. These give a nice taste and a creamy texture. For those watching their sugar, you can cut back. Use less honey or maple syrup. You can also try stevia or monk fruit sweetener for a low-calorie option. If you want a vegan treat, swap Greek yogurt for a plant-based yogurt. Look for options made from almond, soy, or coconut. These keep the pops creamy and delicious. Make these berry yogurt popsicles your own! You can use the [Full Recipe] as a guide and experiment with flavors that you love. To keep your Berry Yogurt Popsicles fresh, store them in airtight containers or freezer bags. This helps prevent ice crystals from forming. Label each container with the date you made them. You can keep these popsicles in the freezer for up to 2 months without losing flavor. After this time, they might taste a bit bland. When you’re ready to enjoy your popsicles, you should thaw them gently. The best way is to let them sit at room temperature for about 5 minutes. If you’re in a hurry, run warm water over the outside of the molds for a few seconds. This will help loosen the popsicles for easy removal. Enjoy your treat when it’s nice and soft! How long do homemade popsicles last in the freezer? Homemade popsicles can last about 2 to 3 months in the freezer. They stay tasty and safe to eat during this time. After that, they might lose some flavor or texture. Can I use other types of yogurt for this recipe? Yes, you can. You can use regular yogurt, plant-based yogurt, or even flavored yogurt. Just keep in mind that flavored yogurt will change the taste. Greek yogurt gives a nice creamy texture. What to do if my popsicles are too hard? If your popsicles are too hard, try letting them sit at room temperature for a few minutes. This will help them soften up. You can also run warm water over the molds to loosen them. Can I make these popsicles without molds? Yes, you can! You can use small cups or ice cube trays instead. Just stick a popsicle stick in the center before they freeze. This way, you enjoy delicious popsicles without special molds. In this guide, we explored how to make berry yogurt popsicles from scratch. You learned about choosing the right ingredients, preparing the mixtures, and layering them in molds. I shared tips for perfecting flavor and texture. Now you’re ready to make popsicles that please your taste buds. Enjoy experimenting with flavors and share your creations. Simple steps lead to delicious results. Happy popsicle making!

Berry Yogurt Popsicles Fresh and Flavorful Treats

Looking for a cool treat this summer? Berry yogurt popsicles are simple, tasty, and perfect for hot days. With creamy

- 1 ¾ cups all-purpose flour - 1 cup granulated sugar - ½ cup unsalted butter, softened at room temperature - 2 large eggs, at room temperature - ½ cup buttermilk, at room temperature - 1 tablespoon fresh lemon juice - Zest of 1 medium lemon - 1 teaspoon baking powder - ½ teaspoon baking soda - ¼ teaspoon salt - 1 cup strawberries, pureed (fresh or frozen) - 1 teaspoon vanilla extract - For Frosting: - 1 cup powdered sugar - 2 tablespoons fresh lemon juice - 1 tablespoon unsalted butter, softened - Fresh strawberries and lemon slices, for garnish (optional) When measuring flour, use the spoon and level method. Spoon flour into your measuring cup, then level it off with a straight edge. This helps avoid too much flour, which can make cupcakes dense. For sugar, pack it lightly into the cup. For butter, make sure it is soft for easy mixing. Room temperature items mix better, creating a smoother batter. If you need to swap out items, here are some ideas: - Use coconut oil instead of butter for a dairy-free option. - Replace buttermilk with almond milk mixed with 1 teaspoon of vinegar. - If you don’t have fresh strawberries, frozen ones work well too. - For a gluten-free version, try a gluten-free flour blend in place of all-purpose flour. These options keep your cupcakes tasty while allowing you to adjust based on what you have at home. {{ingredient_image_2}} 1. Preheat the Oven: Start by preheating your oven to 350°F (175°C). This helps the cupcakes bake evenly. 2. Prepare the Pan: Line a standard cupcake pan with cupcake liners. This keeps the cupcakes from sticking and makes for easy serving. 3. Mix the Dry Ingredients: In a medium bowl, whisk together the all-purpose flour, baking powder, baking soda, and salt. Make sure these are well mixed for a good rise. 4. Cream Butter and Sugar: In a large bowl, beat the softened butter and granulated sugar together using an electric mixer. Mix on medium speed until light and fluffy, about 3 to 5 minutes. 5. Add Eggs and Flavorings: Add the eggs one at a time, mixing well after each addition. Then mix in the buttermilk, fresh lemon juice, lemon zest, and vanilla extract. Make sure everything is blended well. 6. Combine Mixtures: Gradually add the dry mixture to the wet ingredients. Mix on low speed until just combined. Don't overmix; this keeps the cupcakes light. 7. Fold in Strawberry Puree: Gently fold in the strawberry puree using a spatula. This adds a lovely berry flavor to every bite. 8. Fill the Cupcake Liners: Pour the batter into the cupcake liners, filling each about two-thirds full. This allows space for rising. 9. Bake the Cupcakes: Place the pan in the oven. Bake for about 18 to 20 minutes. Check with a toothpick to see if they are done— it should come out clean. 10. Cool the Cupcakes: Let the cupcakes cool in the pan for 5 minutes. After that, transfer them to a wire rack to cool completely. This step is important for the frosting. 11. Prepare the Frosting: In a mixing bowl, beat the softened butter until creamy. Gradually add the powdered sugar and lemon juice. Mix until smooth and spreadable. 12. Frost the Cupcakes: Once cooled, frost each cupcake with the lemon frosting. You can use a spatula or a piping bag for a nice look. 13. Garnish (Optional): Top each frosted cupcake with a fresh strawberry or a lemon slice for a pretty touch. To make your cupcakes light and fluffy, start by creaming the butter and sugar. Beat them together until they look pale and airy. This helps to incorporate air into the batter. Use room temperature ingredients, like eggs and buttermilk. Mixing in these ingredients at the right temperature keeps the batter smooth and fluffy. Lastly, don’t overmix when combining the dry and wet ingredients. Mix just until you see no dry flour. This step helps keep the cupcakes airy. Decorating your cupcakes can be fun and creative! Use a piping bag with a star tip for a fancy look. Swirl the frosting on top for beautiful peaks. For a fresh touch, add a slice of lemon or a whole strawberry on top. You can also sprinkle some lemon zest for color and flavor. If you're feeling extra creative, use edible flowers for a vibrant finish. Arrange your cupcakes on a tiered stand for a lovely display at any gathering. Baking can be tricky, but avoiding a few common mistakes helps a lot. First, always preheat your oven. This ensures even baking and the right rise. Next, measure ingredients accurately. Too much flour can make cupcakes dense. Remember to check your baking powder and baking soda; they should be fresh for the best rise. Finally, let your cupcakes cool completely before frosting. If they are warm, the frosting will melt away. Following these tips makes for perfect strawberry lemonade cupcakes every time! Pro Tips Use Room Temperature Ingredients: Ensuring your butter, eggs, and buttermilk are at room temperature helps to create a smoother batter and improves the cupcakes' texture. Fresh Strawberries for Puree: Using fresh strawberries will provide a more vibrant flavor in your puree compared to frozen. If using frozen, make sure they are fully thawed and drained. Don’t Overmix the Batter: Mix the dry and wet ingredients until just combined to avoid dense cupcakes. A few lumps are okay! Cool Completely Before Frosting: Allowing the cupcakes to cool completely prevents the frosting from melting and ensures a neat presentation. {{image_4}} You can easily make vegan strawberry lemonade cupcakes. Replace eggs with flaxseed meal. Mix 1 tablespoon of flaxseed with 3 tablespoons of water and let it sit. Use almond milk instead of buttermilk. For the butter, use vegan margarine or coconut oil. These swaps keep the flavor but make it plant-based. To make gluten-free strawberry lemonade cupcakes, swap all-purpose flour for a gluten-free blend. Look for a blend that includes xanthan gum for better texture. Make sure your baking powder is gluten-free too. This way, everyone can enjoy these tasty treats without worry. You can play with flavors to make them unique. Try adding lime juice instead of lemon for a twist. You can also mix in some fresh mint leaves for a refreshing feel. Want more strawberry flavor? Add extra strawberry puree to the batter. You can even sprinkle in some lemon zest for a stronger citrus taste. Each change can add a new layer of fun! To keep your strawberry lemonade cupcakes fresh, store them in an airtight container. This will help lock in moisture and flavor. Place the cupcakes in a single layer to avoid squishing the frosting. If you have leftover frosting, store it separately in a sealed container. Keep the cupcakes at room temperature for up to three days. If you want to keep them longer, refrigerate them for up to a week. Freezing cupcakes is a great way to save them for later. To freeze, first, let the cupcakes cool completely. Then, wrap each cupcake in plastic wrap. Place the wrapped cupcakes in a freezer-safe bag or container. They can last in the freezer for up to three months. When you're ready to enjoy them, thaw the cupcakes at room temperature for a few hours. Frost them after thawing for the best taste. Ensure your frosting stays fresh by storing it in the fridge. Use an airtight container to prevent it from drying out. It can last for up to a week in the fridge. If it's too thick when you're ready to use it, mix in a little lemon juice or milk to reach your desired texture. Frosting can also be frozen. Just place it in a freezer-safe container and use it within three months. When you're ready to use it, let it thaw overnight in the fridge. To boost the lemon flavor, add more lemon juice and zest. You can increase the lemon juice to 2 tablespoons and add the zest of another lemon. This will give the cupcakes a bright, zesty taste that shines through. You could also consider using lemon extract for an extra punch. Just a half teaspoon will do! Yes, you can use frozen strawberries! Just thaw them first and then puree them. This allows you to still enjoy that sweet berry flavor, even when fresh strawberries are out of season. The flavor remains vibrant, making it a great option for these cupcakes. If you don’t have buttermilk, you can make a quick substitute. Mix ½ cup of milk with 1 tablespoon of lemon juice or vinegar. Let it sit for about five minutes. This will create a similar tangy flavor and acidity, perfect for your cupcake batter. In this post, we covered everything you need for delicious strawberry lemonade cupcakes. We listed key ingredients and measurements, including helpful substitutions. You learned step-by-step instructions for preparation, mixing, and baking. Tips for fluffy cupcakes and fun decorating ideas were shared, along with variations for dietary needs. We also covered storage methods to keep your treats fresh. Baking is fun and rewarding. With practice, you can make amazing cupcakes every time. Enjoy your baking journey!

Strawberry Lemonade Cupcakes Delightful and Sweet Treat

Ready to indulge in a sweet and tangy treat? Strawberry Lemonade Cupcakes are the perfect dessert for summer! These cupcakes

The main ingredients in this salad create a delightful mix of flavors and textures. Here's what you need: - 2 cups shredded cooked chicken breast - 1/2 cup dried cranberries - 1/2 cup walnuts, coarsely chopped - 1/2 cup celery, finely diced - 1/4 cup red onion, finely chopped The shredded chicken gives the salad its heartiness. Dried cranberries add a sweet and tangy note. Chopped walnuts provide a nice crunch that balances the dish. The dressing brings everything together with its creamy and zesty taste. You will need: - 1/2 cup Greek yogurt (plain) - 2 tablespoons honey mustard - 1 tablespoon freshly squeezed lemon juice - Salt and freshly ground black pepper to taste The Greek yogurt offers creaminess while keeping it healthy. Honey mustard adds a touch of sweetness and tang. Fresh lemon juice brightens the flavors, making each bite refreshing. You can customize your salad with these optional ingredients: - Fresh arugula or mixed greens for serving - Additional seasoning options like garlic powder or herbs Using arugula or mixed greens gives the salad a fresh base. Add extra seasonings to enhance the flavor profile to your liking. For the full recipe, check out the complete details. Mixing the main ingredients Start by gathering all your main ingredients. In a large bowl, combine 2 cups of shredded cooked chicken breast, 1/2 cup of dried cranberries, 1/2 cup of chopped walnuts, 1/2 cup of finely diced celery, and 1/4 cup of finely chopped red onion. Mix these ingredients gently to ensure they blend well without breaking the chicken too much. Making the dressing In a separate bowl, prepare the dressing. Whisk together 1/2 cup of plain Greek yogurt, 2 tablespoons of honey mustard, and 1 tablespoon of freshly squeezed lemon juice. Add salt and freshly ground black pepper to taste. Keep whisking until the dressing is smooth and well combined. Folding the dressing into the chicken mixture Now, pour the yogurt dressing over the chicken mixture. Use a spatula to carefully fold the dressing into the chicken. Make sure every piece is coated, but be gentle to keep the chicken pieces intact. Adjusting seasoning to taste Once mixed, taste your salad. You may want to add more salt or pepper depending on your preference. Adjust the seasoning until it is just right for you. Chilling the salad Cover your bowl with plastic wrap or transfer the salad to an airtight container. Place it in the refrigerator for at least 30 minutes. This chilling step lets the flavors blend beautifully. Plating the dish on greens To serve, lay a bed of fresh arugula or mixed greens on each plate. Spoon the chicken salad over the greens. This not only looks great but also adds a fresh crunch. For a finishing touch, consider using the Full Recipe to guide your presentation and impress your guests! To save time, consider these two great options for pre-cooking chicken: - Poaching Chicken: Place chicken breasts in boiling water. Cook for about 15-20 minutes until fully cooked. Let it cool before shredding. - Using Rotisserie Chicken: Grab a rotisserie chicken from the store. It saves time and adds flavor. Just shred it and you’re ready to go! For extra zing in your salad, add these spices: - Cinnamon: A pinch can add warmth. - Cayenne Pepper: A tiny dash gives it a kick. You can also mix in fresh herbs: - Parsley: Adds freshness and color. - Thyme: Provides a subtle earthy flavor. How you serve your salad makes a big difference. Here are some tips: - Use a Clear Bowl: A glass bowl shows off the bright colors of your salad. - Garnish with Extras: Sprinkle more chopped walnuts and cranberries on top for a nice touch. Choose the right serving bowl to match your meal. A large bowl works for sharing, while smaller bowls are great for individual servings. {{image_4}} If you need gluten-free options, choose gluten-free mustard. You can also use gluten-free grains. For dairy-free alternatives, replace Greek yogurt with a plant-based yogurt. Almond or coconut yogurt works well. You can add fruits or vegetables to this salad. Try chopped apples for crunch or diced bell peppers for color. Mixing in fresh herbs like parsley or cilantro gives it a fresh taste. Changing the nuts used adds a new twist. Pecans or almonds can replace walnuts for a different flavor. Making it a wrap or sandwich is a fun twist. Use a large lettuce leaf or a tortilla to wrap the chicken salad. This makes a great lunch. You can also transform it into a dip. Serve it with crackers or veggies for a tasty snack. Check out the Full Recipe for more ideas! To keep your Cranberry Walnut Chicken Salad fresh, store any leftovers in the fridge. Use an airtight container to seal in flavors and moisture. This helps prevent the salad from drying out. - Make sure the container is clean and dry. - Avoid using plastic wrap as your only cover. - Label the container with the date so you know when you made it. You can freeze chicken salad, but it’s best to do so without the greens. This keeps the salad fresh and tasty. - Place the salad in a freezer-safe container. - Leave some space at the top to allow for expansion. - Thaw the salad in the fridge overnight before serving. In the fridge, your Cranberry Walnut Chicken Salad lasts about three to four days. Always check for signs of spoilage before eating. - Look for any off smells or changes in texture. - If the salad looks slimy or has an unusual color, it’s best to throw it out. - Use your senses to ensure safety when enjoying this delicious dish. For the complete recipe, check out the Full Recipe section. Yes, you can use canned chicken. It saves time and makes prep easy. However, canned chicken may taste different than freshly cooked chicken. It often lacks the fresh flavor and tender texture you get from cooking your own chicken. If you choose canned chicken, rinse it well to reduce sodium. Shredding it helps mix it better with other ingredients. Cranberry Walnut Chicken Salad lasts about three to five days in the fridge. Store it in an airtight container to keep it fresh. If you notice any changes in smell or texture, it's best to throw it away. For optimal taste, enjoy it within the first two days. This salad pairs well with a variety of side dishes and drinks. Here are some great options: - Whole grain bread or wraps - Fresh fruit salad - Vegetable sticks with hummus - Crisp white wine or sparkling water Feel free to experiment with these side dishes. They can enhance your meal and make it even more enjoyable. For the full recipe, check the link above! Cranberry Walnut Chicken Salad combines tasty chicken, sweet cranberries, and crunchy walnuts. You now know how to make the dressing with Greek yogurt, honey mustard, and lemon juice. Adding optional greens and spices makes it your own. Remember to chill the salad for the best taste. You can customize it to meet dietary needs and serve it in many fun ways. Store leftovers well and enjoy this dish for days. Now it’s time to try making your delicious salad!

Cranberry Walnut Chicken Salad Fresh and Flavorful Dish

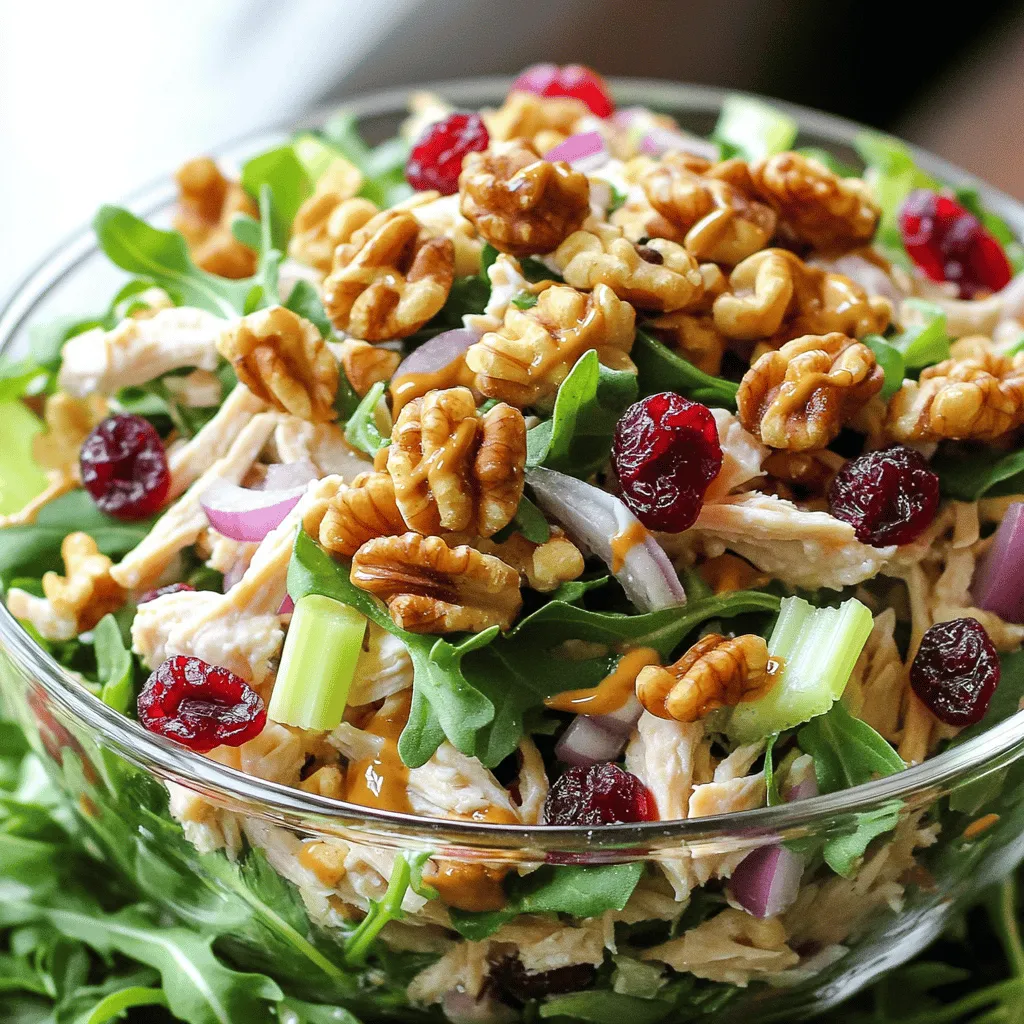
If you’re looking for a fresh and flavorful dish that’ll impress your friends, look no further! This Cranberry Walnut Chicken

Older posts
Newer posts
← Previous Page1 … Page24 Page25 Page26 … Page113 Next →

dsad

© 2025 spoonfulsavory • Built with GeneratePress

Our Policies

  • Copyright Policy
  • Cookie Policy
  • GDPR Policy
  • Privacy Policy
  • Disclaimer
  • Terms Of Use

More Information

  • Home
  • About
  • Contact
  • Appetizers
  • Dessert
  • Dinner
  • Drinks
©2025, spoonfulsavory About Back To Top