Salted Caramel Apple Dip Irresistible and Easy Recipe
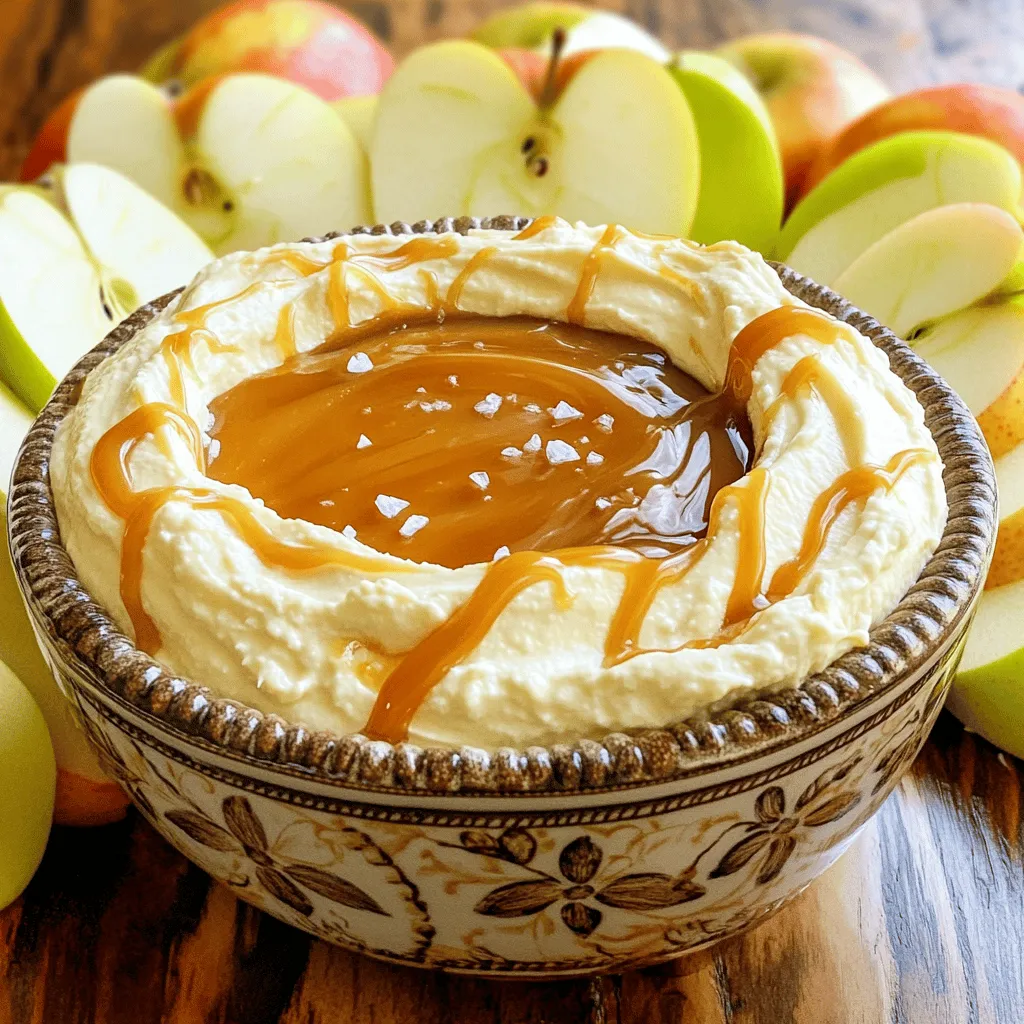
Looking for a fun and tasty snack? This Salted Caramel Apple Dip is your answer! With just a few simple
Looking for a fun and tasty snack? This Salted Caramel Apple Dip is your answer! With just a few simple
![For my Pumpkin Chocolate Chip Blondies, I use simple and tasty ingredients. Here’s what you need: - 1 cup pumpkin puree - 1 cup packed brown sugar - 1/2 cup granulated sugar - 1/2 cup unsalted butter, melted - 2 large eggs at room temperature - 1 teaspoon pure vanilla extract - 1 1/2 cups all-purpose flour - 1 teaspoon baking powder - 1 teaspoon baking soda - 1 teaspoon ground cinnamon - 1/2 teaspoon ground nutmeg - 1/4 teaspoon salt - 1 cup semi-sweet chocolate chips The pumpkin puree gives these blondies a rich flavor and moist texture. The brown sugar adds a deep sweetness, while the granulated sugar balances it out. Melting the butter makes mixing easy. Eggs help bind everything together. The flour, baking powder, and baking soda create the right rise. The spices, cinnamon and nutmeg, bring warmth and that cozy fall vibe. Finally, the chocolate chips provide little bursts of sweetness. You can find the full recipe in this article for more detailed steps. Enjoy making these blondies! To make Pumpkin Chocolate Chip Blondies, follow these steps closely. Each step builds toward that sweet, rich treat. - Preheat oven to 350°F (175°C). - Prepare an 8x8-inch baking pan by greasing it lightly. Line it with parchment paper, leaving some overhang. This helps lift the blondies out later. - In a large mixing bowl, combine the melted butter, brown sugar, and granulated sugar. Stir until smooth and well blended. - Next, add the pumpkin puree, eggs, and vanilla extract to the sugar mixture. Mix until smooth with no lumps. - In a medium bowl, whisk together the flour, baking powder, baking soda, ground cinnamon, ground nutmeg, and salt. Ensure they are well mixed. - Gradually add the dry mix to the wet ingredients. Stir gently until just combined. Avoid overmixing to keep blondies light and airy. - Finally, fold in the chocolate chips evenly with a spatula. - Transfer the batter to your prepared baking pan. Use a spatula to spread it evenly. - Bake in the oven for 25-30 minutes. They’re ready when a toothpick comes out clean, with a few moist crumbs. - Let the blondies cool in the pan for about 10 minutes. Use the parchment overhang to lift them out onto a wire rack. Let them cool completely before cutting into squares. Following these steps will help you create delicious Pumpkin Chocolate Chip Blondies that everyone will love. For the complete recipe, refer to the [Full Recipe]. To get the best blondies, avoid overmixing the batter. Mix just until combined. This helps keep them light and soft. After baking, allow proper cooling time. Let them cool for at least 10 minutes in the pan. This makes cutting easier and keeps them from falling apart. If you don't have pumpkin puree, you can use applesauce or mashed banana. Both add moisture and flavor. For sugar substitutes, try coconut sugar or a sugar blend. These options can lower calories while keeping sweetness. For a lovely finish, serve the blondies with a dusting of powdered sugar. This simple step makes them look fancy. You can also pair them with ice cream. A scoop of vanilla or caramel ice cream adds a creamy touch. This makes for a perfect dessert experience. For the full recipe, see earlier sections. {{image_4}} You can add nuts or dried fruits to the batter. Pecans or walnuts bring a nice crunch. Dried cranberries or apricots add a sweet twist. Feel free to mix and match! Using different types of chocolate can change the game. Try dark chocolate for a rich taste. White chocolate adds a sweetness that balances the pumpkin. For a gluten-free option, swap all-purpose flour for almond flour. This keeps the blondies moist and soft. You can also try coconut flour, but adjust the liquid in the recipe. If you want a vegan version, replace the eggs with flax eggs or applesauce. Use plant-based butter instead of dairy butter. For the chocolate chips, look for dairy-free options. During the holidays, you can make Christmas spice blondies. Add ginger, cloves, and allspice for a festive flavor. For Thanksgiving, consider adding chopped pecans and a swirl of cream cheese. This adds a creamy texture and more flavor to your blondies. Check the Full Recipe for all the details on making these delicious treats! To keep your Pumpkin Chocolate Chip Blondies fresh, store them in an airtight container. You can keep them at room temperature for up to three days. Just make sure they stay away from heat and sunlight. If you want them to last longer, refrigerate them. This can extend their freshness for about a week. You can freeze these blondies for up to three months. First, cut the blondies into squares. Wrap each piece tightly in plastic wrap. Then, place them in a freezer-safe bag. When you want to enjoy a blondie, take it out of the freezer. Let it thaw in the fridge overnight for the best results. For optimal freshness, eat your blondies within a week if stored in the fridge. Watch for signs of spoilage, like a dry texture or a strange smell. If the blondies look hard or have mold, it’s best to toss them. Enjoy your sweet treat while it’s still delightful! For the full recipe, check out the complete details. What is the best way to cut blondies? Cutting blondies can be easy with the right tools. Use a sharp knife for clean edges. First, let the blondies cool completely. Then, lift them out by the parchment. Cut into squares for perfect pieces. Wipe the knife with a damp cloth between cuts. This keeps each piece neat and tidy. Can I use fresh pumpkin instead of canned? Yes, you can use fresh pumpkin! Just cook and puree the pumpkin until smooth. Use the same amount as canned, which is one cup. Fresh pumpkin can add a rich, natural flavor. It may also have a bit more moisture, so keep an eye on the bake time. Why are my blondies too dense? Dense blondies can happen for a few reasons. Overmixing the batter is a big one. When you mix too much, you add air and gluten. This can lead to a heavy texture. Make sure to mix gently until just combined. Also, check your baking powder and soda for freshness. How can I make blondies more moist? To keep blondies moist, try a few tips. Adding an extra egg can help create a softer texture. You can also reduce the flour slightly. Another option is to add a splash of milk or cream. Be careful not to overbake, as that dries them out too. Caloric content per serving Each blondie has about 180 calories. This can vary based on the exact ingredients used. The chocolate chips add some extra calories, but they also add joy! Health benefits of pumpkin in desserts Pumpkin is a great addition to desserts. It is low in calories and high in fiber. It contains vitamins A and C, which are good for your skin and eyes. Using pumpkin can boost the nutrition of your treats without losing taste. Enjoy your blondies while feeling good about your choice! This post shared a simple recipe for pumpkin chocolate chip blondies. You learned about the ingredients, prep steps, and baking instructions. Remember, the right mixing and cooling will give you the best texture. Don’t shy away from experimenting with flavors or dietary swaps. Store them well for lasting taste. Enjoy every bite and share your creations with friends. These blondies can be a sweet treat anytime. Happy baking!](https://spoonfulsavory.com/wp-content/uploads/2025/07/2dea9d4f-9d06-404d-8d49-6f48f2cf9fa4.webp)
Get ready to indulge in a delightfully sweet treat! These Pumpkin Chocolate Chip Blondies combine rich pumpkin flavor with melty

Are you ready to elevate your dinner game? My Crispy Honey Garlic Tofu is not just easy; it’s packed with

Do you crave a quick and tasty snack? Look no further! Buffalo Chicken Pinwheels are easy to make and full

Are you ready for a sweet treat that’s simple and delicious? In this guide, you’ll learn how to make Chocolate
![To make Garlic Parmesan Pull Apart Rolls, you need a few simple ingredients. Here is the complete list of ingredients you'll require: - 3 cups all-purpose flour - 2 teaspoons instant yeast - 1 tablespoon granulated sugar - 1 teaspoon sea salt - 1 cup warm milk (ideally around 110°F) - 1/4 cup unsalted butter, melted - 1/2 cup finely grated Parmesan cheese - 4 cloves of garlic, minced - 2 tablespoons freshly chopped parsley - 2 tablespoons extra virgin olive oil These ingredients work together to create soft, tasty rolls. The all-purpose flour gives the rolls structure, while the instant yeast helps them rise. Sugar feeds the yeast, making the rolls fluffy. Warm milk and melted butter add richness and moisture. Garlic and Parmesan bring bold flavors. Fresh parsley adds a nice touch of color and taste. Using high-quality olive oil enhances the rolls' flavor even more. If you want to create a mouthwatering treat, gather these ingredients. You can find the full recipe to guide you through each step of the process. Start by pouring warm milk into a large bowl. Add the sugar and instant yeast. Stir gently. Wait about 5 minutes until the mixture becomes foamy. This foam shows the yeast is alive and ready to work. Next, add all-purpose flour and sea salt to the yeast mix. Pour in the melted butter. Stir until the dough forms. Transfer it to a floured surface and knead for 5 to 7 minutes. The dough should be smooth and elastic, bouncing back when pressed lightly. Shape the dough into a ball. Place it in a greased bowl and cover with a towel. Let it rise in a warm place for about 1 hour. While the dough rises, make the garlic Parmesan mixture. In a small bowl, mix minced garlic, grated Parmesan, chopped parsley, and olive oil. Stir well and set aside. After the dough rises, punch it down to release air bubbles. Divide it into 12 equal pieces. Shape each piece into a ball. Dip each ball into the garlic Parmesan mixture. Make sure each one is coated well. Arrange the coated dough balls in a greased baking dish or bundt pan. Stack them nicely. Cover the dish with a towel and let it rise for another 30 minutes. Preheat your oven to 350°F (175°C). Bake the rolls for 25 to 30 minutes. They should turn golden brown on top. After baking, brush any leftover garlic mixture over the rolls. Let them cool for a few minutes before serving. For the full recipe, refer to the complete list of instructions above. To make your rolls rise well, keep them in a warm place. Yeast loves warmth. A draft-free area works best. You can use your oven with just the light on. This gives a nice warm spot. Look for signs that the dough has risen. It should double in size. When you poke it, the dough should spring back slowly. If it stays down, it needs more time. Adjusting the garlic and cheese levels can change the taste. If you love garlic, feel free to add more. If you want a milder flavor, cut back. Using fresh herbs like parsley or basil adds great taste. Fresh herbs brighten the rolls. You can mix them into the garlic and cheese mix for more flavor. Enjoy the rolls warm, fresh from the oven. They are great on their own. You can also serve them with a small bowl of olive oil. A touch of balsamic vinegar works well too. These rolls pair well with soups or salads. They make a perfect side for a cozy dinner. For a fun twist, serve with marinara sauce for dipping. {{image_4}} You can switch up the cheese in your rolls. Using mozzarella gives a gooey texture that melts nicely. Cheddar adds a sharp flavor that kids love. Mixing cheeses can create a unique taste. Try combining Parmesan with mozzarella or cheddar for extra richness. Each cheese brings its own flair to the rolls. Want to spice things up? Add fresh herbs like rosemary or thyme. These herbs give a lovely aroma and depth of flavor. You can also sprinkle in some red pepper flakes for a kick. Mixing in spices like paprika or garlic powder can enhance the taste. Don't be afraid to experiment with flavors you enjoy. For gluten-free rolls, swap all-purpose flour with a gluten-free blend. This change requires some tweaks. You might need to add extra liquid for the right dough consistency. Always check your baking powder and yeast to ensure they are gluten-free. Your gluten-free rolls can still be soft, tasty, and perfect for sharing. For the full recipe and more detailed steps, check out the [Full Recipe]. To keep your garlic Parmesan pull apart rolls fresh for a few days, store them in an airtight container. This helps keep moisture in and prevents the rolls from drying out. You can also wrap them in plastic wrap or foil. Avoid placing them in the fridge, as this can make them tough. If you have leftovers, freezing is a great option. Wrap each roll in plastic wrap, then place them in a freezer bag. They can last up to three months in the freezer. When you're ready to enjoy them again, thaw the rolls in the fridge overnight. To reheat for the best taste, pop them in a 350°F oven for about 10-15 minutes until warm. When reheating, consider wrapping the rolls in foil. This keeps them soft and warm. To maintain texture, avoid using the microwave, which can make them soggy. Instead, reheating in the oven helps keep that lovely crispness on the outside while staying soft inside. Enjoy your rolls just like fresh! To make these rolls, follow these easy steps: 1. Pour warm milk into a large bowl. Add sugar and instant yeast. Stir and let it sit for 5 minutes. 2. Gradually mix in flour and salt. Add melted butter. Stir until a soft dough forms. 3. Knead the dough on a floured surface for 5-7 minutes. It should feel smooth and elastic. 4. Shape the dough into a ball. Place it in a greased bowl. Cover it with a towel and let it rise for 1 hour. 5. While the dough rises, mix minced garlic, grated Parmesan, parsley, and olive oil in a bowl. 6. After rising, punch down the dough. Divide it into 12 equal balls. 7. Dip each ball into the garlic Parmesan mix. Coat them well. 8. Place the balls in a greased bundt pan or round dish. Stack them nicely. 9. Cover and let them rise for another 30 minutes. 10. Preheat the oven to 350°F. Bake the rolls for 25-30 minutes until golden brown. 11. Brush any leftover garlic mix on top and serve warm. Yes, you can prepare these rolls ahead of time. Here are some options: - Dough Preparation: You can make the dough earlier. Chill it in the fridge after the first rise. Take it out and let it warm up before shaping. - Shaped Rolls: Shape the rolls and place them in the baking dish. Cover and refrigerate overnight. Let them rise before baking. - Baked Rolls: Bake the rolls and store them in an airtight container. They stay fresh for a few days at room temperature. If you need a cheese substitute, here are some options: - Mozzarella: It melts well and adds a nice stretch. - Cheddar: Sharp cheddar gives a bold flavor. - Asiago: It has a similar taste to Parmesan and works well in this recipe. To keep the flavor consistent, try to use cheese with a strong taste. Adjust the amount to your liking for the best results. You now have all the tools to make delicious Garlic Parmesan Pull Apart Rolls. We covered essential ingredients, provided clear steps, and offered helpful tips. Remember, adjusting flavors and exploring variations can enhance your rolls. Whether you store them short-term or long-term, enjoy them later with the right reheating tips. Experiment, have fun, and enjoy the mouthwatering taste of your homemade rolls!](https://spoonfulsavory.com/wp-content/uploads/2025/07/2518480a-b7bb-4e93-b15e-06c8713e412d.webp)
Are you ready to elevate your snack game? Garlic Parmesan Pull Apart Rolls are simple to make and bursting with
. To get a creamy consistency, mash the avocado well. Use a fork or masher to break it down. Mix in Greek yogurt or mayonnaise to add creaminess. Make sure to blend until smooth, but don’t overdo it. You want some small chunks of avocado for interest. Keeping a bit of chunkiness adds a nice bite to the salad. You can change the flavors by trying different herbs. Fresh dill or cilantro can add a new twist. For a spicy kick, use a pinch of cayenne or red pepper flakes. You can also mix in extra veggies. Chopped bell peppers or shredded carrots can add color and crunch. They also boost the nutrition value. Serve your avocado egg salad over crisp lettuce. This adds freshness and makes a lovely presentation. You can also use it in wraps or on slices of crusty bread. For plating, consider a colorful bowl. Add a sprinkle of herbs on top for a pop of color. A lemon wedge on the side is a nice touch too. It makes your dish look inviting and appetizing. For the complete recipe, check out the Full Recipe link. {{image_4}} Want to boost your salad? Add cooked chicken or turkey. Cooked chicken adds a nice texture and flavor. I like to use shredded rotisserie chicken for ease. Simply mix it in with the eggs and avocado. This makes a hearty meal. You can enjoy it on bread or in a wrap. It’s a great way to make your salad more filling. If you want a plant-based version, chickpeas work great. Mash cooked chickpeas instead of eggs. They add protein and a creamy texture. You can use the same spices and avocado. This vegan option is fresh and satisfying. Serve it on toast or with crackers. Your friends won’t even miss the eggs! For those who crave heat, try adding hot sauce or jalapeños. A few drops of hot sauce can make the salad zing. If you like jalapeños, chop them finely and mix them in. This adds a nice kick to your dish. Pair it with a cool drink to balance the spice. You’ll love this twist on the classic recipe. To keep your avocado egg salad fresh, store it in an airtight container. This container will help prevent air from getting in, which can cause it to brown. I recommend using glass or plastic containers that seal tightly. If you have leftovers, make sure to cover the top with plastic wrap before sealing the lid. This extra layer helps to keep the salad fresh longer. You should eat the salad within three days for the best taste and quality. After that, the eggs and avocado may start to spoil. If you notice any changes in color or smell, it’s best to throw it away. Always trust your senses when checking food freshness. You can make the salad a day ahead of time. This makes meal prep easy! Just mix all the ingredients, then store them in the fridge. If you want to freeze it, consider leaving out the avocado until you’re ready to eat. Freezing can change the texture of the avocado, making it mushy. To enjoy the salad later, prepare it fresh for the best taste. For the full recipe, check out the Avocado Egg Salad Delight. Avocado egg salad lasts about 2 to 3 days in the fridge. To keep it fresh, store it in an airtight container. The longer it sits, the more the avocado may brown. Yes, you can use any mayonnaise you like. Options include avocado mayo, vegan mayo, or even Greek yogurt. Each will give the salad a unique taste and texture. For extra crunch, try adding chopped nuts, sunflower seeds, or diced bell peppers. You could also use crispy bacon bits or toasted bread crumbs for a fun twist. Absolutely! This recipe is naturally gluten-free. Just ensure that any bread or wraps you use are gluten-free as well. Yes, leftover hard-boiled eggs work great in this dish. Just chop them up and mix them in with the other ingredients. It saves time and reduces waste. To make a larger batch, simply double or triple the ingredients. Keep the same ratios to maintain the flavor. Adjust seasonings to taste as you go. Avocado is rich in healthy fats, vitamins, and fiber. Eggs provide protein, B vitamins, and minerals. Together, they make a filling and nutritious meal, perfect for any time of day. For the full recipe, refer to the earlier sections. This blog post covered everything you need for a tasty avocado egg salad. We started with the key ingredients, including eggs and avocados. You learned how to mix and mash, creating a creamy yet chunky texture. We shared tips for adding flavors and serving beautifully. Variations let you customize the dish to fit your diet or spice level. Storing tips ensure your salad stays fresh. Now you can enjoy this simple, delicious meal that’s perfect for any occasion. Get creative and dive in!](https://spoonfulsavory.com/wp-content/uploads/2025/07/73265e23-63a2-4e4e-a057-57e93a438548.webp)
Looking for a fresh and easy dish that satisfies? Avocado Egg Salad is a creamy delight packed with flavor and

Indulging in a Fudge Brownie Cookie Dough Shake is like sipping on pure joy! If you love rich flavors and
. In this post, we covered the key ingredients for delicious teriyaki chicken meatballs, including ground chicken and seasonings. I shared steps for mixing, shaping, and cooking to ensure great texture and taste. I offered tips to enhance flavors, suggested variations, storage methods, and even answered common questions. With these tools, you can create juicy, tasty meatballs tailored to your preferences. Enjoy experimenting with flavors and cooking methods for your perfect dish!](https://spoonfulsavory.com/wp-content/uploads/2025/07/13a2375c-fb9d-44c2-b5ad-4903c351046a.webp)
Looking for a dinner that’s both tasty and easy? You’re in the right place! My Teriyaki Chicken Meatballs recipe will
![- 2 cups all-purpose flour - 1/4 cup granulated sugar - 1 tablespoon baking powder - 1/2 teaspoon fine sea salt - 6 tablespoons cold unsalted butter, cut into small cubes - 1/2 cup white chocolate chips - 1 cup fresh raspberries - 3/4 cup heavy cream - 1 teaspoon pure vanilla extract - 1 egg (for egg wash) The ingredients for Raspberry White Chocolate Scones are simple and fresh. Each one plays a key role. - All-purpose flour gives the scones their structure and base. It is essential for a good texture. - Granulated sugar adds sweetness and helps with browning. - Baking powder makes the scones rise, creating a fluffy inside. - Fine sea salt enhances the flavors of the other ingredients. - Cold unsalted butter creates a tender crumb and adds richness. - White chocolate chips bring sweetness and creamy flavor. - Fresh raspberries add tartness and juicy pops. - Heavy cream binds the dough and keeps it moist. - Pure vanilla extract adds a warm, aromatic taste. - Egg wash gives the scones a beautiful golden finish. - Prep Time: 15 minutes - Total Time: 30 minutes - Servings: 8 scones This quick prep time makes this recipe perfect for breakfast or snacks. You can whip these up in no time. The total time from start to finish is just 30 minutes, making it easy to enjoy fresh scones. You will love how simple these are to make. For the full recipe, check out the step-by-step instructions. - Preheat the oven to 400°F (200°C). - Line a baking sheet with parchment paper. - Sift together flour, sugar, baking powder, and sea salt in a large bowl. - Add the cold, cubed butter. Use your fingertips to rub the butter into the flour. Aim for a crumb-like texture, like coarse sand. - Gently fold in white chocolate chips and fresh raspberries with a spatula. Be careful to keep the raspberries whole. - In a small bowl, whisk together the heavy cream and vanilla extract until mixed well. - Gradually pour this liquid mixture into the dry ingredients. Gently mix until the dough comes together. Do not overwork the dough; this keeps the scones tender. - Lightly flour a clean surface. Turn the dough onto it and shape it into a circle about 1 inch thick. - Use a sharp knife to cut the circle into 8 wedges. - Arrange the scone wedges on the prepared baking sheet, leaving space between them. - Brush the tops with the beaten egg to give a shiny finish. - Bake for 18-20 minutes, or until they turn golden brown. Enjoy the heavenly scent while they bake! - Check for doneness by looking for a golden brown color. This means they are ready. - Don’t overmix the dough to keep scones tender. Mix just until combined. - Lightly dust with powdered sugar before serving. This adds a sweet touch. - Serve warm for the best texture. Freshly baked scones taste amazing. - Recommended pairings include clotted cream or vanilla yogurt. Both enhance the flavor. - Add extra raspberries for garnish. They make the dish pop with color. For the full recipe, check out the detailed instructions. Enjoy baking! {{image_4}} You can change the flavor of your scones easily. Try using different berries. Blueberries or strawberries work great. They add a fresh taste and color. You can also swap in dark chocolate chips. They give a rich flavor that balances the sweetness. Want to make your scones gluten-free? Use a gluten-free flour blend. This keeps the texture light and fluffy. If you need a dairy-free option, try coconut cream. You can also use dairy-free butter. This way, everyone can enjoy these tasty scones. For the [Full Recipe], you can find all the details needed to create these delightful treats! After baking, let your Raspberry White Chocolate Scones cool completely. This step is key. Cooling helps the scones set properly. It also keeps them from getting soggy when stored. Store your scones in an airtight container at room temperature. This keeps them fresh for up to two days. For a longer shelf life, refrigerate them. They last up to 5 days in the fridge. Just make sure they are in a sealed container to avoid drying out. When you're ready to enjoy them again, reheat your scones in the oven. Set it to low heat and warm them for a few minutes. This brings back their fresh-baked taste and texture. Enjoy your delightful scones as if they just came out of the oven! For the full recipe, check above. To make your scones fluffy, add a bit more baking powder. Use 1 tablespoon instead of 1 teaspoon. This small change helps create more lift. Also, mix the dough gently. Overmixing can make scones tough. Just combine the ingredients until they come together. Yes, you can freeze the scones! First, let them cool completely. Then, wrap each scone in plastic wrap. Place them in a freezer bag or airtight container. They will stay fresh for up to three months. To reheat, bake them in a preheated oven at 350°F (175°C) for about 10-15 minutes. Enjoy your scones warm for the best taste. You can add toppings like clotted cream or vanilla yogurt. A sprinkle of powdered sugar makes them look fancy. Pair them with fresh raspberries for extra flavor. These simple touches enhance the whole experience! For the complete method, check the Full Recipe. These Raspberry White Chocolate Scones are easy to make and delicious. You learned about the key ingredients, step-by-step instructions, and helpful tips. Remember to use cold butter to keep the scones light and fluffy. Explore variations with different fruits or make them dairy-free. Store leftovers properly, and savor them later. Enjoy baking these delightful scones and impress your friends or family with your skills! You will love sharing this treat warm with clotted cream or yogurt. Happy baking!](https://spoonfulsavory.com/wp-content/uploads/2025/07/f4096ae8-8f2f-4753-a39d-1197466e8cba.webp)
Raspberry White Chocolate Scones are the perfect treat for any time of day! These scones are light, fluffy, and packed
