Skip to content
DisclaimerTerms Of UseGDPR PolicyCookie Policy

spoonfulsavory

  • Home
  • Drinks
  • Appetizers
  • Dinner
  • Dessert
  • About
  • Contact
  • Privacy Policy
DisclaimerTerms Of UseGDPR PolicyCookie Policy

Sarah

- 1 pound large shrimp, peeled and deveined - 3 cloves garlic, minced - 1/4 cup fresh lemon juice (about 2 lemons) - Zest of 1 lemon - 1/4 cup extra-virgin olive oil - 1 teaspoon smoked paprika - 1/2 teaspoon red pepper flakes - Sea salt and freshly cracked black pepper to taste - Fresh parsley and lemon wedges for garnish When making Lemon Garlic Grilled Shrimp, each ingredient plays a key role. The large shrimp provide a firm texture, while the garlic gives a strong, savory kick. Fresh lemon juice brings bright acidity, enhancing the shrimp's natural flavors. The lemon zest adds a fragrant layer that lifts the dish. Extra-virgin olive oil keeps the shrimp moist and adds richness. Smoked paprika adds a subtle smokiness, perfect for grilling. The red pepper flakes give a hint of heat, which you can adjust based on your taste. Finally, sea salt and black pepper enhance all these flavors. Fresh parsley not only adds color but also freshness. Lemon wedges are perfect for squeezing just before eating, giving an extra zesty punch. Gather these ingredients, and you are ready to create a delicious meal that impresses! {{ingredient_image_2}} Start by gathering your ingredients. In a medium mixing bowl, combine: - 3 cloves garlic, minced - 1/4 cup fresh lemon juice (about 2 lemons) - Zest of 1 lemon - 1/4 cup extra-virgin olive oil - 1 teaspoon smoked paprika - 1/2 teaspoon red pepper flakes Next, season the mixture with sea salt and freshly cracked black pepper. Whisk everything together until it blends well. This simple marinade packs a lot of flavor. Now it’s time for the shrimp. Add 1 pound of peeled and deveined shrimp into the marinade. Make sure every piece is coated well. This step is key for flavor. After coating, cover your bowl tightly with plastic wrap. Place it in the refrigerator for at least 30 minutes. If you want more flavor, let it sit for up to 2 hours. This extra time helps the shrimp absorb the zesty marinade. Before grilling, preheat your grill to medium-high heat. Aim for a temperature of about 375°F to 400°F. If you use wooden skewers, soak them in water for about 30 minutes. This helps stop them from burning. Next, carefully thread the marinated shrimp onto the skewers. If you use metal skewers, you can skip the soaking. Make sure the shrimp are evenly spaced. This will help them cook evenly. Place the skewers on the preheated grill. Grill the shrimp for about 2 to 3 minutes on each side. You will know they are done when they turn pink and opaque. Be careful not to overcook them. Overcooked shrimp can become tough and rubbery, ruining your dish. Once cooked, transfer the skewers to a serving plate. Let them rest for a minute. This short wait allows the juices to settle. Garnish with freshly chopped parsley and serve with lemon wedges for a zesty kick. Enjoy your tasty Lemon Garlic Grilled Shrimp! How long should you marinate shrimp for best flavor? I recommend marinating shrimp for at least 30 minutes. If you have time, you can let them soak for up to 2 hours. This longer time will give you a richer taste. Do you want to adjust spice levels? You can add more or less red pepper flakes. Start with 1/2 teaspoon for mild heat. Add more if you like it spicy! How can you prevent shrimp from sticking? Make sure your grill is hot enough before you add the shrimp. You can also brush the grill with oil before grilling. This helps the shrimp slide off easily. How do you check shrimp doneness without overcooking? Look for the color change. When shrimp turn pink and opaque, they are done. This usually takes about 2-3 minutes on each side. Be careful not to leave them on too long! What are some presentation ideas for serving? You can arrange the shrimp skewers on a nice platter. Add lemon wedges around the shrimp for color. A sprinkle of chopped parsley adds a vibrant touch. What side dishes should you serve with grilled shrimp? Try grilled vegetables or a fresh salad. These complement the dish well and add more flavor to your meal! Pro Tips Marinating Time: For the best flavor, let the shrimp marinate for at least 1 hour. This allows the garlic and lemon to penetrate the shrimp, enhancing the overall taste. Grilling Temperature: Ensure your grill is preheated to medium-high heat. This helps achieve a nice sear on the shrimp without overcooking them. Don’t Overcook: Keep a close eye on the shrimp while grilling. They only need about 2-3 minutes per side. Once they turn pink and opaque, they’re done! Serving Suggestions: Serve the grilled shrimp with a side of fresh salad or grilled veggies. The freshness complements the zesty shrimp perfectly! {{image_4}} You can switch up the flavors in your Lemon Garlic Grilled Shrimp. Try using fresh herbs like basil, cilantro, or dill. Each herb brings a unique twist. You can also add spices like cumin or coriander for a warm touch. If you want to explore citrus, try lime or orange juice. They will give a different, bright taste. Grilling is fun, but broiling works too. Broiling shrimp cooks them from above, giving them a nice char. If you don’t have a grill, you can bake the shrimp in the oven. Just set it to 400°F and place your shrimp on a baking sheet. Bake for about 8-10 minutes, or until they are pink and opaque. If you want to change things up, you can use other seafood. Scallops or fish like salmon work well with lemon and garlic. For a protein option, try chicken or pork. They can soak up the marinade just like shrimp. If you prefer vegetarian choices, consider using firm tofu or mushrooms. They can mimic the flavors of shrimp with the right seasoning. To keep your grilled shrimp fresh, refrigerate them right away. Place them in an airtight container. This helps prevent moisture loss and keeps them safe to eat. Make sure to let the shrimp cool down before sealing them up. You can freeze grilled shrimp for future meals. Just place them in a freezer-safe bag. Remove as much air as possible before sealing. This keeps them tasty for a long time. When you're ready to enjoy them, thaw shrimp in the fridge overnight. To reheat, place them in a skillet over low heat. This keeps the shrimp tender and avoids rubbery texture. Grilled shrimp can last in the fridge for up to three days. Always check for signs of spoilage. If they smell off or have a slimy feel, it's best to toss them. Fresh shrimp should smell like the ocean, not fishy. Yes, you can use frozen shrimp. Just make sure to thaw them first. Place the shrimp in the fridge overnight or submerge them in cold water for about 30 minutes. Once thawed, peel and devein them if needed. Frozen shrimp can taste great too, especially when marinated well. Lemon Garlic Grilled Shrimp pairs well with many sides. Here are some ideas: - Grilled vegetables, like zucchini and bell peppers - A fresh green salad with vinaigrette - Rice or quinoa for a filling option - Garlic bread for a tasty crunch - Pasta with light sauce to soak up the flavors To avoid overcooking shrimp, pay attention to their color. Cook them for just 2-3 minutes on each side. They should turn pink and opaque. If you see they curl up tightly, they are likely overcooked. Keep a close eye on them and remove them from the grill as soon as they are done. In this article, we explored how to make delicious Lemon Garlic Grilled Shrimp. We covered the key ingredients, from fresh shrimp to bold seasonings. I shared detailed steps for marinating and grilling to ensure perfect flavor and texture. You can even adjust spices and use various cooking methods. Finally, I offered tips for storage and serving that keep your shrimp tasty. With these strategies, you can enjoy a flavorful meal that’s easy to prepare and share. Happy cooking!

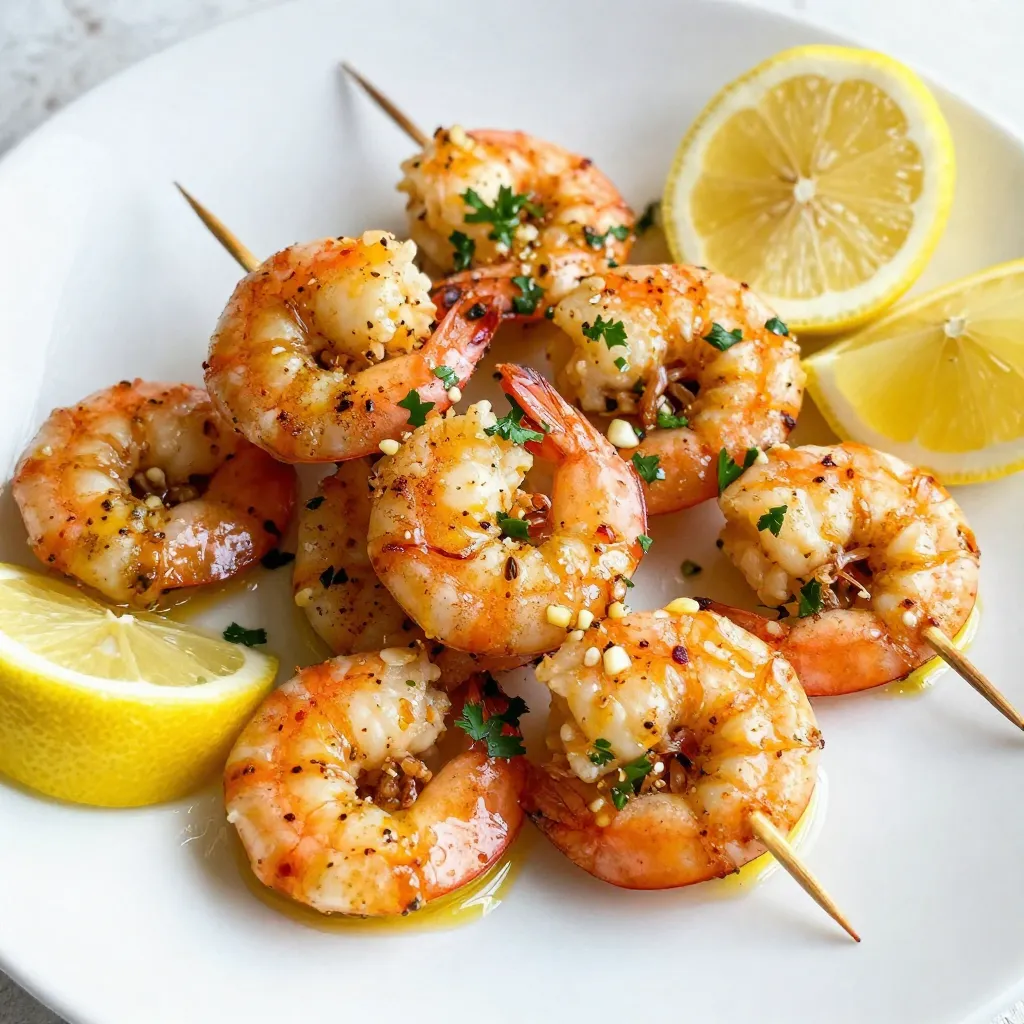
Lemon Garlic Grilled Shrimp Flavorful and Easy Recipe

If you’re looking for a quick and tasty meal, Lemon Garlic Grilled Shrimp is a winner! This dish bursts with

- 1 cup rolled oats - 1/2 cup almond butter (or your choice of nut butter) - 1/4 cup honey or maple syrup - 1 teaspoon ground ginger - 1 teaspoon ground cinnamon - 1/2 teaspoon ground nutmeg - 1/4 teaspoon ground cloves - 1/4 cup molasses - 1/4 cup mini dark chocolate chips (optional for extra indulgence) - 1/4 cup chopped walnuts or pecans (optional for added crunch) - A pinch of salt For these Gingerbread Energy Bites, each ingredient plays a key role. You start with rolled oats. They are the base and give a hearty texture. Almond butter adds creaminess and healthy fats. You can choose any nut butter you like. Next, you need sweeteners. Honey or maple syrup gives a nice touch of sweetness. Ground ginger brings that warm, spicy flavor we love. Cinnamon, nutmeg, and cloves add depth and a cozy feel. They create that classic gingerbread taste. Molasses adds richness and a slight bitterness, balancing the sweetness. It also helps to bind the mixture. Optional mix-ins like mini dark chocolate chips add a fun twist. Chopped walnuts or pecans bring crunch and extra nutrition. A pinch of salt enhances all the flavors. With these ingredients, you create a delightful and nutritious snack. Enjoy making these energy bites with care and love! {{ingredient_image_2}} - Mixing the Base Ingredients Start by taking a large bowl. Add 1 cup of rolled oats, 1/2 cup of almond butter, and 1/4 cup of honey or maple syrup. Use a spatula to mix these ingredients well. Keep mixing until they blend into a smooth mixture without any lumps. - Incorporating Spices and Molasses Next, add your spices! Sprinkle in 1 teaspoon of ground ginger, 1 teaspoon of ground cinnamon, 1/2 teaspoon of nutmeg, and 1/4 teaspoon of cloves. Also, add a pinch of salt. Stir well to make sure the spices mix evenly. After that, slowly pour in 1/4 cup of molasses. Mix again until it is fully combined. - Adding Optional Ingredients If you want some extra flavor and crunch, this is the time to add 1/4 cup of mini dark chocolate chips or 1/4 cup of chopped walnuts or pecans. Gently fold these into the mixture. This step is not just for flavor; it also adds a fun texture! - Chilling and Shaping the Bites Now, cover your bowl with plastic wrap or a lid. Place it in the fridge for about 30 minutes. Chilling helps the mixture firm up. After the time is up, take it out and use your hands to roll the mixture into small balls, about 1 inch in size. Try to make them all the same size for a neat look. Place the energy bites on a parchment-lined baking sheet, keeping some space between each one. - Presentation Tips To serve, arrange your energy bites in a festive bowl. You can sprinkle some extra cinnamon or shredded coconut on top for a lovely touch. These bites also make great gifts! Package them in a pretty jar for friends and family. - Storing Options Keep the energy bites in an airtight container in the fridge. They can last for about a week. If you want to save them longer, you can freeze them. Just make sure to separate them with parchment paper so they don’t stick together. Enjoy your healthy, tasty snack anytime! Calories and Macronutrients per Serving Each gingerbread energy bite has about 100 calories. This snack packs 4 grams of protein, 5 grams of fat, and 10 grams of carbs. The rolled oats give you fiber, while nut butter adds healthy fats. These bites are a smart choice for energy. Health Benefits of Ingredients - Rolled Oats: Great for digestion. They help keep you full longer. - Nut Butter: Provides protein and healthy fats. It supports muscle health. - Honey or Maple Syrup: Natural sweeteners that boost energy. They also add antioxidants. - Spices (Ginger, Cinnamon, Nutmeg, Cloves): These spices have anti-inflammatory properties. They also add rich flavor. - Molasses: Packed with vitamins and minerals. It’s good for your blood health. Energy Boost and Satiety The blend of oats and nut butter fuels your body. The protein and healthy fats help you feel full. Enjoy these bites as a pre-workout snack or a midday pick-me-up. They satisfy cravings without empty calories. Plus, the spices make them taste like the holidays! Pro Tips Chill for Better Handling: Refrigerating the mixture for 30 minutes not only makes it easier to roll into balls but also enhances the flavors as they meld together. Customize Your Nuts: Feel free to experiment with different types of nuts or seeds based on your personal preference or dietary needs for added nutrition. Sweetness Control: Adjust the amount of honey or maple syrup to your taste, especially if you prefer a less sweet treat; the molasses will still provide depth of flavor. Presentation Matters: When serving, arrange the bites on a festive plate, and consider drizzling with a bit of melted chocolate for an extra touch of elegance. {{image_4}} How to Ensure Consistency in Bites To get uniform bites, keep your measurements precise. Use a kitchen scale if you can. After mixing, chill the mixture. This makes it easier to roll into balls. Aim for one-inch sizes. Use a small cookie scoop for even portions. This gives you a neat and tidy look. Substitutions for Dietary Needs You can change ingredients to fit your diet. For nut allergies, try sunflower seed butter. If you're vegan, swap honey with maple syrup. This keeps the sweetness without animal products. If you want gluten-free bites, make sure your oats are certified gluten-free. This way, everyone can enjoy them. Using Different Nut Butters Almond butter is great, but you can try other nut butters too. Peanut butter adds a classic flavor. Cashew butter gives a creamy taste. Each nut butter changes the flavor a bit. Choose what you love most! Experimenting with Additional Spices Spices can change your bites a lot. Try adding a pinch of cardamom for warmth. You can also mix in some vanilla extract for extra flavor. Don’t forget to taste as you go. This helps you find what you like best. You can change up the flavors of your gingerbread energy bites. Here are two fun ideas: - Pumpkin Spice Energy Bites: Swap some spices for pumpkin pie spice. Add 1/4 cup of canned pumpkin for a creamy texture. This makes them taste like fall in a bite! - Chocolate Peanut Butter Energy Bites: Use peanut butter instead of almond butter. Mix in 1/4 cup of cocoa powder for a rich chocolate flavor. Add a touch more honey for sweetness. These variations keep your snacks exciting and full of flavor! You can easily adapt these energy bites for different diets. - Vegan Options: Use maple syrup instead of honey. Choose a nut butter that’s free from animal products. These bites will be delicious and suitable for vegans. - Gluten-Free Alternatives: Check that your rolled oats are certified gluten-free. This way, anyone can enjoy these tasty bites without worry. With these simple tweaks, everyone can enjoy gingerbread energy bites! Gingerbread energy bites last about one week in the fridge. Keep them in an airtight container. If you store them well, they keep their taste and texture. Yes, you can freeze gingerbread energy bites. They freeze well for up to three months. Just place them in a freezer-safe bag. When you want one, let it thaw in the fridge overnight. You can use any nut butter you like. Peanut butter or cashew butter works great. If you need a nut-free option, try sunflower seed butter. It adds a unique taste while keeping the bites creamy. You learned about making tasty gingerbread energy bites. We covered key ingredients, step-by-step instructions, and serving tips. I shared nutritional benefits and helpful variations to try. Remember, these bites fit many diets and taste great. You can mix flavors and adapt them to your needs. Enjoy your energy bites as a quick snack, boost, or treat. With a few tweaks, you can make them just right for you. Get creative and savor the flavors!

Gingerbread Energy Bites Nutritious and Simple Snack

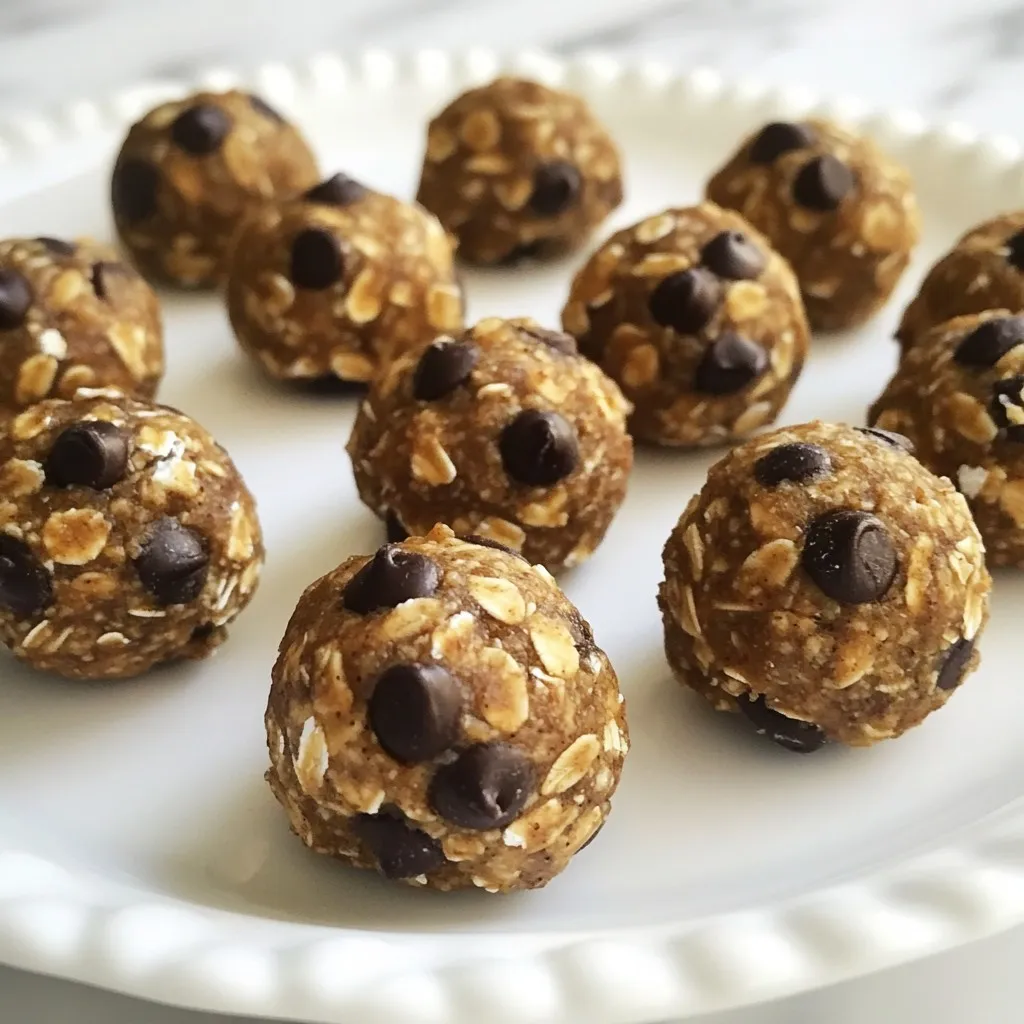
Looking for a quick, tasty, and healthy snack? Gingerbread Energy Bites are the answer! With simple ingredients like oats, nut

- 1 pound ground chicken (or you may substitute with turkey or beef) - 1/2 cup seasoned breadcrumbs - 1/4 cup grated Parmesan cheese - 1/4 cup freshly chopped cilantro - 2 cloves garlic, finely minced - 1 tablespoon fresh ginger, grated - 1 large egg, beaten - Salt and black pepper, to taste The main ingredients create a rich base for your meatballs. Ground chicken offers a lean option, while turkey or beef can add different flavors. The seasoned breadcrumbs help the meatballs hold together. Parmesan cheese adds a nice salty kick, while cilantro gives a fresh taste. Garlic and ginger bring warmth and depth. The egg acts as a binder, ensuring your meatballs stay moist. - 1/2 cup sweet chili sauce - 2 tablespoons soy sauce - 1 tablespoon rice vinegar - 1 tablespoon sesame oil The sauce is the star of this dish. Sweet chili sauce gives a balance of sweetness and spice. Soy sauce adds umami, enhancing all flavors. Rice vinegar adds a tangy note, while sesame oil brings a nutty richness. Mixing these together creates the perfect glaze. - Sesame seeds, for garnish - Sliced green onions, for garnish Garnishing adds a lovely touch. Sesame seeds give a nice crunch, and sliced green onions add freshness. These simple toppings make your dish visually appealing and enhance the flavor. {{ingredient_image_2}} - Set oven temperature to 400°F (200°C) - Prepare baking sheet with parchment paper Start by preheating your oven. This step helps the meatballs cook evenly. While the oven heats up, line a baking sheet with parchment paper. This will make cleanup easy later. - Combine all ingredients in a mixing bowl - Ensure mixture is well incorporated In a large bowl, mix the ground chicken, breadcrumbs, grated Parmesan, and chopped cilantro. Add minced garlic, grated ginger, and the beaten egg. Don't forget to sprinkle in some salt and pepper. Use your hands or a spatula to blend everything well. This step is key for flavor. - Shape mixture into uniform 1-inch meatballs - Bake for 20 minutes until golden brown Now, shape the mixture into uniform 1-inch meatballs. Keeping them the same size helps them cook evenly. Place the meatballs on your prepared baking sheet, spaced out so they don’t touch. Bake them for about 20 minutes. You want them golden brown and cooked through. - Whisk together sauce ingredients in a bowl - Coat baked meatballs with sauce in skillet While the meatballs bake, whisk together the sweet chili sauce, soy sauce, rice vinegar, and sesame oil in a bowl. This sauce is where the magic happens! Once the meatballs are done, transfer them to a skillet over medium heat. Pour the prepared sauce over the meatballs. Gently toss to coat them all. Cook for another 5 to 7 minutes. The sauce will thicken, making the meatballs shine. To make great meatballs, size matters. Keep them uniform at about 1 inch. This size helps them cook evenly. A meat thermometer is your best friend. Check for doneness at 165°F (75°C). This ensures they are safe to eat and juicy too. Want to kick up the flavor? Try adding spices like paprika or cumin. A little goes a long way! You can also adjust the sweetness of your sauce. Add more sweet chili sauce if you like it sweeter, or reduce it for a tangy taste. These meatballs shine when served with rice or noodles. They make a complete meal that everyone will love. You can also serve them as a snack or appetizer at parties. Just place toothpicks in each meatball for easy eating! Pro Tips Chill the Mixture: Refrigerating the meatball mixture for about 30 minutes before forming them helps the flavors meld together and makes them easier to shape. Uniform Size: Using a cookie scoop or measuring spoon can help ensure all meatballs are the same size, which promotes even cooking. Alternate Cooking Methods: If you prefer, these meatballs can also be pan-fried for a crispy exterior or grilled for a smoky flavor. Customize the Sauce: Feel free to adjust the sweet chili sauce with additional spices like sriracha or garlic powder for a kick of heat. {{image_4}} You can use different meats. Ground turkey or beef works well. If you prefer a lighter option, try ground chicken. For those who want a plant-based meal, use lentils or chickpeas. These options fit any diet. To add heat, mix in chili paste. This spicy version gives the meatballs a kick. If you like sweet and sour flavors, add pineapple juice to the sauce. It adds a bright twist that kids will love! For gluten-free meatballs, use gluten-free breadcrumbs. This simple swap keeps the dish tasty. If you’re vegan, replace the meat with a plant-based option. Use a flax egg instead of a regular egg. These changes let everyone enjoy the dish. After enjoying your sweet chili glazed meatballs, store leftovers in an airtight container. This keeps them fresh and tasty. In the fridge, they last for about three to four days. Always check for any signs of spoilage before eating. To freeze cooked meatballs, let them cool completely. Place them in a freezer-safe bag or container. Be sure to remove as much air as possible. Frozen meatballs can last up to three months. When ready to eat, thaw them in the fridge overnight. You can reheat them in the oven at 350°F (175°C) for about 15 minutes or until hot. Preparing meatballs in advance is simple and smart. You can mix and shape them ahead of time. Keep them in the fridge for a quick weeknight meal. Another option is to bake a large batch and freeze some. This way, you can enjoy them on busy days. Pair them with rice, noodles, or veggies for a complete meal. You can serve sweet chili glazed meatballs with many tasty sides. Here are some great options: - Steamed jasmine rice - Noodles tossed in sesame oil - Fresh vegetable stir-fry - Crisp salad with a light dressing - Roasted broccoli or green beans These sides balance the sweet and spicy flavors of the meatballs. To keep your meatballs moist, follow these tips: - Use ground chicken or turkey with higher fat content. - Add breadcrumbs soaked in a little water or broth. - Mix the meat gently; overmixing can make them tough. - Do not overcook the meatballs; check with a meat thermometer. These steps help lock in moisture and flavor. Yes, you can make sweet chili glazed meatballs ahead of time. Here’s how: - Prepare the meatball mixture and shape the meatballs. - Store raw meatballs in the fridge for up to 24 hours. - You can also freeze them for up to 3 months. - Cook and glaze them when you’re ready to eat. When reheating, ensure they reach 165°F for safety. These sweet chili glazed meatballs are easy to make and tasty. We covered the main ingredients, mixing methods, and baking steps. You can choose from various meat options and sauces to fit your taste. Remember to store any leftovers properly and use them in meal prep. With these tips and tricks, you can create a delightful dish for any occasion. Enjoy experimenting with flavors and serving suggestions to make it your own!

Sweet Chili Glazed Meatballs Flavorful Dinner Delight

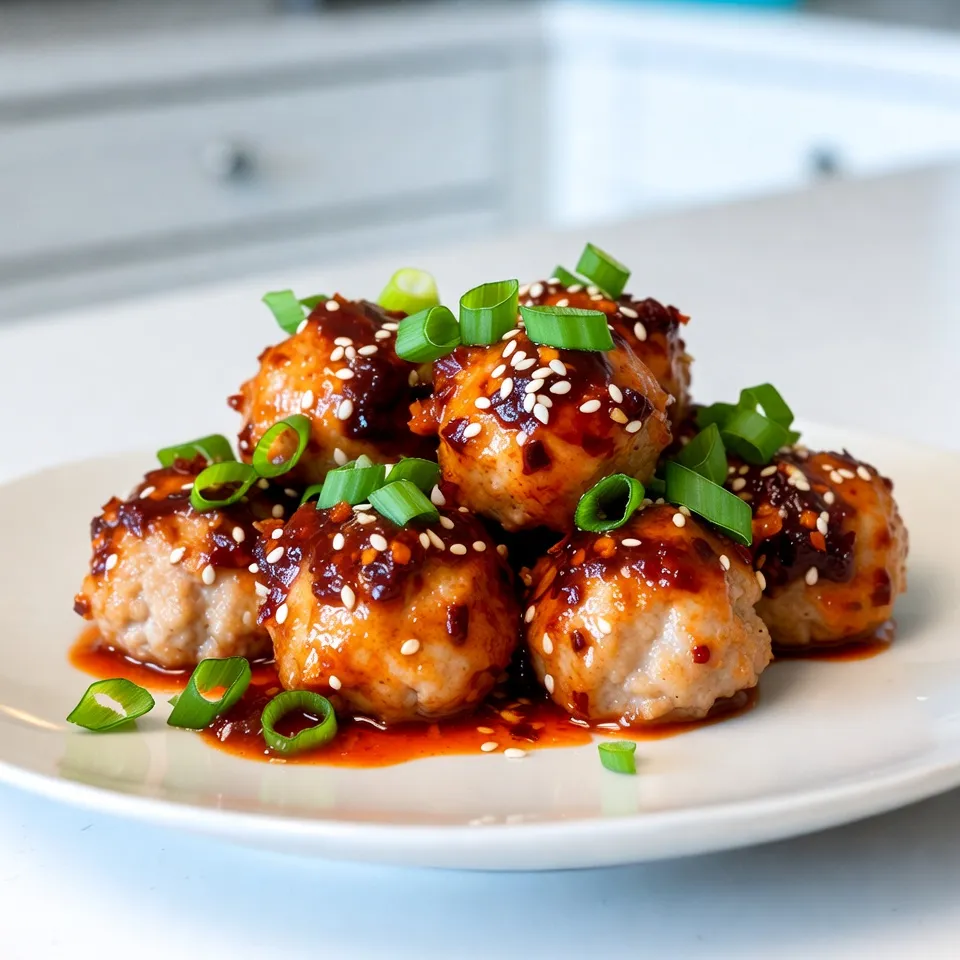
Are you ready to make dinner a tasty adventure? My Sweet Chili Glazed Meatballs are packed with flavor and simple

- 2 cups cooked rice (preferably a day old for best texture) - 1 cup kimchi, chopped into bite-sized pieces - 1 tablespoon vegetable oil (or your favorite cooking oil) - 2 cloves garlic, minced - 1 small onion, diced finely - 1 carrot, diced small - ½ cup frozen peas - 2 green onions, sliced (reserve some for garnish) - 2 large eggs (optional, for a protein boost) - 2 tablespoons soy sauce - 1 tablespoon gochujang (Korean chili paste for a spicy kick) - Salt and pepper to taste - Sesame oil for drizzling - Sesame seeds for garnish Using these ingredients, you can make a dish that is both spicy and satisfying. The base is cooked rice, which must be cool or a day old. This helps the rice fry nicely without getting mushy. Kimchi gives the dish its unique flavor, so choose a variety you like best. You can add garlic and onion for depth. They bring out the flavors and create a lovely aroma. I like to include extra veggies like carrots and peas. They add color and crunch. If you want to boost protein, add eggs. They make the dish more filling. The soy sauce and gochujang add saltiness and heat. Be careful with the gochujang; it can be quite spicy. Finish with sesame oil and seeds for a nice touch. This dish is all about balance, so feel free to adjust the seasonings. Enjoy creating this flavorful meal! {{ingredient_image_2}} 1. Heat the oil: Start by heating 1 tablespoon of vegetable oil in a large skillet or wok over medium heat. Wait until the oil shimmers. 2. Sauté garlic and onion: Add 2 cloves of minced garlic and 1 small diced onion. Cook them for about 2-3 minutes. You want the garlic to smell nice and the onion to turn soft and clear. 3. Add the carrot: Next, toss in 1 small diced carrot. Stir and cook for another 3 minutes. This step helps the carrot soften and blend in with the flavors. 4. Stir in the kimchi: Now, add 1 cup of chopped kimchi to the skillet. Let it cook for 2-3 minutes. This will help the kimchi's spicy flavors mix into the dish. 5. Mix in the rice: Add 2 cups of cooked rice. Use a spatula to break any clumps. Mix everything well so the rice gets coated in the kimchi and veggies. 6. Drizzle soy sauce and gochujang: Pour in 2 tablespoons of soy sauce and 1 tablespoon of gochujang. Stir to combine all the flavors. 7. Add peas and green onions: Toss in ½ cup of frozen peas and 2 sliced green onions. Season with salt and pepper. Cook for another 3-5 minutes. This will give your rice a crispy bit at the bottom. 8. Incorporate eggs: If you want to include eggs, push the rice to one side. Crack in 2 large eggs into the empty space. Scramble the eggs until they are fully cooked. Then fold them into the rice mixture. 9. Finish with sesame oil: Remove the skillet from heat. Drizzle some sesame oil over the fried rice. Give it a light toss to mix. Your spicy kimchi fried rice is ready to enjoy! Using day-old rice is key for great fried rice. It dries out a bit, which helps make the rice crispy. Fresh rice can work too, but it needs some care. If you must use fresh rice, spread it out on a baking sheet. Let it cool for about 30 minutes. This will help it dry out a little. Gochujang gives kimchi fried rice its spicy kick. You can adjust the spice by using less gochujang. Start with one teaspoon if you want it milder. You can also use sriracha or even a mild chili paste instead, if you prefer. Serve your spicy kimchi fried rice in a bowl for a nice look. Top it with green onions and sesame seeds for crunch. You can also add a few slices of fresh cucumber on the side. This adds a cool contrast to the heat of the dish. Extra kimchi on the side is a great idea for those who like more spice! Pro Tips Use Day-Old Rice: For the best texture, use rice that has been cooked and refrigerated for at least a day. This will help the grains to firm up and prevent them from becoming mushy during frying. Customize the Spice Level: Adjust the amount of gochujang according to your heat preference. You can also add fresh chilies or chili flakes if you want an extra kick! Texture Matters: Allow the fried rice to develop a crispy bottom by not stirring it too often while it's frying. This will add a delightful crunch to the dish. Garnish for Freshness: Don’t skip the green onions and sesame seeds as garnish. They add a fresh flavor and a nice crunch that elevates the overall dish. {{image_4}} You can easily make this dish vegetarian by skipping the meat. Instead, add more veggies. Try bell peppers, zucchini, or mushrooms. They bring color and taste. You can also use extra kimchi for a bolder flavor. Don’t forget to add some tofu for protein. It soaks up flavors well. If you want a protein boost, try adding chicken or beef. Cook them first and set them aside. Mix them into the rice near the end. Tofu is a great choice too. It’s a tasty option for vegetarians. You can also use eggs. Scrambled eggs or fried eggs on top work great. They add richness and flavor. To enhance the taste, think about other sauces. Sriracha or sesame oil can add extra kick. You can also add a splash of rice vinegar for balance. Flavored oils, like chili oil, bring a new layer. Use aromatics like ginger or shallots for more depth. They make your fried rice even more exciting. To store your spicy kimchi fried rice, use an airtight container. Glass or plastic containers work well. Make sure the rice cools to room temperature first. This helps keep it fresh. You can store it in the fridge for up to three days. For quick reheating, the microwave is the easiest. Place the rice in a microwave-safe bowl. Add a splash of water to prevent it from drying out. Cover it with a damp paper towel. Heat it for one to two minutes, stirring halfway through. If you prefer using a skillet, heat a little oil in the pan. Add the rice and stir it often. This method gives the rice a nice crisp. Heat until it’s hot and ready to eat. Yes, you can freeze spicy kimchi fried rice! This is a great way to save leftovers. Let the rice cool completely before freezing. Transfer it to a freezer-safe bag or container. Remove as much air as possible. Label it with the date for easy tracking. To thaw, place the frozen rice in the fridge overnight. If you're in a hurry, you can use the microwave. Heat it on a low setting until it softens. Enjoy your delicious fried rice anytime! The best type of kimchi for fried rice is napa cabbage kimchi. It has a nice crunch and a bold flavor. You can also use radish kimchi for a different taste. Each type brings its unique twist. If you want less spice, look for mild kimchi varieties. Always choose kimchi that is fermented well for richer flavor. Yes, you can use fresh rice. However, it may make your dish a bit sticky. Day-old rice has dried out slightly, which helps it fry better. Fresh rice can clump together when heated. If you use fresh rice, spread it out on a tray to cool. This step helps reduce stickiness and improves texture. It can be gluten-free! Use gluten-free soy sauce instead of regular soy sauce. Many brands offer this option. For gochujang, check the label for gluten-free versions. Some brands may add wheat in their ingredients. Always read labels to ensure your meal is safe and gluten-free. You've learned how to make a tasty Kimchi Fried Rice. Start with cooked rice and your favorite kimchi. Sauté garlic and onion, then mix in fresh veggies. Season it with soy sauce and gochujang for flavor. Remember to adjust spice levels to fit your taste. You can personalize your dish by adding proteins or more veggies. Store any leftovers in the right container. Keep experimenting and enjoy each bite, because cooking is all about having fun and sharing meals!

Spicy Kimchi Fried Rice Flavorful and Simple Recipe

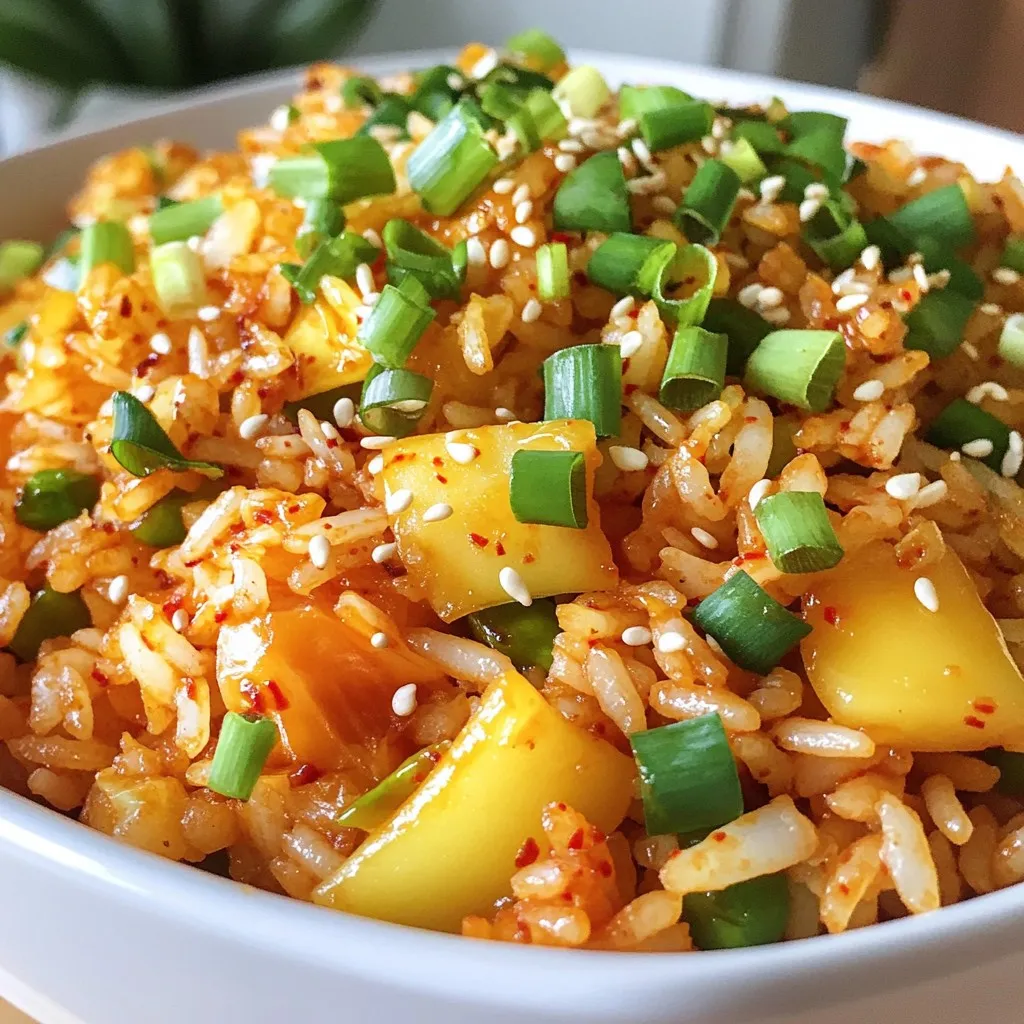
Are you ready to spice up your meal routine? This Spicy Kimchi Fried Rice recipe is quick, easy, and packed

- 500g button or cremini mushrooms - 4 tablespoons extra-virgin olive oil - 4 cloves garlic, finely minced - 1 teaspoon dried thyme - 1 teaspoon dried rosemary - 1 teaspoon smoked paprika - Sea salt and freshly ground black pepper - Fresh parsley, for garnish - Calories per serving: About 150 - Macronutrient breakdown: - Protein: 3g - Fat: 14g - Carbohydrates: 5g Garlic herb roasted mushrooms make a great side dish. They add flavor and texture to any meal. You can use either button or cremini mushrooms. Both types work well and taste amazing. The base of this recipe is simple. You will need olive oil, garlic, and some herbs. These ingredients create a rich flavor. Dried thyme and rosemary add depth. Smoked paprika gives a nice kick. When you prepare the mushrooms, clean them well. You want them free of dirt. After that, mix the ingredients in a bowl. Toss the mushrooms until they are coated in the herb oil. This step is key for even flavor. Roasting brings out their natural sweetness. In the oven, they become tender and golden. The smell of garlic and herbs will fill your kitchen. It’s hard to resist! For presentation, sprinkle fresh parsley on top. This adds color and freshness. You can serve these mushrooms with crusty bread. They also pair well with grilled meats or pasta. The options are endless! Enjoy these flavorful mushrooms as a delightful side dish. They elevate any meal with ease. {{ingredient_image_2}} Set your oven to 200°C (400°F). This helps roast the mushrooms evenly. Preheating is key for great results. In a large bowl, pour 4 tablespoons of extra-virgin olive oil. Add 4 finely minced garlic cloves, 1 teaspoon of dried thyme, 1 teaspoon of dried rosemary, and 1 teaspoon of smoked paprika. Season with sea salt and freshly ground black pepper. Whisk until it smells great and looks smooth. Take 500g of cleaned and trimmed button or cremini mushrooms. Toss them in the herb oil mixture. Make sure each mushroom is well-coated. This boosts the flavor and makes them tasty. Spread the mushrooms in a single layer on a large baking sheet. This allows space for air to circulate. Roast them for 15-20 minutes. Halfway through, stir gently to help them brown evenly. They should be golden brown and tender when done. After roasting, take the mushrooms out of the oven. Let them cool for about a minute. Transfer them to your serving dish. Garnish with finely chopped fresh parsley for a pop of color and fresh taste. Enjoy your flavorful side dish! When choosing mushrooms, I often pick between button and cremini. Button mushrooms are mild and tender. They work well in many dishes. Cremini mushrooms have a deeper flavor. They add a richer taste to your meals. Both are great options, so it depends on your flavor preference. Spacing your mushrooms on the baking sheet is key. If they touch, they steam instead of roast. This can lead to uneven cooking. I recommend placing them in a single layer. This way, each mushroom can get the perfect amount of heat. You’ll enjoy a nice golden brown color on all sides. You can boost the flavor with extra herbs or spices. Consider adding fresh thyme or dill for a twist. A pinch of red pepper flakes can add some heat. Feel free to experiment! The beauty of this dish is its versatility. Each tweak can bring something new to the table. Pro Tips Use Fresh Herbs: Fresh herbs can elevate the flavor of your roasted mushrooms. If possible, substitute dried thyme and rosemary with fresh ones for a more vibrant taste. Experiment with Mushroom Varieties: While button and cremini mushrooms work well, try mixing in shiitake or portobello for a richer flavor profile and varied textures. Don’t Overcrowd the Pan: Ensure mushrooms are spread out in a single layer. Overcrowding can lead to steaming instead of roasting, resulting in less flavor and texture. Add a Splash of Balsamic Vinegar: For an extra layer of flavor, drizzle a little balsamic vinegar over the mushrooms before roasting. It enhances the umami and adds a hint of sweetness. {{image_4}} You can add other veggies to your garlic herb roasted mushrooms. Carrots, zucchini, and bell peppers work well. These vegetables add color and flavor. Cut them into bite-sized pieces for even cooking. Toss them with the mushroom mixture for a tasty blend. Try using different herbs to change the flavor. Basil, oregano, or sage can add a new twist. Mix fresh herbs with the garlic for a bright taste. You could also use a blend of dried herbs to create layers of flavor. Experimenting is key to finding your favorite mix. If you want a vegan dish, you can easily swap ingredients. Use vegetable oil instead of olive oil. You might also try adding nutritional yeast for a cheesy flavor. This keeps the dish plant-based and full of flavor. Enjoy making it your own! To store leftovers, place your garlic herb roasted mushrooms in an airtight container. Make sure they cool down first. This helps keep them fresh. Store them in the fridge for up to three days. Check for any off smells before eating. If they smell fine, enjoy them! The best way to reheat your mushrooms is in a pan. Heat a small amount of olive oil over medium heat. Add the mushrooms and cook for about 3 to 5 minutes. Stir them gently to keep them from burning. This method keeps their flavor and texture tasty. You can also use a microwave, but they might lose some crispness. You can freeze roasted mushrooms, but they may change in texture. To freeze them, let the mushrooms cool completely. Place them in a freezer bag or container. Remove excess air before sealing. They can last for up to three months in the freezer. When ready to use, thaw them in the fridge overnight. Reheat them in a pan for the best results. Yes, you can use fresh herbs! Fresh herbs add a bright taste. They also bring a lovely aroma. However, they can be more delicate. Here's what to consider: - Pros of fresh herbs: - Stronger flavor and aroma. - Adds vibrant color to the dish. - Cons of fresh herbs: - Shorter shelf life. - You need more to match the taste of dried herbs. If you choose fresh, use about three times the amount of dried herbs. This change ensures you keep the flavor strong. These mushrooms pair well with many dishes. Here are some great options: - Grilled meats: Chicken or steak enhances the meal. - Pasta: Toss the mushrooms with your favorite noodles. - Salads: Add them to a fresh salad for extra flavor. - Bread: Serve with crusty bread to soak up the juices. Mix and match to create a full meal that everyone will enjoy! Roasted mushrooms can last about 3 to 5 days in the fridge. Here are some tips for storage: - Cool completely: Let them cool before storing. - Use airtight containers: This keeps them fresh. - Check for spoilage: Look for any off smells or changes in texture. To enjoy them again, reheat them in the oven or on the stove for the best taste! Garlic Herb Roasted Mushrooms are simple yet packed with flavor. We reviewed the ingredients, detailed the cooking steps, and shared tips for the perfect roast. Don’t forget to explore variations and storage options to maximize your dish's life. Remember, cooking is all about finding what works for you. Enjoy experimenting with flavors and textures. With these mushrooms, you'll impress everyone at your next meal.

Garlic Herb Roasted Mushrooms Flavorful Side Dish

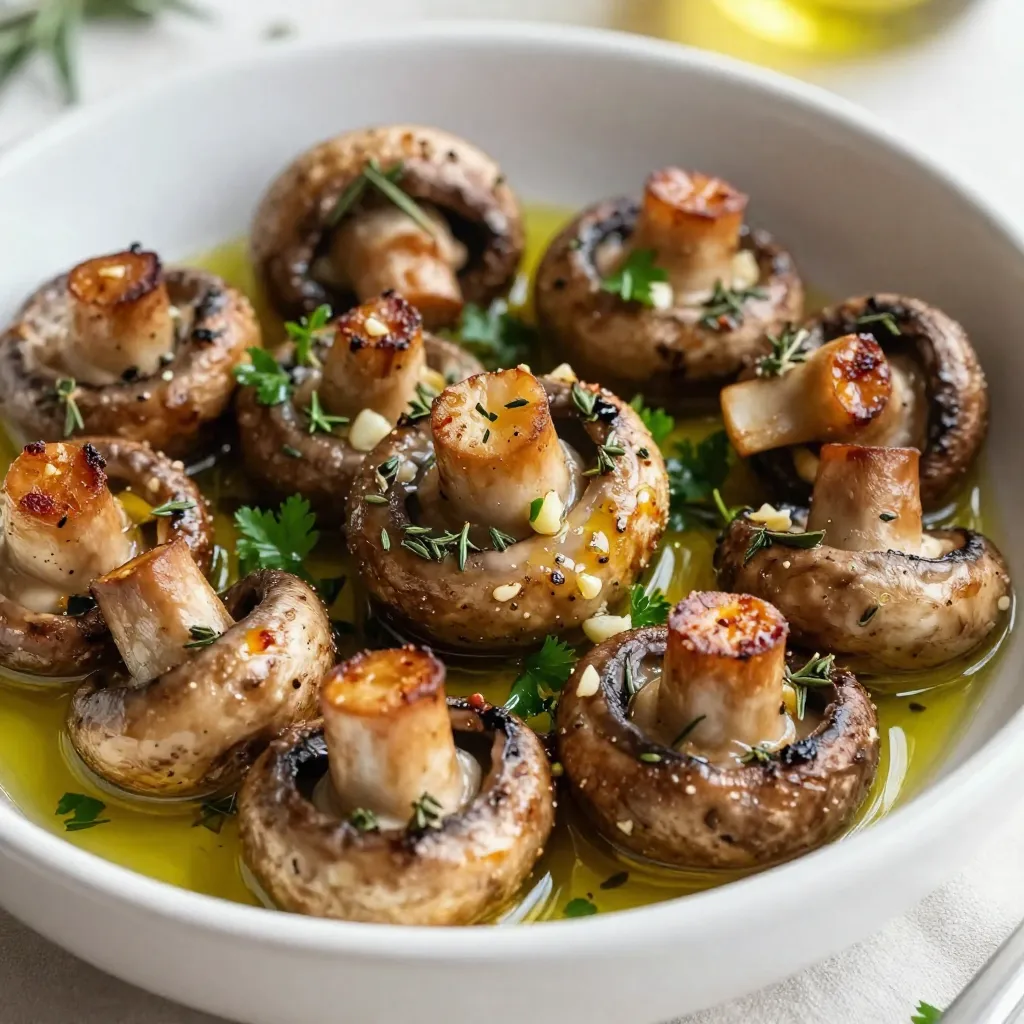
If you’re looking for a delicious side dish, Garlic Herb Roasted Mushrooms are a must-try! These mushrooms are easy to

- 4 boneless, skinless chicken breasts - 1/2 cup honey - 1/4 cup Dijon mustard - 2 tablespoons apple cider vinegar - 1 teaspoon garlic powder - 1 teaspoon onion powder - Salt and pepper, to taste The main ingredients create a tasty mix. The chicken is the star of the dish. Use fresh, high-quality chicken breasts for the best flavor. Honey adds sweetness, while Dijon mustard brings a tangy bite. Apple cider vinegar gives a nice acidity to balance the honey. Garlic and onion powders add depth without overpowering the other flavors. Salt and pepper round out the dish, enhancing all the tastes. - 1 cup fresh green beans, trimmed - 1 cup baby carrots, peeled - 1 tablespoon olive oil The vegetables add color and nutrition. Fresh green beans bring a crisp texture. Baby carrots add sweetness and brightness. Toss them with olive oil to help them roast well. This blend of veggies complements the chicken perfectly. - Fresh parsley, chopped, for garnish Fresh parsley adds a pop of color. It also gives a nice fresh flavor to the dish. Sprinkle it on just before serving for the best look and taste. This small touch makes your meal feel special and complete. {{ingredient_image_2}} Set the temperature to 375°F (190°C). This step is key for even cooking. Preheating helps the chicken bake perfectly. In a bowl, whisk together the following ingredients: - 1/2 cup honey - 1/4 cup Dijon mustard - 2 tablespoons apple cider vinegar - 1 teaspoon garlic powder - 1 teaspoon onion powder - Salt and pepper, to taste Mix until smooth. This marinade adds a sweet and tangy flavor to the dish. Place 4 boneless, skinless chicken breasts into a baking dish. Pour half of the honey mustard marinade over the chicken. Spread it evenly. Make sure each piece of chicken is well coated. This step ensures all the flavors soak in nicely. To make a great honey mustard chicken bake, you need the right balance. The sweetness from honey and the tang from Dijon mustard should work together. Start with half a cup of honey and a quarter cup of Dijon mustard. This mix brings out the best flavors. I like to add a bit of apple cider vinegar for extra zing. It helps to cut through the sweetness. Be sure to taste your marinade. Adjust it until you love it. Cooking chicken just right is key. You want it to be juicy, not dry. The safe temperature for chicken is 165°F (75°C). Use a meat thermometer to check. Insert it into the thickest part of the chicken. This ensures that every piece is perfectly cooked. After 25 minutes of baking, check early. If it reaches the right temp, you can skip the extra time. Keeping your chicken moist is essential for a tasty meal. Cover your baking dish with aluminum foil. This traps steam and keeps the chicken juicy. Uncover it for the last 15 minutes to brown the top. The foil helps the chicken cook evenly. It also softens the veggies. This way, every bite stays tender and flavorful. Pro Tips Marinade Time: For deeper flavor, marinate the chicken for at least 30 minutes or up to 2 hours in the refrigerator before baking. Vegetable Variations: Feel free to substitute the green beans and carrots with your favorite vegetables such as bell peppers or zucchini for a colorful twist. Check Doneness: Always use a meat thermometer to check that the chicken has reached an internal temperature of 165°F (75°C) for safety and juiciness. Leftover Storage: Store any leftover chicken and vegetables in an airtight container in the refrigerator for up to 3 days, and reheat gently to maintain texture. {{image_4}} You can boost the flavor of your honey mustard chicken bake by adding fresh herbs. Try rosemary or thyme for a nice touch. You can also use spices like paprika or cayenne for some heat. These small changes can make a big impact on taste. I love adding fresh herbs right before serving. They add color and freshness to your dish. Want to change up your veggies? You can easily swap out green beans and carrots. Broccoli, zucchini, or bell peppers work great too. Just remember to cut them to similar sizes. This ensures they cook evenly. You can even mix different vegetables for a colorful dish. The choice is yours, so get creative! Feel free to experiment with different mustards or sweeteners. Instead of Dijon, you can use whole grain mustard for a different texture. Honey can also be swapped with maple syrup for a unique flavor. You can mix in some soy sauce for a savory twist. Trying different combinations can lead to new favorites! After enjoying your Honey Mustard Chicken Bake, store leftovers safely. Let the dish cool down to room temperature first. Place the chicken and vegetables in an airtight container. Make sure to cover it well to keep moisture in. You can store leftovers in the fridge for up to three days. This way, you can enjoy the meal again! When it's time to enjoy leftovers, reheating is key. The oven gives the best results. Preheat your oven to 350°F (175°C). Place the chicken and vegetables in an oven-safe dish. Cover with foil to keep them moist. Heat for about 20 minutes, or until the chicken is warm throughout. If you use a microwave, place the food in a microwave-safe dish. Heat in short bursts of one minute, stirring in between. This method helps avoid hot spots. Want to save some for later? You can freeze Honey Mustard Chicken Bake too! After cooling, cut the chicken into portions. Place the chicken and vegetables in freezer bags or containers. Remove as much air as possible to prevent freezer burn. Label the bags with the date. You can freeze them for up to three months. When ready to eat, thaw in the fridge overnight before reheating. Enjoy a quick and tasty meal later! Yes, you can use bone-in chicken for this recipe. Bone-in chicken adds flavor and moisture. The cooking time may change. Bone-in pieces generally take longer to cook, so adjust the baking time. Aim for an internal temperature of 165°F (75°C) for safety. If you choose bone-in, you might enjoy a richer taste. You can store leftovers in the fridge for up to four days. Make sure to place them in an airtight container. This keeps the chicken moist and safe to eat. If you want to enjoy the dish later, freeze it for up to three months. Just thaw it in the fridge before reheating. This honey mustard chicken bake goes great with many sides. Here are some ideas: - Crusty bread: Perfect for soaking up the sauce. - Fresh side salad: Adds crunch and freshness. - Rice or quinoa: Complements the flavors nicely. - Mashed potatoes: A comforting option to balance the dish. Feel free to mix and match! You learned about delicious baked chicken with simple ingredients like chicken breasts, honey, and Dijon mustard. We discussed how to prepare the marinade and properly cook the chicken for the best flavor. I shared tips to keep your chicken juicy and variations to try. You also learned how to store and reheat leftovers. Enjoy experimenting in your kitchen with these easy steps. Cooking can be fun and tasty!

Honey Mustard Chicken Bake Tasty Family Dinner

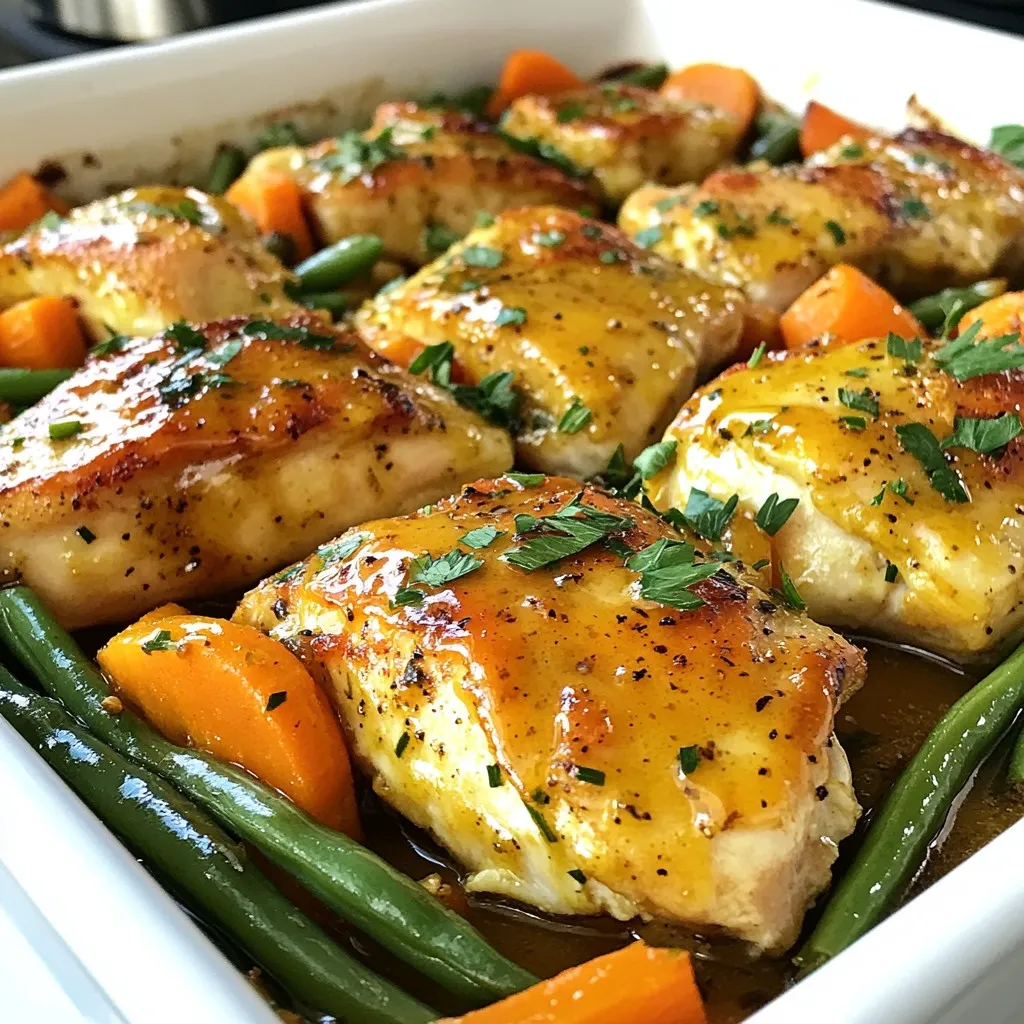
Looking for a tasty family dinner? Try my Honey Mustard Chicken Bake! This dish packs juicy chicken breasts coated in

To make a Blueberry Lemon Yogurt Smoothie, gather these items: - 1 cup fresh or frozen blueberries - 1 ripe banana - 1 cup plain Greek yogurt - 1 tablespoon honey (or adjust to taste) - 1 tablespoon freshly squeezed lemon juice - ½ cup almond milk (or your preferred milk) - Zest of 1 lemon - A handful of ice cubes (optional) These ingredients work together to create a tasty and healthy drink. The blueberries add sweetness and color. The banana gives a creamy texture. Greek yogurt adds protein and richness. Lemon juice and zest provide a bright, zesty flavor. You can make your smoothie look fancy with these garnishes: - Whole blueberries - A light sprinkle of lemon zest - Lemon slices on the rim of the glass These simple touches not only add beauty but also enhance the flavor. They make your drink more fun to enjoy. If you don't have some ingredients, here are good substitutes: - Use regular yogurt instead of Greek yogurt. - Swap almond milk for any milk you like. - Try maple syrup or agave instead of honey. - Use other fruits, like strawberries or peaches, for a twist. These substitutes can change the taste but still keep the smoothie delicious. Feel free to mix and match based on what you have at home! {{ingredient_image_2}} Start by preparing your ingredients. If you use fresh blueberries, rinse them well under cold water. This step keeps your smoothie clean and fresh. If you choose frozen blueberries, skip the washing. They are ready to blend straight from the freezer. Next, grab a ripe banana. This adds natural sweetness and creaminess to your smoothie. Now it’s time to blend! In your blender, combine the blueberries, banana, Greek yogurt, honey, lemon juice, almond milk, and lemon zest. Ensure all ingredients are in the blender to create a smooth mix. Blend on high speed. Watch as the colors mix and transform into a creamy delight. If you want a thicker smoothie, toss in a handful of ice cubes and blend again. After blending, taste your smoothie. If it needs more sweetness, add a bit more honey and blend once more. You want the perfect balance of flavors. Pour your smoothie into tall glasses. For a pretty touch, garnish with whole blueberries and a sprinkle of lemon zest. This not only looks great but adds extra flavor. Enjoy your delicious blueberry lemon yogurt smoothie! To make the best smoothie, start with ripe, fresh ingredients. Use ripe bananas for natural sweetness. Always wash fresh blueberries well. If using frozen blueberries, no washing is needed. This keeps the flavor intact. Use plain Greek yogurt for creaminess and protein. Measure your liquids and solids for a balanced mix. Blend at high speed for a smooth texture. Add a bit more lemon juice for a zesty kick. You can also try vanilla extract for extra flavor depth. If you like a sweeter taste, mix in more honey. A pinch of salt can elevate the overall flavor too. Consider adding fresh mint leaves for a refreshing twist. You can even toss in a handful of spinach for extra nutrients without changing the taste. Don’t skip the banana; it gives the smoothie body. Avoid over-blending, as it can make the smoothie too thin. If your smoothie is too thick, add more milk gradually. Be careful not to add too much honey; sweetness can quickly overpower. Lastly, remember to taste it before serving. You might want to adjust sweetness or tartness then! Pro Tips Use Frozen Blueberries: They not only chill the smoothie but also enhance the creaminess without the need for ice. Adjust Sweetness to Taste: Depending on the ripeness of your banana and your personal preference, feel free to add more or less honey. Try Different Yogurts: For a lighter option, you can substitute Greek yogurt with a dairy-free yogurt or a low-fat alternative. Add Protein: Boost the nutritional value by incorporating a scoop of your favorite protein powder into the blend. {{image_4}} You can swap or add fruits to your blueberry lemon yogurt smoothie. Here are some tasty options: - Strawberries - Raspberries - Mangoes - Pineapple - Peaches These fruits can give your smoothie a new flavor. Each fruit adds its unique charm. For example, mango adds a creamy texture, while raspberries bring a nice tartness. If you want a dairy-free smoothie, use non-dairy yogurt. Options include: - Almond yogurt - Coconut yogurt - Soy yogurt You can also switch Greek yogurt for a nut milk, like almond or oat milk. Just make sure to keep the same liquid amount to maintain the smoothie’s texture. Want to make your smoothie more filling? Add protein! Here are some easy ideas: - A scoop of protein powder - Chia seeds - Flaxseeds - Nut butter Nut butter adds a creamy richness. Chia seeds boost fiber and protein. Just one tablespoon of these ingredients can greatly enhance the smoothie without changing its great taste. You can store any leftover smoothie in the fridge. Use an airtight container. It will stay fresh for up to 24 hours. When you are ready to drink it, give it a good shake. The ingredients may separate, but that’s normal. If you want to prepare ahead, freeze the ingredients. Portion the blueberries, banana, and lemon zest into freezer bags. Store them flat for easy stacking. When you’re ready, just blend them straight from the freezer. This keeps your smoothie ready without waste. Smoothies are best enjoyed cold, so reheating isn’t needed. If you froze your smoothie, thaw it overnight in the fridge. You can also leave it out for a couple of hours. After thawing, blend it again for a smooth texture. Enjoy! Yes, you can use frozen blueberries. They make the smoothie cold and thick. Just toss them in the blender without thawing. It is an easy swap and saves time. To sweeten your smoothie, add more honey. Start with one tablespoon. Then blend and taste. If you want it sweeter, keep adding a little at a time. This smoothie is packed with nutrients. Blueberries are full of antioxidants. They help fight free radicals. Greek yogurt gives you protein and probiotics for gut health. Lemon juice adds vitamin C, which boosts your immune system. Yes, you can prepare the smoothie in advance. Blend all the ingredients, then store it in the fridge. However, for the best taste and texture, drink it within 24 hours. If you freeze it, it can last for a week. Just blend it again when you’re ready to enjoy! In this post, we covered the key ingredients, step-by-step instructions, and helpful tips for making a perfect blueberry lemon yogurt smoothie. We explored different variations, proper storage methods, and answered common questions. You now have all the tools to create a tasty and healthy drink. Experiment with flavors and find what you love. Smoothies can be fun and good for you, so enjoy every blend!

Blueberry Lemon Yogurt Smoothie Refreshing Delight

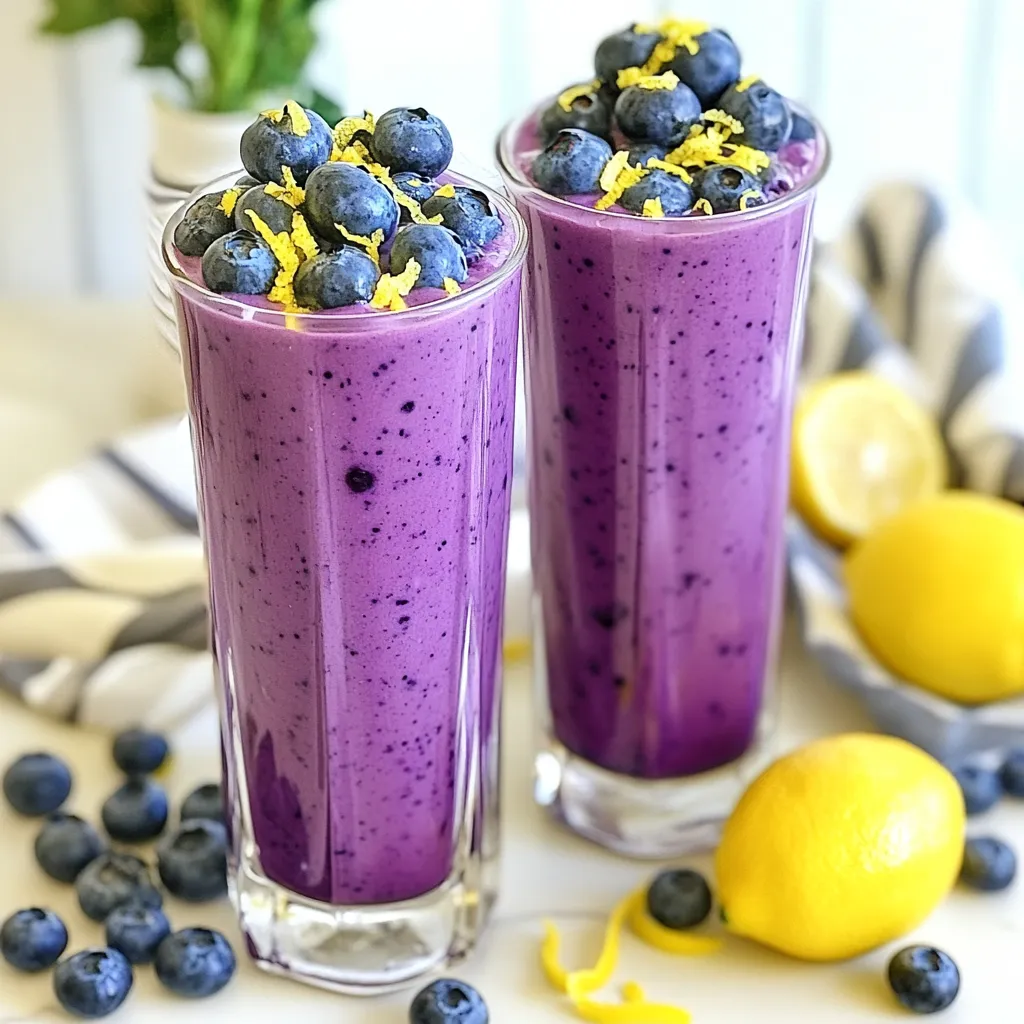
Are you craving a cool and tasty treat? The Blueberry Lemon Yogurt Smoothie is your answer! Packed with vibrant flavors

- 4 cups fresh kale, chopped - 1 can (15 oz) chickpeas, drained and rinsed - 3 tablespoons olive oil - 1 teaspoon garlic powder - 1 teaspoon paprika - 1/4 cup creamy Greek yogurt - 2 tablespoons lemon juice - 2 tablespoons Dijon mustard - 1 tablespoon Worcestershire sauce - 1/4 cup grated Parmesan cheese (or nutritional yeast) - Croutons (optional) - Kale: 4 cups, chopped into bite-sized pieces - Chickpeas: 1 can (15 oz), drained and rinsed - Olive oil: 3 tablespoons, divided - Garlic powder: 1 teaspoon - Paprika: 1 teaspoon - Greek yogurt: 1/4 cup - Lemon juice: 2 tablespoons, freshly squeezed - Dijon mustard: 2 tablespoons - Worcestershire sauce: 1 tablespoon - Parmesan cheese: 1/4 cup, grated (or nutritional yeast for vegan) - Croutons: optional - For a vegan option, replace Greek yogurt with cashew cream or tahini. - Use nutritional yeast instead of Parmesan cheese for a dairy-free version. - For gluten-free needs, ensure croutons are certified gluten-free or skip them entirely. - You can also swap olive oil for avocado oil if preferred. {{ingredient_image_2}} First, preheat the oven to 400°F (200°C). This step is key for crispy chickpeas. Next, dry the chickpeas thoroughly with paper towels. This helps them get crunchy. Spread them out on a baking sheet. Drizzle 1 tablespoon of olive oil over the chickpeas. Sprinkle with garlic powder, paprika, salt, and pepper. Toss them gently so every chickpea is coated. Now, place the baking sheet in the oven. Roast the chickpeas for 20 to 25 minutes. Stir them halfway through for even cooking. They should turn golden brown and crispy. Keep an eye on them to avoid burning. While the chickpeas roast, make the dressing. In a medium bowl, combine Greek yogurt, lemon juice, Dijon mustard, Worcestershire sauce, and the remaining olive oil. Whisk until smooth. This dressing will be creamy and tangy, perfect for the kale. In a large salad bowl, add the chopped kale. Pour the dressing over the kale. With clean hands, massage the kale for 1 to 2 minutes. This makes the kale softer and helps it soak up the dressing. Once the chickpeas are done, add them to the bowl. Sprinkle on the grated Parmesan cheese. If you want, add croutons just before serving for extra crunch. Toss everything gently to mix. Enjoy your delicious Kale Caesar Salad with Crispy Chickpeas! To get crispy chickpeas, start with dry ones. After draining, pat them with a paper towel. This step removes extra moisture. Use enough olive oil to coat them well. Season with garlic powder, paprika, salt, and pepper. Spread them evenly on a baking sheet. Roast at 400°F for 20-25 minutes. Stir halfway for even cooking. You want them to be golden and crunchy. To boost flavor, consider adding more spices. A dash of cayenne can give heat. Fresh herbs like parsley can add freshness. You might also try a splash of balsamic vinegar. For a twist, mix in some capers or olives. Each option brings a unique taste. Experiment with flavors until you find your favorite. Serve this salad with grilled chicken for protein. It pairs well with roasted veggies too. You can even enjoy it with a warm soup. If you want a heartier meal, add quinoa or farro. This salad is versatile and can fit many dishes. Pro Tips Dry Chickpeas for Extra Crispiness: Ensure the chickpeas are thoroughly dried before roasting. Excess moisture can prevent them from achieving that perfect crunch. Massage the Kale: Don’t skip the massaging step! This helps to break down the tough fibers in kale, making it more tender and enjoyable to eat. Customize Your Dressing: Feel free to adjust the dressing ingredients to suit your taste. Add more lemon for brightness or a splash of hot sauce for a kick. Serve Immediately: For the best texture, serve the salad right after tossing. The longer it sits, the softer the chickpeas and kale will become. {{image_4}} To make a vegan version of this salad, swap out the Greek yogurt and cheese. Use plant-based yogurt instead. For cheese, try nutritional yeast for a cheesy flavor. This keeps the dressing creamy without dairy. You can still enjoy the same rich taste while following a vegan diet. If you want to add more protein, grilled chicken or tofu works great. Simply grill the chicken until cooked through and slice it thin. For tofu, press it to remove moisture, then grill or sauté until golden. Both options will make your salad filling and delicious. Feel free to get creative with seasonal ingredients. In summer, add fresh berries for sweetness. In fall, nuts like walnuts or pecans add crunch. These extra touches not only enhance flavor but also make your salad shine with seasonal colors. To keep your Kale Caesar salad fresh, store it in an airtight container. Make sure to keep the crispy chickpeas separate. This way, they stay crunchy. You can add them just before serving. If you have leftover dressing, store it in a small jar. It will last well for a few days. Reheating the salad is not the best option, as it may wilt the kale. Instead, focus on reheating the chickpeas if you like. Place them in an oven at 350°F (175°C) for about 5-10 minutes. This will restore some of their crunch. You can also use a microwave, but they won't be as crispy. For the best quality, eat the salad within 2-3 days. The kale will start to wilt after this time. If stored properly, the crispy chickpeas can last for about a week. However, they may lose some crunch over time. Yes, you can prep this salad ahead of time. Start by making the crispy chickpeas. Store them in an airtight container to keep them crunchy. Next, wash and chop the kale. Keep it in a separate container. You can prepare the dressing too. Just mix Greek yogurt, lemon juice, Dijon mustard, Worcestershire sauce, and olive oil. Store it in the fridge. When ready to serve, combine everything. This way, the salad stays fresh and tasty. To keep your kale fresh, store it in the fridge. Place it in a bag with some air. You can also wrap it in a damp paper towel. This helps keep it crisp. Avoid washing it before storage. Wash it only when you are ready to use it. Use it within a week for the best flavor. This salad pairs well with many sides. Here are some great options: - Grilled chicken for added protein - Quinoa for a hearty touch - Roasted sweet potatoes for sweetness - Whole grain bread for a crunchy bite - A light soup for a warm contrast These sides complement the salad and make a complete meal. Enjoy experimenting! This blog post covered key ingredients, preparations, and variations for a tasty salad. We explored how to prepare chickpeas, make a creamy dressing, and assemble a fresh dish. I shared tips for crispy chickpeas and suggested delicious meal pairings. Remember, you can customize this salad to fit your dietary needs. Store any leftovers well to keep them fresh. Enjoy creating and sharing this healthy salad that’s easy and fun to make!

Kale Caesar Salad with Crispy Chickpeas Delight

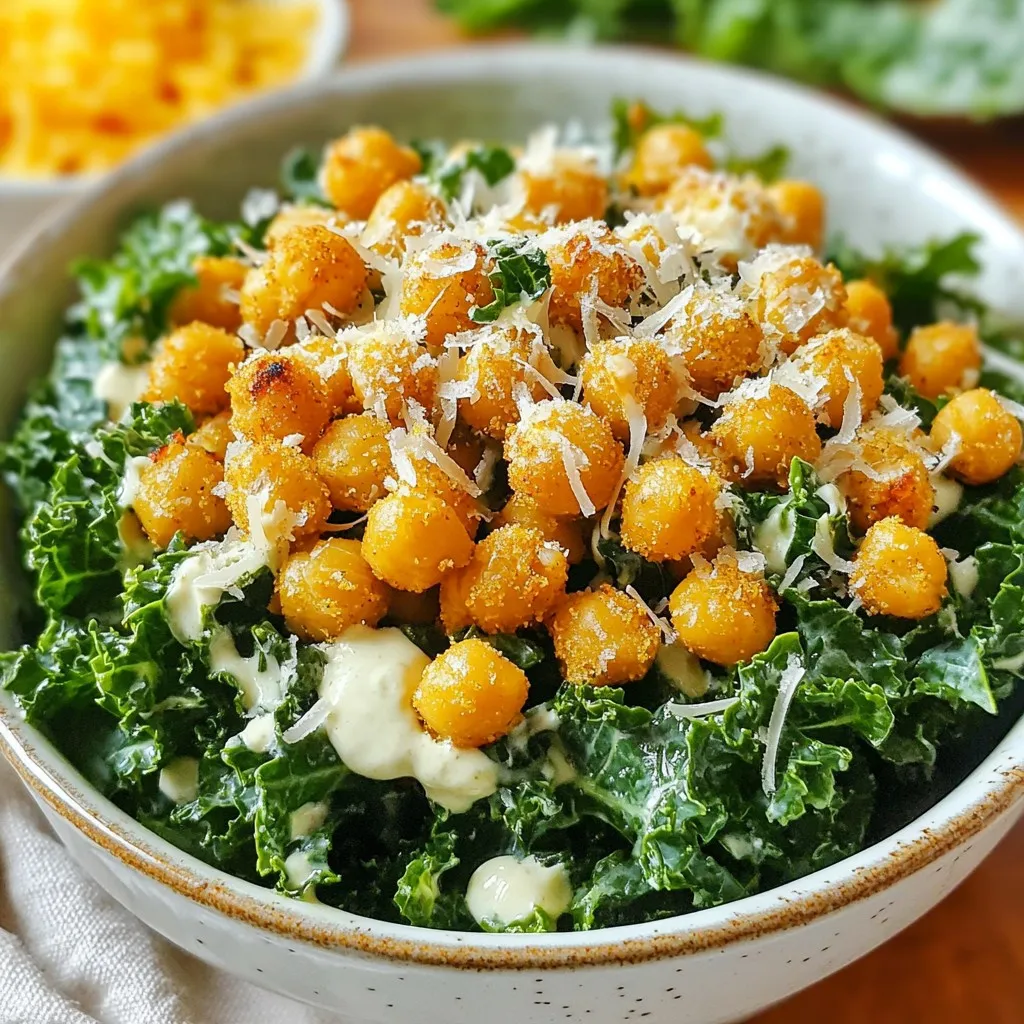
Are you ready to change up your salad game? This Kale Caesar Salad with Crispy Chickpeas is not only tasty

- 2 medium zucchinis, sliced into half-moons - 1 red bell pepper, cut into bite-sized chunks - 1 yellow bell pepper, cut into bite-sized chunks - 1 cup cherry tomatoes, halved - 1 large red onion, cut into thick wedges - 3 tablespoons extra virgin olive oil - 2 tablespoons fresh lemon juice - 1 tablespoon fresh thyme, chopped - 1 tablespoon fresh rosemary, chopped - 2 cloves garlic, minced - Salt and pepper to taste - Grill - Mixing bowl - Skewers or grilling basket - Whisk Gathering fresh vegetables is key to a vibrant dish. I love using zucchini, bell peppers, cherry tomatoes, and red onion. Each veggie brings unique flavors and colors. The marinade is what makes these veggies sing. I mix olive oil, lemon juice, thyme, rosemary, and garlic. This blend adds a bright and fresh taste. Don't forget salt and pepper. They bring everything together. You will need a grill to cook these veggies to perfection. A mixing bowl helps combine everything easily. Skewers or a grilling basket make cooking and serving simpler. A whisk helps mix the marinade evenly. Having everything ready makes the cooking process smooth and fun. {{ingredient_image_2}} Preheat your grill to medium-high heat. This step is key for perfect grilling. A hot grill gives veggies nice char marks and keeps them tender. In a large mixing bowl, combine the following vegetables: - 2 medium zucchinis, sliced into half-moons - 1 red bell pepper, cut into bite-sized chunks - 1 yellow bell pepper, cut into bite-sized chunks - 1 cup cherry tomatoes, halved - 1 large red onion, cut into thick wedges Toss them lightly. This helps spread the colors and textures evenly. In a small bowl, whisk together: - 3 tablespoons extra virgin olive oil - 2 tablespoons fresh lemon juice - 1 tablespoon fresh thyme, chopped - 1 tablespoon fresh rosemary, chopped - 2 cloves garlic, minced - Salt and freshly ground black pepper to taste This mix is where the magic happens. The herbs and lemon give your veggies a fresh taste. Pour the marinade over the veggies in the bowl. Use a spatula or your hands to coat everything well. Let them marinate for about 15-20 minutes. This time allows the flavors to soak in. If you use skewers, thread the marinated veggies onto them. Soak wooden skewers in water for 30 minutes to prevent burning. You can also use a grilling basket for easy handling. Place the skewers or basket on the preheated grill. Cook for 8-10 minutes, turning occasionally. Your goal is tender veggies with nice grill marks. Once the veggies are done, take them off the grill. Let them rest for a few minutes. For a beautiful presentation, arrange them on a large platter. Add a sprinkle of fresh herbs on top. Serve with lemon wedges on the side. This extra touch gives a zesty kick to your dish. Optimal Temperature for Grilling Grill your veggies at medium-high heat. This heat gives a nice char while cooking them through. It also helps keep the texture firm and prevents burning. Aim for around 400°F to 450°F for the best results. Tips for Even Cooking Cut your veggies into similar sizes. This helps them cook evenly. For skewers, alternate colors to make it fun and eye-catching. If using a grilling basket, stir the veggies once or twice while grilling. This ensures all sides get that tasty char. How Long to Marinate for Best Flavor Marinate your veggies for about 15 to 20 minutes. This time allows the flavors to soak in without getting too soft. If you have more time, letting them sit for up to an hour can deepen the taste even more. Additional Flavor Additions or Pairings For extra flavor, sprinkle fresh herbs after grilling. Parsley or basil works well. You can also serve grilled veggies with a squeeze of fresh lemon juice. This adds a bright taste that balances the rich flavors. Serve alongside a grain salad or grilled protein for a full meal. Pro Tips Soak Skewers: If using wooden skewers, soak them in water for at least 30 minutes before grilling to prevent burning. Marinate Longer: For deeper flavor, consider marinating the vegetables for 30 minutes instead of 15-20 minutes. Mix and Match: Feel free to experiment with different vegetables such as asparagus or mushrooms for variety. Grill in Batches: If you're grilling a large quantity, do it in batches to ensure even cooking and prevent overcrowding. {{image_4}} You can change the veggies in this dish. Instead of zucchini and bell peppers, try these options: - Eggplant: Cut into cubes or slices. - Mushrooms: Use whole or halved. - Asparagus: Trimmed and left whole. - Carrots: Cut into thin sticks or rounds. - Broccoli: Cut into small florets. These veggies can add new flavors and textures to your meal. Feel free to change up the herbs and spices. Here are some ideas for different tastes: - Basil: This adds a sweet, fragrant flavor. - Oregano: A great choice for a savory touch. - Cumin: Gives a warm, earthy flavor. - Smoked paprika: Adds a nice smoky edge. Mix and match according to your taste. Don't be afraid to experiment! You can easily adapt this recipe for special diets: - Vegan: The recipe is already vegan if you skip any cheese. - Gluten-Free: All ingredients are naturally gluten-free. Just check labels to be sure. - Low-Carb: Skip the cherry tomatoes and focus on non-starchy veggies. These changes help everyone enjoy the dish without worry. To keep your grilled veggies fresh, store them in an airtight container. Make sure the container is clean and dry. Place the veggies in the fridge. They stay good for about three to five days. If you want to avoid sogginess, avoid putting them in the container while they are still hot. Let them cool down first. To reheat grilled vegetables, use the oven for best results. Preheat your oven to 350°F (175°C). Spread the veggies on a baking sheet in a single layer. Heat them for about 10-15 minutes. You can also use a skillet on medium heat for a quicker option. Stir occasionally to warm them evenly. If you like, add a splash of olive oil or some fresh herbs for extra flavor. Can you freeze grilled veggies? Yes, you can! To freeze, let them cool completely. Then, place them in freezer-safe bags or containers. Remove as much air as possible before sealing. They can stay in the freezer for up to three months. When you’re ready to eat, thaw them in the fridge overnight. Reheat as mentioned above for a tasty side dish. The best way to grill vegetables is to prep them well. Start with fresh, colorful veggies like zucchini, bell peppers, and cherry tomatoes. Cut them into even pieces to ensure they cook at the same rate. Preheat your grill to medium-high heat for nice char marks. - Tips for Achieving Char Marks: - Oil the grill grates before cooking. - Turn the veggies only once or twice. - Keep the lid closed while grilling. You can use frozen vegetables, but they may not grill as well. Frozen veggies can become mushy when cooked. If you do use them, thaw and drain them first. This helps to reduce excess moisture. - Recommendations for Best Results: - Use fresh vegetables for better flavor and texture. - If using frozen, grill them for a shorter time. To prevent sticking, use a good marinade and prepare your grill. Marinating adds flavor and creates a barrier. - Using Marinades and Grill Prep Techniques: - Coat veggies in olive oil, lemon juice, and herbs. - Preheat your grill properly and oil the grates. Lemon herb grilled veggies pair nicely with many sides. Consider serving them with grilled chicken, fish, or a light pasta dish. They also go well with quinoa or a fresh salad. - Pairing Suggestions for a Complete Meal: - Grilled chicken or fish for protein. - Quinoa or couscous for a grain option. - A simple green salad to add freshness. Grilling vegetables enhances their natural flavors and offers a healthy, tasty dish. We discussed key ingredients, from fresh veggies to a zesty marinade. You learned how to prepare, marinate, and grill these ingredients for perfect results. Remember to explore variations and tips for serving and storing leftovers. Grilled vegetables can elevate any meal, making them a great choice. Enjoy delicious meals full of flavor and nutrition!

Lemon Herb Grilled Veggies Fresh and Flavorful Dish

Discover the vibrant taste of Lemon Herb Grilled Veggies! With just a few fresh ingredients, you can create a colorful

- 1 ½ cups all-purpose flour - 1 teaspoon baking powder - ½ teaspoon baking soda - ¼ teaspoon salt - ½ cup unsalted butter, softened to room temperature - 1 cup granulated sugar - 1 large egg - 1 teaspoon vanilla extract - 1 teaspoon almond extract - ½ cup rainbow sprinkles (plus extra for topping) - ¾ cup white chocolate chips When making Funfetti birthday cake cookies, you need the right mix of ingredients. The dry ingredients form the base. You will start with flour, baking powder, baking soda, and salt. These ingredients work together to give your cookies structure. Next, we have the wet ingredients. Softened butter and sugar create a light and fluffy mixture. The egg adds moisture and binds everything. The vanilla and almond extracts bring a sweet and nutty flavor. These flavors make the cookies taste special. Now, let’s talk about the fun part: the add-ins! Rainbow sprinkles bring color and joy to each cookie. They make each bite feel like a celebration. The white chocolate chips add creamy sweetness. Together, these ingredients make your cookies truly irresistible. Gather all these ingredients, and you're ready to create a batch of delightful Funfetti birthday cake cookies that everyone will love! {{ingredient_image_2}} - Preheat your oven to 350°F (175°C). - Line a baking sheet with parchment paper. This step helps with easy cleanup. - In a medium bowl, combine 1 ½ cups of all-purpose flour, 1 teaspoon baking powder, ½ teaspoon baking soda, and ¼ teaspoon salt. Whisk until mixed well. - In a large bowl, cream ½ cup of softened butter and 1 cup of granulated sugar. Beat until it is light and fluffy. This takes about 2-3 minutes. - Now, add 1 large egg, 1 teaspoon vanilla extract, and 1 teaspoon almond extract to the butter mixture. Mix until everything is smooth and well combined. - Gradually add the dry mixture to the wet mixture. Mix on low speed until just combined. Be careful not to overmix. - Gently fold in ½ cup of rainbow sprinkles and ¾ cup of white chocolate chips. Use a spatula to ensure they are mixed evenly. - Scoop out dough with a tablespoon. Roll each scoop into a ball and place them on the baking sheet. Leave about 2 inches between each cookie. Lightly flatten the tops and sprinkle with extra rainbow sprinkles. - Bake the cookies for 10-12 minutes. Look for lightly golden edges and soft centers. This keeps them chewy. - Once done, let the cookies cool on the baking sheet for about 5 minutes. This helps them set before moving them to a wire rack to cool completely. To make the best Funfetti cookies, avoid overmixing. When you blend the wet and dry ingredients, mix just until they come together. If you mix too much, the cookies can turn out tough. For the best baking time, set your oven to 350°F (175°C). Bake for 10-12 minutes. Look for lightly golden edges and soft centers. This keeps your cookies chewy and delicious. Make your cookies stand out! Stack them high on a colorful plate. Drizzle melted white chocolate over the top to add flair. You can use a spoon for this. Add some extra rainbow sprinkles on top for a fun touch. Want to change up the flavor? You can use different extracts. Try using lemon or coconut for a twist. If you love chocolate, swap the white chocolate chips for dark or milk chocolate chips. Each choice adds a new layer of taste to your cookies. Pro Tips Chill the Dough: For thicker cookies, chill the dough in the refrigerator for at least 30 minutes before baking. This helps the cookies retain their shape and prevents spreading. Use Room Temperature Ingredients: Ensure your butter and egg are at room temperature. This allows for better mixing and a smoother batter, resulting in tender cookies. Experiment with Sprinkles: Feel free to use different types or colors of sprinkles to match the occasion. Nonpareils, confetti, or chocolate sprinkles can add a unique twist to your cookies. Check for Doneness: To ensure perfect cookies, look for lightly golden edges with soft centers. They will continue to bake on the baking sheet once removed from the oven, achieving the ideal chewy texture. {{image_4}} You can change the flavors in your Funfetti birthday cake cookies. Try using different mix-ins. Instead of white chocolate chips, use dark chocolate or peanut butter chips. Each option adds a unique twist. You can also swap sprinkles for crushed candy or nuts for fun textures. If you're gluten-free, use almond flour or coconut flour. These flours work great and give nice flavors. Just keep in mind that the texture may be a bit different. You might need to adjust the liquid in your dough. Funfetti cookies can match any season! For holidays, use themed sprinkles. Red and green for Christmas or pastel colors for Easter make them festive. You can also add spices like cinnamon or nutmeg for a warm fall flavor. These subtle changes bring new life to a classic treat. Want a new way to enjoy these cookies? Try making cookie bars instead! Press the dough into a baking pan and bake it for a longer time. Once cooled, cut them into squares. You can also make sandwich cookies. Bake two cookies and spread frosting between them. This adds creaminess that pairs well with the cookie crunch. It’s a fun twist that kids and adults will love! To keep your funfetti cookies fresh, store them in an airtight container. This helps prevent them from getting stale. You can layer parchment paper between the cookies to avoid sticking. If you have more cookies than you can eat, use a clean, dry container for best results. You can freeze the cookies before or after baking. If freezing before baking, scoop the dough into balls and place them on a baking sheet. Freeze until solid, then transfer to a freezer bag. For freezing after baking, let the cookies cool completely. Place them in a freezer-safe container, adding parchment paper between layers. To reheat your cookies, use the oven for best results. Preheat your oven to 300°F (150°C). Place the cookies on a baking sheet for about 5-7 minutes. This warms them up while keeping them soft. You can also use a microwave, but be careful. Heat them for only 10-15 seconds to avoid making them tough. Funfetti cookies taste like birthday cake due to their sweet flavor and creamy texture. The mix of vanilla and almond extracts adds a rich taste. Rainbow sprinkles give them a festive touch, making every bite feel like a celebration. These cookies bring the joy of cake into a fun, bite-sized treat. Yes, you can use margarine instead of butter in this recipe. Make sure to choose a good quality margarine that has a similar fat content. This change may slightly alter the flavor and texture but will still yield tasty cookies. To prevent your cookies from spreading too much, chill the dough before baking. You can refrigerate it for at least 30 minutes. Also, be sure not to overmix the dough, as this can cause spreading. Finally, place the cookie balls on a cool baking sheet. Absolutely! You can use different types of sprinkles to customize your cookies. Try chocolate sprinkles, star shapes, or seasonal colors for various occasions. Each type will add its own unique touch and look to the cookies. To make these cookies vegan, replace butter with a vegan butter or coconut oil. Use a flax egg instead of the large egg. Mix 1 tablespoon of ground flaxseed with 2.5 tablespoons of water and let it sit for 5 minutes. This will give your cookies the right texture while keeping them plant-based. In this article, we explored how to make delicious Funfetti cookies that taste like birthday cake. We listed all the necessary ingredients and provided clear step-by-step instructions to simplify the baking process. I shared key tips for cookie texture, presentation ideas, and tasty variations. Lastly, I discussed storage and reheating methods to keep your cookies fresh. Baking these cookies can bring joy and deliciousness to any occasion. Enjoy making your batch and savoring each bite. Happy baking!

Funfetti Birthday Cake Cookies Irresistible Sweet Treat

If you love birthday cake, get ready for a sweet surprise! Funfetti Birthday Cake Cookies are here to bring joy

Older posts
Newer posts
← Previous Page1 Page2 Page3 Page4 … Page111 Next →

dsad

© 2025 spoonfulsavory • Built with GeneratePress

Our Policies

  • Copyright Policy
  • Cookie Policy
  • GDPR Policy
  • Privacy Policy
  • Disclaimer
  • Terms Of Use

More Information

  • Home
  • About
  • Contact
  • Appetizers
  • Dessert
  • Dinner
  • Drinks
©2025, spoonfulsavory About Back To Top