
Honey Garlic Chicken Bites Flavorful and Easy Meal
Are you ready for a meal that’s both sweet and savory? Honey Garlic Chicken Bites are flavorful, easy to make,
Are you ready for a meal that’s both sweet and savory? Honey Garlic Chicken Bites are flavorful, easy to make,
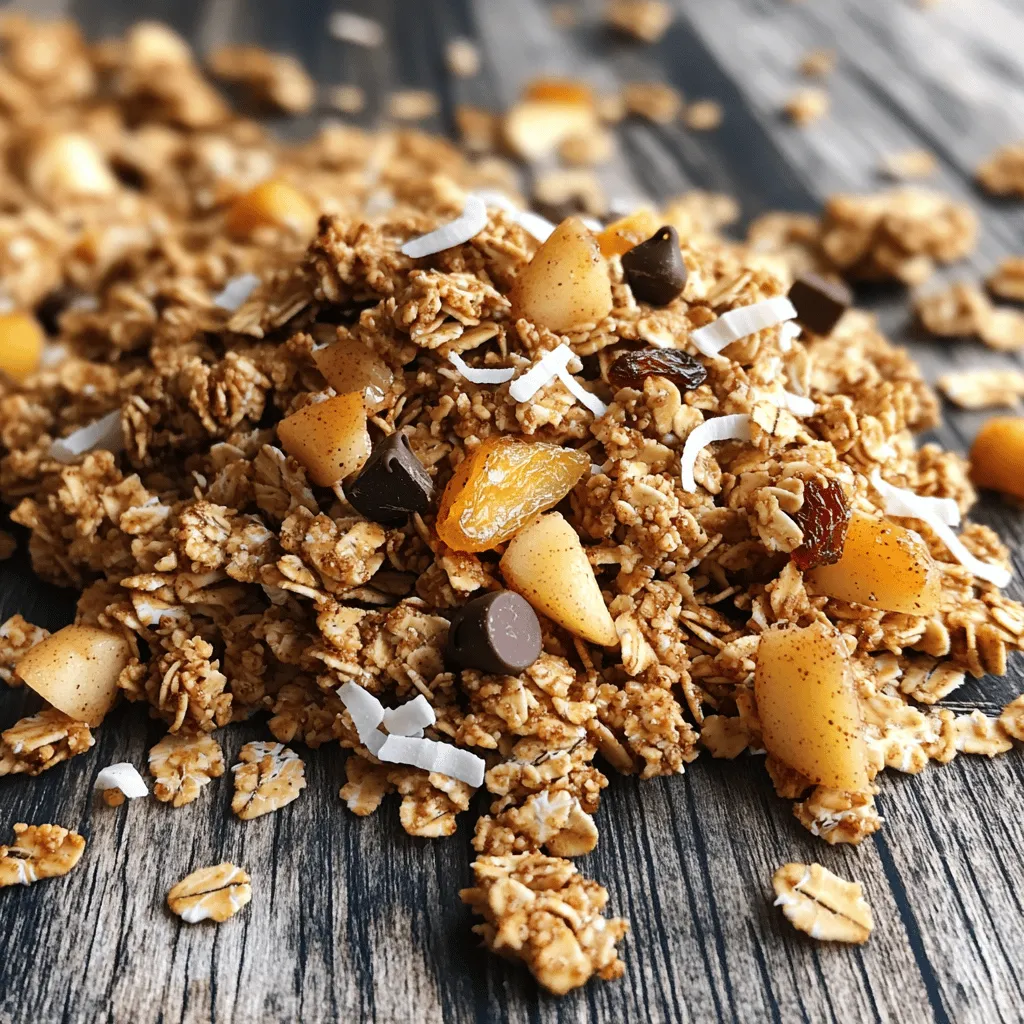
If you crave a crunchy and tasty treat, you’ll love my Maple Cinnamon Apple Granola! It’s packed with flavor and

Are you ready to dive into a delicious plant-based meal? Vegan Sweet Potato Black Bean Burritos are packed with flavor

Craving a sweet, fall treat without the fuss? No Bake Pumpkin Cheesecake Cups are the perfect solution! These delightful, creamy
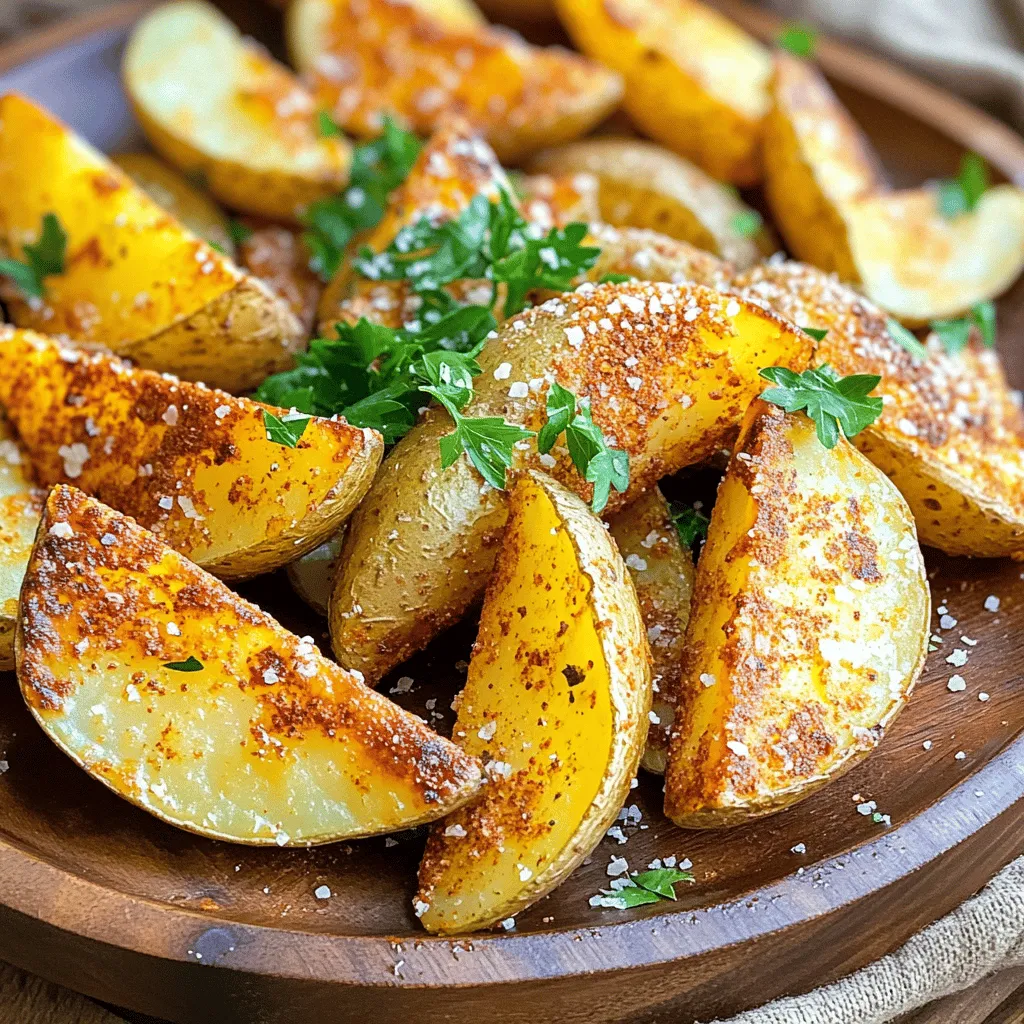
Looking for a tasty side that’s simple to make? You’re in for a treat! Air Fryer Parmesan Potato Wedges are
![To make One Pot Creamy Tomato Basil Pasta, gather these simple items: - 12 oz (340 g) pasta (penne or fusilli work perfectly) - 2 tablespoons olive oil - 1 small onion, finely chopped - 3 garlic cloves, minced - 1 can (14 oz) crushed tomatoes - 3 cups vegetable broth - 1 cup heavy cream or coconut cream for a dairy-free alternative - 1 teaspoon dried oregano - 1 teaspoon sugar - Salt and pepper, to taste - 1 cup fresh basil leaves, chopped - ½ cup grated Parmesan cheese (optional, or nutritional yeast for a vegan substitute) These ingredients combine to create a rich and creamy pasta dish that everyone will love. You can swap out some items too. For a gluten-free version, use gluten-free pasta. If you want a lighter dish, replace heavy cream with coconut cream. Here are some helpful conversions for international readers: - 1 cup = 240 ml - 1 tablespoon = 15 ml - 12 oz (340 g) pasta = about 2.5 cups dry pasta For those who prefer visual aids, a standard measuring cup holds about 8 fluid ounces. This helps you see how much you need for liquids like vegetable broth or cream. For dry items, a kitchen scale can help ensure you get the right amount of pasta. Before you start cooking, gather your ingredients. This makes everything easier. Here’s what you need to do: - Chop: - 1 small onion, finely - 3 garlic cloves, minced - 1 cup fresh basil, chopped - Measure: - 12 oz pasta (penne or fusilli) - 2 tablespoons olive oil - 1 can crushed tomatoes (14 oz) - 3 cups vegetable broth - 1 cup heavy cream or coconut cream - 1 teaspoon dried oregano - 1 teaspoon sugar - Salt and pepper to taste - ½ cup grated Parmesan cheese (optional) For this recipe, you’ll need a large pot. A sturdy wooden spoon works well for stirring. Now, let’s cook the One Pot Creamy Tomato Basil Pasta! 1. In your large pot, warm the olive oil over medium heat. Once hot, add the chopped onion. Sauté for about 3-4 minutes until it’s soft and clear. 2. Next, add the minced garlic. Cook for one more minute. You want to smell that great aroma. 3. Now, pour in the crushed tomatoes, vegetable broth, dried oregano, sugar, salt, and pepper. Stir it all together and bring it to a gentle boil. 4. Carefully add the pasta. Make sure it’s submerged in the liquid. Stir well. Cover the pot and let it simmer for 10-12 minutes. Stir occasionally to stop the pasta from sticking. You want it to be al dente, with some liquid left. 5. Once the pasta is cooked, lower the heat to a gentle simmer. Add the heavy cream (or coconut cream) and stir until the sauce is creamy. 6. Toss in the chopped basil and grated Parmesan cheese if you’re using it. Mix it all together until heated through. 7. Taste your dish! Adjust the salt and pepper if needed. 8. Serve hot! Garnish with extra basil and cheese for a lovely finish. This dish takes about 25 minutes in total, and it serves four people. Enjoy the creamy goodness! To boost the flavor of your One Pot Creamy Tomato Basil Pasta, consider adding a pinch of red pepper flakes. This spice adds a subtle heat that brightens the dish. Fresh herbs, like parsley or thyme, also enhance the taste. You can mix these in at the end for a fresh burst. If you want a creamier sauce, try using more heavy cream or coconut cream. You can also add a little pasta water to adjust the sauce's thickness. This water adds starch, which helps the sauce cling to the pasta better. To reduce cooking time, use a high heat when boiling the broth and tomatoes. Once it’s boiling, add the pasta right away. This keeps the cooking time short but effective. When stirring, use a wooden spoon. It prevents the pasta from sticking and helps mix the sauce evenly. Be sure to stir often, especially in the last few minutes. This keeps the pasta from clumping together and ensures every bite is creamy and delicious. For the best results, follow the Full Recipe. This will guide you through each step with ease, ensuring a delightful meal every time. {{image_4}} You can easily make this dish fit your diet. For a vegan option, swap the heavy cream with coconut cream. Use nutritional yeast instead of Parmesan for a cheesy flavor without dairy. If gluten is a concern, choose gluten-free pasta like brown rice penne or chickpea pasta. Here are some quick swaps: - Heavy Cream: Use coconut cream or cashew cream. - Parmesan Cheese: Try nutritional yeast or a vegan cheese. - Pasta: Use gluten-free pasta or zucchini noodles. Add your favorite proteins to this dish for a hearty meal. Cooked chicken or shrimp mix well with the creamy sauce. Just add them in when you stir in the cream. You can also play with flavors by adding different veggies. Spinach, bell peppers, or mushrooms add color and nutrition. If you want a spicy kick, mix in some crushed red pepper flakes or a splash of hot sauce. Feel free to experiment with sauces too. A pesto swirl or sun-dried tomato paste can change the whole vibe of this dish. Each variation can make your meal unique and exciting! For the full recipe, check out [Full Recipe]. After cooking One Pot Creamy Tomato Basil Pasta, let it cool down. Place it in an airtight container. This helps keep flavors fresh. You can store it in the fridge for up to three days. Make sure to keep it away from strong-smelling foods. This keeps your pasta tasting great. For best results, use glass or plastic containers with tight-fitting lids. These containers help maintain moisture and flavor. Avoid using metal containers, as they can react with the food. To reheat One Pot Creamy Tomato Basil Pasta, use a pot or microwave. If using a pot, add a splash of water or broth. This helps bring back the creaminess. Heat on low, stirring often. This prevents sticking and burning. If using a microwave, place the pasta in a microwave-safe bowl. Add a bit of water or broth to keep it moist. Heat in short bursts, stirring in between. This ensures even heating and keeps your pasta creamy. Avoid overheating, as it can dry out the sauce. Can I make this recipe ahead of time? Yes, you can make this dish ahead. Cook it as normal and let it cool. Store it in the fridge for up to three days. When you are ready to eat, just reheat it on the stove. Add a splash of water or broth to keep it creamy. What can I serve with One Pot Creamy Tomato Basil Pasta? This pasta pairs well with many sides. A fresh green salad with a light dressing is a great choice. Garlic bread also makes a nice addition. For a heartier meal, serve it with grilled chicken or roasted vegetables. Can I use fresh tomatoes instead of canned? Yes, you can use fresh tomatoes. You will need about six medium-sized tomatoes. Peel and chop them before adding. Fresh tomatoes will give your dish a bright flavor, but make sure to adjust the cooking time. What if I don't have heavy cream? If you don't have heavy cream, try coconut cream. It adds creaminess and a hint of sweetness. You can also use whole milk or a mix of milk and sour cream for a lighter option. Each choice will slightly change the taste but will still be delicious. One Pot Creamy Tomato Basil Pasta is a simple yet delicious dish. We covered all the necessary ingredients and how to prepare them. I shared tips to enhance flavor and speed up cooking. We also talked about variations for dietary needs and storage methods. This recipe is flexible, so feel free to experiment. Enjoy making this dish your own with different flavors and textures. Cooking should be fun and rewarding. Dive in, and savor each bite!](https://spoonfulsavory.com/wp-content/uploads/2025/07/6e6b25a1-f0b9-4494-a283-58b78d0a1ab5.webp)
Are you ready for a meal that’s both simple and full of flavor? My One Pot Creamy Tomato Basil Pasta
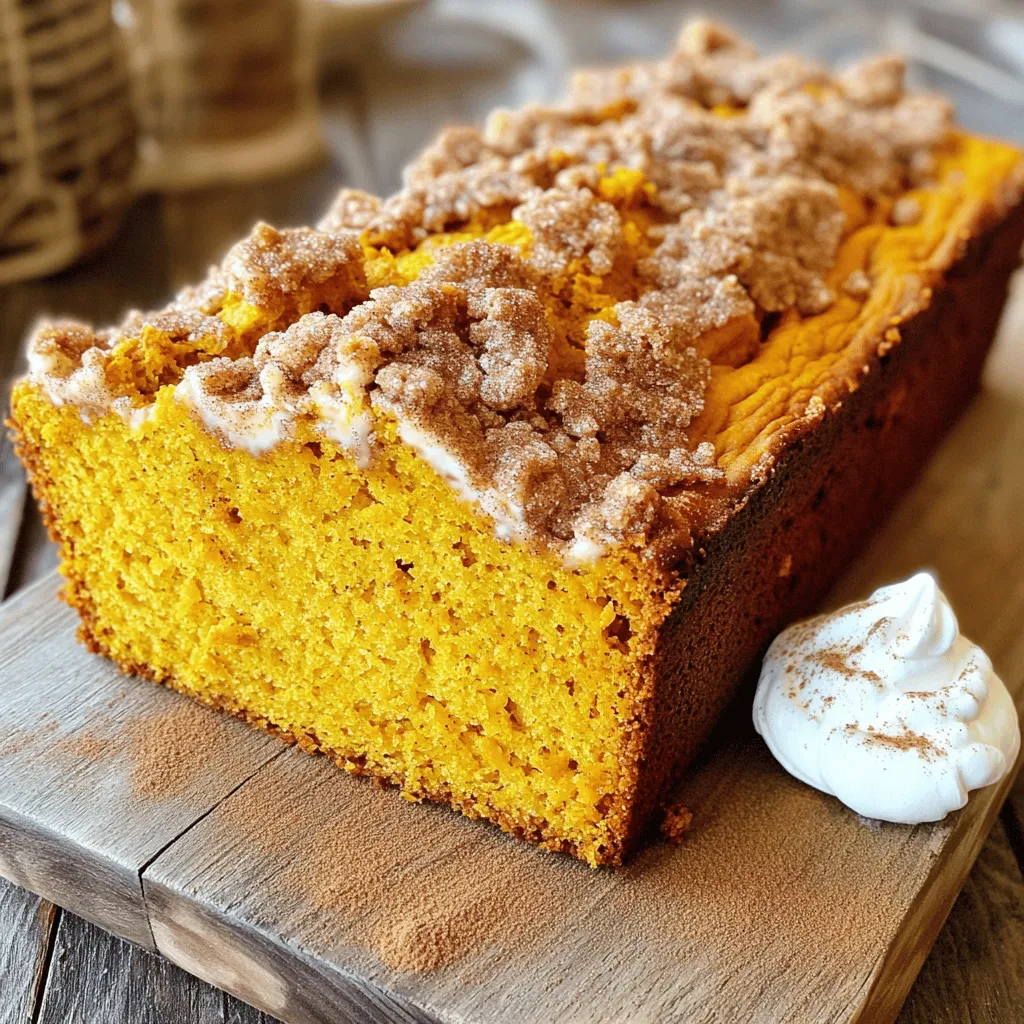
If you love the taste of fall, you need to try this Pumpkin Streusel Bread Loaf! This recipe is simple,
![To make crispy garlic herb potato wedges, you need simple and fresh ingredients. Here’s what you will need: - 4 large russet potatoes - 3 tablespoons extra virgin olive oil - 4 cloves of garlic - 1 teaspoon dried oregano - 1 teaspoon dried thyme - 1 teaspoon smoked paprika - ½ teaspoon sea salt - ½ teaspoon freshly cracked black pepper - Fresh parsley (for garnish) - Grated Parmesan cheese (optional) These ingredients come together to create a dish that is not only crispy but also packed with flavor. The russet potatoes provide a fluffy inside while the garlic and herbs give a tasty kick. Using fresh garlic ensures a strong and aromatic flavor. The olive oil helps to crisp up the wedges, making them golden and irresistible. Don't forget the optional Parmesan cheese for a savory finish! For the full recipe, check out the detailed instructions. - Step 1: Preheat the oven and prepare your baking sheet Set your oven to 425°F (220°C). Line a large baking sheet with parchment paper. This makes cleanup easy. - Step 2: Make the garlic-herb mixture In a big bowl, mix 3 tablespoons of olive oil with 4 minced garlic cloves, 1 teaspoon of oregano, 1 teaspoon of thyme, 1 teaspoon of smoked paprika, ½ teaspoon of sea salt, and ½ teaspoon of black pepper. This mixture smells amazing! - Step 3: Coat the potato wedges with the mixture Add 4 large russet potato wedges to the bowl. Toss them gently to coat each wedge in the garlic-herb blend. Make sure every wedge is covered well. - Step 4: Arrange the wedges and prepare for baking Place the coated wedges in a single layer on the baking sheet. Leave space between each wedge. This helps them crisp up nicely. - Step 5: Bake and flip for maximum crispiness Put the baking sheet in the oven. Bake for 25-30 minutes. Flip the wedges halfway through. This ensures they get golden brown on both sides. - Step 6: Garnish before serving When the wedges are crispy and golden, take them out. If you like, sprinkle grated Parmesan cheese on top. Finish with chopped parsley for a pop of color. For the full recipe, check out the detailed instructions. Enjoy your crispy garlic herb potato wedges! To get your potato wedges super crispy, start by spacing them out on the baking sheet. This helps hot air move around each wedge, making them golden. If they touch, they steam, and that won’t give you the crunch you want. Flipping the wedges halfway through cooking is key. It helps both sides brown evenly for that perfect crispiness. I like to set a timer to remind me. Using parchment paper helps too. It prevents sticking and makes cleaning easier. If you bake directly on the pan, you might lose some crunch. To make these wedges even tastier, try adding other spices or herbs. A pinch of cayenne pepper can add heat. You could also use rosemary for a lovely aroma. When it comes to salt, sea salt gives a different flavor than regular salt. Sea salt has larger crystals, which make a nice crunch. Try it next time for an upgrade. Dipping sauces take these wedges to another level. I recommend creamy garlic aioli or classic ketchup for a nice contrast. If you’re feeling fancy, try a spicy sriracha mayo. For presentation, serve the wedges in a rustic basket lined with parchment paper. It looks great and makes for easy sharing. Don’t forget to pair it with a small bowl of your favorite dip! {{image_4}} You can easily change up the flavors in your crispy garlic herb potato wedges. Here are a few fun ideas: - Cheesy Twist: Add grated cheese, like Parmesan or cheddar, for a creamy touch. - Spicy Kick: Mix in a pinch of cayenne or chili powder for heat. - Fresh Herbs: Swap dried herbs for fresh ones. Use basil or rosemary for a different taste. If you want to try something new, use sweet potatoes instead of russet potatoes. They add a lovely sweetness and beautiful color. Just follow the same steps in the recipe. The result will be just as crispy and delicious! You can also use other methods to cook these tasty wedges. Here are two great options: - Air Fryer: For a quicker version, toss your seasoned wedges in the air fryer. Cook them at 400°F for about 15-20 minutes. Shake the basket halfway through for even crispiness. - Grilling: If it’s summer, grill your potato wedges for a smoky flavor. Preheat the grill and place wedges on a grill pan. Cook for about 20 minutes, flipping often. This method adds a nice char and enhances the taste. Feel free to explore these variations and cooking methods. They can make your crispy garlic herb potato wedges even more fun! For the complete cooking process, check out the Full Recipe. To keep your crispy garlic herb potato wedges fresh, store them in an airtight container. Allow them to cool completely before sealing to avoid steam buildup. This helps maintain their crispiness. Keep the container in the fridge for up to three days. If you have extra wedges, consider separating them with parchment paper. This prevents them from sticking together. Reheating is key to enjoying your potato wedges again. Use the oven for the best results. Preheat your oven to 400°F (200°C). Spread the wedges on a baking sheet. Bake for about 10-15 minutes until they are hot and crispy again. Avoid the microwave if you can. It can make them soggy. If you must use it, heat them in short bursts. Check often to prevent overcooking. For the best flavor and texture, stick to the oven method. For the full recipe, check the detailed cooking steps and tips. These potato wedges take about 25 to 30 minutes to cook. You will want to flip them halfway through to ensure they cook evenly and get nice and crispy. Yes, you can prepare the potato wedges ahead of time. Cut and coat them in the garlic-herb mix. Store them in the fridge for up to 24 hours. Just remember to bake them fresh for the best texture. The best type of potato for wedges is the russet potato. They have a high starch content. This makes them crispy on the outside and fluffy on the inside when cooked. To make these potato wedges vegan-friendly, skip the Parmesan cheese. You can still enjoy the rich flavors from the garlic and herbs without any animal products. Yes, you can freeze these potato wedges. After baking, let them cool completely. Place them in an airtight container and freeze. When ready to eat, reheat them in the oven for a crispy finish. For the full recipe, check out the detailed instructions above. Crispy garlic herb potato wedges are a simple and tasty dish. You can make them in about 40 minutes. The steps are easy to follow, and you’ll enjoy a crunchy treat. Start by preheating your oven to 425°F (220°C). Mix the olive oil, garlic, and spices in a bowl. Then, coat the potato wedges in this mix. Lay them out on a baking sheet with space between them. Bake for 25-30 minutes, flipping halfway for even crispiness. For detailed instructions and tips, check the [Full Recipe]. Enjoy these crunchy wedges as a snack or side! In this blog post, we covered how to make crispy garlic herb potato wedges. You learned about the key ingredients, step-by-step cooking instructions, and tips for perfecting taste and texture. Remember, spacing and flipping the wedges are key for crispiness. You can also try different seasonings or even sweet potatoes for variety. Enjoy your delicious potato wedges with your favorite dips. This easy recipe satisfies cravings and adds fun to any meal!](https://spoonfulsavory.com/wp-content/uploads/2025/07/dd962bca-b4e4-4223-a082-d22742269e03.webp)
Ready to elevate your snack game? These Crispy Garlic Herb Potato Wedges are packed with flavor and texture that will

Craving a treat that bursts with wholesome flavor? You’ve found it! These Lemon Ricotta Blueberry Muffins are easy, delicious, and
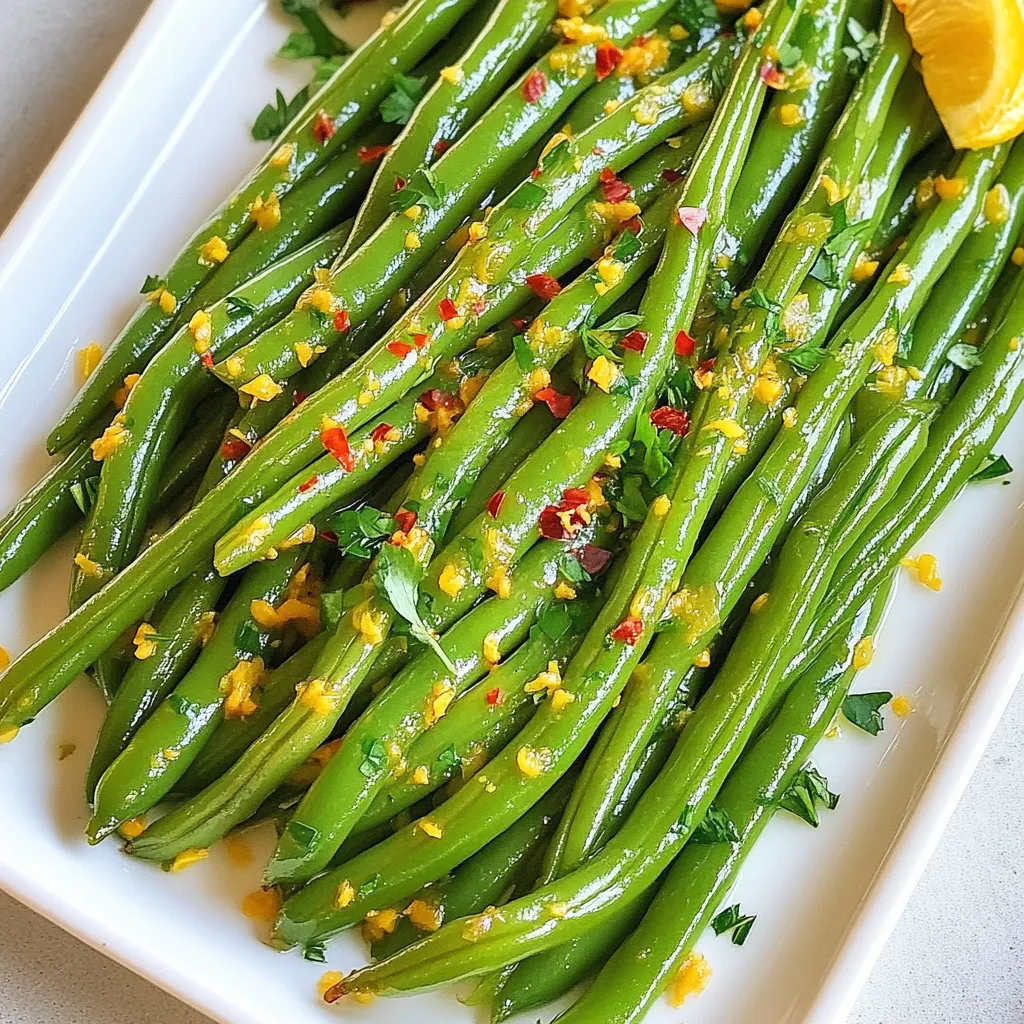
Looking for a side dish that packs a punch? My Spicy Garlic Butter Green Beans are easy to make and
