Skip to content
DisclaimerTerms Of UseGDPR PolicyCookie Policy

spoonfulsavory

  • Home
  • Drinks
  • Appetizers
  • Dinner
  • Dessert
  • About
  • Contact
  • Privacy Policy
DisclaimerTerms Of UseGDPR PolicyCookie Policy

Sarah

- 1 ½ cups all-purpose flour - 1 teaspoon baking soda - ½ teaspoon baking powder - ½ teaspoon salt - 1 teaspoon ground cinnamon - ½ teaspoon ground nutmeg - ½ teaspoon ground ginger - 1 cup pumpkin puree (canned or homemade) - ½ cup granulated sugar - ½ cup brown sugar, packed - 2 large eggs - ½ cup vegetable oil - 1 teaspoon vanilla extract - ½ cup chopped pecans or walnuts (optional) - ½ cup all-purpose flour - ⅓ cup brown sugar, packed - ½ teaspoon ground cinnamon - ¼ cup unsalted butter, melted - ¼ cup chopped nuts (optional) In this recipe, we focus on fresh, simple ingredients that create a rich flavor. The dry ingredients form the base of our bread, while the wet ingredients bring moisture and sweetness. Pumpkin puree gives the loaf its signature taste. You can choose homemade or canned puree; both work well. The streusel topping adds a delightful crunch. It combines flour, sugar, and melted butter for that perfect crumbly texture. You can add chopped nuts if you like a nutty flavor. Using quality ingredients is key. I recommend organic flour and fresh spices for the best taste. This recipe is all about bringing warmth and comfort to your kitchen, making it an irresistible fall treat. For full details on how to prepare this delicious bread, refer to the Full Recipe. - Preheat the oven to 350°F (175°C). - Prepare a 9x5-inch loaf pan by greasing and flouring it. - In a medium bowl, whisk together the dry ingredients. This includes 1 ½ cups of flour, baking soda, baking powder, salt, ground cinnamon, ground nutmeg, and ground ginger. - In a large mixing bowl, combine the wet ingredients. Mix together 1 cup of pumpkin puree, ½ cup of granulated sugar, ½ cup of packed brown sugar, 2 large eggs, ½ cup of vegetable oil, and 1 teaspoon of vanilla extract. Ensure this mixture is smooth. - Gradually add the dry ingredients to the wet mixture. Stir gently until just blended. If you like, fold in ½ cup of chopped nuts for a nice texture. - Carefully pour the batter into the prepared loaf pan. Spread it evenly. - For the streusel topping, mix ½ cup of flour, ⅓ cup of packed brown sugar, and ½ teaspoon of ground cinnamon in a small bowl. Add ¼ cup of melted butter and mix until crumbly. If desired, add ¼ cup of chopped nuts. - Evenly sprinkle the streusel topping over the batter in the loaf pan. - Bake for 55-65 minutes. Check with a toothpick to see if it comes out clean. If the top gets too brown, lightly cover it with foil to avoid over-baking. For the complete details of the recipe, check the Full Recipe. - Use a kitchen scale for accurate flour measurements. - Spoon flour into a measuring cup, then level it off. - Mix batter gently; over-mixing can make it tough. - Check the oven temperature with an oven thermometer. - Slice the warm loaf into thick pieces. - Serve it on a pretty platter to impress guests. - Enjoy with coffee, tea, or hot cider for a warm treat. - After baking, dust the top with powdered sugar. - Garnish with whole pecans for a nice touch. - Use colorful napkins or plates to add cheer. These tips will help you create a stunning pumpkin streusel bread loaf. For the complete recipe, check out the Full Recipe. {{image_4}} You can make this bread fit your needs. For gluten-free options, swap the all-purpose flour for a gluten-free blend. It works well and keeps the bread moist. If you want a vegan version, use flax eggs or applesauce instead of regular eggs. Both options keep the bread tasty. Want to add more flavor? Try mixing in chocolate chips. They melt and create a rich taste in every bite. You can also add shredded coconut. It gives the bread a nice texture and a hint of sweetness. Both options make the loaf even more special. Switch up the topping for a fun twist. A crumbly oat topping adds crunch and depth. Just mix oats with a bit of flour, butter, and brown sugar. Another great choice is spiced cream cheese frosting. This rich frosting pairs perfectly with the bread's warm flavors. You can easily customize your loaf to fit any occasion. For the full recipe, check out the detailed steps to create this delicious treat. To keep your pumpkin streusel bread fresh, store it at room temperature. Place the loaf in an airtight container. This helps maintain its moist texture. You can also wrap it tightly in plastic wrap. It will stay tasty for about three days. For longer storage, freeze slices or the entire loaf. Wrap each slice in plastic wrap, then place them in a freezer bag. This keeps the bread fresh for up to three months. When you're ready to enjoy it, simply thaw it in the fridge overnight. When reheating, avoid drying out your loaf. Preheat your oven to 350°F (175°C). Wrap the loaf in aluminum foil. Heat it for about 10-15 minutes. This keeps the bread moist and warm. You can also reheat slices in a microwave for about 20-30 seconds. Just be careful, as microwaving too long can make it tough. Yes, you can use fresh pumpkin. Start by roasting a small pumpkin. Cut it in half, remove the seeds, and bake it at 350°F (175°C) for about 30-45 minutes. Once it cools, scoop out the soft flesh and blend it until smooth. Fresh pumpkin adds a lovely flavor, but be sure to drain any excess moisture. This helps keep your bread from being too wet. Check the loaf with a toothpick. Insert it into the center of the bread. If it comes out clean, your loaf is done. If it has batter on it, bake for a few more minutes. Keep an eye on the top. If it browns too fast, cover it with foil. This keeps the top from burning while the inside cooks. You can use several egg substitutes. A common choice is applesauce. Use ¼ cup of applesauce for each egg. You can also use mashed banana or a flaxseed mixture. To make a flaxseed egg, mix 1 tablespoon of ground flaxseed with 2.5 tablespoons of water. Let it sit for 5 minutes until it thickens. This will help bind your bread just like eggs do. For more details and a full list of ingredients, check out the Full Recipe. In this post, we covered the key ingredients for a delicious pumpkin loaf. You learned how to mix both dry and wet ingredients, bake the loaf, and create a tasty streusel topping. We also discussed tips for perfect results, serving suggestions, and fun variations to try. Baking is all about experimenting. Don't be afraid to make it your own. Enjoy your pumpkin loaf, and share it with friends!

Pumpkin Streusel Bread Loaf Irresistible Fall Treat

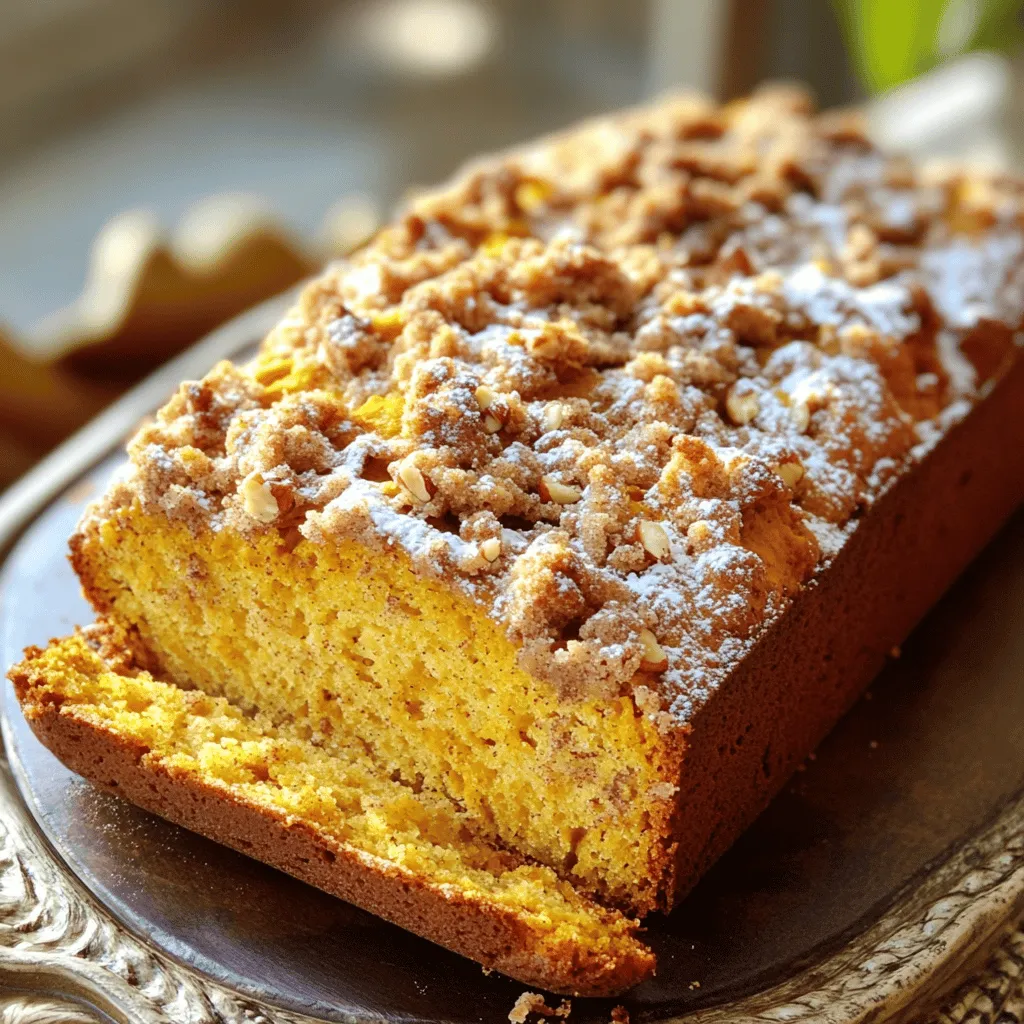
As fall rolls in, nothing warms the heart like a slice of Pumpkin Streusel Bread Loaf. This easy recipe combines

- 4 large russet potatoes - 4 tablespoons extra virgin olive oil - 4 cloves garlic, minced For this recipe, russet potatoes shine. They are starchy and give a fluffy inside. You want large ones for big wedges. Olive oil adds flavor and crispness. Fresh garlic gives a great aroma and taste. - 2 teaspoons dried oregano - 2 teaspoons dried thyme - 1 teaspoon smoked paprika Dried oregano and thyme boost the flavor. They add a nice herbal note. Smoked paprika gives a warm, smoky taste. This mix makes your wedges special and tasty. - Grated Parmesan cheese - Fresh parsley for garnish - Salt and black pepper to taste Parmesan cheese adds a rich, salty kick. Fresh parsley brightens the dish and looks great. Salt and black pepper round out the flavors. You can adjust these to fit your taste. For the full recipe, check the details above. Enjoy making your crispy garlic herb potato wedges! - Preheat the oven to 425°F (220°C). - Prepare a baking sheet with parchment paper. Start by heating your oven. This step is key for crispy potato wedges. The parchment paper helps with cleanup and prevents sticking. - Combine olive oil, garlic, herbs, and seasonings. - Toss potato wedges in the oil mixture. In a large bowl, mix the olive oil with minced garlic, oregano, thyme, smoked paprika, onion powder, salt, and pepper. This mixture smells fantastic and adds great flavor. Next, add the potato wedges. Use your hands to toss them well. Make sure each wedge gets coated so every bite is tasty. - Arrange wedges on the baking sheet. - Bake for 30-35 minutes, flipping halfway. Spread the coated wedges evenly on the baking sheet. Space them out to allow air to circulate. This helps them become crispy. After 15 minutes, flip the wedges. This ensures they cook evenly. Keep an eye on them until they are golden brown. The smell will make your mouth water! For the full recipe, check the details above. Enjoy making these crispy garlic herb potato wedges! To get that perfect crunch, space the wedges well on the baking sheet. If the wedges touch, they will steam instead of crisp. Arrange them in a single layer, giving each wedge room to breathe. Flip the wedges halfway through baking. This helps both sides to brown and crisp up nicely. Want more flavor? Add extra herbs or spices to the mix. You can try rosemary, basil, or even a bit of chili powder for heat. When selecting potatoes, go for russet potatoes. They are starchy and get crispy on the outside while staying fluffy inside. These wedges pair perfectly with dips like ketchup or aioli. They also make a great side dish for burgers or grilled chicken. Enjoy them as a tasty snack anytime. For a fun twist, serve them with a sprinkle of cheese or fresh herbs. Check out the Full Recipe for more tips and ideas! {{image_4}} You can change the taste of your potato wedges with some fun twists. For a spicy kick, add chili powder. Start with one teaspoon and adjust to your taste. Mix it in with the garlic and herbs. This adds heat and flavor. For cheese lovers, try a cheesy version. After baking, sprinkle extra cheese on top. Cheddar or mozzarella works great. Melted cheese adds a rich layer. If you want a vegan option, simply skip the cheese or use a dairy-free substitute. Nutritional yeast gives a cheesy flavor without dairy. It’s a great choice for vegans. If you need a gluten-free dish, rest easy! This recipe is naturally gluten-free. Just be sure your ingredients are certified gluten-free. You can also make these wedges in an air fryer. Set it to 400°F (200°C) and cook for about 20 minutes. Shake the basket halfway through for even cooking. Want to grill? That works too! Place the wedges on a grill-safe pan. Cook them over medium heat for about 15-20 minutes. Just turn them often for even crispiness. These methods bring out different textures and flavors. For the full recipe, check out the Crispy Garlic Herb Potato Wedges section. To keep your crispy garlic herb potato wedges fresh, let them cool first. Place them in an airtight container. This helps keep moisture out. You can store them in the fridge for a few days. Just remember, the longer they sit, the less crispy they become. The best way to reheat these wedges is in the oven. Preheat your oven to 400°F (200°C). Lay the wedges on a baking sheet. Heat them for about 10-15 minutes. This restores their crispiness quite well. If you use a microwave, they will heat quickly, but they may lose some crunch. Place them on a microwave-safe plate and cover with a damp paper towel. Heat for 1-2 minutes. In the fridge, these potato wedges last about 3-5 days. For longer storage, you can freeze them. Place the cooled wedges in a freezer bag, squeezing out extra air. They can last up to 3 months in the freezer. When you're ready to eat, thaw them in the fridge overnight before reheating. Enjoy your delicious potato wedges anytime! Yes, you can prep these potato wedges in advance. Start by cutting the potatoes. Soak them in cold water for 30 minutes. This helps remove excess starch and keeps them crispier. After soaking, drain and dry the wedges well. Toss them in the oil and spices as usual. You can cover and refrigerate them for up to 24 hours. When you're ready, just bake them straight from the fridge. This way, you save time and enjoy fresh, crispy wedges. I recommend using large russet potatoes for the best results. Russets are starchy, which makes them fluffy inside and crispy outside. They hold their shape well and absorb flavors nicely. Other good options are Yukon Gold or red potatoes. Each has its own taste, but russets give the best texture for these wedges. Avoid waxy potatoes, as they won't crisp up as well. If you want to add some heat, try adding chili powder or cayenne pepper to the mix. Start with a small amount, like half a teaspoon, and taste as you go. You can also use crushed red pepper flakes for a nice kick. For a bolder flavor, add some hot sauce to the oil mixture before tossing the wedges. This will give your potato wedges a spicy, zesty touch. These potato wedges are easy to make and full of flavor. You gather simple ingredients like russet potatoes and olive oil, then mix in tasty herbs and spices. After baking, you can enjoy them crispy and delicious. Remember, you can customize these wedges to fit any taste or diet. Use different spices, add cheese, or even try cooking methods like grilling. Don’t forget to store leftovers properly. This way, you can enjoy them later. Enjoy making and sharing these tasty treats!

Crispy Garlic Herb Potato Wedges Easy Oven Recipe

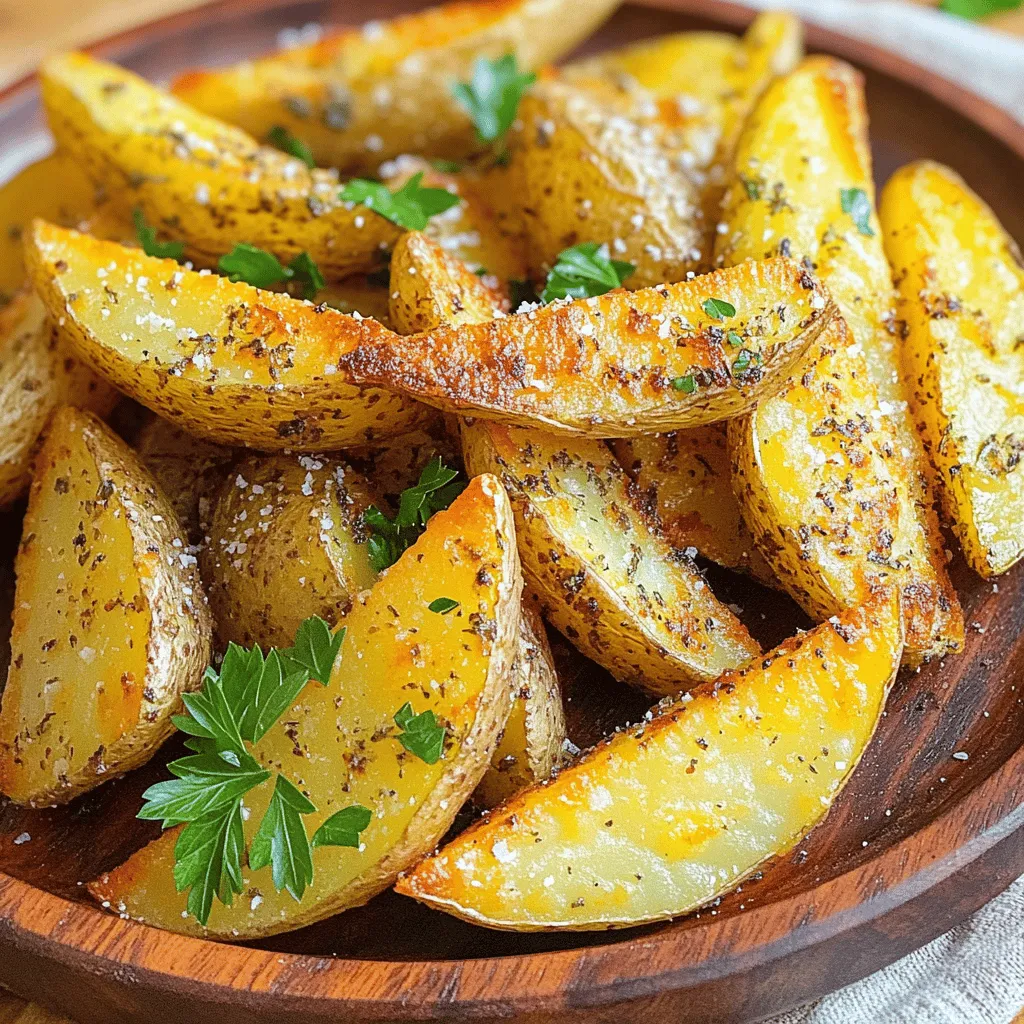
Are you ready for a tasty treat? These Crispy Garlic Herb Potato Wedges are simple to make and packed with

To make Lemon Ricotta Blueberry Muffins, you need a few key items. Here’s what you should gather: - 1 cup ricotta cheese - 1/2 cup unsalted butter, softened - 3/4 cup granulated sugar - 2 large eggs, at room temperature - Zest of 1 medium lemon - 2 tablespoons freshly squeezed lemon juice - 1 teaspoon pure vanilla extract - 1 1/2 cups all-purpose flour - 2 teaspoons baking powder - 1/2 teaspoon baking soda - 1/4 teaspoon salt - 1 cup fresh blueberries (or frozen if fresh are not available) - Optional: Powdered sugar for dusting Using fresh blueberries is best for flavor. They burst in your mouth and add a lovely color. If you can't get fresh ones, frozen blueberries work well, too. Just keep in mind that frozen berries may release some juice. This can make your muffins a bit more moist. I also suggest keeping powdered sugar on hand. A light dusting adds a sweet touch and looks great on the muffins. It’s perfect for serving at brunch or a special gathering. For the complete cooking steps, check out the Full Recipe. 1. Start by preheating your oven to 375°F (190°C). 2. Prepare a muffin tin by placing paper liners or greasing it with non-stick spray. This helps your muffins come out easily. 3. In a large bowl, cream together softened butter and granulated sugar. Use an electric mixer for about 3-4 minutes. The mix should look light and fluffy. 4. Next, add ricotta cheese, eggs, lemon zest, lemon juice, and vanilla extract to the bowl. Mix until everything is fully combined. Scrape down the bowl's sides to catch any bits. 5. In another bowl, whisk together flour, baking powder, baking soda, and salt. 6. Gradually fold the dry mixture into the wet ingredients. Stir gently just until combined. Overmixing can make the muffins dense. 1. Gently fold in the blueberries. This keeps them intact, making your muffins look great. 2. Use a spoon or ice cream scoop to fill each muffin cup about two-thirds full. 3. Place the muffin tin in the oven and bake for 18-22 minutes. 4. To check if your muffins are done, insert a toothpick into the center of a muffin. If it comes out clean or with a few moist crumbs, they are ready. 1. Once baked, remove the muffins from the oven. Cool them in the tin for about 5 minutes. 2. After that, transfer the muffins to a wire rack to cool completely. 3. For a lovely presentation, dust the cooled muffins with powdered sugar. Arrange them on a beautiful platter. You can even add fresh berries and a little jug of honey for a nice touch. For complete guidance on making these delightful treats, refer to the Full Recipe. To get the best texture in your Lemon Ricotta Blueberry Muffins, follow these tips: - Use room temperature ingredients. This helps the batter mix smoothly. Cold eggs and butter can cause clumping. - Don’t overmix the batter. Stir just until combined. Overmixing can lead to tough muffins. - Add blueberries gently. Fold them in carefully to keep their shape and flavor. If you have dietary restrictions, try these substitutions: - Gluten-free flour: Use a 1:1 gluten-free baking blend. This will work well. - Dairy-free option: Substitute ricotta with a dairy-free yogurt. Almond or coconut yogurt works best. To keep your muffins fresh, store them properly: - At room temperature: Place them in an airtight container. They stay fresh for up to 3 days. - In the fridge: For longer storage, keep them in the fridge for up to a week. If you want to freeze your muffins: - Wrap each muffin tightly. Use plastic wrap or foil to avoid freezer burn. - Use freezer bags. Place wrapped muffins in a freezer bag for extra protection. They last up to three months. For a quick snack later, just thaw them at room temperature or pop them in the microwave for a few seconds. Enjoy these delightful muffins anytime! For the complete guidance on making Lemon Ricotta Blueberry Muffins, check the Full Recipe. {{image_4}} You can easily change up the flavor of your Lemon Ricotta Blueberry Muffins. Here are some fun ideas: - Nuts: Add chopped walnuts or almonds for a crunchy texture. - Spices: A sprinkle of cinnamon or nutmeg can enhance the flavor. - Other Fruits: Swap blueberries for raspberries or chopped strawberries. Each will give a unique twist. These simple changes keep your muffins fresh and exciting. You can make these muffins fit different diets. Here are some options: - Vegan Version: Use plant-based ricotta and replace eggs with flaxseed meal or applesauce. - Dairy-Free: Substitute ricotta with a non-dairy yogurt or cashew cream. - Low-Sugar Alternatives: Try using honey or maple syrup instead of granulated sugar. You can also use a sugar substitute like stevia. These swaps let everyone enjoy the muffins without worry. For the complete guidance on making these delightful treats, check the Full Recipe. To keep your Lemon Ricotta Blueberry Muffins fresh, use an airtight container. This helps lock in moisture. You can also use freezer bags for longer storage. Just make sure to squeeze out the air. - Room Temperature: Store muffins at room temperature for up to 2 days. - Refrigerated: If you refrigerate them, they will last about a week. When it's time to enjoy your muffins again, reheating is key. The best way is to use an oven. Preheat your oven to 350°F (175°C). Place muffins on a baking sheet for about 5 to 10 minutes. This keeps them soft and warm. You can also use a microwave. Heat muffins for 15 to 20 seconds. This is great if you want a quick snack. Serve them warm for the best taste! For an extra treat, add a light dusting of powdered sugar on top. For the complete guidance on making these muffins, check out the Full Recipe. What makes these muffins light and fluffy? These muffins use ricotta cheese, which adds moisture. The key is to cream the butter and sugar well. This process incorporates air, making them light and fluffy. Can I use different fruits besides blueberries? Yes! You can swap blueberries for raspberries, blackberries, or chopped strawberries. Use what you love most. Just keep the same amount, so the texture stays right. How do I tell if the muffins are done without a toothpick? Look for a golden-brown top. Gently press the center; it should spring back. If it sinks, they need more time. The sides will also pull away from the pan slightly. Can this recipe be doubled or halved? Absolutely! Doubling works great for gatherings. Halving is perfect for a smaller batch. Just keep the same method for mixing and baking. Solutions for common baking problems such as dense muffins or burnt tops If muffins are dense, try not to overmix. Overmixing can make them tough. If the tops burn, lower the oven temperature. This helps them bake more evenly without burning. Tips for adjusting baking times based on oven variations Every oven heats differently. Check muffins a few minutes early if your oven runs hot. If they need more time, add in small increments. This ensures you get perfectly baked muffins every time. For the complete guidance on making these delicious treats, please refer to the Full Recipe. Lemon Ricotta Blueberry Muffins are delightful and easy to make. The key ingredients bring flavor and texture to these muffins. Here’s what you need: - 1 cup ricotta cheese - 1/2 cup unsalted butter, softened - 3/4 cup granulated sugar - 2 large eggs, at room temperature - Zest of 1 medium lemon - 2 tablespoons freshly squeezed lemon juice - 1 teaspoon pure vanilla extract - 1 1/2 cups all-purpose flour - 2 teaspoons baking powder - 1/2 teaspoon baking soda - 1/4 teaspoon salt - 1 cup fresh blueberries (or frozen) - Optional: Powdered sugar for dusting Each ingredient plays a part in making these muffins soft and moist. Ricotta cheese adds creaminess, while lemon zest and juice give a fresh zing. When choosing blueberries, fresh is best. However, frozen blueberries work well too and can be just as tasty. For complete guidance on making Lemon Ricotta Blueberry Muffins, check the Full Recipe. You now have all the tools to make amazing Lemon Ricotta Blueberry Muffins. We covered the key ingredients, such as fresh blueberries and optional powdered sugar. I shared step-by-step instructions, tips for perfect texture, and ways to store leftovers. You can even explore fun variations to make the recipe your own. For full guidance, check the complete recipe. Now, get baking and enjoy your delicious muffins!

Lemon Ricotta Blueberry Muffins Flavorful and Easy Recipe

Do you crave a delightful treat that bursts with flavor? Look no further than my Lemon Ricotta Blueberry Muffins! This

To make this dip, you need key ingredients. Start with 8 oz of cream cheese. It should be softened for easy mixing. Add 1/2 cup of sifted powdered sugar. This keeps the dip smooth and sweet. Don't forget 1 teaspoon of pure vanilla extract. This adds a nice flavor. Next, we need fresh ingredients for taste and color. Use 1 cup of fresh blueberries. They bring a burst of flavor. You can set aside extra blueberries for garnish. You will also need 1/4 cup of freshly squeezed lemon juice. This gives a zesty kick to balance the sweetness. For dipping, I suggest a few tasty options. Graham crackers are classic and crunchy. You can also use assorted fruit slices. Apples and strawberries work great. These will enhance your dip experience. Try different dips to see what you enjoy most! {{ingredient_image_2}} To start, gather your ingredients. You will need cream cheese, powdered sugar, and vanilla extract. First, place the softened cream cheese in a large bowl. Add the sifted powdered sugar and the vanilla extract. Beat these together with an electric mixer on medium speed. Keep mixing until the blend is smooth and creamy without lumps. Next, it's time to add the Greek yogurt. Gradually mix in half a cup of yogurt. This makes the dip extra creamy. Once fully combined, gently fold in one cup of fresh blueberries. Use a spatula to avoid smashing them. Reserve some blueberries for later. Now, drizzle in the freshly squeezed lemon juice. This adds a nice zing! Taste the dip. If you like it sweeter, add a bit more powdered sugar. Now, spoon the blueberry cheesecake dip into a nice serving bowl. Top it with the reserved blueberries for a pretty look. If you want, sprinkle a little powdered sugar on top for extra sweetness. Serve the dip with graham crackers or fresh fruit slices like apples or strawberries. Enjoy every creamy bite! To get a smooth and creamy dip, use softened cream cheese. If it's cold, it will be lumpy. Beat the cream cheese with powdered sugar and vanilla first. Mix until it’s smooth. Then, add Greek yogurt slowly. This keeps the dip light and fluffy. Finally, fold in the blueberries carefully. You want them whole for texture. Taste your dip before serving. If you want it sweeter, add more powdered sugar. Start with a little, then mix well. You can always add more, but you can't take it out. The lemon juice adds a nice zing, balancing the sweetness. It’s all about finding that perfect blend. Make your dip look pretty! Use a nice bowl for serving. Top with fresh blueberries for color. You can also sprinkle some powdered sugar on top. For a fancy touch, serve in small ramekins. Add fresh mint leaves beside each one for a pop of green. It makes the dip look special and inviting! Pro Tips Use Room Temperature Cream Cheese: Ensuring that your cream cheese is at room temperature allows for easier mixing and a smoother texture in your dip. Opt for Fresh Blueberries: Fresh blueberries will provide the best flavor and texture. If using frozen, make sure to thaw and drain them well to avoid excess moisture. Adjust Sweetness to Taste: Depending on the tartness of your blueberries and personal preference, feel free to adjust the amount of powdered sugar to achieve your desired sweetness level. Chill Before Serving: For an even creamier dip, refrigerate the mixture for at least 30 minutes before serving. This allows the flavors to meld beautifully. {{image_4}} You can make your blueberry cheesecake dip even better. Adding lemon zest brightens the flavor. It gives your dip a fresh and tangy taste. You can also use flavored yogurt. Try vanilla or lemon yogurt for a twist. This small change adds a layer of flavor that excites your taste buds. Blueberries are great, but you can mix it up. Try raspberries or strawberries for a fruity flair. These berries will add a nice color and taste. You can also use peaches or mangoes for a tropical vibe. Each fruit brings its own twist, making your dip unique. Graham crackers are a classic, but there are more options. Serve with apple slices for a crisp and sweet crunch. You can also use strawberries for a berry-on-berry treat. Try pretzels for a salty contrast to the sweet dip. Each dipping partner can change your experience, making every bite a little surprise. To keep your blueberry cheesecake dip fresh, store it in an airtight container. This helps prevent it from drying out or absorbing odors from your fridge. Always refrigerate the dip right after serving. If you have leftovers, don't let them sit out for too long. This dip lasts about 3 to 5 days in the fridge. If you want to freeze it, use a freezer-safe container. It can stay good for about one month frozen. When you are ready to use it, defrost it in the fridge overnight. After thawing, stir it well. The texture might change slightly, so taste it again and adjust the sweetness if needed. You can make the dip a day before your event. This can save you time and stress. Just follow the recipe and store it in the fridge. The flavors will blend and taste even better the next day. Remember to garnish it right before serving. This will keep it looking fresh and inviting. Yes, you can use frozen blueberries. They work well in the dip. Just thaw them first. This helps reduce excess moisture. Be careful when mixing, as they can break apart. If you want a fresher taste, use fresh blueberries. They add a nice crunch and vibrant color. If you don’t have Greek yogurt, try sour cream. It gives a similar tangy flavor. You can also use regular yogurt, but the dip may be thinner. Cream cheese alone can work too, but it lacks some creaminess. Remember to taste and adjust the sweetness if you change the yogurt. You can keep leftover dip in the fridge for about three days. Make sure to store it in an airtight container. This keeps it fresh and tasty. If you notice any change in color or smell, it’s best to discard it. For a quick snack, enjoy it with fresh fruit or graham crackers! You can make a tasty blueberry cheesecake dip with simple ingredients and steps. We discussed key ingredients like cream cheese, sweeteners, and fresh items. I provided step-by-step instructions and tips for the best creamy texture. You learned fun ways to change flavors and more. Lastly, I shared storage tips to keep your dip fresh. This dessert is easy to make and sure to impress! Enjoy creating and sharing this delightful treat!

Blueberry Cheesecake Dip Simple and Creamy Delight

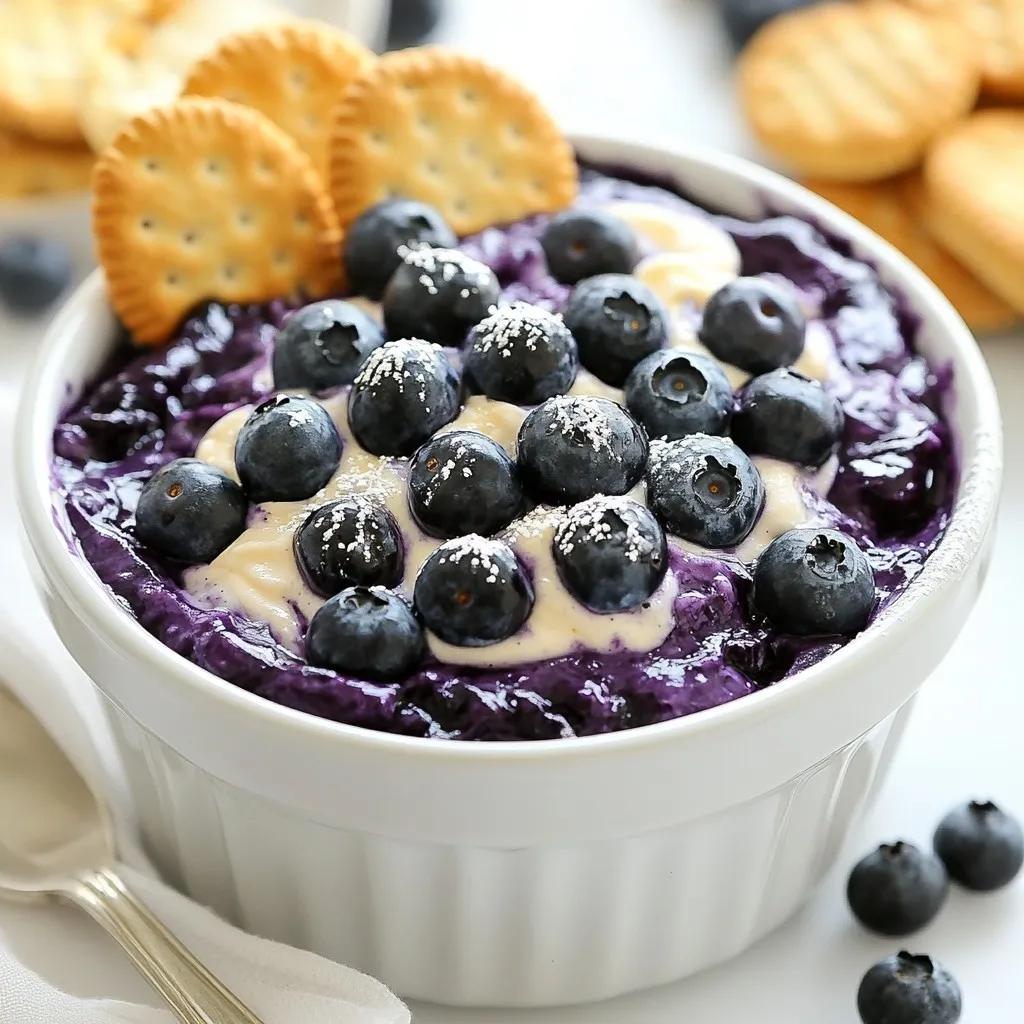
If you love rich flavors and creamy textures, get ready to indulge! This Blueberry Cheesecake Dip is a simple delight

For this recipe, you will need: - 1 large head of cauliflower, cut into uniform florets - 4 cloves of fresh garlic, finely minced - 1/4 cup freshly grated Parmesan cheese These main ingredients create a strong flavor base. Cauliflower is your star. It absorbs flavors well and roasts beautifully. Fresh garlic adds a pungent depth to every bite. Parmesan cheese brings a savory richness that completes the dish. Now, let’s spice things up with some essential seasonings: - 3 tablespoons extra virgin olive oil - 1 teaspoon onion powder - 1 teaspoon garlic powder - 1/2 teaspoon red pepper flakes (adjust for spice preference) - Salt and freshly cracked black pepper to taste Extra virgin olive oil helps the cauliflower crisp up nicely. Onion powder and garlic powder enhance the garlic flavor, while red pepper flakes add a little kick. Salt and pepper round out the taste, making each floret pop. Finally, we need a garnish for that finishing touch: - Fresh parsley, finely chopped This adds a splash of color and freshness. Parsley also brightens the flavors. It’s the perfect addition right before serving, giving your dish a restaurant-quality look. {{ingredient_image_2}} Start by preheating your oven to 425°F (220°C). This helps the cauliflower roast nicely. Next, line a large baking sheet with parchment paper. This makes cleanup easy and keeps the cauliflower from sticking. In a big mixing bowl, add the cauliflower florets. Then, mince four cloves of fresh garlic and toss them in. Drizzle three tablespoons of extra virgin olive oil over the florets. Now, sprinkle in one teaspoon each of onion powder and garlic powder. For a bit of heat, add half a teaspoon of red pepper flakes. Lastly, add salt and freshly cracked black pepper to taste. Use your hands or a spatula to mix everything well. Each piece of cauliflower should be coated evenly. Spread the seasoned cauliflower in a single layer on the prepared baking sheet. Make sure the florets have some space. This allows them to roast properly. Put the baking sheet in your preheated oven. Roast the cauliflower for 20 minutes. After 20 minutes, take it out and sprinkle a quarter cup of grated Parmesan cheese on top. Return the baking sheet to the oven for another 10 to 15 minutes. You want the cheese to melt and turn golden brown. The cauliflower should be tender with crisp edges. Once ready, take it out and let it cool for a few minutes. Before serving, sprinkle some chopped fresh parsley on top for a pop of color. To get perfect garlic parmesan roasted cauliflower, you want even cooking. First, make sure your cauliflower florets are uniform in size. This way, they all cook at the same rate. Spread them out on the baking sheet without crowding. If they touch, they will steam instead of roast. This tip helps you achieve crispy edges and a tender center. If you have leftover roasted cauliflower, don’t throw it away! You can use it in many dishes. Chop it up and add it to salads for a tasty crunch. Mix it into pasta for a quick meal. You can even blend it into soups for a creamy texture. The flavors of garlic and parmesan will enhance your new dishes. The red pepper flakes add a nice kick to your cauliflower. If you love heat, use more than half a teaspoon. If you prefer a milder flavor, reduce the amount. You can also try other spices, like paprika or cayenne. Adjusting the spices can help you find the perfect balance for your taste buds. Pro Tips Uniform Florets: Cutting the cauliflower into uniform florets ensures even cooking and consistent texture throughout the dish. Garlic Freshness: Use fresh garlic for a more robust flavor. If you must use pre-minced garlic, reduce the quantity to avoid overpowering the dish. Space for Roasting: Make sure to spread the florets out on the baking sheet without overcrowding them. This allows the cauliflower to roast properly and develop a nice caramelization. Serving Suggestions: Pair the roasted cauliflower with a squeeze of lemon juice or a drizzle of balsamic glaze for an extra layer of flavor. {{image_4}} You can mix up the flavor by adding different cheeses. Try using mozzarella for a stretchy melt. Cheddar adds a sharp taste that pairs well with garlic. Feta brings a tangy kick that cuts through the richness. Just remember to adjust the amount of cheese based on your choice. You want a good balance without overpowering the dish. If you want to change the spice, there are many options. Use smoked paprika for a deeper flavor. Curry powder can add an exotic twist. For a zestier kick, try cumin or coriander. Adjust the red pepper flakes based on your taste. Remember, the key is to enhance, not mask the cauliflower’s natural taste. Once you roast your garlic Parmesan cauliflower, you can turn it into a bake. Simply mix the roasted cauliflower with some cream and additional cheese. Place it in a baking dish and top with breadcrumbs. Bake again until golden and bubbly. This dish is perfect for family dinners or potlucks. It takes the simple roasted cauliflower to a whole new level! After cooking, let your Garlic Parmesan Roasted Cauliflower cool. Place it in an airtight container. This keeps it fresh for up to four days in the fridge. Make sure to store it away from strong-smelling foods. This way, it won't pick up any unwanted flavors. You can freeze leftover roasted cauliflower. First, cool it completely. Then, place it in a freezer-safe bag or container. Be sure to remove as much air as possible. This helps avoid freezer burn. The cauliflower can last up to three months in the freezer. When you're ready to eat it, thaw it in the fridge overnight. To reheat, you have a few options. The oven is best for keeping that crispy texture. Preheat your oven to 350°F (175°C). Spread the cauliflower on a baking sheet and heat for about 10-15 minutes. If you're in a hurry, you can use a microwave. Place the cauliflower in a microwave-safe dish and cover it. Heat in short intervals, checking often. Just remember, the microwave may make it softer. Enjoy your tasty leftovers! Yes, you can use frozen cauliflower. However, it may release more water. This can make the dish less crispy. To avoid this, thaw the cauliflower first and pat it dry. Then, follow the same steps in the recipe. You still get great flavor! You can store leftovers in the fridge for about three days. Make sure to keep them in an airtight container. When you want to eat them, reheat in the oven. This helps keep the cauliflower crispy. You can also use a microwave, but the texture may change. Garlic Parmesan Roasted Cauliflower pairs well with many dishes. Here are some ideas: - Grilled chicken or fish - A fresh garden salad - Quinoa or brown rice - Pasta with olive oil and herbs - Roasted potatoes or sweet potatoes These sides will give you a balanced meal. Enjoy! Garlic Parmesan roasted cauliflower is an easy and tasty dish. We covered its ingredients, preparation steps, and tips for success. You can customize it with various cheeses or spices to suit your taste. Storing leftovers is simple, too. Try to use this recipe as a delightful side or a main dish. Enjoy making it, and impress your friends and family with a flavorful, healthy option! The best part? You can always have fun with your variations!

Garlic Parmesan Roasted Cauliflower Flavorful Twist

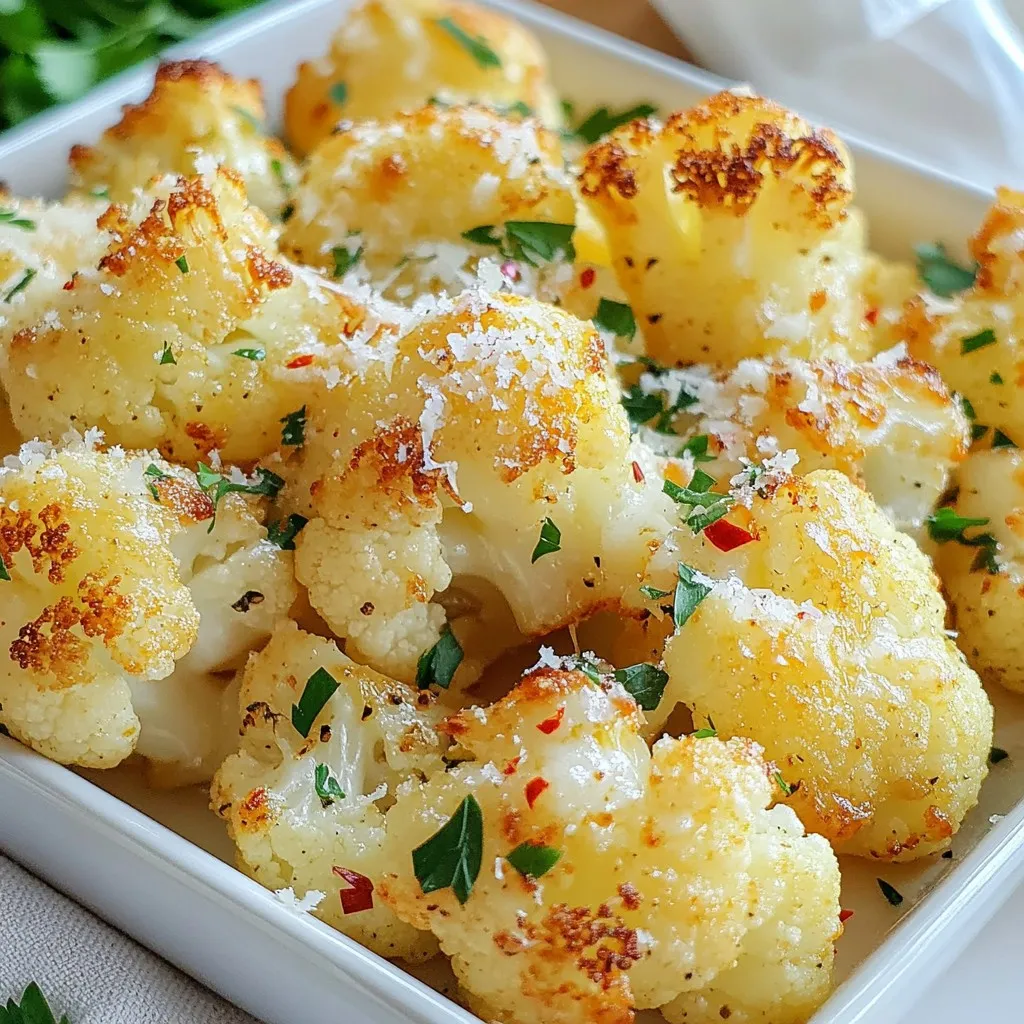
Garlic Parmesan Roasted Cauliflower is a game-changer for veggies. You’ll love how easy it is to make this dish pop

- 2 cups fresh blackberries - 1 cup plain Greek yogurt - 1/2 cup honey or agave syrup - 1/2 cup fresh lemon juice - 1 teaspoon vanilla extract - A pinch of salt - Blender - Fine mesh sieve (optional) - Mixing bowls - Popsicle molds - Popsicle sticks The ingredients for Blackberry Lemon Yogurt Popsicles are simple yet fresh. You need two cups of blackberries for a rich flavor. Next, grab one cup of plain Greek yogurt to make it creamy. A half cup of honey or agave syrup adds sweetness. You will also need half a cup of fresh lemon juice for a tangy kick. One teaspoon of vanilla extract brings warmth to the mix. A pinch of salt helps to enhance all the flavors. For equipment, you need a blender to puree the blackberries. A fine mesh sieve is optional but can help if you want a smooth texture. Mixing bowls are essential for combining the yogurt and other ingredients. Popsicle molds will shape your treats, and popsicle sticks will help you enjoy them easily. Gather these items, and you are ready to make a tasty summer treat! {{ingredient_image_2}} - Rinse 2 cups of fresh blackberries under cool water. - Place them in a blender with 1/2 cup of honey or agave syrup. - Blend on high until smooth. - If you want a smooth texture, strain through a fine mesh sieve. - Use a spatula to push the mixture through and discard the seeds. - In a bowl, combine 1 cup of plain Greek yogurt with 1/2 cup of fresh lemon juice. - Add 1 teaspoon of vanilla extract and a pinch of salt. - Whisk until the mixture is smooth and creamy. - Take your popsicle molds and add a layer of yogurt mixture at the bottom. - Next, add a layer of blackberry puree. - Alternate the layers, ending with yogurt on top. - Use a skewer or toothpick to swirl the layers gently. - Insert popsicle sticks into the molds. - Freeze for at least 4-6 hours until solid. - To release the popsicles, run warm water over the molds for a few seconds. To achieve a creamy texture in your popsicles, use full-fat Greek yogurt. It gives a rich and smooth base. Mix the yogurt well with lemon juice and vanilla until it is completely smooth. You want no lumps for a perfect bite. For a seedless puree, blend the blackberries until smooth. Then, pour the mixture through a fine mesh sieve. Use a spatula to push the puree through. This way, you get all the flavor without the seeds. Discard the seeds left in the sieve. You can mix in other fruits like strawberries or raspberries for added flavor. These fruits pair well with blackberry and lemon. If you want to switch things up, try adding a bit of mango for a tropical twist. For sweetness, adjust the amount of honey or agave syrup to your taste. If you prefer less sweetness, start with less and add more if needed. This helps you create a popsicle that suits your palate. For a fun serving idea, use a colorful plate or a rustic wooden board. It makes your popsicles look even more inviting. You can add fresh blackberries and lemon slices around the popsicles for a beautiful display. Garnishing with fresh fruits not only looks nice but also adds extra flavor. It’s a small touch that makes a big difference. Use your creativity to make your popsicles stand out! Pro Tips Use Frozen Blackberries: If fresh blackberries are not available, you can substitute them with frozen blackberries. Just thaw them slightly before blending for a smooth puree. Sweetness Adjustment: Taste the blackberry puree before layering. Depending on your preference, you can add more honey or agave syrup to achieve your desired sweetness. Layering Technique: For an eye-catching marbled effect, pour the layers slowly into the molds. This allows for better control over the swirling without mixing them too much. Storage Tips: To keep popsicles fresh for longer, wrap them individually in plastic wrap or store them in an airtight container after removing them from the molds. {{image_4}} You can swap blackberries for strawberries or raspberries. These fruits add sweetness and bright color. If you want a tropical twist, try mango or coconut. Mango gives a rich flavor, while coconut adds a creamy texture. Mix and match to find your favorite. For a dairy-free treat, use plant-based yogurt. Almond or coconut yogurt works well. You can also use agave syrup or maple syrup as sweeteners. These options fit various dietary needs while keeping your pops cool and tasty. Add fresh herbs like mint or basil for a unique flavor. Mint pairs perfectly with lemon, giving a fresh taste. You can also mix in spices like ginger or cinnamon. These spices add warmth and depth to your popsicles. Experiment with these flavors for a fun twist! To keep your popsicles fresh, follow these tips: - Use airtight containers or freezer-safe bags. - Make sure the popsicles are fully frozen before storing them. - Avoid overcrowding in the freezer to allow for good air flow. For optimal freshness, consume your popsicles within 2-3 months. They will still taste good, but the texture may change after that time. To safely defrost your popsicles, here’s what you should do: - Remove the popsicle from the freezer. - Let it sit at room temperature for a few minutes. - Alternatively, run warm water over the mold for a few seconds. To prevent freezer burn, store the popsicles well. Make sure the molds are tightly sealed. If you see ice crystals on the popsicles, they may have been stored too long. Enjoy them fresh for the best taste! Blackberry Lemon Yogurt Popsicles need at least 4-6 hours to freeze. I suggest checking them after six hours to ensure they are solid. If you want to be safe, leave them overnight. The longer they freeze, the easier they will be to enjoy. Yes, you can use frozen blackberries! They work well if you can’t find fresh ones. Just blend them directly from the freezer. You might need to add a bit more honey or agave syrup for sweetness. Frozen blackberries can make the popsicles a bit thicker, but they taste just as good! To release the popsicles, run warm water over the outside of the molds. This helps loosen them. Do it for just a few seconds. If they still stick, gently twist the stick while pulling it out. This should do the trick without breaking your popsicles. You’ve learned how to make delicious Blackberry Lemon Yogurt Popsicles. By blending and layering simple ingredients, you create a tasty treat. Remember to play with flavors and textures, using different fruits or mixes. Proper storage ensures they stay fresh. These tips will help you enjoy your homemade popsicles all summer. Dive into this fun recipe, impress your friends, and satisfy your sweet cravings. Enjoy every creamy, fruity bite!

Blackberry Lemon Yogurt Popsicles Perfect for Summer

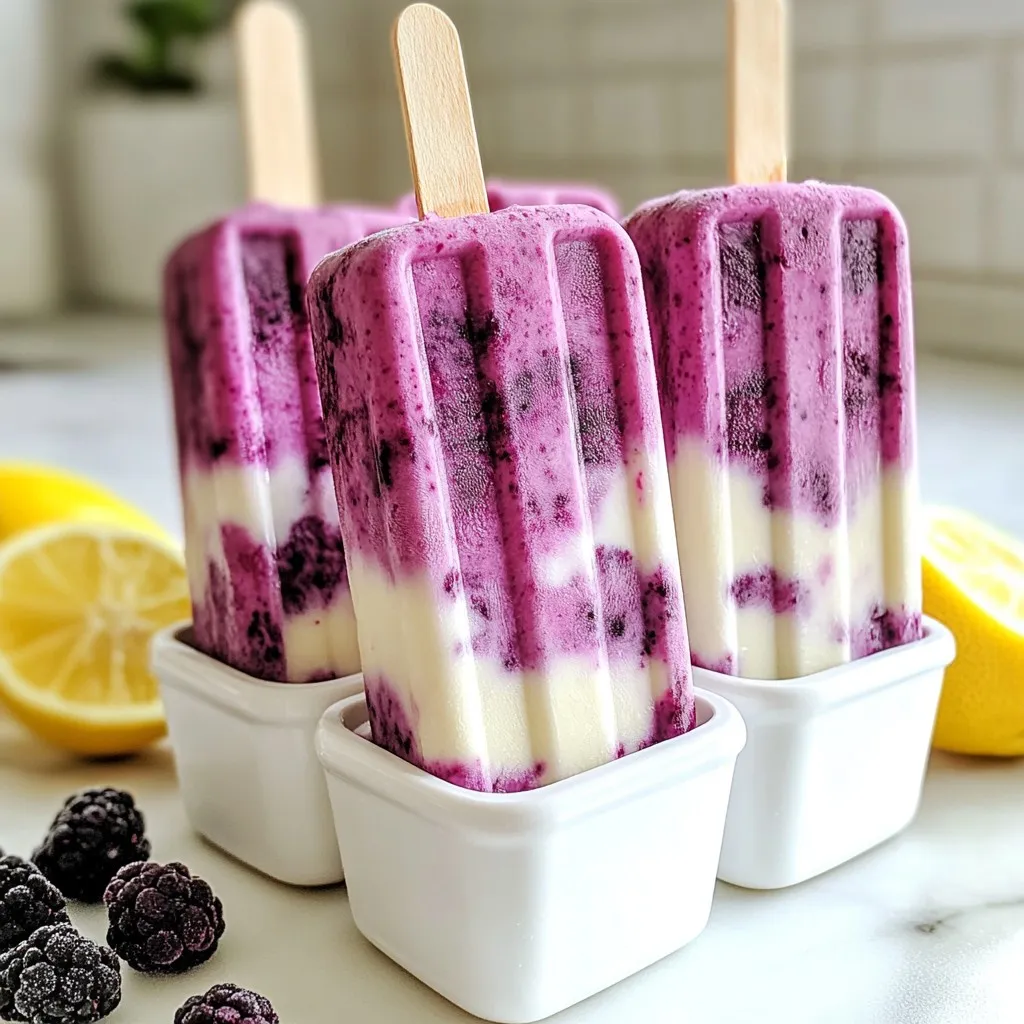
Summer is the perfect time to cool off with a refreshing treat. Blackberry Lemon Yogurt Popsicles are delicious, easy to

For this dish, you need simple and fresh ingredients. Here is what you will use: - 2 boneless, skinless chicken breasts, diced into bite-sized pieces - 1 cup dill pickle juice - 1 tablespoon ranch seasoning mix - 2 medium zucchini, spiralized into zoodles - 1 bell pepper, sliced - 1 cup cherry tomatoes, halved - 2 tablespoons olive oil, divided - 1 teaspoon garlic powder - 1/2 teaspoon black pepper - Fresh dill sprigs, for garnish Each ingredient adds its own flavor. The chicken brings protein, while zoodles keep it light. The ranch adds a creamy taste, and the pickle juice gives it a tangy kick. You can add more to this dish for extra flavor. Consider these options: - Red pepper flakes for heat - Green onions for freshness - Lemon juice for brightness - Parmesan cheese for a cheesy touch Feel free to mix and match. These extras can make your meal even more special. You may not have all ingredients on hand. Here are some easy swaps: - Chicken can be replaced with turkey or tofu for a vegetarian option. - Zoodles can be swapped for other veggies like spaghetti squash or carrots. - Ranch seasoning can be homemade with herbs and spices if needed. These substitutions keep the dish delicious. Don’t hesitate to get creative with what you have. For the full recipe, check out the complete guide above! First, gather your ingredients. Start by taking 2 boneless, skinless chicken breasts. Dice them into bite-sized pieces. In a medium bowl, mix the chicken with 1 cup of dill pickle juice. Make sure the chicken is fully covered. Cover the bowl with plastic wrap. Place it in the fridge for at least 30 minutes. This step is key for adding flavor. After marinating, take the chicken out of the pickle juice. Discard the marinade. Heat a large skillet over medium-high heat. Add 1 tablespoon of olive oil to the pan. Once hot, add the chicken pieces. Sprinkle 1 tablespoon of ranch seasoning mix over the chicken. Cook for about 6 to 8 minutes. You want the chicken to turn golden brown and be cooked through. When done, transfer the chicken to a plate. Set it aside for later. In the same skillet, pour in another tablespoon of olive oil. Heat it up, then add the sliced bell pepper. Sauté for 3 to 4 minutes until it softens. Now, add the spiralized zucchini and halved cherry tomatoes. Season with 1 teaspoon of garlic powder and 1/2 teaspoon of black pepper. Toss everything gently in the skillet. Cook for 2 to 3 more minutes. The zoodles should be tender yet still crisp. Next, return the cooked chicken to the skillet. Stir everything together well. Let it cook for another 1 to 2 minutes. This helps the flavors mix. Once done, remove the skillet from the heat. Garnish your dish with fresh dill sprigs. Serve warm and enjoy your pickle ranch chicken over zoodles. For the complete recipe, check out the Full Recipe. Marinating chicken adds flavor and moisture. Use dill pickle juice for a tangy taste. I recommend marinating your chicken for at least 30 minutes. This time helps the chicken soak in the pickle flavor. You can marinate for longer if you want a stronger taste. Just keep it in the fridge. Always use a covered bowl to prevent spills and keep it fresh. Zoodles can be tricky to cook right. Start by spiralizing fresh zucchini for the best texture. Avoid overcooking zoodles to keep them crisp. Sauté them for just 2-3 minutes. They should be tender but still have a bite. Toss them with the other veggies to mix flavors. This will keep them from getting too soft. For a full meal, serve your pickle ranch chicken over zoodles. Add a side salad for extra crunch and freshness. You can also serve it with crusty bread to soak up the juices. If you want more flavor, sprinkle feta cheese or crushed red pepper on top. Fresh dill as a garnish adds a nice touch too. Check out the Full Recipe for more ideas to enjoy this dish! {{image_4}} You can switch up the veggies in your stir fry. Try using broccoli or snap peas for a crunchy twist. Carrots also add a nice color and sweetness. If you like greens, toss in some spinach or kale. Each veggie brings its own taste and texture, making your dish unique. If you want to change the protein, consider tofu or tempeh for a plant-based option. Shrimp can also work well if you enjoy seafood. For a heartier choice, use beef or pork. Just make sure to adjust the cooking time for each protein type. Experiment with spices to change the flavor. Add chili flakes for heat or paprika for smokiness. If you prefer a zestier taste, try lemon pepper or garlic herb blends. You can also mix in some soy sauce or sriracha for an Asian flair. Each seasoning creates a new taste adventure in your dish. For the full recipe, check the earlier section. After enjoying your Pickle Ranch Chicken and Zoodle Stir Fry, store any leftovers in an airtight container. This keeps your dish fresh. Make sure to let it cool down before sealing it. You can keep it in the fridge for up to three days. If you know you won't eat it soon, consider freezing it. To reheat, use a skillet on low heat. Add a splash of water or broth to keep the zoodles moist. Stir gently until everything is heated through. You can also use a microwave. Warm it in 30-second intervals, stirring in between. This way, it won’t dry out. If you want to freeze your stir fry, separate the chicken and zoodles. The chicken can freeze well for up to three months. Use a freezer-safe bag or container. Zoodles do not freeze well since they can get mushy. Consider storing just the chicken for a quick meal later. For full details on making this dish, check the Full Recipe. To make this dish, start by marinating the chicken. Mix diced chicken with dill pickle juice in a bowl. Let it sit for at least 30 minutes. This step adds a tangy flavor. Next, heat olive oil in a skillet and cook the chicken with ranch seasoning until golden. Then, stir fry bell pepper, zoodles, and cherry tomatoes. Season with garlic powder and black pepper. Finally, combine everything in the skillet and serve it warm. For the full recipe, check out the details provided earlier. This dish pairs well with many sides. Try serving it with a fresh salad or crusty bread. You can also add a side of rice or quinoa for more texture. For a low-carb option, serve with steamed broccoli or cauliflower rice. These options will complement the flavors while adding nutrition. Yes, you can prepare this recipe in advance. Marinate the chicken a day before. This helps the flavors develop even more. You can also chop the vegetables ahead of time. Store them in airtight containers in the fridge. When ready to cook, just stir fry and combine everything. Absolutely! Pickle ranch chicken and zoodle stir fry is great for meal prep. You can store it in meal prep containers. Keep the chicken and veggies separate if you prefer. It stays fresh for up to four days in the fridge. Just reheat and enjoy a quick, healthy meal. In this blog post, we explored how to make a tasty Pickle Ranch Chicken and Zoodle Stir Fry. We covered key ingredients and optional add-ins for extra flavor. I shared step-by-step cooking instructions to guide you. You learned tips for marinating and cooking chicken, plus how to perfect your zoodles. We also looked at some fun variations and how to store leftovers. This dish is versatile and perfect for meal prep. Dive into cooking, and enjoy a delicious meal!

Pickle Ranch Chicken and Zoodle Stir Fry Delight

Welcome to the mouthwatering world of Pickle Ranch Chicken and Zoodle Stir Fry Delight! If you’re looking for a fun,

To make Cherry Almond Breakfast Muffins, you need the following ingredients: - 1 cup all-purpose flour - 1 cup almond flour - 1 teaspoon baking powder - 1/2 teaspoon baking soda - 1/4 teaspoon salt - 1/2 cup packed brown sugar - 2 large eggs - 1/2 cup Greek yogurt - 1/4 cup almond milk (or regular milk) - 1 teaspoon pure almond extract - 1/2 cup fresh or frozen cherries, pitted and roughly chopped - 1/4 cup sliced almonds, plus extra for topping When using almonds in your muffins, you have choices. Ground almonds add a fine texture. They blend well, making the muffins moist. Whole almonds add a nice crunch. They also give a more rustic look. I recommend using ground almonds for a smoother batter. They'll mix in easily and create a tender muffin. Use whole almonds for topping or additional texture. Fresh cherries make a real difference in flavor. Look for cherries that are bright in color. They should feel firm and plump. Avoid any that are soft, bruised, or wrinkled. If you can, smell them. A sweet scent means they're ripe. If fresh cherries are not available, frozen ones work well, too. Just make sure they are pitted and roughly chopped. This way, they mix into the batter nicely. For the complete Cherry Almond Breakfast Muffins recipe, check the Full Recipe section. Start by preheating your oven to 350°F (175°C). This step is key for even baking. Use a muffin tin and line it with paper liners or spray it lightly with non-stick spray. This prevents the muffins from sticking. Make sure each cup is ready for the batter to come. In a medium bowl, mix the dry ingredients. Combine one cup of all-purpose flour, one cup of almond flour, one teaspoon of baking powder, half a teaspoon of baking soda, and a quarter teaspoon of salt. Whisk them together well. This ensures that the leavening agents distribute evenly in the batter. In a large bowl, whisk together half a cup of packed brown sugar and two large eggs until smooth. Then, add half a cup of Greek yogurt, a quarter cup of almond milk, and one teaspoon of pure almond extract. Mix until everything is combined. Slowly add the dry mixture to this wet mix, folding gently. You want it just combined, so don’t overmix. Small lumps are okay! Now, fold in half a cup of chopped cherries and a quarter cup of sliced almonds. Spoon the batter into the muffin cups, filling them about two-thirds full. Sprinkle extra sliced almonds on top if you like. Place the tin in the oven and bake for 18-20 minutes. Check for doneness by inserting a toothpick; it should come out clean. Let the muffins cool in the tin for five minutes before moving them to a wire rack. When making Cherry Almond Breakfast Muffins, be gentle. Overmixing can make the muffins tough. Mix the wet and dry ingredients until just combined. If you see some lumps, that’s okay! This keeps the muffins soft and fluffy. To get cherries all through your muffins, chop them evenly. When you fold them into the batter, do it carefully. Use a spatula to lift and fold instead of stirring. This helps the cherries spread out without breaking apart too much. For light and airy muffins, use room-temperature ingredients. Cold eggs or milk can make the batter dense. Also, don’t pack the flour too tightly in your measuring cup. Lightly spoon the flour in and level it off. This helps the muffins rise better. For more details on making these muffins, check out the Full Recipe! {{image_4}} You can make these muffins gluten-free! Use a gluten-free flour blend instead of all-purpose flour. Look for blends that contain rice flour, potato starch, and tapioca starch. These blends mimic regular flour well. To ensure the best texture, add a bit of xanthan gum. This helps bind the ingredients together and keeps your muffins fluffy. Enhance your muffins with flavors that pair well. Try adding a teaspoon of vanilla extract for a sweeter taste. You could also mix in a dash of cinnamon for warmth. If you love citrus, zest a lemon or orange into the batter. These flavors brighten your muffins and make them even more delightful. You can change the fruit based on what is in season. In spring, fresh strawberries work wonders. In summer, try blueberries or peaches. In fall, chopped apples and a sprinkle of nutmeg add cozy charm. Each season brings new flavors, so feel free to experiment. These changes keep your breakfast muffins exciting and fresh. Check out the Full Recipe for more ideas! To keep your Cherry Almond Breakfast Muffins fresh, store them in an airtight container. This will help prevent them from drying out. You can keep them at room temperature for about three days. For longer storage, consider refrigeration, which can extend freshness up to a week. Just remember to allow them to cool completely before storing. Freezing these muffins is easy! First, let them cool fully. Then, wrap each muffin tightly in plastic wrap. Place the wrapped muffins in a freezer-safe bag or container. This method can keep them fresh for up to three months. When you're ready to enjoy, simply take out a muffin and thaw it overnight in the fridge. To enjoy your muffins warm, preheat your oven to 350°F (175°C). Place the muffins on a baking sheet for about 5-10 minutes. This will help restore their soft texture. You can also use the microwave for quick reheating. Just heat for 15-20 seconds, but be careful not to overdo it. Enjoy them warm for the best flavor! Yes, you can use dried cherries. They add a sweet and chewy texture. Just chop them into smaller pieces to blend well. You may want to reduce the sugar in the recipe. Dried cherries are sweeter, so cut back on brown sugar by a couple of tablespoons. If you lack almond extract, you can use vanilla extract. It won’t have the same flavor, but it will still taste good. You can also use a few drops of hazelnut extract for a unique twist. Try adjusting the amount to suit your taste. To check if the muffins are done, insert a toothpick into the center. If it comes out clean, they are ready. You can also gently press the top. If it springs back, that’s a good sign. Look for a light golden color on top. Each muffin has about 150 calories. They have 6 grams of fat and 3 grams of protein. The muffins also include 20 grams of carbs and 1 gram of fiber. Each muffin provides a tasty balance of flavors and nutrients. For the full recipe, you can explore the details in the earlier sections. We explored an easy recipe for Cherry Almond Muffins. You learned about the best ingredients, how to mix them, and bake tips. Plus, I shared helpful tricks for texture and storage. You can even customize the recipe with different ingredients. Baking these muffins can be fun and rewarding. Enjoy your baking journey and share these tasty treats with friends!

Cherry Almond Breakfast Muffins Delightful and Easy

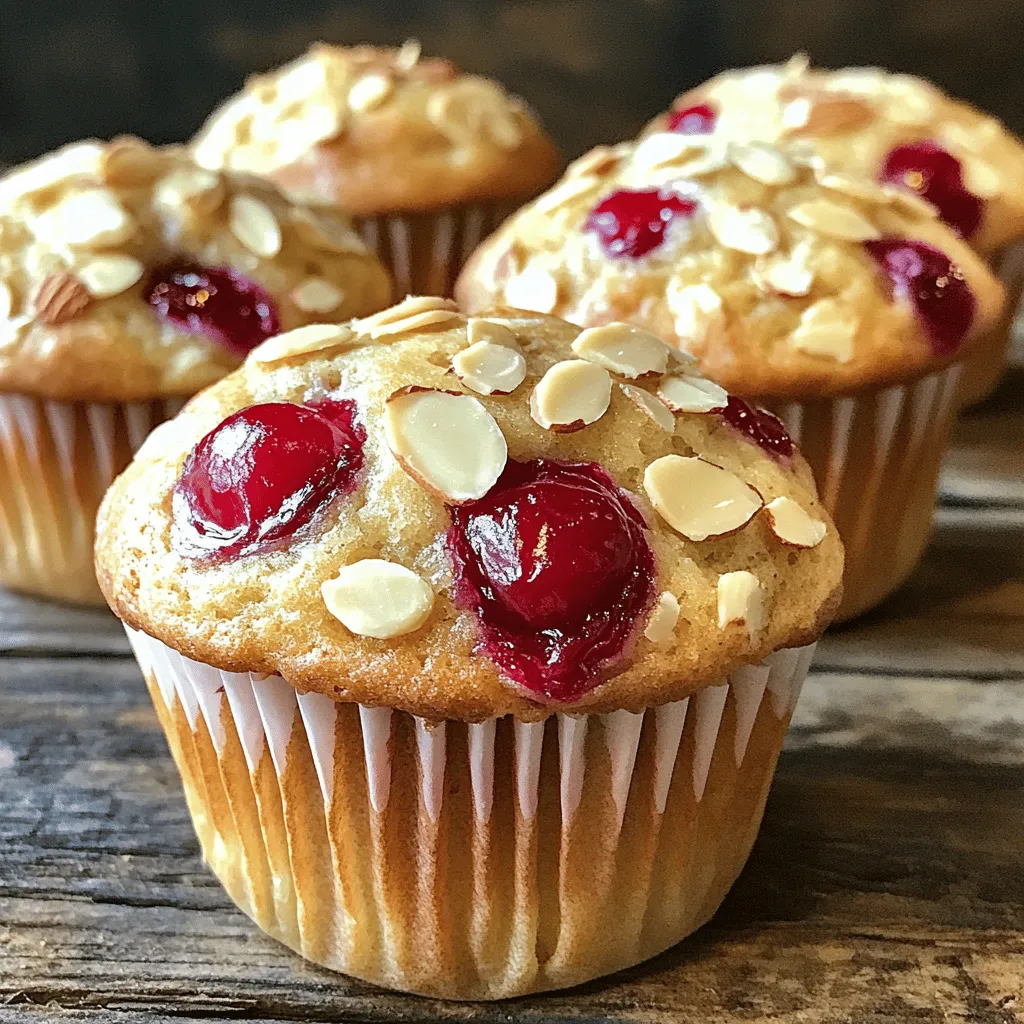
Are you ready to delight your taste buds with a breakfast treat? These Cherry Almond Breakfast Muffins are simple to

- 2 cups cooked chicken, shredded or diced - 1/2 cup dill pickle slices, coarsely chopped - 1/2 cup ranch dressing - 1 cup fresh baby spinach leaves - 4 large whole wheat tortillas - 1/2 cup shredded cheddar cheese - 1/4 cup red onion, thinly sliced - Salt and pepper to taste You need these simple items to make this tasty wrap. Start with cooked chicken. You can use rotisserie chicken or any leftover chicken you have. The pickles give a nice crunch. They add a tangy flavor that shines through. Ranch dressing keeps everything moist and tasty. Fresh spinach adds a lovely green color and nutrition. Whole wheat tortillas are perfect for wrapping. They are healthy and hold all the good stuff inside. Cheddar cheese adds a rich taste. Red onion gives a bit of bite. Don’t forget salt and pepper to bring all the flavors together. - Best ranch dressing brands: Look for brands like Hidden Valley or Annie's. - Options for whole wheat tortillas: Try Mission or Ezekiel for great texture. - Types of cheddar cheese for flavor enhancement: Sharp cheddar works best for rich taste. Choosing the right brands helps make your wraps even better. A good ranch dressing brings creaminess. Whole wheat tortillas should be soft yet sturdy. Sharp cheddar cheese elevates the flavor, making each bite more delicious. For the full recipe, check out the details above. Enjoy making these wraps! Start by mixing the chicken, pickles, and dressing. In a large bowl, combine 2 cups of cooked chicken, 1/2 cup of coarsely chopped dill pickles, and 1/2 cup of your favorite ranch dressing. Sprinkle in a bit of salt and pepper. Mix well until all the chicken is coated nicely. Next, prepare the tortillas and spinach. Lay out 4 large whole wheat tortillas on a clean surface. Place 1 cup of fresh baby spinach leaves in the center of each tortilla. Make sure to spread the spinach evenly, so every bite has a fresh crunch. Now, it's time to layer the ingredients for optimal flavor. Spoon a generous portion of the chicken and pickle mix over the spinach in each tortilla. Ensure each wrap has enough filling for great taste and texture. Add a sprinkle of 1/2 cup of shredded sharp cheddar cheese and a few slices of thinly sliced red onion for a delightful crunch. For folding techniques, carefully fold in the sides of each tortilla. Then, roll the wrap from the bottom up. This snug wrap keeps all the yummy fillings inside. Use a sharp knife to slice each wrap in half diagonally. This makes for a nice presentation. For presentation ideas, place the wraps on a colorful platter. You can serve them with a small bowl of extra ranch dressing on the side for dipping. To make it more fun, garnish the platter with whole dill pickle spears. This adds a nice crunch and a pop of color. For suggested side dishes, consider serving these wraps with fresh fruit, veggie sticks, or chips. They pair well together to create a complete meal. For the full recipe, check out the details above. Enjoy your tasty Pickle Ranch Chicken and Spinach Wraps! To make your wraps delightful, ensure you spread the ingredients evenly. Start by mixing the chicken, pickles, and ranch well. This way, every bite tastes great. When you lay the tortillas flat, take care not to overload them. Less is more. For rolling the wraps, fold the sides in first. Then, roll from the bottom up. This keeps all the tasty fillings inside. If you find the wrap too tight, don’t worry. Gently squeeze it to make room for the fillings without spilling. You can easily change the ingredients to suit your needs. If you want a lighter dish, try using cooked turkey or a plant-based protein. For a kick, add some sliced jalapeños or a dash of hot sauce. Feel free to swap out the ranch dressing for another flavor. A zesty garlic sauce or a creamy avocado dressing can be great choices. Be adventurous and mix in fresh herbs like cilantro or basil for extra flavor. For the full recipe, check out the detailed instructions above. {{image_4}} To make your wraps lighter, consider using low-carb tortillas. These tortillas reduce carbs but keep the wrap tasty. You can find options made from almond flour or coconut flour. They still hold the filling well and add a unique flavor. If you want a plant-based meal, swap out the chicken for a plant-based protein. Options like chickpeas or lentils work great. They absorb flavors well and add protein, making your wraps filling and satisfying. Adding fresh herbs and spices can elevate your wraps. Try mixing in cilantro, dill, or even a touch of garlic powder. Each herb brings a new taste, making your meal exciting. Experiment with different dressings too. Instead of ranch, you can use yogurt-based dressings or spicy sriracha. This little change can shift your wrap from classic to adventurous. For more ideas, check out the Full Recipe for inspiration. To keep your leftover wraps fresh, refrigerate them right away. Wrap them tightly in plastic wrap or foil. Place them in an airtight container. This helps seal in moisture and flavor. Store them in the fridge for up to three days. If you want to save space, stack them with parchment paper between each wrap. This prevents them from sticking together. You can freeze these wraps for later meals. First, wrap each one in plastic wrap. Then place them in a freezer-safe bag. Remove as much air as possible to prevent freezer burn. These wraps can last in the freezer for up to three months. When ready to eat, thaw them in the fridge overnight. For a quick meal, you can microwave them. Heat on medium for about one to two minutes. This keeps the texture soft and tasty. Enjoy your Pickle Ranch Chicken and Spinach Wraps anytime! For the full recipe, check back to create these delicious wraps. Can I make these wraps ahead of time? Yes, you can make these wraps ahead of time. Prepare the wraps and store them in the fridge. It’s best to eat them within 24 hours for the best taste. What are the best sides to serve with these wraps? Great sides include carrot sticks, cucumber slices, or a fresh fruit salad. You can also serve them with chips for some crunch. How long do the wraps last in the fridge? These wraps last about 2 to 3 days in the fridge. Make sure to keep them in an airtight container. Can I use gluten-free tortillas? Yes, gluten-free tortillas work well in this recipe. They keep the wraps tasty and enjoyable for those with gluten allergies. What are some protein alternatives for this recipe? You can use shredded turkey, tofu, or even beans for protein. These options provide good flavor and fit well in the wraps. For the full recipe, check out the earlier section! In this article, we explored how to make tasty Pickle Ranch Chicken and Spinach Wraps. We covered the required ingredients, brands to choose, and step-by-step instructions. You learned tips for perfect wraps and fun variations to try. Feel free to customize the recipe to fit your taste. These wraps are not just easy to make; they are also yummy and healthy. Enjoy making them and sharing with friends or family!

Pickle Ranch Chicken and Spinach Wraps Delight

Are you ready to spice up your lunch routine? Dive into the delicious world of Pickle Ranch Chicken and Spinach

Here is what you need to make Cherry Coconut Muffins. Gather these items before you start: - 1 cup all-purpose flour - 1 cup shredded coconut - 1/2 cup granulated sugar - 2 teaspoons baking powder - 1/2 teaspoon baking soda - 1/4 teaspoon salt - 1/2 cup unsweetened coconut milk - 1/4 cup vegetable oil - 1 large egg - 1 teaspoon vanilla extract - 1 cup cherries (fresh or frozen) - Optional: Additional shredded coconut for topping These ingredients create a wonderful blend of flavors. The cherries bring a sweet and tart taste, while the coconut adds a nice chew. Be sure to use fresh or high-quality frozen cherries for the best results. You can even choose sweetened or unsweetened shredded coconut, based on your preference. If you want a richer coconut flavor, try using melted coconut oil instead of vegetable oil. For the full recipe, you can find all the steps to create these delightful muffins. This list ensures you have everything for a simple and tasty baking experience. Preheat the Oven - Set temperature to 350°F (175°C) - Prepare the muffin tin with liners or cooking spray First, preheat your oven to 350°F (175°C). This step ensures even baking. Grab a muffin tin and line it with paper liners or spray it with cooking spray. This keeps the muffins from sticking. Combine the Dry Ingredients - Mix flour, shredded coconut, sugar, baking powder, baking soda, and salt In a large bowl, mix together the dry ingredients. Combine 1 cup of flour, 1 cup of shredded coconut, and 1/2 cup of sugar. Add 2 teaspoons of baking powder, 1/2 teaspoon of baking soda, and 1/4 teaspoon of salt. Whisk these together until they blend well. A good mix helps the muffins rise nicely. Whisk Together Wet Ingredients - Mix coconut milk, vegetable oil, egg, and vanilla extract until smooth Now, take another bowl and whisk the wet ingredients. Mix 1/2 cup of coconut milk, 1/4 cup of vegetable oil, 1 large egg, and 1 teaspoon of vanilla extract. Keep whisking until the mixture is smooth. This will add moisture and flavor to your muffins. Combine Wet and Dry Ingredients - Fold wet ingredients into dry without over-mixing - Gently incorporate halved cherries Next, pour the wet mixture into the dry bowl. Use a spatula to fold the two together. Do this gently and do not over-mix; a few lumps are okay. Now, fold in 1 cup of halved cherries. This adds a burst of flavor in every bite. Fill Muffin Cups - Use a spoon or ice cream scoop for even distribution - Optional: add extra shredded coconut on top Using a spoon or ice cream scoop, fill each muffin cup about two-thirds full. This will give them room to rise. If you like, sprinkle some extra shredded coconut on top for a nice touch. Bake and Cool - Bake for 18-22 minutes - Cool in the pan then transfer to a wire rack Place your muffin tin in the preheated oven. Bake for 18 to 22 minutes. To check if they are done, insert a toothpick in the center of a muffin. If it comes out clean, they are ready. Let them cool in the pan for about 5 minutes, then move them to a wire rack. This helps them cool evenly. For the full recipe, see the main article. To make your Cherry Coconut Muffins shine, start with room temperature ingredients. This helps mix everything well and rise nicely. After you bake, use a toothpick to check if they are done. It should come out clean or with just a few crumbs. For a lovely finish, dust your muffins with powdered sugar. This adds a sweet touch and looks great. You can also serve them with whipped cream. This makes each bite more special and creamy. Be careful not to over-mix your batter. This can make the muffins tough instead of light. Also, remember to let them cool. Skipping this step can make them soggy and hard to enjoy. Try these tips to elevate your baking game and impress your family and friends! For the full recipe, check out the cooking instructions above. {{image_4}} You can switch up the flours for your Cherry Coconut Muffins. Almond flour works great if you want a gluten-free option. It gives the muffins a nutty flavor and keeps them moist. Just remember to adjust the liquid a bit. Coconut flour is another choice. It makes the muffins denser and adds even more coconut taste. Keep in mind that you will need less coconut flour than regular flour, so start with a smaller amount. To make your muffins pop with flavor, you can add lemon zest. This gives a bright, citrus twist that complements the cherries. Just a teaspoon of zest will do wonders. If you want a deeper flavor, try incorporating vanilla bean. It adds a rich aroma and pairs well with the coconut. Scrape the seeds from a vanilla pod and mix them into your wet ingredients for the best effect. If cherries aren't your thing, feel free to swap them out. Blueberries or raspberries work well and offer a different taste. They add a burst of flavor to each bite. You might even want to mix in chocolate chips. This creates a sweeter treat that both kids and adults will love. Just fold them in gently with the fruit to keep everything balanced. For the full recipe, check out the details above. Keep muffins in an airtight container at room temperature for up to 2 days. This helps keep them fresh. If you want them to last longer, consider freezing them. You can freeze muffins for up to 3 months. To do this, wrap each muffin tightly in plastic wrap. Then, place them in a freezer-safe bag. When you're ready to eat, reheat them in the oven or microwave. To thaw muffins, let them sit at room temperature for about 30 minutes. You can also warm them in the microwave for a few seconds. This will help bring back their soft texture. Enjoy your Cherry Coconut Muffins whenever you like! For the complete recipe, check the Full Recipe above. You can swap some ingredients to make these muffins healthier. Here are some ideas: - Use whole wheat flour instead of all-purpose flour. - Replace granulated sugar with honey or maple syrup. - Use applesauce in place of vegetable oil for moisture. - Add nuts or seeds for extra crunch and nutrition. These swaps keep the muffins tasty while adding more fiber and nutrients. Yes, you can use dried cherries. Dried cherries will change the moisture in the muffins. Here’s what to do: - Soak the dried cherries in warm water for about 15 minutes. - Drain and pat them dry before adding to the batter. This step will help keep your muffins moist and soft. To check if your muffins are ready, use a toothpick. Insert it into the center of a muffin. If it comes out clean, the muffins are done. You can also look for these signs: - The tops will be golden brown. - The edges will pull away slightly from the muffin tin. These tips will help you avoid underbaking or overbaking your muffins. In this blog post, we covered everything you need for Cherry Coconut Muffins. You learned the ingredients, step-by-step instructions, and helpful tips. Don't forget to try out variations for a fun twist. Storing muffins properly keeps them fresh longer. Always check for doneness to avoid soggy treats. I hope you enjoy baking these muffins as much as I do! Happy baking!

Cherry Coconut Muffins Tasty and Simple Delight

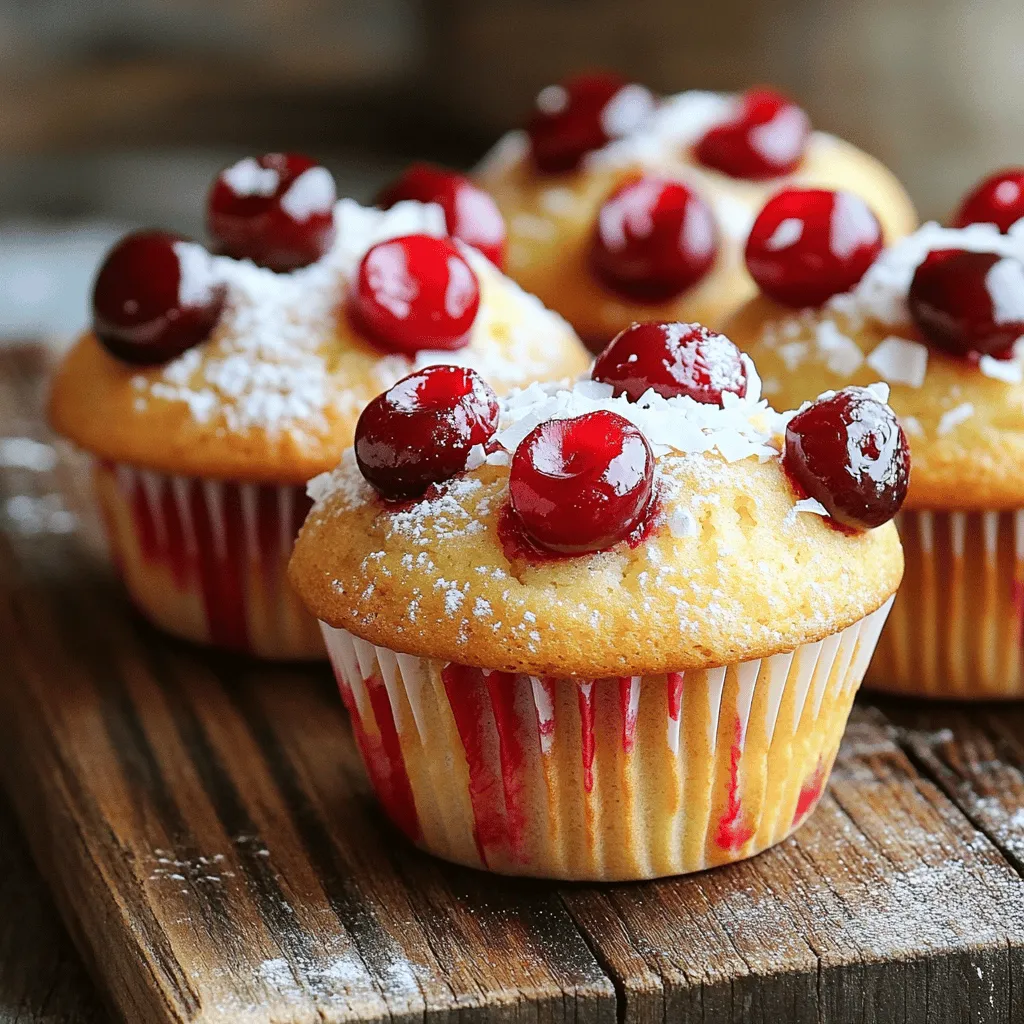
Looking for a quick and tasty treat? These Cherry Coconut Muffins are simple to make and oh-so-delicious! With just a

Older posts
Newer posts
← Previous Page1 … Page31 Page32 Page33 … Page114 Next →

dsad

© 2025 spoonfulsavory • Built with GeneratePress

Our Policies

  • Copyright Policy
  • Cookie Policy
  • GDPR Policy
  • Privacy Policy
  • Disclaimer
  • Terms Of Use

More Information

  • Home
  • About
  • Contact
  • Appetizers
  • Dessert
  • Dinner
  • Drinks
©2025, spoonfulsavory About Back To Top