![- 1 medium butternut squash, peeled and cut into cubes - 1 medium acorn squash, peeled and cut into cubes - 2 cups Brussels sprouts, trimmed and halved - 1 large red onion, sliced - 3 tablespoons olive oil - 2 tablespoons pure maple syrup - 1 teaspoon ground cinnamon - 1/2 teaspoon freshly grated nutmeg - Salt and freshly ground black pepper - Fresh thyme sprigs for garnish When I make this Easy Roasted Squash Medley, I love the mix of flavors. The sweet butternut squash pairs well with the nutty acorn squash. Brussels sprouts add crunch, and red onion gives a nice touch. The olive oil and maple syrup create a lovely glaze. Cinnamon and nutmeg add warmth and depth. This dish is not only tasty but also healthy. A serving has about 200 calories. You get a good mix of carbs, fiber, and healthy fats. This recipe is vegan and gluten-free, making it perfect for many diets. You can enjoy this medley as a side dish or a main course. It’s full of nutrients and flavor, making it a smart choice for any meal. If you want the full recipe, check this out: [Full Recipe]. 1. First, preheat your oven to 425°F (220°C). This step is key for even cooking. 2. Prepare a large baking sheet by lining it with parchment paper. This helps with easy cleanup. 3. In a spacious mixing bowl, combine the cubed butternut squash, acorn squash cubes, halved Brussels sprouts, and sliced red onion. Mix them well. 1. Generously drizzle olive oil and maple syrup over the vegetables. This adds flavor and helps them roast. 2. Season the mixture with ground cinnamon, freshly grated nutmeg, salt, and black pepper. Adjust the seasonings to your taste. 3. Using your hands or a large spoon, toss the vegetables until they are evenly coated. This ensures every piece is flavorful. 1. Transfer the vegetable mixture onto the prepared baking sheet. Spread it out in a single layer for even roasting. 2. Roast the vegetables in the preheated oven for 25-30 minutes. Stir the mixture halfway through to promote even cooking. 3. After roasting, carefully remove the baking sheet from the oven. Let the vegetables cool slightly for a few minutes. 4. To serve, garnish the roasted medley with fresh thyme sprigs. This adds a nice touch and enhances the dish's aroma. For the full recipe, check out the detailed steps and ingredients. To choose the best squash, look for firm, smooth skin. Avoid any with soft spots. Butternut and acorn squash work great in this dish. They add sweetness and texture. Cutting the squash into even sizes is key. Aim for 1-inch cubes. This ensures they cook evenly. If some pieces are bigger, they may not roast well. To add more flavor, consider garlic or chili flakes. These spices can give your squash a nice kick. You might also try adding a splash of balsamic vinegar for depth. For toppings, sprinkle cheese on before serving. Feta or goat cheese pairs nicely. You can also add toasted nuts for crunch and flavor. For a beautiful presentation, serve in a rustic bowl. Sprinkle extra thyme leaves on top for color. Drizzle with maple syrup for a sweet finish. This roasted squash goes well with grains like quinoa or farro. It also pairs nicely with a simple green salad. {{image_4}} You can switch up the squash in this dish. Try using kabocha or spaghetti squash for different tastes. Both are sweet and have great textures. You can also add seasonal root vegetables. Carrots, parsnips, and sweet potatoes work well. They add more color and flavor to your medley. If you want a twist, swap maple syrup for honey or agave. Each sweetener brings its own unique flavor. You might also want to add spices for extra kick. Cumin or chili powder can make it spicy. Try using smoked paprika for a smoky taste. Experimenting with flavors is part of the fun. This roasted squash medley is versatile. You can turn it into a salad or grain bowl. Just add some greens or grains like quinoa or farro. Toss everything with your favorite dressing for a new meal. You can also turn it into a soup. Use vegetable broth and blend the mixture until smooth. This creates a warm, comforting dish. For more details, check the Full Recipe. To keep your roasted squash fresh, store it in an airtight container. This helps maintain flavor and texture. You can keep it in the fridge for about 3 to 5 days. Make sure it cools down before sealing the container. This prevents moisture buildup. For the best taste, reheat your squash in the oven. Preheat your oven to 350°F (175°C). Spread the squash on a baking sheet and heat for about 10 to 15 minutes. You can also use a microwave, but this may make the squash soggy. If you do use the microwave, place a paper towel over the dish to absorb excess moisture. Yes, you can freeze roasted squash! It’s best to freeze it in portions. Place the cooled squash in freezer bags, removing as much air as possible. It will last for up to 3 months in the freezer. When you’re ready to enjoy it, thaw it in the fridge overnight. Reheat it as mentioned above for the best results. For the complete recipe, check out the Full Recipe link! How do I make this recipe vegan? To make this recipe vegan, simply skip the maple syrup or replace it with agave syrup. You can also swap the olive oil for coconut oil or any plant-based oil you prefer. This keeps the dish both tasty and vegan-friendly. Can I use frozen squash for this recipe? Yes, you can use frozen squash. Just remember to thaw and drain it first. Frozen squash may cook faster, so keep an eye on it while roasting. What is the best type of squash to use? Butternut and acorn squash work great in this recipe. They both have a sweet taste and a nice texture when roasted. Feel free to try other types like delicata or kabocha for added flavor. My squash is mushy; what went wrong? Mushy squash usually means it was overcooked or cut too small. Make sure to cut the squash into even, 1-inch cubes. Roasting at the right temperature and time is also key. How do I know when the squash is properly roasted? You’ll know the squash is done when it’s tender and slightly caramelized. A fork should easily pierce the flesh, and it should have a golden-brown color. Stirring halfway through helps ensure even roasting. How many servings does this recipe yield? This recipe yields about four servings. It’s perfect for a family meal or a cozy dinner with friends. Can this be meal prepped in advance? Absolutely! You can prepare the veggies a day ahead, store them in the fridge, and roast them just before serving. This makes it easy to enjoy a healthy meal without spending too much time in the kitchen. This blog post has shown how to create a delicious roasted squash medley. We covered ingredients, step-by-step instructions, and helpful tips. You learned about storage options and variations. This dish offers great flavors and fits many diets, like vegan and gluten-free. Whether you roast or transform it into a salad, there are many ways to enjoy this recipe. Explore your options and make it your own. Happy cooking!](https://spoonfulsavory.com/wp-content/uploads/2025/07/58c2a7ef-ed04-45e2-8a93-52d4731eb788.webp)
Easy Roasted Squash Medley Flavorful Dinner Option
Looking for a tasty and easy dinner idea? This Easy Roasted Squash Medley packs flavor and nutrition into every bite.
Looking for a tasty and easy dinner idea? This Easy Roasted Squash Medley packs flavor and nutrition into every bite.

Are you looking for a sweet and easy treat? Try these No-Bake Peach Pie Cups! With fresh peaches and a
![- Ripe pineapple (1, peeled and diced) - Ripe mangoes (2, diced) - Medium papaya (1, cubed) - Fresh strawberries (1 cup, hulled and halved) - Large banana (1, sliced) - Shredded coconut (1/2 cup, sweetened or unsweetened) - Fresh lime juice (juice of 1 lime) - Honey or agave syrup (2 tablespoons, optional) - Fresh mint leaves (for garnish) I love using fresh fruits for my Tropical Fruit Salad. The ripe pineapple adds a sweet and tangy flavor. Mangoes bring a rich, juicy taste. Papaya has a soft texture and mild sweetness that balances the mix. Fresh strawberries add a pop of color and a burst of freshness. Bananas lend a creamy texture and natural sweetness. For extra flair, I often sprinkle shredded coconut on top. You can choose sweetened or unsweetened, depending on your taste. A splash of fresh lime juice brightens up the dish. You can add honey or agave syrup for extra sweetness if needed. Finally, garnishing with fresh mint leaves gives a lovely aroma and a nice touch of color. Using these ingredients, you create a vibrant and refreshing treat. This salad not only looks beautiful but also tastes amazing. You can serve it at parties or enjoy it as a healthy snack. For the full recipe, check out the Tropical Paradise Fruit Salad. Start with the pineapple. Cut off the top and bottom. Stand the pineapple upright. Slice the skin off in strips. Remove any eyes you see. Then, cut the fruit into bite-sized cubes. Next, grab the mangoes. Use a sharp knife to slice down the sides of the pit. Then, cut each half into cubes. Use a spoon to scoop out the fruit. For the papaya, cut it in half lengthwise. Use a spoon to scoop out the seeds. Then, peel the skin off and cut it into cubes. Now, it's time for the strawberries. Hold the berry and use a small knife to cut off the green top. Cut each berry in half. This makes them easier to eat. Finally, take the banana. Slice it into rounds. Aim for about half an inch thick. This gives a nice texture to the salad. In a small bowl, squeeze the juice from one lime. This should give you about two tablespoons. Add honey or agave syrup to the lime juice. Use a whisk to mix it all together until smooth. You can taste the dressing. If you want it sweeter, add more honey or agave. This dressing brings a bright flavor to the fruit. In a large bowl, gently toss all the prepared fruits together. Be careful not to mash them. Drizzle the lime dressing over the fruit. Use a large spoon to mix everything. Ensure each piece of fruit gets a coat of dressing. Cover the bowl with plastic wrap. Place it in the refrigerator for about 30 minutes. This chill time allows the flavors to blend nicely. When you're ready to serve, give the salad a gentle toss. Garnish with fresh mint leaves for a pop of color. This makes your fruit salad look as good as it tastes. For a fun touch, serve it in a clear bowl to show off the colorful fruits. You can sprinkle some extra coconut on top for added flair. Enjoy your Tropical Paradise Fruit Salad! For the full recipe, check out the detailed instructions above. For a tasty fruit salad, I suggest mixing sweet and tart fruits. Use ripe pineapple, mangoes, and strawberries. These fruits balance well together. Add a touch of papaya for creaminess. To enhance the look, cut fruits into even pieces. This makes the salad beautiful and appealing. When cutting a banana, slice it just before serving. Bananas brown quickly. To slow down browning, coat the slices with lime juice. This keeps them fresh and bright. You can switch up the dressing for your fruit salad. Coconut milk adds a tropical twist. It’s creamy and pairs well with fruit. If you want more zing, sprinkle a little chili powder. This brings a unique flavor that surprises your taste buds. For a light sweetness, mix honey with lime juice. This simple dressing enhances the fruit's natural taste. Try these options to see what you love the most! For the full recipe, check [Full Recipe]. {{image_4}} You can make your tropical fruit salad even better by adding extra ingredients. Nuts and seeds add a nice crunch. Try almonds, walnuts, or sunflower seeds for a fun twist. They also boost the nutrition of your salad. You can also add more tropical fruits. Kiwi and passion fruit work great in this mix. Kiwi brings a lovely green color and a tart flavor, while passion fruit adds a sweet and tangy taste. These fruits help to make the salad look colorful and delicious. If you're looking for vegan options, this salad is already perfect! All the fruits are plant-based. For gluten-free diets, you can enjoy this salad worry-free. If you want to lower the sugar, you can use stevia or monk fruit. These natural sweeteners keep the taste sweet without added sugar. Just adjust the amount based on your taste. With these variations, your tropical fruit salad will be enjoyable for everyone! You can find the full recipe [here](#). To keep your leftover fruit salad fresh, store it in the fridge. Use an airtight container to seal in the flavors. Glass or plastic containers work well. Make sure to cover the salad tightly to prevent it from drying out. If you have extra mint leaves, add them just before serving for a fresh touch. Your tropical fruit salad can stay fresh in the refrigerator for about three days. After that, the fruits may start to lose their taste and texture. Look for signs like browning, mushiness, or an unpleasant smell. If you notice any of these, it's time to toss the salad. Always trust your senses when it comes to food safety. For the full recipe, check out the Tropical Paradise Fruit Salad 🥭 section. What fruits can I use in Tropical Fruit Salad? You can use many fruits in your salad. I love ripe pineapple, mangoes, papaya, strawberries, and bananas. These fruits mix well together. You can also add kiwi, oranges, or even berries. Each fruit adds its own flavor. How do I make Tropical Fruit Salad ahead of time? To prepare it early, cut the fruit and store it in the fridge. Keep the dressing separate. Mix the fruit and dressing just before serving. This keeps the fruit fresh and tasty. You can store it for up to a day. Can I substitute the sweetener in this recipe? Yes, you can swap the sweetener. Honey or agave syrup works great. If you want a low-sugar option, use stevia or maple syrup. Adjust the amount to meet your taste. What type of dishes pair well with Tropical Fruit Salad? Tropical fruit salad pairs nicely with grilled meats or fish. It also complements a spicy dish. You can serve it at barbecues or picnics. It adds a fresh touch to any meal. How to serve it as a breakfast or dessert option? Serve it over yogurt for breakfast. You can also add granola for crunch. As a dessert, try it with whipped cream or coconut milk. This salad makes a lovely, light treat any time of day. Don't forget to check the Full Recipe for more details! This article covers all you need to know for a tasty tropical fruit salad. You learned which fresh fruits to use and how to prepare them. I shared tips for a great dressing and unique variations for your salad. Proper storage tips help keep your salad fresh longer. Now, you can impress everyone with a colorful, delicious dish. Enjoy creating your own version, and make it your own!](https://spoonfulsavory.com/wp-content/uploads/2025/07/156de252-a6fc-4ddf-a724-b7e983a03dc1.webp)
Are you ready to enjoy a burst of flavor with a Tropical Fruit Salad? This refreshing and healthy treat is
![- Canned chickpeas - Coconut milk - Diced tomatoes Chickpeas are the star of this dish. They bring a nice, hearty texture. I prefer canned chickpeas for this recipe. They are ready to use and save time. Coconut milk adds creaminess and a hint of sweetness. It helps balance the spices well. Diced tomatoes add moisture and flavor. They make the curry rich and vibrant. - Curry powder - Ground cumin - Turmeric - Garam masala Seasonings are vital for a great chickpea curry. Curry powder gives warmth and depth. Ground cumin adds a nutty flavor that I love. Turmeric brings a beautiful golden color and health benefits. Garam masala adds complexity with its mix of spices. These seasonings transform simple ingredients into a delightful meal. - Onions, garlic, ginger - Fresh spinach - Lemon juice Fresh ingredients make this dish pop. Onions, garlic, and ginger build a strong flavor base. They create a fragrant aroma as they cook. Fresh spinach adds color and nutrients. It wilts down nicely in the curry. A splash of lemon juice brightens the flavors. It gives a fresh finish that ties everything together. You’ll find all these ingredients in the [Full Recipe] for this easy chickpea curry! - Prepare the vegetables: Start by chopping the onion finely. Mince the garlic and grate the ginger. Set these aside for cooking. - Warm the coconut oil: In a large saucepan, heat the coconut oil over medium heat until it melts and shimmers. This will add a nice flavor to your curry. - Sauté onions, garlic, and ginger: Add the chopped onion to the pan. Cook it for about five minutes, or until soft and clear. Then, mix in the minced garlic and grated ginger. Cook for one more minute. - Stir in spices: Sprinkle in the curry powder, ground cumin, turmeric, and garam masala. Stir well and cook for two minutes. This step brings out the deep flavors of the spices. - Combine chickpeas, coconut milk, and tomatoes: Pour in the undrained diced tomatoes and coconut milk. Stir until everything mixes well. Then, add the drained chickpeas gently. Bring the mixture to a gentle simmer, letting the flavors blend. - Simmer the curry: Cover the pot with a lid. Let it simmer for 15 to 20 minutes. Stir occasionally until the curry thickens a bit. - Add fresh spinach: Fold in the chopped spinach and cook for five more minutes. The spinach will wilt and add a vibrant color. - Adjust seasoning: Season the curry with salt, pepper, and fresh lemon juice. Taste and adjust as needed. When everything is ready, serve the chickpea curry over warm basmati rice or fluffy quinoa for a hearty meal. For the full recipe, check the detailed instructions above. To enhance flavors in your chickpea curry, start with fresh spices. Fresh spices pack more punch than older ones. Toast them in the pan for a minute. This brings out their taste. Simmering is key to good curry. Keep the heat low and let the flavors meld. If it's too hot, the sauce can burn. Stir occasionally to prevent sticking. A gentle simmer makes the dish creamy and rich. Chickpea curry pairs well with cooked basmati rice or fluffy quinoa. These sides soak up the delicious sauce. You can also serve it with naan bread for a fun twist. For garnishing, fresh coriander leaves add a nice touch. A wedge of lemon brightens the dish. Try adding a dollop of yogurt for creaminess if you want. Feel free to add more vegetables. Carrots, bell peppers, or peas work great. These add color and nutrition. Adjust the spice level to your taste. Add more curry powder for heat, or try a pinch of cayenne pepper. For a milder flavor, reduce the spices. You can make this dish your own! For the full recipe, check out [Full Recipe]. {{image_4}} You can easily change some ingredients in your chickpea curry. For a fun twist, use dried chickpeas instead of canned ones. Soak them overnight, then cook them until soft before adding to the curry. This swap gives a firmer texture. Another idea is to try non-dairy milk. Instead of coconut milk, you can use almond or oat milk. This change makes it lighter while still creamy. Adjust the spices to keep the flavor strong. Chickpea curry is popular all over the world. For a Thai-style twist, add lemongrass and lime leaves. These ingredients give the dish a fresh, zesty taste. You could also add some Thai red curry paste for more heat. If you want Indian-inspired flavors, use garam masala and fresh cilantro. You can also include peas or potatoes for extra texture. These changes make the dish unique and delicious. This chickpea curry is already vegan-friendly. To keep it that way, ensure you use vegetable broth if you make any swaps. For those who need gluten-free options, this recipe works great! Just check your spice labels to confirm they are gluten-free. You can serve it with quinoa or rice for a complete meal. For the full recipe, check out the detailed instructions above! To store your leftover chickpea curry, let it cool first. Then, place it in an airtight container. This keeps the flavors fresh and prevents spills. Glass or plastic containers work well. Make sure they are sealed tightly to avoid any odors. If you want to freeze the curry, use freezer-safe bags or containers. Make sure to leave some space at the top, as the curry may expand when frozen. To thaw, simply move it to the fridge overnight. When ready to eat, reheat it in a pot over low heat. Stir it well and make sure it's hot all the way through. Chickpea curry lasts about 3 to 4 days in the fridge. If you freeze it, it can last for up to 3 months. Check for signs of spoilage like off smells or strange colors. If it looks or smells bad, it's best to toss it. Enjoy your Easy Chickpea Curry with confidence! For the full recipe, refer to the section above. Chickpea curry pairs well with various sides. Here are some great options: - Cooked basmati rice - Fluffy quinoa - Naan bread - Steamed vegetables - Fresh salad Each option adds a unique touch. Rice absorbs the sauce well. Quinoa adds a nutty flavor. Naan is perfect for scooping up the curry. Choose what you love! Yes, you can make chickpea curry in advance. It tastes even better after resting. Here’s how to prepare it: - Cook the curry as per the Full Recipe. - Let it cool completely. - Store in an airtight container. - Refrigerate for up to 3 days. When ready to eat, reheat gently on the stove. Add a splash of water if it thickens too much. Making a great curry takes care. Here are common mistakes to avoid: - Overcooking vegetables - Not seasoning enough - Skipping the simmering time Overcooked vegetables turn mushy. To keep them firm, add them later in the cooking. Proper seasoning is key for flavor. Always taste and adjust before serving! This blog post covered the essential ingredients for a tasty chickpea curry. You learned how to prepare, cook, and serve this dish. I shared tips for enhancing flavors and customizing your recipe. You can even explore regional variations to keep things interesting. Remember to store your leftovers properly to enjoy later. This dish offers great options for all dietary needs. Now, you can make a delicious chickpea curry that your family will love. Enjoy cooking and keep experimenting!](https://spoonfulsavory.com/wp-content/uploads/2025/07/e6cb8a36-f8ad-40f3-b2ab-4ed091e4f2b1.webp)
Looking for an easy, tasty meal? You’re in the right place! My Easy Chickpea Curry is packed with flavor and
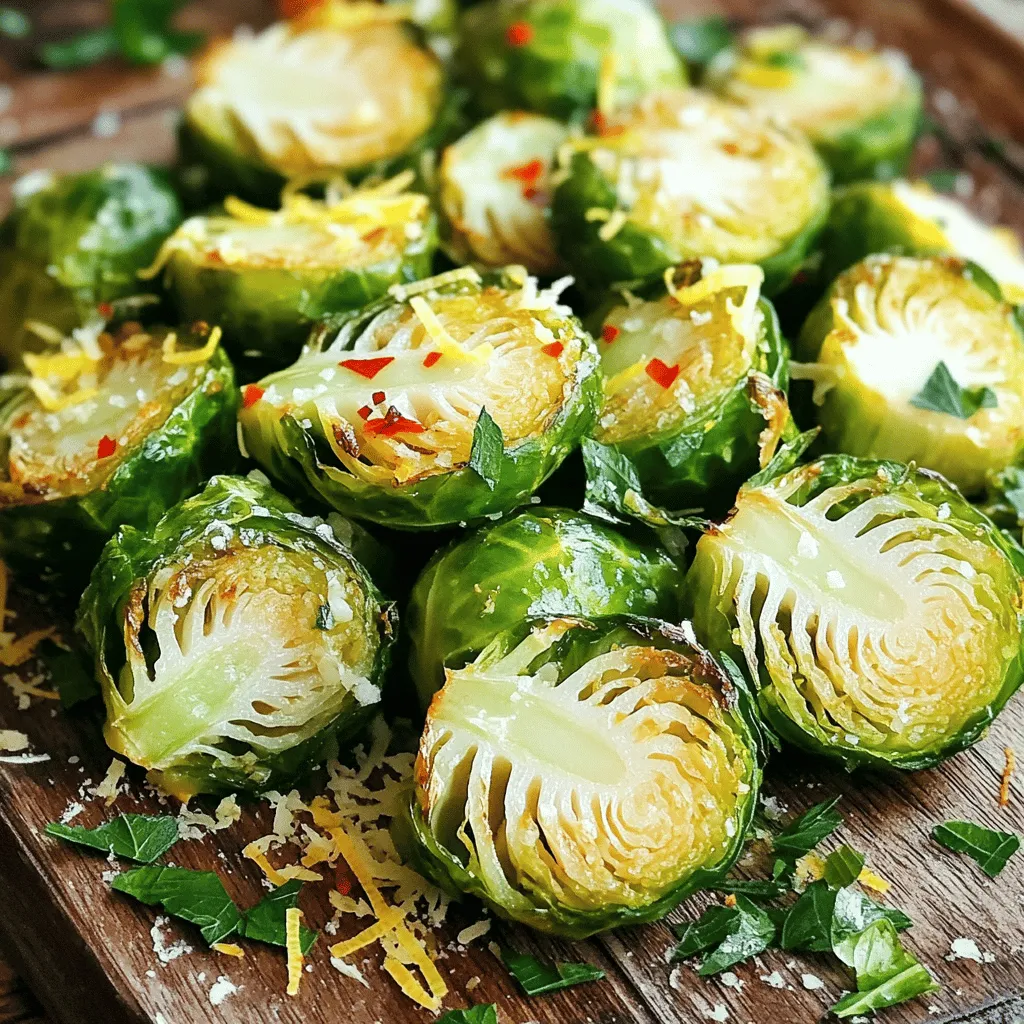
If you’re looking for a dish that’s packed with flavor and simple to make, Lemon Garlic Roasted Brussels Sprouts are

Are you ready to whip up a quick and tasty dinner? My Crispy Tofu Stir Fry is packed with flavor
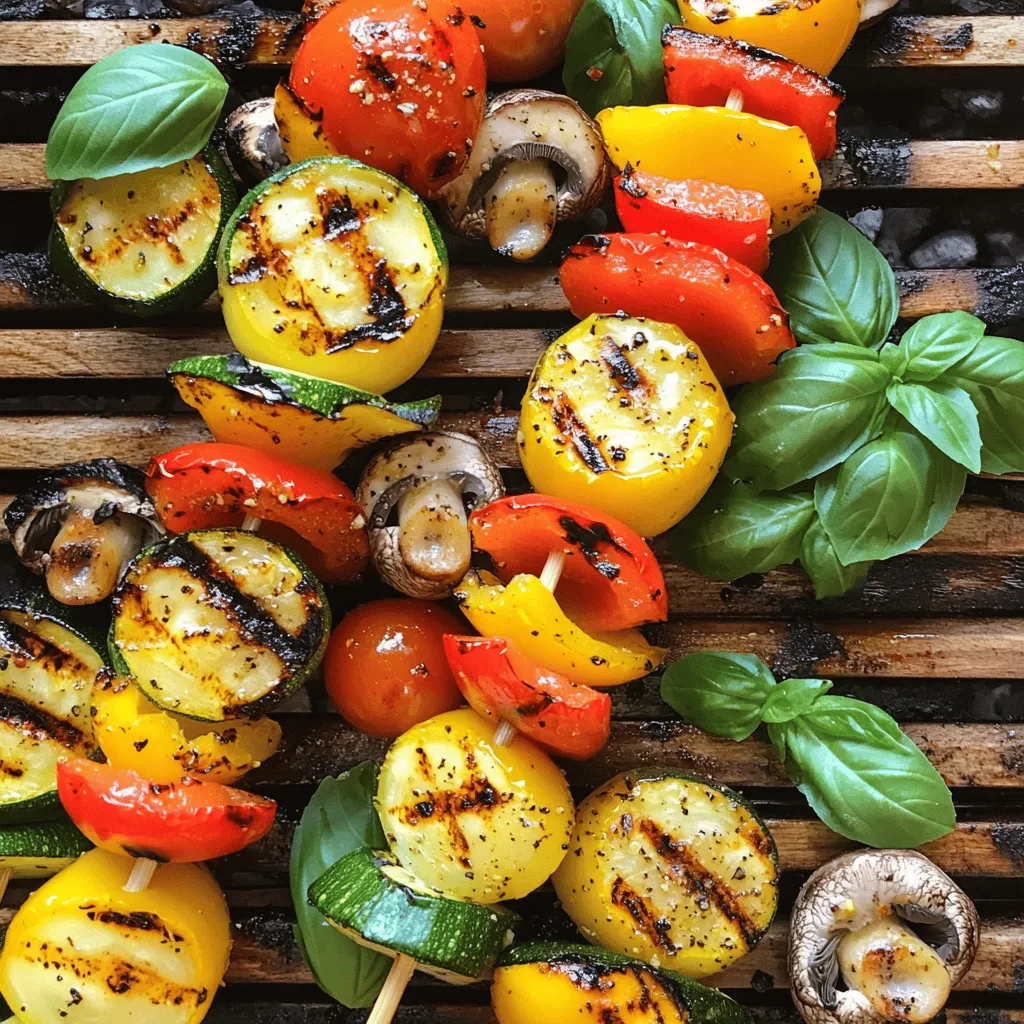
Grilled veggie skewers are a fresh and tasty way to enjoy healthy eating. They are colorful, packed with flavor, and
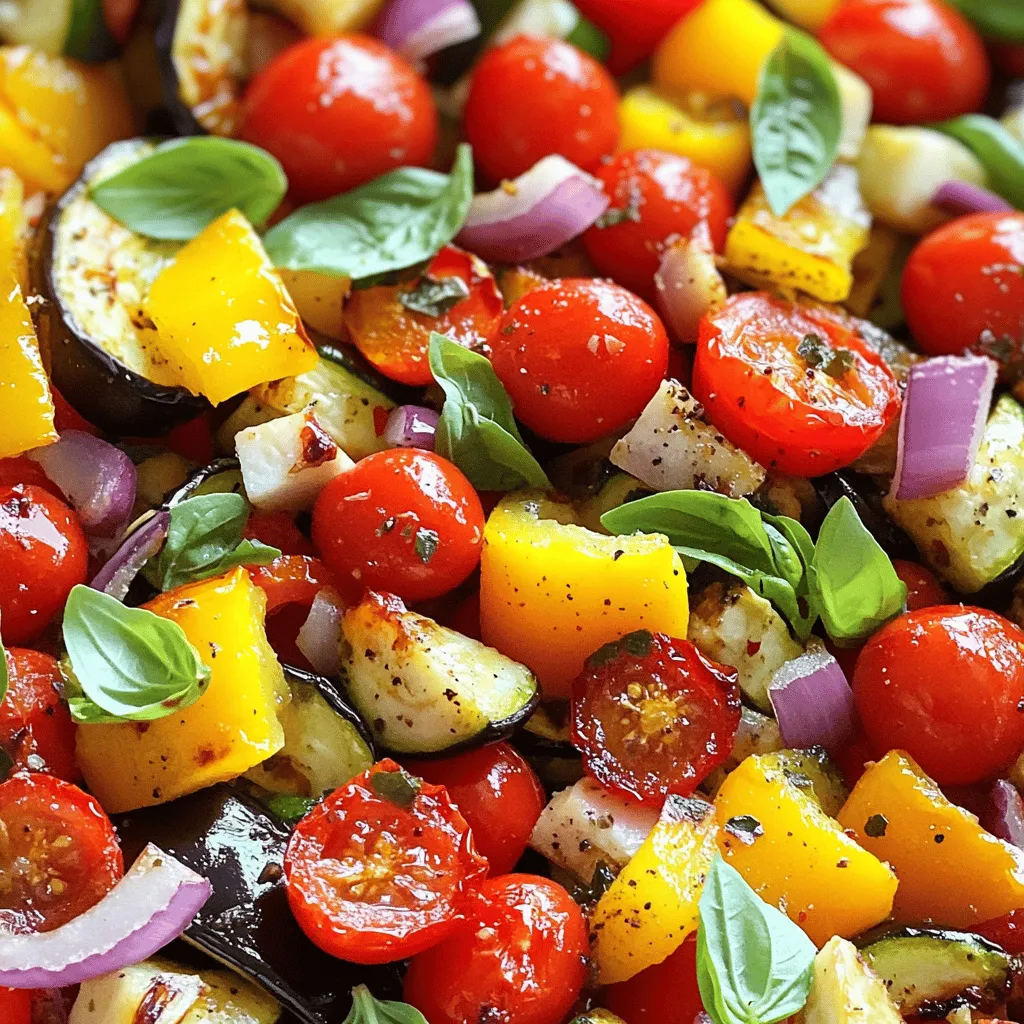
If you’re seeking a quick and delicious way to enjoy healthy food, you’ve come to the right place! Today, I’ll
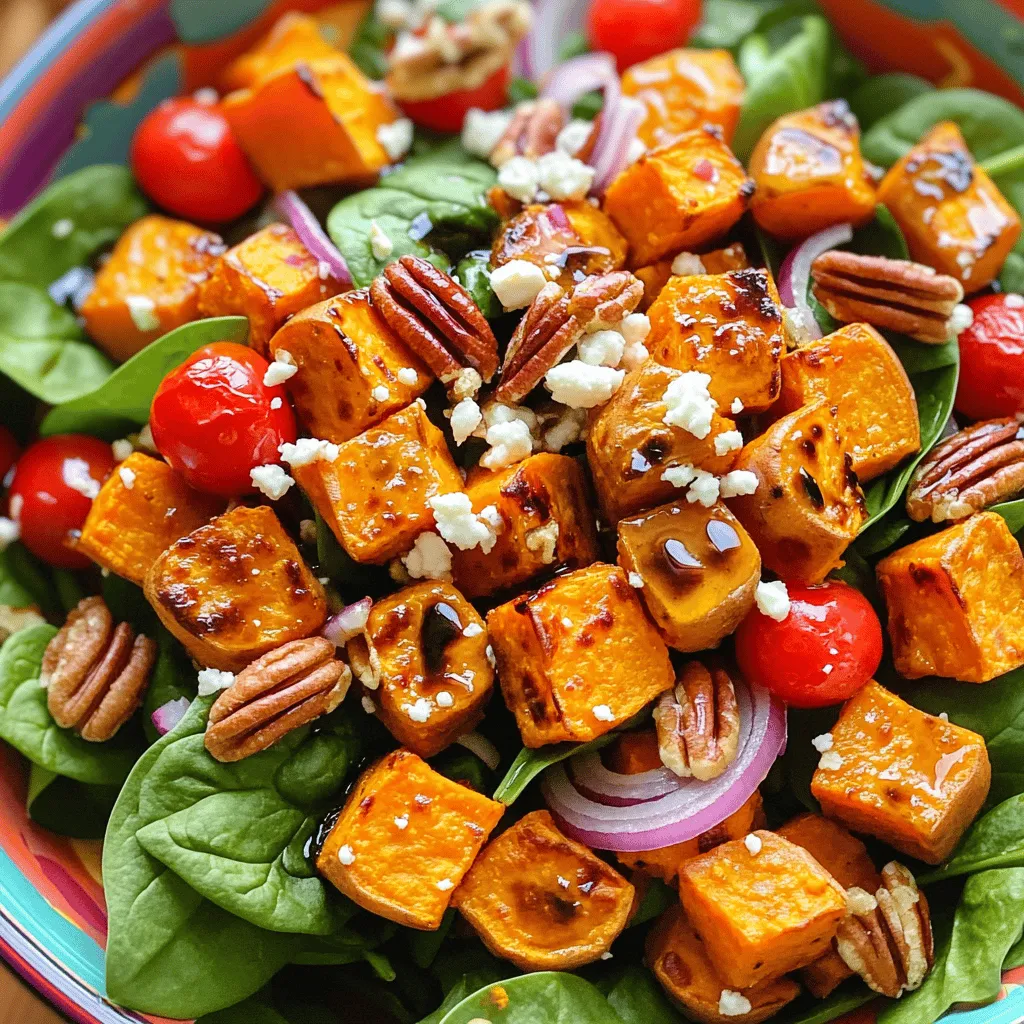
Looking to brighten up your meal routine? This Roasted Sweet Potato Salad is both flavorful and nutritious! Packed with vibrant

Looking for a crunchy, tasty treat that bursts with summer flavors? Try my Zucchini Corn Fritters! This easy recipe combines
