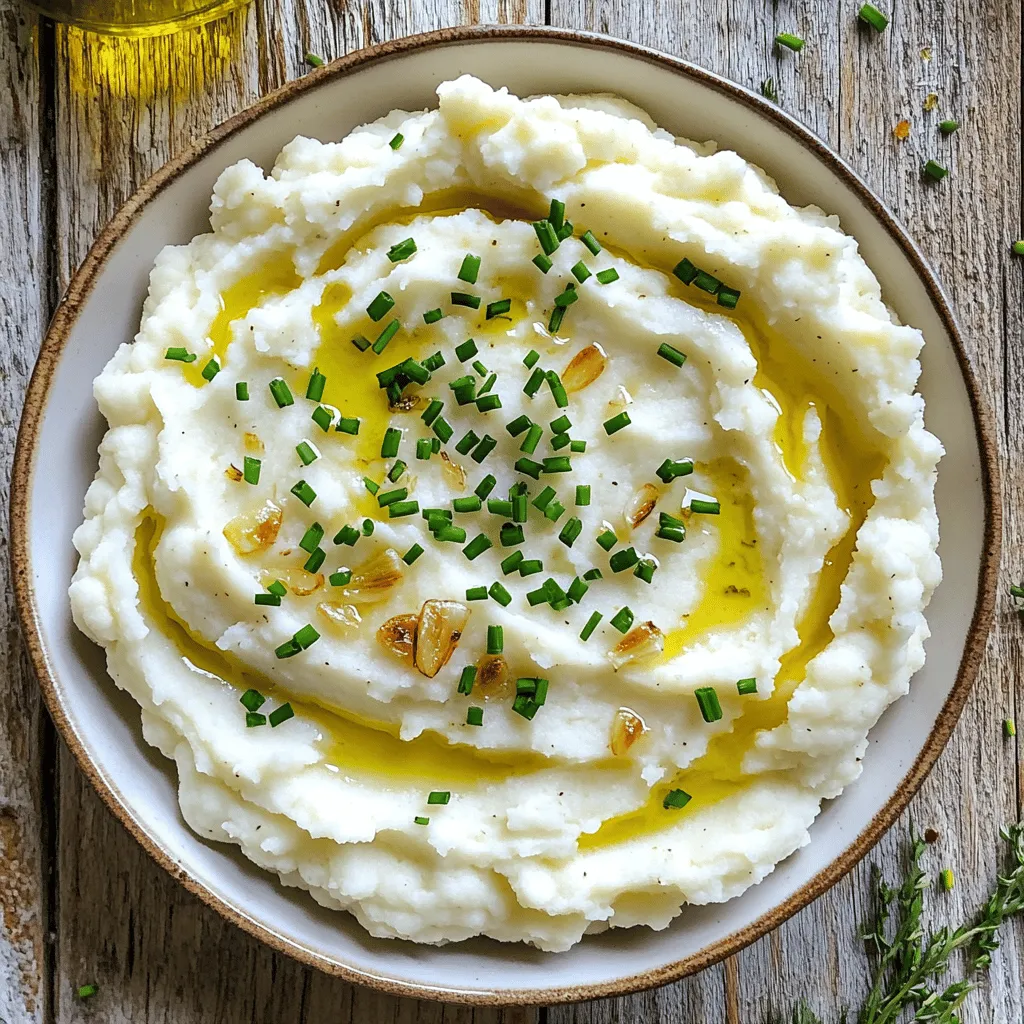
Roasted Garlic Mashed Cauliflower Creamy Delight Recipe
Are you craving a creamy, guilt-free side dish? Let me introduce you to my Roasted Garlic Mashed Cauliflower. With rich
Are you craving a creamy, guilt-free side dish? Let me introduce you to my Roasted Garlic Mashed Cauliflower. With rich

Looking for a tasty and healthy snack? Cheesy Cauliflower Breadsticks are your answer! They combine the goodness of cauliflower with
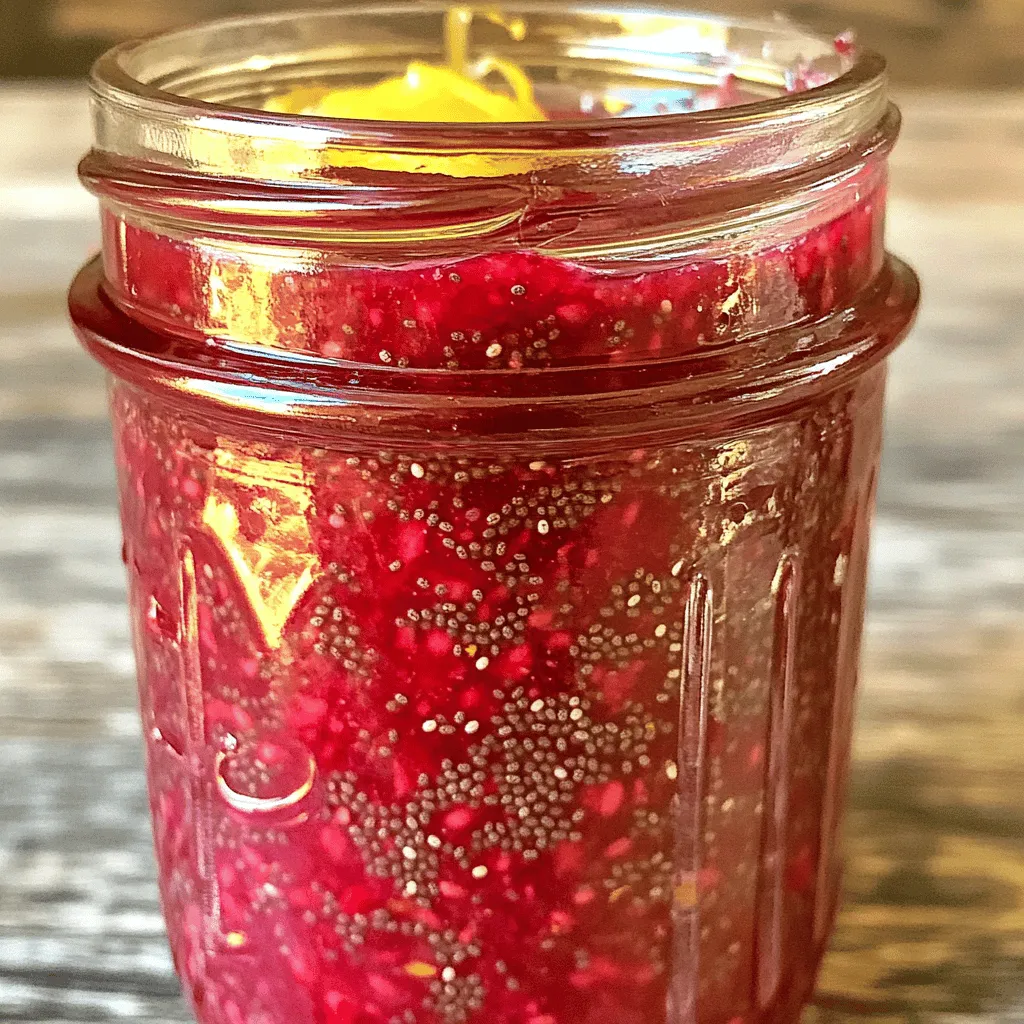
Welcome to the sweet world of Raspberry Lemon Chia Jam! This simple and delicious recipe puts a fresh twist on
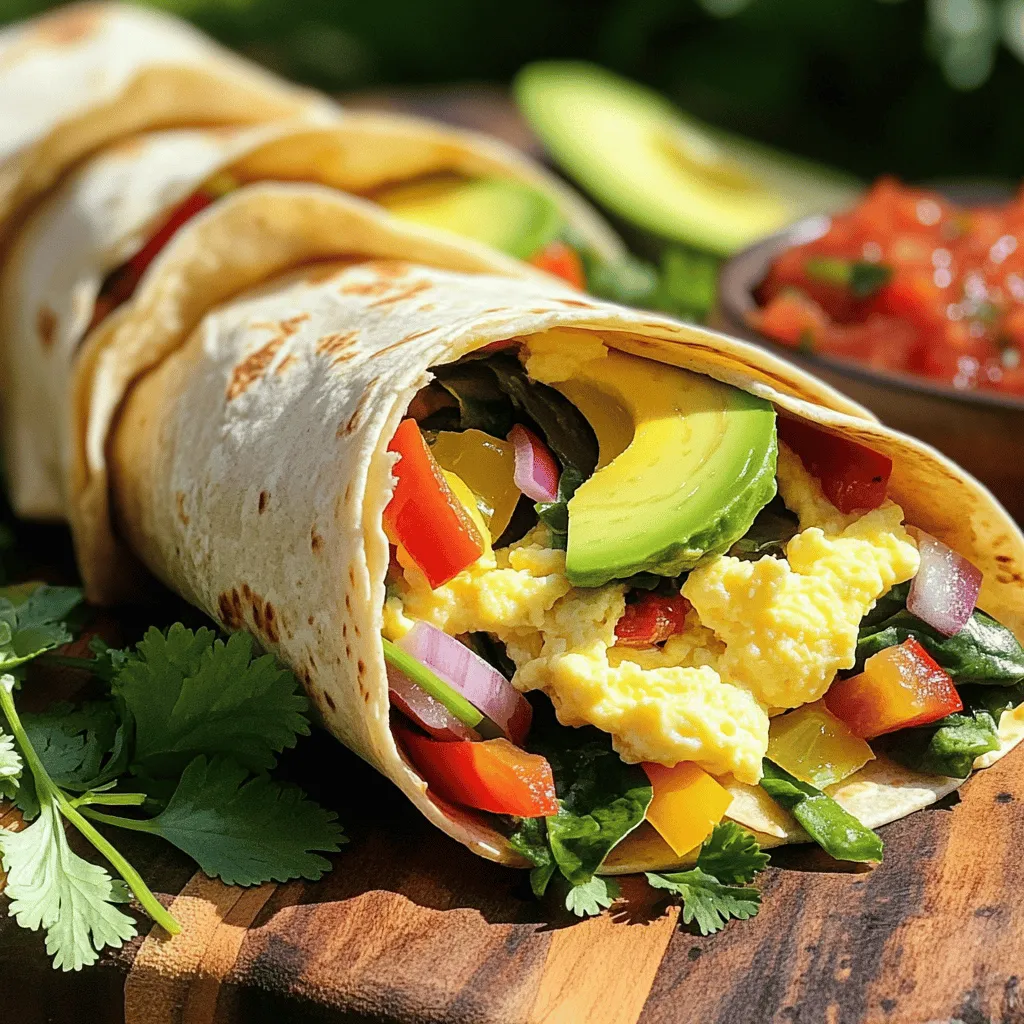
Start your day the right way with these Veggie Packed Breakfast Burritos! Loaded with colorful veggies, protein-rich black beans, and
![- 1 lb chicken breast, cut into bite-sized pieces - 1/4 cup honey - 1/4 cup low-sodium soy sauce - 4 cloves garlic, minced - 1 tablespoon fresh ginger, grated - 2 tablespoons vegetable oil - 1 tablespoon cornstarch - Salt and freshly ground black pepper to taste These ingredients work together to create a sweet and savory dish. The chicken breast is tender and juicy, while the honey adds a lovely sweetness. The soy sauce brings in that umami flavor, making every bite a delight. Garlic and ginger add depth, giving the dish a wonderful aroma. Using vegetable oil helps to get that nice sear on the chicken. Cornstarch is key for a crispy outside. Don't forget to season with salt and pepper; it ties everything together. For the full recipe, check out the [Full Recipe]. Mixing the marinade First, grab a medium mixing bowl. Add 1/4 cup of honey, 1/4 cup of low-sodium soy sauce, 4 cloves of minced garlic, and 1 tablespoon of grated ginger. Whisk these together until you have a smooth mixture. This is your marinade. Remember to save 2 tablespoons for later! Coating the chicken Next, take 1 pound of chicken breast cut into small pieces. In another bowl, toss the chicken with 1 tablespoon of cornstarch, salt, and freshly ground black pepper. Make sure each piece is well coated. This will help make the bites crispy when cooked. Heating the skillet Now it’s time to heat things up! Pour 2 tablespoons of vegetable oil into a large skillet. Turn the heat to medium-high. Wait until the oil shimmers, which means it's hot enough. Cooking the chicken bites Carefully add the coated chicken bites in a single layer. If your skillet is small, cook them in batches. This keeps them from steaming. Cook for about 5 to 6 minutes. Flip the pieces often. You want them golden brown and fully cooked. The inside should reach at least 165°F. Adding the marinade Once the chicken is cooked, lower the heat to medium. Pour the remaining marinade over the chicken in the skillet. Stir well to coat each piece. Let it cook for another 2 to 3 minutes. This thickens the sauce and adds flavor. Garnishing Take the skillet off the heat. Drizzle the reserved marinade on top of the chicken bites for an extra kick. For a nice finish, sprinkle toasted sesame seeds and finely sliced green onions on top. This adds a fresh touch and makes the dish look great. Now you have a tasty meal ready to enjoy! For the full recipe, check out the details. To get the best texture, coat the chicken in cornstarch. This will give it a crispy crust. Make sure your oil is hot before adding the chicken. This helps seal in juices and makes the bites golden. Turn the chicken bites often. This ensures even cooking and a nice brown color. You can adjust the sweetness by adding more or less honey. If you like it sweeter, add more honey. For a stronger flavor, try adding some red pepper flakes or chili powder. This will spice things up and bring new taste to the dish. For sides, serve honey garlic chicken bites with steamed rice or mixed veggies. Both pair well and add color to your plate. Presentation matters too! Arrange the chicken bites neatly on a platter. Drizzle extra honey on top for a shiny look. Adding toothpicks makes it easier for guests to enjoy. {{image_4}} You can easily swap chicken for other proteins. Tofu works great for a vegan option. Just cut it into bite-sized pieces. Shrimp is another tasty choice. It cooks quickly and adds a nice twist. If you need gluten-free options, choose tamari instead of soy sauce. This keeps your dish safe for those with gluten issues. You can cook these chicken bites in different ways. Baking is a healthy choice. Preheat your oven to 400°F (200°C) and spread the bites on a lined tray. Bake for about 15-20 minutes until golden. Frying gives a crispy texture. Heat oil in a skillet and follow the recipe. If you prefer slow cooking, combine the chicken and marinade in a slow cooker. Cook on low for 4-6 hours for tender bites. Want to add some fun flavors? Try an Asian twist by adding sesame oil or hoisin sauce. You can also mix in spices like five-spice powder for depth. Fresh herbs like cilantro or basil brighten the dish. Experiment with chili flakes for a spicy kick. Each change creates a unique taste that keeps your dinners exciting. For the complete cooking experience, check the Full Recipe. To keep your honey garlic chicken bites fresh, place them in an airtight container. This helps prevent moisture loss and keeps the flavors intact. Use a glass or plastic container with a tight lid. You can store the chicken in the fridge for up to three days. When you're ready to enjoy leftovers, you can use a microwave or stovetop. For the microwave, place the chicken in a microwave-safe dish. Heat in short bursts, stirring in between, until warm. This method is quick and easy. If you prefer the stovetop, heat a skillet over medium heat. Add a splash of water or oil to help maintain moisture. Stir the chicken until it’s heated through. This method keeps the chicken's texture better. If you want to save some for later, freezing is a great option. Let the chicken cool completely before placing it in a freezer-safe bag. Squeeze out any air to prevent freezer burn. You can freeze the chicken for up to three months. When you're ready to eat, thaw the chicken in the fridge overnight. You can also use the microwave on the defrost setting for quicker thawing. To ensure your chicken is safe to eat, check its internal temperature. The chicken must reach at least 165°F (75°C). You can use a meat thermometer to check this. Insert it into the thickest part of the chicken. If it reads 165°F, your chicken is ready. Yes, you can prep this dish in advance. You can marinate the chicken and store it in the fridge for up to 24 hours. This helps the flavors soak in better. You can also cook the chicken ahead of time and reheat it later. Just store it in an airtight container in the fridge. These chicken bites pair well with many sides. Here are some great ideas: - Steamed rice - Fried rice - Stir-fried vegetables - Fresh salad - Noodles Each of these options complements the sweet and savory flavors of the chicken. You can mix and match to create a balanced meal. Enjoy your culinary adventure! This blog post guides you through making delicious Honey Garlic Chicken Bites. We covered the key ingredients like chicken, honey, and soy sauce, and shared easy steps for preparation and cooking. I included tips to achieve the perfect texture and ways to customize the recipe to your taste. Remember, cooking is fun, and your meals can always be better. Keep experimenting with flavors and methods. Enjoy your tasty bites, and don’t hesitate to share your own twists!](https://spoonfulsavory.com/wp-content/uploads/2025/07/e34f8c40-46b3-4579-9c95-c3381c6a63c2.webp)
Looking for a quick and tasty dinner? Dive into my Honey Garlic Chicken Bites! This dish is perfect for busy
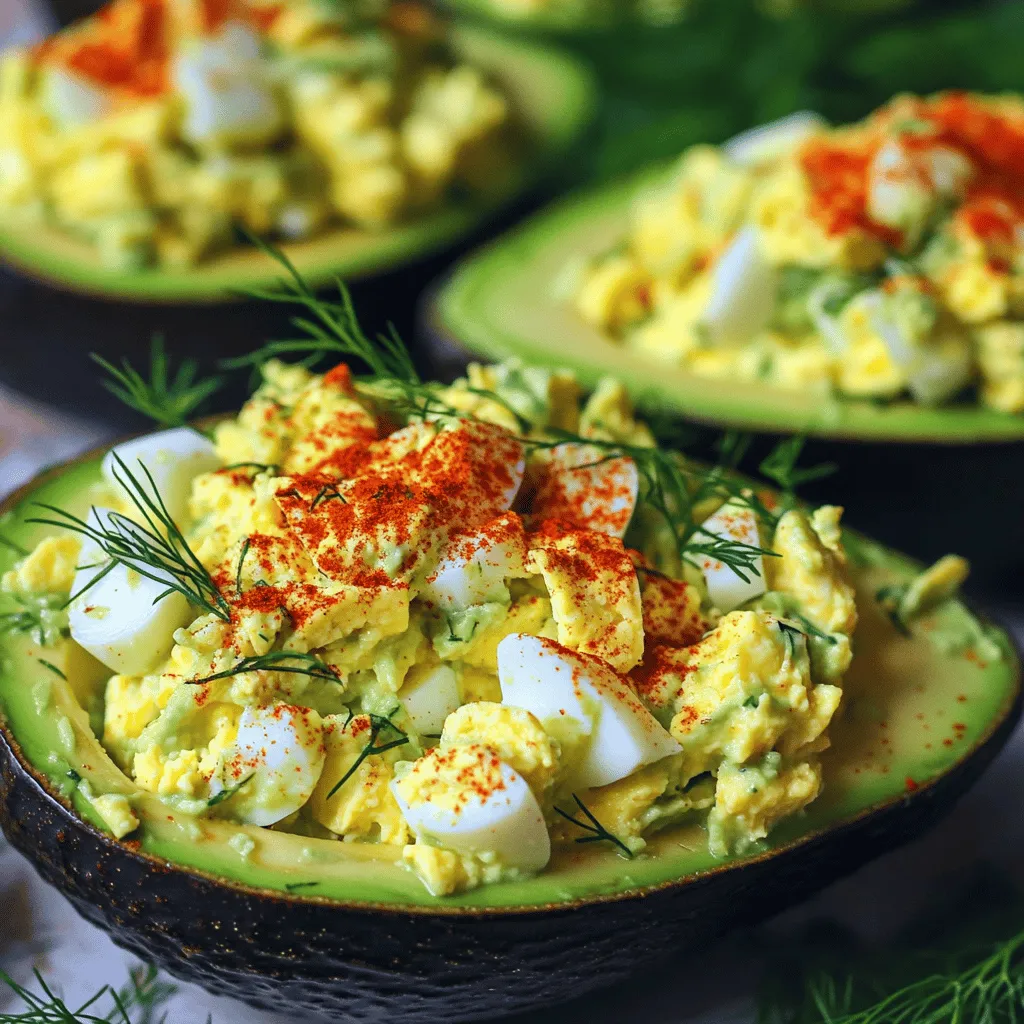
Looking for a tasty and easy dish that’s sure to impress? Try Egg Salad Avocado Boats! This healthy recipe combines
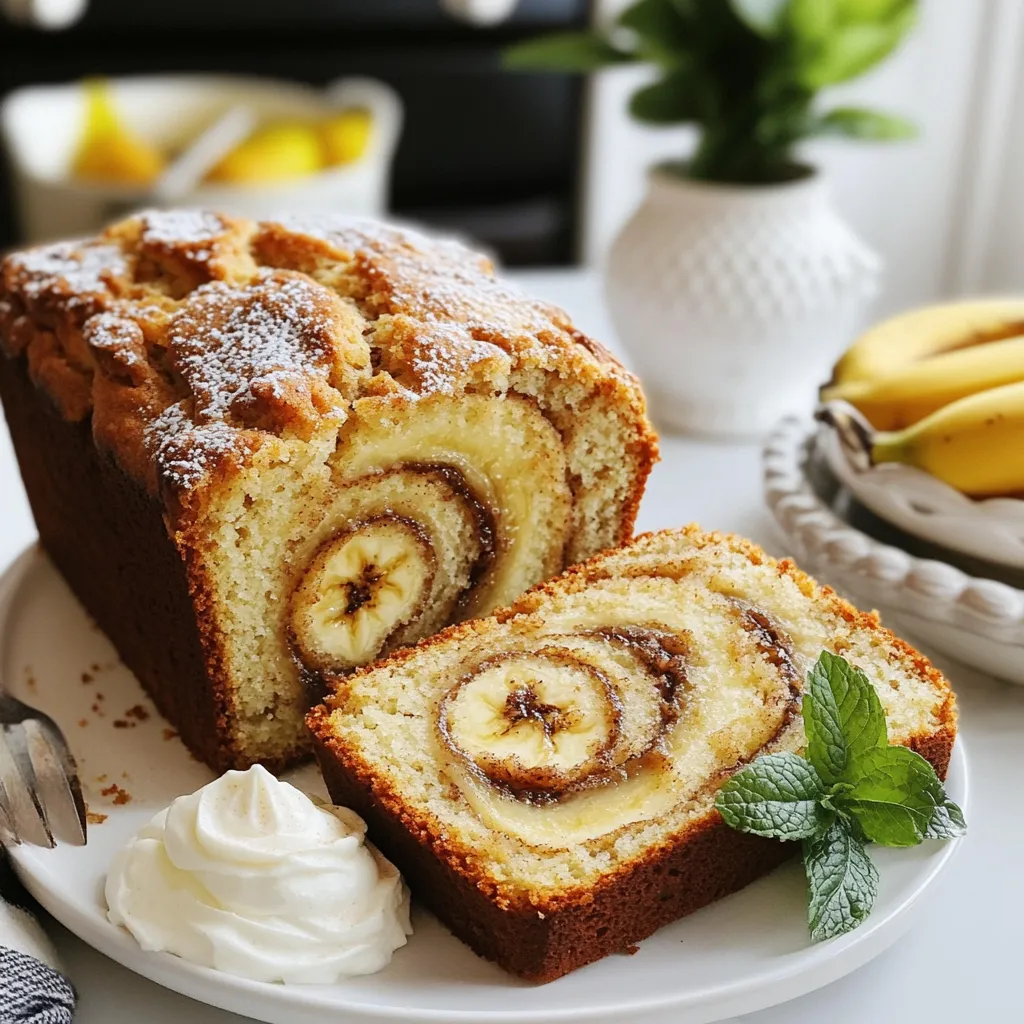
Are you ready to bake something delicious? In this post, I’m sharing my simple Cinnamon Swirl Banana Bread recipe. This
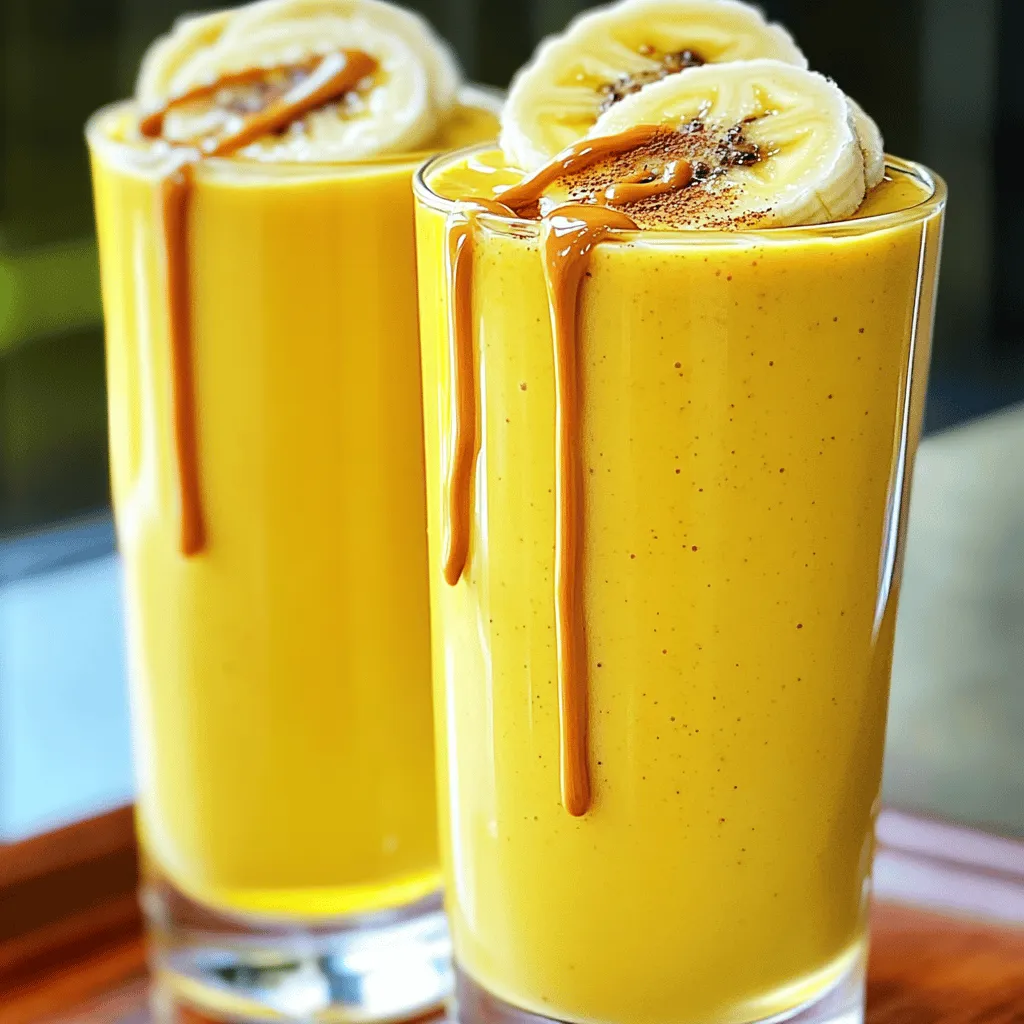
Welcome to the world of flavors with my Peanut Butter Banana Smoothie! This creamy drink is not just tasty; it’s
![To make savory chicken taco salad bowls, you need fresh and tasty ingredients. Here’s what you’ll need for this meal: - 2 boneless, skinless chicken breasts - Marinade: - 1 tablespoon olive oil - 1 teaspoon chili powder - 1 teaspoon ground cumin - 1 teaspoon garlic powder - 1 teaspoon onion powder - Salt and freshly ground black pepper, to taste - Salad ingredients: - 4 cups romaine lettuce, chopped into bite-sized pieces - 1 cup cherry tomatoes, halved - 1 cup black beans, rinsed and drained - 1 cup corn (fresh, frozen, or canned) - 1 ripe avocado, diced - ½ cup shredded cheese (cheddar, Monterey Jack, or a Mexican blend) - ½ cup salsa (your favorite kind) - ¼ cup sour cream or Greek yogurt - Fresh cilantro, chopped (for garnish) - Tortilla chips (for added crunch) These ingredients create a colorful and flavorful dish. Each one adds a unique taste and makes your meal look great. I love using fresh produce because it makes my food more vibrant and tasty. You can find the full recipe [here]. Start by making a tasty marinade. In a medium bowl, whisk together the following ingredients: - 1 tablespoon olive oil - 1 teaspoon chili powder - 1 teaspoon ground cumin - 1 teaspoon garlic powder - 1 teaspoon onion powder - Salt and freshly ground black pepper, to taste Next, coat each chicken breast with the marinade. Make sure each piece gets a good coating. Let the chicken rest for about 15 minutes. This time helps the flavors soak in. Now it’s time to cook! Preheat your grill or grill pan over medium-high heat until it’s nice and hot. Place the marinated chicken breasts on the grill. Cook them for about 6-7 minutes on each side. You want the chicken to reach an internal temperature of 165°F (75°C). Once the chicken is done, transfer it to a cutting board. Let it cool slightly before slicing it into bite-sized pieces. In a large serving bowl or individual bowls, create your salad base. Start with chopped romaine lettuce. This will give you a crunchy foundation for your meal. Now, layer the toppings. Add halved cherry tomatoes, rinsed black beans, and corn on top of the lettuce. Next, sprinkle on diced avocado and the grilled chicken pieces. This colorful mix adds great flavor and looks beautiful. For the dressing, drizzle salsa generously over the salad. If you like it creamy, add dollops of sour cream or Greek yogurt. Lastly, sprinkle shredded cheese over everything and top with crushed tortilla chips. The chips add a nice crunch. Finish with a sprinkle of fresh cilantro for color and flavor. Serve your salad right away to keep everything crisp. Enjoy your fresh and flavorful Chicken Taco Salad Bowls! To make your chicken flavorful, marinate it well. I suggest mixing olive oil, chili powder, ground cumin, garlic powder, onion powder, salt, and black pepper. Coat the chicken breasts completely. Let them sit for 15 minutes. This allows the spices to soak in and enhance the taste. You can cook the chicken in two main ways: grilling or pan-searing. Grilling gives a smoky flavor and nice grill marks. Heat your grill to medium-high and cook each side for 6-7 minutes. Ensure the chicken reaches an internal temperature of 165°F (75°C). If you choose pan-searing, heat some oil in a skillet and cook the chicken for the same time. Both methods yield juicy, tender chicken for your salad. For the best taco salad, layer your ingredients in the right order. Start with a base of chopped romaine lettuce. This gives a nice crunch. Then, add the chicken, black beans, corn, cherry tomatoes, and avocado. Each layer brings its own flavor and texture. You can prepare this salad ahead of time. Just keep the ingredients separate until you are ready to eat. This way, the lettuce stays crisp. When you are ready to serve, drizzle salsa and add sour cream or Greek yogurt. Toss in some crushed tortilla chips for crunch. This makes a quick, fresh meal that is full of flavor. For the complete list of ingredients and steps, check the Full Recipe. {{image_4}} You can easily change up the proteins in your chicken taco salad bowls. Instead of chicken, try tofu for a plant-based option. Ground beef or shrimp also work great. Each protein brings its own flavor and texture. Cheese choices can make your salad special. You might use cheddar, Monterey Jack, or a Mexican blend. If you want more kick, consider pepper jack cheese. For a creamier touch, swap sour cream for ranch or a zesty avocado dressing. You can make your chicken taco salad bowls gluten-free with simple swaps. Use corn tortillas instead of regular ones. For a vegetarian option, skip the chicken and load up on beans and veggies. If you are watching carbs, go for lettuce wraps instead of tortilla chips. You can also skip the corn and beans to lower the carbs. These small changes make it easy to fit any diet while keeping the flavors bold and fun. For the full recipe, check out the details above! To keep your chicken taco salad bowls fresh, store them in airtight containers. This helps prevent moisture loss and keeps flavors intact. You can use glass or plastic containers with tight-fitting lids. Make sure to separate the crunchy toppings, like tortilla chips, from the salad. This way, they stay crisp until you are ready to eat. When reheating your chicken, the best method is to use the microwave. Heat it on a low setting to avoid drying it out. If you have leftover salad, only reheat the chicken and keep the salad cold. This keeps the lettuce crunchy and fresh. If you want to warm the salad a bit, do it gently in a skillet on low heat. Avoid overcooking to preserve the texture of the veggies. For more details, check the Full Recipe. Yes, you can use pre-cooked chicken. Rotisserie chicken works great. Simply shred or chop it. You can also use leftover chicken from another meal. Just warm it up before adding it to the salad. If you want a change from lettuce, try using spinach or kale. Both add great taste and nutrition. You can also use cabbage for a crunchy base. If you're feeling adventurous, try quinoa or rice for a different texture. To add heat, you can include jalapeños. Fresh or pickled jalapeños both work well. Hot sauce is another easy option. Just drizzle it on top. You can also mix in some cayenne pepper or chili flakes while cooking the chicken. This will elevate the spice level to your liking. This blog post covers yummy chicken taco salad. You learned about the main ingredients, cooking steps, and tips. You can customize this dish to fit your taste and dietary needs. Proper storage keeps your leftovers fresh, and we answered common questions, too. Enjoy making this dish, and feel free to get creative with it. Your taco salad can be as simple or fancy as you want, so dive in and have fun!](https://spoonfulsavory.com/wp-content/uploads/2025/07/02357fa5-9be2-4cf0-bd3d-83c52e4a6d5d.webp)
Looking for a fresh and tasty meal? My Savory Chicken Taco Salad Bowls are the answer! Packed with flavor, they
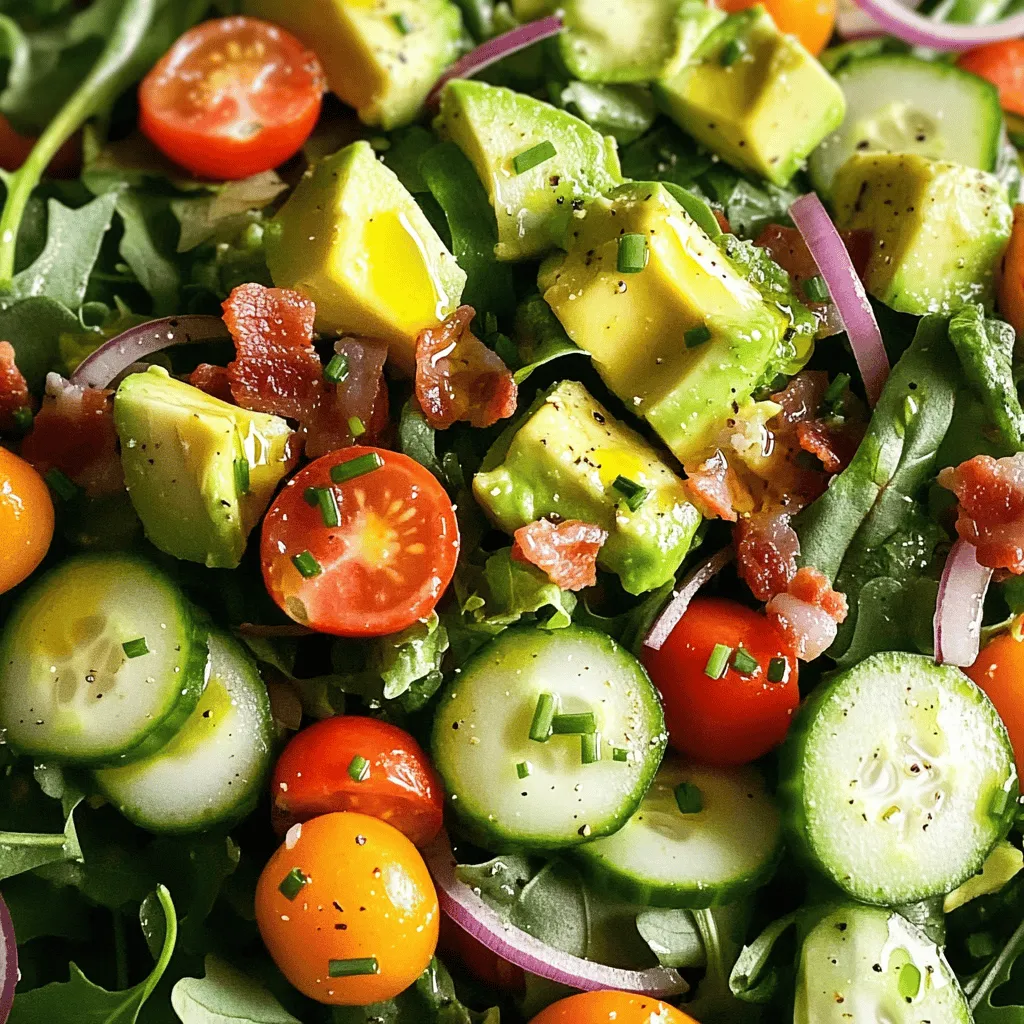
Are you ready to enjoy a delicious Avocado BLT Salad that is fresh and full of flavor? This easy recipe
