
Chocolate Chip Cookie Dough Truffles Tempting Treats
Craving a sweet treat that’s easy to make? Chocolate Chip Cookie Dough Truffles are the answer! These little bites of
Craving a sweet treat that’s easy to make? Chocolate Chip Cookie Dough Truffles are the answer! These little bites of

If you’re craving a bright and tasty treat, these Lemon Blueberry Yogurt Muffins are perfect for you. Packed with fresh

Looking for a simple and tasty chicken dish? Baked Parmesan Crusted Chicken is your answer! This easy recipe packs flavor
![To make this soup, you need a few key items. Gather the following ingredients: - 6 medium Yukon gold potatoes, peeled and cut into 1-inch cubes - 1 whole head of garlic - 1 large onion, finely chopped - 4 cups vegetable broth (homemade or store-bought) - 1 cup heavy cream (or coconut cream for a dairy-free alternative) - 2 tablespoons extra-virgin olive oil These main ingredients create the rich base for your soup. Yukon gold potatoes add a creamy texture. Roasted garlic gives the soup its deep, sweet flavor. Seasoning can make a big difference in taste. Here are the extra items you will want: - 1 teaspoon dried thyme - 1 teaspoon dried rosemary - Salt and freshly ground black pepper to taste Thyme and rosemary add aromatic notes. Adjust salt and pepper to match your taste. Garnishes enhance both look and flavor. Consider these options: - Fresh chives, finely chopped, for garnish Chives add a nice pop of color and a mild onion flavor. You can also drizzle some olive oil for extra richness. For the full recipe, check out the details above. Start by gathering all your ingredients. You'll need Yukon gold potatoes, garlic, onion, vegetable broth, and heavy cream. Peel the potatoes and cut them into 1-inch cubes. Chop the onion finely. For the garlic, you will roast a whole head, so don’t peel it yet. This simple prep helps the flavors shine. Preheat your oven to 400°F (200°C). Cut the top off the garlic head to expose the cloves. Drizzle a teaspoon of olive oil on top. Wrap the garlic in aluminum foil and place it on a baking sheet. Roast for about 30-40 minutes. You’ll know it’s done when the cloves feel soft. The roasting brings out a sweet, rich flavor. In a large pot, heat 2 tablespoons of olive oil over medium heat. Add the chopped onion and sauté for about 5-7 minutes. The onion should turn translucent and fragrant. Next, add the diced potatoes to the pot along with dried thyme and rosemary. Stir and cook for another 5 minutes. Pour in the vegetable broth and bring the mixture to a gentle boil. Once boiling, lower the heat, cover, and let it simmer for 20 minutes. After the potatoes are tender, squeeze the roasted garlic cloves into the pot. Blend the mixture until smooth, using an immersion blender or a countertop blender. Stir in the heavy cream and adjust the seasoning to taste. Heat it gently for another 5 minutes. Now you're ready to serve! Ladle the soup into bowls and garnish with fresh chives. You can find the complete recipe [Full Recipe]. To get the best flavor from your soup, balance is key. Start with fresh ingredients. Use high-quality vegetable broth for depth. Roasting garlic brings out its sweetness. This step is crucial. The herbs also add layers of flavor. Thyme and rosemary work well together. Taste your soup while cooking. Adjust salt and pepper as needed. A squeeze of lemon juice can brighten it up too. Deciding on texture is fun! If you like smooth soup, blend it well. An immersion blender makes this easy. For a chunkier texture, set aside some potato cubes. Add them back after blending. This gives your soup character. You can also mash some potatoes with a fork. Play around and find what you love best. Serving your soup is as fun as making it. Use deep bowls for a cozy feel. Add a swirl of cream on top for flair. Chopped chives add a nice pop of color. Serve with warm crusty bread for dipping. This adds a nice crunch. You can also pair it with a fresh salad. It's a perfect match for your creamy soup. For the full recipe, check out the details above. {{image_4}} If you want a dairy-free soup, use coconut cream instead of heavy cream. It adds a nice sweetness and keeps the soup creamy. You can also try unsweetened almond or cashew milk. These options keep the flavor rich and delicious while being kind to those who avoid dairy. You can change up the soup based on the season. In winter, add some roasted carrots or parsnips for extra sweetness. In spring, toss in fresh peas or asparagus for a pop of color and flavor. This makes the soup lighter and fresher, perfect for warmer days. Don’t be afraid to play with herbs! If you want a different taste, try using fresh basil or dill. They bring a fresh twist to the soup. You can also add a pinch of smoked paprika for a smoky flavor. Adjusting the herbs keeps the soup fun and exciting, making it your own. For the Full Recipe, check out the complete instructions to make this delicious dish! You can store leftover soup in the fridge. Use an airtight container to keep it fresh. It will last for about 3-4 days. Always let the soup cool first before sealing it. This step helps prevent condensation and keeps the soup creamy. To freeze the soup, let it cool completely. Pour it into freezer-safe containers. Leave some space at the top, as soup expands when frozen. It can stay in the freezer for up to 3 months. When you’re ready to eat, just thaw it in the fridge overnight. When reheating, do it slowly on the stove. Stir often to avoid burning. If the soup is too thick, add a splash of broth or water. You can also microwave it in a bowl. Heat in short bursts and stir in between. This way, your soup stays warm and tasty. For more details, check the Full Recipe. Yes, you can make this soup ahead of time. Prepare it, let it cool, and store it in the fridge. It will stay fresh for up to three days. Reheat it on the stove before serving. The flavors will deepen with time, making it even tastier. To add spice, try these ideas: - Add a pinch of cayenne pepper or crushed red pepper flakes. - Mix in some diced jalapeños or serrano peppers. - Stir in a tablespoon of hot sauce. Adjust the spice to your taste, and enjoy the extra kick. This soup pairs well with various sides. Here are some great options: - Warm crusty bread or baguette. - Grilled cheese sandwiches for a classic combo. - A fresh green salad with a light vinaigrette. These sides will enhance your soup experience. For the full recipe, check the earlier section. You now know how to make creamy roasted garlic potato soup. Start with fresh ingredients and simple seasonings. Roast garlic to boost flavor, and cook the soup to a smooth finish. Choose your texture and garnishes to match your taste. Consider variations for special diets and seasonal ingredients. Store leftovers well to enjoy later. This soup is comforting, flavorful, and a hit with many meals. Dive in, get creative, and enjoy each warm bowlful!](https://spoonfulsavory.com/wp-content/uploads/2025/07/cd416155-4a37-4658-b023-800b11dfe2d1.webp)
Creamy Roasted Garlic Potato Soup is not only tasty but also simple to make. With just a few main ingredients
![To create this tasty Greek Chicken Sheet Pan Dinner, you need a few basic ingredients. Here’s what to gather: - 4 boneless, skinless chicken breasts - 1 cup cherry tomatoes, halved - 1 red bell pepper, sliced into strips - 1 yellow bell pepper, sliced into strips - 1 medium red onion, cut into wedges - 1 medium zucchini, sliced into rounds - 1 cup pitted kalamata olives These ingredients work together to build layers of flavor and nutrition. The right spices make this dish sing. Here are the key components for the marinade: - 3 cloves fresh garlic, minced - 2 tablespoons extra virgin olive oil - 2 teaspoons dried oregano - 1 teaspoon smoked paprika - Juice of 1 fresh lemon - Salt and freshly cracked black pepper, to taste This blend adds depth and brightness to the chicken, making each bite memorable. Garnishes can elevate your meal. Consider these options for a beautiful finish: - Chopped fresh parsley Adding parsley enhances flavor and gives a pop of color to your plate. You can also drizzle some extra lemon juice over the dish for added zest. For the full recipe, check out the [Full Recipe]. First, you need to preheat your oven to 400°F (200°C). This temperature helps the chicken cook evenly and gives the veggies a nice roast. Next, grab a large rimmed baking sheet and line it with parchment paper. This makes cleanup easy and keeps the food from sticking. While your oven heats up, let's make the marinade. In a big bowl, mix together two tablespoons of extra virgin olive oil, three minced garlic cloves, two teaspoons of dried oregano, one teaspoon of smoked paprika, and the juice of one fresh lemon. Add salt and cracked black pepper to taste. Now, take your four boneless, skinless chicken breasts and add them to the bowl. Make sure each piece gets coated well. Let the chicken marinate for about 20 minutes. This step infuses the meat with great flavor. After the chicken has marinated, it’s time to arrange everything on the sheet pan. Place the chicken breasts right in the center. Then, add one cup of halved cherry tomatoes, one sliced red bell pepper, one sliced yellow bell pepper, one medium red onion cut into wedges, one medium zucchini sliced into rounds, and one cup of pitted kalamata olives around the chicken. Drizzle any leftover marinade over the veggies. Don’t forget to sprinkle a little extra salt and pepper for more flavor. Now, it’s time to roast! Slide the sheet pan into your preheated oven and set a timer for 25 to 30 minutes. The chicken should reach an internal temperature of 165°F (75°C). The veggies will turn tender and get a nice caramelized edge. Once the timer goes off, take the pan out and let it rest for about 5 minutes. This helps the juices settle. Finally, sprinkle some chopped fresh parsley on top for a burst of color. Serve it hot and enjoy your meal! For the complete recipe, check out [Full Recipe]. To cook chicken just right, use a meat thermometer. Aim for 165°F. Chicken breasts can dry out. To avoid this, do not overcook them. Marinating helps keep the chicken moist. The lemon juice in the marinade adds flavor and moisture. Always let the chicken rest for a few minutes after cooking. This keeps the juices inside, making it juicier. Different vegetables cook at different rates. For this dish, cherry tomatoes and zucchini cook fast. They need only 25 minutes. Bell peppers and onions take a bit longer. Cut them into smaller pieces to speed up cooking. If you want softer veggies, roast them longer. Be careful not to burn them. Check the vegetables halfway through and stir them around. Fresh herbs make a big difference. They add bright flavors and aromas. Use parsley for a fresh finish. Chopped oregano can elevate the dish too. You can add herbs at the end for a burst of flavor. If you want a stronger taste, mix herbs into the marinade. This will give the chicken and veggies a great boost. For more ideas, try adding dill or mint. These herbs will add a unique twist to your meal. {{image_4}} You can easily swap chicken for other proteins. Try turkey breast or pork tenderloin. Both will absorb the marinade well. If you like fish, use firm types like salmon or cod. They cook fast and pair nicely with the veggies. For veggies, feel free to mix and match. Use asparagus, green beans, or eggplant. Carrots add sweetness, while broccoli offers crunch. Always cut vegetables into similar sizes. This helps them cook evenly. If you want a meatless meal, replace the chicken with chickpeas or tofu. Both options soak up the marinade flavors well. Use firm tofu for best results. You can also add more veggies. Try artichoke hearts, spinach, or bell peppers. Add some feta cheese for creaminess. It brings a nice tang to the dish. Don’t be afraid to experiment with flavors. For a spicy kick, add red pepper flakes to the marinade. This gives a nice heat without overpowering the dish. For a sweet touch, drizzle honey over the veggies before baking. This caramelizes them and adds depth. You could also switch the herbs. Instead of oregano, use thyme or rosemary for a different taste. Each herb brings its unique aroma and flavor. For the full recipe, check out the Mediterranean Chicken Sheet Pan Feast. After enjoying your Greek Chicken Sheet Pan Dinner, you may have some leftovers. To store them, let the dish cool down for about 30 minutes. Then, place the chicken and veggies in an airtight container. This helps keep them fresh. Leftovers can stay in the fridge for up to 3 days. When you're ready to eat your leftovers, reheating them correctly is key. Preheat your oven to 350°F (175°C). Place the chicken and veggies on a baking sheet. Cover them with foil to keep moisture in. Heat for about 15-20 minutes. This method helps keep the chicken juicy and the veggies tasty. You can also reheat portions in the microwave for quick meals. Just use a microwave-safe dish and cover it loosely. Heat in short bursts, stirring in between. If you want to save some for later, freezing is a great option. After cooling, pack the chicken and veggies into freezer-safe containers. Make sure to remove excess air to prevent freezer burn. Label the containers with the date. These can last up to 3 months in the freezer. When you’re ready to eat, thaw in the fridge overnight. Then, reheat in the oven or microwave. Enjoy your meal without the fuss! It takes about 25 to 30 minutes to cook Greek chicken in the oven. The chicken should reach an internal temperature of 165°F (75°C). This timing ensures the chicken is juicy and the veggies are tender. I recommend keeping an eye on it during the last few minutes. Ovens can vary, so check for doneness to avoid overcooking. Yes, you can use skin-on chicken for this recipe. Skin-on chicken adds more flavor and moisture. However, it may take a few extra minutes to cook through. Make sure to check the internal temperature to ensure it’s fully cooked. The skin also gets crispy and adds a nice texture to the dish. Several sides go well with Greek chicken. Here are some tasty options: - Greek salad: Fresh tomatoes, cucumbers, olives, and feta cheese. - Rice or couscous: Fluffy grains soak up the chicken's juices. - Pita bread: Soft bread is great for scooping up chicken and veggies. - Tzatziki sauce: A cool yogurt sauce adds creaminess and flavor. To add spice to your Greek chicken dish, consider these options: - Add crushed red pepper flakes to the marinade for heat. - Mix in some cayenne pepper for an extra kick. - Use spicy olives instead of regular ones for added flavor. - Serve with a spicy dipping sauce on the side for more heat. Try these tips to customize the spice level to your liking! For the complete cooking process, check out the Full Recipe. This Greek Chicken Sheet Pan Dinner is simple and tasty. You learned about the key ingredients, spices, and how to marinate chicken. We broke down each step, from prepping your pan to cooking times. I shared tips for perfectly cooked chicken and veggie adjustments. You can also explore variations, from swaps to different flavors. Plus, I covered storage and reheating tips to enjoy leftovers. This dish is easy to make and enjoy any time. Now it's your turn to try it yourself!](https://spoonfulsavory.com/wp-content/uploads/2025/07/e3d2a806-4169-4292-9435-f78583439e80.webp)
Looking for a meal that’s both easy to make and full of flavor? You’re in the right place! This Greek

If you’re craving a refreshing drink that’s both tasty and nutritious, you’re in the right place! The Mango Pineapple Smoothie
![- 1/2 cup chia seeds - 2 cups almond milk (or any plant-based milk of your choice) - 1 tablespoon maple syrup (or honey for a non-vegan option) - 1 teaspoon pure vanilla extract - 1 cup fresh strawberries, hulled and sliced - 2 ripe kiwis, peeled and diced Chia seeds are the stars of this recipe. They soak up the almond milk and create a creamy texture. Almond milk is a great choice, but feel free to use any plant-based milk you like, such as oat or coconut milk. For sweetness, I use maple syrup, but honey works too if you prefer. The vanilla extract adds a lovely aroma, making every bite special. Fresh strawberries and kiwis bring bright flavors and a pop of color. The strawberries add sweetness, while kiwis give a tangy twist. This mix of fruits keeps the dish fresh and vibrant. - Fresh mint leaves - Additional toppings ideas While the pudding is fantastic on its own, garnishing can elevate it even more. Fresh mint leaves add a nice touch and a refreshing smell. You can also get creative with toppings. Try adding granola for crunch or shredded coconut for a tropical vibe. A sprinkle of nuts can also add texture and health benefits. For the full recipe, check out the complete instructions. To start, we need to mix the chia seeds with the liquids. In a medium bowl, combine: - 1/2 cup chia seeds - 2 cups almond milk (or any plant-based milk of your choice) - 1 tablespoon maple syrup (or honey for a non-vegan option) - 1 teaspoon pure vanilla extract Use a whisk to blend everything well. This step helps spread the chia seeds evenly. You want to see no clumps. Now, let's talk about resting time. After mixing, cover the bowl tightly. Place it in the fridge for at least 4 hours, or overnight if you can. This time is key. The chia seeds will soak up the liquid and turn creamy. Next, we chill the pudding. The suggested time is at least 4 hours. This helps achieve the best texture. If you can wait overnight, it’s even better. While chilling, you can cover the bowl with plastic wrap or a lid. This keeps the pudding fresh and prevents any smells from the fridge. When the chia pudding is ready, it's time to layer and serve. Grab some serving glasses or small bowls. Start with a spoonful of chia pudding at the bottom. Then, add a layer of fresh strawberries. Follow it with more chia pudding, and then sprinkle the diced kiwi on top. Repeat until your glass is full. To make it look fancy, gently swirl the layers with a spoon. This creates a beautiful marbled effect. If you want to add a touch of color, garnish with fresh mint leaves. They add a nice aroma and taste. For the complete method, check the Full Recipe. To get a smooth chia pudding, you must blend well. Start by whisking the chia seeds with almond milk. This step keeps the seeds from clumping together. If you notice clumps, use a fork to break them up. You can adjust the liquid to get the right thickness. If your pudding is too thick, add a little more almond milk. If it’s too runny, add more chia seeds and let it sit longer. Remember, the seeds absorb liquid and swell up, so you want to find that balance. Strawberry kiwi chia pudding works great for breakfast or dessert. Pair it with granola, yogurt, or fresh fruit for a tasty meal. It makes a fun snack for kids too! This pudding is perfect for summer picnics or brunch gatherings. The colorful layers make it a showstopper. Serve it in clear cups for a beautiful display. You can even make it ahead and store it in the fridge. For the full recipe, check out the details above. {{image_4}} When making strawberry kiwi chia pudding, you can swap fruits for a new twist. Try using mango, blueberries, or raspberries. Each fruit adds its own flavor and color. You can mix and match to find your favorite combo. Seasonal fruits work great too. In summer, use peaches or apricots. In fall, think about apples or pears. This way, your pudding stays fresh and exciting all year. You can enhance the flavor of your pudding with spices or extracts. A pinch of cinnamon or nutmeg gives warmth. Adding a drop of almond or coconut extract can create a unique taste. If you want to sweeten your pudding, consider alternatives like agave syrup or stevia. These options can help you control the sweetness based on your taste. Experimenting with flavors makes each batch special. For the complete experience, check out the Full Recipe. To keep your strawberry kiwi chia pudding fresh, use airtight containers. Glass jars work well because they do not absorb odors. Make sure the lids fit tightly to avoid spills. Store the pudding in the refrigerator. It must stay cool to prevent spoilage. I recommend keeping it in the fridge for easy access. When stored properly, your pudding stays good for about five days. It tastes best within the first three days. Watch for signs of spoilage. If you see any mold or the pudding smells off, throw it away. A change in texture can also indicate spoilage. Keep an eye on it to enjoy your delicious treat! For the full recipe, check out the [Full Recipe]. Can I use other types of milk? Yes, you can use other types of milk. Any plant-based milk works great. Try coconut, soy, or oat milk. They all add different flavors and textures. Just make sure to choose unsweetened options if you want to control the sweetness. How do I make it vegan? To make this recipe vegan, use maple syrup instead of honey. This simple switch keeps it plant-based. You can also use any non-dairy milk, like almond or coconut milk. Both options are creamy and delicious. Calories and macros per serving Each serving has about 200 calories. It also has 8 grams of protein and 12 grams of healthy fats. The chia seeds are the star of the show, providing fiber and good fats. Health benefits of chia seeds Chia seeds are tiny but mighty! They are packed with fiber, protein, and omega-3 fats. These nutrients help keep you full and support heart health. They also have antioxidants, which help your body fight free radicals. What to do if it's too runny? If your pudding is too runny, add more chia seeds. One tablespoon at a time should help thicken it. Let it rest for another 30 minutes to set. Solutions for clumping issues If you see clumps, don’t worry! Just stir it well after chilling. If that doesn’t work, use a blender. Blend it on low for a few seconds. This will break up the clumps, making your pudding smooth. You can find the full recipe for Strawberry Kiwi Chia Pudding in the earlier sections of this article. Enjoy your fresh and creamy delight! This blog post covered making chia pudding from start to finish. We explored key ingredients like chia seeds and almond milk, followed by easy step-by-step instructions. You learned tips for perfect consistency and serving ideas for any occasion. Variations let you get creative, whether with fruits or flavors. Lastly, we discussed storage tips to keep your pudding fresh. Remember, this tasty treat is both fun to make and good for you. Enjoy experimenting and sharing your creations!](https://spoonfulsavory.com/wp-content/uploads/2025/07/073e21a4-f124-4895-949e-58f4db137650.webp)
Are you ready to dive into a fresh and creamy treat? This Strawberry Kiwi Chia Pudding is not only delicious
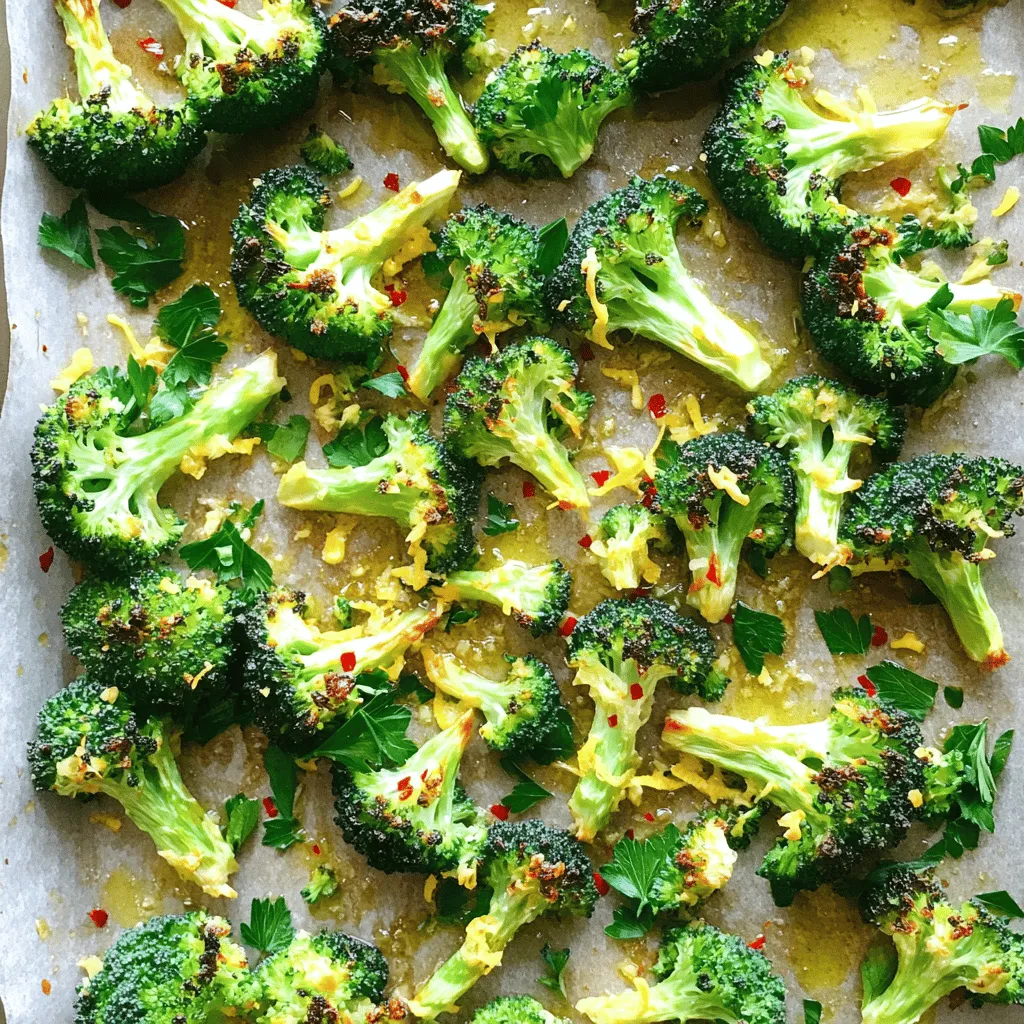
Looking for a tasty and simple side dish? Lemon Garlic Roasted Broccoli is perfect! This easy recipe packs flavor and

Are you ready to treat yourself to a mouthwatering blend of flavors? This Chocolate Peanut Butter Banana Bread is a
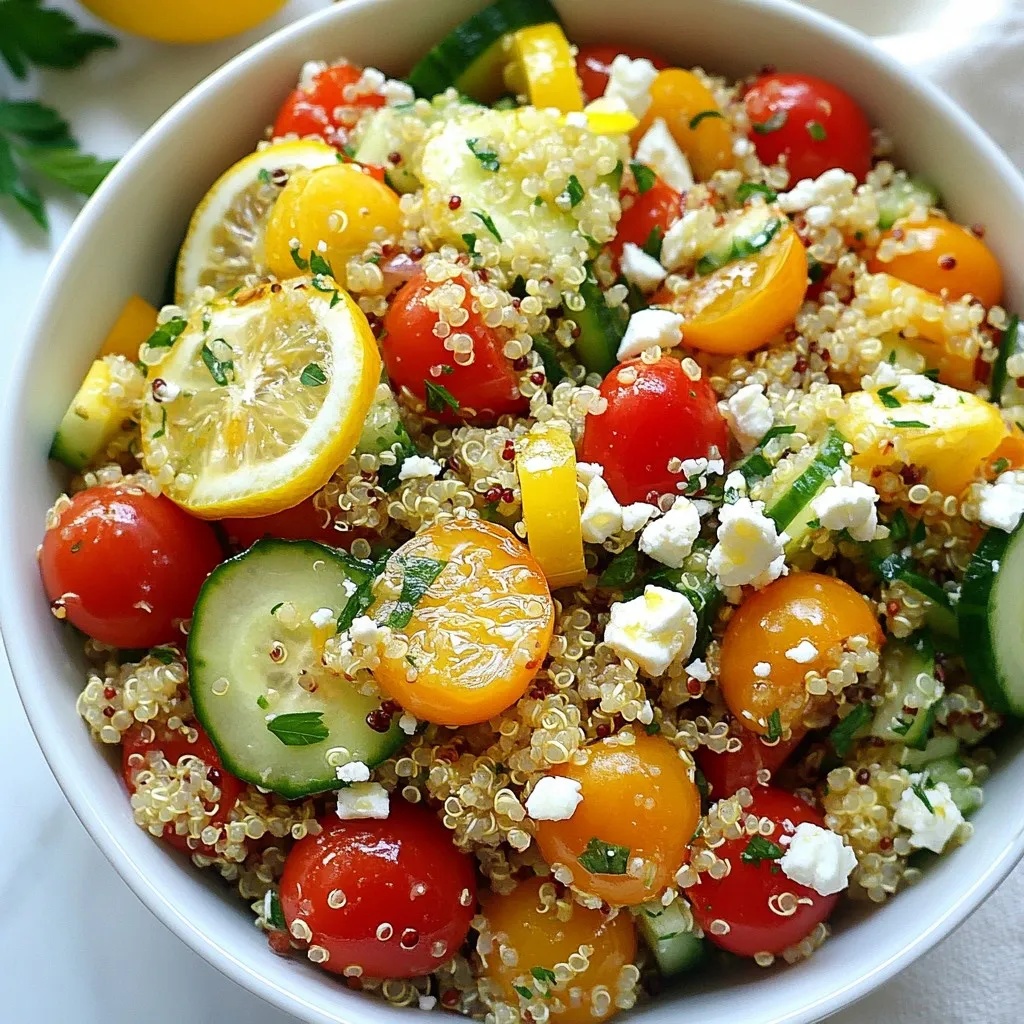
Looking for a fresh and flavorful dish that’s easy to make? The Lemon Herb Quinoa Salad is your answer! It’s
