Skip to content
DisclaimerTerms Of UseGDPR PolicyCookie Policy

spoonfulsavory

  • Home
  • Drinks
  • Appetizers
  • Dinner
  • Dessert
  • About
  • Contact
  • Privacy Policy
DisclaimerTerms Of UseGDPR PolicyCookie Policy

Sarah

- 2 cups cooked basmati rice - 1 lb boneless chicken thighs, sliced into thin strips - 3 tablespoons extra virgin olive oil - 3 cloves garlic, finely minced - 2 teaspoons ground cumin - 2 teaspoons ground coriander - 1 teaspoon smoked paprika - 1 teaspoon ground turmeric - 1 teaspoon ground cinnamon - 1/2 teaspoon cayenne pepper (adjust to taste) - Salt and freshly cracked black pepper to taste - Juice of 1 large lemon The base of your Chicken Shawarma Rice Bowl is the basmati rice. It’s fluffy and fragrant. The chicken thighs bring a juicy texture. They soak up all the spices in the marinade. This blend of olive oil, garlic, and spices makes the chicken really special. - 1 cup cucumber, diced into small pieces - 1 cup cherry tomatoes, halved - 1/4 cup red onion, finely chopped - 1/4 cup fresh parsley, finely chopped The fresh salad adds a crisp bite. The cucumber cools down the spices. Cherry tomatoes add sweetness, while red onion gives a nice zing. Fresh parsley brings color and flavor, making the bowl vibrant. - 1/2 cup plain yogurt - 1 tablespoon tahini - Fresh lemon juice The yogurt-tahini sauce ties everything together. It’s creamy and tangy. This sauce adds richness to the chicken and rice. A drizzle of this sauce makes every bite even better. For the full recipe, check out Juicy Chicken Shawarma Rice Bowl . First, mix the marinade ingredients in a medium bowl. You need: - 3 tablespoons extra virgin olive oil - 3 cloves garlic, minced - 2 teaspoons ground cumin - 2 teaspoons ground coriander - 1 teaspoon smoked paprika - 1 teaspoon ground turmeric - 1 teaspoon ground cinnamon - 1/2 teaspoon cayenne pepper (adjust to taste) - Salt and black pepper to taste - Juice of 1 lemon Whisk everything together until well combined. This mix adds great flavor to the chicken. Marinating is key! Let the chicken sit in this mixture for at least 30 minutes. For even better taste, aim for 1 to 2 hours. Now it's time to cook the chicken. Heat a large skillet over medium-high heat. Add the marinated chicken strips. Cook for about 5 to 7 minutes. Stir often to get a nice golden brown color. The chicken is ready when it reaches an internal temperature of 165°F (75°C). Use a meat thermometer for accuracy. To assemble your bowl, start with fluffy basmati rice. Spoon it into individual bowls. Next, add the cooked chicken strips on top. Then, layer on the fresh salad mix. For the salad, combine diced cucumber, halved cherry tomatoes, finely chopped red onion, and parsley. Finally, drizzle the yogurt-tahini sauce over everything. To make the sauce, mix plain yogurt and tahini in a small bowl. This adds a creamy touch. For the full recipe, check out Juicy Chicken Shawarma Rice Bowl . Enjoy your meal! How long to marinate for best flavor For the best flavor, I recommend marinating the chicken for at least 30 minutes. However, 1 to 2 hours gives the spices time to work their magic. Longer marination enhances the taste, making it juicier and more delicious. Marination container recommendations Use a glass or plastic container with a lid. This keeps the marinade from spilling and helps the chicken soak up the flavors well. If you use a bowl, cover it tightly with plastic wrap to avoid any mess in your fridge. Optimal skillet heat settings Set your skillet to medium-high heat. This helps to sear the chicken quickly, locking in juices and flavor. Make sure the skillet is hot before adding the chicken for the best results. Ensuring chicken is evenly cooked Cook the chicken for 5 to 7 minutes, stirring often. This helps it cook evenly and brown nicely. Always check that the chicken reaches 165°F (75°C) to ensure it is safe to eat. Ideas for vibrant plating For a colorful and appealing bowl, start with a base of fluffy basmati rice. Layer the chicken on top, then add the fresh salad mixture. This creates a beautiful contrast of colors. Using garnishes for visual appeal Finish your bowl with a drizzle of the yogurt-tahini sauce. Add a sprinkle of fresh parsley on top for a pop of green. These simple steps make your meal look inviting and ready to enjoy. {{image_4}} You can change the flavor of your Chicken Shawarma Rice Bowl by swapping proteins. Beef or lamb works great with the same spices. Just marinate them like the chicken. For a veggie twist, use roasted veggies instead. Eggplant or bell peppers add a nice touch. Rice is the base of this dish. Basmati rice offers a nice flavor and fluffy texture. If you want a healthier choice, try brown rice. It has more fiber and a nutty taste. For a low-carb option, use cauliflower rice. It cooks quickly and absorbs flavors well. Toppings can elevate your bowl. Add slices of creamy avocado or crumbled feta cheese for richness. They pair well with the spices. You can also experiment with different dressings or sauces. A tangy tahini or a zesty garlic sauce can bring new life to your meal. Discover more about these ideas in the full recipe for a delicious experience! To keep your chicken and rice fresh, store them separately. Place leftover chicken in an airtight container. Let it cool to room temperature first. For the rice, you can use the same type of container. This prevents the chicken from making the rice soggy. If you have salad leftover, store it in a separate bowl. Cover it with plastic wrap to keep it fresh. Avoid dressing the salad until you are ready to eat. This keeps the veggies crisp. When reheating, use the microwave or a skillet. If using a microwave, place chicken and rice in a bowl. Add a splash of water to keep it moist. Cover with a microwave-safe lid or plastic wrap. Heat in short bursts, stirring in between. If using a skillet, heat on medium-low. Add a little olive oil or water to prevent sticking. This helps maintain flavor and texture. Always check that the chicken reaches 165°F (75°C) before serving. If you want to freeze the meal, it’s best to do it right after cooking. Place the chicken and rice in freezer-safe bags. Remove as much air as possible before sealing. For the salad, you should not freeze it. It does not hold up well. When ready to eat, thaw the chicken and rice overnight in the fridge. To reheat, follow the earlier steps. Enjoy your tasty bowl later on! If you need the full recipe, refer to Juicy Chicken Shawarma Rice Bowl . For Chicken Shawarma Rice Bowl, I prefer basmati rice. It is fragrant and fluffy. Basmati rice has a nutty flavor that pairs well with spices. Jasmine rice is also a good option. It is slightly sweeter and stickier. Both types work, but basmati rice is my top choice. Yes, you can make this dish ahead of time. Store the chicken, rice, and salad separately in the fridge. Use airtight containers to keep them fresh. When ready to eat, reheat the chicken and rice in the microwave. The salad can be enjoyed cold. This way, you save time on busy days. You can serve many tasty sides with this bowl. Warm pita bread is a nice touch. Hummus or baba ghanoush pairs well too. For drinks, try lemonade or mint tea. These options complement the flavors of the dish perfectly. You can find the full recipe for Juicy Chicken Shawarma Rice Bowl online. It includes all the steps and tips to make this meal easy and delicious. To conclude, the Chicken Shawarma Rice Bowl is a delicious meal that combines key ingredients like basmati rice, marinated chicken, and fresh salads. You learned how to prepare and cook these ingredients step-by-step. I shared tips to enhance flavor and presentation, as well as variations to fit your taste. This bowl is flexible, satisfying, and easy to store or reheat. Enjoy making this dish and experimenting with your favorite flavors. It’s a fun way to cook!

Chicken Shawarma Rice Bowl Flavorful Meal Idea

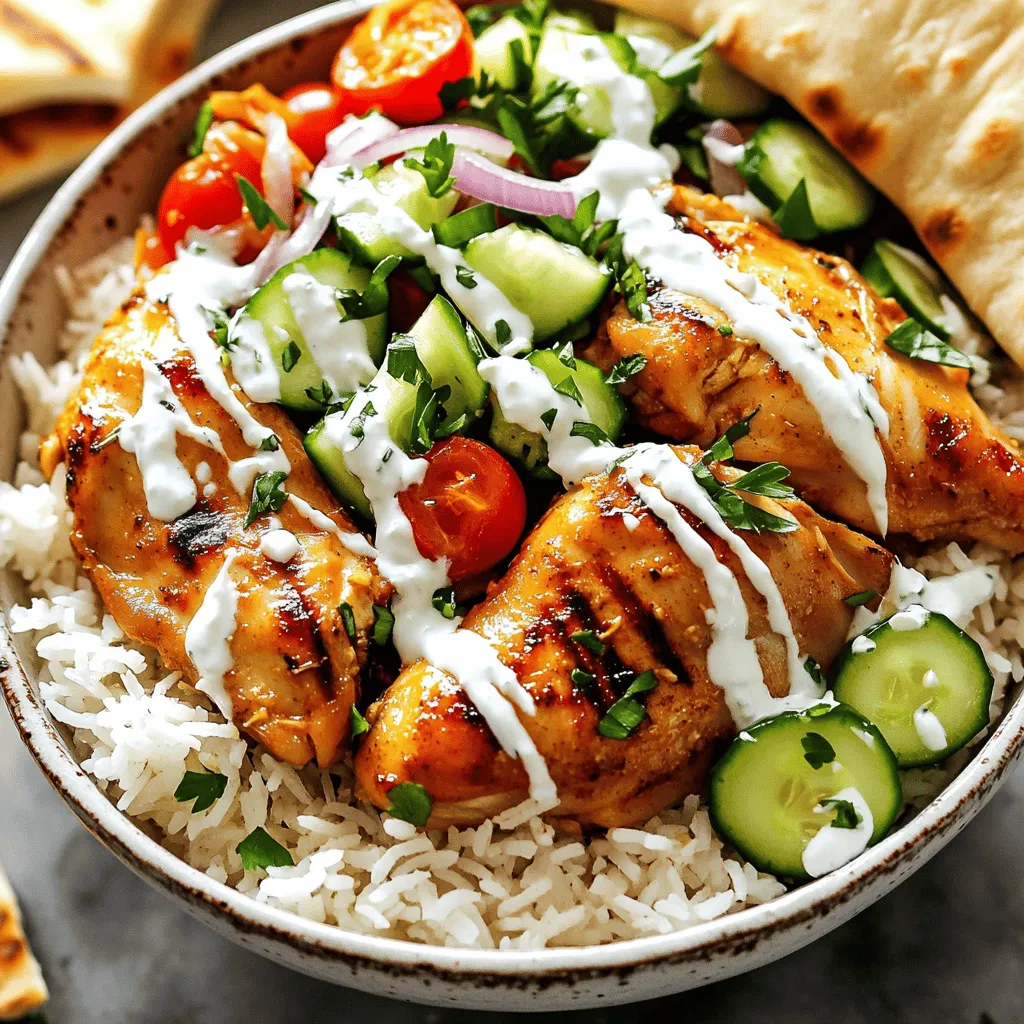
Ready for a delicious meal idea? The Chicken Shawarma Rice Bowl combines savory marinated chicken and fluffy basmati rice with

- 4 bone-in, skin-on chicken thighs - 1/4 cup honey - 4 cloves garlic, minced Bone-in, skin-on chicken thighs bring juiciness and flavor. The skin crisps up nicely, adding texture. Honey gives the dish a sweet balance. It caramelizes during cooking, adding depth. Fresh garlic offers health benefits, too. It adds a strong flavor and boosts immunity. - 1 cup broccoli florets - 1 red bell pepper, sliced into strips Broccoli florets add nutrition and crunch. They soak up the sauce well. Red bell pepper brings bright color and natural sweetness. Together, they make the dish look and taste great. - 1 tablespoon apple cider vinegar - 1 teaspoon freshly grated ginger - Cooked rice or quinoa for serving Apple cider vinegar adds a tangy kick. It balances the sweetness of honey. Freshly grated ginger gives a warm spice. It enhances the flavor profile nicely. Serve the chicken over cooked rice or quinoa. This adds heartiness and makes it a full meal. For the full recipe, check the previous section. - Preheat the oven to 400°F (200°C). This ensures even cooking. - Gather your ingredients for the honey garlic sauce. You will need honey, minced garlic, soy sauce, apple cider vinegar, and grated ginger. Mix them well in a bowl. Set aside. - Heat olive oil in a large oven-safe skillet over medium-high heat. - Season both sides of the chicken thighs with salt and pepper. - Place the chicken thighs skin-side down in the skillet. Sear for about 5-7 minutes until golden brown. - Flip the chicken carefully to sear the other side. This step gives it a nice crust. - Add broccoli florets and sliced red bell pepper around the chicken in the skillet. - Pour the honey garlic sauce over the chicken and vegetables. Make sure everything is well coated. - Transfer the skillet to the oven. Bake for 25-30 minutes. The chicken should reach an internal temperature of 165°F (74°C). Ensure the juices run clear. This simple recipe brings together great flavors in one pan. Enjoy your meal! To get crispy skin on chicken thighs, I recommend starting with a dry surface. Pat the chicken thighs with paper towels. This helps remove moisture, which can cause steaming instead of searing. Heat olive oil in your skillet until it shimmers. Place the chicken skin-side down and let it sear without moving it. Aim for about 5-7 minutes for a beautiful golden color. If you flip the chicken too soon, you won’t get that nice crisp. A key alteration to cooking temperature is lowering it slightly after searing. Once you flip the chicken, reduce the heat to medium. This allows the meat to cook evenly without burning the skin while keeping it crispy. If you need a soy sauce substitute, try coconut aminos or tamari. Both options give a similar savory flavor. You can also use Worcestershire sauce for a unique twist. To balance sweetness and savoriness, I recommend tasting the sauce before adding too much honey. If it’s too sweet, a touch of salt or more soy sauce can help. For side dishes, I love serving this dish with rice or quinoa. Both pair well with the honey garlic sauce. You can also try roasted potatoes for a hearty option. To make your dish visually appealing, garnish with chopped green onions or sesame seeds. Adding a lime wedge on the side brightens up the plate and adds a zesty flavor. {{image_4}} You can change the veggies to match the season. In spring, try snap peas or asparagus. In fall, roasted carrots and sweet potatoes work well. Adding more greens like spinach or kale boosts nutrition too. These greens cook fast and add color to your dish. Want a kick? Add chili flakes for some heat. A pinch can transform the dish. Fresh herbs like thyme or rosemary also add great flavor. They bring a nice earthiness that pairs well with chicken. Just sprinkle some on before baking for a fresh taste. To make this dish gluten-free, swap soy sauce for tamari. This keeps the flavor but removes gluten. For a low-carb option, skip the rice or quinoa. Instead, serve with cauliflower rice or a side salad. These swaps still taste great without the carbs. For more ideas, check the Full Recipe. After you enjoy your meal, let the chicken cool down. Place the chicken thighs in an airtight container. Make sure to add any leftover sauce and vegetables as well. This helps keep everything juicy and tasty. Store it in the fridge for up to four days. If you follow these steps, your chicken will stay fresh and full of flavor. When it’s time to eat your leftovers, you want them warm and delicious. The best way to reheat chicken thighs is in the oven. Set the oven to 350°F (175°C). Place the chicken in a baking dish and cover it with foil. This keeps the moisture in, making the chicken tender. Heat for about 15-20 minutes or until it's warm. You can also use a microwave, but be careful not to overheat. This can make the chicken dry. You can freeze one-pan honey garlic chicken thighs if you want to save them for later. Just make sure to cool them completely first. Then, wrap each piece tightly in plastic wrap. Place the wrapped thighs in a freezer bag, removing as much air as possible. They can last for up to three months in the freezer. When you're ready to eat, thaw the chicken overnight in the fridge. Reheat it using the oven or microwave to enjoy a tasty meal again. I bake chicken thighs for 25 to 30 minutes. This timing works well for bone-in, skin-on thighs. Make sure the chicken reaches an internal temperature of 165°F (74°C). If your thighs are larger, you may need to bake them a bit longer. Always check for clear juices to know they are done. Yes, you can use boneless chicken thighs. However, they cook faster than bone-in thighs. Bake boneless thighs for about 20 to 25 minutes. The texture will be a bit different too. Boneless thighs tend to be more tender but may not have as much flavor without the bone. You can mix it up easily! Try adding sriracha for heat or lime juice for zest. Use maple syrup instead of honey for a different sweetness. You can also add sesame oil for a nutty flavor. Experiment and find what you love! For the full recipe, check out the link above. This blog post covered how to make one-pan honey garlic chicken thighs. We discussed key ingredients like chicken, honey, and garlic. Vegetables like broccoli and red bell pepper enhance the dish both in taste and nutrition. I shared tips on perfecting the sear and suggestions for serving and storing leftovers. Remember, cooking is about exploring flavors and having fun. Whether trying new veggies or adjusting the sauce, feel free to make it your own. Enjoy your tasty, homemade meal!

One-Pan Honey Garlic Chicken Thighs Simple Recipe

If you’re looking for a quick and delicious meal, you’ve come to the right place! I’m excited to share this

- 2 cups all-purpose flour - 1/2 cup granulated sugar - 2 teaspoons baking powder - 1/2 teaspoon baking soda - 1/4 teaspoon salt - 1/2 cup cold unsalted butter - 1/2 cup fresh blueberries - Zest and juice of 1 lemon - 1/2 cup buttermilk - 1 large egg - 1 teaspoon vanilla extract - 1 tablespoon coarse sugar When I make lemon blueberry scones, I focus on using fresh, quality ingredients. The all-purpose flour provides the base, while the sugar adds sweetness. Baking powder and soda help the scones rise, giving them a light texture. A touch of salt balances the flavors perfectly. The special ingredients make these scones shine. Cold unsalted butter is crucial for a flaky texture. I love using fresh blueberries for their burst of flavor. The zest and juice of one lemon brighten the scones and add a refreshing taste. Buttermilk keeps the scones tender, while a large egg binds everything together. A dash of vanilla extract enhances the overall flavor. For the topping, I sprinkle coarse sugar on top. This adds a delightful crunch and a bit of sweetness. You can find the Full Recipe for the scones above. - Preheat your oven to 400°F (200°C). - Line a baking sheet with parchment paper. - Combine 2 cups of flour, 1/2 cup of sugar, 2 teaspoons of baking powder, 1/2 teaspoon of baking soda, and 1/4 teaspoon of salt in a bowl. - Whisk until the mixture is airy and well-mixed. - Add 1/2 cup of cold, cubed butter into the flour mixture. Use your fingers or a pastry cutter to mix until it looks crumbly. - Gently fold in 1/2 cup of fresh blueberries and the zest of 1 lemon. - In a separate bowl, whisk together 1/2 cup of buttermilk, 2 tablespoons of lemon juice, 1 large egg, and 1 teaspoon of vanilla extract. - Pour the wet mixture into the dry ingredients. Mix until just combined. The dough should be slightly sticky. - Lightly flour your work surface and turn the dough out onto it. - Shape the dough into a 1-inch thick disc. Cut it into 8 wedges. - Place the scone wedges on the prepared baking sheet, leaving space between each. - Sprinkle with 1 tablespoon of coarse sugar on top. - Bake for 15-20 minutes until golden brown. For the Full Recipe with detailed measurements and tips, check the ingredient section. To get the best texture in your scones, start with cold butter. Cold butter helps create those flaky layers we love. Cut the butter into small cubes, then mix it into the flour until it looks like crumbs. This step is key! Next, be careful not to overmix the dough. Mix just until the ingredients come together. This keeps your scones light and fluffy. If you mix too much, the scones can become tough. Want a stronger lemon flavor? Add more lemon zest. The zest packs a bright punch that really shines through. You can also experiment with spices. A dash of cinnamon adds a warm touch that pairs well with blueberries. These scones taste best when warm. Pair them with honey or clotted cream for a sweet touch. For a lovely presentation, garnish your plate with extra lemon zest and fresh blueberries. This not only looks pretty but hints at the flavors within. {{image_4}} If you want gluten-free scones, use a gluten-free flour blend. This substitute works well in most recipes. You may need to adjust the baking time. Start checking for doneness around 15 minutes. To make vegan scones, replace the butter with coconut oil. This swap gives the scones a nice flavor. For buttermilk, use plant-based milk mixed with vinegar. This combination mimics the acidity of buttermilk. Get creative with your scones! You can add nuts like walnuts or pecans for a crunchy twist. You can also experiment with other fruits. Try raspberries or strawberries to change the flavor profile. Each option adds its own unique touch to the scones. For the Full Recipe, check the ingredients section. To keep your scones fresh, store them in an airtight container at room temperature. They taste best within 2-3 days. After that, they may start to lose their lovely texture. You can freeze the scones for up to 3 months. Freezing keeps them tasty for later. When you want to enjoy them, reheat in the oven. This helps restore their soft and flaky texture. Thaw the scones overnight in the refrigerator before reheating. This ensures they warm up evenly. Reheat them in the toaster or oven for the best results. You'll enjoy that fresh-baked taste again! - Yes, prepare the dough, cut into wedges, and refrigerate until ready to bake. This makes it easy to enjoy fresh scones in the morning. - Use a mixture of milk and vinegar or yogurt for a similar effect. This keeps your scones moist and flavorful without needing buttermilk. - Look for a golden brown color on the edges, and a toothpick should come out clean. This is a simple way to check if they are baked just right. - Yes, but do not thaw them to avoid a soggy texture. Frozen blueberries can still add that burst of flavor and color to your scones. - Store them in an airtight container at room temperature for short-term, or freeze for long-term. This keeps them fresh and tasty for days. - The Full Recipe for these delicious scones can be found in the ingredient section. Lemon blueberry scones are easy to make with simple ingredients. You learned the steps to prepare, bake, and store them. I shared tips for great texture and flavor. You can also try gluten-free or vegan versions for variety. Enjoy these scones fresh or warm, paired with honey or cream. They are a tasty treat for any time of day.

Lemon Blueberry Scones Delightful and Easy Recipe

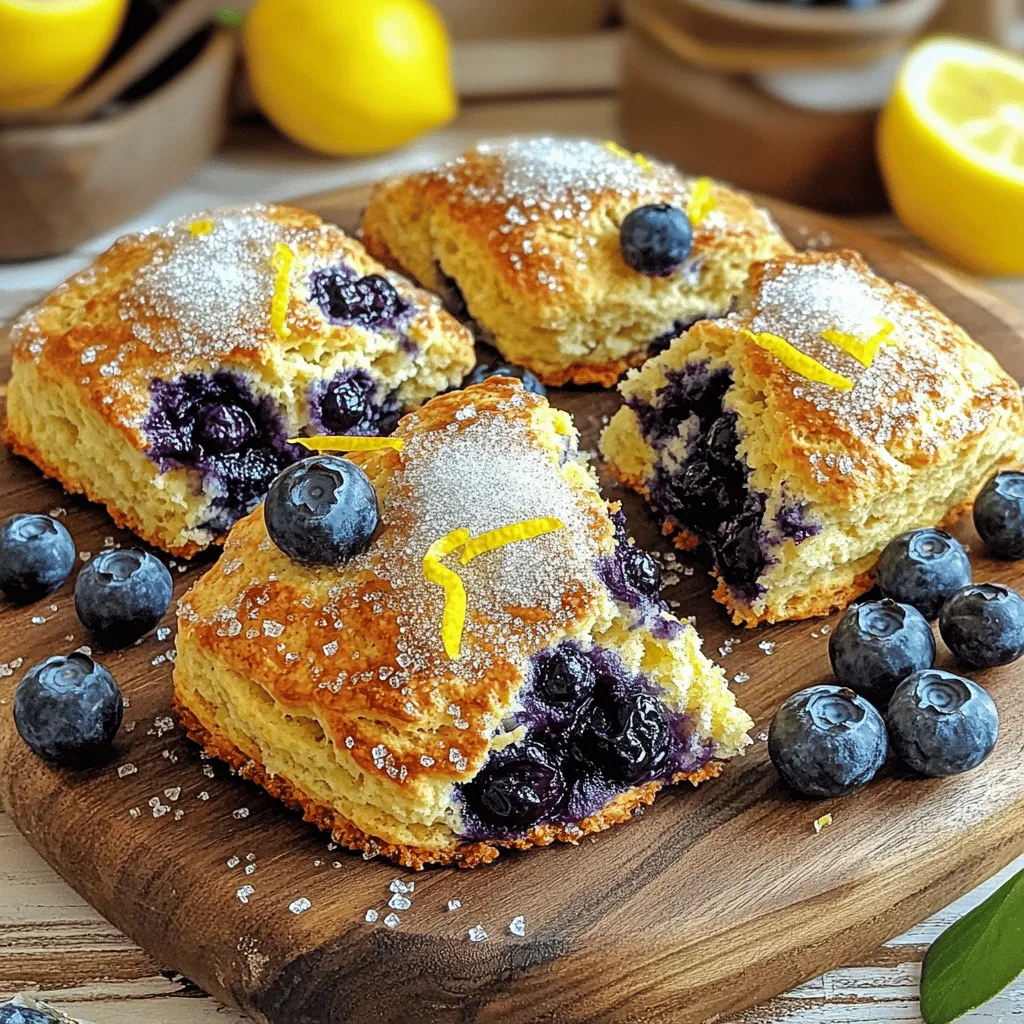
Are you ready to bake something amazing? These Lemon Blueberry Scones are both simple and delightful! With a burst of

- 2 ripe avocados - 4 slices of whole grain or gluten-free bread - 2 tablespoons freshly squeezed lemon juice - 1 teaspoon garlic powder - 1 teaspoon onion powder - 1 teaspoon nutritional yeast (optional) - Sea salt and freshly cracked black pepper - 2 tablespoons everything bagel seasoning - Handful of cherry tomatoes, halved (for garnish) - Fresh microgreens or sprouts (for garnish) Gathering the right ingredients is key to making the perfect vegan avocado toast. You need ripe avocados for smoothness. The bread choice matters too; whole grain or gluten-free adds texture. Fresh lemon juice keeps the avocado bright and tasty. Garlic and onion powders bring a savory kick. Nutritional yeast adds a cheesy flavor, but it’s optional. Don’t forget sea salt and black pepper to enhance the taste. Everything bagel seasoning is the star here, giving your toast that unique crunch. For garnish, cherry tomatoes and microgreens not only look good but add freshness. With these ingredients, you can create a dish that is both simple and satisfying. For the full recipe, check out the details above. - Preheat the toaster or toaster oven. This step is key to getting that perfect crunch. - Toast the bread until it turns a delightful golden brown. Pay close attention to avoid burning. - Cut and scoop the avocados into a bowl. Make sure they are ripe for the best flavor. - Add lemon juice, garlic powder, onion powder, and salt. This mix enhances the taste. - Mash the avocado to your desired consistency. You can leave it chunky for more texture. - Spread the avocado mixture generously on the toasted bread. Ensure each slice has a good layer. - Sprinkle everything bagel seasoning evenly on top. This adds a nice crunch and flavor burst. - Garnish with halved cherry tomatoes and fresh microgreens. This makes your toast colorful and fun. Try this recipe for a quick and tasty meal. For more detailed steps, check out the Full Recipe. To find ripe avocados, look for a few key signs. A ripe avocado feels slightly soft when you gently squeeze it. The skin should be dark green to almost black. If it is too hard, it is not ripe yet. If it feels mushy, it may be overripe. Timing is important too. Buy avocados a few days before you plan to use them. This way, they can ripen nicely at home. If you need them faster, place them in a paper bag with a banana. The ethylene gas helps them ripen quicker. There are many ways to toast bread. A toaster is the easiest method. Set it to medium for a nice golden color. You can also use a toaster oven or a skillet. A skillet gives you more control, so keep an eye on it. For a perfect crunch, toast the bread until it is crispy. This texture will hold the avocado well without getting soggy. If you want a unique flavor, try brushing the bread with a little olive oil before toasting. Serving your avocado toast well makes it even more inviting. Use a rustic wooden board or a colorful plate. This adds a nice touch to your meal. When arranging, spread the avocado mixture evenly. Then, sprinkle the everything bagel seasoning on top. For a pop of color, add halved cherry tomatoes and fresh microgreens. This creates a bright and appealing dish. Drizzling extra lemon juice over the garnishes adds a zesty finish. For the full recipe, check out Avocado Bliss Toast with Everything Bagel Magic. {{image_4}} To add a twist to your avocado toast, try different seasonings. You can use smoked paprika for a smoky flavor. Cumin adds warmth and depth. For a spicy kick, consider cayenne pepper or chili flakes. Mix and match these spices to find your favorite blend. You can also experiment with herbs like dill or cilantro. These fresh flavors brighten the dish. If you enjoy a little tang, add lemon zest. It enhances the taste and looks great on your toast. Garnishing your avocado toast can change the game. Radishes add a crisp texture and peppery flavor. Thinly sliced cucumbers bring freshness and crunch. Nuts like toasted almonds or walnuts can add healthy fats and a satisfying crunch. You can also layer your toast with other veggies. Try roasted red peppers or sautéed spinach. These options not only boost nutrition but also add vibrant colors. If you're looking for gluten-free options, many choices exist. Rice cakes or corn tortillas can work well. They provide a great base for your toppings. For a grain-free option, use thick slices of sweet potato. Simply roast or grill them until tender. Explore different bread types, too. Sourdough brings a tangy flavor, while rye adds a hearty touch. Each bread type adds its unique taste and texture. So, don’t hesitate to mix it up! For the full recipe, check out the Avocado Bliss Toast with Everything Bagel Magic. To keep your avocado mixture fresh, store it in an airtight container. Press plastic wrap directly onto the surface of the mixture before sealing. This reduces air exposure and slows browning. Use it within one day for the best taste. Signs your mixture has gone bad include an off smell and a dark color. If you see any browning, you can scrape off the top layer, but if it smells bad, toss it. Storing finished toast can be tricky. It tastes best fresh. If you have leftovers, wrap each piece in foil or plastic wrap. Store them in the fridge for up to two days. Do not freeze the toast. It will lose its crispiness when thawed. Instead, reheat in the toaster for a quick revive. Making avocado toast ahead of time is smart for busy mornings. You can prepare the avocado mixture and store it in the fridge. This makes for a quick breakfast option. To freeze avocado mixtures, place them in ice cube trays. Once frozen, transfer cubes to a freezer bag. This way, you can thaw just what you need. Use the thawed mixture within three days for great taste. For the full recipe, check out the section above! You can easily make this recipe nut-free by choosing bread that does not contain nuts. Look for whole grain or gluten-free options that meet your needs. You can also skip any optional toppings that might include nuts. Instead, add seeds like sunflower or pumpkin for crunch and nutrition. Yes, you can use frozen avocados! First, let them thaw in the fridge overnight. After thawing, drain any excess water. Then, mash them like fresh avocados. Keep in mind that the texture may be a bit softer, but they will still taste great. Everything bagel seasoning is a blend of spices that packs a punch. It usually contains sesame seeds, poppy seeds, garlic, onion, and salt. This mix gives your toast a savory flavor and a nice crunch. It’s perfect for enhancing the creamy avocado. To make this toast more filling, consider adding protein-rich toppings. Try sliced tofu, chickpeas, or a sprinkle of hemp seeds. You can also add a few slices of smoked salmon or a scoop of hummus. These options will not only add protein but also create new textures. Absolutely! You can prepare the avocado mixture in advance. Just store it in an airtight container with a little lemon juice on top to prevent browning. Toast the bread fresh when you’re ready to eat. This way, you enjoy the crunch and freshness without losing flavor. For the full recipe, check out the complete guide. This post covered making delicious avocado toast. We discussed the required ingredients and step-by-step instructions. You learned tips for choosing ripe avocados and the best ways to toast bread. We also looked at variations and storage tips to keep your toast fresh. Enjoy experimenting with different toppings and spices. Healthy eating can be fun and creative. Enjoy your tasty avocado toast!

Vegan Avocado Toast with Everything Bagel Seasoning Delight

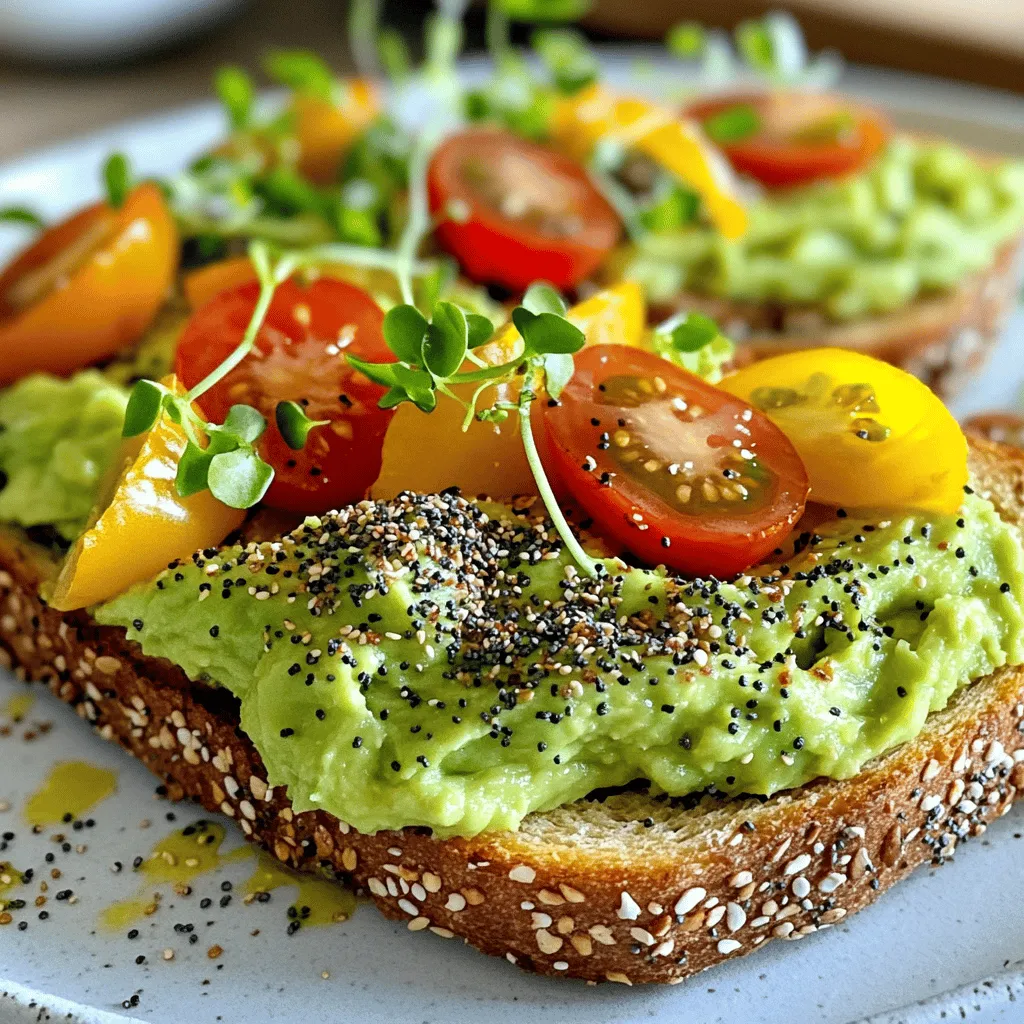
Welcome to the delicious world of Vegan Avocado Toast with Everything Bagel Seasoning! If you’re craving a healthy, tasty meal

- 1 ripe mango, peeled and diced - 1 cup fresh pineapple chunks - 1 medium ripe banana, frozen - 1 cup coconut milk (or regular milk) - 1/2 cup Greek yogurt (optional) - 1 tablespoon honey or agave syrup - 1 tablespoon chia seeds (optional) - Ice cubes (optional) Gathering fresh ingredients is key for the best flavor. Use a ripe mango for sweetness. Fresh pineapple brings a bright, tangy taste. A frozen banana adds creaminess and helps chill the smoothie. Coconut milk gives a rich texture, but regular milk works too. Greek yogurt is optional, but it makes the smoothie extra creamy. Honey or agave syrup adds sweetness; you can adjust it to your liking. Chia seeds are optional, but they add nutrition. Ice cubes can make it thicker and cooler, perfect for a hot day. You can find the full recipe listed above. Start by dicing the ripe mango and fresh pineapple into small pieces. Use a sharp knife for clean cuts. The mango should be soft but not mushy. Pineapple pieces should be juicy and sweet. These fruits will provide a bright flavor to your smoothie. Next, freeze the banana. A frozen banana gives the smoothie a thick, creamy texture. Peel the banana and cut it into chunks. Place the chunks in a bag and freeze them for a few hours. Frozen bananas are key to a rich smoothie. Now, it's time to add the ingredients to the blender. First, put the diced mango and pineapple in. Then, add the frozen banana. Pour in one cup of coconut milk for creaminess. If you want, include Greek yogurt for extra smoothness. Next, drizzle in the honey or agave syrup. This sweetener helps balance the tartness of the fruits. Taste as you go and adjust the sweetness to your liking. If you want more nutrition, toss in one tablespoon of chia seeds. They can give a nice health boost! Blend the mixture on high speed until smooth. Remember to pause and scrape down the sides. This helps mix all the ingredients well. You want a creamy and vibrant color. After blending, taste your smoothie. If it's too thick, add a bit more coconut milk. If you like it thicker, throw in some ice cubes. Blend again until you reach your perfect texture. Pour the smoothie into tall glasses and enjoy your tropical drink. For more details, check the Full Recipe. To achieve the perfect thickness for your smoothie, ice cubes can be your best friend. Start with a few cubes and blend them in. If you want a creamier texture, adjust the amount of coconut milk. More milk will make it thinner, while less will keep it thick. To make your smoothie even tastier, you can add a splash of vanilla extract. This simple addition brings out the fruit's natural sweetness. You can also use flavored yogurt instead of plain Greek yogurt. This change can add a fun twist to your drink. Serving your smoothie in tall, clear glasses looks great. You can garnish each glass with a slice of fresh mango on the rim. A sprinkle of chia seeds on top adds a nice touch. For a cheerful look, consider adding a colorful straw. Your smoothie will not only taste good but look amazing too! {{image_4}} If you want a creamy mango pineapple smoothie without dairy, try these options. - Coconut milk works great. It adds a rich flavor and creamy texture. - You can also use almond or oat milk. These options keep it light and tasty. - For yogurt, choose non-dairy yogurt made from nuts or soy. It gives a nice creaminess without milk. Adding different fruits can change the taste and nutrition. - Spinach is an easy addition. It blends well and boosts health without altering the flavor. - You can mix in berries like strawberries or blueberries. They add a fun flavor and are packed with vitamins. - Other tropical fruits, like papaya or kiwi, can also make your smoothie unique. You can adjust the sweetness and nutrition of your smoothie easily. - Maple syrup is a great natural sweetener. It adds a rich flavor without processed sugar. - For extra protein, try adding protein powder. This can help keep you full longer and is great for post-workout recovery. - You can also sprinkle in some chia seeds. They boost fiber and omega-3s, making your drink even healthier. For the full recipe, check out the Tropical Sunset Mango Pineapple Smoothie . To store leftover mango pineapple smoothie, use an airtight container. Glass jars or plastic containers work well. Make sure to leave some space at the top since liquids expand when frozen. If you plan to freeze it, pour the smoothie into ice cube trays. This way, you can use small portions later. If your smoothie sits in the fridge, it may separate. To refresh it, simply shake the container or stir it well. You can also blend it again with some fresh fruit or a splash of coconut milk. The smoothie is best enjoyed within one to two days for optimal flavor. If frozen, consume within three months for the best taste and texture. To freeze mango and pineapple, start by cutting them into small chunks. This helps them freeze evenly. Place the chunks on a baking sheet in a single layer. This step prevents them from sticking together. Freeze for about two hours until solid. Then, transfer the chunks to a freezer bag. Remove as much air as possible before sealing. Label the bag with the date. This method keeps the fruits fresh for up to six months. Yes, you can swap in many fruits! Try berries like strawberries or blueberries for a new flavor. Bananas work well, too, adding creaminess and sweetness. If you like a tropical twist, add passion fruit or kiwi. You can mix and match as you like! Just remember to adjust the sweetener based on the fruits you pick. Each fruit brings its own taste, making your smoothie unique. To cut the sweetness, add more yogurt or milk. Greek yogurt gives a nice tang that balances flavors. Try adding a squeeze of lemon or lime juice. This will add acidity without extra sugar. You can also use unsweetened coconut milk for a creamy base. If you still find it too sweet, blend in some spinach or kale. These greens add nutrition and help tone down sweetness. This blog post guided you through making a tasty mango pineapple smoothie. We covered ingredients, preparation, and tips for the best results. You learned how to blend fruits, adjust flavors, and create your perfect drink. Don't forget to try different fruit combos or sweeteners. Enjoy your smoothie fresh or store it for later. With these steps, you can impress anyone with your smoothie skills. Start blending and have fun experimenting!

Mango Pineapple Smoothie Refreshing and Nutritious Drink

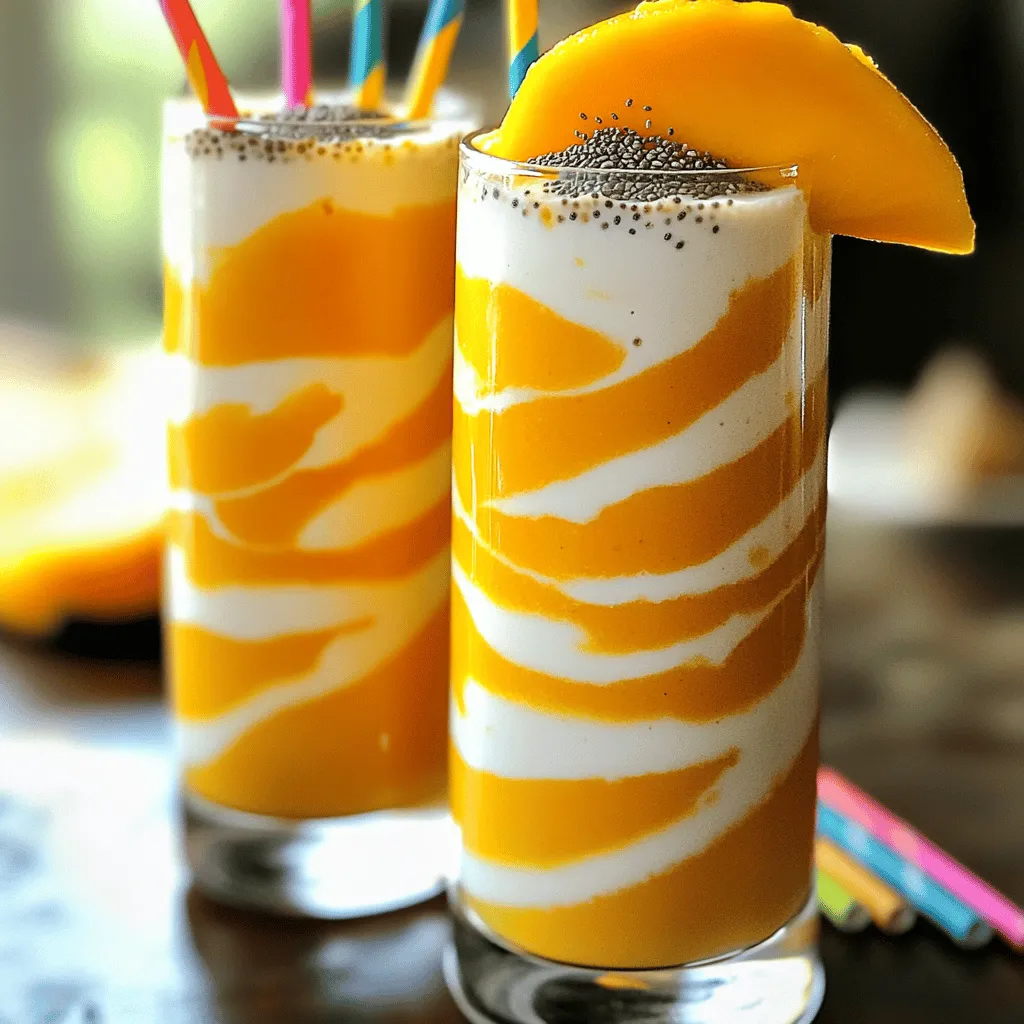
Are you ready for a tasty treat that’s both refreshing and good for you? The Mango Pineapple Smoothie is the

- 2 flatbreads (store-bought or homemade) - 1 cup cooked chicken, shredded into bite-sized pieces - 1/2 cup basil pesto (store-bought or homemade) The base of this dish is the flatbreads. They give a nice, crispy texture. You can use store-bought flatbreads for speed or make your own for fun. Next, we add cooked chicken. Shredded chicken is easy to distribute and adds great flavor. You can use any leftover chicken or rotisserie chicken. Finally, basil pesto brings all the taste together. It adds a rich, herbal flavor that makes your flatbread special. - 1 cup cherry tomatoes, sliced in half - 1 cup fresh mozzarella cheese, shredded - 1/4 cup parmesan cheese, finely grated - A handful of fresh basil leaves for garnish Toppings are what make this dish pop. Cherry tomatoes add sweetness and color. Fresh mozzarella melts beautifully, while parmesan gives a nice sharpness. Don’t forget fresh basil leaves! They add a lovely touch both in taste and looks. - Extra virgin olive oil for drizzling - Salt and black pepper to taste Seasoning is key to flavor. A drizzle of extra virgin olive oil enhances everything. It also helps the flatbreads crisp up nicely. Salt and black pepper add depth and balance. Adjust these to your taste for the best results. For the complete recipe, check the Full Recipe section! 1. Preheating the Oven Start by preheating your oven to 400°F (200°C). This step is key for a crispy flatbread. 2. Arranging Flatbreads on Baking Sheet Next, arrange your flatbreads on a baking sheet lined with parchment paper. This helps prevent sticking and makes cleanup easy. 1. Spreading Basil Pesto Take half a cup of basil pesto and spread it generously over each flatbread. Make sure to cover every inch for great flavor. 2. Adding Chicken and Toppings Now, add one cup of shredded chicken on top of the pesto. Make sure to spread it out evenly. Then, add sliced cherry tomatoes and sprinkle the fresh mozzarella and parmesan cheese on top. 1. Baking Time and Temperature Place the baking sheet in your preheated oven. Bake for 12-15 minutes. You want the cheese to melt and turn slightly golden. 2. Garnishing Before Serving After baking, take the flatbreads out of the oven. Let them cool for a couple of minutes. Finally, garnish with fresh basil leaves before slicing and serving. For detailed cooking steps and ingredients, check out the Full Recipe. How to Achieve the Perfect Cheese Melt To get the cheese just right, use fresh mozzarella. Shred it yourself for better meltability. Mix it with parmesan for extra creaminess. Bake the flatbreads until the cheese is bubbly and slightly golden. This usually takes about 12-15 minutes at 400°F. Keep an eye on them to avoid burning. Preventing Flatbreads from Sticking To stop your flatbreads from sticking, use parchment paper on your baking sheet. This makes cleanup a breeze too. Lightly drizzle olive oil on the flatbreads before adding toppings. This helps them slide off easily after baking. Additional Herbs and Spices Want to kick up the flavor? Add herbs like thyme or oregano. You can even sprinkle some crushed red pepper for heat. These little extras can make your flatbread pop with flavor. Using Homemade Pesto vs. Store-Bought Homemade pesto shines with fresh taste. It’s quick to make with basil, garlic, and nuts. Store-bought pesto saves time and still tastes great. Choose what fits your needs best. If you have time, I recommend making your own for the best flavor. Pairing with Salads or Sides Flatbreads pair well with fresh salads. A simple arugula salad dressed with lemon works great. You can also serve it with roasted veggies for a hearty meal. The contrast in flavors enhances your dining experience. Creative Ways to Slice and Serve For a fun presentation, slice the flatbreads into triangles. Serve them on a wooden board for a rustic look. Drizzle some extra pesto on top for a pop of color. This makes your meal look as good as it tastes! For the full recipe, check out the Delicious Pesto Chicken Flatbread Delight section. {{image_4}} You can easily change the protein in this dish. If you prefer turkey, use shredded turkey instead of chicken. Tofu works too! It absorbs flavors well and adds a nice texture. For cheese, you have options. Try feta for a tangy twist. Goat cheese is another great choice. Both add unique flavors to your flatbread. Making your flatbreads is simple and fun. You can mix flour, water, and yeast to create your base. It gives you a warm, fresh taste. If you are short on time, store-bought flatbreads are great too. You can also customize your pesto. Use spinach or kale if you want a different flavor. Mix in nuts like walnuts or cashews for extra crunch. If you need gluten-free options, look for gluten-free flatbreads at the store. They taste great and work well in this recipe. For vegan modifications, skip the chicken and cheese. You can use chickpeas for protein and nutritional yeast for a cheesy flavor. Your pesto can be made with olive oil, garlic, and nuts for a rich taste without dairy. For the full recipe, check out the Delicious Pesto Chicken Flatbread Delight section. To keep your pesto chicken flatbread fresh, use airtight containers. These containers prevent moisture from getting in. Place the flatbreads in one layer if possible. For best taste, eat leftovers within three days. To reheat your flatbread, use an oven at 350°F (175°C). This method helps keep the flavors alive. Avoid microwaving, as it can make the flatbread soggy. Bake for about 10 minutes. Check to ensure the cheese melts again. You can freeze assembled flatbreads for later. Wrap each flatbread in plastic wrap, then foil. This extra layer helps prevent freezer burn. When you're ready to eat, thaw in the fridge overnight. Reheat them in the oven for the best results. Can I use frozen flatbreads? Yes, you can use frozen flatbreads. Just thaw them first. This helps them bake evenly. If you skip thawing, the center may stay cold. How do I make homemade basil pesto? Making homemade basil pesto is simple. You need fresh basil, garlic, pine nuts, olive oil, and cheese. Blend these together until smooth. Adjust the ingredients to taste. What is the best baking temperature for flatbreads? The best baking temperature for flatbreads is 400°F (200°C). This heat melts the cheese well and crisps the bread. Preheating your oven is key to great results. How do I know when the flatbread is done? You know the flatbread is done when the cheese melts and turns slightly golden. It should look bubbly and delicious. Keep an eye on it as it cooks. Can I use different meats or veggies? Absolutely! You can use turkey, ham, or even veggies like bell peppers. Get creative with flavors. Just ensure your ingredients are cooked before adding them to the flatbread. Is there a dairy-free alternative for the cheese? Yes, you can use dairy-free cheese. Many brands offer tasty options that melt well. Nutritional yeast can also add a cheesy flavor without dairy. In this article, we explored how to make easy pesto chicken flatbread. We covered main ingredients like flatbreads, cooked chicken, and basil pesto. You also learned about toppings such as cherry tomatoes and mozzarella cheese. I provided tips on cooking and storage, plus creative variations. Try these steps and tips to enjoy a tasty meal. You can customize it to fit your taste. Whether you're cooking for yourself or friends, this dish is sure to please!

Easy Pesto Chicken Flatbread Quick and Tasty Meal

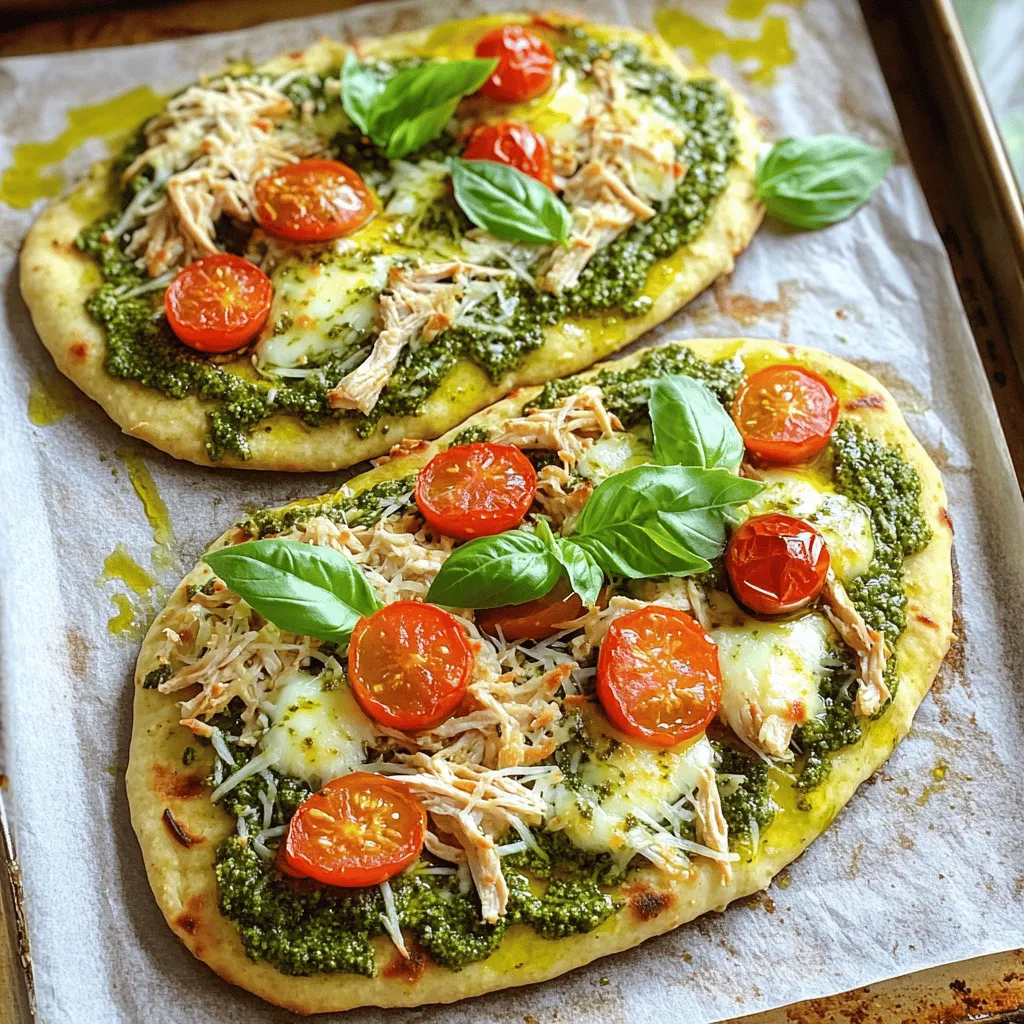
Looking for a quick and tasty meal? This Easy Pesto Chicken Flatbread is just what you need! It’s simple to

- 2 cups plain Greek yogurt - 2 tablespoons honey or maple syrup - 1 teaspoon pure vanilla extract - 1 cup fresh strawberries - ¼ cup dark chocolate chips - 2 tablespoons chopped nuts The main ingredients make this Frozen Yogurt Strawberry Bark fresh and tasty. You start with Greek yogurt. It offers a thick base and a good dose of protein. Honey or maple syrup adds the right sweetness. I love using pure vanilla extract to enhance the flavor. Fresh strawberries bring a burst of juicy goodness. Dark chocolate chips add a rich touch, while chopped nuts give a nice crunch. - Alternative sweeteners: You can swap honey for agave syrup or stevia. Both work well and keep it sweet. - Dairy-free yogurt options: Use coconut yogurt or almond yogurt for a great dairy-free choice. - Fresh vs. frozen strawberries: Fresh strawberries taste best, but you can use frozen if that's what you have. Just thaw them first for easier mixing. These substitutions help you customize the recipe. So, make it your own! For the full recipe, check the detailed instructions and tips. To start, we need to create a creamy yogurt mix. First, grab a medium mixing bowl. Add 2 cups of plain Greek yogurt. Then, pour in 2 tablespoons of honey or maple syrup. This sweetens the mix just right. Next, add 1 teaspoon of pure vanilla extract. Whisk these together until the mixture is smooth. You want it to be completely blended. The smoother it is, the better it spreads later. Now, it's time to assemble our bark. Line a baking sheet with parchment paper or a silicone mat. This step helps the yogurt not stick. Once lined, carefully pour the yogurt mixture onto the sheet. Use a spatula to spread it out. Aim for a rectangle about ½ inch thick. It should look even. Next, take 1 cup of fresh strawberries and slice them. Distribute these over the yogurt mix. Press them down gently so they stick. Then, sprinkle ¼ cup of dark chocolate chips and 2 tablespoons of chopped nuts on top. This adds nice flavor and crunch. Let’s freeze our creation! Place the baking sheet in the freezer. Wait about 4 to 6 hours. You want the yogurt bark to become solid. Once frozen, take it out. Break the bark into pieces by hand. For cleaner cuts, you can use a sharp knife. Store the pieces in an airtight container. Keep them in the freezer until you are ready to enjoy. Serve them on a bright plate, and maybe add a drizzle of honey on top for fun. Enjoy this cool treat! To make your frozen yogurt strawberry bark even better, start by adjusting the sweetness. Some like it sweeter, while others prefer less sugar. You can use honey or maple syrup as a sweetener. Just add it slowly and taste as you go. Next, ensure even distribution of ingredients. When spreading the yogurt mixture, use a spatula for an even layer. This helps every bite taste great. Press the strawberries down slightly into the yogurt. This way, they stick and won’t fall off when frozen. When it comes to serving, think bright and colorful. Arrange the yogurt bark pieces on a vibrant plate. You can add fresh strawberries around the edges for a pop of color. Drizzling honey over the top adds a nice touch. This simple step makes the dessert look fancy and inviting. For parties, cut the bark into small pieces. This way, guests can grab a bite easily. You can also use mini cups for each piece. This keeps things neat and fun. One common mistake is sticking to the pan. To prevent this, always line your baking sheet with parchment paper or a silicone mat. This step is key for easy removal. Another mistake is not freezing long enough. The bark needs at least 4 to 6 hours in the freezer. If it’s not frozen solid, it will be hard to break. Wait until it’s firm for the best results. {{image_4}} You can change the flavor of your frozen yogurt strawberry bark easily. Try adding more fruits like bananas or blueberries. These fruits add sweetness and color. You can mix them into the yogurt or layer them on top. You can also use different nuts and seeds. Almonds, walnuts, or even pistachios add crunch. Chia seeds or flaxseeds can boost the health factor. Just sprinkle them on before you freeze the bark. If you need gluten-free options, this recipe is great. All the ingredients are naturally gluten-free. Just make sure to check the labels on your yogurt and chocolate chips. You can also make a vegan version. Use coconut yogurt instead of Greek yogurt. Swap honey for maple syrup to keep it plant-based. These changes keep the bark delicious and friendly for all diets. Think beyond just eating frozen yogurt bark as is. You can use it as a topping for pancakes or waffles. Break it into pieces and sprinkle over your breakfast. Another fun idea is to add it to smoothie bowls. The cool, creamy bark adds texture. Blend your favorite fruits and yogurt, then add the bark on top for a tasty crunch. For the full recipe, check out the main article. Enjoy your tasty treats! To keep your frozen yogurt strawberry bark fresh, use airtight containers. This helps prevent ice crystals and keeps the flavor strong. Make sure to seal the container tightly. Store it in the freezer until you're ready to enjoy it. The cold keeps it firm and tasty. How long does the yogurt bark stay good? If stored well, it can last for about two weeks. To check for spoilage, look for signs like freezer burn or a change in texture. If it feels dry or has an off smell, it's best to toss it. Can you refreeze yogurt bark? Yes, but it may not be as good. Each time you refreeze it, the texture can change. It may become icy and lose some of its creaminess. For the best taste, try to only freeze it once. To make Frozen Yogurt Strawberry Bark, follow these steps: 1. Mix 2 cups of plain Greek yogurt with 2 tablespoons of honey and 1 teaspoon of vanilla. 2. Line a baking sheet with parchment paper. 3. Spread the yogurt mix on the sheet, making a rectangle about ½ inch thick. 4. Add sliced strawberries on top, pressing them in gently. 5. Sprinkle dark chocolate chips and chopped nuts over everything. 6. Freeze for 4 to 6 hours. 7. Once frozen, break into pieces. Enjoy your treat! For the full recipe, check the earlier section. Yes, Frozen Yogurt Strawberry Bark is a healthy treat. It uses Greek yogurt, which is high in protein and calcium. Strawberries add fiber and vitamins. The honey or maple syrup adds natural sweetness but can be adjusted. Keep in mind the sugar content from honey and chocolate chips. This treat is lower in sugar than many desserts. Absolutely! You can switch out strawberries for bananas, blueberries, or raspberries. Each fruit adds its unique flavor. You could also try kiwi or mango for a tropical twist. Mix and match for fun combinations. Just make sure the fruits are fresh and ripe for the best taste. Yes, you can. If you want less sweetness, use less honey or maple syrup. You can also try adding a ripe banana for natural sweetness. If you need more sweetness, add a bit more honey. Just taste as you go to keep the flavor balanced. This article covered how to make delicious frozen yogurt bark with simple ingredients. We shared ingredient swaps, step-by-step instructions, and storage tips. You can customize your bark with different fruits and flavors. Avoid common mistakes for the best results. Remember, this treat is healthy and fun for all. Enjoy your tasty creation!

Frozen Yogurt Strawberry Bark Fresh and Tasty Treat

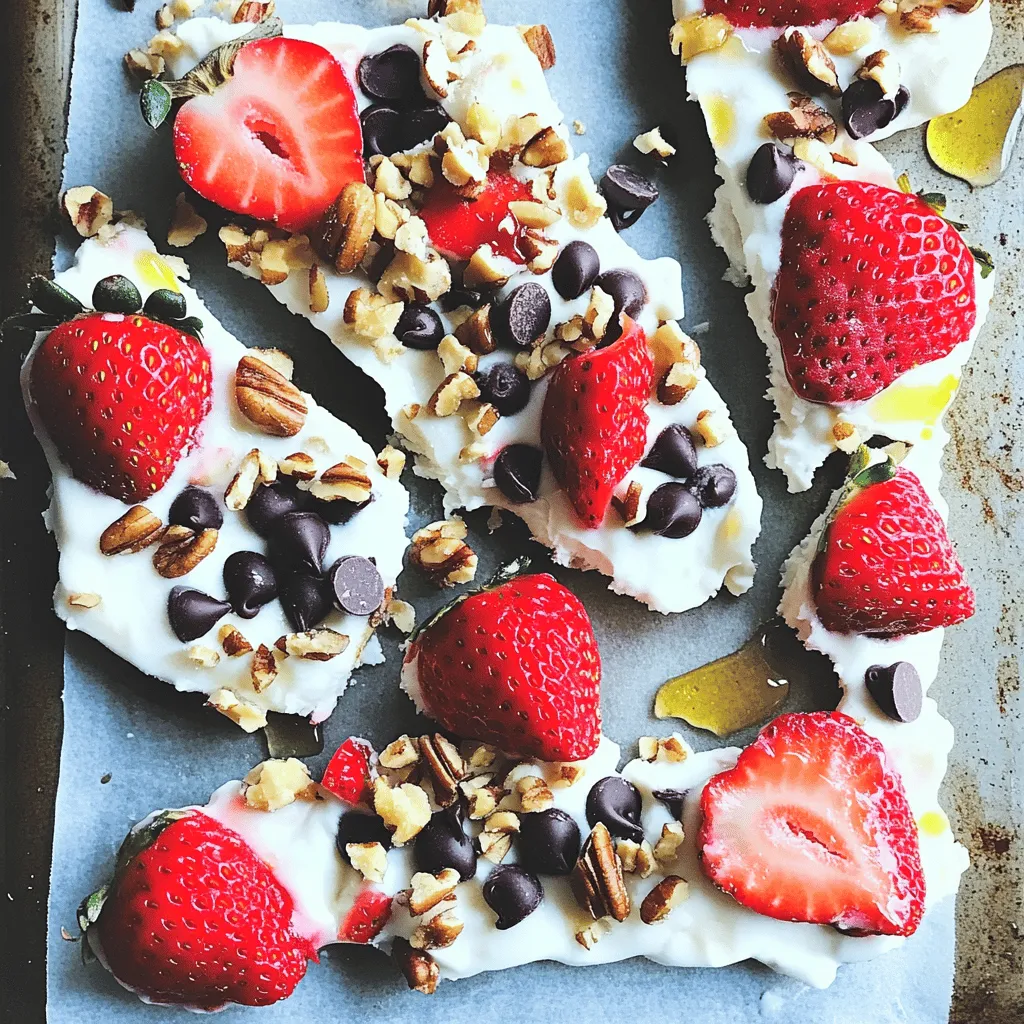
If you’re looking for a fun and healthy treat, you’ve found it! Frozen Yogurt Strawberry Bark is a simple delight

To make Air Fryer Buffalo Cauliflower, you will need: - 1 head of cauliflower, broken into bite-sized florets - 1 cup all-purpose flour - 1 cup water - 1 teaspoon garlic powder - 1 teaspoon onion powder - 1 teaspoon smoked paprika - 1/2 teaspoon sea salt - 1/2 teaspoon freshly ground black pepper - 1 cup buffalo sauce (store-bought or homemade) - 2 tablespoons olive oil - Fresh parsley, finely chopped (for garnish) - Celery sticks and ranch dressing (for serving) You can tweak this recipe for your taste. Here are some fun ideas: - Add a pinch of cayenne for extra heat. - Include a tablespoon of lemon juice for zing. - Swap the buffalo sauce for BBQ sauce for a different flavor. If you have allergies, here are some easy swaps: - Use gluten-free flour instead of all-purpose flour. - Replace the buffalo sauce with a dairy-free option if needed. - If you're avoiding oil, try using vegetable broth to keep it lighter. These ingredients create a base for a tasty snack or meal. You can check the Full Recipe for more details on how to prepare this crunchy treat! To start, gather your ingredients. You will need: - 1 head of cauliflower, broken into bite-sized florets - 1 cup all-purpose flour - 1 cup water - 1 teaspoon garlic powder - 1 teaspoon onion powder - 1 teaspoon smoked paprika - 1/2 teaspoon sea salt - 1/2 teaspoon freshly ground black pepper - 1 cup buffalo sauce - 2 tablespoons olive oil - Fresh parsley, finely chopped (for garnish) - Celery sticks and ranch dressing (for serving) Next, mix the batter. In a large bowl, whisk together the flour, water, garlic powder, onion powder, smoked paprika, sea salt, and black pepper. It should be smooth and thick enough to coat the florets well. Now, take each cauliflower floret and dip it into the batter. Make sure it is fully covered. Allow any extra batter to drip off before setting it aside. Preheat your air fryer to 400°F (200°C). This helps the cauliflower cook evenly and become crispy. Lightly spray the air fryer basket with cooking spray. This prevents sticking and helps achieve a nice texture. Place the battered florets in the basket in one layer. Do not let them touch each other. If you have too many, cook in batches. Air fry for 10-12 minutes. Halfway through, shake the basket. This ensures they cook evenly and get golden brown. While the cauliflower cooks, prepare the buffalo sauce. In another large bowl, mix the buffalo sauce and olive oil. Once the cauliflower is ready, transfer it to this bowl. Toss the florets gently to coat them with sauce. For an extra crispy finish, return the coated cauliflower to the air fryer. Cook for 3-5 more minutes. When done, remove it from the fryer. To serve, sprinkle freshly chopped parsley on top. This adds color and freshness. Enjoy your crunchy buffalo cauliflower bites with celery sticks and ranch dressing. They make the perfect snack or appetizer! For the full recipe, refer to the earlier section. To get that perfect crunch, you need a few tricks. First, coat the cauliflower well with the batter. This helps create a thick outer layer. After air frying, toss the cauliflower in buffalo sauce. Then, return them to the air fryer for a few more minutes. This will give you a crispier bite. Make sure to space the florets apart when cooking. Overcrowding can lead to sogginess. You can easily tweak the heat in your buffalo cauliflower. If you like it mild, use less buffalo sauce. Try mixing in some honey or maple syrup for sweetness. If you want it spicier, add a pinch of cayenne pepper to the batter. This gives a nice kick without being too hot. Always taste your sauce before tossing to find your perfect balance. Your air fryer is a powerful tool. Start by preheating it for about 5 minutes at 400°F (200°C). This helps the food cook evenly. Use a light spray of cooking oil on the basket. This prevents sticking and helps with browning. Remember to shake the basket halfway through cooking. This ensures all sides get that golden color. If you follow these tips, your snack will be both crunchy and flavorful. For the full recipe, refer back to the earlier section. {{image_4}} You can switch up the flavor by trying different sauces. Sriracha adds heat and a bit of sweetness. BBQ sauce gives a smoky twist. For a tangy taste, use a honey mustard blend. Each sauce brings a new vibe to the buffalo cauliflower. Feel free to mix sauces too. A combo of buffalo and ranch can be amazing! If you want to change things up, try other veggies. Broccoli florets work well and get nice and crispy. Zucchini slices can give a different flavor. You can even try mushrooms for a meaty taste. These veggies cook similarly in the air fryer. Just keep an eye on the cooking time. To make this dish vegan, swap the flour with a gluten-free mix. Use plant-based milk instead of regular water. This keeps the batter light and tasty. For gluten-free options, check the buffalo sauce label. Some brands contain gluten. With these changes, you can enjoy this snack while sticking to your diet! For the complete guide, check out the Full Recipe. After enjoying your buffalo cauliflower, let the leftover bites cool down. Place them in an airtight container. You can store them in the fridge for up to three days. This way, they stay fresh and tasty for your next snack or meal. To reheat, simply use your air fryer. Set it to 350°F (175°C) and heat for about 5-7 minutes. This will help them regain their crispy texture. You can also use an oven for reheating at the same temperature. Use glass or BPA-free plastic containers for storage. They seal well and keep the cauliflower fresh. If you have smaller portions, consider using silicone bags. They are eco-friendly and great for saving space in your fridge. For a detailed guide on making this delightful dish, check out the Full Recipe. The best way to prepare cauliflower for air frying is to cut it into bite-sized florets. Rinse the cauliflower under cold water. Pat it dry to remove excess moisture. Moisture can make it soggy instead of crispy. Then, toss the florets in a batter made from flour, spices, and water. This coating helps create that crunchy layer when air fried. Yes, you can make buffalo cauliflower ahead of time. Prepare the cauliflower bites and coat them in the batter. You can store them in the fridge for a few hours. Just remember to cook them fresh for the best crunch. You can also cook them and store them. Just reheat when ready to serve. To make homemade buffalo sauce, you need a few simple ingredients. Combine melted butter and hot sauce in a bowl. You can use any hot sauce you like. Add a pinch of garlic powder for extra flavor. Mix well until it’s smooth. Adjust the heat by adding more hot sauce if you want it spicier. You can cook frozen cauliflower in the air fryer. However, it’s best to thaw it first. This helps the batter stick better. If you cook it straight from frozen, expect longer cooking times. It may not get as crispy as fresh cauliflower. If you’re in a hurry, you can still use frozen, but fresh is best. For the full recipe, check out the ingredients and instructions above. It’s a fun and easy way to enjoy this tasty snack! This recipe for Air Fryer Buffalo Cauliflower shows that cooking can be fun and easy. We covered all the ingredients, steps, and tips to make your dish perfect. You learned how to customize flavors and adjust spice levels for your taste. Don't forget about storage tips for leftovers and reheating. Now, you can impress friends and family with a tasty and healthy snack. Enjoy your cooking journey and experiment with different flavors!

Air Fryer Buffalo Cauliflower Crunchy and Flavorful Snack

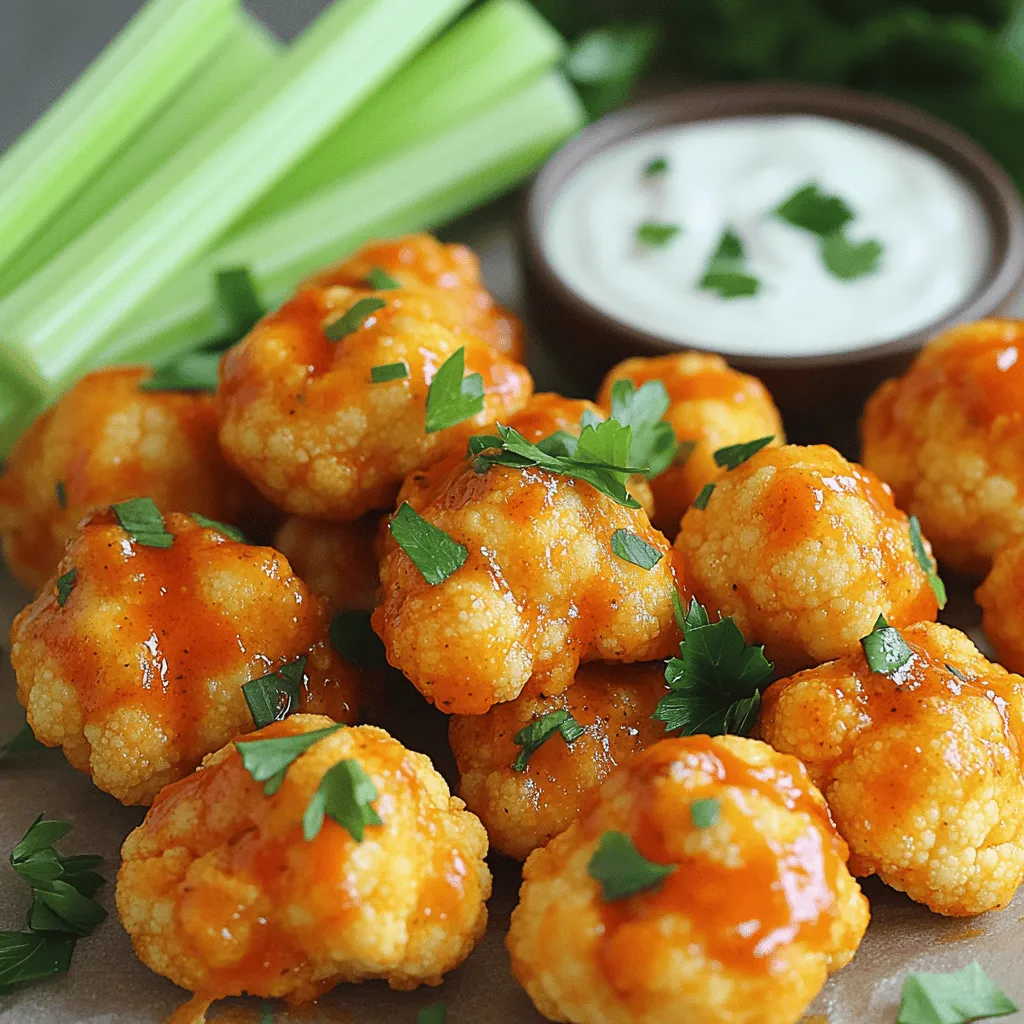
Looking for a tasty snack that packs a punch? You’ve come to the right place! Air Fryer Buffalo Cauliflower is

Here’s what you need for your creamy corn chowder: - 4 cups fresh corn kernels (or 3 cups frozen corn if fresh is unavailable) - 2 medium potatoes, peeled and diced - 1 medium onion, finely chopped - 2 cloves garlic, minced - 1 green bell pepper, diced - 4 cups vegetable broth - 1 cup heavy cream (or canned coconut milk for dairy-free) - 2 tablespoons extra virgin olive oil - 1 teaspoon smoked paprika - 1 teaspoon dried thyme - Salt and pepper to taste - Fresh cilantro or parsley for garnish Gather these ingredients before you start cooking. Fresh ingredients make a big difference in flavor. Don't worry if you can't find fresh corn; frozen corn works just as well. The same goes for potatoes. You can use any type you like. Just make sure they are diced small for even cooking. The heavy cream adds richness, but you can swap it with coconut milk if you want a dairy-free option. Keep the smoked paprika and thyme handy. They will give your chowder a warm, inviting flavor. Finally, grab some cilantro or parsley for garnish. It adds a nice pop of color and freshness to your dish. This creamy corn chowder is not just tasty; it's nourishing too. It warms you up and fills you up. For the full recipe, check out the details above. Start by warming the olive oil in a large pot over medium heat. When the oil shimmers, add the finely chopped onion and diced green bell pepper. Sauté them for about 5 minutes. You want the onion to turn soft and clear. Next, add the minced garlic and sprinkle in the smoked paprika. Stir this mix for 1-2 minutes until you smell the garlic’s aroma. Now it’s time to add the heart of the chowder. Toss in the diced potatoes and corn. Mix them well, ensuring they are evenly spread in the pot. Pour in 4 cups of vegetable broth and add the dried thyme. Turn up the heat until it starts to gently boil. Once it boils, lower the heat, cover the pot, and let it simmer for 15-20 minutes. You want the potatoes to be fork-tender. After the simmering time, check the potatoes. They should be soft enough to pierce easily with a fork. Use an immersion blender to puree half of the chowder. This gives you that creamy texture while keeping some chunks. If you don’t have an immersion blender, carefully pour half of the chowder into a regular blender. Blend it until smooth, then return it to the pot. Now for the best part! Slowly stir in the heavy cream or coconut milk. Let the chowder warm gently for about 5 minutes. As it heats, taste it and adjust the seasoning with salt and pepper as needed. When ready, serve the chowder hot in bowls. Don’t forget to garnish with fresh cilantro or parsley for a bright, fresh finish. For the full recipe, refer to the earlier section. To get that smooth and creamy texture, you can use an immersion blender. It lets you blend right in the pot. If you don't have one, a regular blender works too. Just be careful when transferring hot chowder. To avoid over-blending, blend only half of the chowder. This keeps some chunks, adding texture. Spices can really boost the taste of corn. Try using smoked paprika; it adds a nice depth. Dried thyme pairs well too, bringing out the corn's sweetness. For garnishing, fresh cilantro or parsley adds color and freshness. You can even sprinkle some crispy bacon bits on top for extra crunch. Checking potatoes for doneness is simple. Use a fork; if it goes in easily, they are ready. Always taste as you cook. Adjust the salt and pepper to match your preference. This step can make a big difference in your chowder's flavor. Enjoy your cooking process! For the full recipe, check out the detailed steps above. {{image_4}} You can boost your chowder with protein. Adding bacon brings a smoky taste. Cook it until crispy, then crumble it into the soup. Sausage works well too; just slice it up and cook it with the veggies. For a vegetarian option, try adding beans or tofu. Beans add fiber and nutrients, while tofu soaks up flavors. Both options make the chowder hearty without meat. Add more veggies to your chowder for color and taste. Carrots, celery, or zucchini can enhance the flavor. They also add nutrients. Different potatoes can change the taste too. Use sweet potatoes for a hint of sweetness, or red potatoes for a firmer texture. Each type of potato gives a unique twist to your chowder. If you want a lighter option, try dairy-free substitutes. Canned coconut milk gives a rich, creamy texture. Almond or oat milk can also work well, but may be thinner. Experiment with these nut milks to find what you like best. Adjust the amount to get the creaminess you desire. To keep your creamy corn chowder fresh, use these tips: - Refrigeration: Cool the chowder to room temperature before storing. Place it in an airtight container. It will stay good for about 3-4 days in the fridge. - Freezing: If you want to save it longer, you can freeze it. Pour the cooled chowder into freezer-safe containers, leaving some space at the top. It can last for about 2-3 months in the freezer. When you want to enjoy it later, here’s how to defrost: - Move the container from the freezer to the fridge, letting it thaw overnight. - For faster defrosting, place the container in cold water for a few hours. Reheating your chowder is easy, and I have some great methods: - Stovetop: Pour the chowder into a pot over low heat. Stir it often to heat evenly. - Microwave: Place it in a microwave-safe bowl. Heat in 1-minute bursts, stirring in between to avoid hot spots. To ensure your chowder stays creamy, follow these tips: - Add Liquid: If the chowder thickens too much, stir in a little broth or cream while reheating. - Gentle Heat: Avoid high heat to keep the cream from separating. Now you can enjoy your creamy corn chowder whenever you want! Yes, you can use frozen corn. It tastes great and has a similar texture. Frozen corn is also convenient. Just add it directly to your chowder without thawing. The sweet flavor and crunch remain intact, making your chowder just as delicious. If your chowder is too thin, try a few easy methods. You can add more potatoes and let them cook down. Another option is to mix a bit of cornstarch with water and stir it in. This will help thicken the chowder quickly. Lastly, blending a portion of the chowder can give it a creamier texture without extra ingredients. If your chowder is too salty, don’t worry! You have some simple fixes. Add diced potatoes to absorb some saltiness. Cook them in the chowder until soft, then remove them. Another way is to add more cream or coconut milk. This balances the flavors and makes it creamy. This blog post showed you how to make a delicious corn chowder from scratch. We covered the main ingredients and easy steps to prepare the dish. I shared tips for achieving the perfect creaminess and flavor. You also learned how to store and reheat leftovers. Try different variations to make this chowder your own. Enjoying homemade soup can be fulfilling and fun. Remember to taste as you go and adjust to your liking. A little creativity goes a long way in the kitchen!

Creamy Corn Chowder Nourishing and Hearty Dish

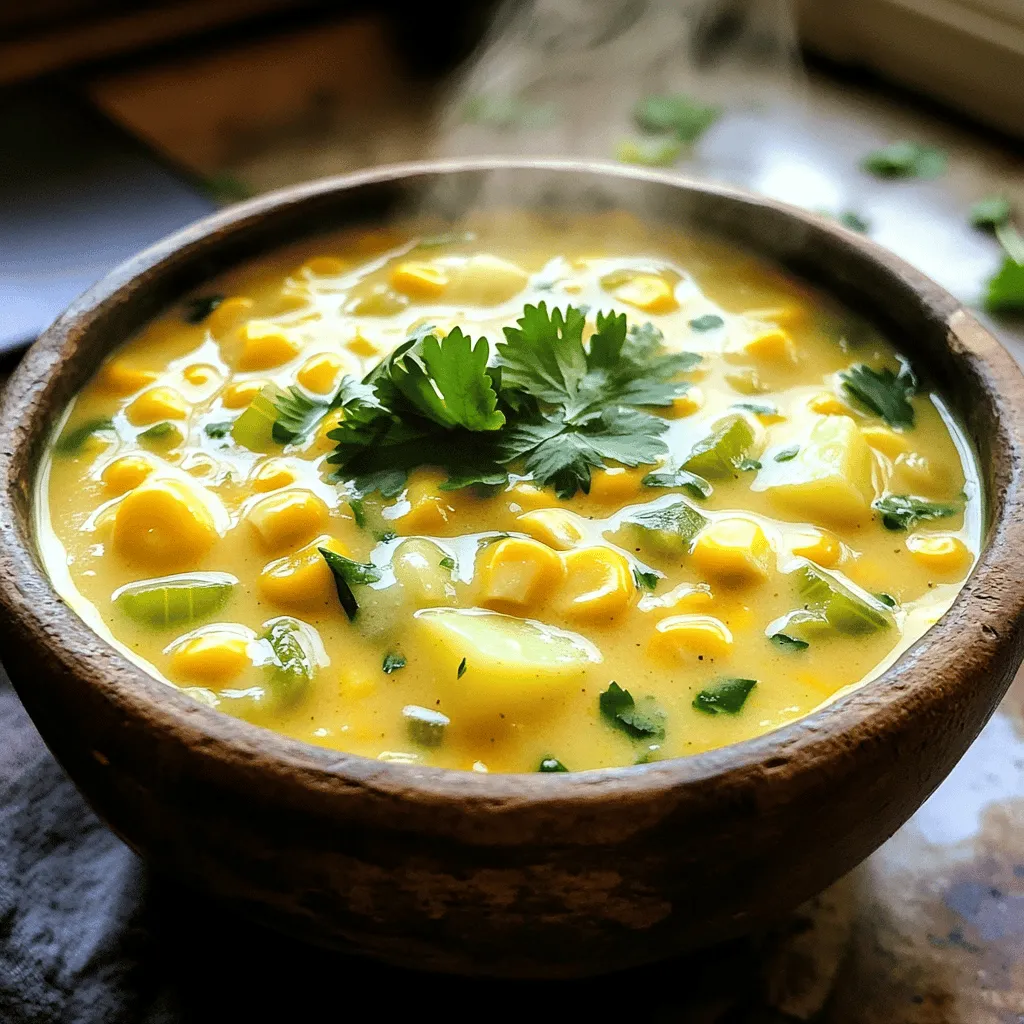
Looking for a comforting bowl of warmth? My Creamy Corn Chowder is just what you need! Packed with fresh ingredients,

- 1 can (15 oz) sweet corn, drained - 1 cup cream cheese, softened at room temperature - 1 cup plain Greek yogurt - 1 cup shredded sharp cheddar cheese - 2 fresh jalapeños, finely chopped - 1/4 cup green onions, sliced thinly - 1 teaspoon garlic powder - 1 teaspoon onion powder - 1 teaspoon smoked paprika - Freshly ground salt and pepper to taste - Tortilla chips for serving To create a delicious Creamy Jalapeño Corn Dip, you need a few key ingredients. Start with a can of sweet corn. This adds natural sweetness and a crunchy texture. Next, use cream cheese. It gives the dip a rich, creamy base. Make sure it is soft at room temperature for easy mixing. Add plain Greek yogurt for tanginess and extra creaminess. This also lightens the dip. Shredded sharp cheddar cheese adds a wonderful flavor. It pairs well with the other ingredients. For heat, use fresh jalapeños. Finely chop them to mix well. If you want less heat, remove the seeds. Green onions add a fresh taste and nice color. Slice them thinly for the best results. Seasonings like garlic powder, onion powder, and smoked paprika boost the flavors. Finally, add salt and pepper to taste. Serve the dip with crispy tortilla chips. They make the perfect crunchy companion. These simple ingredients come together to create a tasty, creamy delight that is perfect for any gathering. {{ingredient_image_2}} Start by taking your cream cheese and Greek yogurt. Place them in a large mixing bowl. Beat them together using an electric mixer. Mix until the texture is smooth and creamy. You want to avoid any lumps here. This creamy base is the heart of your dip. Now, add the shredded sharp cheddar cheese. Stir it into the creamy base. Make sure it blends evenly. This step adds a rich flavor that everyone loves. Next, fold in the sweet corn and finely chopped jalapeños. Remember to drain the corn first. Mixing in green onions comes next. This adds a nice crunch and fresh taste. Sprinkle in your garlic powder, onion powder, and smoked paprika. These spices give the dip a wonderful kick. Don’t forget to add salt and pepper. Taste and adjust the seasoning if needed. Transfer the dip into a serving bowl. Cover it and place it in the fridge for at least 30 minutes. Chilling helps the flavors mix well. Before serving, stir the dip again. Check the seasoning one last time. Serve it with crispy tortilla chips for a fun treat! To make your dip even creamier, try adding more cheese. Creamy Monterey Jack or tangy goat cheese works great. These cheeses blend well and add extra richness. Remember, use room temperature ingredients. This helps them mix better and creates a smoother dip. If you want a milder dip, remove the seeds from the jalapeños. This simple step cuts back on the heat. You can also try using poblano peppers for a different flavor. They add a nice taste without too much spice. Garnishing can make your dip look fancy. Sprinkle chopped green onions on top for color. You can even add thin jalapeño slices for a bit of flair. Serve the dip on a colorful platter with tortilla chips. This creates a fun and inviting display for your guests. Pro Tips Adjust Spice Level: If you prefer a milder dip, remove the seeds and membranes from the jalapeños or substitute them with bell peppers for a sweeter, non-spicy option. Make Ahead: This dip can be prepared a day in advance. Allow it to chill overnight to enhance the flavors even more! Serve Warm: For a different twist, try baking the dip in a casserole dish at 350°F (175°C) for about 20 minutes until hot and bubbly, then serve with chips. Flavor Variations: Experiment with adding diced tomatoes, black beans, or corn salsa to elevate the taste and texture of your dip! {{image_4}} You can add black beans to your dip. They bring extra protein and texture. Diced bell peppers also work great. Their crunch gives a nice contrast. Fresh herbs like cilantro or parsley can brighten the flavor. Just chop them finely and mix in. Consider pairing your dip with different options. Fresh veggies like carrots and celery are tasty choices. You can also use pita chips for a unique twist. This dip is versatile in recipes too. Try spreading it on sandwiches or using it in tacos for added creaminess. For a gluten-free option, just check your tortilla chips. Most are safe, but always read labels. If you want a vegan dip, use dairy-free cream cheese and yogurt. For a low-fat version, you can replace cream cheese with low-fat yogurt. This keeps the flavor while cutting calories. To keep your creamy jalapeño corn dip fresh, use airtight containers. This helps prevent air from drying it out. Store the dip in the fridge for up to four days. Always make sure the lid is on tight. You can freeze this dip if you have leftovers. To freeze, place the dip in a freezer-safe container. Leave some space at the top for expansion. When you want to eat it, thaw it in the fridge overnight. To maintain texture, stir it well after thawing. If it seems too thick, add a little Greek yogurt or cream cheese to bring it back to life. You can keep Creamy Jalapeño Corn Dip in the fridge for about three to five days. Make sure to store it in an airtight container. This keeps the dip fresh and tasty. If you see any changes in color or smell, it’s best to throw it away. Yes, you can make this dip ahead of time. It actually tastes better after resting in the fridge for a bit. I often prepare it a day in advance. This lets the flavors blend well. Just cover it tightly and refrigerate until you are ready to serve. If you need a substitute for cream cheese, try using sour cream or a nut-based cream cheese. Greek yogurt can also work well. Each option gives a slightly different taste, but they all create a creamy dip. To spice it up, add more jalapeños or use spicy peppers like serranos. You can also mix in some cayenne pepper or hot sauce. Start with a little, then taste it. You can always add more if you want more heat. Yes, you can serve Creamy Jalapeño Corn Dip warm! Just heat it gently in the oven or microwave. Keep an eye on it so it doesn’t get too hot. Warm dip can be comforting and delicious with tortilla chips. This creamy jalapeño corn dip is simple and full of flavor. We mixed sweet corn, cream cheese, Greek yogurt, and cheddar for a tasty treat. The jalapeños bring the heat, while seasoning enhances every bite. Remember to chill it before serving for the best taste. You can adapt the recipe to fit your needs, whether for parties or a cozy night in. Store leftovers properly to enjoy them later. Get creative with your servings and have fun sharing this dip with friends. Enjoy making it your own!

Creamy Jalapeño Corn Dip Flavorful Party Treat

Looking for a crowd-pleasing party dip? Let me introduce you to Creamy Jalapeño Corn Dip! This vibrant mix of creamy

Older posts
Newer posts
← Previous Page1 … Page47 Page48 Page49 … Page117 Next →

dsad

© 2025 spoonfulsavory • Built with GeneratePress

Our Policies

  • Copyright Policy
  • Cookie Policy
  • GDPR Policy
  • Privacy Policy
  • Disclaimer
  • Terms Of Use

More Information

  • Home
  • About
  • Contact
  • Appetizers
  • Dessert
  • Dinner
  • Drinks
©2025, spoonfulsavory About Back To Top