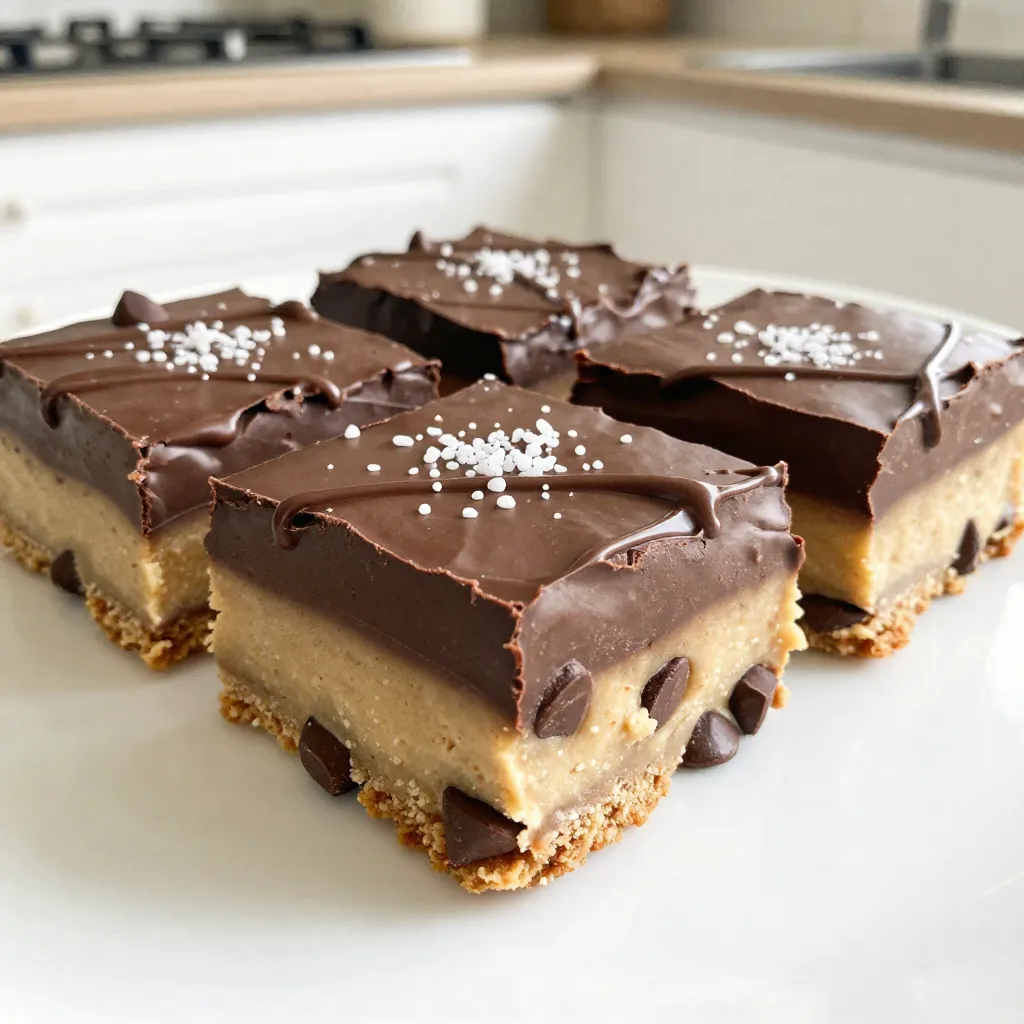
Chocolate Chip Cookie Dough Fudge Indulgent Delight
If you love the rich taste of cookie dough and the smoothness of fudge, you’re in for a treat! In
If you love the rich taste of cookie dough and the smoothness of fudge, you’re in for a treat! In
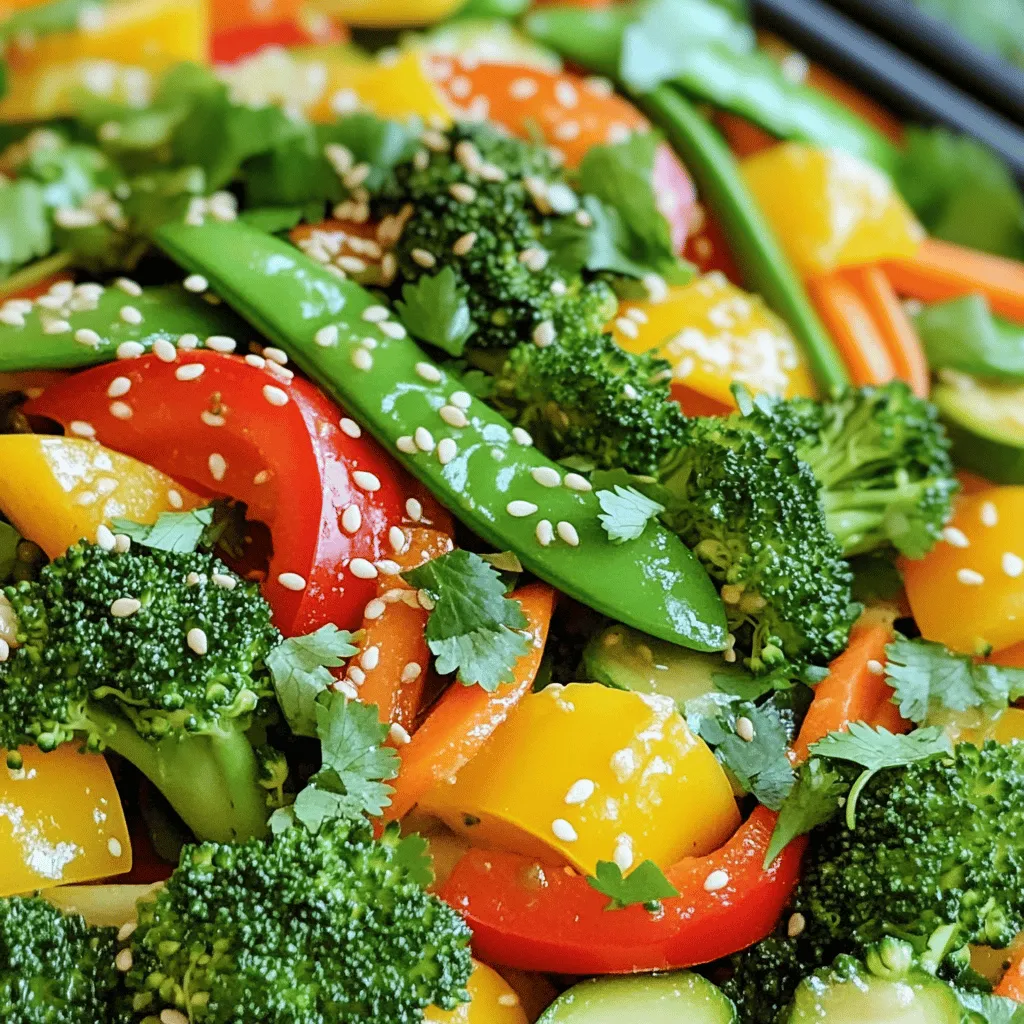
Looking for a quick and tasty dinner idea? You’re in the right place! This Easy Veggie Stir Fry is simple,
![For my Simple Greek Yogurt Chicken Salad, I use a few key ingredients that make it delicious and fresh: - 2 cups cooked chicken, shredded or diced - 1 cup plain Greek yogurt - 1/4 cup celery, finely chopped - 1/4 cup red grapes, halved - 1/4 cup walnuts, chopped - 1 tablespoon Dijon mustard - 1 tablespoon honey - 1 tablespoon fresh dill, finely chopped - 1 tablespoon fresh lemon juice - Salt and black pepper, to taste These ingredients mix well together. The chicken adds protein. Greek yogurt gives a creamy texture. Celery and grapes add crunch and sweetness. Walnuts offer a nice nutty flavor. You can switch things up with optional ingredients. Try adding: - Diced apples for sweetness - Sliced almonds for extra crunch - Fresh herbs like parsley or basil These options let you personalize the salad. Feel free to get creative based on your tastes! I always add salt and black pepper to taste. These seasonings boost the flavors of the salad. Adjust them to suit your preferences. A little extra salt can make all the difference! For the full recipe, check out the detailed steps. 1. In a large mixing bowl, combine the shredded or diced cooked chicken with the Greek yogurt. Use a spatula or wooden spoon to mix thoroughly. You want every piece of chicken coated in yogurt. 2. Next, add the finely chopped celery, halved red grapes, and chopped walnuts into the bowl. Gently stir these ingredients together. This helps blend the flavors and gives the salad great texture. 1. In a separate small bowl, whisk together the Dijon mustard, honey, fresh dill, lemon juice, and a pinch of salt and black pepper. Make sure the dressing is smooth and well combined. 1. Drizzle the prepared dressing over the chicken mixture. Gently fold the dressing into the salad. Stir until everything is well mixed and creamy. 2. Taste the salad and adjust the seasoning with more salt and pepper if needed. 3. Cover the bowl with plastic wrap or transfer the salad to an airtight container. Refrigerate for at least 30 minutes. This makes the flavors meld perfectly. 4. Serve the salad chilled. It’s perfect on its own, in sandwiches, or on a bed of greens. For the full recipe, check out [Full Recipe]. For the best taste, use rotisserie or grilled chicken. Rotisserie chicken is juicy and full of flavor. Grilled chicken adds a nice smoky touch. You can also use leftover chicken from last night's dinner. Just make sure it is shredded or diced into small pieces. This helps the chicken mix well with the yogurt and other ingredients. To get the perfect texture, mix the chicken and Greek yogurt first. Use a spatula or wooden spoon to blend them well. This ensures every piece of chicken is coated. Next, add in the celery, grapes, and walnuts. Gently stir so you keep some crunch. Don’t mash the ingredients; you want a nice bite in every scoop. For the dressing, whisk it in a separate bowl first. This makes it smooth and easy to combine. Then, drizzle it over the chicken mixture and fold it in slowly. This keeps the salad light and creamy. You can serve this salad in many ways. One great option is on whole-grain bread for a sandwich. Another fun idea is to use lettuce leaves as wraps. These are fresh and low-carb. You can also plate it on a bed of mixed greens for a fancy touch. Add some extra dill or lemon slices on top for color and flavor. This salad is perfect for lunch, picnics, or light dinners. For the full recipe, check out the Complete Recipe section. {{image_4}} You can swap the chicken for turkey. Turkey adds a leaner taste. Tofu is a great choice for plant-based diets. It soaks up flavors well. Chickpeas offer a nice crunch and protein boost. They make the salad hearty and filling. Add a teaspoon of curry powder for warmth. This spice brings a new twist to the dish. Fresh herbs like basil or parsley can brighten the flavors. You can also experiment with garlic powder or smoked paprika. These ingredients add depth and complexity to the mix. For a gluten-free option, ensure all ingredients are safe. Most brands of Greek yogurt are gluten-free. If you need a dairy-free choice, try coconut yogurt. It gives a creamy texture and slight sweetness. Always check labels to confirm they fit your dietary needs. This salad stays fresh in the fridge for about three to four days. Keep it in an airtight container. The flavors will deepen as it sits, making it even tastier. You can freeze chicken salad with Greek yogurt, but I don't recommend it. The yogurt can change texture when thawed. It may become watery or grainy, affecting the taste. Use airtight containers to keep your salad fresh. Glass containers work well. They do not absorb odors and are easy to clean. If you use plastic, choose BPA-free options. Proper storage helps maintain flavor and texture for days. For the full recipe, check out the main article. Yes, you can make this salad ahead of time. I often prepare it a few hours before serving. When you let it sit, the flavors combine and taste even better. Just keep it in the fridge until you're ready to eat. For best taste, try to eat it within two days. This salad is versatile and pairs well with many sides. Here are some ideas: - Fresh fruit salad - Whole grain bread or wraps - Crunchy vegetable sticks like carrots and cucumbers - Mixed greens with a light vinaigrette These sides add variety and balance to your meal. You can make this salad even healthier with a few simple tips: - Use low-fat Greek yogurt instead of regular. - Add more veggies like bell peppers or spinach for extra nutrients. - Swap out walnuts for sunflower seeds to cut fat. These changes keep the salad tasty while lowering calories. This blog post walked you through making a tasty Greek yogurt chicken salad. We discussed choosing the best ingredients, preparing the dressing, and mixing everything for a great flavor. I shared tips for storage, serving, and healthy adjustments. You can always tweak this recipe to fit your tastes. Try new proteins or add herbs for a fun twist. Enjoy making your own version of this dish, and remember to have fun in the kitchen!](https://spoonfulsavory.com/wp-content/uploads/2025/06/02537c91-1e74-4eee-ad1c-99507d958b26.webp)
Looking for a quick and healthy meal? This Simple Greek Yogurt Chicken Salad is packed with flavor and nutrition. It’s
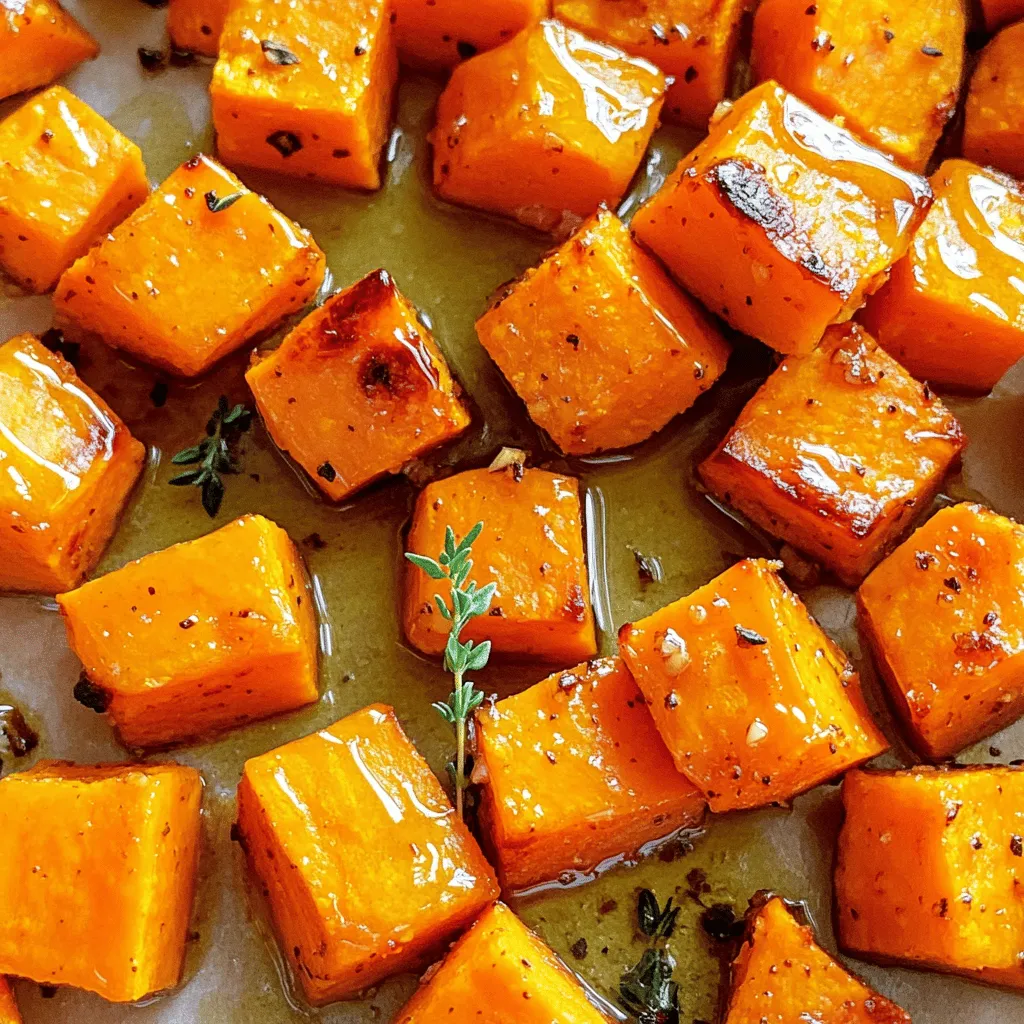
Looking for a side dish that bursts with flavor? Honey Garlic Roasted Sweet Potatoes are your answer! This dish combines
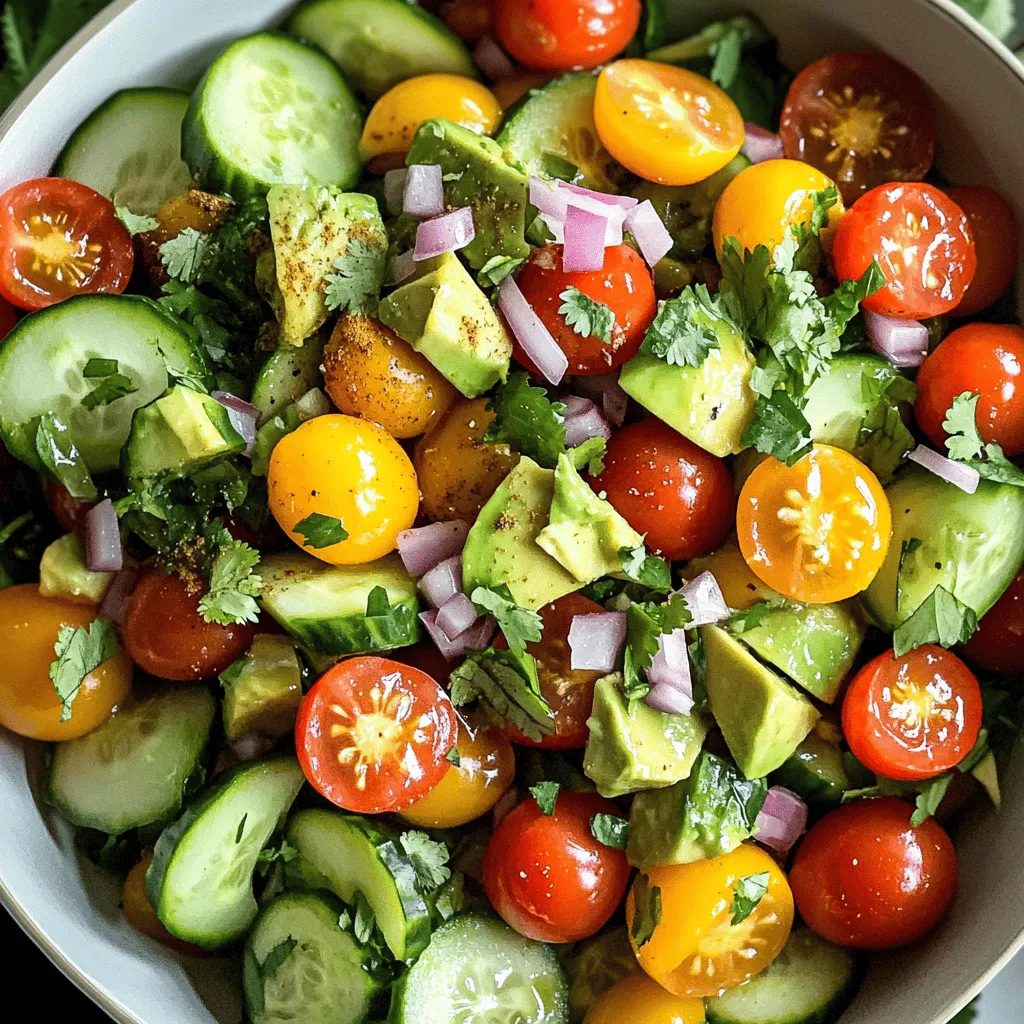
If you’re looking for a fresh and tasty salad that’s quick to make, you’ll love this Avocado Tomato Cucumber Salad.
. Store your Lemon Chickpea Orzo Soup in a sealed container. Place it in the fridge if you have leftovers. This keeps it fresh for up to three days. To reheat, pour the soup into a pot. Heat it over medium heat, stirring often. You can also use a microwave; just heat it in short bursts. Stir between intervals to ensure even heating. Adding a splash of water can help if the soup thickens. Freezing is great for longer storage. Pour the soup into freezer-safe containers. Leave space at the top for expansion. Label each container with the date for easy tracking. When you want to enjoy it again, take a container out of the freezer. Place it in the fridge to thaw overnight. For quicker defrosting, you can use the microwave on low. Reheat the soup slowly on the stove, stirring often, to keep the flavors intact. Enjoy this comforting dish anytime, knowing you have easy storage solutions! For the complete cooking process, check out the Full Recipe. Can I use other types of pasta instead of orzo? Yes, you can. Many small pastas work well, like ditalini or fusilli. Just adjust cooking times based on the pasta you choose. It’s good to check the package for details. How long does Lemon Chickpea Orzo Soup last in the fridge? This soup keeps well for about three to four days. Store it in an airtight container. If you want it to last longer, consider freezing it. Is this soup vegan and gluten-free? Yes, it is vegan. You use vegetable broth, chickpeas, and fresh veggies. For gluten-free, choose gluten-free orzo or a similar pasta. Always check labels to ensure they meet your needs. Health benefits of key ingredients like chickpeas and lemon Chickpeas are high in protein and fiber, which help keep you full. They also support digestion. Lemons add vitamin C, boosting your immune health. Plus, they give the soup a zesty flavor. What if my soup is too thick? If your soup is too thick, just add more vegetable broth or water. Stir it in slowly until you reach your desired consistency. How can I make the soup more filling? You can add more chickpeas or toss in some leafy greens. Kale or spinach works great. You can also serve it with crusty bread for a complete meal. For the complete recipe, check out the [Full Recipe]. This blog post has covered how to make a delicious Lemon Chickpea Orzo Soup. We explored the main ingredients, aromatics, and seasoning to build great flavor. I offered tips for perfecting the soup and discussed variations to suit your taste. Creating this dish can be simple and rewarding. It’s healthy, versatile, and perfect for any meal. Enjoy making it your own, and don’t hesitate to experiment!](https://spoonfulsavory.com/wp-content/uploads/2025/06/bf35e6f1-0e56-4c39-a66c-1b49a183b1ae.webp)
Looking for a warm, simple dish that’s packed with flavor? Lemon Chickpea Orzo Soup is your answer! This recipe combines
![To make a grilled peach burrata salad, you need fresh and simple ingredients. Here’s what you will need: - 2 ripe peaches, halved and pitted - 1 tablespoon extra virgin olive oil - Salt and freshly cracked black pepper to taste - 4 cups fresh arugula or a blend of mixed greens - 8 oz burrata cheese, gently torn into bite-sized pieces - 1/4 cup fresh basil leaves, roughly chopped - 1/4 cup balsamic reduction - 1/4 cup pine nuts or walnuts, lightly toasted Each ingredient plays a key role in the salad. The peaches bring sweetness and a juicy texture. The olive oil adds richness while the salt and pepper enhance the flavors. Arugula or mixed greens give a fresh crunch. Burrata cheese provides a creamy element that pairs well with the warm peaches. Fresh basil adds a lovely aroma. Balsamic reduction gives a sweet and tangy finish, while toasted nuts add a satisfying crunch. When you have these ingredients ready, you can follow the full recipe to create a bright and delicious dish. Enjoy the mix of flavors and textures in every bite! - Preheat grill to medium-high heat - Ensure grill grates are clean Start by heating your grill to medium-high. This helps the peaches cook well. Clean the grill grates to prevent sticking. A clean surface also gives nice grill marks. - Brush peaches with olive oil - Season with salt and pepper Next, take your ripe peaches. Brush the cut sides with olive oil. This adds flavor and helps them grill better. Then, sprinkle salt and pepper on them. This simple step enhances their natural sweetness. - Grill peaches cut-side down for 3-4 minutes - Remove and let cool Place the peaches cut-side down on the grill. Grill them for about 3 to 4 minutes. You want to see those beautiful grill marks. When done, take them off the grill and let them cool for a few minutes. This helps the flavors settle. - Create a base with arugula or mixed greens - Slice grilled peaches and layer over greens - Add torn burrata cheese and sprinkle with basil Now, it’s time to build your salad. Use arugula or mixed greens for the base. Arrange them nicely in a large bowl. Slice the grilled peaches into wedges. Layer them over the greens, making it colorful. Then, take the burrata cheese and tear it into bite-sized pieces. Distribute the cheese evenly over the peaches. Finally, sprinkle fresh basil on top. This adds a fragrant touch that pairs well with the peaches. For the complete recipe, check the [Full Recipe]. To make your grilled peach burrata salad shine, season well. Use sea salt and fresh black pepper. They boost the sweet taste of the peaches. You can also add a pinch of chili flakes for a slight kick. When it comes to olive oil, choose a high-quality extra virgin. It adds a rich flavor and aroma. A robust oil helps balance the creaminess of the burrata. For perfect grill marks, heat your grill to medium-high. Place the peach halves cut-side down on the grill. Avoid moving them around; let them cook for 3-4 minutes. You’ll know they are done when they soften and show nice grill marks. If they start to brown too much, they may become mushy. When serving, arrange the salad on individual plates. This adds a touch of elegance. Layer the grilled peaches and burrata artfully for a stunning look. For garnish, add a fresh basil leaf on top. Drizzle a bit more balsamic reduction across the plate for extra flair. This makes your salad not just tasty but also beautiful. If you want more tips, check the Full Recipe. {{image_4}} Adding variety to your grilled peach burrata salad keeps it fresh and exciting. Here are some tasty variations to try. You can easily boost the protein in your salad. - Grilled Chicken or Shrimp: Adding grilled chicken or shrimp gives your salad a hearty touch. Simply grill your protein alongside the peaches. Slice it up and place it on top of your salad for added flavor and texture. - Plant-Based Protein: For a plant-based option, consider adding chickpeas or black beans. These ingredients provide protein without meat. They also add a nice texture to your dish. While burrata is creamy and delicious, you can switch it up. - Mozzarella or Feta: Substitute burrata with fresh mozzarella for a milder taste. Feta cheese offers a tangy flavor and crumbly texture, adding a nice contrast to the sweetness of the peaches. - Vegan Cheese: If you want a dairy-free option, try vegan cheese made from nuts or soy. These alternatives can mimic the creamy texture of burrata while keeping your salad vegan. Changing fruits and greens according to the season keeps your salad vibrant. - Seasonal Fruits: Use strawberries or figs instead of peaches during their peak season. These fruits provide different flavors and textures that can enhance your salad. - Other Greens or Nuts: You can mix different greens like spinach or kale. Replacing pine nuts with almonds or pecans adds a unique crunch and flavor layer to your dish. Explore these variations to make your grilled peach burrata salad a new experience every time. Check out the Full Recipe for more details! To keep your grilled peach burrata salad fresh, store it in the fridge. Use an airtight container for best results. Grilled peaches last about 3 days when stored properly. Burrata cheese can stay fresh for around 2 days, but it’s best used right away. Grilled peaches can be reheated, but be gentle. Place them on a plate and microwave for 10 to 15 seconds. This keeps them soft without losing flavor. When reheating the salad, avoid heating the greens. Instead, serve the grilled peaches on fresh greens to keep the salad crisp. You can prep ingredients ahead of time. Cut peaches and store them in the fridge with olive oil and seasoning. Just keep the salad greens and burrata separate until you’re ready to serve. Assemble the salad right before serving for the best taste and texture. Check the Full Recipe for more tips on preparation. If you can't find burrata, use fresh mozzarella. It has a similar creamy feel. For a richer taste, try ricotta or goat cheese. Each option gives a unique flavor while keeping the salad fresh and tasty. Yes, you can prep this salad early! Keep the grilled peaches, greens, and cheese separate. Store them in airtight containers in the fridge. Assemble the salad right before serving. This keeps the greens crisp and the flavors bright. Making balsamic reduction is easy. Follow these steps: - Pour 1 cup of balsamic vinegar into a saucepan. - Heat it over medium heat. - Let it simmer gently for 15-20 minutes. - Stir it occasionally until it thickens. - Cool it before using it on your salad. This salad is vegetarian with burrata cheese. For a vegan option, skip the burrata. Use avocado or a vegan cheese instead. This keeps the salad creamy while meeting vegan diets. Serve this salad with grilled chicken or fish for protein. A crusty bread or a light soup pairs well too. You can also offer a fruit platter for a fresh touch. These sides enhance the meal and make it more filling. This blog post covers how to make a delicious grilled peach and burrata salad. You learned about the fresh ingredients, step-by-step grilling, and assembling tips. I shared ways to enhance flavors and presentation ideas too. Remember, you can customize this salad with different proteins, cheeses, and seasonal fruits. Enjoy making this dish, and feel free to experiment with your favorite flavors. You’ll impress your friends and family with this tasty salad!](https://spoonfulsavory.com/wp-content/uploads/2025/06/dc3bcd0f-ca65-4a14-8a7d-62d14afc7ea7.webp)
Looking for a fresh and tasty dish that uses summer’s best fruit? Try this Grilled Peach Burrata Salad! With juicy
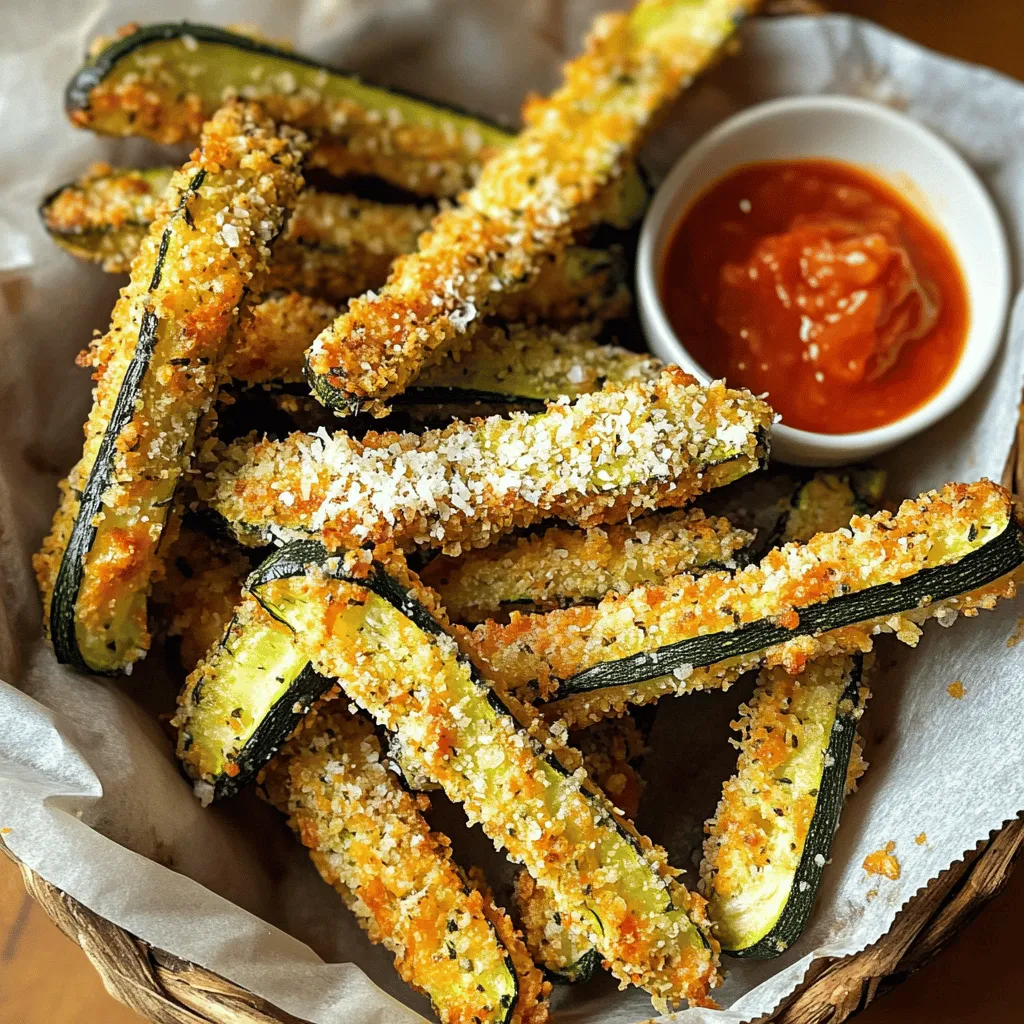
Craving a tasty snack that’s also healthy? Look no further than Crispy Parmesan Zucchini Fries! These easy-to-make delights pack a
![- 2 ripe bananas - 1/2 cup unsweetened applesauce - 1/4 cup honey or maple syrup - 1 teaspoon pure vanilla extract - 1 cup whole wheat flour - 1/2 cup unsweetened cocoa powder - 1 teaspoon baking soda - 1/2 teaspoon baking powder - 1/4 teaspoon fine sea salt - 1/2 cup dark chocolate chips (optional) - 1/4 cup walnuts or pecans (optional) The first step to making healthy chocolate banana muffins is gathering your ingredients. Using ripe bananas gives your muffins a sweet flavor. They also provide potassium and vitamins. The unsweetened applesauce adds moisture without extra fat. You can use honey or maple syrup as a natural sweetener. Whole wheat flour is a great choice here. It has more fiber than white flour, making your muffins more filling. Unsweetened cocoa powder adds a rich chocolate taste without added sugar. Baking soda and baking powder help the muffins rise and stay fluffy. If you want extra flavor, add dark chocolate chips. They make your muffins even more delicious. Chopped walnuts or pecans can add a nice crunch and healthy fats. You can find the full recipe for these muffins to guide you through the cooking process. - Ripe Bananas: Rich in potassium and vitamins - Whole Wheat Flour: Higher fiber content than white flour - Cocoa Powder: Packed with antioxidants Each ingredient plays a role in making these muffins tasty and nutritious. Ripe bananas provide energy and nutrients. Whole wheat flour helps with digestion due to its fiber. Cocoa powder is full of antioxidants, which can protect your body. Together, they create a healthy snack that you can enjoy any time of day. 1. Preheat your oven to 350°F (175°C). This step is key for even baking. 2. Prepare a muffin tin. You can grease it lightly or use muffin liners. This helps with easy removal. 3. In a large mixing bowl, mash the ripe bananas until smooth. 4. Add the unsweetened applesauce, honey or maple syrup, and pure vanilla extract. 5. Mix these wet ingredients thoroughly until you have a uniform consistency. 1. In a separate bowl, sift together the whole wheat flour, unsweetened cocoa powder, baking soda, and fine sea salt. 2. Sifting helps make the flour light and airy. This is important for fluffy muffins. 1. If you want to add extra flavor, fold in dark chocolate chips and chopped nuts. 2. Do this gently to keep the batter fluffy and avoid overmixing. 1. Evenly distribute the batter into each muffin cup. Fill them about three-quarters full. 2. Bake in your preheated oven for 18-20 minutes. 3. Check doneness by inserting a toothpick into the center. It should come out clean or with a few moist crumbs. 4. Let the muffins cool in the tin for about 5 minutes before moving them to a wire rack. For the full recipe, refer to the main section of this article. To make the best muffins, avoid overmixing. This helps keep them fluffy. When you mix too much, the muffins can become dense. Aim to stir just until the ingredients blend together. Using ripe bananas is key. The riper the banana, the sweeter it is. This natural sweetness cuts down on added sugar. Look for bananas with brown spots; they are perfect for baking. You can make these muffins gluten-free. Use gluten-free flour instead of whole wheat flour. This change keeps the texture light and tasty. If you want a vegan option, try a flax egg. Mix one tablespoon of ground flaxseed with three tablespoons of water. Let it sit for five minutes. This mixture works well as an egg substitute. Baking times can vary. Ovens have different temperatures. If your oven runs hot, check muffins a few minutes early. At high altitudes, you may need to bake longer. Keep an eye on them and use the toothpick test to see if they are done. {{image_4}} You can easily make gluten-free chocolate banana muffins. Start by using gluten-free flour instead of whole wheat flour. Almond flour or oat flour works well. You may need to adjust the liquid in the recipe. Gluten-free flours can absorb more moisture. Add a bit more applesauce or banana if the batter seems too thick. This change helps keep the muffins soft and tasty. To make vegan chocolate banana muffins, replace the eggs with a flax egg. Mix 1 tablespoon of ground flaxseed with 2.5 tablespoons of water. Let it sit for about 5 minutes to thicken. Use plant-based milk, like almond or soy, instead of regular milk. This keeps your muffins dairy-free. You can also check for dairy-free chocolate chips for extra sweetness. Want to spice up your muffins? Adding cinnamon can bring warmth and depth. Just 1 teaspoon can make a difference. Nutmeg is another great option. It adds a cozy aroma. You might want to try a pinch of both spices for a delightful twist. These small changes make your muffins unique, fun, and even more enjoyable. For the full recipe, check the link provided! To keep your muffins fresh, use an airtight container. A good option is a glass or plastic container with a tight lid. This helps prevent air from drying them out. You can also place a piece of parchment paper between layers to avoid sticking. Store the muffins at room temperature for up to three days. For longer freshness, put them in the fridge. Freezing muffins is easy and great for later use. First, let the muffins cool completely. Then, wrap each muffin tightly in plastic wrap. You can also use a freezer bag. Squeeze out as much air as you can before sealing. Muffins can be frozen for up to three months. When you are ready to eat them, just thaw at room temperature or microwave for a quick snack. Reheating muffins is simple. You can use the microwave or the oven. For the microwave, heat each muffin for about 15 to 20 seconds. For the oven, preheat it to 350°F. Place the muffins on a baking sheet and heat for about 5 to 10 minutes. This keeps them soft and warm. Enjoy your muffins just like they are fresh from the oven! To check if your muffins are ready, use the toothpick test. Insert a toothpick into the center of a muffin. If it comes out clean or with a few moist crumbs, your muffins are done. This simple test works well every time. Yes, you can use other sweeteners. Agave syrup and coconut sugar are great options. They add sweetness without altering the flavor too much. Just remember to adjust the amount based on sweetness level. If your dough feels too thick, add a splash of milk or more applesauce. These additions help make the batter smoother. Mix gently until you reach your desired texture. Avoid overmixing to keep your muffins light. These muffins last about three days at room temperature. If you store them in the fridge, they can last up to a week. Make sure to keep them in an airtight container to prevent drying out. You can definitely make mini muffins! Just adjust the baking time. Bake them for about 10-12 minutes. Keep an eye on them to avoid overbaking. Mini muffins are perfect for snacks or lunchboxes. For the complete recipe, check out the Healthy Chocolate Banana Muffins [Full Recipe]. For a delicious take on muffins, try my Healthy Chocolate Banana Muffins. They are simple to make and packed with flavor. Here’s the full recipe: - 2 ripe bananas, thoroughly mashed - 1/2 cup unsweetened applesauce - 1/4 cup honey or maple syrup (choose your preference) - 1 teaspoon pure vanilla extract - 1 cup whole wheat flour - 1/2 cup unsweetened cocoa powder - 1 teaspoon baking soda - 1/2 teaspoon baking powder - 1/4 teaspoon fine sea salt - 1/2 cup dark chocolate chips (optional, for extra indulgence) - 1/4 cup walnuts or pecans, finely chopped (optional for added crunch) These ingredients blend to create a moist muffin that you will love. The ripe bananas give natural sweetness. You can also use applesauce to cut down on fat. Whole wheat flour adds fiber, making these muffins a healthier choice. Want more details? Check out the full recipe for instructions. You will find it easy to follow and fun to make! These healthy chocolate banana muffins are easy to make and packed with good stuff. You need ripe bananas, whole wheat flour, and cocoa for flavor and nutrition. Remember to mix your wet and dry ingredients well without overworking the batter to keep your muffins soft. You can tweak the recipe for vegan or gluten-free options too. Enjoy these treats fresh or frozen; they’ll stay tasty for days. Baking these muffins brings joy and health to your kitchen.](https://spoonfulsavory.com/wp-content/uploads/2025/06/407400c2-35dc-4e4f-903d-04cacf2fe692.webp)
Looking for a delicious way to enjoy healthy treats? You’re in the right place! These Healthy Chocolate Banana Muffins blend
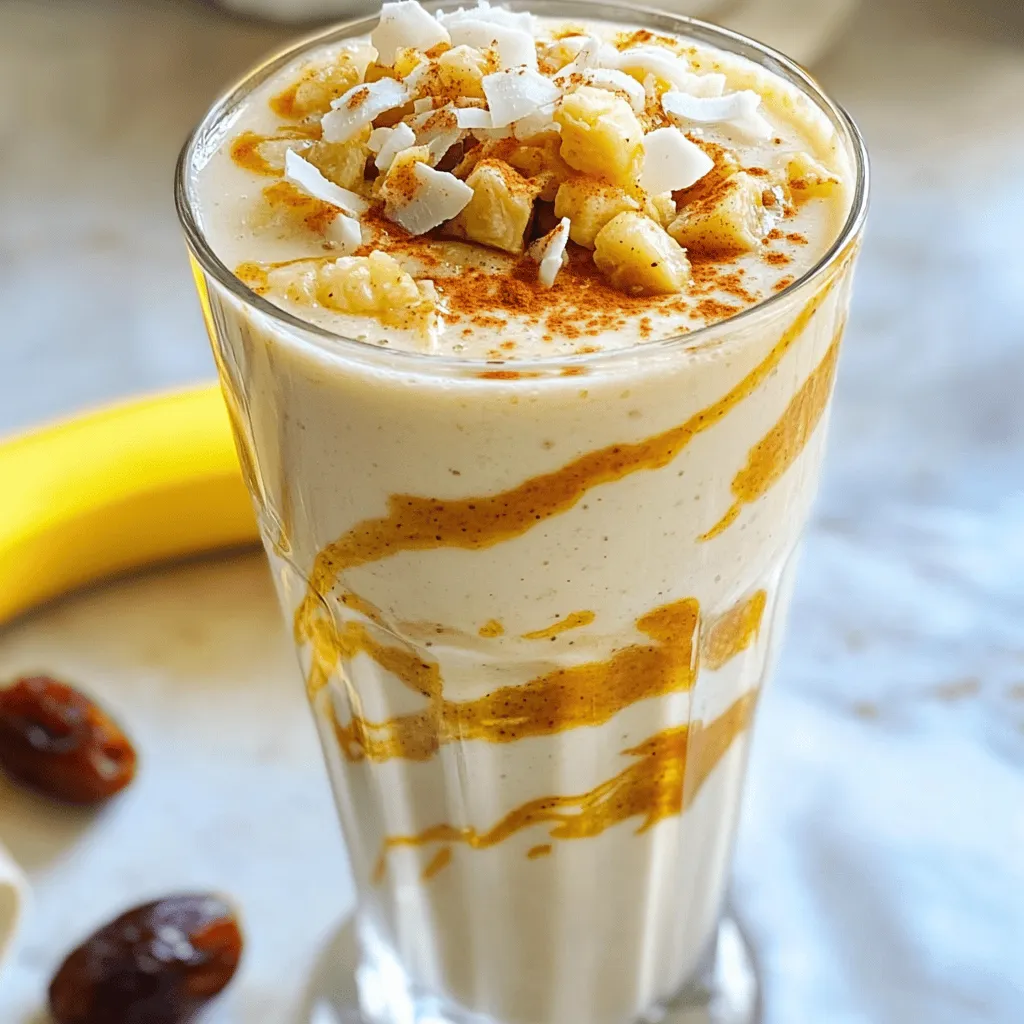
Looking for a drink that’s both refreshing and nutritious? The Coconut Date Shake is your answer! This creamy blend of
