
Minty Pineapple Cooler Refreshing Summer Beverage
Looking for the perfect drink to cool you down this summer? The Minty Pineapple Cooler bursts with fresh flavors that
Looking for the perfect drink to cool you down this summer? The Minty Pineapple Cooler bursts with fresh flavors that
![To create a delicious Peach Raspberry Chia Smoothie, gather these ingredients: - 2 ripe peaches, pitted and finely chopped - 1 cup fresh raspberries - 1 ripe banana, frozen - 1 tablespoon chia seeds - 1 cup almond milk (or your preferred choice of milk) - 1 tablespoon honey or maple syrup (optional, for added sweetness) - A handful of ice cubes Sometimes, you may not have all the ingredients. Here are a few swaps you can try: - Peaches: Use nectarines or mangos for a different flavor. - Raspberries: Swap with strawberries or blueberries if desired. - Banana: For a creamier texture, use avocado. - Chia seeds: Try flax seeds as a substitute. - Almond milk: Any milk works, like coconut or oat milk. - Honey or maple syrup: Agave syrup or stevia can work for sweetness. This smoothie is packed with nutrients. Here’s a quick look at what each ingredient brings to the table: - Peaches: They are low in calories and high in vitamins A and C. - Raspberries: These berries are rich in fiber, antioxidants, and vitamins. - Banana: It adds potassium, which is great for heart health. - Chia seeds: They provide omega-3 fatty acids and protein. - Almond milk: This milk is low in calories and rich in vitamin E. - Honey or maple syrup: These natural sweeteners add flavor and quick energy. - Ice cubes: They give a refreshing chill and thick texture. This Peach Raspberry Chia Smoothie delivers a blend of health benefits and delicious taste. For the full recipe, check it out here! To start, gather all your ingredients. This makes the process smooth and easy. You will need: - 2 ripe peaches, pitted and finely chopped - 1 cup fresh raspberries - 1 ripe banana, frozen - 1 tablespoon chia seeds - 1 cup almond milk (or your preferred choice of milk) - 1 tablespoon honey or maple syrup (optional) - A handful of ice cubes First, chop the peaches and wash the raspberries. You want ripe peaches for the best flavor. The banana should be frozen to add creaminess. When blending, start with the fruit. Place the chopped peaches and fresh raspberries into your blender. Next, add the frozen banana. This gives your smoothie a thick, creamy texture. Sprinkle in the chia seeds and pour the almond milk over the fruit. This helps everything blend well. If you like it sweeter, add honey or maple syrup now. Blend on high speed until smooth. Check for any fruit chunks. If it’s too thick, add more almond milk and blend again. For a frosty finish, toss in ice cubes and blend until crushed. Now it’s time to serve! Pour your vibrant smoothie into tall glasses for a fun look. To make it even more appealing, garnish with whole raspberries and a slice of peach on the rim. Sprinkle a few chia seeds on top for texture. This adds a nice touch and shows off the healthy ingredients. Enjoy your delicious Peach Raspberry Chia Smoothie! For more details, refer to the Full Recipe. One common mistake is not using ripe fruit. Ripe peaches and raspberries bring out the best flavor. If your fruit is too firm, the smoothie may taste bland. Another mistake is adding too much liquid. Start with a cup of almond milk and adjust as needed. Avoid over-blending; you want a creamy texture, not a watery mix. To adjust sweetness, taste your smoothie before serving. If it's not sweet enough, add honey or maple syrup. Start with a small amount; you can always add more. You can also use ripe fruits to enhance natural sweetness. Bananas, in particular, can add a nice touch. Freezing fruits makes smoothies easier and faster. Chop and freeze your peaches and bananas ahead of time. You can store them in bags for quick access. Raspberries can also be frozen, but add them fresh for best taste. Prepare your chia seeds by soaking them in water for a few hours. This makes them swell and adds a nice texture. {{image_4}} You can switch out fruits to make this smoothie even more fun. Try using mangoes or strawberries instead of peaches. Both fruits add a sweet touch and blend smoothly. For a tart twist, blackberries or blueberries work great too. Mix and match to find your favorite blend! To keep this smoothie vegan, use plant-based milk, like almond or oat milk. These options are creamy and tasty. You can also skip the honey and use maple syrup instead. This keeps the smoothie sweet and vegan-friendly. Enjoy the same great taste without any dairy! Want to boost your smoothie? Add some protein or superfoods! A scoop of protein powder can help keep you full. You can also mix in spinach or kale for added nutrients. These greens blend well and won’t change the taste much. Chia seeds are already packed with fiber and nutrients. You can even use flaxseed for extra omega-3s! For the full recipe, check out the details above. After making your Peach Raspberry Chia Smoothie, you may have some left over. To store it, pour the smoothie into a clean jar with a tight lid. This keeps it fresh longer. Always try to fill the jar to the top. This way, less air stays in the jar. If you can, drink it within one day. This keeps the flavors bright and tasty. You can freeze this smoothie for later. Pour it into ice cube trays or freezer-safe bags. Make sure to leave space in the bags for expansion. Smoothies can freeze well for up to three months. When you want one, just thaw it in the fridge overnight. You can also blend it again for a quick treat. Your Peach Raspberry Chia Smoothie stays fresh in the fridge for about 24 hours. After that, the chia seeds may soak up too much liquid. This makes it thicker and less enjoyable. If you notice any off smells or changes in color, it's best to toss it. Always trust your nose and eyes. For the best taste, enjoy it soon after making it. If you want the full recipe, check out the details above. Chia seeds are small but mighty. They offer fiber, protein, and omega-3 fats. Fiber helps your digestion and keeps you full. Protein aids muscle growth and repair. Omega-3 fats support heart health. Plus, they are rich in antioxidants. This means they help fight free radicals in your body. Chia seeds also absorb water, which can help with hydration. Adding them to your smoothie boosts its nutrition. Yes, you can use frozen fruits! Frozen fruits are just as healthy as fresh ones. They are often picked at peak ripeness and quickly frozen. This locks in their nutrients and flavor. Using frozen fruits can also make your smoothie colder and creamier. If you use frozen peaches or raspberries, just blend them straight from the freezer. You may need to adjust the almond milk to get your desired texture. Absolutely! This smoothie is great for meal prep. You can make it ahead of time and store it in the fridge. Just keep it in a sealed container. It stays fresh for up to 24 hours. For longer storage, consider freezing it. Pour the smoothie into ice cube trays. Once frozen, pop the cubes into a bag. This way, you can blend them with fresh milk later. It’s a quick and healthy option for busy days. For the full recipe, check here: [Full Recipe]. In this post, we explored smoothie ingredients, blending techniques, and storage tips. I shared common mistakes to avoid and ways to customize your drink. Remember, the right ingredients can boost flavor and nutrition. Always store leftovers properly to keep them fresh and tasty. Try new fruit combos and consider adding superfoods for extra health benefits. Enjoy experimenting with your smoothies, and find what makes them perfect for you. Your next delicious and healthy blend is just a recipe away!](https://spoonfulsavory.com/wp-content/uploads/2025/06/31c14e13-48a5-4c86-a65e-c6f0b87d3b3d.webp)
Craving a fresh and healthy treat? Let me introduce you to the Peach Raspberry Chia Smoothie! This vibrant drink blends
![- 1 cup oat milk - 1 shot espresso (or 1/2 cup strong brewed coffee) - 2 tablespoons pure maple syrup - 1/2 teaspoon ground cinnamon (plus extra for garnishing) - 1/4 teaspoon vanilla extract - Pinch of salt - Optional: whipped coconut cream for topping To create this rich and flavorful drink, you need the right ingredients. Oat milk is creamy and adds a lovely texture. The espresso or strong coffee brings a strong flavor that pairs well with the sweetness of maple syrup. Ground cinnamon gives warmth and spice, while vanilla enhances the taste. A pinch of salt balances the sweetness. If you want a touch of luxury, whipped coconut cream is a delightful option on top. - You can use almond or soy milk instead of oat milk. - For a low-sugar option, look for sugar-free maple syrup. - Try different spices like nutmeg or cardamom to change the flavor. Ingredient substitutions allow you to customize this latte. If you're out of oat milk, almond or soy milk works well. Sugar-free maple syrup can help cut calories. Experimenting with spices can lead to fun new flavors. Whether you want a classic taste or something unique, these options keep your latte exciting. Check the [Full Recipe] for more details on making this drink! 1. Heating oat milk: Start by pouring the oat milk into a small saucepan. Set the heat to medium-low. Use a whisk to stir gently as it warms. Keep a close eye on it and avoid boiling. You want it steaming hot but creamy. 2. Combining maple syrup and spices: In a separate bowl, mix the pure maple syrup, ground cinnamon, vanilla extract, and a pinch of salt. Stir well. The mixture should be syrupy and fragrant. 3. Mixing coffee and syrup: Now, add your shot of espresso or half a cup of strong brewed coffee to the syrup mix. Stir until the coffee blends into the sweet mixture. This creates a base full of flavor. - Tips for whisking oat milk: To achieve a frothy latte, it's key to whisk the oat milk well. Use a whisk or a milk frother. Keep whisking as you pour the milk into the coffee mix. This adds air and creates a light, fluffy texture. - Creating a frothy finish: Once you pour in the oat milk, continue whisking. This helps form a rich foam on top. The light froth enhances the drink's visual appeal and mouthfeel. - Taste test recommendations: After combining all ingredients, take a sip. If you want it sweeter, add more maple syrup. Adjust the sweetness until it’s just right for you. - Customizing flavors to personal preference: Feel free to play with flavors. You can add more cinnamon or even a dash of nutmeg. Making the latte your own will make it even more enjoyable. To steam oat milk well, keep it between 150°F and 160°F. This range helps create a creamy texture without boiling. Boiling can make the milk separate and lose its richness. Watch it closely, stirring gently as it heats. Avoid common mistakes, like using cold milk or boiling it. Cold milk will not froth well. Boiling will ruin the flavor and texture. Always heat it slowly and gently for the best results. Serve your latte in a warm, cozy mug. Add a sprinkle of cinnamon on top for a lovely touch. A decorative saucer under the mug adds charm. Pair it with a warm pastry, like a croissant or muffin. This makes the drink feel special and inviting. For a fun twist, try adding a cinnamon stick as a stirrer. It looks great and adds flavor as you sip. A fresh sprig of mint can also brighten the look and taste. When brewing espresso, use fresh beans for the best taste. Grind them just before brewing. This keeps the flavors bright and fresh. Aim for a fine grind for espresso, and use about 18-20 grams for a double shot. If you prefer brewed coffee, use a strong blend. Aim for a coffee-to-water ratio of 1:15 for a rich flavor. Adjust the strength by adding more or less coffee as you like. These tips will help you create a delicious Maple Cinnamon Oat Milk Latte. Follow the Full Recipe for the perfect drink every time. {{image_4}} You can easily change the flavor of your Maple Cinnamon Oat Milk Latte. Adding a splash of vanilla or caramel gives it a sweet twist. Simply mix in 1/4 teaspoon of vanilla extract or a drizzle of caramel sauce. This adds depth to the drink and makes it extra special. Seasonal flavors can also enhance your latte. In fall, try adding pumpkin spice. Use a teaspoon of pumpkin spice mix in place of cinnamon. It brings warmth and cheer on chilly mornings. For winter, consider nutmeg or ginger for a cozy vibe. Oat milk is a great choice for your latte. It is rich in vitamins and minerals. Oat milk has less fat than whole milk. It’s also high in fiber, which is good for digestion. These health benefits make it a smart option. If you want a lower-calorie drink, use less maple syrup. You can also use sugar-free maple syrup. This keeps the flavor without the extra calories. Another option is to add a little cocoa powder for a chocolatey twist without added sugar. This latte is already dairy-free and vegan-friendly! But you can make it even better with some tweaks. For toppings, use whipped coconut cream instead of dairy cream. It adds a nice texture and taste. You can also experiment with sweeteners. Agave syrup or date syrup works well. These options keep your drink vegan while adding unique flavors. Enjoy customizing your latte to suit your taste! For the full recipe, check out the earlier section. To keep your oat milk fresh, store it in the fridge. Use an airtight container for the best results. Oat milk usually lasts about 7 to 10 days after opening. Always check the expiration date on the carton. If you notice any changes in smell or taste, it's best to toss it. For your leftover maple syrup mixture, pour it into a small jar. Seal it tightly and place it in the fridge. This syrup mix can last for up to two weeks. Just give it a stir before using it again. If you love this maple cinnamon oat milk latte, consider making multiple servings at once. You can prepare the oat milk and syrup mixture ahead of time. Store each in separate containers in the fridge. When you’re ready, just heat the oat milk and mix in the coffee and syrup. For those who want to save even more time, freeze the syrup mixture in an ice cube tray. Once frozen, transfer the cubes to a zip-top bag. When you want a latte, just pop a cube in your cup, add hot oat milk, and stir. To keep oat milk fresh for longer, always store it in a cool place. Avoid leaving it out at room temperature. If you want to extend the life of your spices, keep them in a dark, dry place. Ground cinnamon typically lasts for about six months when stored properly. Maple syrup can last for years if kept in a cool, dark spot. Once opened, move it to the fridge. This helps maintain its flavor and quality. Always make sure to check for any mold or off smells before using. Yes, you can. If you don't have espresso, use strong brewed coffee instead. A half cup works well. You still get that rich flavor. You can also try a coffee substitute like a chicory blend. This adds a unique twist. The best oat milk for lattes is one that froths well. Look for brands that say "barista blend." Oatly Barista Edition is popular and creamy. Other good options are Pacific Foods and Califia Farms. Try different brands to find your favorite. Once opened, oat milk lasts about 7 to 10 days in the fridge. Always check the expiration date on the carton. Store it tightly closed to keep it fresh. If it smells bad or looks strange, toss it out. Absolutely! To make an iced version, brew your coffee first. Let it cool down. Use cold oat milk instead of heating it. Mix the coffee with the maple syrup and cinnamon. Pour it over ice, then add the oat milk. Yes, this latte can be healthy. Oat milk has fiber and is lower in calories than dairy. Maple syrup is a natural sweetener. It adds vitamins and minerals too. Just watch your portion sizes of syrup for sugar intake. You can find this drink at many local cafes. Look for coffee shops that focus on plant-based options. Chains like Starbucks offer it as well. You might also find it in specialty coffee shops in your area. The Maple Cinnamon Oat Milk Latte combines rich flavors with easy steps. You learned what ingredients you need and how to prepare them. I shared tips to adjust flavors and avoid common mistakes. You also discovered ways to store leftovers and useful FAQs. Enjoy making this drink at home! It's a tasty treat that fits many diets. Make it your own with different flavors. I hope you enjoy every sip of your latte!](https://spoonfulsavory.com/wp-content/uploads/2025/06/313efd81-2eb8-4cf3-be03-a93f6cd5b790.webp)
Imagine waking up to the warm, inviting aroma of a Maple Cinnamon Oat Milk Latte. This rich and flavorful drink
![To make the Strawberry Vanilla Bean Latte, you need the following ingredients: - 1 cup fresh strawberries, hulled and sliced - 2 tablespoons vanilla bean paste (or 1 teaspoon of pure vanilla extract) - 2 cups milk (dairy or non-dairy) - 1-2 tablespoons honey or maple syrup - 1 shot of espresso or 1/2 cup of strong brewed coffee - Whipped cream (optional) - Additional fresh strawberry slices for garnish Each ingredient plays a key role. The strawberries add a fresh and fruity flavor. Vanilla bean paste brings out a rich aroma. Milk adds creaminess and balances the drink. Honey or maple syrup sweetens it just right. Espresso gives a strong coffee base that pairs well with the other flavors. Whipped cream adds a nice touch if you want to make it extra special. Finally, fresh strawberry slices make the drink look pretty and inviting. Using high-quality ingredients makes a big difference. Fresh strawberries will give you the best taste. Choose the milk you love best. You can even try different sugars based on your taste. For the full recipe, check out the Strawberry Vanilla Bean Latte section. - First, slice the fresh strawberries. - In a small saucepan, combine the sliced strawberries with honey or maple syrup. - Cook this mix over medium heat for 5-7 minutes. Stir often until the strawberries soften and release their juices. - Next, warm the milk in a separate saucepan over medium heat. - Make sure it gets hot but does not boil. - Add the vanilla bean paste or extract and whisk until it’s smooth and slightly frothy. - Brew your espresso or strong coffee in your favorite coffee maker. - Pour the brewed coffee into a large mug. - Strain the warm strawberry mixture into the coffee. You can keep some solids if you like texture. - Gradually pour in the vanilla-infused milk. Stir gently to mix everything well. - For a special touch, add whipped cream on top and garnish with fresh strawberry slices. You can find the full recipe [here]. Enjoy your drink! Serve your strawberry vanilla bean latte in clear glass mugs. This shows off the pretty layers of color. The vibrant red strawberries and the creamy milk look beautiful together. For a touch of class, add a sprig of fresh mint on top. This will make your drink look even more inviting. You can make your drink sweeter if you like. Adjust the honey or maple syrup to fit your taste. If you want to try something new, swap out the milk. You can use almond, oat, or coconut milk. Each choice adds its own flavor and richness. To get that café-style finish, use a milk frother. It makes the milk light and fluffy. You can also play with the temperature settings. Warmer milk gives a different foam than cooler milk. Experiment to find the froth that you love best. You can check out the Full Recipe for more details on making this delightful drink! {{image_4}} You can switch strawberries for other fruits. Raspberries or blueberries work great. Each fruit adds a unique flavor. You can also mix fruits for a berry latte. Try combining strawberries, raspberries, and blueberries. This mix gives a fun, colorful drink. If you want a dairy-free drink, use coconut or almond milk. Both options add a nice twist. You can also try different non-dairy creamers. These alternatives can make your latte just as creamy and rich. To make an iced version, simply brew your coffee and chill it. You can use cold milk instead of heating it. Pour the cold coffee over ice for a refreshing treat. For fun, make ice cubes from coffee or fruit juice. This adds extra flavor as they melt. To keep the strawberry base fresh, store it in an airtight container. Place it in the fridge right after it cools. This way, you keep the flavors intact. Consume it within three days for the best taste. After that, the strawberries may lose some of their flavor and freshness. If you have leftover milk, seal it tightly and store it in the fridge. Use it within five days for optimal taste. When reheating, heat the milk slowly over low heat. Stir it gently to prevent curdling. You can also use a microwave, but do it in short bursts and stir in between. If you have leftover latte, store it in the fridge in a covered container. Drink it within one day for the best flavor. To reheat, warm it gently on the stove or in the microwave. Stir well to mix the layers again. This will ensure it tastes just as good as when freshly made. For the full recipe, check out the Strawberry Vanilla Bean Latte section to enjoy a creamy delightful drink. Yes, you can easily make this latte vegan. For milk, try using almond, oat, or soy milk. These options give a rich flavor. For sweeteners, agave syrup or coconut sugar works well. Both options are plant-based and will still keep your drink sweet and tasty. To make this latte sugar-free, you can skip the honey or maple syrup. Instead, use stevia or monk fruit sweetener. These alternatives provide sweetness without added sugar. You can adjust the amount based on your taste. They blend well with the strawberry and vanilla flavors. For the best flavor, espresso is my top choice. It adds a strong, rich taste that pairs perfectly with strawberry. If you prefer brewed coffee, make it strong to balance the sweetness. I recommend using a dark roast for a deep flavor. Both options work, but espresso gives a more authentic café taste. This blog post has covered how to create a delicious strawberry latte. You need just a few key ingredients, including fresh strawberries, milk, and coffee. I shared step-by-step instructions to guide you in preparing this drink. You also learned helpful tips for presentation and variations you can try. Remember, this latte is fun to customize. Enjoy experimenting with flavors and ingredients! Making your own drinks at home can be simple and rewarding. Now, go ahead and make your perfect strawberry latte!](https://spoonfulsavory.com/wp-content/uploads/2025/06/0fb4724f-2fc0-4763-9ca2-5695430aa796.webp)
Dive into the delicious world of the Strawberry Vanilla Bean Latte! This creamy drink combines fresh strawberries and rich vanilla
![To make a delightful Pistachio White Chocolate Shake, gather these tasty ingredients: - 2 cups creamy vanilla ice cream - 1 cup milk (choose between whole or almond milk) - 1/2 cup white chocolate chips - 1/4 cup shelled pistachios, plus additional for garnish - 1 teaspoon pure vanilla extract - Whipped cream, for a luscious topping - Fresh mint leaves, for an aromatic garnish Each ingredient plays a key role in creating the perfect shake. The creamy vanilla ice cream gives it a smooth base. The milk adds richness and can be adjusted to your taste. White chocolate chips bring sweetness and a lovely flavor. Shelled pistachios add a nice crunch and nutty taste. Pure vanilla extract enhances the shake's overall flavor. Finally, whipped cream and mint leaves make it look beautiful and appealing. For the full recipe, follow the steps to blend these ingredients into a rich and creamy treat. To start, you need to melt the white chocolate. Take a microwave-safe bowl and add the white chocolate chips. Set your microwave to medium power. Heat the chocolate in 20-second intervals. Stir the chocolate well between each interval. Keep heating until it is fully melted and smooth. Let it cool slightly before using it in your shake. This cooling step is important. It helps keep your shake creamy and thick. Next, it’s time to blend the shake. In your blender, combine the creamy vanilla ice cream, your choice of milk, the melted white chocolate, pure vanilla extract, and the shelled pistachios. Blend on high speed. You want the mixture to be smooth and creamy with no lumps. After blending, taste the shake. If you want it thinner, add a splash more milk. Blend briefly to mix it in. Now, let’s serve your delicious shake. Carefully pour it into tall glasses. Fill each glass about three-quarters full. This leaves space for the whipped cream. Generously dollop whipped cream on top of each shake. It adds a nice touch and makes it look fancy! Sprinkle extra crushed pistachios on top for crunch. Finally, add a fresh mint leaf on each shake. This gives a burst of color and a nice aroma. Enjoy your Pistachio White Chocolate Shake! For the full recipe, check the details above. To make your shake sweeter, add a bit more white chocolate. Taste it as you mix. You can also try flavored milk. Almond milk adds a nice nutty taste. Or use coconut milk for extra creaminess. Each change brings a new twist to the shake. For a smooth shake, blend on high speed. Make sure there are no lumps left. If you want a thicker shake, use frozen ingredients. Frozen pistachios or ice cream work great. They make the shake cold and creamy. You can also chill your glasses. This keeps your shake frosty longer. For the full recipe, check out the [Full Recipe]. {{image_4}} You can change up this shake by using different ice cream flavors. For example, try mint chocolate chip for a fresh twist. Chocolate chip cookie dough also adds a rich taste to your shake. You can also swap out the pistachios. Try almonds, walnuts, or even hazelnuts for unique flavors. Adding toppings can elevate the shake too. Consider mini chocolate chips, crushed cookies, or caramel drizzle for extra sweetness. Using seasonal ingredients can make your shake special. In spring, add fresh strawberries or cherries for a fruity flavor. In fall, pumpkin spice can create a warm, cozy feel. You might even use fresh berries in summer for a refreshing twist. Incorporating seasonal flavors keeps your shake fun and exciting. Try new ideas to surprise your friends and family! To keep your shake fresh, store leftovers in a sealed container. Place it in the fridge. It stays good for up to two days. If you want to keep it longer, freeze it. Pour the shake into ice cube trays for easy portions. This way, you can enjoy it later without waste. To refresh leftover shakes, you need to re-blend them. First, pour the shake into your blender. Add a splash of milk to make it creamy again. Blend on high until smooth. If it's too thick, add more milk. This will bring back the rich, creamy texture. Enjoy your shake just like the first time! Yes, you can make this shake without ice cream. Try using frozen bananas or frozen yogurt as a base. Both options add creaminess and sweetness. For a dairy-free version, use coconut yogurt or cashew cream. These alternatives keep your shake rich while fitting various diets. To make this shake healthier, reduce the sugar. You can use fewer white chocolate chips or try a sugar-free version. Swap regular milk for unsweetened almond or oat milk to cut calories. You could also add spinach or protein powder for extra nutrients without changing flavor. If you want to replace pistachios, try using almonds or cashews. They both add a nice crunch and flavor. For a nut-free option, sunflower seeds or pumpkin seeds work well too. These alternatives keep the shake tasty while changing up the flavor profile. For the full recipe, check out the Pistachio Bliss White Chocolate Shake above! This shake combines creamy vanilla ice cream, milk, and tasty nuts. You learned how to melt white chocolate, blend your ingredients, and serve it nicely. I shared tips to enhance flavors and make it smoother. You also discovered various spins on the shake and how to store leftovers. Try different ideas to suit your taste. Enjoy crafting your unique shake and share it with friends or family. Be creative, and have fun!](https://spoonfulsavory.com/wp-content/uploads/2025/06/7752f472-9ae0-4aa8-b664-7615e6212b7a.webp)
Craving a sweet and creamy treat? The Pistachio White Chocolate Shake is here to satisfy. This shake combines rich white
![- 2 green tea bags - 1 cup freshly pressed apple juice - 1/2 cup mixed berries (strawberries, blueberries, and raspberries) - 1 teaspoon honey (or to taste) - 1 tablespoon freshly squeezed lemon juice - 2 cups boiling water - Fresh mint leaves for garnish - Ice cubes (optional) To make apple berry green tea, you need fresh and quality ingredients. The green tea bags bring a lovely flavor and health benefits. Apple juice adds sweetness and charm. Mixed berries provide vibrant color and nutrients. Honey gives a touch of sweetness, while lemon juice adds a zesty kick. Boiling water is essential for steeping the tea properly. Fresh mint leaves not only look nice but also offer a refreshing aroma. Ice cubes are optional if you want a chilled drink on warm days. - Additional sweeteners (agave, stevia) - Different berry combinations (blackberries, cranberries) - Citrus options (lime, orange juice) You can customize your apple berry green tea with optional add-ins. If you prefer a sweeter drink, try agave or stevia. Feel free to mix different berries for a unique twist. Blackberries and cranberries can bring new flavors to the drink. You can also play with citrus options like lime or orange juice for an extra zing. Each choice allows you to make this drink truly your own. For the full recipe, check out the complete guide. Boil 2 cups of water in a pot. Once the water boils, remove the pot from heat. Place 2 green tea bags into the hot water. Cover the pot and let the tea steep for 3 to 4 minutes. This time gives the tea a nice flavor. If you steep too long, the tea can taste bitter, so keep an eye on the clock! While your tea steeps, it’s time to make the berry-apple mixture. Take 1/2 cup of mixed berries, such as strawberries, blueberries, and raspberries. Add these to a blender along with 1 cup of freshly pressed apple juice. Blend until smooth. To make the juice silky, strain the mixture through a fine mesh sieve into a pitcher. This helps remove any seeds or pulp. Once the tea is ready, remove the tea bags. Pour the strained berry-apple juice into the brewed green tea. Stir gently to mix the flavors. Now, add 1 teaspoon of honey and 1 tablespoon of freshly squeezed lemon juice. Stir until the honey dissolves. Taste the drink and add more honey if you like it sweeter. If you want it cold, chill the drink in the fridge or pour it over ice. For a pretty touch, add fresh mint leaves on top before serving. To make the best apple berry green tea, start with the right water temperature. Green tea needs hot water, but not boiling. Aim for about 175°F to 185°F. This keeps the tea from tasting bitter. For steeping, I suggest 3 to 4 minutes. If you steep too long, it may lose its fresh taste. You can add spices or herbs to boost flavor. A pinch of cinnamon or fresh ginger can add warmth. If you like mint, toss in a few leaves when serving. Pair this tea with light snacks. Think fruit salads, cheese platters, or even light pastries. They will complement the drink well. Serve your tea in clear glasses to show off its vibrant colors. This makes it look more inviting. For a touch of elegance, add a slice of apple on the rim of each glass. You can also garnish with fresh mint leaves for a pop of color and aroma. These small details make your drink even more special. For the full recipe, check out the [Full Recipe]. {{image_4}} You can mix and match fruits to make apple berry green tea even better. Try using seasonal fruits like peaches or nectarines in summer. For a tropical twist, add pineapple or mango. Citrus fruits like oranges or limes brighten the drink and add zing. Each fruit offers a unique taste and can change the drink's character. To make a delicious iced version, prepare the tea as usual. After steeping, let it cool for a bit. Pour it over ice cubes and enjoy a refreshing drink. Add fresh fruit slices to enhance the flavor and look. If you prefer hot tea, serve it right after steeping. This keeps the flavor strong and aromatic. Honey is a good choice for sweetening your drink. You can also try agave syrup or maple syrup for variety. If you want to cut calories, use stevia or monk fruit. These options keep the drink sweet without the extra sugars. Adjust the amount to suit your taste. For more ideas, check the Full Recipe for different sweetener suggestions! To keep leftover apple berry green tea fresh, store it in the fridge. Use a tight lid on your container. Glass jars work great for this. They help keep flavors strong and prevent spills. Drink the tea within three days for the best taste. If you want to save the apple-berry mix for later, consider freezing it. Pour the mix into ice cube trays. Once frozen, transfer the cubes to a freezer bag. This way, you can avoid spoilage. The mix can last for up to three months frozen. Just remember to label the bag with the date. To reheat stored tea, use the stove or microwave. Heat it gently to avoid losing flavor. If using the microwave, start with 30 seconds. Stir and check the temperature. Repeat if necessary. If you want to keep it cold, pour it over ice straight from the fridge. Enjoy your refreshing drink! For the complete recipe, check out the Full Recipe section. Apple berry green tea is packed with health benefits. First, green tea has antioxidants. These help fight free radicals in your body, which can keep you healthy. Second, apples and berries are full of vitamins. Apples give you vitamin C, which helps your immune system. Berries, like strawberries and blueberries, add more vitamins and minerals. They also provide fiber, which is good for digestion. Yes, you can use other types of tea. If you want a stronger flavor, try black tea. For a lighter taste, white tea works well too. Herbal teas can add different flavors, like chamomile or peppermint. Just remember, the flavor will change based on the tea you choose. Apple berry green tea can be great for kids. It has natural sweetness from fruits. Just be careful with the caffeine in green tea. You can use decaf green tea to make it better for children. You might also want to reduce the honey. That way, it will be less sweet for little ones. You can find apple berry green tea at many grocery stores. Look for it in the tea aisle. Many brands offer it, so you can choose your favorite. You can also buy it online at places like Amazon or specialty tea shops. This way, you can find exactly what you want. Brewed apple berry green tea is best when fresh. If you keep it in the fridge, it can last about 3 days. Make sure to store it in a sealed container. This keeps it fresh and tasty. If you notice any changes in smell or color, it’s best to throw it out. This blog post covers the tasty apple berry green tea recipe you can easily make. We explored how to prepare the drink, select ingredients, and enhance its flavors. You can enjoy many variations, whether hot or cold. In my experience, this tea offers generous health benefits, and it tastes great. It's easy to adapt for your taste, so feel free to experiment with flavors. Enjoy your refreshing drink, and share it with friends!](https://spoonfulsavory.com/wp-content/uploads/2025/06/037576d8-e5b7-47f1-9cef-86b6a04d3fda.webp)
Looking for a refreshing drink that’s as healthy as it is delicious? Look no further! Apple Berry Green Tea combines
![For this Caramel Nut Latte, you need a strong coffee base. You can use: - 1 cup freshly brewed espresso - 1 cup strong brewed coffee Espresso gives a rich flavor, while strong coffee offers a milder taste. Both work well, so choose what you love. Next, pick your milk. Options include: - 1 cup dairy milk - 1 cup almond milk - 1 cup oat milk - 1 cup soy milk Each milk adds a unique taste and texture. Dairy milk creates a creamy latte, while nut and plant milks offer a lighter feel. Now it’s time to add some flavor. You’ll need: - 2 tablespoons rich caramel sauce - 1 tablespoon hazelnut syrup - 1/4 teaspoon pure vanilla extract These ingredients make your latte sweet and aromatic. The caramel brings warmth, and the hazelnut adds a nutty twist. Finish your drink with fun toppings. Grab: - Whipped cream - Handful of chopped toasted nuts (like hazelnuts, almonds, or walnuts) The whipped cream adds a creamy layer, while the nuts give a nice crunch. Your Caramel Nut Latte will look and taste amazing! For the full recipe, visit [Full Recipe]. Start by brewing one cup of strong coffee or espresso. Use your favorite method, like a drip machine or French press. The goal is to make it rich and bold. Once brewed, set it aside. Letting it sit helps the flavors deepen. Next, grab a small saucepan. Pour in one cup of milk. You can choose dairy, almond, oat, or soy milk. Add two tablespoons of caramel sauce and one tablespoon of hazelnut syrup. Don’t forget a splash of pure vanilla extract! Stir gently as you heat it over medium heat. Keep stirring until warm, but do not let it boil. After warming, it’s time to froth the milk. You can use a milk frother or whisk it by hand. If you whisk, do it vigorously. You want the milk to become light and airy. This will give your latte a nice texture. In a cozy mug, pour in the brewed coffee. Stir in a pinch of flaky sea salt. This enhances the flavors and balances the sweetness. Carefully pour the frothed milk over the coffee. Watch how it swirls together, creating a marbled look. Now for the fun part! Top your latte with a generous dollop of whipped cream. Drizzle extra caramel sauce over the cream for a sweet touch. Finally, sprinkle chopped toasted nuts on top for a crunchy finish. Serve your Caramel Nut Latte right away. Enjoy every sip of this delightful drink! To get the best foam, start with cold milk. Cold milk froths better and gives a nice texture. Use a milk frother or whisk if you don’t have one. Froth until it’s light and airy, and always avoid boiling the milk. This keeps the flavor smooth. Taste your latte as you go. If it’s too sweet, add a bit more espresso. If it’s not sweet enough, drizzle in more caramel. A pinch of sea salt can also help balance the flavors. It adds depth and enhances the sweetness without overpowering it. Choose fresh, high-quality coffee. The better the coffee, the better your latte will taste. For milk, pick one you love. Almond, oat, or whole milk all work well. Use real caramel sauce and pure vanilla extract for an authentic flavor. Quality ingredients make a big difference. Pair your latte with a tasty treat. A buttery croissant or a slice of banana bread works great. The flavors complement each other perfectly. You can also serve it in a cozy mug for a more inviting feel. Presentation is key to a delightful coffee experience. For the full recipe, check out the Caramel Nut Latte Delight. {{image_4}} You can mix up the nut flavor in your Caramel Nut Latte. Almond, pecan, and walnut all add unique tastes. If you want a sweet and creamy latte, use almond syrup. For a richer flavor, try pecan syrup. Walnut syrup gives a bold, earthy taste. Each nut brings its own twist, so feel free to experiment! Hot drinks are great, but iced lattes are refreshing. To make an iced Caramel Nut Latte, brew your coffee first, and let it cool. Use cold milk or milk alternatives. Add ice to a glass, then pour in the coffee. Top it off with caramel sauce, nut syrup, and whipped cream. The cold drink is perfect for warm days! If you want to skip dairy, there are many tasty options. Almond, oat, and soy milk work well. These alternatives add creaminess without the dairy. Just use them in place of regular milk in the recipe. You can also find nut-flavored syrups that are dairy-free. Enjoy the same great taste without the dairy! For the full recipe, check out the Caramel Nut Latte Delight. You may have some leftover ingredients after making your Caramel Nut Latte. Store them to use later. Keep the milk in a sealed container in the fridge. It stays fresh for a week. Store the caramel sauce and hazelnut syrup in the pantry. They can last for months. Nuts should go in an airtight bag, too. This keeps them crunchy and fresh. If you have leftover latte, you can easily reheat it. Pour it into a microwave-safe cup. Heat it in the microwave for about 30 seconds. Stir it well and check the temperature. You want it warm, not hot. If it cools down too much, you can always add some fresh milk or a splash of coffee. This helps keep the flavor. To keep your Caramel Nut Latte fresh, make it right before you drink it. If you must store it, follow these tips: - Use fresh ingredients for better taste. - Keep everything sealed tightly. - Avoid mixing the latte until ready to drink. - If you want to enjoy it later, try making a smaller batch. This helps maintain the delightful taste and texture. Enjoy your latte at its best! A Caramel Nut Latte is a sweet and nutty coffee drink. It combines espresso with milk, rich caramel sauce, and nut syrup. This latte is topped with whipped cream and crunchy nuts. It’s a cozy treat for coffee lovers. You can find a Caramel Nut Latte at many coffee shops. Look for local cafes or chain stores like Starbucks. Some places may offer their own twist on the drink. If you prefer, you can also make it at home using the Full Recipe. Yes, you can make a Caramel Nut Latte without an espresso machine. Brew strong coffee instead. Use a French press or pour-over method for a rich taste. Froth the milk using a whisk or a jar with a lid. A Caramel Nut Latte can provide some health benefits. The espresso gives you a caffeine boost, which can improve focus. Nuts add protein and healthy fats. Milk provides calcium and vitamins, making it a tasty and nutritious option. You can customize your Caramel Nut Latte in many ways. Try different nut syrups like almond or pecan. Adjust the sweetness by adding more or less caramel sauce. You can also use flavored milk or add spices like cinnamon. You can create your perfect Caramel Nut Latte at home. We covered the key parts: choosing the right coffee base, finding the milk you love, and adding flavor enhancements. Remember to froth the milk well for a great texture. Don’t forget to try out different nut flavors and dairy-free options. Store any extras to enjoy later. With simple steps and quality ingredients, you can enjoy this delicious drink any time. Experiment and find your favorite blend!](https://spoonfulsavory.com/wp-content/uploads/2025/06/dc7b36ac-beaf-4907-b620-bbd473a0d1bc.webp)
Are you ready to treat yourself to a sweet and nutty delight? In this post, I’ll show you how to
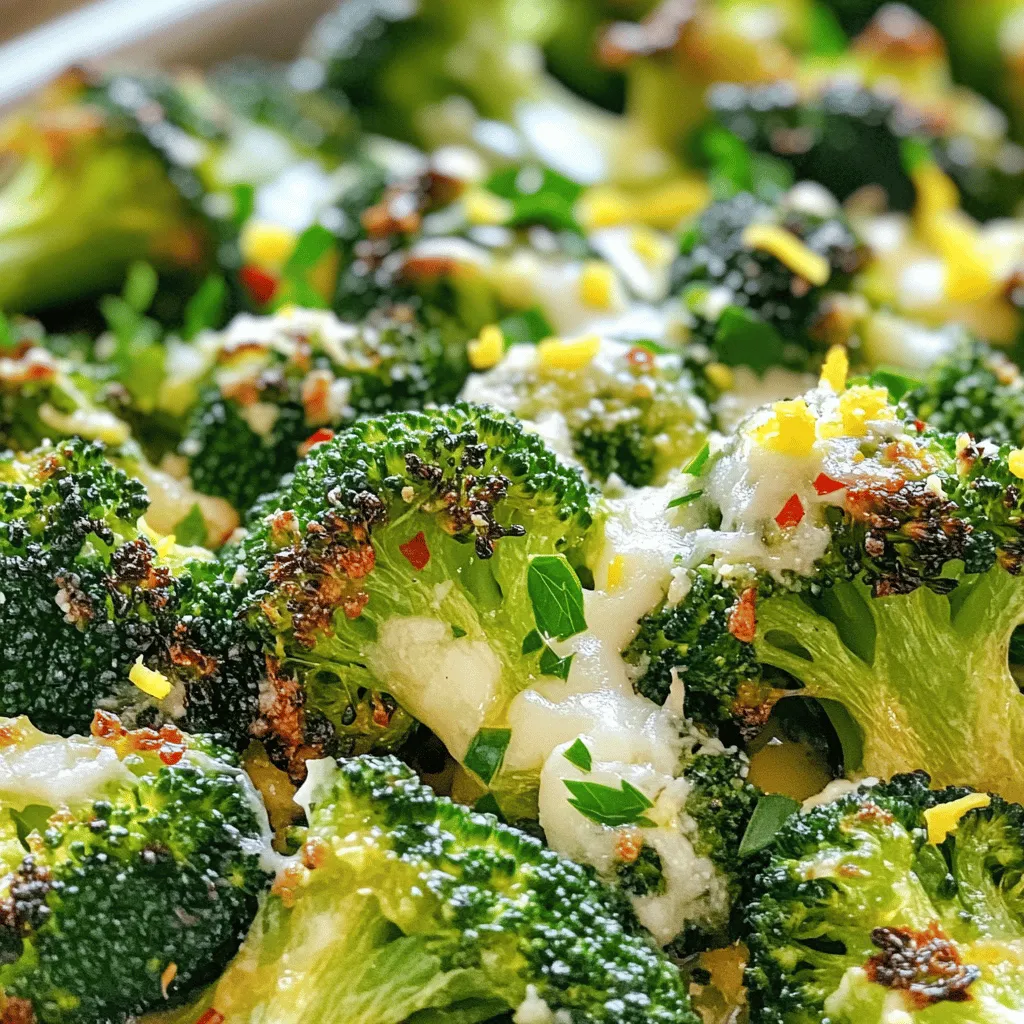
Looking for a simple and tasty side dish? Lemon Garlic Roasted Broccoli is your answer! This vibrant recipe combines fresh
![- 4 large russet potatoes - 1 cup crumbled feta cheese - 1 cup cherry tomatoes - ½ cup kalamata olives - ½ cup red onion - 3 tablespoons extra virgin olive oil - 1 teaspoon garlic powder - 1 teaspoon smoked paprika - Salt and freshly ground black pepper - 1 cup tzatziki sauce - Fresh parsley for garnish When making Loaded Greek Fries, the ingredients matter. Start with russet potatoes. They give you the best texture and flavor. You want them crispy on the outside and soft inside. Next, feta cheese adds a nice salty bite. I prefer crumbled feta because it melts slightly on hot fries. Cherry tomatoes bring sweetness and color. Their juicy pop makes each bite exciting. Kalamata olives add a briny flavor. Their unique taste pairs beautifully with the other ingredients. Red onion gives a nice crunch and a bit of sharpness. You can slice them thin for a milder taste. For seasoning, use extra virgin olive oil. It coats the fries and enhances their flavor. Garlic powder and smoked paprika add depth. A pinch of salt and black pepper is key to balance the flavors. Finally, don’t forget the tzatziki sauce. It adds creaminess and cools the dish down. Top it all off with fresh parsley for a pop of color. This mix of ingredients makes the perfect Loaded Greek Fries. For the full recipe, check out the [Full Recipe]. - Preheat the oven to 425°F (220°C). - Cut the russet potatoes into thick fries. - In a large bowl, mix the fries with olive oil, garlic powder, smoked paprika, salt, and pepper. Toss until all fries are covered. - Line a baking sheet with parchment paper. - Spread the fries in a single layer on the sheet. - Bake for 25-30 minutes, flipping halfway. Look for golden brown and crispy fries. - In a separate bowl, mix cherry tomatoes, olives, and red onion. - Add a pinch of salt and pepper to enhance the flavor. Stir well until combined. - Once the fries are done, sprinkle crumbled feta cheese on top. - Layer the tomato, olive, and onion mix over the fries. - Drizzle tzatziki sauce generously over everything. Add as much as you like! These simple steps lead you to a plate of loaded Greek fries that burst with flavor. For the full recipe, check out the complete guide! To get crispy fries, coat them well with oil and seasoning. This helps them cook evenly. Make sure every fry gets some oil for the best crunch. Bake them at 425°F (220°C) for about 25-30 minutes. Flip them halfway for even browning. If you want them extra crispy, leave them in for a few more minutes. Just watch closely to avoid burning! You can change the toppings to fit your taste. Try adding grilled chicken or sautéed bell peppers. For a vegetarian option, use chickpeas or more veggies. To make it gluten-free, check your tzatziki sauce and use gluten-free fries. You can also swap in different cheeses, like goat cheese or mozzarella, for a twist. Serve your loaded fries in a big bowl so everyone can share. A shallow platter works great too. For a fun touch, add a small bowl of tzatziki on the side for dipping. Pair your fries with a refreshing drink, like iced tea or a light beer. They also go well with a fresh salad or grilled veggies on the side. Enjoy your meal! {{image_4}} You can easily change up your loaded Greek fries. Adding grilled chicken or lamb gives a nice boost. It makes the dish heartier and more filling. You could also try different cheeses. Feta is great, but goat cheese or mozzarella can add a new twist to the dish. These options bring in new flavors and textures. Want a healthier choice? Try using an air fryer for the fries. This method cuts down on oil and still gives you crispy fries. If you're looking for a different base, sweet potatoes are a perfect swap. They add a sweet flavor and more nutrients than regular potatoes. Plus, they look great when you serve them! You can make the dish even tastier by adding spices or herbs. A sprinkle of oregano or a dash of cayenne can really wake up the flavors. Don't forget about sauces! Using harissa or spicy yogurt can give your fries a kick. These flavors mix well with the feta and veggies, creating a delicious meal. For the full recipe, check out the detailed instructions above. To keep your loaded Greek fries fresh, store them in an airtight container. Place them in the refrigerator immediately after they cool. This helps to keep them crispy and tasty. Leftovers will last for about 2 to 3 days. After that, the fries may lose their great texture and flavor. When it’s time to enjoy your leftovers, the best way to reheat them is in the oven. Preheat the oven to 375°F (190°C). Spread the fries on a baking sheet and reheat for about 10 to 15 minutes. This method helps to keep them crispy. You can also use an air fryer if you have one. Set it to 350°F (175°C) and heat for around 5 to 7 minutes. You can freeze already made loaded fries, but they may lose some texture. To freeze, let them cool completely. Then, place them in a single layer on a baking sheet and freeze for 1 to 2 hours. After that, transfer them to a freezer bag. For reheating, cook them directly from frozen. Use the oven at 375°F (190°C) for about 20 to 25 minutes. This keeps them warm and slightly crispy. Yes, you can prepare some parts ahead. Cut the fries and store them in water. This keeps them fresh and crisp. You can also mix the toppings early. Just store them in a container in the fridge. Bake the fries and add toppings right before serving. This way, your fries stay hot and crunchy. Absolutely! Frozen fries are a great time-saver. Just follow the package instructions for baking. You may want to bake them a little longer for extra crispiness. After baking, add the toppings as you would with fresh fries. This still delivers that delicious Greek flavor you crave. If you need a substitute, try these options: - Greek yogurt mixed with lemon juice and garlic - Hummus for a creamy texture - Ranch dressing for a different flavor You can also make a simple cucumber sauce at home. Just mix yogurt, grated cucumber, garlic, and a splash of lemon juice. To make these fries vegan, you can swap out a few ingredients: - Use vegan cheese instead of feta. - Replace tzatziki with a vegan yogurt-based sauce. You can blend cashews, lemon juice, and garlic for a creamy dip. These swaps keep the dish tasty while meeting vegan needs. Enjoy your loaded Greek fries guilt-free! Loaded Greek fries are a fun, tasty dish to make. You learned how to prepare crispy fries, layer on fresh toppings, and drizzle them with tzatziki sauce. You can customize your dish with various ingredients or healthier options, making it perfect for any meal. Store leftovers and reheat them easily for later. Try making these fries ahead of time or substituting ingredients as you like. Enjoy your delicious creation and impress your friends and family!](https://spoonfulsavory.com/wp-content/uploads/2025/06/312a242f-872b-4dee-8a3e-e1a198c0922b.webp)
Are you ready to elevate your snack game? This Loaded Greek Fries recipe is packed with flavor and simple to
![- Chicken breasts - Whole wheat tortillas - Honey mustard dressing - Fresh vegetables (spinach, avocado, bell pepper, carrots) - Optional ingredients (feta cheese, seasonings) To create Honey Mustard Chicken Wraps, gather your essential ingredients. The main star is chicken breasts. I prefer to grill them for a smoky flavor. Use whole wheat tortillas for a healthy option. Honey mustard dressing adds a sweet and tangy kick. Next, fill your wraps with fresh vegetables. I love using baby spinach for a nutrient boost. Avocado adds creaminess, while bell peppers bring crunch. Shredded carrots add color and sweetness. You can also include optional ingredients like feta cheese. This adds a salty touch that pairs well with the dressing. Feel free to sprinkle your favorite seasonings for extra flavor. - Caloric breakdown per serving: Approximately 350 calories - Macronutrient information: 30g protein, 40g carbohydrates, 10g fats Each serving of these wraps is hearty yet healthy. With around 350 calories, they fit into a balanced meal. The protein from chicken helps build muscle. Carbohydrates from the tortillas give you energy. Healthy fats from avocado aid in nutrient absorption. Knowing this nutritional information can help you make smart choices. Enjoy these wraps as a satisfying lunch or dinner option. For the full recipe, check out the Honey Mustard Chicken Wraps. 1. Seasoning the chicken Start by taking your grilled chicken breasts. Sprinkle salt and pepper on both sides. This simple step brings out the chicken's flavor. Let the seasoned chicken rest for a few minutes. 2. Preparing the tortillas Grab four whole wheat tortillas. Lay them flat on a clean surface. Ensure they are smooth and ready for filling. This makes the wrapping easier. 3. Drizzling the honey mustard dressing Take your honey mustard dressing. Drizzle about one tablespoon on the center of each tortilla. Use the back of a spoon to spread it evenly. This will add a sweet and tangy kick to each bite. 1. Layering the ingredients On top of the dressing, add baby spinach leaves. Next, place the sliced chicken. Then, add the avocado slices, bell pepper strips, and shredded carrots. If you want, sprinkle feta cheese on top for extra zest. 2. Rolling the wrap technique Fold in the sides of each tortilla. Make sure the fillings are tucked in. Start at the bottom and roll tightly towards the top. This keeps all the delicious ingredients inside. 3. Serving suggestions You can serve the wraps right away or wrap them in foil. If you serve them right away, cut each wrap in half. This makes them easier to hold. Arrange them on a colorful platter for a nice touch. Add a small bowl of extra honey mustard dressing for dipping. 1. Best practices for grilling chicken To grill chicken well, start with even thickness. This helps the chicken cook evenly. Marinate the chicken for at least 30 minutes. This adds flavor and keeps the meat juicy. Preheat your grill to medium-high heat. Cook the chicken for about 6-7 minutes on each side. Check that the internal temperature reaches 165°F (75°C). Let the chicken rest for 5 minutes before slicing. This keeps it tender. 2. How to properly slice vegetables For easy slicing, use a sharp knife. Cut the bell pepper and avocado into thin strips. This makes them easy to layer in the wrap. For the carrots, use a grater for thin shreds. The baby spinach can be used whole, but wash it first. Dry it thoroughly to avoid sogginess in your wrap. Always slice your vegetables just before using to keep them fresh. 1. Serving suggestions and garnishes To make your wraps look great, use a bright platter. Arrange the wraps in a circle or stack them neatly. Serve with extra honey mustard dressing on the side. This invites guests to dip their wraps. For garnish, add fresh herbs like parsley or cilantro. You can also sprinkle some sesame seeds for a crunchy finish. 2. How to arrange wraps for appeal When arranging wraps, slice them in half diagonally. This shows off the colorful layers inside. Place the cut side facing up for a better view. Space them out to let each wrap shine. Add small bowls of dipping sauce around the platter. This makes it easy for everyone to grab a wrap and enjoy. {{image_4}} You can mix up the protein in your honey mustard chicken wraps. Turkey or tofu works great. Both options keep the meal healthy while changing the flavor. If you want a creamier taste, try ranch or yogurt dressing instead of honey mustard. This adds a new twist that kids often love. To kick up the spice, add sriracha or jalapeños. These ingredients can change the whole vibe of your wraps. They bring a fun heat that many enjoy. You can also play with fresh herbs, like cilantro or basil. Mixing in these herbs brightens the dish and adds more depth to every bite. For a full experience, check out the Full Recipe to create your own delicious wraps! To keep your honey mustard chicken wraps fresh, refrigerate them right away. Wrap each one in plastic wrap or foil. This helps maintain their taste and texture. You want to store them in airtight containers too. This way, they stay safe from other food odors in the fridge. Ideal storage containers: - Plastic wrap - Foil - Airtight containers If you want to save wraps for later, freezing is a great option. Wrap each one tightly in plastic wrap, then put them in a freezer-safe bag. This helps prevent freezer burn. You can freeze them for up to three months. Reheating guidelines: - Thaw wraps in the fridge overnight before reheating. - Heat them in the oven at 350°F (175°C) for about 15 minutes. - You can also use a microwave. Heat for 1-2 minutes, but be careful not to make them soggy. This way, you can enjoy your delicious honey mustard chicken wraps anytime! For the full recipe, check out the details above. Can I make honey mustard chicken wraps ahead of time? Yes, you can. Prepare the wraps and store them in the fridge. Just wrap them tight in foil or plastic wrap. They taste great when you eat them later! What can I use if I don’t have honey mustard dressing? You can mix equal parts honey and mustard. You can also use ranch dressing or a yogurt-based sauce. These options will still give you a nice flavor. Are honey mustard chicken wraps healthy? Yes, these wraps are healthy! They have lean chicken, fresh veggies, and whole wheat tortillas. They are full of protein and fiber. This meal can fit well into a balanced diet. How do I make them gluten-free? To make honey mustard chicken wraps gluten-free, use gluten-free tortillas. Many brands offer tasty options. Make sure all other ingredients, like the dressing, are gluten-free too. What to serve with honey mustard chicken wraps? Serve these wraps with fresh fruit, a side salad, or some crunchy veggie sticks. A light soup can also be a nice addition. Can I serve these wraps cold or do they need to be heated? You can serve them cold or heated! They are tasty either way. If you prefer warm wraps, just heat them in a pan for a few minutes. Recommendations for side dishes to complement the wraps Try a simple green salad with a light vinaigrette. You could also enjoy some sweet potato fries or a fruit salad. These sides balance the meal and add more vitamins. For the full recipe, check out the [Full Recipe] link provided! In this post, we covered how to make honey mustard chicken wraps. We discussed essential ingredients, preparation steps, and tips for perfecting your wraps. You learned about storage and variations to keep your meals exciting. These wraps are not just easy to make; they are healthy too. With a few changes, you can customize them to your taste. Enjoy crafting your wraps to fit any occasion!](https://spoonfulsavory.com/wp-content/uploads/2025/06/83c270ed-0722-4b99-b2ce-260f0c5d9fd6.webp)
Looking for a quick, tasty, and healthy meal? You’re in the right spot! Honey Mustard Chicken Wraps are easy to
