Skip to content
DisclaimerTerms Of UseGDPR PolicyCookie Policy

spoonfulsavory

  • Home
  • Drinks
  • Appetizers
  • Dinner
  • Dessert
  • About
  • Contact
  • Privacy Policy
DisclaimerTerms Of UseGDPR PolicyCookie Policy

Sarah

- 1 can (15 oz) chickpeas, drained and thoroughly rinsed - 2 tablespoons extra virgin olive oil - 1 teaspoon garlic powder - 1 teaspoon smoked paprika - 1/2 teaspoon ground cumin - 1/2 teaspoon sea salt - 1/2 teaspoon freshly ground black pepper - 1 cup mixed nuts (almonds, cashews, walnuts) - 1/2 cup dried cranberries or raisins - 1/4 cup pumpkin seeds - 1 teaspoon honey or maple syrup (optional) The chickpeas form the base of this snack mix. They provide protein and fiber. Rinsing them well helps achieve that crispy texture. The olive oil coats the chickpeas and helps the spices stick. Spices like garlic powder, smoked paprika, and cumin add depth and warmth. You can add other spices to customize your mix. Consider cayenne for heat or turmeric for a golden hue. You might also include fresh herbs like rosemary or thyme for a fragrant touch. For a sweet twist, try adding a pinch of cinnamon. Chickpeas are rich in protein, fiber, and nutrients. They help keep you full and satisfied. Nuts bring healthy fats and crunch. Dried cranberries or raisins provide natural sweetness and antioxidants. Pumpkin seeds add magnesium and zinc, enhancing health benefits. This mix offers a great balance of nutrients, making it a smart snack choice. For the full recipe, check out the complete guide to making this delicious snack! First, preheat your oven to 400°F (200°C). This hot temperature helps the chickpeas get crispy. While the oven heats, drain and rinse the chickpeas. Use a clean towel or paper towels to dry them well. This step is key because moisture will make them soggy instead of crispy. In a large bowl, mix the dried chickpeas with olive oil and spices. Add garlic powder, smoked paprika, ground cumin, sea salt, and black pepper. Toss everything until the chickpeas are coated evenly. Next, spread them on a baking sheet in a single layer. Roast for 20-25 minutes until they turn golden and crunchy. Remember to shake the pan halfway through for even roasting. While the chickpeas roast, prepare the nut mixture. In a separate bowl, combine mixed nuts, dried cranberries, pumpkin seeds, and honey or maple syrup if you want some sweetness. Stir until everything is mixed well. After the chickpeas cool for about 5 minutes, add them to the nut mixture. Toss gently to combine all the ingredients. Let the snack mix cool completely to keep it crispy. For the full recipe, check the earlier section. To get the best crunch from your chickpeas, start with drying them well. After rinsing, lay them out on a towel. This step removes moisture, which helps them crisp up nicely. You can roast them at 400°F for about 20-25 minutes. Shake the pan halfway through for even cooking. This ensures all sides become golden and crunchy. The real fun lies in seasoning! My go-to mix includes garlic powder, smoked paprika, and ground cumin. This blend gives a smoky flavor with a hint of warmth. Feel free to experiment! You can add chili powder for heat or even cinnamon for a sweet twist. The key is to toss the chickpeas until they are well coated to maximize flavor. This snack mix is great for sharing! Serve it in a big bowl for parties or fill small bags for on-the-go snacks. You can also sprinkle it on salads for a crunchy topping. It pairs nicely with soups too. Just remember, the cooler the mix, the crispier it stays! Try the full recipe for a delicious treat. {{image_4}} You can change the flavor of your crispy chickpea snack mix easily. For a spicy kick, add cayenne pepper or chili powder. If you prefer a sweet twist, try cinnamon or nutmeg. You can even mix in some ranch seasoning for a tangy taste. Experiment with these flavors to find your favorite! If you have allergies, swap out ingredients to suit your needs. Use sunflower seeds instead of nuts for a nut-free option. For a gluten-free snack, ensure your spices are certified gluten-free. You can replace dried cranberries with chopped dates or apricots if you need a different fruit. Making your snack mix at home is fun and simple. You control the ingredients and flavors. Store-bought mixes can be convenient, but they often have added sugars or preservatives. By choosing homemade, you enjoy fresh ingredients. Plus, you can adjust the spice levels to your taste. If you want an easy snack, the full recipe makes it quick to prepare. To keep your crispy chickpea snack mix fresh, store it in an airtight container. Glass jars or plastic containers with tight lids work best. Make sure to let the mix cool completely before sealing. This keeps moisture out and helps maintain crunch. You can also use resealable bags. Just squeeze out any air before sealing. For extra freshness, add a small packet of silica gel inside. When stored properly, your snack mix can last for about one week. It keeps best at room temperature, away from sunlight and heat. If you want it to last longer, you can freeze it. Just make sure to use freezer-safe bags. It will stay good for up to three months in the freezer. When you’re ready to eat it, simply let it thaw at room temperature. If your snack mix loses its crunch, don’t worry! You can easily bring back that crispy texture. Preheat your oven to 350°F (175°C). Spread the mix on a baking sheet in a single layer. Bake for about 10 minutes. Check it often to avoid burning. Once it cools, it should be crispy again. Enjoy your snack mix as if it was just made! Chickpeas are packed with protein and fiber. They help keep you full longer. This can aid in weight loss. They also support heart health by lowering cholesterol. Chickpeas contain vitamins and minerals like folate and iron. These nutrients help with energy levels and overall health. Regularly eating chickpeas can help stabilize blood sugar levels. They are great for digestion too due to their high fiber content. Yes, you can easily skip the nuts in this recipe. You can replace them with seeds or dried fruit. Pumpkin seeds work well as a nut substitute. You might also consider adding more chickpeas or crunching up some whole grain crackers. This way, you still get a tasty and crunchy snack mix. To make it spicy, add cayenne pepper or chili powder to your chickpeas. Start with a small amount and adjust to your taste. You can also toss in some hot sauce or sriracha for a kick. Mixing in spicy nuts can add extra heat too. This spicy twist will give your snack mix an exciting flavor. For the full recipe, be sure to check out the detailed instructions above! This blog post outlines how to make a tasty crispy chickpea snack mix. We covered key ingredients, step-by-step instructions, and useful tips. You learned how to achieve the best crunch and explore different flavors. Remember to store your mix properly to keep it fresh. Enjoy creating your own snack mix with these easy recipes and variations. It’s a fun way to eat healthy while satisfying your cravings. Keep experimenting with flavors and enjoy your crunchy treat!

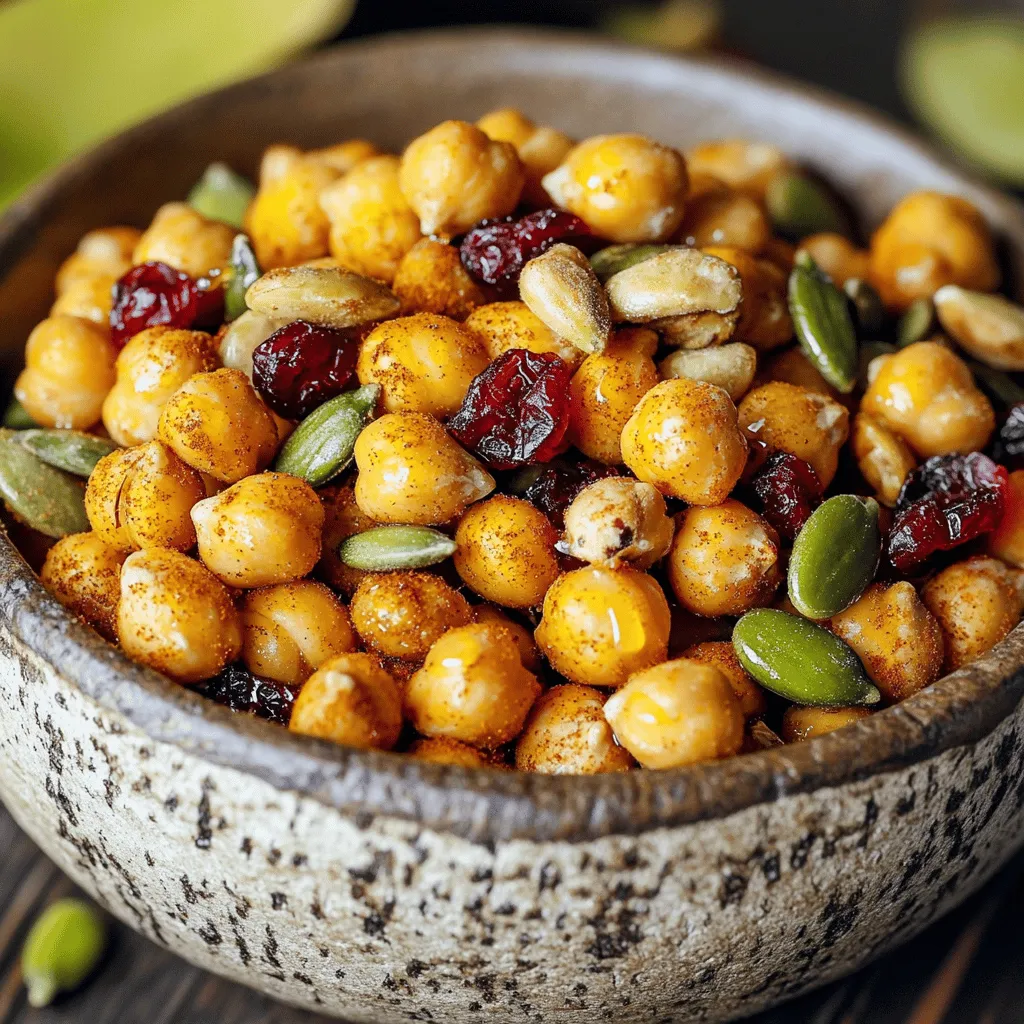
Crispy Chickpea Snack Mix Flavorful and Healthy Snack

Looking for a snack that’s both tasty and good for you? I’ve got just the thing! This Crispy Chickpea Snack

To make the Taco Zoodle Skillet, you need: - 3 medium zucchinis, spiralized into zoodles - 1 lb ground turkey or beef (your choice) - 1 small red onion, finely diced - 2 cloves garlic, minced - 1 bell pepper (your choice of color), diced - 1 can (15 oz) black beans, rinsed and drained - 1 cup corn kernels (fresh or frozen) - 2 tablespoons taco seasoning (store-bought or homemade) - 1 cup diced tomatoes (fresh or canned) For cooking, you will need: - Olive oil (for cooking) - Salt and black pepper to taste To make your dish pop, consider: - Fresh cilantro, chopped (for garnish) - Lime wedges (for serving) These ingredients create a fun and flavorful meal. You can mix and match based on what you have or like. For example, try different proteins or beans. The zoodles add a nice crunch and are a great way to enjoy veggies! For the full recipe, check out the detailed instructions above. Start by gathering all your ingredients. This makes cooking smooth and quick. Wash the zucchinis well, then spiralize them into zoodles. Next, finely dice the red onion and bell pepper. Mince the garlic cloves. Rinse and drain the black beans. If you have fresh corn, cut it off the cob. If frozen, just measure out a cup. Heat a large skillet over medium heat. Add a good splash of olive oil. Wait until the oil shimmers, then add the diced red onion and bell pepper. Sauté for about 3-4 minutes until they soften. Stir in the minced garlic and let it cook for another minute. This brings out its great flavor. Now, add the ground turkey or beef. Break it apart with a spatula as it cooks. This should take about 5-7 minutes until the meat is brown. If there’s extra fat, drain it off. Next, sprinkle taco seasoning over the meat. Mix in the diced tomatoes, black beans, and corn. Stir everything well and let it simmer for about 5 minutes. This allows all the flavors to blend. Carefully fold the zoodles into the mix. Cook for another 2-3 minutes. You want the zoodles to be tender but still have a bit of crunch. Add salt and black pepper to taste. Once everything is cooked, take the skillet off the heat. Serve the dish hot. Garnish with freshly chopped cilantro. Don’t forget lime wedges on the side for a zesty kick. For a fun touch, serve in colorful bowls. You can drizzle a bit more lime juice over the top right before serving. For an extra creamy note, add some avocado slices. This makes your Taco Zoodle Skillet even more special. You can find the full recipe above for more details! When picking zucchini, look for firm ones with a shiny skin. Choose medium-sized zucchinis for the best flavor. Avoid ones with soft spots or blemishes. Fresh zucchini tastes better and holds its shape well when cooked. Zoodles can be watery if not handled right. To reduce moisture, sprinkle salt on the spiralized zucchini. Let it sit for 10-15 minutes. Then, pat it dry with a clean towel. This helps keep your dish from getting soggy. Fresh herbs can boost the taste of your Taco Zoodle Skillet. Consider using cilantro, parsley, or even basil. Add them at the end of cooking, so their flavor stays bright. A squeeze of fresh lime juice also adds a nice zing. For the full experience, check out the Full Recipe. {{image_4}} You can switch out the ground turkey or beef for other proteins. Try using chicken, pork, or even shrimp. Each choice brings a new taste. If you want a leaner option, ground chicken works well. You can also use tofu for a plant-based meal. Just make sure to season it well to enhance the flavor. For a vegetarian option, skip the meat and add more beans or lentils. Black beans are great, but you can use kidney beans too. For a vegan twist, use lentils instead of meat and add extra veggies. Bell peppers, mushrooms, and spinach all work well. This way, you keep it hearty and full of nutrients. If you enjoy heat, add jalapeños or chili flakes to your skillet. They blend nicely with the other flavors. You can also use spicy taco seasoning for an extra kick. For those who love it hot, try adding a splash of hot sauce right before serving. This adds depth and makes each bite exciting. You can store leftovers in an airtight container. Place the cooled Taco Zoodle Skillet in the fridge. It stays fresh for up to three days. Make sure to let it cool before sealing it. This keeps the zoodles from getting soggy. When you’re ready to eat, you can enjoy it cold or warm. For longer storage, freeze your Taco Zoodle Skillet. Use a freezer-safe container or bag. It can last for about two months in the freezer. To freeze, let it cool completely. Then, portion it out for easy meals later. When you’re ready to eat, just thaw it in the fridge overnight. Reheat your Taco Zoodle Skillet on the stove for best results. Use a medium heat and stir often. This helps keep the zoodles crisp. You can also use a microwave. Heat in short bursts of one minute, stirring in between. Add a splash of water to keep it moist. Enjoy your meal warm and tasty! Yes, you can use other types of noodles if you'd like. Spaghetti or rice noodles work well. You can also try whole grain or gluten-free options. Just cook them according to package directions. If you want to keep it low-carb, stick to zoodles. They add great flavor and texture. Taco Zoodle Skillet goes well with many sides. Here are some great ideas: - Fresh salsa or pico de gallo - Guacamole or sliced avocado - Tortilla chips for crunch - A side salad with lime vinaigrette - Mexican rice or cauliflower rice for extra heartiness These sides add bright flavors and textures to your meal. To make Taco Zoodle Skillet more filling, try these tips: - Add more protein, like beans or cheese. - Include more veggies like spinach or mushrooms. - Serve with a side of rice, quinoa, or corn tortillas. - Top with avocado for healthy fats and creaminess. Each option boosts nutrition and keeps everyone satisfied. For the full recipe, check the details above. This post explored the ingredients, steps, and tips for making a Taco Zoodle Skillet. We shared ingredient choices, cooking methods, and storage tips. I hope you feel ready to try the recipe and make it your own. Remember, you can swap proteins, use herbs, and add spices to boost flavor. Enjoy your cooking adventure and make a tasty meal for yourself or friends.

Taco Zoodle Skillet Flavorful and Fun Weeknight Meal

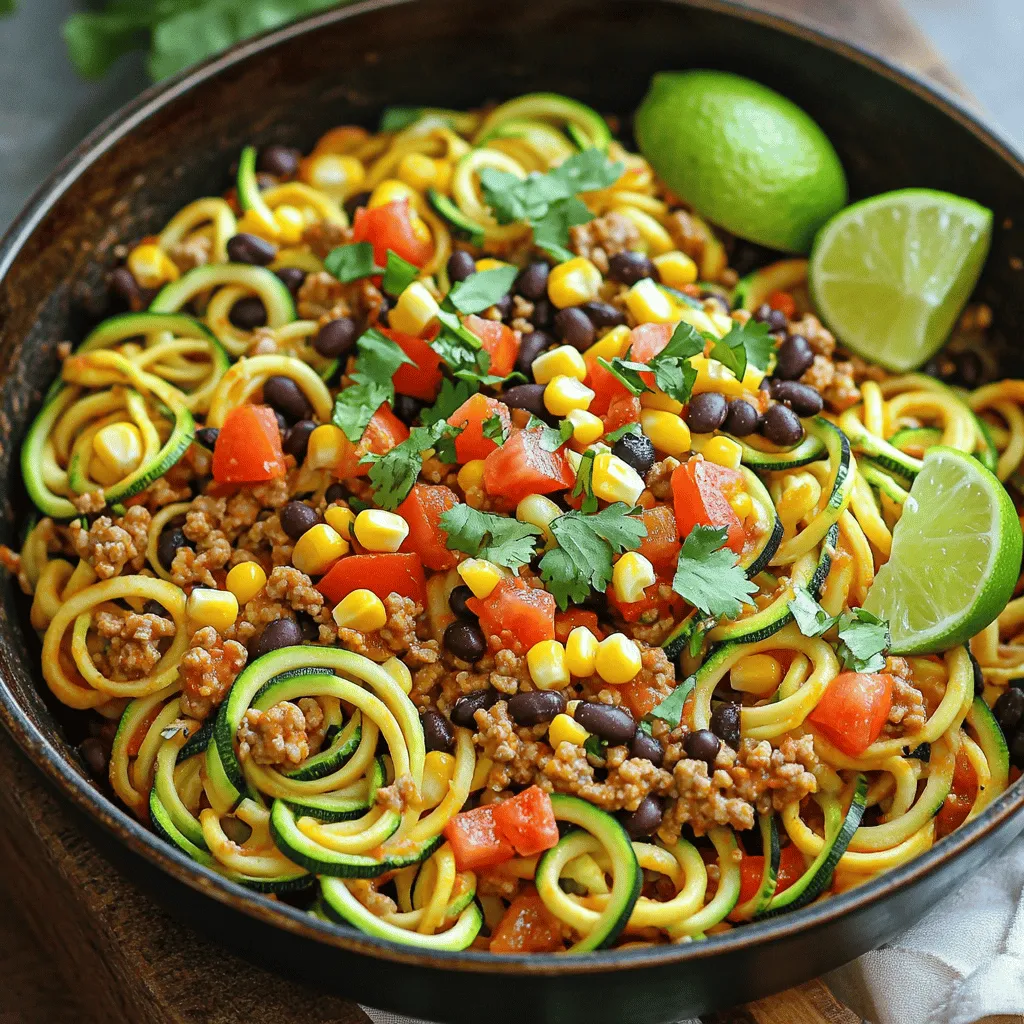
Tired of the same old weeknight meals? Let’s shake things up with a Taco Zoodle Skillet! This fun dish blends

To make these fritters, you need simple and fresh ingredients. Here's what you'll require: - 2 medium zucchinis, freshly grated - 2 large carrots, freshly grated - 1/2 cup all-purpose flour - 1/4 cup freshly grated Parmesan cheese - 1/4 cup fresh parsley, finely chopped - 2 large eggs, lightly beaten - 1 teaspoon garlic powder - 1/2 teaspoon onion powder - Salt and freshly ground pepper to taste - Vegetable oil for frying These main ingredients create a tasty base. The zucchini and carrots add moisture and flavor. The flour helps bind everything together. Parmesan cheese brings a hint of saltiness and richness. Need to boost the flavor? Consider adding some options: - Red pepper flakes for heat - Fresh herbs like dill or chives - Lemon zest for a fresh kick - A splash of soy sauce for umami These extras can make your fritters pop with flavor. Experiment to find your favorite mix! You can easily adapt this recipe for different diets. Here are some smart swaps: - Use gluten-free flour in place of all-purpose flour. - Replace eggs with ground flaxseed mixed with water for a vegan option. - Try nutritional yeast instead of Parmesan cheese for a dairy-free option. These substitutions help everyone enjoy delicious fritters. Adjust the recipe to fit your needs. Check out the Full Recipe for more details on making these yummy snacks! To start, wash your zucchinis and carrots well under cold water. I prefer using a box grater for this task. Grate both vegetables until they are finely shredded. After grating, place them in a clean kitchen towel. Fold the towel over and twist tightly to squeeze out excess moisture. This step is key for crispy fritters. If the mixture is too wet, it will not fry well. In a large mixing bowl, combine the grated zucchini and carrots. Add in the all-purpose flour, grated Parmesan cheese, and chopped parsley. Sprinkle in garlic powder, onion powder, and a bit of salt and pepper. Mix these ingredients well until they are fully blended. Next, pour in the lightly beaten eggs. Stir everything together until you have a thick batter. It should hold together nicely. You can cook these fritters in two ways: frying or baking. For frying, heat about 1/4 inch of vegetable oil in a skillet over medium heat. Once hot, scoop the batter into the skillet. Flatten each scoop to form patties. Fry for about 3-4 minutes on each side until golden brown. If you prefer baking, preheat your oven to 400°F (200°C). Line a baking sheet with parchment paper. Place the fritters on the sheet and lightly spray them with oil. Bake for about 20-25 minutes, flipping halfway through, until they are crispy and golden. Frying gives you a crunchier texture, while baking is a healthier option. For the full recipe, make sure to check it out! To make your fritters crispy, remove as much moisture as possible from the zucchini and carrots. After grating, place them in a clean kitchen towel. Twist the towel tightly to squeeze out excess water. This step is key to a great texture. When frying, heat your oil until it shimmers. This ensures a quick sear, locking in the crunch. Don’t overcrowd the pan. Frying in batches helps each fritter get that perfect crisp. If you have leftovers, store your fritters in an airtight container. Place parchment paper between layers to keep them crispy. They can last in the fridge for about three days. To reheat, bake them in the oven at 375°F (190°C) for about 10 minutes. This method revives their crunch without making them soggy. These fritters shine when served warm. Pair them with a yogurt dip or spicy salsa. A squeeze of lemon adds a bright touch. You can also serve them as a side dish with grilled meats or fish. For a fun twist, serve them on a salad for a crunchy topping. The flavors of zucchini and carrot pair well with fresh herbs, so feel free to experiment! For the full recipe, check out the detailed steps above. {{image_4}} You can make gluten-free fritters by using almond flour or chickpea flour. Both work well in this recipe. For a vegan version, replace the eggs with flaxseed meal. Mix one tablespoon of flaxseed meal with three tablespoons of water. Let it sit for five minutes to thicken. This will help bind the fritters together. Add fresh herbs like basil, dill, or cilantro for extra flavor. You can also try spices like cumin or paprika to give them a kick. If you like a bit of heat, add a dash of cayenne pepper. Each option will create a unique taste and make your fritters even more special. Pair your fritters with a tasty dip. A yogurt dip made with garlic and lemon is refreshing. You can also try a spicy sriracha mayo for a bold twist. For something zesty, a homemade tomato salsa works wonders. These dips will enhance the flavor and make your fritters shine. For the full recipe, check out the detailed instructions above. Each serving of zucchini carrot fritters contains about 200 calories. This includes calories from vegetables, flour, and eggs. The fritters provide a good source of nutrients while keeping calories in check. They fit well into a balanced meal plan. Zucchini is low in calories and high in water content. This makes it great for hydration. It also has vitamin C, which boosts the immune system. Carrots bring beta-carotene, good for eye health. They also have fiber, which aids digestion. Together, these veggies make a healthy snack. To make zucchini carrot fritters even healthier, try these tips: - Use whole wheat flour instead of all-purpose flour. - Substitute Greek yogurt for eggs. - Add more vegetables like spinach or bell peppers. - Bake instead of frying for fewer calories. These simple changes can boost nutrition while keeping the fritters tasty. For the complete recipe, check out the [Full Recipe]. Yes, you can freeze zucchini carrot fritters. Let them cool completely first. Then, place them in a single layer on a baking sheet. Freeze until solid. After that, transfer them to a freezer-safe bag. They can last up to three months in the freezer. When you want to eat them, simply reheat in the oven or skillet. To achieve extra crispy fritters, follow these tips: - Remove moisture: After grating the zucchini and carrots, squeeze out as much water as possible. This step is key to crispiness. - Use cold oil: Heat the oil until it’s hot but not smoking. Cold oil helps create a nice crust. - Don’t overcrowd the pan: Fry in batches to allow each fritter to cook evenly and stay crisp. - Use a mix of flours: Consider using a blend of all-purpose flour and cornstarch for added crunch. There are many tasty dipping sauces for zucchini carrot fritters. Here are a few favorites: - Yogurt dip: Mix plain yogurt with lemon juice and herbs. - Tomato salsa: A zesty salsa adds a fresh kick. - Avocado cream: Blend ripe avocado with lime juice and garlic for a creamy sauce. - Hummus: This adds a rich, nutty flavor that pairs well. Feel free to experiment with different flavors to find your perfect match! In this blog post, we explored how to make delicious zucchini carrot fritters. We covered main ingredients, cooking methods, and tips for crispy results. You also learned about variations and health benefits. These fritters are fun to make and very tasty. You can easily adjust the recipe to fit your diet. Enjoy trying new flavors and sharing your creations with friends and family. Happy cooking!

Zucchini Carrot Fritters Crispy and Delightful Snack

Looking for a tasty and healthy snack? Zucchini Carrot Fritters are your answer! These fritters are crispy on the outside

To make these easy veggie spring rolls, gather the following items: - 10 rice paper wrappers - 1 cup cooked vermicelli noodles - 1 cup shredded carrots - 1 cup cucumber, julienned - 1 cup red bell pepper, julienned - 1 cup fresh mint leaves - 1 cup fresh cilantro leaves - 1 avocado, sliced - 1/4 cup soy sauce (or tamari for a gluten-free option) - 2 tablespoons sesame oil - 1 tablespoon rice vinegar - 1 tablespoon honey or agave syrup - Optional: Sesame seeds for garnish You can easily swap some ingredients if needed. For example: - Use zucchini instead of cucumber for a twist. - Try different herbs like basil or dill for unique flavors. - Substitute almond butter for the honey or agave for a nutty taste. - Use rice noodles instead of vermicelli for a different texture. These changes keep your spring rolls exciting! Fresh ingredients make a big difference. Here’s what to look for: - Choose bright, firm vegetables for crunch. - Pick herbs with a strong scent. This shows they are fresh. - Look for ripe avocados that yield slightly when pressed. - Select rice paper that feels soft and pliable. Shopping at local markets can help you find the best produce. Try to buy seasonal items for the best flavor! Start by making the dipping sauce. In a small bowl, mix together the soy sauce, sesame oil, rice vinegar, and honey or agave syrup. Whisk these ingredients until they blend well. Let this sauce sit for a moment. This helps the flavors to mix nicely. Next, get a large shallow dish and fill it with warm water. Take one rice paper wrapper and dip it into the water. Hold it there for about 15 to 20 seconds until it feels soft. Carefully lift it out and lay it flat on a clean spot. This step helps the wrapper become flexible for rolling. Now, it’s time to fill the spring rolls. Place the softened wrapper on a flat surface. In the center, add a small amount of cooked vermicelli noodles. Then, layer on shredded carrots, julienned cucumber, red bell pepper, fresh mint, fresh cilantro, and a slice of avocado. To roll, fold the sides of the wrapper over the filling. Start rolling from the bottom, tucking the filling in as you go. Roll it tightly but gently. This keeps everything inside secure. Repeat this with the rest of the wrappers and filling until you’ve made all your rolls. Arrange the finished spring rolls on a serving platter. For a fun touch, sprinkle sesame seeds on top. This adds a nice crunch and look. Serve the spring rolls with your prepared dipping sauce on the side. Enjoy each fresh bite! To make your spring rolls perfect, keep a few things in mind. Always start with warm water to soften the rice paper. This helps it become stretchy. Use a clean surface to roll. Lay the wrapper flat and keep the filling in the center. Don’t overfill; this keeps your rolls neat and tight. A few errors can spoil your spring rolls. First, don’t rush soaking the rice paper. If it’s not soft enough, it tears. Avoid using too much water when rolling, as it makes the wrapper soggy. Also, don’t skip the herbs like cilantro and mint. They boost flavor and freshness. To take your spring rolls to the next level, add unique flavors. Try adding lime juice or chili for a kick. You can also mix different herbs like basil. For a richer taste, drizzle sesame oil inside before rolling. Don’t forget the dipping sauce; it should balance sweet, salty, and tangy notes. For a recipe that ties it all together, refer to the Full Recipe. {{image_4}} You can easily add protein to your spring rolls. Tofu is a great choice. It absorbs flavors well and adds a nice texture. Simply press and cube firm tofu, then pan-fry until golden. Shrimp is another tasty option. Cook shrimp until they turn pink, then cool them before adding. Using seasonal veggies can make your spring rolls even better. In spring, try fresh asparagus or snap peas. In summer, add zucchini or ripe tomatoes. Fall brings great choices like roasted sweet potatoes or butternut squash. Winter calls for hearty greens like kale or cabbage. You can make these rolls gluten-free by using tamari instead of soy sauce. For a vegan option, swap honey with agave syrup. You can also use coconut aminos for a different flavor. Always check your rice paper wrappers to ensure they are gluten-free. These small changes keep the dish fresh and accessible for everyone. For the complete recipe, check the Full Recipe. To keep your leftover spring rolls fresh, place them in an airtight container. This will help prevent them from drying out. If you have leftover dipping sauce, store it in a separate small container. Make sure to eat the spring rolls within two days for the best taste. If you want to freeze spring rolls, follow these steps. First, assemble the rolls but do not dip them in water. Lay the rolls on a baking sheet lined with parchment paper. Freeze them for about two hours until they are solid. Then, transfer the frozen rolls to a freezer bag. Remove as much air as you can to prevent freezer burn. These can last up to three months in the freezer. To reheat frozen spring rolls, do not thaw them first. Preheat your oven to 375°F (190°C). Place the rolls on a baking sheet and bake for about 15-20 minutes. This method keeps them crispy. You can also pan-fry them in a bit of oil for a few minutes on each side. Enjoy them hot with your dipping sauce from the Full Recipe! Easy veggie spring rolls are fresh, light snacks made with rice paper. They are filled with colorful veggies like carrots, cucumber, and bell peppers. You can add herbs like mint and cilantro for a burst of flavor. These rolls are healthy and fun to eat. You can dip them in a tasty sauce for extra zest. Yes, you can make spring rolls ahead of time! Just prepare them a few hours before you plan to serve. Keep them in an airtight container with a damp paper towel. This will help them stay fresh and moist. Try not to stack them directly on top of each other to avoid sticking. Spring rolls pair well with many sides. Here are some tasty options: - Fresh fruit salads - Crispy lettuce wraps - Spicy dipping sauces - Vegetable stir-fry - Coconut rice Spring rolls can last in the fridge for about 2-3 days. Make sure to store them in an airtight container. They might lose some crispness over time, but they will still taste great. Just keep an eye out for any signs of spoilage. The best way to dip spring rolls is to use a small bowl. Pour your favorite dipping sauce into the bowl. Hold the spring roll by the end, and dip it into the sauce. Take a bite and enjoy the flavors together. The sauce adds a delicious twist! For the complete recipe, check out the full recipe details above. You’ll find everything you need to create these fresh and delightful rolls! You learned about the key ingredients for spring rolls, how to prepare them, and tips for success. We covered ingredient swaps, rolling techniques, and variations for different diets. Storing and reheating spring rolls also got our attention. Try making these rolls your own! Use fresh ingredients, enjoy the process, and get creative with flavors. Spring rolls can be fun to make. Don't shy away from experimenting. Enjoy your tasty, homemade spring rolls!

Easy Veggie Spring Rolls Fresh and Flavorful Meal

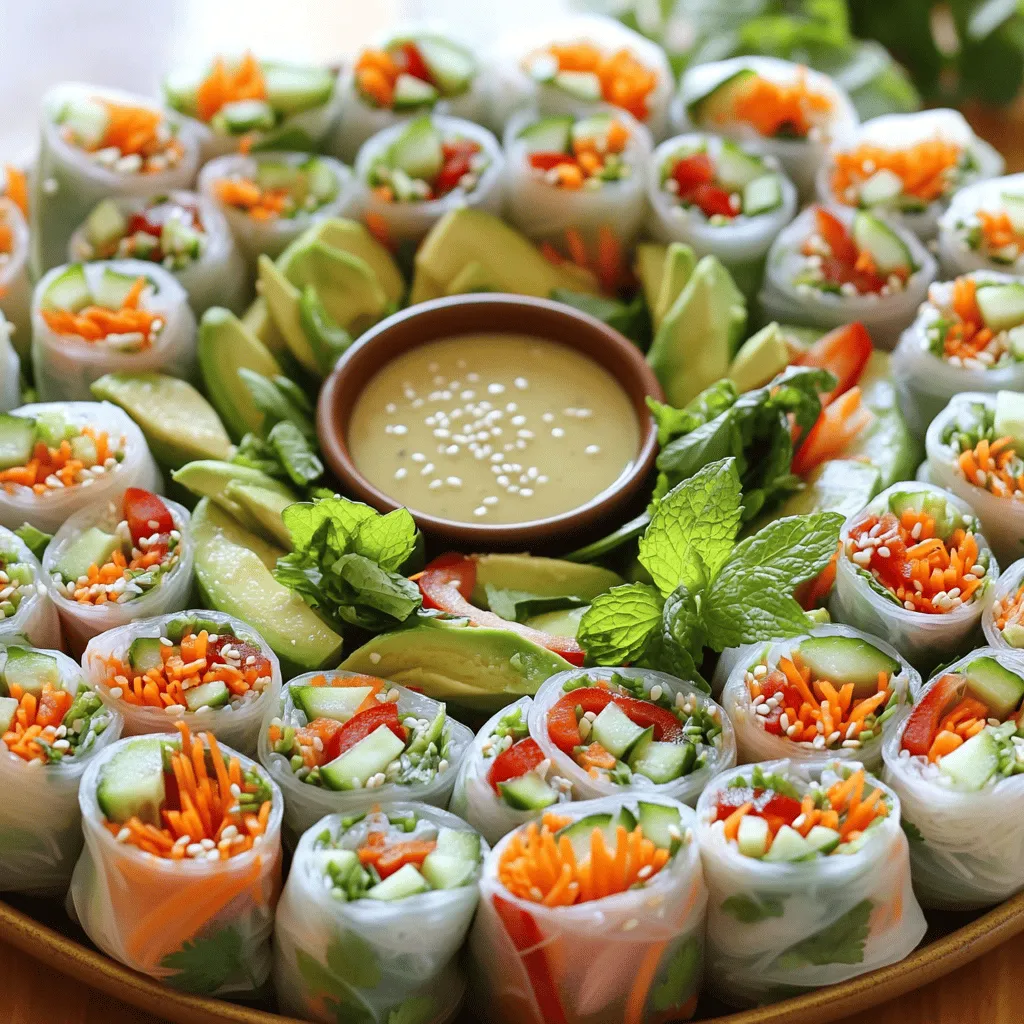
Looking for a fresh and tasty meal? Easy Veggie Spring Rolls are the answer! These colorful rolls are packed with

To make delicious air fryer pretzel bites, gather these key items: - 1 ½ cups warm water (between 110°F to 115°F) - 1 packet (2 ¼ teaspoons) active dry yeast - 1 tablespoon granulated sugar - 4 cups all-purpose flour - 2 teaspoons salt - ½ cup baking soda - 1 large egg, beaten (for egg wash) - Coarse sea salt for topping These ingredients form the base of your pretzel bites. The warm water activates the yeast, making your dough rise. You can add these for extra taste: - Melted butter for brushing on top Brushing melted butter on the warm bites adds richness and a lovely shine. Pretzel bites are perfect with dips. Here are a few ideas: - Tangy mustard - Creamy cheese dip - Spicy ranch dressing These dips elevate the flavor and make for a fun snack experience. You can find the Full Recipe at the end to guide you through each step of making these tasty treats! Start by gathering your ingredients. In a large bowl, mix warm water, active dry yeast, and sugar. Stir gently and let it sit for about 5 minutes. You want it to become frothy with bubbles. This shows the yeast is active and ready to work. Next, add the flour and salt to the frothy yeast mix. Use a wooden spoon or spatula to stir until a dough forms. Transfer the dough to a floured surface. Knead it for about 5 minutes until it feels smooth and elastic. This step helps develop the pretzel’s texture. Now, grease a clean bowl lightly with oil. Place the kneaded dough in the bowl and cover it with a kitchen towel. Let it rise in a warm place for about 1 hour. Your dough should double in size. This rising time is crucial for fluffy pretzel bites. Once the dough rises, you're ready to shape your pretzel bites! Check out the Full Recipe to guide you through the rest of the process. When making air fryer pretzel bites, avoid these common mistakes: - Not activating the yeast: Always let the yeast mixture get frothy. - Skipping the baking soda bath: This step gives your bites their classic flavor and texture. - Overcrowding the air fryer basket: Cook in batches for even cooking. - Not brushing with egg wash: This gives the bites a nice golden color. To get the best texture for your pretzel bites: - Knead the dough well: This builds gluten, making the bites soft yet chewy. - Let the dough rise properly: Aim for double in size for light bites. - Use the right temperature: Preheat your air fryer to 375°F. This ensures even cooking. Follow these tips for air frying pretzel bites: - Arrange in a single layer: This helps them cook evenly and become crispy. - Check halfway through: Flip or shake the basket to ensure even browning. - Brush with butter immediately: This adds flavor and keeps them moist. Follow these tips to make your air fryer pretzel bites a hit! For the full recipe, check out the section above. {{image_4}} You can get creative with flavoring your pretzel bites. Try adding garlic powder or onion powder to the dough for a savory twist. You might also mix in some grated cheese like cheddar or Parmesan. For a sweet treat, sprinkle cinnamon sugar over the top before baking. The options are endless, so have fun exploring different tastes! While pretzel bites are fun, you can also shape the dough into different forms. Make long pretzel sticks for easy dipping, or twist the dough into traditional pretzel shapes. You can even cut the dough into fun animal shapes for kids. Just remember to adjust the cooking time based on the size and shape you choose. If you need a gluten-free option, swap the all-purpose flour for a gluten-free blend. Make sure the baking soda and yeast are gluten-free too. For a vegan version, replace the egg wash with a plant-based milk like almond or soy milk. You can also skip the butter after cooking, or use a vegan butter alternative. Enjoy your tasty snack without worry! For the full recipe, check out the detailed instructions on how to create these delightful bites. To keep your pretzel bites fresh, store them in an airtight container. Place a paper towel inside to absorb any moisture. This helps prevent sogginess. Store them at room temperature for up to two days. If you need more time, consider refrigerating them. They will last for about a week in the fridge. When it's time to enjoy your leftover pretzel bites, reheating is key. I recommend using the air fryer for the best results. Simply preheat it to 350°F (175°C). Place the pretzel bites in the basket for about 3-4 minutes. This method keeps them crisp. You can also use an oven. Bake them at 350°F (175°C) for about 5-7 minutes. If you want to save some pretzel bites for later, freezing is a great option. Allow them to cool completely first. Then, arrange them in a single layer on a baking sheet. Freeze them for about an hour. Once frozen, transfer them to a freezer bag. They will stay fresh for up to three months. When ready to eat, just reheat from frozen using the air fryer or oven. Try this method for a quick snack anytime! You can find the Full Recipe for Air Fryer Pretzel Bites above. To make air fryer pretzel bites, start by mixing warm water, yeast, and sugar. Let it sit for five minutes until it bubbles. Then, add flour and salt. Knead the dough for five minutes until smooth. Let it rise for an hour. Cut the dough into bite-sized pieces. Boil them in water with baking soda for thirty seconds. Brush with egg wash and sprinkle with salt, then air fry for seven to eight minutes until golden. Yes, you can! Store-bought dough makes this recipe quicker. Look for pizza or bread dough at the store. Roll it out and cut it into bite-sized pieces. Then, follow the same boiling and air frying steps. This option saves time while still giving you tasty pretzel bites. Pretzel bites pair well with various dips. Here are a few favorites: - Classic mustard - Cheddar cheese dip - Honey mustard - Ranch dressing - Spicy sriracha mayo These dips add great flavors to your warm pretzel bites. Your pretzel bites are done when they turn golden brown. You can also check if they puff up a bit. If they look light and crispy, they are ready. Use a fork to lift one out and check the color. The Full Recipe for Air Fryer Pretzel Bites includes clear steps for making the dough, boiling, and air frying. It starts with mixing the yeast, then progresses to kneading the dough, letting it rise, and shaping the bites. The final steps involve boiling and air frying, which make them crisp and delicious. Each part is easy to follow, ensuring great results. You now have the tools to make air fryer pretzel bites at home. We covered essential and optional ingredients, step-by-step instructions, and tips for success. I shared fun flavor variations and how to store leftovers well. Use your favorite dips for a tasty treat. Enjoy the process and let your creativity shine. Whether you stick to classic shapes or try something new, these pretzel bites will impress. Happy cooking!

Air Fryer Pretzel Bites Crisp and Tasty Snack Idea

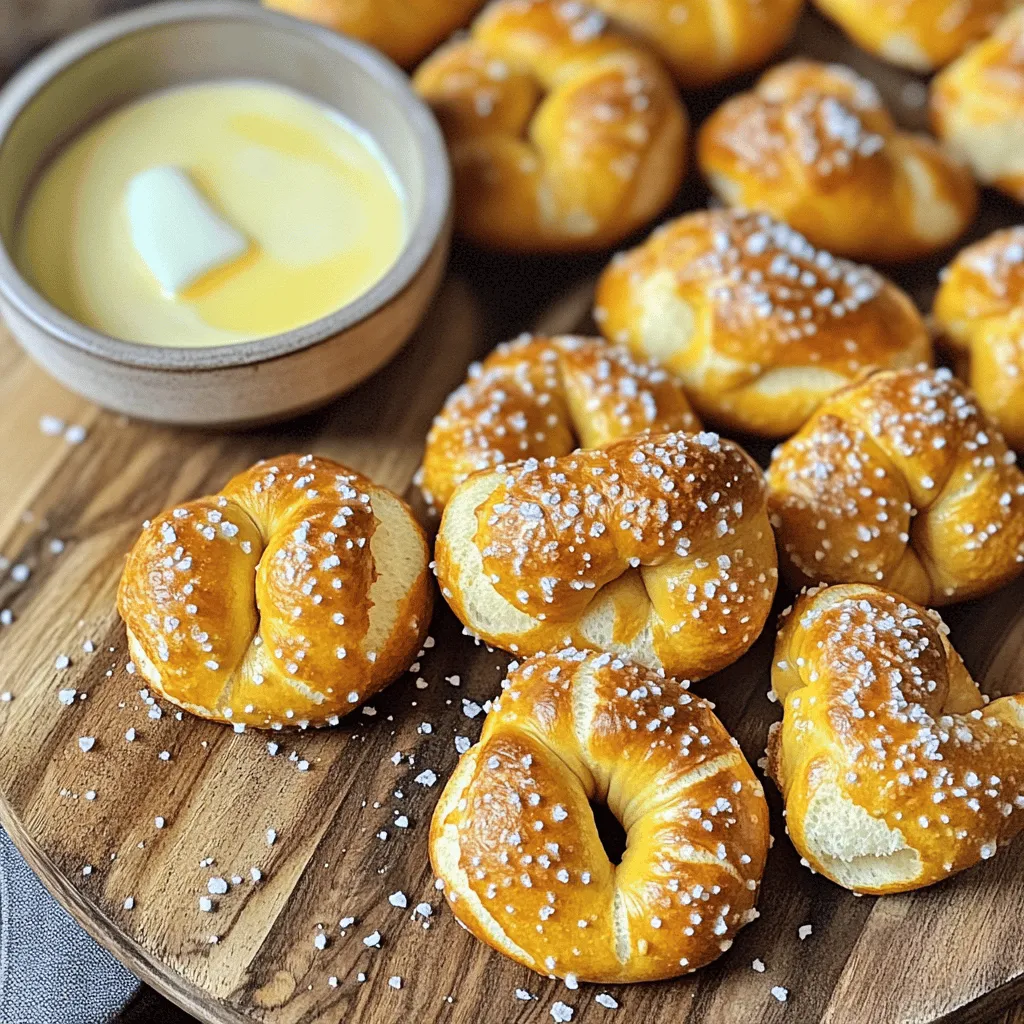
Craving a fun and tasty snack? Let’s make Air Fryer Pretzel Bites! These bites are golden, crispy, and full of

- 1 lb baby carrots, peeled - 3 tablespoons pure honey - 2 tablespoons unsalted butter - 2 cloves garlic, finely minced - 1 teaspoon fresh thyme leaves (or ½ teaspoon dried thyme) - Sea salt and freshly cracked black pepper to taste - 1 tablespoon freshly squeezed lemon juice - Chopped fresh parsley for garnish (optional) To make honey garlic glazed carrots, you will need: - A large skillet - A spatula or wooden spoon - A measuring spoon - A knife and cutting board This dish serves 4 people. Each serving contains: - Calories: 150 - Total Fat: 7g - Saturated Fat: 4g - Cholesterol: 15mg - Sodium: 80mg - Carbohydrates: 23g - Fiber: 2g - Sugar: 10g - Protein: 1g This information helps you understand the dish's health benefits and flavor. Honey adds sweetness, while garlic gives a savory kick. {{ingredient_image_2}} Start by peeling 1 pound of baby carrots. This step lets the sweet glaze stick well. Place the peeled carrots aside on a clean plate. 1. Heat a large skillet over medium heat. Add 2 tablespoons of unsalted butter. Let it melt slowly. 2. Once the butter melts, add 2 cloves of finely minced garlic. Cook for about 1 minute. The garlic should smell nice but not turn brown. 3. Now, add the peeled baby carrots to the skillet. Stir them well in the garlic butter. This helps the carrots soak up the flavor. 4. Drizzle 3 tablespoons of pure honey over the carrots. Then, add 1 teaspoon of fresh thyme leaves. Sprinkle with sea salt and black pepper to taste. 5. Mix everything together to coat the carrots evenly. This helps the honey and seasonings blend. 6. Cover the skillet with a lid. Lower the heat and let the carrots cook for 15-20 minutes. Stir them occasionally. They should be tender yet still bright in color. 7. After they soften, remove the lid. Turn the heat back to medium-high. Let the glaze bubble for 2-3 minutes. This thickens the glaze and makes it stick to the carrots. 8. Take the skillet off the heat. Squeeze 1 tablespoon of fresh lemon juice over the carrots. This adds a nice citrus flavor. 9. Taste the glazed carrots. Adjust the seasoning with more salt and pepper if needed. 10. Finally, transfer the honey garlic glazed carrots to a serving dish. If you like, sprinkle some chopped fresh parsley on top for color. Start with fresh baby carrots. They provide a sweet and tender bite. Peel them to enhance their look and taste. When cooking, always melt the butter slowly. This keeps it from burning. Add garlic just after the butter melts. Stir it for about a minute. This infuses the butter with flavor. Use low heat when covering the skillet. This helps the carrots cook evenly and retain their bright color. Stir occasionally to avoid sticking. Do not rush the cooking process. Cooking carrots too fast can make them hard. Avoid burning the garlic. Brown garlic can taste bitter, ruining your dish. Don’t skip seasoning. Salt and pepper enhance the sweet flavors. Also, don’t forget to add the lemon juice at the end. It brightens up the dish and adds a fresh note. You can play with flavors easily! Try using fresh herbs like rosemary or dill for a twist. If you like a bit of heat, add a pinch of red pepper flakes. For a deeper flavor, consider using maple syrup instead of honey. This gives a nice, rich taste. Adding a splash of balsamic vinegar can also create a unique flavor profile. Enjoy experimenting with different spices to find your favorite combination! Pro Tips Use Fresh Thyme: Fresh thyme adds a vibrant flavor that dried thyme can't match. If possible, opt for fresh herbs for the best taste. Adjust Sweetness: Depending on your preference, you can add more or less honey. Taste the glaze before serving to find your perfect balance. Colorful Presentation: Serve with chopped parsley on top to not only enhance the flavor but also to make the dish visually appealing. Perfect Cooking Time: Keep an eye on the carrots while they cook; they should be tender but still have a slight crunch for the best texture. {{image_4}} You can swap honey for other sweeteners. Maple syrup works great. It adds a rich flavor. Agave nectar is a good choice too. If you want a low-calorie option, try stevia. Each sweetener changes the taste a bit but keeps it sweet. Fresh herbs make a big difference. Try adding rosemary for a bold flavor. Dill can give a fresh twist. If you like spice, add a pinch of red pepper flakes. They add a nice heat that pairs with the sweet glaze. Don’t forget about garlic! You can use garlic powder instead of fresh garlic. It saves time and still tastes good. You can cook these carrots in different ways. Roasting them in the oven gives a nice caramelized flavor. Just toss them with the glaze and bake at 400°F for about 25 minutes. If you want a quicker method, try steaming. It keeps the carrots crisp and bright. You can then toss them with the glaze after. Each method brings out new flavors and textures, making this dish unique every time. To store leftover honey garlic glazed carrots, first let them cool. Once cool, place them in an airtight container. This keeps them fresh and tasty. Store the container in the fridge for up to 3 days. If you want to keep them longer, consider freezing. To reheat the carrots, use a skillet over medium heat. Add a splash of water or broth to help steam the carrots. Stir them often until they are warm. You can also heat them in the microwave. Place them in a microwave-safe dish and cover it. Heat for about 1-2 minutes, checking every 30 seconds. Freezing honey garlic glazed carrots is a great option. Place the cooled carrots in a freezer-safe bag. Squeeze out as much air as you can before sealing. Label the bag with the date. You can freeze them for up to 3 months. When ready to eat, thaw them in the fridge overnight before reheating. Yes, you can use regular carrots. Just peel and cut them into small pieces. Make sure the pieces are similar in size for even cooking. Regular carrots may take a bit longer to become tender. Adjust your cooking time accordingly. To thicken the glaze, cook it a bit longer. After adding the honey, allow the mixture to bubble. Stir it often to prevent burning. You can also add a touch of cornstarch mixed with water. This will help the glaze cling to the carrots better. These glazed carrots pair well with many dishes. Try serving them with roasted chicken or grilled steak. They also complement rice or quinoa dishes nicely. For a vegetarian option, serve them alongside a hearty salad or stuffed peppers. This blog post covered how to cook tasty honey garlic glazed carrots. We explored the ingredients, tools, and nutrition facts. I walked you through how to prepare and cook the carrots, plus tips to avoid mistakes. You learned about variations in flavor and cooking methods. Finally, I shared storage tips for leftovers. With these steps, your carrots will shine on any plate. Enjoy making this dish and impress your family or friends. Simple, delicious carrots can be the star of your meal!

Honey Garlic Glazed Carrots Rich and Flavorful Dish

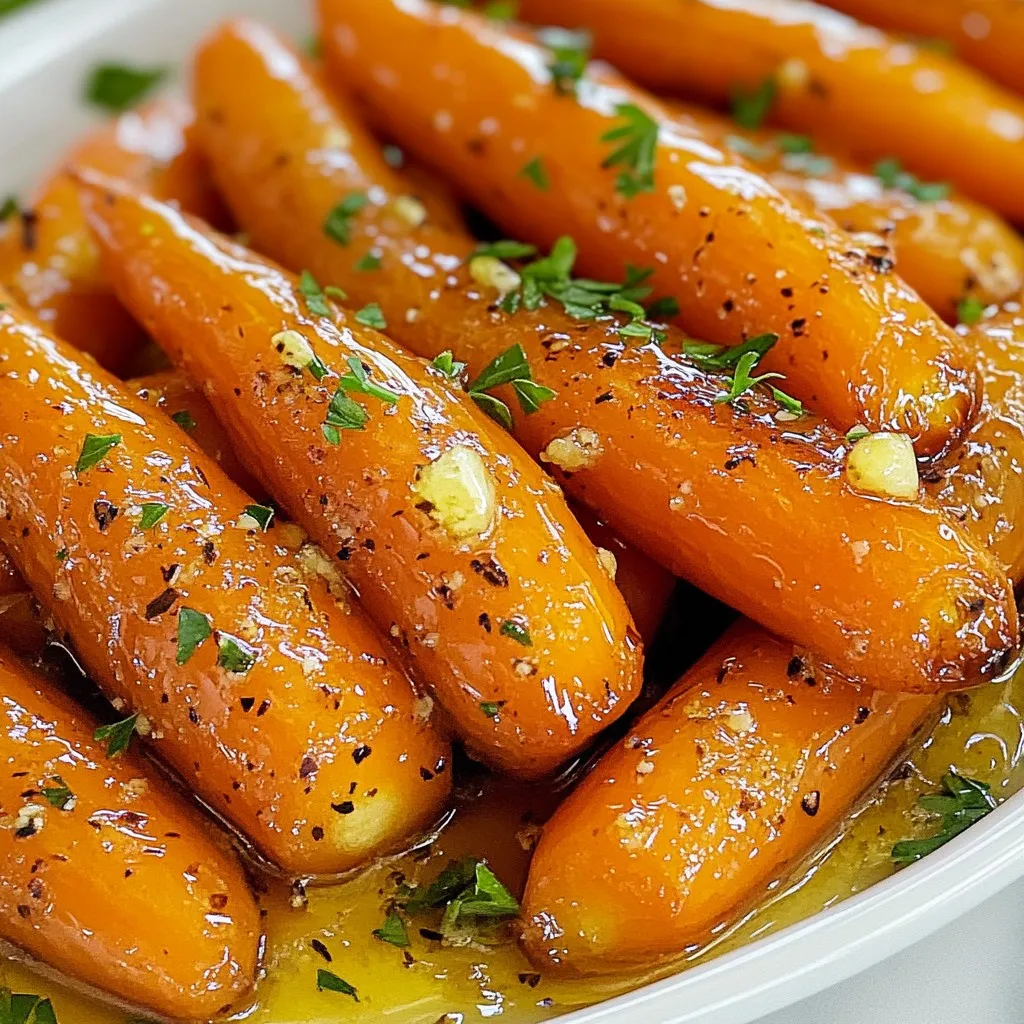
If you’re looking for a side dish that’s sweet, savory, and simple, look no further! Honey Garlic Glazed Carrots are

- 2 cups cooked jasmine rice - 1 cup cooked chicken, shredded or diced - 2 tablespoons vegetable oil - 1 medium onion, finely chopped - 2 cloves garlic, minced - 1 cup mixed vegetables (peas, carrots, and corn) - 3 green onions, sliced - 3 tablespoons soy sauce - 1 tablespoon sesame oil - Salt and pepper, to taste Gathering the right ingredients is key to making classic chicken fried rice. Start with 2 cups of cooked jasmine rice. Using day-old rice gives you the best texture. This rice stays firm and does not clump. Next, have 1 cup of cooked chicken, either shredded or diced. You can use leftover chicken for a quick meal. You will need 2 tablespoons of vegetable oil for cooking. This oil helps fry the rice and gives it a lovely flavor. For extra taste, grab 1 medium onion, finely chopped, and 2 cloves of minced garlic. These will add a rich aroma to your dish. Don't forget the 1 cup of mixed vegetables. Peas, carrots, and corn work well together. They bring color and nutrition. For seasoning, you’ll need 3 green onions, sliced for garnish, 3 tablespoons of soy sauce, and 1 tablespoon of sesame oil. These ingredients create a savory and slightly nutty taste. Lastly, add salt and pepper to taste. With these ingredients, you are ready to follow the full recipe and make a delicious meal! Using day-old rice makes a real difference. It has less moisture. This helps prevent mushiness in your dish. Cold rice is key for great texture. If you have fresh rice, spread it out on a plate. Let it cool in the fridge for about 30 minutes. This way, it will break apart easily and not clump together. Start by heating vegetable oil in a large skillet. I like to use medium-high heat. Add the chopped onion and sauté it for 2-3 minutes. You want the onions to turn soft and clear. Then, stir in minced garlic. Cook it for about 30 seconds. This will bring out its rich flavor without burning it. Now, add the mixed vegetables. Stir-fry these for 3-4 minutes. They should look tender and colorful. Keep stirring to stop them from sticking to the pan. Next, push the veggie mix to one side of the skillet. Pour the beaten eggs into the open space. Scramble them until they are fully cooked. Once cooked, mix the eggs back into the vegetable medley. Now, it’s time to add the chicken. Toss in your shredded or diced chicken and mix it well. This helps spread the chicken evenly. Now, add the cold rice. Break up any clumps as you mix everything. Drizzle soy sauce and sesame oil over the top. Stir well to coat all the ingredients. Keep cooking for another 4-5 minutes. This will heat everything through and add a nice flavor. Finally, fold in sliced green onions and season with salt and pepper to taste. You can find the full recipe here. Using cold, cooked rice is vital for good fried rice. Fresh rice has too much moisture. This can make your dish mushy. Cold rice breaks apart easily. It also helps the grains fry better. If you use day-old rice, it’s perfect for this dish. Adjust your cooking times for the texture you want. For softer rice, cook it a bit longer. For a firmer bite, reduce your cooking time. Stir-frying is quick, so keep an eye on your rice. The stir-frying method gives chicken fried rice its authentic taste. Use a large skillet or a wok. High heat is key for this method. It helps to cook the rice fast. Slight browning adds depth and flavor. Make sure to keep stirring. This keeps the rice from sticking. It also allows for even cooking. Enjoy the sizzling sound as you cook. That’s a good sign your dish is coming together! Garnishing makes your dish pop. Use sliced green onions for color and crunch. A sprinkle of sesame seeds adds a nice touch too. Pair your chicken fried rice with side dishes. Bright salads or crispy spring rolls work well. This creates a balanced meal. It’s all about the colors and flavors on your plate! {{image_4}} You can switch chicken for other proteins like shrimp or tofu. Shrimp gives a sweet and tender taste. Tofu works well for a vegan option. When using tofu, choose firm varieties. Simply cube the tofu and sauté until golden. This choice keeps your meal tasty and healthy. The great thing about fried rice is its flexibility with veggies. You can use seasonal favorites like bell peppers, broccoli, or snap peas. Fresh herbs like cilantro or basil add a pop of flavor. They brighten your dish and make it more vibrant. Try mixing in what you love for a personalized touch. Different cultures have their own takes on chicken fried rice. In Indonesia, they often add sweet soy sauce for a darker color. Chinese fried rice might include oyster sauce for depth. In some areas, they use unique spices, like curry powder. These variations show how adaptable this dish can be. To keep your chicken fried rice fresh, let it cool first. This helps avoid moisture build-up. Once cool, transfer it to an airtight container. This keeps the rice from drying out and helps maintain its flavor. The best way to reheat fried rice is in a skillet. Heat it over medium-high heat. Add a splash of water or oil to keep it moist. Stir it often to heat evenly. You can also use the microwave but be careful. Cover it with a damp paper towel to keep it from drying out. You can store chicken fried rice in the fridge for up to four days. For longer storage, you can freeze it. Place it in a freezer-safe container. It will last for about three months in the freezer. When you’re ready to eat it, just thaw it overnight in the fridge before reheating. You can enhance the taste of chicken fried rice with a few simple tips: - Use soy sauce: Add more soy sauce for a richer flavor. - Add sesame oil: A drizzle of sesame oil brings a nutty taste. - Try oyster sauce: This adds depth and sweetness. - Include spices: A touch of white pepper gives warmth. - Fresh herbs: Chopped cilantro or basil brightens the dish. Mix these flavors well, and you will have a tasty meal. Yes, you can use frozen vegetables for chicken fried rice. Here are the benefits: - Convenience: Frozen veggies save time and prep work. - Freshness: They are often frozen right after harvest, keeping nutrients. - Variety: You can find mixed bags with peas, carrots, and corn. Frozen vegetables heat quickly in the pan, making them easy to use. The best rice for chicken fried rice is jasmine rice. Here’s why: - Texture: Jasmine rice has a fluffy texture that separates well. - Flavor: It has a natural fragrance that enhances the dish. If you can’t find jasmine rice, here are alternatives: - Long-grain white rice: This also works well. - Brown rice: A healthier option with more fiber. - Basmati rice: Offers a different flavor profile. For the best results, use cold, cooked rice. You can check the [Full Recipe] for more details. Chicken fried rice is a simple and tasty dish. You need cooked rice, chicken, and basic veggies. Cook with high heat and use cold rice for the best taste. You can swap proteins or add fresh herbs. Store leftovers well and reheat to keep flavor. Enjoy making this dish your own with your favorite ingredients. Happy cooking!

Classic Chicken Fried Rice Simple and Flavorful Meal

Looking for a quick and tasty meal? Classic chicken fried rice is your answer! This dish combines tender chicken with

To make this easy chicken pesto pasta, you need a few simple ingredients. Each one adds flavor and texture to your dish. Here is the list of ingredients you'll need: - 2 cups rotini pasta - 2 tablespoons extra virgin olive oil - 2 boneless, skinless chicken breasts, diced into bite-sized pieces - Salt and freshly cracked black pepper to taste - 1 cup basil pesto (store-bought or homemade) - 1 cup cherry tomatoes, halved - ½ cup freshly grated Parmesan cheese - A handful of fresh basil leaves for garnish These ingredients come together to create a quick and delightful meal. The rotini pasta holds the sauce well, while the chicken adds protein. The basil pesto gives the dish its rich flavor, and the cherry tomatoes add a nice pop of color and freshness. Parmesan cheese melts beautifully over the warm pasta, making every bite delicious. Fresh basil leaves on top not only look good, but they also enhance the taste. For the full recipe, check out the detailed instructions included above. Bringing Water to a Boil Start by filling a large pot with water. Add a good amount of salt. Bring the water to a full boil. This step helps flavor the pasta. Cooking Time for Rotini Once boiling, add 2 cups of rotini pasta. Cook it for 8 to 10 minutes. You want it to be al dente, which means firm but not hard. After cooking, drain the pasta. Save a cup of the pasta water for later. How to Cook Chicken Perfectly In a large skillet, pour in 2 tablespoons of olive oil. Heat it over medium heat. Add the diced chicken breasts. Cook for 7 to 10 minutes. Make sure to stir often. The chicken should be golden brown and fully cooked. Seasoning Tips While cooking, season the chicken with salt and freshly cracked black pepper. This simple seasoning brings out the chicken's flavor. Tossing Pasta with Pesto Once the chicken is done, add the cooked rotini to the skillet. Pour in 1 cup of basil pesto. Use tongs or a spatula to toss everything together. Make sure the pasta is well coated. Adjusting Texture with Pasta Water If the dish seems dry, add a splash of the reserved pasta water. This will give the dish a creamier texture and help the pesto stick better. Adding Tomatoes and Cheese Gently fold in 1 cup of halved cherry tomatoes. Add ½ cup of freshly grated Parmesan cheese. Mix until everything is well combined. The heat will help the cheese melt a bit. Plating and Garnishing Serve the creamy chicken pesto rotini on plates. Garnish with fresh basil leaves. You can add more grated Parmesan cheese if you like. Enjoy your meal warm! For the full recipe, check out the details above. To make juicy chicken breasts, start with good quality meat. Cut chicken into even pieces. This helps them cook uniformly. Season the chicken well with salt and pepper. Heat your skillet over medium heat before adding the chicken. This keeps the meat from steaming. Cook until it turns golden brown, about 7-10 minutes. Use a meat thermometer if you want to check the internal temp. It should reach 165°F (75°C) for safety. Overcooking can dry out your chicken. To avoid this, keep an eye on the time. If the edges look brown but the center is still pink, remove it from the heat. Let it rest for a few minutes before mixing it with the pasta. This helps the juices settle in. Want to add more flavor? Try adding veggies like spinach or bell peppers. You can also toss in olives or artichokes for a twist. Mix in some roasted garlic for a richer taste. Fresh herbs like thyme or oregano can brighten the dish. For extra seasoning, consider adding red pepper flakes for some heat. A squeeze of lemon juice can also brighten the flavor. Keep tasting as you go to find the balance that you like best. Presentation makes a dish more appealing. Start by using a large bowl or a nice plate. Twirl the pasta into a nest shape for a fun look. Place the chicken pieces on top, so they are visible. Scatter the cherry tomatoes around for color. Garnish with fresh basil leaves and a sprinkle of grated Parmesan. This adds a nice touch and some extra flavor. A drizzle of olive oil over the top can make it shine. Enjoy making your meal look as good as it tastes! {{image_4}} You can switch the chicken for shrimp or tofu. If you use shrimp, cook them in the skillet until they turn pink. This takes about 3-4 minutes. For tofu, press it first to remove water. Cut it into cubes and sauté until golden. Both options add new flavors and textures to the dish. If you need a gluten-free meal, choose gluten-free pasta. Many brands offer great alternatives made from rice or chickpeas. Cook it just like regular pasta. Follow the package instructions for the best results. This keeps your meal tasty without the gluten. To make a meatless dish, simply skip the chicken. Add more veggies instead. Try bell peppers, zucchini, or spinach. You can also add chickpeas for protein. This variation keeps the dish filling while being kind to your diet. Each option adds color and flavor, making your pasta fun and healthy. For the full recipe, check out the detailed steps and ingredients! Store any leftover chicken pesto pasta in an airtight container. Make sure to put it in the fridge right after it cools. It stays good for about three to four days. Keep it away from strong-smelling foods to prevent it from absorbing odors. When reheating, use low heat to keep the pasta moist. Add a little splash of water or olive oil to help it warm up evenly. Stir often to avoid burning. This will help keep the flavors fresh and vibrant. To freeze chicken pesto pasta, place it in a freezer-safe container. Make sure to leave some space at the top, as the pasta will expand. You can freeze it for up to three months. When ready to eat, thaw it in the fridge overnight and reheat as mentioned above. Enjoy your meal later with ease! For the full recipe, check out the details above. Yes, you can use store-bought pesto. It saves time and is easy to find. Some brands taste great and make cooking faster. However, homemade pesto can add a fresh touch. Making your own allows you to control flavors, like adding garlic or nuts. If you have the time, I suggest trying both to see what you like best. Chicken pesto pasta lasts about three to four days in the fridge. Store it in an airtight container to keep it fresh. When you want to eat it again, just reheat it gently. You can add a splash of water or oil to keep it moist. This dish is perfect for meal prep, making it easy to enjoy later. You can serve chicken pesto pasta with many sides. A simple green salad pairs well. Garlic bread is also a favorite choice. You can add roasted vegetables for a colorful plate. These sides balance the meal and add more flavors. Feel free to mix and match to find your perfect combo. Yes, you can make this dish in advance. Prepare it a day or two ahead for easy meals. Just cook everything and let it cool before storing. Keep it in the fridge until you're ready to eat. Reheat it on the stove or in the microwave. This makes meal prep simple and helps you save time during busy weeks. For the full recipe, check out the full recipe section. In this article, we explored how to make a delicious chicken pesto pasta with rotini. You learned about essential ingredients, from chicken breasts to fragrant basil. I shared step-by-step cooking instructions and tips for juicy chicken and vibrant presentation. Plus, you discovered variations for different diets and smart storage methods. By following these steps, you'll create a dish that looks great and tastes even better. Enjoy your cooking journey and share your tasty pasta experience!

Easy Chicken Pesto Pasta Quick and Flavorful Meal

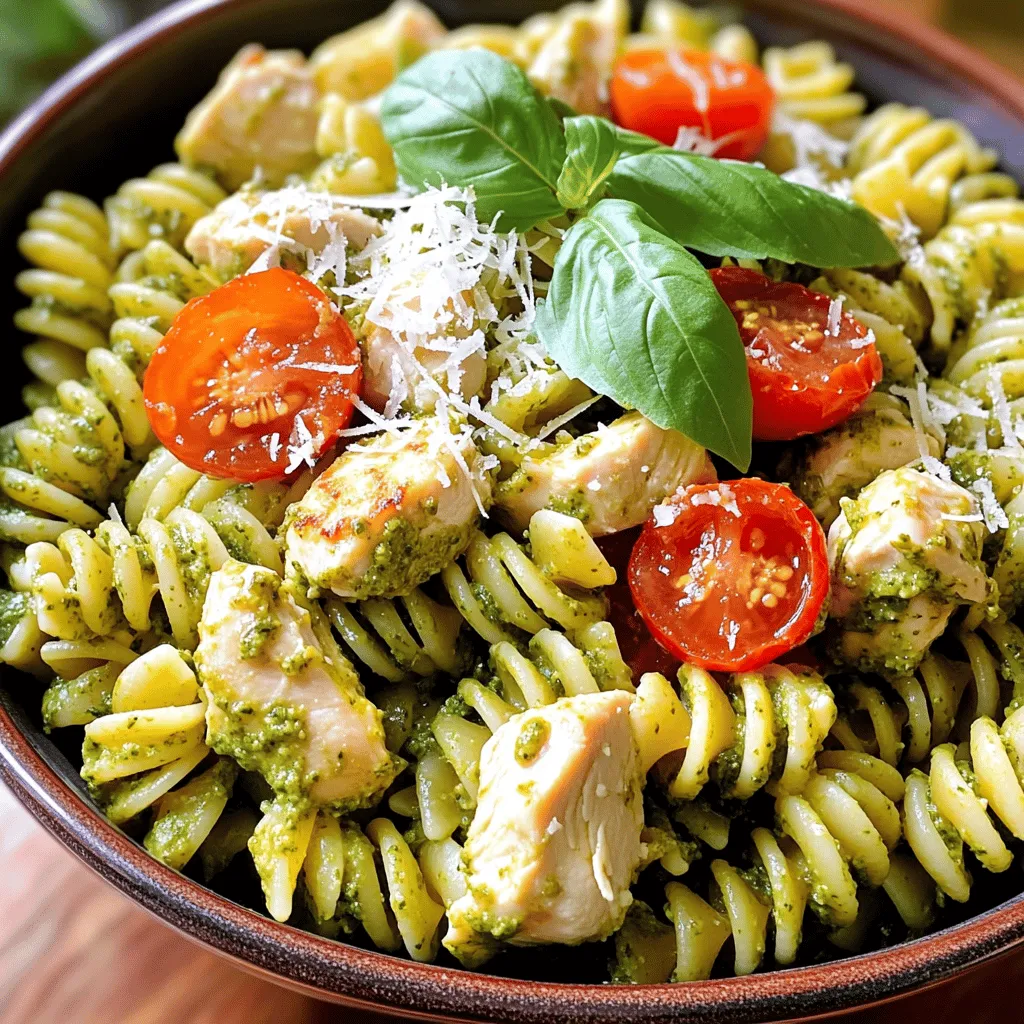
Are you craving a quick and tasty dinner? Try this Easy Chicken Pesto Pasta! With just a few ingredients, you

To make simple garlic roasted mushrooms, you need a few fresh ingredients. Here’s the list: - 1 pound of fresh button or cremini mushrooms - 4 cloves of fresh garlic - 3 tablespoons of extra virgin olive oil - 1 teaspoon of dried thyme leaves - 1 teaspoon of dried rosemary - Sea salt and black pepper - Fresh parsley for garnish These ingredients come together to create a dish that is both tasty and easy to make. The mushrooms bring a rich, earthy flavor. The garlic adds a nice kick. Olive oil helps everything roast perfectly. Thyme and rosemary give it a warm, herbal taste. Using fresh garlic is key. It enhances the flavor and aroma of the mushrooms. Make sure to chop it finely for the best results. The herbs add depth, making each bite satisfying. Don’t forget the sea salt and black pepper. They balance the flavors and bring out the best in every ingredient. Finally, a sprinkle of fresh parsley adds color and freshness to the dish. For the full recipe, you can follow the instructions and enjoy this delightful meal. First, you need to preheat your oven to 400°F (200°C). This hot temperature helps your mushrooms get that nice, golden color. It also makes them tender and juicy inside. Make sure your oven is ready before you start mixing your ingredients. Next, grab your ingredients. You will need 1 pound of fresh mushrooms, 4 cloves of garlic, and olive oil. Clean the mushrooms and cut them in half. Peel and finely mince the garlic. In a large bowl, mix the halved mushrooms, minced garlic, 3 tablespoons of olive oil, 1 teaspoon of dried thyme, and 1 teaspoon of crushed rosemary. Add a good pinch of sea salt and black pepper. Use your hands or a spoon to stir everything well. You want each mushroom to be covered in the tasty oil and spices. Now, prepare a baking sheet. You can line it with parchment paper or lightly grease it with olive oil. Spread the seasoned mushrooms in a single layer on the sheet. Make sure not to overcrowd them; this helps them roast evenly. Place the sheet in the preheated oven. Roast the mushrooms for about 20-25 minutes. Halfway through, stir them gently for even cooking. They should be tender and golden brown when done. Once roasted, take them out and transfer them to a serving dish. Sprinkle with fresh parsley for a bright finish. Enjoy this savory garlic roasted mushrooms dish! For a detailed recipe, check out the Full Recipe. To get mushrooms that are golden and tender, start with fresh ones. Look for firm button or cremini mushrooms. Clean them gently with a damp cloth. Cut them in half to help them cook evenly. When mixing, coat each mushroom well with olive oil and spices. Spread them out on the baking sheet. If they are too close together, they will steam instead of roast. Stir them halfway through for even cooking. Want to boost the flavor? Try adding a splash of balsamic vinegar before roasting. This adds a nice tang. You can also mix in some chili flakes for heat. Fresh herbs like thyme or rosemary work great too. For a rich taste, sprinkle some grated Parmesan cheese after roasting. The cheese melts and adds a tasty layer. Garlic roasted mushrooms are very versatile. You can serve them as a side dish or a topping. Try them on grilled meats or fish. They also work well in pasta dishes or salads. For a simple snack, serve them with crusty bread. They can be a great addition to a charcuterie board too. Enjoy experimenting with these mushrooms in many ways! {{image_4}} You can switch up the mushrooms in this dish. Try using shiitake or portobello mushrooms. These types add a rich flavor. They also give a meaty texture. If you want something more unique, use oyster mushrooms. Their delicate taste pairs well with garlic too. This recipe is already vegetarian. If you want it vegan, you are in luck! All the ingredients are plant-based. Just make sure to check the olive oil. Most brands are vegan-friendly. You can also add a splash of balsamic vinegar for a tangy twist. Feel free to play with the spices. You can add a pinch of paprika for some heat. Lemon zest brightens the dish and adds freshness. If you love heat, consider red pepper flakes. They will make your garlic roasted mushrooms pop. You can find more ideas in the Full Recipe. After you roast your mushrooms, let them cool. Place them in an airtight container. Store them in the fridge for up to four days. When you're ready to eat, reheat them in a skillet on medium heat. This method keeps them tender and tasty. You can also use a microwave for quick reheating. Just cover them, so they don’t dry out. You can freeze roasted mushrooms if you want to save some for later. First, let them cool completely. Spread them out on a baking sheet in a single layer. Freeze them for about an hour. This way, they won’t stick together. Once frozen, transfer them to a freezer-safe bag. They can last for up to three months in the freezer. When you’re ready to enjoy, just reheat them from frozen. To keep your mushrooms fresh before cooking, store them in a paper bag. This allows them to breathe and stay dry. Avoid storing them in plastic, as it traps moisture. If you notice any slimy spots, clean them off with a damp cloth. For the best flavor, use fresh mushrooms within a week of purchase. This maximizes the taste and texture of your savory garlic roasted mushrooms. For the complete recipe, refer to the Full Recipe section. Roast mushrooms for about 20-25 minutes. This time gives them a nice golden color. Check them halfway through and stir for even roasting. Yes, you can use dried garlic. Use about 1 teaspoon of dried garlic for this recipe. Fresh garlic has a stronger flavor, but dried works fine too. Garlic roasted mushrooms pair well with many dishes. Try them with grilled chicken, pasta, or on a salad. They also taste great on toast or as a pizza topping. Yes, you can make this recipe ahead of time. Roast the mushrooms, then store them in the fridge for up to 3 days. Reheat them in the oven before serving for best results. For the full recipe, check the earlier section. Roasting mushrooms is simple and fun. We covered key ingredients, from mushrooms to herbs. I gave step-by-step instructions for easy cooking. Plus, I shared tips to enhance flavors and serving ideas. Remember, you can tweak this dish with different mushrooms or seasonings. Store and reheat them easily to enjoy later. This recipe is truly flexible. Now, it's your turn to try it and enjoy the rich, tasty results!

Simple Garlic Roasted Mushrooms Flavorful and Easy Dish

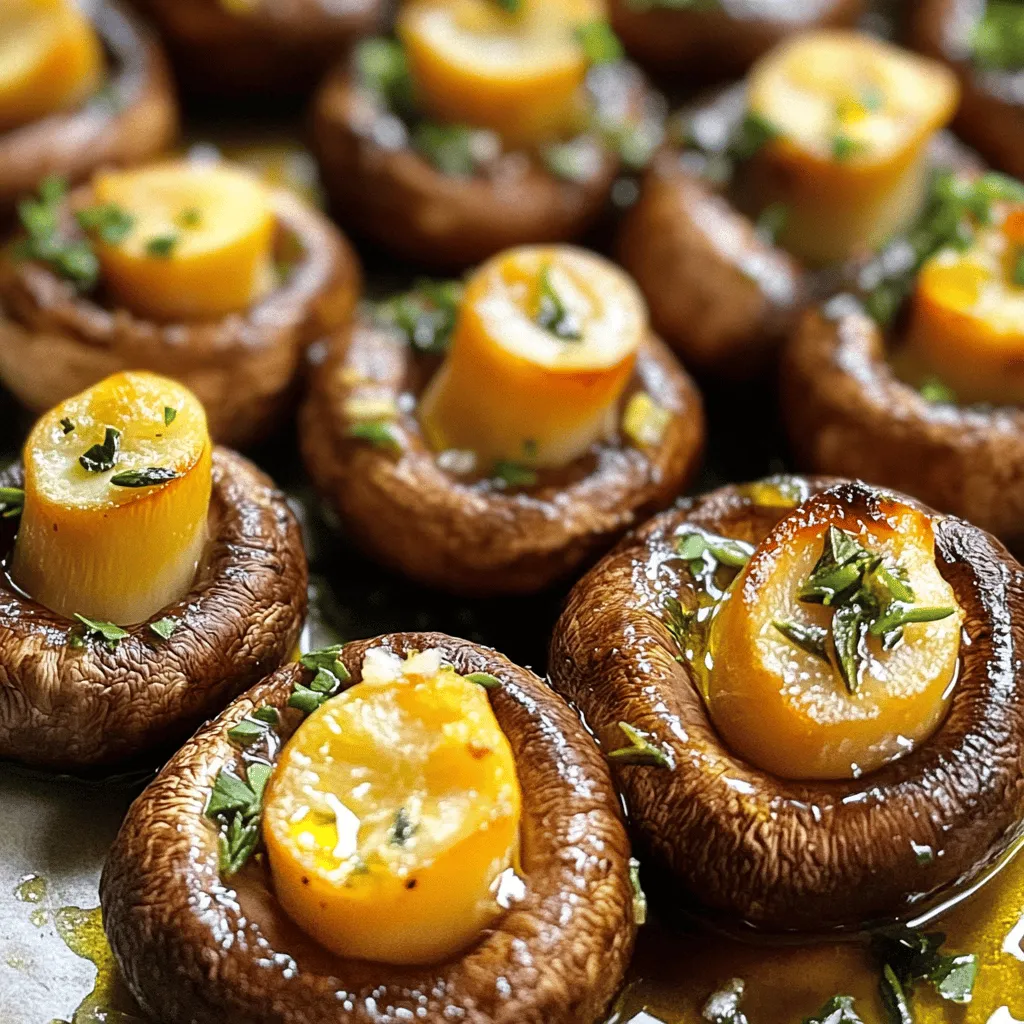
Looking for a simple dish that bursts with flavor? These Garlic Roasted Mushrooms are the answer! With just a few

To make a classic minestrone soup, gather these ingredients: - 1 tablespoon extra virgin olive oil - 1 medium onion, diced - 2 garlic cloves, finely minced - 2 medium carrots, diced - 2 celery stalks, diced - 1 medium zucchini, diced - 1 cup green beans, trimmed and cut into 1-inch pieces - 1 can (14 oz) diced tomatoes with their juices - 4 cups vegetable broth (homemade or low-sodium) - 1 can (15 oz) cannellini beans, thoroughly drained and rinsed - 1 cup small pasta (such as ditalini or elbow pasta) - 1 teaspoon dried oregano - 1 teaspoon dried basil - Salt and freshly ground black pepper to taste - Fresh parsley, chopped (for garnish) Fresh ingredients bring bright flavors and textures. I always prefer fresh onions, garlic, carrots, and zucchini. They make the soup taste alive. However, canned ingredients, like diced tomatoes and cannellini beans, save time. They still provide good taste and are often great for quick meals. If you can’t find an ingredient, don’t worry! You can swap items easily. Use sweet potatoes instead of carrots for a sweeter taste. Spinach can replace zucchini if you want greens. For pasta, you can use rice or quinoa. Each swap gives a new twist to the soup while keeping it hearty and filling. For the full recipe, check the details mentioned above. To start, gather your ingredients. You will need olive oil, onion, garlic, carrots, celery, zucchini, green beans, diced tomatoes, vegetable broth, cannellini beans, small pasta, oregano, basil, salt, and pepper. 1. Heat 1 tablespoon of olive oil in a large pot over medium heat. 2. Add the diced onion. Sauté for 3-4 minutes until soft and see-through. 3. Mix in 2 minced garlic cloves, 2 diced carrots, and 2 diced celery stalks. Cook for another 5 minutes. 4. Add 1 diced zucchini and 1 cup of green beans. Cook for 3-4 minutes until tender. 5. Pour in 1 can of diced tomatoes and 4 cups of vegetable broth. Stir well. 6. Add 1 can of rinsed cannellini beans, 1 teaspoon of oregano, and 1 teaspoon of basil. Season with salt and pepper. 7. Bring the mixture to a boil, then lower the heat. 8. Add 1 cup of small pasta and cook for 10-12 minutes until al dente. 9. Taste and adjust seasoning before serving. 10. Ladle the soup into bowls and garnish with fresh parsley. - Prep Time: 15 minutes - Cooking Time: 25 minutes - Total Time: 40 minutes - Servings: 6 When you sauté, look for the onion to become soft and slightly golden. This shows it is ready for the next steps. Watch the pasta closely to avoid overcooking. It should stay firm but tender. For serving, a bowl with vibrant colors makes the dish more appealing. Add fresh parsley for a pop of green and flavor. Enjoy your hearty minestrone soup warm! To make your minestrone soup burst with flavor, use fresh herbs. Fresh basil and parsley add a bright note. You can also add a splash of balsamic vinegar for depth. A pinch of red pepper flakes gives it a nice heat. Always taste and adjust the seasoning before serving. Texture is key in a great minestrone. Start with a good sauté. This softens the onions and garlic, building a solid base. Cook your pasta just until al dente to keep it firm. Avoid overcooking the vegetables; they should remain vibrant and slightly crunchy. You want each bite to have a nice mix of soft and crisp. Serve your hearty minestrone soup in a bowl with a sprinkle of parsley on top. A slice of crusty bread makes a perfect side for dipping. For a richer taste, add grated Parmesan cheese just before eating. You could also pair it with a side salad for a complete meal. Explore the full recipe to dive deeper into making this classic dish. {{image_4}} You can easily make this minestrone soup vegan. Simply skip the Parmesan cheese. Use vegetable broth instead of chicken broth. For gluten-free options, select gluten-free pasta. This way, everyone can enjoy it! This soup thrives on fresh vegetables. In spring, add peas and asparagus. In summer, use corn and bell peppers. In fall, consider adding squash or sweet potatoes. In winter, kale or spinach works well. These swaps keep the flavors bright and fresh. You can add protein for a heartier meal. Chickpeas or lentils fit perfectly into this soup. If you prefer meat, diced chicken or sausage can work well. Just cook them before adding to the soup. These options make it filling and satisfying. For more detailed cooking instructions, check out the Full Recipe. To keep your minestrone soup fresh, use airtight containers. Glass jars or plastic containers work well. Let the soup cool completely before sealing. This helps prevent moisture build-up. Store it in the fridge if you plan to eat it within a few days. For longer storage, freezing is best. To freeze minestrone soup, portion it into smaller containers. This way, you can take out just what you need. Leave a little space in the container for expansion as it freezes. When you’re ready to eat, thaw it in the fridge overnight. Reheat on the stove over low heat. Stir often to heat evenly. You can also use the microwave for quick reheating. In the fridge, minestrone soup lasts about 3-4 days. If you freeze it, it can last up to 3 months. Always check for signs of spoilage before eating. If it smells off or looks strange, it's best to toss it. Enjoy your hearty and flavorful minestrone soup, even days later! For the complete recipe, refer to Full Recipe. Minestrone soup has roots in Italy. It started as a simple peasant dish. Cooks used what they had on hand. This meant lots of vegetables, beans, and pasta. Over time, each region in Italy added its own twist. Today, it varies widely. You can find versions with local vegetables and spices. This soup reflects Italian culture and love for fresh food. Yes, you can add meat to your minestrone. Common choices include bacon, sausage, or chicken. Just remember, meat changes the flavor and texture. Cook the meat first, then add the veggies. This way, you keep the soup hearty and rich. If you want a lighter option, try adding meat only in moderation. To thicken your minestrone soup, use a few easy tricks. One method is to blend a portion of the soup. This will create a creamy texture without adding dairy. Another option is to add more beans or pasta. They help soak up liquid and make it heartier. You can also simmer the soup longer to reduce liquid. Just keep an eye on it to avoid burning. For more detailed instructions, check the Full Recipe. Minestrone soup offers endless ways to enjoy freshness in every bowl. We reviewed key ingredients, cooking methods, and tips for flavor enhancement. You can adapt this dish to fit your diet and preferences easily. Always store soup right for long-lasting taste. Remember, making minestrone is simple and fun. Dive in and create your perfect version today!

Classic Minestrone Soup Flavorful and Hearty Recipe

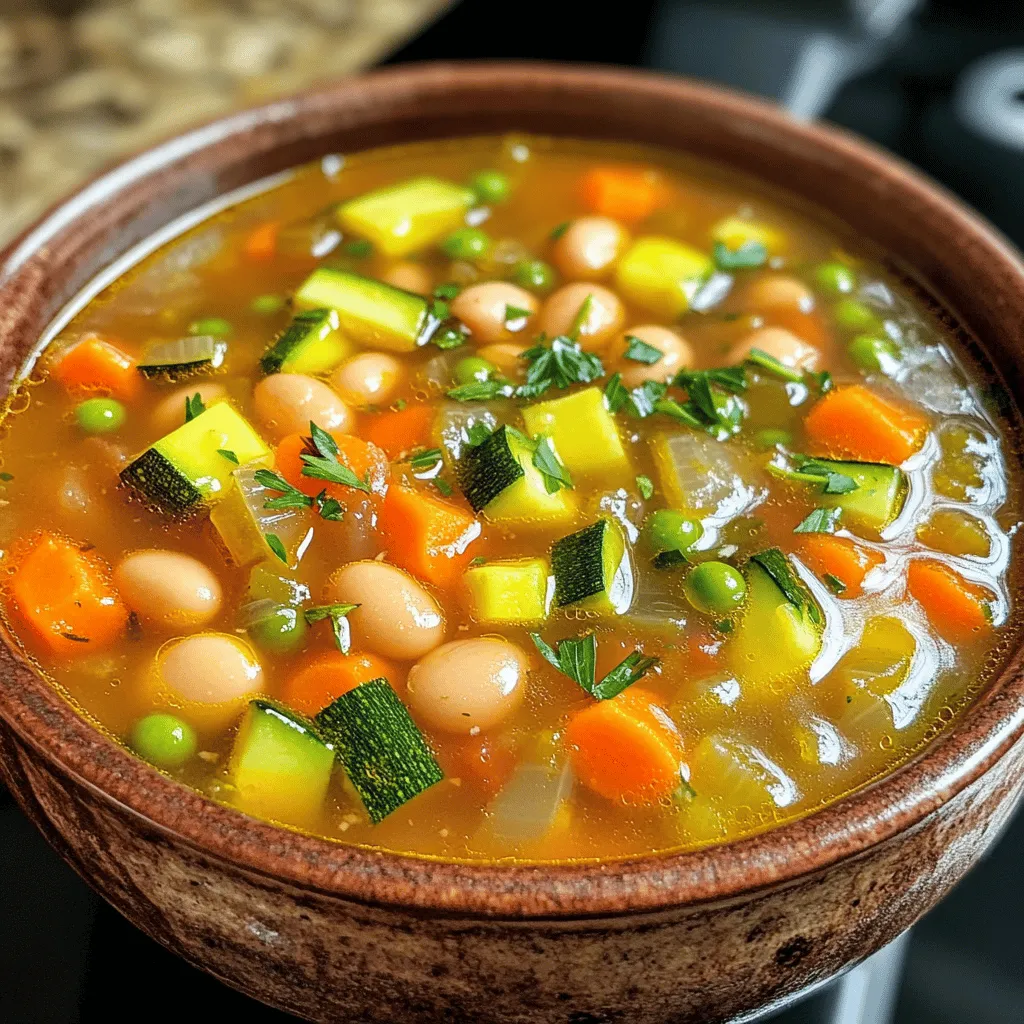
Are you ready to dive into a bowl of warmth and comfort? Classic minestrone soup is not just filling; it’s

Older posts
Newer posts
← Previous Page1 … Page50 Page51 Page52 … Page117 Next →

dsad

© 2025 spoonfulsavory • Built with GeneratePress

Our Policies

  • Copyright Policy
  • Cookie Policy
  • GDPR Policy
  • Privacy Policy
  • Disclaimer
  • Terms Of Use

More Information

  • Home
  • About
  • Contact
  • Appetizers
  • Dessert
  • Dinner
  • Drinks
©2025, spoonfulsavory About Back To Top