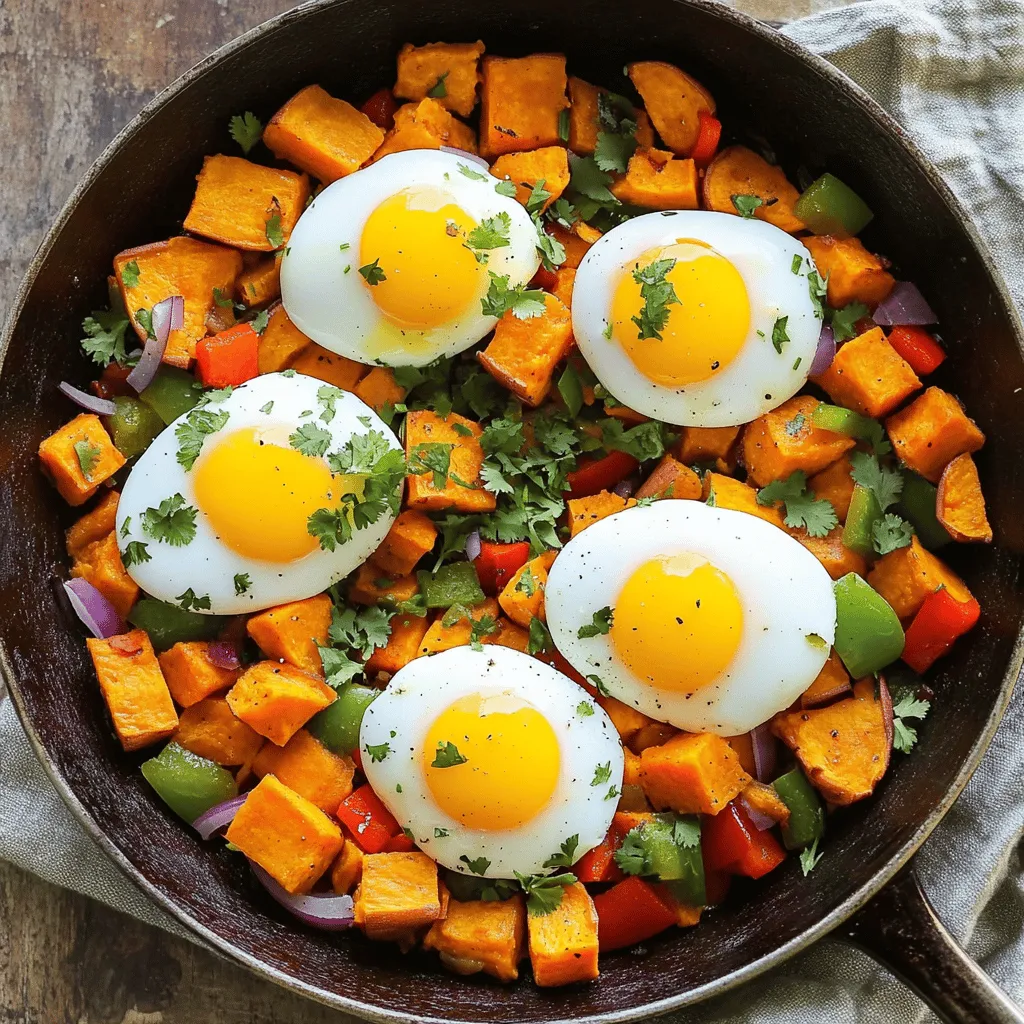
Sweet Potato Breakfast Hash Packed with Flavor
Start your day right with a Sweet Potato Breakfast Hash that bursts with flavor! This dish combines sweet potatoes, bell
Start your day right with a Sweet Potato Breakfast Hash that bursts with flavor! This dish combines sweet potatoes, bell
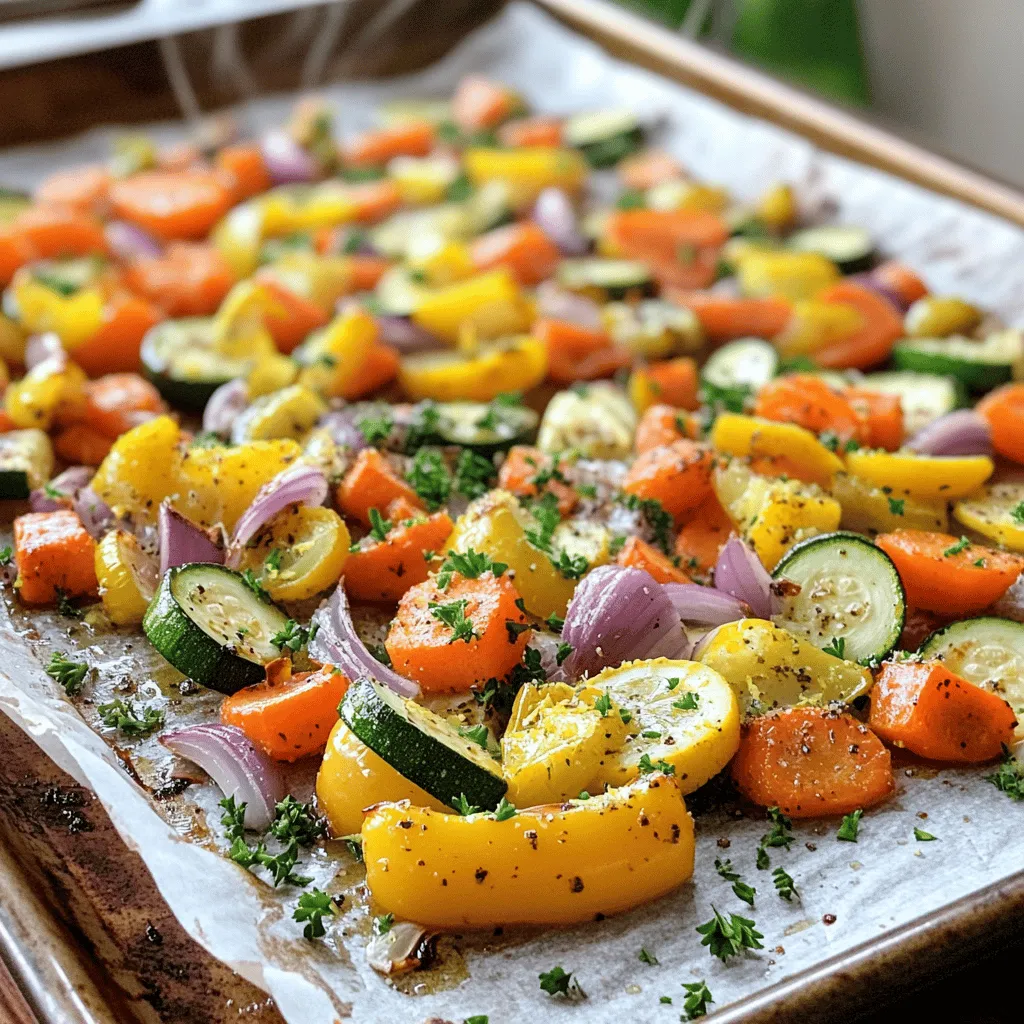
Looking for a quick, tasty side dish? My Lemon Herb Roasted Veggies recipe is here for you! It’s easy, flavorful,
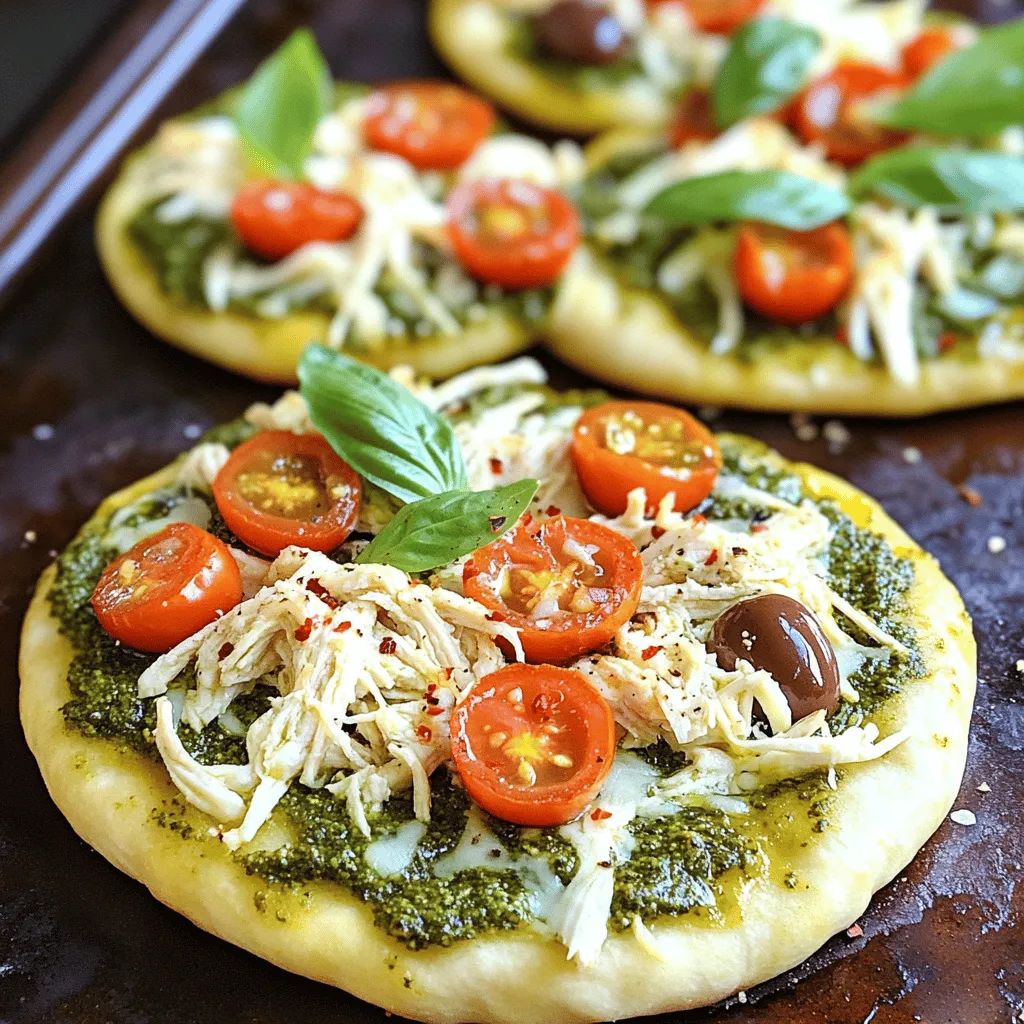
Looking for a quick and tasty meal? This Pesto Chicken Flatbread recipe is a game-changer! It’s not only easy to
![To make tasty Strawberry Banana Bread, gather these ingredients: - 2 ripe bananas - 1 cup fresh strawberries - 1/2 cup granulated sugar - 1/4 cup brown sugar - 1/3 cup coconut oil - 2 large eggs - 1 teaspoon pure vanilla extract - 1 teaspoon baking soda - 1/2 teaspoon salt - 1 1/2 cups all-purpose flour - 1/2 teaspoon ground cinnamon (optional) - 1/4 cup chopped walnuts or pecans (optional) These ingredients create a moist and flavorful loaf. The ripe bananas add sweetness. Fresh strawberries bring a burst of flavor and color. You can make choices based on what you have: - Alternative oils for coconut oil: Use vegetable oil or melted butter. Both work well in this recipe. - Using frozen strawberries instead: If fresh strawberries aren't available, frozen ones are fine. Just thaw and chop them first. - Egg substitutes for vegan options: Use flax eggs or applesauce. Mix one tablespoon of flaxseed meal with three tablespoons of water. Let it sit for five minutes. Each slice of Strawberry Banana Bread has around 150 calories. Here’s a breakdown: - Carbohydrates: About 30 grams - Fats: Around 5 grams - Proteins: Roughly 2 grams This bread is not only tasty but also gives you energy from the carbs. It's a great snack or breakfast choice! For the complete recipe, check the full recipe section. 1. Preheat your oven to 350°F (175°C). This is key for even baking. 2. Prepare a 9x5-inch loaf pan. Grease it well or line it with parchment paper. This helps with easy removal later. 3. In a large mixing bowl, combine wet ingredients. Add the thoroughly mashed bananas, granulated sugar, brown sugar, and melted coconut oil. Mix until smooth. 4. Incorporate the beaten eggs and vanilla extract. Stir until everything is fully mixed and smooth. 1. Mix the dry ingredients in a separate bowl. Combine baking soda, salt, flour, and ground cinnamon if you like that flavor. Whisk them well. 2. Gradually add the dry mix to the wet mix. Stir gently until just combined. Avoid overmixing for a tender bread. 3. Fold in the chopped strawberries and nuts. Make sure they are evenly distributed in the batter. 4. Pour the batter into the prepared loaf pan. Use a spatula to smooth the top evenly. 1. Check for doneness after 55-60 minutes. Insert a toothpick in the center. It should come out clean. 2. Let the bread cool in the pan for about 10 minutes. Then, transfer it to a wire rack to cool completely. This helps the texture stay just right. You’ll find the full recipe details earlier in this article. Enjoy making this tasty treat! To get that soft and fluffy texture, avoid overmixing. When you mix too much, the bread can become tough. You want to mix just until the ingredients come together. This keeps your bread light and airy. Using ripe bananas is also key. Ripe bananas are sweeter and add moisture. Look for bananas with brown spots. They will give your bread the best taste and texture. To make your bread even tastier, try adding spices. Nutmeg and ginger bring warmth to the flavor. A little bit goes a long way, so start with just a pinch. You can also brighten the flavor with citrus zest. Lemon or orange zest adds a nice touch. Just a teaspoon stirred into the batter will do wonders. When it comes to serving, warm slices with butter are a classic choice. The meltiness of the butter complements the bread's sweetness. For a fancier touch, add a dollop of whipped cream on top. Then, sprinkle fresh strawberries around the plate. This makes your dish look inviting and special. Enjoy every delightful bite! If you're ready to try making this delicious treat, check out the Full Recipe for all the details. {{image_4}} You can change up the fruits in your bread. Blueberries or raspberries work well. They add a burst of flavor and color. You can also use peaches or apples for a sweet twist. These fruits keep the bread moist and tasty. Each option brings its own special touch to the recipe. If you need gluten-free options, use gluten-free flour. It will still taste great! For a sugar-free adaptation, try using ripe bananas. They add natural sweetness. You can also use stevia or a similar sweetener if you prefer. These changes make your bread fit different diets while tasting delicious. You can bake this recipe as mini loaves or muffins. Just adjust the bake time. Mini loaves may need about 30-40 minutes. Muffins usually take about 20-25 minutes. Check for doneness with a toothpick. For muffins, you can get creative with toppings. Try adding a sprinkle of oats or a drizzle of honey. These small changes can make your treats even more fun to eat. Enjoy the variations! [Full Recipe] To keep your strawberry banana bread fresh, wrap it tightly. Use plastic wrap or foil. You can also store it in an airtight container. This keeps the bread moist and tasty. Avoid letting it sit out in the open air. To freeze your bread, let it cool completely first. Then wrap it well in plastic wrap. Place it in a freezer bag or container. Label it with the date. When you’re ready to eat, take it out. Thaw it in the fridge overnight for best flavor. At room temperature, your bread lasts about 3 to 4 days. Check for signs of spoilage. If you see mold or it smells off, it’s best to toss it. If it looks and smells fine, enjoy a slice! Can I use frozen bananas? Yes, you can use frozen bananas. Just thaw them first. Drain excess water. This helps keep the mix moist and sweet. What can I do if my bread is too dry? If your bread is dry, add a bit of milk or yogurt. You can also include mashed banana for moisture. These will help bring back that soft texture. How do I make it vegan? To make vegan strawberry banana bread, replace eggs with flax eggs. Mix one tablespoon of flaxseed meal with three tablespoons of water. Let it sit for five minutes. Use a plant-based oil instead of coconut oil. What to do if the bread doesn't rise? If the bread doesn’t rise, check the baking soda. Make sure it’s fresh. Old baking soda can lose its power. Also, avoid overmixing the batter. How to fix an undercooked loaf? If your loaf is undercooked, bake it longer. Cover it with foil to avoid burning the top. Check every five minutes with a toothpick until it comes out clean. Can I use another type of oil? Yes, you can use vegetable oil or butter instead of coconut oil. Just keep the amount the same. Each oil adds a unique flavor and texture. What can I substitute for eggs? You can use unsweetened applesauce or mashed bananas as egg substitutes. Use 1/4 cup for each egg. This will help keep the bread moist and flavorful. For the complete recipe, check out the Full Recipe section. This blog post covered how to make delightful strawberry banana bread. We reviewed ingredients, substitutions, and baking steps. You learned tips for perfect texture and flavor, plus variations for dietary needs. Proper storage and common questions were also addressed. Now, you can bake scrumptious bread and impress everyone. Trust these simple steps, and enjoy your baking journey!](https://spoonfulsavory.com/wp-content/uploads/2025/06/0d8f0e92-aa9e-4e4c-988c-47934340abdf.webp)
If you love a moist, sweet treat, you’ll adore this Strawberry Banana Bread recipe. It’s easy to make and uses
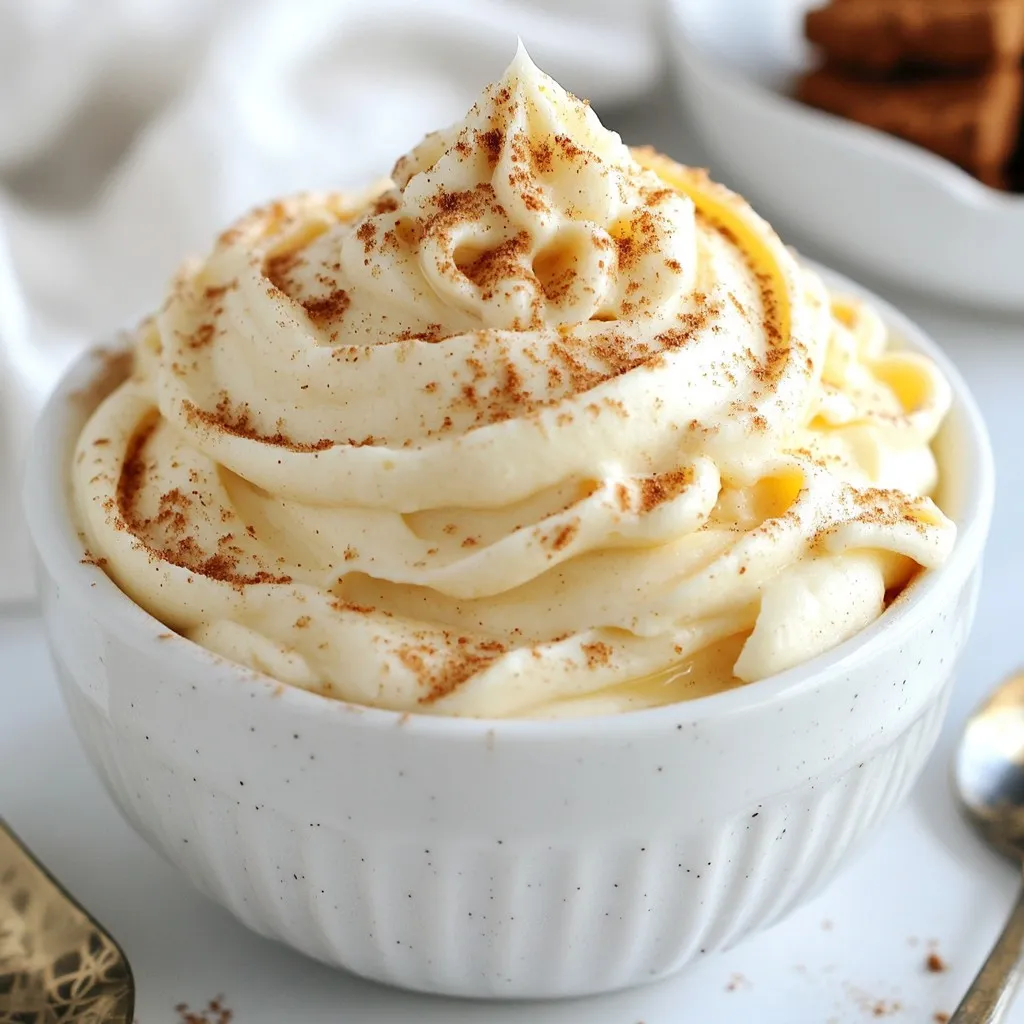
Are you ready to elevate your holiday treats? Gingerbread buttercream frosting is a game-changer. With rich spices and a creamy
![- 2 cups rolled oats - 1 cup natural peanut butter - 1/2 cup honey or maple syrup These main ingredients create a solid base. Rolled oats give the bars chewiness. Peanut butter adds creaminess and protein. Honey or maple syrup brings natural sweetness and binds everything together. This mix works great for a quick snack. - 1/2 cup packed brown sugar - 1/2 teaspoon salt - 1 teaspoon pure vanilla extract Adding brown sugar boosts sweetness. Salt enhances all flavors, making them pop. Vanilla extract provides depth and warmth. These extra ingredients transform simple bars into a tasty treat. - 1/4 cup mini chocolate chips - 1/4 cup chopped nuts (walnuts or almonds) Mix-ins add fun flavors and textures. Mini chocolate chips create bursts of sweetness. Chopped nuts give crunch and healthy fats. Feel free to add any of these for a personal touch. For full details, check the [Full Recipe]. - Preheat the oven to 350°F (175°C). - Line an 8x8-inch baking dish with parchment paper. - In a large bowl, whisk together 2 cups rolled oats, 1/2 cup packed brown sugar, and 1/2 teaspoon salt. - In a separate microwave-safe bowl, warm 1 cup natural peanut butter and 1/2 cup honey (or maple syrup) for about 30 seconds in the microwave. - Stir the warm peanut butter mixture and 1 teaspoon pure vanilla extract until smooth. - Pour this mixture over the dry oat mixture. Mix well to combine all ingredients. If you like, fold in 1/4 cup mini chocolate chips and 1/4 cup chopped nuts at this point. - Transfer the mixture to the lined baking dish. Press it down firmly and evenly with a spatula or your hands. - Bake for 20-25 minutes until the edges turn a lovely golden brown. - Allow the dish to cool completely on a wire rack before lifting the bars out using the parchment overhang. Cut them into squares or rectangles. For the Full Recipe, remember these steps and ingredients will guide you to a tasty snack! To get the best texture for your Peanut Butter Oatmeal Bars, press the mixture down evenly. Use your hands or a spatula. This helps the bars hold together. After baking, let them cool in the dish. Cooling helps the bars firm up and makes cutting easier. Want to kick up the flavor? Try adding spices like cinnamon or nutmeg. A splash of almond extract also works well. If you want something different, swap out chocolate chips for dried fruits or seeds. You can use raisins or cranberries for a fruity twist. To make your bars look nice, arrange them on a decorative plate. For added flair, drizzle melted chocolate over the top. This makes the bars pop and adds sweetness. You can also sprinkle extra chopped nuts on top for a nice touch. {{image_4}} You can switch up the peanut butter for other nut butters. Try almond butter or sunflower seed butter for a fun twist. Each option gives a unique taste. You can also change the sweetener. Use agave syrup or coconut sugar instead of honey or maple syrup. These swaps can add new flavors and sweetness levels to your bars. Adding dried fruits can boost flavor and nutrition. Try mixing in raisins or cranberries for a chewy texture. You can also use seeds like chia or flaxseed. They add extra fiber and healthy fats. These add-ins make your bars even more delicious and nutritious. If you're gluten-free, use certified gluten-free oats. They provide the same great taste without gluten. You can also make these bars vegan. Simply substitute honey with maple syrup. This keeps your bars sweet without animal products. For the full recipe, check out the detailed instructions above. To keep your Peanut Butter Oatmeal Bars fresh, use airtight containers. Glass or plastic containers work well. You can also wrap them in plastic wrap. This helps keep moisture in and air out. You can store the bars at room temperature. They will stay fresh for a few days. If you want them to last longer, place them in the fridge. Chilling them makes the bars firmer and easier to cut. When stored properly, these bars can last up to one week at room temperature. In the fridge, they can last up to two weeks. Look for signs that the bars have spoiled. If they smell off or have mold, it’s time to toss them. Changes in color or texture can also mean they are not safe to eat. Always check before enjoying your snack! Yes, you can make these bars ahead. They stay fresh for up to a week. Store them in an airtight container at room temperature. For longer storage, place them in the fridge. If you want to reheat them, just pop them in the microwave for a few seconds. This warms them up nicely and keeps them soft. To avoid crumbly bars, make sure to press the mixture down firmly. Use your hands or a spatula to create a compact layer in the baking dish. Also, let the bars cool in the dish. Cooling helps them set, making them firmer. If they still crumble, try adding a bit more peanut butter or honey to bind them better. Yes, you can freeze these bars! After they cool completely, cut them into squares. Wrap each bar in plastic wrap and place them in a freezer bag. Label the bag with the date. To thaw, take out a bar and leave it in the fridge overnight. You can also microwave it for about 30 seconds. Enjoy the convenience of having a tasty snack ready anytime! In this blog post, we explored the world of peanut butter oatmeal bars. We covered key ingredients, step-by-step instructions, and tips for the perfect texture. You learned about variations, storage best practices, and how to answer common questions. These bars are versatile and easy to make. They’re a healthy snack for any day. Try using different nut butters or sweeteners to find your favorite twist. Enjoy making these delicious treats!](https://spoonfulsavory.com/wp-content/uploads/2025/06/e8011912-e41c-40c3-bed2-bb90d6206017.webp)
Looking for a quick and healthy snack? These Peanut Butter Oatmeal Bars are just the answer! Packed with wholesome ingredients
![To make chocolate dipped pretzels, you need just a few simple items. Here’s what you’ll need: - 1 cup pretzel rods or twists - 1 cup semi-sweet chocolate chips - 1 tablespoon coconut oil (or shortening) These ingredients form the base of your sweet and salty snack. The pretzels provide a nice crunch, while the chocolate adds rich flavor. You can use different types of chocolate for dipping. I recommend semi-sweet chocolate chips for a classic taste. Milk chocolate gives a sweeter touch, while dark chocolate adds depth. You can even mix two types for a fun flavor twist. Get creative with your toppings! Here are some ideas: - 1/2 cup crushed nuts (such as almonds, peanuts, or hazelnuts) - 1/4 cup colorful sprinkles (optional) - Sea salt (for optional sprinkling) These toppings can enhance your snack. Nuts add crunch, sprinkles bring color, and sea salt balances the sweetness. Feel free to experiment with your favorite flavors! For the full recipe, check out the detailed instructions. Start by lining a baking sheet with parchment paper. This keeps the pretzels from sticking. It also makes cleanup easy. Place the sheet on a flat surface. Make sure you have enough space to work. In a microwave-safe bowl, combine the chocolate chips and coconut oil. The oil helps the chocolate melt smoothly. Microwave the bowl in 30-second bursts. Stir the chocolate after each burst. Continue this until the chocolate is fully melted. It should be shiny and smooth. Grab a pretzel by one end. Dip it into the melted chocolate. Let the extra chocolate drip off back into the bowl. If you want a thicker layer, dip it again. This gives you a rich chocolatey taste. After dipping, add your toppings right away. Sprinkle on the crushed nuts or colorful sprinkles. A touch of sea salt adds a nice twist. Place the dipped pretzels on the lined baking sheet. Make sure they are spaced apart. Once all pretzels are coated, put the sheet in the fridge. Let them chill for about 30 minutes. This will harden the chocolate. When firm, your chocolate dipped pretzels are ready to enjoy! Serve them right away, or store them in an airtight container. To get that smooth chocolate layer, use quality chocolate chips. I prefer semi-sweet for its rich flavor. Add coconut oil to make the chocolate glossy and easy to dip. Heat the chocolate in 30-second bursts in the microwave. Stir well after each burst. This helps avoid burning the chocolate. Make sure it cools a bit before dipping the pretzels. This way, the chocolate won’t slide off. After dipping, let your creativity shine! Use crushed nuts like almonds or peanuts for a crunchy touch. Colorful sprinkles add fun and color. If you want a sweet and salty mix, sprinkle a bit of sea salt on top. You can also drizzle melted white chocolate over the dipped pretzels for a beautiful design. Each pretzel can be unique, so have fun with your toppings! These pretzels fit any event! For parties, serve them on a fun platter. Arrange different toppings in small bowls for your guests. They can create their own masterpiece! For movie nights, serve them in cute bags or bowls. You can even box them as gifts for friends or family. Everyone loves a treat made with love! For a holiday, use themed sprinkles or colors to match the season. Check out the Full Recipe for a simple guide to making these delicious snacks! {{image_4}} You can change up your chocolate choice for dipping. Try dark chocolate for a richer taste. Milk chocolate offers a sweeter flavor. If you want a fun twist, use white chocolate. Each option adds its own flair to your pretzels. You can even mix chocolates for a unique blend! Get creative with toppings! Crushed nuts like almonds or peanuts add crunch. For a pop of color, use colorful sprinkles. You can also sprinkle sea salt for a sweet and salty mix. Want a zesty touch? Try coconut flakes or crushed pretzels for extra texture. The options are endless! Pretzels come in many shapes. You can use rods or twists for your chocolate dip. For a fun party, try mini pretzels or pretzel sticks. Each shape gives a different look and bite. Choose what fits your occasion best! For a full recipe, refer to the [Full Recipe]. Store your chocolate dipped pretzels in an airtight container. This keeps them fresh and tasty. If you stack them, place parchment paper between layers. This helps prevent sticking. Chocolate dipped pretzels last about one week at room temperature. They may last longer in the fridge, up to two weeks. However, cold storage can change the texture. If stored in a cool, dry place, they stay crunchy and delicious. You can freeze chocolate dipped pretzels for up to three months. Place them in a single layer on a baking sheet first. Once frozen, transfer them to a freezer bag. Remove as much air as possible. When you're ready to eat them, thaw in the fridge or at room temperature. Enjoy your treats! For the full recipe, check the main article. Yes, you can use white chocolate. It melts well and tastes great. Just follow the same steps as when using semi-sweet chocolate. You might want to add some flavors, like vanilla, to enhance the taste. White chocolate pairs nicely with nuts and sprinkles, too. To keep chocolate smooth, use coconut oil. It helps chocolate stay fluid longer. Heat the chocolate gently and stir often. You can also work in small batches. This way, you dip each pretzel before the chocolate cools. You can find high-quality chocolate-dipped pretzels at specialty shops or online. Look for brands that use real chocolate. Local bakeries may also offer fresh options. Always check reviews to ensure you get a good product. Yes, you can make these pretzels ahead of time. Store them in an airtight container. They last up to two weeks at room temperature. If you plan to keep them longer, consider freezing them. Just thaw at room temperature before serving. You can find the Full Recipe to guide you through the steps. You learned how to make chocolate-dipped pretzels. We covered essential ingredients, including chocolate types and toppings. I shared step-by-step instructions to perfect your dipping skills. Tips on serving and creative decoration add fun. You saw flavor variations and storage advice to keep pretzels fresh. Now, get started on your sweet treat. Enjoy the process and share your results. Happy dipping!](https://spoonfulsavory.com/wp-content/uploads/2025/06/ea67ce71-943d-491b-9355-477bdeab0a50.webp)
If you love salty and sweet snacks, you’ll adore my Chocolate Dipped Pretzels recipe! This treat combines crunchy pretzels with
![- 1 lb (450g) shredded rotisserie chicken - 1/2 cup buffalo sauce - 1/4 cup ranch dressing - 8 slider rolls - 1/2 cup blue cheese crumbles - 1 cup coleslaw - Olive oil, salt, and pepper to taste - Feta cheese as a substitute for blue cheese - Homemade coleslaw recipe suggestions These ingredients are key for your buffalo chicken sliders. The rotisserie chicken saves you time and adds great flavor. The buffalo sauce gives that spicy kick. You can adjust the heat with the buffalo sauce to suit your taste. Ranch dressing adds creaminess and balances the heat. The slider rolls hold everything together, making them easy to eat. Blue cheese crumbles give a nice tang, while coleslaw adds crunch. If you want a milder taste, you can swap blue cheese for feta. You can also make your own coleslaw for a fresh touch. Use your favorite recipe or try a mix of cabbage and carrots with some mayo. These details make the dish special. For the full recipe, refer to the section above. Start by mixing the shredded chicken with the buffalo sauce. You want to get every piece coated well. Season the mix with salt and pepper. This adds flavor and balances the heat from the sauce. In a small bowl, combine the ranch dressing and blue cheese crumbles. Stir until the blue cheese blends into the ranch. This sauce gives the sliders a tasty and creamy twist. Next, heat a skillet over medium heat. Add a tablespoon of olive oil to the skillet. Once the oil shimmers, add the buffalo chicken mix. Stir occasionally for about 4 to 5 minutes. You want the chicken hot and the flavors mixed. While the chicken cooks, slice the slider rolls in half. Toast them until they turn golden brown. You can use a grill pan or toaster oven for this. Toasting adds a nice crunch and holds the filling better. On the bottom half of each toasted roll, add a generous scoop of the buffalo chicken. Then, add a dollop of your creamy sauce. Top it off with a small handful of coleslaw. This gives your sliders a fresh crunch and great flavor. Finally, cap each slider with the top half of the roll. If you like, cut each slider in half. Serve them with fresh celery sticks for a crisp, tasty side. Enjoy your flavorful Buffalo Chicken Sliders with a Creamy Twist! For the complete recipe, see the [Full Recipe]. To make your Buffalo Chicken Sliders pop, coat the chicken well with buffalo sauce. Use a large bowl for mixing. This helps ensure every piece of chicken gets that spicy kick. If you like it hot, add more buffalo sauce. If you prefer it milder, use less. Buffalo Chicken Sliders pair great with crunchy sides. Try serving them with carrot sticks or sweet potato fries. For a fun twist, add a side of pickles. To make your sliders look even better, arrange them on a colorful platter. Add a small bowl of ranch dressing for dipping. This adds flair and makes it extra delicious. Want to save time? Use rotisserie chicken instead of cooking your own. It’s already cooked and ready to go. This cuts down your prep time, making it easy to whip up these sliders in just 25 minutes. {{image_4}} You can change the heat level of your Buffalo chicken sliders easily. Just adjust the hot sauce. If you want them milder, use less sauce or add some ranch dressing. For a twist, try using BBQ sauce or Sriracha instead of the buffalo sauce. Each option gives a new taste and keeps it fun. Want to make your sliders gluten-free? Just swap the regular slider rolls for gluten-free ones. You can also make a tasty vegetarian version. Use cauliflower or chickpeas instead of chicken. Just mix them with the buffalo sauce, and you're good to go! These options make sure everyone can enjoy the sliders. You can make mini sliders for a fun party snack, or stick with regular-sized sliders for a meal. If you're feeling creative, try making Buffalo chicken flatbreads. Use flatbread instead of slider rolls, and layer the chicken, sauce, and toppings on top. It’s a great way to serve a crowd! For the full recipe, check out the [Full Recipe]. To keep your Buffalo Chicken Sliders fresh, store them in an airtight container. This method helps prevent drying out. Make sure to separate the sliders if you can. This keeps the rolls from becoming soggy. When it comes time to reheat, use an oven. Preheat it to 350°F (175°C). Place the sliders on a baking sheet. Heat for about 10-15 minutes. This method helps keep the rolls crispy and warm. You can also use a microwave for convenience. Just heat them for 30 seconds to 1 minute. However, this may make the rolls soft. You can freeze the sliders for later. To do this, assemble them without the coleslaw. Wrap each slider tightly in plastic wrap. Then, place them in a freezer bag. This way, they keep their flavor and texture better. If you want to freeze just the filling, put it in a freezer-safe container. This option is great if you want to make sliders fresh later. When you're ready to enjoy them, thaw the sliders in the fridge overnight. For the filling, heat it in a skillet until warm. Reassemble the sliders with fresh rolls and coleslaw. This will give you that fresh taste, just like the first time! You can use feta cheese instead of blue cheese. Feta gives a milder taste. Creamy goat cheese works well too. You may also try cheddar cheese for a sharper flavor. Each option brings its own twist to the sliders. Yes, you can prepare Buffalo Chicken Sliders in advance. Cook the chicken mixture and store it in the fridge. You can also toast the rolls ahead. When ready to serve, just heat the chicken and assemble the sliders fresh. This saves time during gatherings. These sliders pair well with crunchy veggie sticks. Carrot and celery sticks are great choices. You can also serve chips or fries on the side. For drinks, try a cold soda or light beer. These options balance the flavors nicely. To boost the heat, add more buffalo sauce. You can stir in hot sauce for extra kick. Another idea is to mix in diced jalapeños. If you like it really spicy, try using spicy ranch instead of regular ranch. This will elevate your sliders! Buffalo chicken sliders are simple, tasty, and fun to make. You start with shredded chicken, mix in buffalo sauce, and layer it with tangy sauce and crunchy coleslaw. You can tweak flavors or make them vegetarian to suit your taste. These sliders are great for any gathering. Store any leftovers well for future snacks. Follow these steps and tips, and you’ll impress everyone with your new dish. Enjoy your slider adventure!](https://spoonfulsavory.com/wp-content/uploads/2025/06/c22eae92-5c0b-492d-a27b-09545ff2951a.webp)
Are you ready to spice up your snack game? These Buffalo Chicken Sliders are not only easy to make but
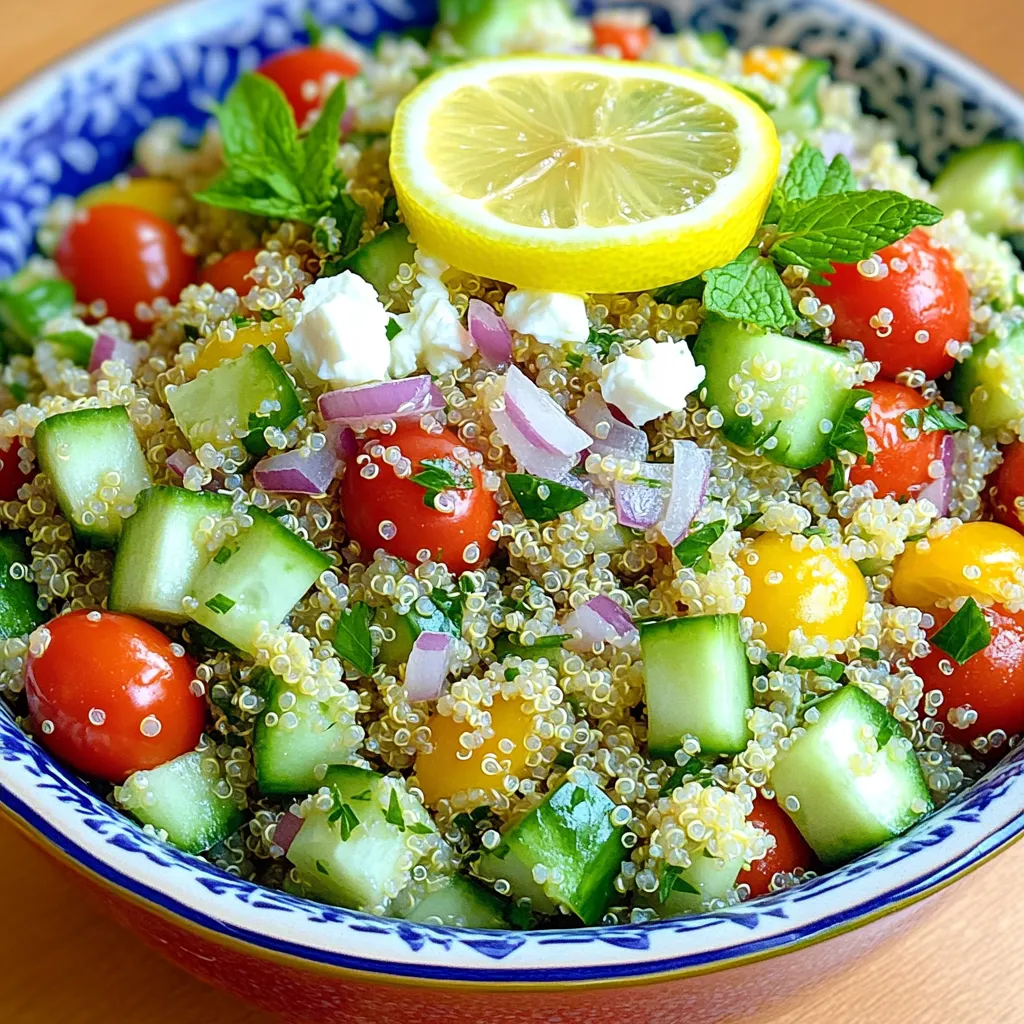
Looking for a zesty, healthy dish? My Lemon Herb Quinoa Salad packs a punch of flavor and freshness. It’s perfect
![- 2 pounds Yukon Gold potatoes - 4 cloves garlic - 1 cup sharp cheddar cheese - ½ cup cream cheese - ½ cup unsalted butter - ½ cup whole milk - Salt and pepper - ¼ cup fresh chives Cheesy garlic mashed potatoes need simple and fresh ingredients. The Yukon Gold potatoes give a smooth texture. They have a natural buttery flavor. Garlic adds a bold kick. Sharp cheddar cheese brings richness and depth. I choose cream cheese for its tangy taste. Unsalted butter makes the dish creamy and rich. Whole milk adds the right amount of moisture. Seasoning with salt and pepper enhances all the flavors. Fresh chives add color and a mild onion taste. Use this full recipe to gather your ingredients. I promise, these cheesy garlic mashed potatoes will delight your taste buds! Start by preparing your pot. Choose a large, heavy pot. Place the cubed Yukon Gold potatoes inside. Cover them with cold water, ensuring the potatoes are fully submerged. Add a generous pinch of salt to the water. Bring the pot to a vigorous boil over medium-high heat. Once boiling, reduce the heat. Maintain a gentle simmer. Cook the potatoes until they are fork-tender, which takes about 15 to 20 minutes. You can check doneness by poking a potato with a fork. If it slides off easily, the potatoes are ready. While the potatoes cook, prepare the garlic-infused butter. In a small saucepan, melt the unsalted butter over low heat. Keep an eye on it until it becomes frothy. Then, add the minced garlic. Cook for 1 to 2 minutes while stirring frequently. You want the garlic to be fragrant but not browned. Take the saucepan off the heat and set it aside. This step gives your mashed potatoes a rich, garlicky flavor. Once the potatoes are tender, drain them in a colander. Return them to the pot while they’re still hot. Use a potato masher or a ricer to mash the potatoes. Aim for a smooth and creamy texture, free of lumps. Next, pour in the melted garlic butter. Add the softened cream cheese and freshly grated sharp cheddar cheese. Pour in the warmed milk. Stir the mixture vigorously until everything is combined and the cheese melts completely. If the potatoes seem too thick, add a splash more of milk for a velvety finish. Finally, season your mashed potatoes generously with salt and freshly cracked black pepper. Taste and adjust the seasoning as needed. For a beautiful presentation, transfer the cheesy garlic mashed potatoes to a serving bowl. Top with chopped fresh chives for a pop of color. Enjoy this delightful dish! For the full recipe, visit the [Full Recipe]. Yukon Gold potatoes shine for mashed potatoes. They are creamy and buttery. Other potatoes, like Russets, can be dry and fluffier. Yukon Golds hold moisture well, giving you a rich texture. Their smooth skin also means less peeling. You get a great taste with less effort. Cheese can take your mashed potatoes to new heights. Sharp cheddar cheese adds a tangy depth. Cream cheese creates a smooth and creamy experience. You can also try mozzarella for a stretchy pull. Gruyere offers a nutty flavor that pairs well too. Mix and match to find your favorite combo! The right balance makes all the difference. Start with Yukon Golds for creaminess. Add warm milk for a smooth blend. Use garlic-infused butter for a savory kick. Don't forget to season well with salt and pepper. Taste as you mix to get it just right. Adjust until you find your perfect flavor. You want every bite to be simply delightful! {{image_4}} You can easily customize cheesy garlic mashed potatoes. Adding crispy bacon gives a salty crunch. Fresh herbs like rosemary or thyme add a burst of flavor. Roasted garlic creates a deeper taste. Just mix these ingredients in when you combine the cheeses. The flavors will blend beautifully, making your dish unique. For gluten-free options, this recipe is naturally safe. Just check your cheese and butter labels. If you want low-carb, substitute potatoes with cauliflower. Steam the cauliflower until soft, then mash it like potatoes. You can still enjoy creamy goodness without the carbs. These mashed potatoes pair well with many dishes. Serve them alongside grilled chicken or steak for a hearty meal. They also complement roasted vegetables beautifully. You can even use them as a base for a savory stew. The creamy texture makes every bite delightful. For more ideas, check out the Full Recipe to find inspiration. To store cheesy garlic mashed potatoes in the refrigerator, let them cool first. Place them in an airtight container. This keeps them fresh and tasty. They will last about three to five days in the fridge. When you want to eat them, just take out the amount you need. If you want to save them longer, freezing is a great option. Use a freezer-safe container or a heavy-duty freezer bag. Make sure to remove as much air as possible before sealing. Label the bag with the date. You can freeze them for up to three months. When you’re ready to eat, thaw them overnight in the fridge. Reheat in the oven or microwave, adding a splash of milk to keep them creamy. For the best taste, enjoy your cheesy garlic mashed potatoes within a few days. Storing them properly helps keep their rich flavor and creamy texture. If they start to smell off or look strange, it's best to toss them. Always trust your senses to judge freshness. You can make cheesy garlic mashed potatoes a day in advance. Just follow the recipe and let them cool. Store them in an airtight container in the fridge. When you’re ready to serve, reheat them gently on the stove or in the oven. Add a splash of milk to keep them creamy. Yes, you can. Feel free to swap sharp cheddar with other cheeses. Try Gruyère for a nutty flavor or mozzarella for stretchiness. Each cheese brings a new taste. Just ensure the cheese melts well for the best texture. Yes, you can make vegan cheesy garlic mashed potatoes. Use vegan butter and plant-based cream cheese. Replace regular cheese with a vegan cheese alternative. You can also add nutritional yeast for a cheesy flavor. This way, everyone can enjoy this dish! If your mashed potatoes are too thick, add a little warm milk. Stir until you reach your desired consistency. You can also add more melted vegan butter or cream cheese for creaminess. Adjust it slowly to avoid making them too runny. To reheat without drying, use low heat. Add a splash of milk while reheating. Stir gently to combine the milk. This will help restore the creamy texture. You can use the stove, microwave, or oven. Just be careful not to overheat them. This blog post covered how to make cheesy garlic mashed potatoes from scratch. We looked at key ingredients like Yukon Gold potatoes, garlic, and cheddar cheese. I shared step-by-step instructions for cooking and mashing, plus tips for the best flavor and texture. Variations and storage tips enhance your cooking experience. Incorporate these ideas to create a tasty dish for any meal. Enjoy the process and impress everyone with your cooking!](https://spoonfulsavory.com/wp-content/uploads/2025/06/d0d34f4e-38a4-47c3-8865-0e18d0b60f1f.webp)
Are you ready to elevate your comfort food game? Cheesy Garlic Mashed Potatoes are a world of creamy, cheesy goodness
