Skip to content
DisclaimerTerms Of UseGDPR PolicyCookie Policy

spoonfulsavory

  • Home
  • Drinks
  • Appetizers
  • Dinner
  • Dessert
  • About
  • Contact
  • Privacy Policy
DisclaimerTerms Of UseGDPR PolicyCookie Policy

Sarah

To make savory spinach artichoke pasta, you need these key ingredients: - 12 oz pasta (preferably penne or fettuccine) - 1 cup fresh spinach, roughly chopped - 1 cup canned artichoke hearts, drained and coarsely chopped - 1 cup heavy cream - 1 cup mozzarella cheese, freshly shredded - 1/2 cup Parmesan cheese, finely grated - 2 cloves garlic, minced - 2 tablespoons extra virgin olive oil - 1 teaspoon Italian seasoning blend - Salt and freshly ground pepper to taste - Fresh basil leaves for garnish For the best results, I suggest using: - Pasta: Barilla or De Cecco for quality and texture. - Artichoke Hearts: Roland for consistent flavor. - Cream: Organic Valley for rich creaminess. - Cheeses: Whole Foods 365 brand for fresh mozzarella and Parmesan. You can easily swap out some ingredients if needed: - Pasta: Use gluten-free pasta for a gluten-free option. - Heavy Cream: Substitute with coconut cream for a dairy-free version. - Cheese: Swap mozzarella with vegan cheese for a plant-based dish. - Spinach: Kale or arugula work if you want a different green. - Garlic: Garlic powder can replace fresh garlic in a pinch. This list covers everything you need for a tasty meal. For the full recipe, check out the details above! To make this creamy spinach artichoke pasta, start by cooking your pasta. Fill a large pot with water and add a good amount of salt. Bring the water to a rolling boil. Add 12 ounces of your favorite pasta, like penne or fettuccine. Cook it until it’s al dente, which usually takes about 8-10 minutes. Drain the pasta and place it in a large mixing bowl. Next, heat 2 tablespoons of extra virgin olive oil in a spacious skillet over medium heat. Add 2 cloves of minced garlic and sauté for about 1 minute. Watch the garlic closely so it doesn’t burn. Then, add 1 cup of canned artichoke hearts, drained and chopped. Sauté for an additional 2 to 3 minutes, letting the artichokes heat through and release their flavor. Now, pour in 1 cup of heavy cream. Stir well and let it simmer for about 3-4 minutes until it thickens a bit. Reduce the heat to low and add 1 cup of freshly shredded mozzarella cheese, stirring until it melts into a creamy sauce. Add 1 cup of roughly chopped fresh spinach and 1 teaspoon of Italian seasoning. Cook this for another 2-3 minutes until the spinach wilts down. Carefully fold in your cooked pasta until it’s well coated in the creamy mixture. Season with salt and pepper to taste. Finally, remove the skillet from heat and stir in 1/2 cup of finely grated Parmesan cheese. Let it rest for a few minutes to thicken. Serve hot, garnished with fresh basil leaves. To ensure your pasta is perfectly cooked, always taste a piece before draining. It should be firm but not hard. When cooking the spinach, keep an eye on its color. It should turn bright green and wilt down. If you find your sauce too thick, add a splash of pasta water to loosen it up. To make this process easier, consider watching a video tutorial. Visuals can guide you through each step. You can also find helpful images online that show the texture you want for each stage of cooking. If you want a detailed recipe, check out the Full Recipe for more insights! To make your spinach artichoke pasta shine, use fresh herbs. Basil adds a bright taste. Italian seasoning brings warmth. Salt and pepper enhance all flavors. Remember to taste as you go. This helps you find the perfect balance for your dish. One common mistake is overcooking the pasta. Always cook it until al dente. This keeps it firm and helps it hold sauce better. Another mistake is adding cheese too early. Wait until your sauce is thick before mixing it in. This ensures a smooth and creamy texture. Sauté garlic in olive oil until fragrant, but don’t let it burn. This adds a rich flavor. When adding spinach, stir gently. This helps it wilt without turning mushy. Finally, let your pasta sit for a couple of minutes after mixing. This thickens the sauce, making every bite delicious. For the complete recipe, you can check the Full Recipe link above. {{image_4}} You can easily make this dish vegetarian by skipping the cheese. Use cashew cream for a rich flavor. For a vegan twist, swap the heavy cream with coconut milk. Nutritional yeast adds a cheesy taste without dairy. You can also use vegan cheese as a substitute. The flavors still shine through, making it a tasty meal. If you need to avoid gluten, use gluten-free pasta. There are many options like rice or chickpea pasta. They cook well and hold sauces nicely. Just check the cooking time, as it may differ. This change keeps the dish creamy and satisfying without gluten. To elevate the dish, add some sun-dried tomatoes or olives. They bring a nice zing to the creamy sauce. You can also toss in some cooked chicken or shrimp for extra protein. Fresh herbs like parsley or dill can brighten up the flavors. Experimenting with these additions makes each bite a new experience. For the full recipe, check back to our earlier section! To keep your creamy spinach artichoke pasta fresh, store it in an airtight container. Make sure it cools to room temperature before sealing. This helps prevent condensation, which can make it soggy. You can keep it in the fridge for up to three days. If you notice any changes in color or smell, it’s best to discard it. When it's time to enjoy leftovers, reheat the pasta gently. Use a skillet over low heat. Add a splash of milk or cream to help revive the sauce. Stir often to prevent it from sticking. You can also use the microwave. Just cover the bowl and heat in short bursts, stirring in between. This keeps the dish creamy. If you want to save it for later, you can freeze the pasta. Place it in a freezer-safe container and leave some space at the top for expansion. It can last up to three months in the freezer. To thaw, move it to the fridge overnight. Then reheat as mentioned before. This way, you’ll still enjoy that rich, creamy taste! The best pasta shapes for Spinach Artichoke Pasta are penne or fettuccine. These shapes hold the creamy sauce well. Penne has ridges that catch the sauce, making each bite flavorful. Fettuccine has a wide surface area that adds a silky touch. You can use other pasta shapes too, but these two work best. Yes, you can make this dish ahead of time. Cook the pasta and sauce separately. Store them in the fridge until you’re ready to eat. When you want to serve, combine them in a skillet. Warm it gently on low heat. This method keeps the pasta from getting soggy. To add spice, you can use red pepper flakes. Stir in a teaspoon for a kick. If you want more protein, try adding grilled chicken or shrimp. Cook the protein first, then mix it in with the pasta. This way, you’ll have a hearty meal that’s still quick and easy. For the full recipe, check out the details above. This blog post covered everything you need for Spinach Artichoke Pasta. We discussed key ingredients, cooking steps, and expert tips. You learned how to avoid common mistakes and explored tasty variations. Storing your leftovers and reheating tips ensure you can enjoy this dish later. Remember, using the right pasta shape can elevate your meal. With this guide, you can make a delicious dish every time. Now, go ahead and create your perfect Spinach Artichoke Pasta!

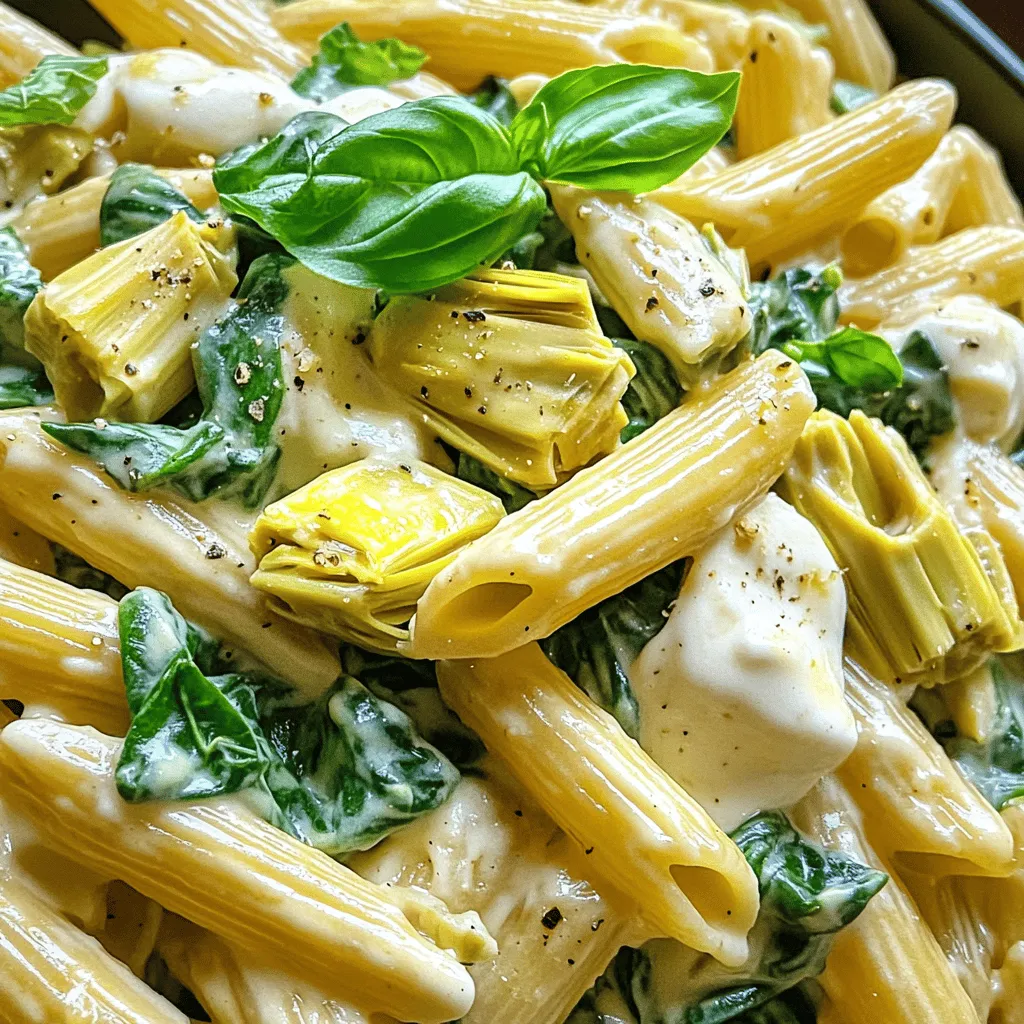
Savory Spinach Artichoke Pasta Simple and Quick Meal

Ready to whip up a quick and tasty meal? My Savory Spinach Artichoke Pasta is easy to make and packed

- 1 lb ground beef or turkey - 1 can (15 oz) black beans, drained and rinsed - 1 can (15 oz) corn, drained - 1 can (14.5 oz) diced tomatoes with green chilies - 1 packet (1 oz) taco seasoning - 1 cup salsa The main ingredients create a hearty base for your Easy Taco Casserole. You can choose ground beef or turkey based on your taste. Black beans and corn add fiber and texture. Diced tomatoes bring in a nice flavor. Taco seasoning and salsa are key for that classic taco taste. - 2 cups tortilla chips, slightly crushed - 1 cup shredded cheddar cheese - 1/2 cup sour cream - 1/4 cup fresh cilantro, chopped (for garnish) Cheddar cheese melts beautifully and gives a rich flavor. Sour cream adds creaminess to balance the spices. Fresh cilantro brightens the dish and adds freshness. The crushed tortilla chips give a nice crunch. - Optional toppings: sliced jalapeños, diced avocado, or olives - Ingredient substitutions: Use black-eyed peas instead of black beans for a twist. Swap sour cream with Greek yogurt for a healthier option. These tips help you customize your casserole. Try adding toppings for a fun twist. You can easily adjust ingredients to fit your dietary needs. For more details, check the Full Recipe. - Preheating the oven: Start by preheating your oven to 350°F (175°C). Make sure the rack is in the center. This helps the casserole cook evenly. - Cooking the meat: In a large skillet, add 1 lb of ground beef or turkey over medium heat. Use a spatula to break the meat apart as it cooks. You want to brown it well, which takes about 5-7 minutes. If there's too much fat, drain it off. This keeps your casserole from being greasy. - Layering tortilla chips and meat mixture: Grease a 9x13 inch baking dish. Start with half of the crushed tortilla chips at the bottom. Then, spoon half of the meat mixture over the chips, spreading it evenly. - Adding cheese layers: Sprinkle half of the shredded cheddar cheese over the meat layer. Repeat this process with the remaining tortilla chips, meat, and finish with the last half of the cheese. This creates a tasty, cheesy topping. - Baking time and temperature: Place the baking dish in the preheated oven. Bake for 20-25 minutes. The cheese should be melted, bubbly, and slightly golden. Keep an eye on it to avoid over-browning. - Cooling and serving tips: Once baked, take the casserole out of the oven. Let it cool for a few minutes before serving. Drizzle sour cream on top and garnish with fresh cilantro. This adds a burst of flavor and color. For more detailed steps, refer to the Full Recipe. - Preventing a greasy casserole: To keep your casserole from being greasy, drain any excess fat after cooking the meat. This small step can make a big difference. Use a paper towel to absorb any remaining grease before mixing in the other ingredients. - Ensuring even cooking: Make sure to preheat your oven. This helps the cheese melt nicely and the casserole cook evenly. Position the rack in the center to avoid hot spots. Keep an eye on it while baking, as ovens can vary in temperature. - Presentation ideas for serving: Serve the casserole straight from the baking dish. This gives a cozy, homey touch. For a more polished look, scoop portions onto colorful plates. Top each serving with extra cilantro for a fresh pop of color. - Pairing with sides and drinks: Pair the casserole with a simple side salad for balance. You can also add tortilla chips or a scoop of guacamole. For drinks, consider serving margaritas or a light soda to enhance the fiesta vibe. - Recommended kitchen equipment: Use a large skillet for cooking the meat and a spatula for stirring. A measuring cup is helpful for portioning salsa and cheese. - Suggested bakeware: A 9x13 inch baking dish works well for this recipe. Make sure it’s greased to prevent sticking. An oven mitt is a must when handling hot dishes. These tips will help you create a perfect Easy Taco Casserole that your family will love! For the complete guide, check out the full recipe. {{image_4}} You can easily swap out ground beef for chicken or turkey. This keeps the dish light and tasty. If you want a plant-based option, use lentils or black beans. This makes the casserole healthy and filling. For gluten-free options, choose corn tortilla chips instead of regular ones. You can also use gluten-free taco seasoning. To make it dairy-free, skip the cheese and sour cream. Use avocado instead for creaminess. To spice things up, add jalapeños or bell peppers. These ingredients give the casserole extra crunch and flavor. You can adjust the spice level to your liking. If you want it mild, skip the jalapeños. For a kick, add a sprinkle of cayenne pepper or hot sauce. This makes the dish fun for everyone at the table. Leftovers can be a delight! You can enjoy them in a burrito or taco. Just wrap the casserole mix in a tortilla with some fresh toppings. Another idea is to turn it into a quesadilla. Just spread the leftovers between two tortillas and grill until crispy. This gives you a new dish without much effort. To store your taco casserole, let it cool first. Then, cover it tightly. Use plastic wrap or aluminum foil. This keeps it fresh in the fridge. It’s best to eat it within 3-4 days. If you want to keep it longer, freezing works well. For freezing, cut the casserole into portions. Place each piece in a freezer-safe container. You can also wrap them in foil. This makes it easy to reheat later. When you’re ready, simply thaw it in the fridge overnight. To reheat the casserole, the oven is best. Preheat your oven to 350°F. Place the casserole in an oven-safe dish. Add a splash of salsa or broth to keep it moist. Cover it with foil to prevent drying out. Heat for about 20-25 minutes, or until hot. You can also use the microwave. Place a portion in a microwave-safe bowl. Cover with a damp paper towel to trap steam. Heat in 1-minute increments until warm. In the fridge, taco casserole lasts about 3-4 days. If frozen, it can last for up to 3 months. Always check for signs of spoilage. Look for any strange smells or mold. If it smells off or looks funny, toss it. Enjoy your taco fiesta with confidence! You can swap ground beef or turkey with plant-based proteins. Here are some great options: - Crumbled tempeh - Lentils cooked in taco seasoning - Chopped mushrooms for a meaty texture These swaps keep the flavor while making it meat-free. Yes, you can prepare it ahead. Here’s how: 1. Cook the meat and mix with other ingredients. 2. Layer the casserole in the baking dish. 3. Cover and refrigerate for up to 24 hours. When ready, just bake it straight from the fridge. You may need to add a few extra minutes to the cook time. You can get creative with toppings! Here are some ideas: - Sliced jalapeños for heat - Chopped green onions for freshness - Sliced olives for a briny kick - Avocado or guacamole for creaminess These toppings add fun and flavor. Yes, it is! Here are some tips to make it even more appealing: - Use mild salsa or no salsa for less heat. - Skip spicy toppings like jalapeños. - Serve with a side of sour cream for dipping. Kids love the cheesy goodness and crunchy chips. You can find the full recipe for Taco Fiesta Casserole [here](#). Dive into all the details to make this tasty dish! In this post, we explored how to make a tasty Taco Fiesta Casserole. We looked at the key ingredients like ground meat and beans, with options for cheese and garnishes. We detailed simple steps for preparation and cooking. I shared tips to avoid common mistakes and suggested fun variations to suit your taste. Finally, we discussed how to store leftovers effectively. Cooking should be fun and easy, and with this casserole, you can enjoy a great meal anytime!

Easy Taco Casserole Quick and Tasty Family Dinner

Looking for a quick and tasty family dinner? You’ve come to the right place! This Easy Taco Casserole is packed

- 12 fresh jalapeños - 8 oz cream cheese, softened - 1 cup shredded sharp cheddar cheese - 1/2 cup breadcrumbs - 1/4 cup green onions, finely chopped - 2 cloves garlic, minced - 1 teaspoon smoked paprika - 1/2 teaspoon ground cumin - Salt and black pepper to taste - Olive oil, for drizzling To make the best baked jalapeño poppers, you need fresh ingredients. Start with 12 jalapeños that are firm and bright. The cream cheese should be soft to mix well with shredded cheddar. I like to use sharp cheddar for its strong taste. You can add breadcrumbs for a crunchy top. Green onions give a nice bite. Garlic brings a savory flavor. Smoked paprika and cumin add depth. Don't forget salt and pepper to enhance all the tastes. A drizzle of olive oil helps crisp the poppers as they bake. - Baking sheet - Mixing bowls - Parchment paper - Measuring cups and spoons - Spoon for scooping seeds Using the right tools makes cooking easier. A baking sheet is essential for even cooking. Mixing bowls help combine your ingredients well. Parchment paper keeps your sheet clean and prevents sticking. Measuring cups and spoons ensure precise amounts. A small spoon is handy for scooping out jalapeño seeds. With these tools, you'll create tasty poppers without any fuss. For the full recipe, check out the last section in this article. - Preheat your oven to 375°F (190°C). - Slice the jalapeños in half lengthwise. Use a small spoon to remove the seeds. Preparing the jalapeños is simple but key to the flavor. The heat comes from the seeds, so removing them helps make the dish more enjoyable. If you find the heat too strong, you can also scrape the white membrane inside. This part holds a lot of heat. - Blend the cream cheese with the shredded cheddar cheese. - Add the green onions, garlic, smoked paprika, cumin, salt, and black pepper. Making the filling is where the magic happens. The cream cheese gives a rich base. The cheddar adds sharpness. Mixing in green onions and garlic adds freshness. The spices bring warmth and depth, making every bite a delight. - Fill each jalapeño half with the cheese mixture. - Combine the breadcrumbs with olive oil, then sprinkle on top. - Bake for 20-25 minutes. Now comes the fun part—stuffing the jalapeños! Make sure they are filled generously. The breadcrumb topping adds a nice crunch. Baking them transforms everything. You want them to be tender and golden, with the cheese bubbling slightly. This step is crucial for a perfect snack. For the full recipe, check out the recipe details. Enjoy the process and savor the results! - Wear gloves when handling jalapeños. The oils can irritate your skin. - Ensure an even mix of ingredients for filling. This gives each bite a balanced taste. - Monitor baking time for a crispy top. Start checking around 20 minutes. - Allow cooling time for easier handling when serving. This helps the filling set. - Arrange on a platter. Create a beautiful display for guests. - Garnish with chopped green onions and sour cream. This adds color and flavor. These tips can make your baked jalapeño poppers a hit at any gathering. For the full recipe, check the link provided. Enjoy your cooking! {{image_4}} You can easily change the cheese in your poppers. Instead of cheddar, try using pepper jack. It adds a nice kick. Mozzarella is another tasty choice. It gives a rich, creamy texture. Mixing different cheeses can also boost flavor and fun. Want to make your poppers heartier? Add cooked bacon or sausage to the cheese mix. This adds a savory punch. You can also bring in fresh herbs like cilantro or dill. They give a bright taste that makes each bite special. Experimenting with fillings opens a world of flavors. If you prefer less heat, go for milder peppers. Poblano peppers work well for this. They add flavor without too much spice. For those who love heat, try adding hot sauce to the cheese filling. This way, you can customize your poppers just the way you like them. Store leftovers in an airtight container for up to 3 days. The poppers taste best when fresh, but they can still be enjoyed later. Make sure the container is sealed tight to keep them from drying out. Reheat in the oven for the best texture. Set the oven to 350°F (175°C) and bake for about 10 minutes. This helps restore their crunch. You can use the microwave as an alternative, but this might soften the poppers. If you're in a hurry, the microwave will work, but the crispiness may not be the same. You can freeze poppers before baking for up to 2 months. This is a great way to prepare snacks ahead of time. Just make sure to place them in a freezer-safe bag or container. Thaw in the fridge before baking for the freshest taste. This will help them cook evenly and maintain their flavor. If you want to try making these tasty bites, check out the Full Recipe for step-by-step guidance! Yes, you can prep and store them before baking. This saves time and makes serving easy. Just keep them in the fridge until you are ready to bake. Yes, use gluten-free breadcrumbs or crushed nuts. Both options work great and keep the flavor. Just make sure you mix them well with olive oil for crunch. Choose milder jalapeños or remove all seeds for less heat. This way, you control how spicy your poppers are. A little adjustment can change the whole snack. Consider ranch dressing, sweet chili sauce, or guacamole. These sauces balance the heat and add extra flavor. You can even mix and match for more fun. Bake for 20-25 minutes, until they are golden brown and crispy. Keep an eye on them to avoid burning. The right bake gives you the perfect crunch. Access the full recipe details including ingredients, steps, and tips. You now have all the steps to make tasty baked jalapeño poppers. From the fresh ingredients to the baking time, each part is important. Remember to keep the heat where you like it. Try different cheeses and fillings for fun options. If you have leftovers, cool them down and store them right. You can even prep ahead for an easy snack later. Enjoy serving these poppers at your next gathering or as a treat for yourself!

Baked Jalapeno Poppers Crunchy and Flavorful Snack

If you’re craving a snack that’s both crunchy and bursting with flavor, look no further than baked jalapeño poppers. These

- 3 medium apples (recommended: Fuji or Honeycrisp) - 1 teaspoon ground cinnamon - 1 tablespoon coconut sugar (optional) - A pinch of sea salt To make these healthy baked apple chips, you need just a few simple ingredients. I always choose Fuji or Honeycrisp apples. They have a nice balance of sweetness and tartness. The ground cinnamon adds warmth and flavor, while coconut sugar can sweeten the chips if you like. A small pinch of sea salt enhances the taste. - Calories: About 100 per serving - Fat: 0g - Carbohydrates: 27g - Sugar: 19g Apples are full of fiber, which is great for digestion. They also provide vitamins A and C. These nutrients help your body stay strong. You get a satisfying snack without the guilt. Healthy baked apple chips are a crunchy, nutritious choice! 1. Start by washing the apples. Rinse them under cold water. This removes dirt and wax. 2. Next, core the apples. Use an apple corer or a knife. This makes slicing easier. 3. Slice the apples into thin rounds. Aim for 1/8 inch thick. This helps them get crispy. 1. Now, make the cinnamon-sugar mixture. In a small bowl, mix together: - 1 teaspoon ground cinnamon - 1 tablespoon coconut sugar (optional) - A pinch of sea salt 2. Lay the apple slices on lined baking sheets. Arrange them in a single layer. Avoid overlapping for even baking. 1. Preheat your oven to 225°F (110°C). The low heat helps dry the apples slowly. 2. Bake the apple slices for 1 to 1.5 hours. Flip them halfway through. This ensures they crisp up evenly. 3. Keep an eye on them near the end. You want them golden-brown and crisp. Remove them when they reach this perfect state. Allow the chips to cool completely on the sheets. They will continue to crisp up as they cool. You can find the full recipe above for more details. To make sure your apple chips are crispy, slice the apples thin. Aim for about 1/8 inch thick. Thin slices bake better and dry out faster. If your slices are too thick, they may not crisp up well. The right baking temperature is key too. Bake at 225°F (110°C). This low heat helps the moisture escape without burning the apples. You can add fun flavors to your apple chips. Try sprinkling nutmeg for a warm taste. You can also use other spices like ginger or clove. If you like sweeter chips, add coconut sugar or honey. Just a little goes a long way. You can even skip sugar altogether if you prefer a tart flavor. When it’s time to serve, make it look nice! Use a rustic bowl or a wooden platter. This adds charm to your snack. You can also sprinkle extra cinnamon on top for a pop of flavor. For a fun twist, pair the chips with nut butter for dipping. This adds protein and makes the snack more filling. Enjoy your healthy baked apple chips! For more details, check the Full Recipe. {{image_4}} You can use many types of apples for baked apple chips. Each variety has its unique flavor and texture. Here are some great options: - Fuji: Sweet and crisp, perfect for snacking. - Honeycrisp: Juicy and sweet, they add a nice crunch. - Granny Smith: Tart and firm, they give a tangy bite. - Gala: Mildly sweet, ideal for those who prefer less tartness. Choosing apples for sweetness and crispness makes a big difference. For the best results, select apples that are fresh and firm. You can spice up your apple chips with extra flavor. Here are some fun ideas: - Vanilla: Add a dash of vanilla extract for a warm taste. - Clove: A pinch of ground clove gives a cozy aroma. - Ginger: A bit of ginger adds a zingy flavor. - Citrus Zest: Use lemon or orange zest to brighten the taste. Mix these flavorings with the cinnamon for a tasty twist on your chips. Using a dehydrator can offer a different approach. Here’s how to do it: 1. Prepare the apples as you would for baking. 2. Lay the slices on the dehydrator trays in one layer. 3. Set the temperature to 135°F (57°C). 4. Dry for 6-8 hours, checking for crispness. Pros of Using a Dehydrator: - It uses less energy than an oven. - You can make larger batches. Cons: - It takes longer than baking. - You need a dehydrator. Both methods work well, so choose what fits your needs! If you're interested, check out the Full Recipe for more detailed steps. To keep your baked apple chips fresh, use airtight containers. Glass jars or plastic bags work well. Make sure they are sealed tightly. This keeps air out and helps maintain crispiness. Store your apple chips at room temperature. They stay fresh for about one week. If your chips lose their crunch, you can bring them back. Preheat your oven to 200°F (93°C). Spread the stale chips on a baking sheet. Bake them for about 10 minutes. This helps restore their crispiness. You can also use stale chips in other recipes. Crumble them over yogurt or oatmeal for a tasty topping. You could even mix them into a trail mix. They add a nice crunch and flavor. Healthy baked apple chips can last up to a week when stored properly. To keep them fresh, place them in an airtight container. This will protect them from moisture, which can make them soft. If you notice any moisture inside the container, it’s best to eat them quickly. Yes, you can make healthy baked apple chips without sugar. Using just apples and cinnamon gives you a tasty snack. If you want a little sweetness, try using honey or maple syrup. Just remember, going without sugar can change the taste. The chips may taste less sweet, but the apple flavor shines through. Yes, apple chips are often better than regular potato chips. Apple chips are lower in calories and contain no fat, while potato chips have more calories and fat. Apples are rich in fiber and vitamins, making them a healthier choice. - Nutritional Facts Comparison: - Apple chips: Fewer calories, no fat, high in fiber. - Potato chips: Higher calories, contains fat, low in fiber. You learned how to make healthy baked apple chips from start to finish. We covered the best ingredients, step-by-step instructions, and tips for perfect crispness. You now know about different apple types and flavor options. Storing your chips properly keeps them fresh longer. This snack is easy and fun to make. It’s a great option that is both tasty and healthy. Enjoy your apple chips and share them with friends!

Healthy Baked Apple Chips Crunchy and Nutritious Snack

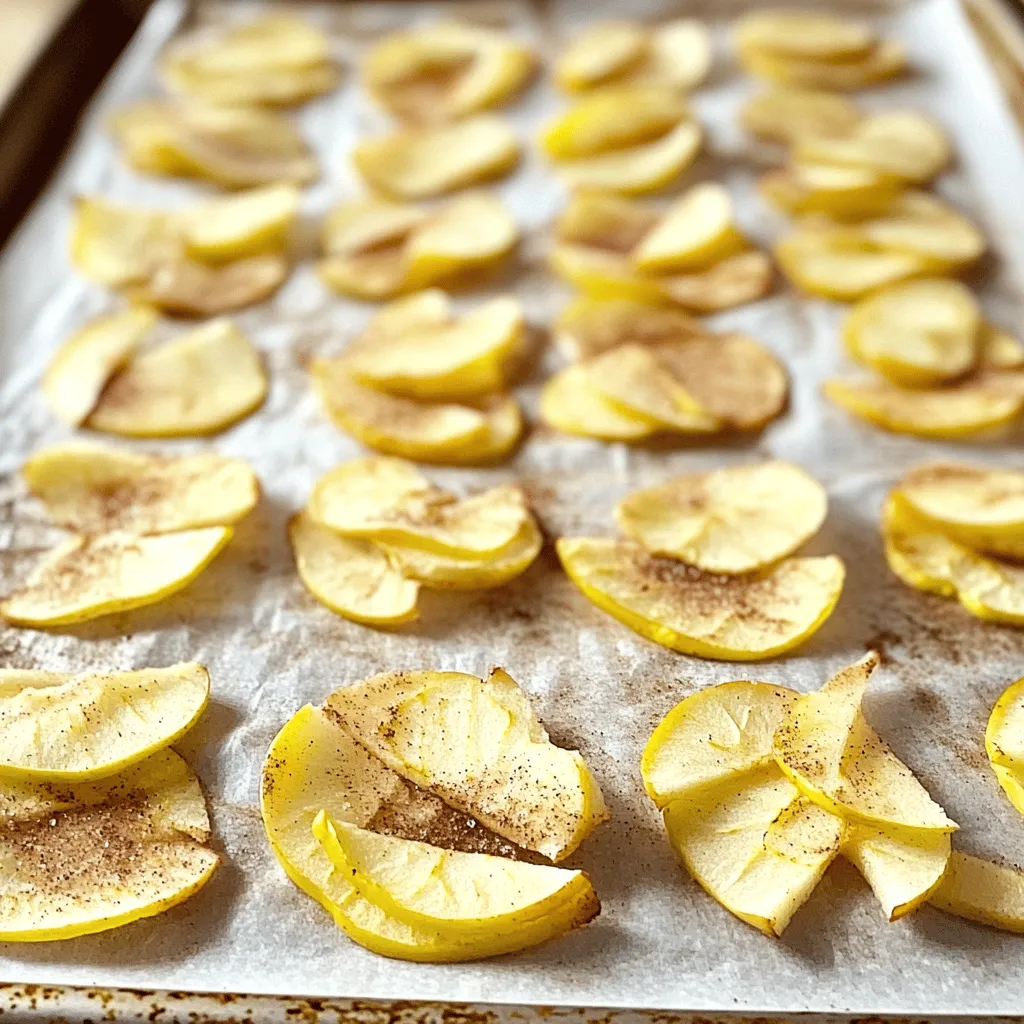
Looking for a snack that’s both crunchy and healthy? I’ve got just the thing! These Healthy Baked Apple Chips are

- 4 cod fillets (approximately 6 oz each) - 4 tablespoons extra virgin olive oil - 3 cloves fresh garlic, finely minced - 1 lemon (zest and juice) - 1 teaspoon dried oregano - 1 teaspoon smoked paprika - Salt and freshly cracked pepper, to taste - Fresh parsley, finely chopped (for garnish) - Lemon wedges (for serving) When I make Lemon Garlic Baked Cod, I start with fresh ingredients. Fresh cod fillets are key for the best taste. You can find them in the seafood section of your grocery store. I love using extra virgin olive oil; it adds a rich flavor. Fresh garlic brings a wonderful aroma to the dish. Zesting the lemon gives a nice citrus kick. The spices are simple but effective. Dried oregano complements the fish well. Smoked paprika adds a hint of warmth. Don't forget salt and freshly cracked pepper; they enhance every bite. For garnish, I use fresh parsley. It makes the dish look bright and inviting. Serving lemon wedges on the side allows you to add more zing. This combination creates a meal that is simple yet flavorful. - Calories per serving: About 260 - Macronutrients breakdown: - Carbs: 6g - Protein: 25g - Fat: 16g - Dietary considerations: Gluten-free, low-carb This dish is a great option for a healthy meal. It is low in carbs and high in protein. The healthy fats from the olive oil are good for your heart. Enjoy this meal without guilt! Eating tasty food can also be nutritious. - Preheat your oven to 400°F (200°C). - In a bowl, whisk together: - 4 tablespoons extra virgin olive oil - 3 cloves fresh garlic, finely minced - Zest and juice of 1 lemon - 1 teaspoon dried oregano - 1 teaspoon smoked paprika - Salt and freshly cracked pepper to taste This marinade creates a bright and bold flavor for the cod. - Lay 4 cod fillets in a light greased baking dish. - Pour the marinade over the cod. - Coat each fillet evenly to soak up flavor. - Let the cod marinate for 15-20 minutes. Marinating helps the fish absorb all the tasty goodness. - Once marinated, place the dish in the oven. - Bake the cod for 12-15 minutes. - Check for doneness: the fish should be opaque and flake easily with a fork. After baking, let the cod rest for 2-3 minutes. This step helps keep it juicy. To marinate cod well, start with a flavorful mix. Use fresh garlic, lemon juice, and olive oil. Mix these ingredients in a bowl. Coat the fillets fully. Let them sit for 15-20 minutes. This time is key for deep flavors. For the best texture, bake at 400°F (200°C). Check the cod after 12 minutes. It should look opaque and flake easily. If it resists, give it a few more minutes. Don’t rush this step; it makes all the difference. Presentation can elevate your dish. Place the cod on a bed of bright spinach. Or serve it with colorful roasted veggies. Drizzle leftover marinade over the cod. This adds a zesty touch and makes it shine. For sides, consider a light salad or steamed rice. Both work well to balance the dish's flavors. Lemon wedges are perfect too. They add a fresh squeeze of flavor on your plate. One big mistake is overcooking the cod. It can turn dry and tough. Check the fish after 12 minutes, as noted. If it’s undercooked, it’s easy to pop it back in the oven. Another mistake is not seasoning enough. Cod can taste bland without proper seasoning. Be generous with salt and pepper. The marinade should pack a punch. Trust your taste buds here; they know best. {{image_4}} To make your Lemon Garlic Baked Cod even better, add some herbs and spices. Here are a few ideas: - Fresh thyme for a light, earthy taste - Dill for a touch of brightness - Red pepper flakes for some heat You can also add vegetables to your dish. This way, you create a one-pan meal that is easy and healthy. Try using: - Asparagus for a crunchy bite - Cherry tomatoes for a sweet burst - Zucchini for a mild flavor You can grill or bake your cod. Grilling gives it a smoky taste. It also creates nice grill marks. When grilling, use a fish basket to keep the cod intact. Cooking in a foil packet is another great option. This method keeps the fish moist and flavorful. Just wrap the cod and marinade in foil and place it on the grill or in the oven. If you can't find cod, don't worry. Other fish work well too. Here are some choices: - Haddock, known for its firm texture - Tilapia, which has a mild flavor - Salmon, for a richer taste For a vegetarian option, consider chickpeas or tofu. Both can soak up flavors well. They also give a nice protein boost to your meal. For the full recipe, check out the Lemon Garlic Baked Cod section. To store leftover Lemon Garlic Baked Cod, place it in an airtight container. Make sure the cod is cool before sealing. The cod stays fresh for up to three days in the fridge. If you want to enjoy it later, follow these steps closely. To freeze baked cod properly, wrap each fillet tightly in plastic wrap. Then, place them in a freezer-safe bag. This way, you can keep the cod for up to two months. When you want to eat it, thaw the cod in the fridge overnight. Reheat it gently to keep it moist and tasty. Reheating cod can be tricky, but you can do it well. The best method is to use the oven. Preheat it to 350°F (175°C) and place the cod in a baking dish. Cover it loosely with foil to keep moisture in. Heat for about 10 minutes or until warmed through. This keeps the cod flaky and flavorful. Cod should bake for 12-15 minutes at 400°F (200°C). This time works well for cod fillets. The fish cooks quickly due to its light texture. Bake until the fish is opaque and flakes easily with a fork. If you bake it too long, it will dry out. Yes, you can use frozen cod. Just make sure to thaw it first. Thaw the fish overnight in the fridge for best results. You can also use the quick-thaw method by placing it in cold water for about an hour. This ensures even cooking and helps the fish stay moist. Some great sides for this cod dish include: - Sautéed spinach - Roasted veggies - Rice pilaf - Quinoa salad These sides add color and nutrition. They also complement the zesty flavor of the cod. You can tell cod is cooked when it is opaque and flakes easily. Use a fork to test it. If it flakes without resistance, it’s ready. The fish should not be translucent at all. This ensures you have a perfectly cooked meal. This blog post shared a simple yet delicious recipe for Lemon Garlic Baked Cod. You learned about the essential ingredients, step-by-step instructions, tips for perfect baking, and ways to store leftovers. My final thought is that cooking can be fun and rewarding. With this recipe, you can create a healthy meal that impresses everyone. Enjoy experimenting with flavors and serving ideas, and make this dish your own!

Lemon Garlic Baked Cod Simple and Flavorful Meal

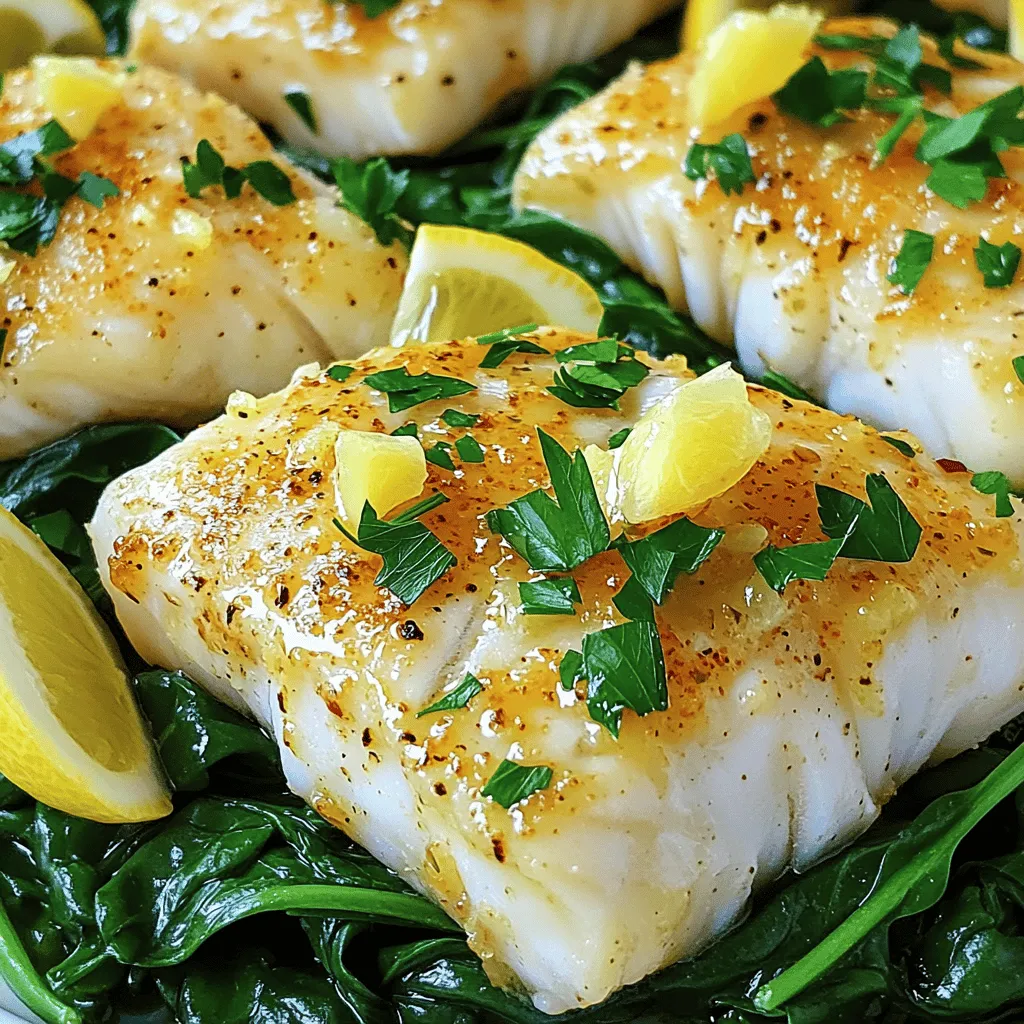
If you want a quick and tasty dinner, I’ve got the perfect recipe for you. Lemon Garlic Baked Cod is

To make a tasty Savory Spinach Mushroom Quiche, gather these ingredients: - 1 pre-made pie crust (or homemade if you’re feeling adventurous) - 2 cups fresh spinach, roughly chopped - 1 cup mushrooms, thinly sliced - 1 medium onion, finely chopped - 3 large eggs - 1 cup heavy cream - 1 cup shredded cheese (recommendations: Swiss, cheddar, or a blend) - 1 teaspoon garlic powder - 1 teaspoon salt - ½ teaspoon black pepper - ½ teaspoon ground nutmeg (optional for added warmth) - 2 tablespoons olive oil Using fresh spinach is best, but you can swap it for frozen spinach if needed. Just make sure to thaw and drain it well. For mushrooms, any type works, but I love using cremini or button mushrooms for their flavor. If you don't have heavy cream, you can use milk or a milk alternative. This will make the quiche lighter. Choosing the right cheese can elevate your quiche. I suggest using Swiss cheese for a nutty taste or cheddar for a sharp kick. A cheese blend can also add depth. You can even try goat cheese for a tangy twist. Just remember, the cheese should melt well for the best texture. You can find the Full Recipe above to see how to use these ingredients for a delicious meal! First, gather all your ingredients. You need: - 1 pre-made pie crust (or homemade if you’re feeling adventurous) - 2 cups fresh spinach, roughly chopped - 1 cup mushrooms, thinly sliced - 1 medium onion, finely chopped - 3 large eggs - 1 cup heavy cream - 1 cup shredded cheese (Swiss, cheddar, or a blend) - 1 teaspoon garlic powder - 1 teaspoon salt - ½ teaspoon black pepper - ½ teaspoon ground nutmeg (optional for added warmth) - 2 tablespoons olive oil Make sure your spinach is fresh. Rinse it well to remove any dirt. Chop the spinach into small pieces. Slice the mushrooms thinly so they cook fast. Chop the onion finely. This helps it mix well. Now, let’s cook the filling. Heat 2 tablespoons of olive oil in a large skillet over medium heat. Once hot, add the finely chopped onion. Sauté for about 3-4 minutes until soft and clear. Next, add the sliced mushrooms. Stir them for about 5-6 minutes. They’ll release liquid and turn golden brown. This adds great flavor. After that, add the chopped spinach to the skillet. Cook for another 2-3 minutes. The spinach will wilt down. Once everything is cooked, take the skillet off the heat. Let the mixture cool for a few minutes. In a separate bowl, whisk together the 3 large eggs and 1 cup of heavy cream. Make sure they are well mixed. Then, add in the garlic powder, salt, black pepper, and nutmeg (if using). Whisk again to combine all the flavors. Now, gently fold the cooled spinach and mushroom mixture into the egg mixture. Add the shredded cheese and mix until everything is evenly spread out. If you are using a pre-made pie crust, place it into a pie dish. Pour the cheesy filling into the crust. Spread it out evenly with a spatula. Finally, place your quiche in the preheated oven at 375°F (190°C) and bake for 35-40 minutes. The center should set and the top should turn lightly golden. When it’s done, let it cool for about 10 minutes before slicing. Enjoy this savory spinach mushroom quiche as a tasty meal. For the full recipe, refer to the earlier section. To make the best crust, use a pre-made pie crust for ease. If you want to try making your own, use cold butter and ice water for a flaky texture. Roll the dough evenly and avoid stretching it. This prevents shrinking during baking. Always chill the crust for at least 30 minutes before filling. This step helps it hold its shape. For a creamy quiche, use heavy cream. It gives a rich mouthfeel. Whisk the eggs and cream together well. This ensures the filling is smooth. Don’t overmix after adding the spinach and mushrooms; you just want to combine them gently. This keeps the filling light and fluffy. Bake your quiche at 375°F (190°C) for even cooking. Check it around the 30-minute mark. If the top browns too quickly, cover it with foil. The quiche is done when the center is set and a knife inserted comes out clean. Let it cool for about 10 minutes before slicing. This helps keep the slices intact. For more tips, check the Full Recipe for detailed instructions. {{image_4}} You can boost your quiche with tasty protein. Adding crispy bacon or diced ham makes it rich and savory. Just cook the bacon until crispy, then crumble it. If you use ham, cut it into small pieces. Mix these into the spinach and mushroom filling before adding it to the egg mixture. This adds flavor and texture that many enjoy. For a twist, swap in bell peppers or kale. Bell peppers add crunch and sweetness. Chop them finely and sauté with the onions. Kale is hearty and full of nutrients. Remove the tough stems, chop the leaves, and add them after the spinach. Both options change the taste and make the dish colorful and fun. If you need dairy-free or gluten-free options, don’t worry. For a dairy-free quiche, use almond or coconut milk instead of cream. Choose a dairy-free cheese that melts well. For gluten-free, use a gluten-free pie crust or make a crustless quiche. Just pour the filling directly into a greased pie dish. These options keep the dish tasty and inclusive for all diets. For the full recipe, check out the Savory Spinach Mushroom Quiche. To keep your leftover quiche fresh, first let it cool. Then, wrap it tightly in plastic wrap or aluminum foil. You can also place it in an airtight container. This helps to keep the moisture in and the flavors intact. Stored this way, quiche can last in the fridge for about 3 to 4 days. When you're ready to eat your leftover quiche, the best method is the oven. Preheat your oven to 350°F (175°C). Place the quiche on a baking sheet. Heat it for about 15 to 20 minutes, or until it's warmed through. You can also use the microwave. Just heat individual slices for about 1 to 2 minutes. Keep an eye on it, so it doesn’t get rubbery. If you want to prepare in advance, freezing is a great option. First, let the quiche cool completely. Then, wrap it well in plastic wrap and foil. Label it with the date for easy tracking. You can freeze it for up to 2 months. When you’re ready to eat, thaw it in the fridge overnight. Reheat it in the oven for the best taste. For the full recipe, check out the Savory Spinach Mushroom Quiche section! Baking a quiche typically takes 35 to 40 minutes. I check the center to see if it’s set. The top should be lightly golden. If it jiggles too much, it needs more time. Always let it cool for 10 minutes before slicing. This helps it firm up. Yes, you can use frozen spinach. Just thaw it and drain the excess water. Fresh spinach has a different flavor and texture, but frozen works well in a pinch. Make sure to squeeze out any moisture. This step keeps your quiche from being soggy. I love serving quiche with a light salad. Mixed greens with a simple vinaigrette pair well. You can add tomatoes or cucumbers for a fresh crunch. For a heartier meal, serve with roasted potatoes. This adds a nice contrast to the soft quiche. Check the Full Recipe for more ideas! To make a great quiche, blend your ingredients well and follow the steps closely. Start with fresh veggies and choose your cheese wisely. Bake until golden for a perfect crust. Remember, you can customize it with proteins or veggies you love. Store any leftovers right to keep them fresh. Whether it's for a brunch or a weeknight meal, this quiche is a fun dish. Enjoy your cooking, and impress your friends and family!

Savory Spinach Mushroom Quiche Easy and Flavorful Dish

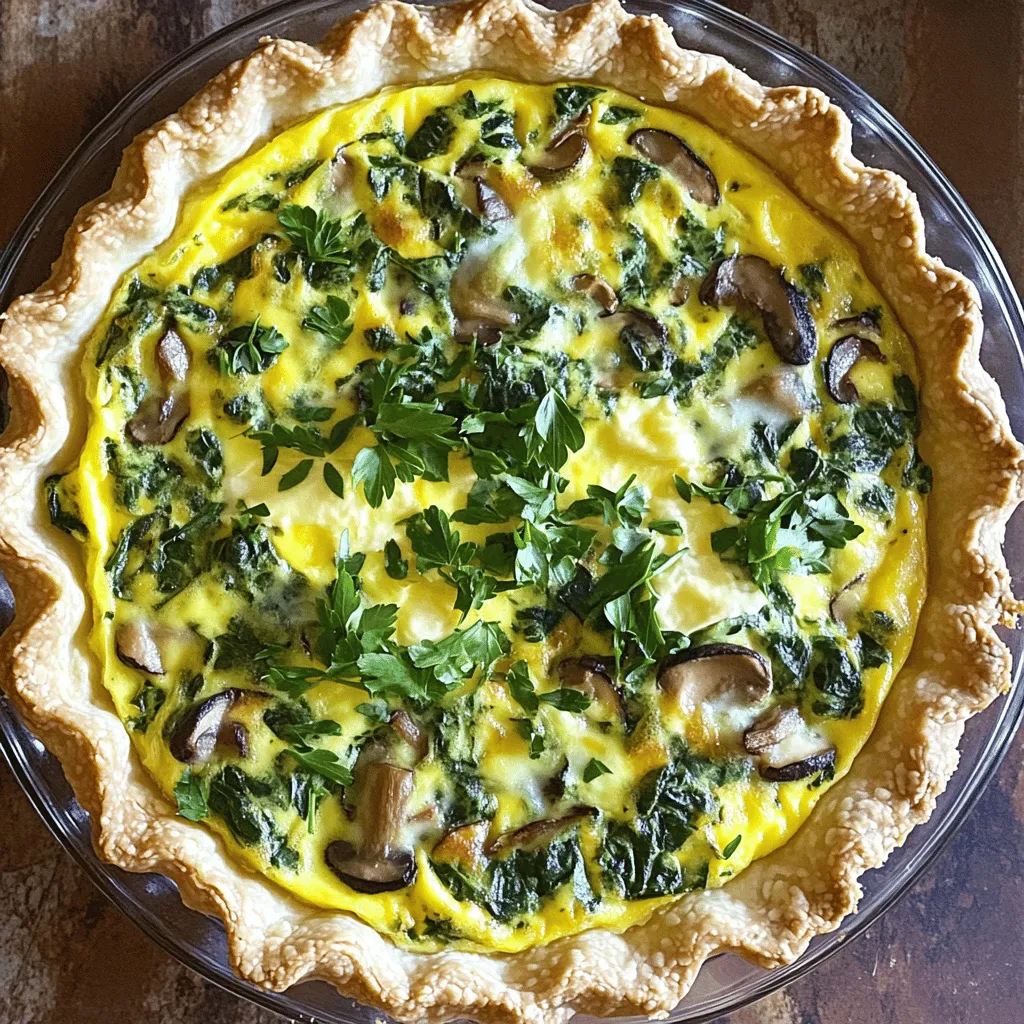
Are you ready to create a mouthwatering Savory Spinach Mushroom Quiche? This dish is not only easy to make but

- 2 medium zucchinis, cut into half-moon slices - 1 pint cherry tomatoes, halved - 3 cloves of garlic, finely minced - 3 tablespoons extra-virgin olive oil - 1 teaspoon dried oregano - Sea salt and freshly cracked black pepper, to taste The essential ingredients are simple yet packed with flavor. Zucchini adds a light texture, while cherry tomatoes bring sweetness. Garlic gives a nice kick. Olive oil helps everything roast beautifully. Oregano adds a touch of earthiness, and salt and pepper enhance all those tastes. - 1 teaspoon balsamic vinegar - Fresh herbs, like basil or parsley While the essential ingredients shine on their own, you might want to add balsamic vinegar for a tangy twist. Fresh herbs like basil or parsley can also brighten the dish. They add color and flavor, making your meal more vibrant. - Baking sheet - Mixing bowl - Spatula You need just a few tools for this recipe. A baking sheet is key for roasting the veggies. A mixing bowl helps you combine everything easily. A spatula is perfect for tossing the ingredients and spreading them out on the sheet. These tools make cooking fun and straightforward. For the full recipe, check out the details above. 1. Preheat the oven: Start by setting your oven to 425°F (220°C). This high heat helps the veggies get nicely roasted. 2. Wash and cut vegetables: Rinse the zucchinis and cherry tomatoes under cool water. Cut the zucchinis into half-moon slices. Halve the cherry tomatoes for even cooking. 1. Combine zucchinis and tomatoes: In a large mixing bowl, toss the sliced zucchinis and halved tomatoes together. 2. Add seasonings and mix: Now, add the minced garlic, olive oil, dried oregano, balsamic vinegar, salt, and pepper to the bowl. Mix well with your hands or a spatula. Make sure every piece is coated. 1. Spread mixture on baking sheet: Pour the vegetable mixture onto a baking sheet, spreading it out in a single layer. This helps all the pieces cook evenly. 2. Roasting time and temperature: Place the baking sheet in your preheated oven. Roast for 20-25 minutes. Look for tender zucchini and slightly blistered tomatoes. For the full recipe, check the earlier sections of this article. Enjoy the delicious flavors of your roasted zucchini and tomatoes! For great roasted zucchini and tomatoes, even layering is key. Spread your veggies in a single layer on the baking sheet. This helps them cook evenly. If they are piled up, some will steam instead of roast. Set your oven to 425°F (220°C). This is the ideal temperature for roasting. It ensures that the edges get crispy while the centers stay tender. To boost flavor, consider extra seasonings. You can add red pepper flakes for heat or lemon zest for a fresh taste. Herbs like thyme or rosemary also work well. For garnishing, torn fresh basil leaves add color and a burst of flavor. Drizzle a bit of balsamic vinegar on top before serving. This adds a nice tang. One big mistake is overcrowding the baking sheet. If you fill it too much, the veggies will not roast right. Instead, they will steam and turn mushy. Another mistake is not using enough oil. A good amount of olive oil helps the veggies brown and adds flavor. Aim for about three tablespoons, as in the Full Recipe. {{image_4}} You can easily change this recipe based on the season. Adding different vegetables is a great way to switch things up. Try bell peppers, asparagus, or squash. Each veggie brings its own taste and texture, making every dish unique. Using seasonal herbs can also boost flavor. In summer, fresh basil shines. In fall, try sage or thyme. These herbs add fresh notes and enhance the dish. This dish works well for many diets. For vegan options, skip the cheese and focus on the veggies. You can also add nuts for crunch. This keeps it hearty without dairy. If you need a gluten-free meal, you're in luck! This recipe is naturally gluten-free. Just make sure any added ingredients are also gluten-free. This way, everyone can enjoy the meal without worry. Want to change the flavor? Incorporating spices can help. Try red pepper flakes for heat or smoked paprika for depth. Each spice gives the dish a new twist. Using different vinegars can also change the taste. Swap balsamic for red wine vinegar or apple cider vinegar. Each option adds its unique zing, making your roasted veggies even more exciting. For the full recipe, check out the details above. To store leftovers, let the roasted zucchini and tomatoes cool first. Place them in an airtight container. They will stay fresh in the fridge for up to three days. If you want to keep them longer, consider freezing. For long-term storage, freezing is a great option. First, make sure the vegetables are fully cooled. Next, spread them on a baking sheet in a single layer. Freeze until solid, about one to two hours. After that, transfer them to a freezer-safe bag or container. They will last for up to three months in the freezer. To reheat, use the oven for the best results. Preheat it to 350°F (175°C). Spread the vegetables on a baking sheet. Heat for about 10 to 15 minutes, or until warm. You can also use the microwave, but it may make them a bit soggy. For crispness, stick to the oven. Enjoy your delicious roasted zucchini and tomatoes again! If you need more details on making this dish, check out the Full Recipe. How long does it take to roast zucchini and tomatoes? Roasting zucchini and tomatoes takes about 20-25 minutes. You want them tender and slightly caramelized. Preheat your oven to 425°F (220°C) to get the best results. Can I use other vegetables in this recipe? Yes, you can add veggies like bell peppers, eggplant, or onions. Each vegetable will add its own flavor. Just cut them into similar sizes for even cooking. What can I substitute for olive oil? You can use canola oil or avocado oil instead of olive oil. These oils work well and have a neutral taste. They also help the veggies roast nicely. Can I use canned tomatoes instead of fresh? Yes, you can use canned tomatoes. Drain them well to avoid excess moisture. However, fresh tomatoes give a better texture and flavor in this dish. What can I serve with roasted zucchini and tomatoes? Roasted zucchini and tomatoes pair well with grilled chicken or fish. You can also serve them over a bed of quinoa or pasta. How to incorporate leftovers into other meals? Use leftovers in salads, wraps, or omelets. They add great flavor to any dish. Just warm them up gently before adding to your meal. This blog post covered a simple and tasty way to roast zucchini and tomatoes. We discussed key ingredients, necessary tools, and easy steps. Remember to layer evenly for the best results. Don’t be afraid to mix in your favorite spices or herbs. Storage tips help keep your dish fresh, and the FAQs answer common questions. Enjoy this healthy dish while trying out your own variations. Cooking shouldn't be hard, and with these tips, it can be fun and flavorful. Happy roasting!

Easy Roasted Zucchini and Tomatoes Healthy Recipe

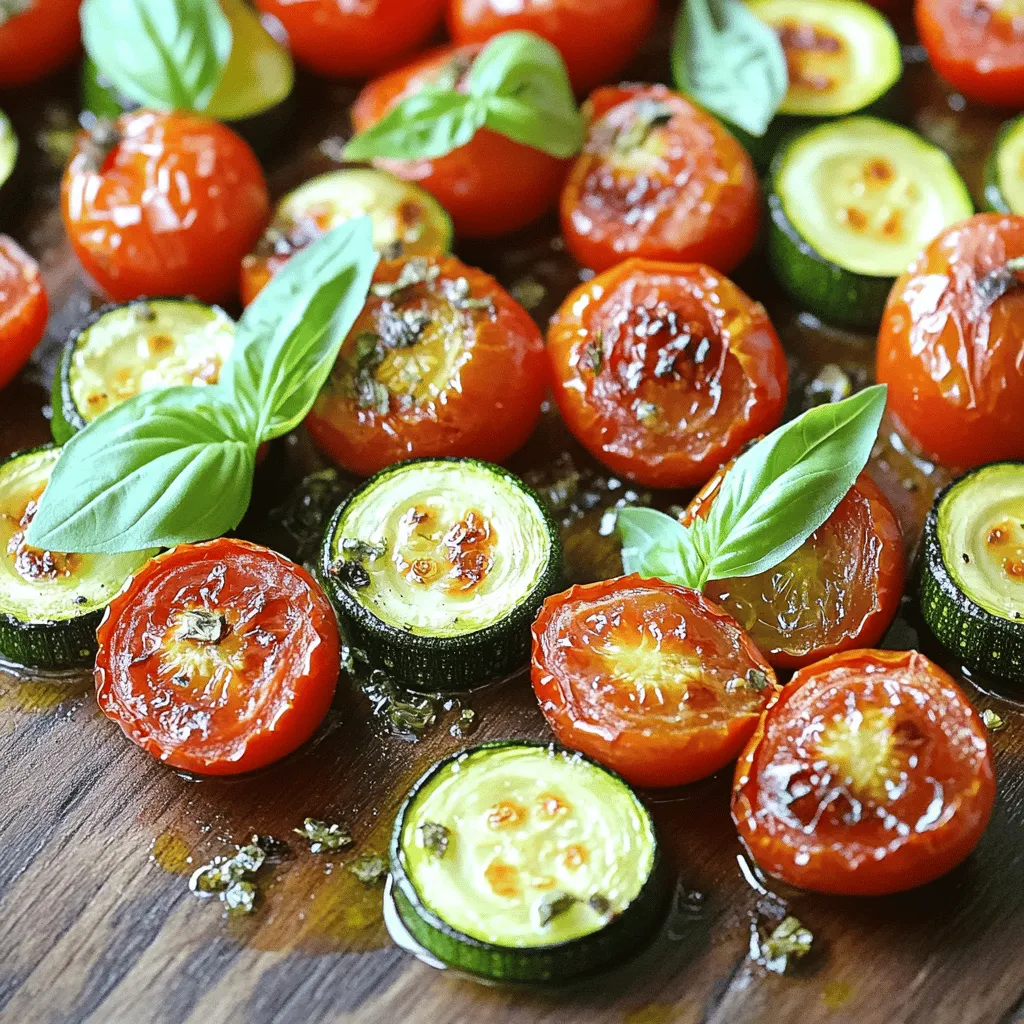
Are you ready to elevate your meal prep? This easy roasted zucchini and tomatoes recipe is packed with flavor and

- 3 ripe bananas, thoroughly mashed - 1/2 cup unsalted butter, melted until slightly cooled - 3/4 cup packed brown sugar - 1/4 cup granulated sugar Ripe bananas are key. They should be soft and brown. They add natural sweetness and moisture. Use unsalted butter for the best taste. It also helps the bread stay rich. The mix of brown and granulated sugar gives depth. Brown sugar makes it chewy, while granulated sugar adds lightness. - 1 teaspoon baking soda - 1/2 teaspoon baking powder - 1/2 teaspoon salt - 1 1/2 cups all-purpose flour - 1/2 cup unsweetened cocoa powder Baking soda and baking powder help the bread rise. They make it fluffy and light. The salt balances the sweetness. All-purpose flour is a must for structure. Unsweetened cocoa powder gives that rich chocolate flavor. It’s what makes this banana bread truly special. - 1/2 cup semi-sweet or dark chocolate chips - 1/2 cup walnuts or pecans, chopped (optional) Chocolate chips add bursts of chocolate in every bite. Choose semi-sweet or dark for a richer taste. Nuts bring a nice crunch. Walnuts and pecans work well in this recipe. They also add healthy fats and protein. For the full recipe, check the details above. - Preheat Oven and Prepare Loaf Pan Start by setting your oven to 350°F (175°C). This temperature helps the bread cook evenly. While the oven heats, grab a 9x5-inch loaf pan. Grease it with butter or oil. For easier removal, you can also line it with parchment paper. - Mix Wet Ingredients Together In a large bowl, mash the ripe bananas well. Add the melted butter to the bananas. Stir in both the brown sugar and granulated sugar. Mix until the blend looks creamy and smooth. This step makes the bread sweet and rich. - Incorporate Eggs and Vanilla Extract Next, add the eggs to the banana mix. Do this one at a time. Make sure to mix well after each egg. Then, pour in the vanilla extract. This adds a lovely flavor to the bread. - Mix Dry Ingredients Separately In another bowl, take the baking soda, baking powder, salt, all-purpose flour, and cocoa powder. Whisk them together until they are combined. This helps the leavening agents spread evenly in the batter. - Fold Ingredients Together Now, slowly fold the dry mix into the wet banana mix. Use a spatula or wooden spoon for this. Mix just until you see no dry flour. Be careful not to over-mix. This keeps the bread light and fluffy. - Pour into Pan and Bake Pour the batter into your prepared loaf pan. Smooth the top with a spatula. Place it in the oven and bake for 60-65 minutes. You can check for doneness by inserting a toothpick into the center. It should come out clean or with a few moist crumbs. The Full Recipe includes more details to help you create this delicious treat. Enjoy the process! - Use Ripe Bananas for Best Flavor Choose bananas that are very ripe. The peels should be brown with some spots. Ripe bananas give the best taste and sweetness. They also help keep the bread moist. - Don't Overmix the Batter Mix just until the flour disappears. Overmixing can make the bread tough. A light hand keeps it soft and fluffy. - Test for Doneness with Toothpick Insert a toothpick into the center of the loaf. If it comes out clean or with a few crumbs, your bread is ready. This step is key to avoid undercooked or overcooked bread. - Cooling Tips for Best Texture Let the bread cool in the pan for about 10 minutes. Then, move it to a wire rack. This prevents sogginess and helps maintain its texture. - Presentation Ideas Serve warm with a light dusting of powdered sugar. You can also slice and place it on a nice plate. Add a few berries for a pop of color. - Pairing Options Enjoy your chocolate banana bread with a scoop of vanilla ice cream. The cold ice cream contrasts nicely with the warm bread. You can also serve it with whipped cream for extra creaminess. For the full recipe, check out [Full Recipe]. {{image_4}} You can make your chocolate banana bread even better! Here are some fun ideas: - Add Spices: A bit of cinnamon or nutmeg adds warmth. Just one teaspoon of cinnamon can change the game. - Use Flavored Extracts: Try using almond extract instead of vanilla. It gives a nice twist! These small changes can boost the flavor and make your banana bread unique. Cooking can be fun and fit all diets. Here’s how to adjust: - Gluten-Free Alternatives: Replace all-purpose flour with almond flour or a gluten-free blend. This makes it safe for those with gluten issues. - Vegan Substitutions: Swap eggs with applesauce or flaxseed meal. Use plant-based butter for a vegan version. These adjustments keep everyone happy at the table. Want to surprise your friends? Here are some creative ideas: - Swirl Peanut Butter or Nutella: After mixing your batter, add dollops of peanut butter or Nutella on top. Use a knife to swirl it in. It adds a rich, creamy taste. - Incorporate Dried Fruits: Toss in cranberries or raisins. They add a chewy texture and a hint of sweetness. These twists make your chocolate banana bread extra special! For the complete recipe, don’t miss the Full Recipe section. Enjoy the fun in your kitchen! Room Temperature Storage You can store your chocolate banana bread at room temperature. Wrap it in plastic wrap or foil. This keeps it moist and fresh. Place it in a cool, dry spot. Enjoy it within three days for the best taste. Refrigeration Guidelines If you want to keep it longer, you can refrigerate it. Wrap it tightly to avoid drying out. This method is good for up to a week. However, the bread may lose some of its soft texture. How to Freeze Banana Bread Freezing is a great option if you have extra bread. Let the bread cool completely first. Then, slice it into pieces for easy thawing. Wrap each slice in plastic wrap, then place them in a freezer bag. This way, it stays fresh for up to three months. Thawing Tips and Tricks To thaw frozen banana bread, take out the slices you need. Place them in the fridge overnight. You can also let them sit at room temperature for a few hours. For a warm treat, heat them in the microwave for 10-15 seconds. Best Practices for Freshness For the best flavor, eat your chocolate banana bread soon after baking. If stored properly, it stays fresh for about three days at room temperature. Refrigeration can extend this to a week. Signs of Spoilage Check for any mold or an off smell. If the bread feels dry or crumbly, it might be past its prime. Always trust your senses when deciding if it's still good to eat. Use very ripe bananas for the best flavor. Look for bananas with a dark yellow skin, covered in brown spots. These bananas are soft and sweet. The more spots, the sweeter the taste. Avoid green bananas as they lack the needed sweetness. If you have overripe bananas, they are perfect for this recipe. Yes, you can use frozen bananas! Thaw them first before using. Simply place the frozen bananas in a bowl at room temperature. You can also microwave them for a quick thaw. Once thawed, mash them well. This method keeps the banana flavor strong and delicious. Dense banana bread can happen for several reasons. Common mistakes include overmixing the batter or using too many ripe bananas. Mixing too much adds air, which causes density. Also, measure your flour correctly. Use a spoon to fill the measuring cup, then level it off. This helps keep the texture light and fluffy. To boost the chocolate flavor, use high-quality cocoa powder. You can also add extra chocolate chips. Dark chocolate chips add a richer taste. Mixing in a touch of espresso powder can deepen the chocolate flavor too. Just a small amount can make a big difference. Absolutely! You can make this bread a day or two in advance. Let it cool completely, then wrap it in plastic wrap. Store it at room temperature for freshness. For longer storage, freeze the bread. Make sure to slice it first. This way, you can enjoy a slice whenever you want. For the full recipe, check out the full recipe section. This blog post covered everything you need to make delicious chocolate banana bread. We explored key ingredients, step-by-step baking instructions, and useful tips for success. You learned about variations and how to store your bread to keep it fresh. In the end, making chocolate banana bread is fun and rewarding. With a few simple steps, you can create a tasty treat that everyone will enjoy. Happy baking!

Best Ever Chocolate Banana Bread Delightful Recipe

Are you ready to bake the best chocolate banana bread ever? This delightful recipe transforms ripe bananas and rich cocoa

For a classic potato salad, we need fresh and tasty ingredients. Here’s what you will use: - 2 pounds of Yukon Gold potatoes - 1 cup green peas (fresh or frozen) - ½ cup sweet pickle relish - ½ cup creamy mayonnaise - ¼ cup thick Greek yogurt - 1 tablespoon smooth Dijon mustard - 1 tablespoon apple cider vinegar - 1 small red onion - 3 stalks of celery - ½ teaspoon garlic powder - Salt and pepper, to taste - Fresh dill sprigs for garnish These ingredients come together to create a dish that is both creamy and crunchy. Yukon Gold potatoes give a buttery texture. Green peas add a pop of color and sweetness. Sweet pickle relish brings a tangy kick. The mix of creamy mayonnaise and Greek yogurt makes it rich without being too heavy. Using fresh dill as a garnish not only looks nice but also adds a fresh flavor. You can find all these items at your local store. Check for the freshest produce to get the best taste. For the full recipe, check out the complete guide. To start, you need to boil the potatoes. Fill a large pot with enough water to cover the potatoes. Bring the water to a rapid boil. Once boiling, add a generous pinch of salt. This step enhances the flavor of the potatoes. Now, add the potato cubes to the boiling water. Cook the potatoes for about 10 to 15 minutes. You want them fork-tender but not mushy. Check them with a fork; they should break apart easily but still hold their shape. If you are using fresh green peas, add them to the pot in the last 2 to 3 minutes of cooking. If you prefer frozen peas, just thaw them ahead of time. There’s no need to cook them. After cooking, drain the potatoes and peas in a colander. Let them cool in a large mixing bowl. This will help remove any excess moisture. Next, prepare the dressing. In a separate bowl, mix together the creamy mayonnaise, Greek yogurt, Dijon mustard, apple cider vinegar, and garlic powder. Whisk until smooth, then season with a pinch of salt and pepper. Once the potatoes and peas are cool, gently fold them into the dressing. Make sure all the veggies get coated well. Then, add in the finely chopped red onion and diced celery. Mix them in carefully to ensure even distribution. Now, taste the salad. Adjust the seasoning with more salt or pepper if you need to. After that, cover the bowl with plastic wrap or a lid. Chill the salad in the fridge for at least 1 hour. This helps the flavors blend together nicely. For the full recipe, check out the Garden Fresh Classic Potato Salad. To get the best potato salad, start with the right potatoes. Yukon Gold potatoes are my favorite. They have a rich flavor and creamy texture. When boiling them, cook until they are fork-tender. This usually takes about 10 to 15 minutes. Be careful not to overcook them. You want them soft but not mushy. Next, let’s talk about the dressing. It’s key to making a great potato salad. Start with a mix of mayonnaise and Greek yogurt. The yogurt adds a nice tang and creaminess. Add Dijon mustard and apple cider vinegar for extra flavor. Mix this all well until it’s smooth. Tasting as you go is vital. Adjust salt and pepper for your liking. Potato salad is great with many dishes. It pairs well with grilled meats, like burgers or chicken. You can also serve it with sandwiches or as part of a picnic spread. For presentation, choose a large bowl. Arrange the potato salad neatly. Garnish with fresh dill sprigs on top. This adds color and a nice aroma. If you want to make it even more special, add sliced hard-boiled eggs on top. This makes it look inviting. For the full recipe, you can check the details provided earlier. {{image_4}} For a healthier twist, you can swap out some ingredients. Use low-fat mayo or Greek yogurt for a lighter dressing. This keeps the taste but cuts down on calories. You can also try adding more veggies. Chopped bell peppers or carrots add crunch and color. Adding proteins can make your potato salad heartier. Consider diced hard-boiled eggs, cooked bacon bits, or even shredded chicken. Each adds a unique taste and makes the dish more filling. Herbs and spices can take your potato salad to the next level. Fresh dill adds a bright taste. Chopped chives bring a mild onion flavor. You might also try adding a pinch of smoked paprika for a hint of warmth. Around the world, potato salad varies greatly. In Germany, they often use vinegar and bacon. Southern U.S. styles might include sweet pickle relish and mustard. Each version has its own charm and flavor. You can mix and match based on your preferences. Explore the [Full Recipe] for a classic take on this dish! Store leftover potato salad in a sealed container. This helps keep it fresh. I like to use glass containers for easy viewing. The fridge is the best place for storage. Properly stored, potato salad lasts about 3 to 5 days. Always check for any off smells or changes in texture before using it again. Can you freeze potato salad? It’s not ideal, but you can freeze it. The texture changes after thawing, so keep that in mind. If you must freeze it, place it in an airtight container. Remove as much air as possible to avoid freezer burn. When thawing, move the salad to the fridge overnight. This helps maintain some texture. After thawing, stir the salad well. You might need to add a dash of mayo or yogurt to revive its creaminess. Serve it cold for the best taste. Enjoy your classic potato salad at summer gatherings with ease! For the full recipe, check out the section above. To make potato salad creamy, start with the right mix of ingredients. Use creamy mayonnaise and thick Greek yogurt. These two ingredients blend well and create a rich texture. Make sure to mix them well until smooth. You can also add a splash of apple cider vinegar for tanginess. This helps cut through the creaminess and adds flavor. Yes, you can use different types of potatoes. Yukon Gold potatoes work great because they are creamy and hold shape well. However, you can try red potatoes or even fingerling potatoes. Just keep in mind that some types may break down more easily. Always choose potatoes that you enjoy and that fit your taste. Adding ingredients can really boost the flavor of your potato salad. Consider mixing in fresh herbs like dill or parsley. You can also add crispy bacon bits for a smoky kick. Chopped pickles or olives add tanginess. For a bit of crunch, try diced celery or bell peppers. These extras make your salad pop with flavor. Potato salad should not sit out for more than two hours. If it’s hot outside, limit it to one hour. This is important for food safety. After serving, store any leftovers in the fridge right away. Proper storage keeps your salad fresh and safe to eat later. In this post, we covered how to make a tasty potato salad. We looked at the key ingredients like Yukon Gold potatoes and fresh peas. I shared step-by-step instructions for preparing and combining everything. We also discussed tips for perfect texture and flavor, plus ways to add variety. Lastly, I talked about storing leftovers safely. Try making this potato salad for your next meal. It’s sure to impress!

Classic Potato Salad Perfect for Summer Gatherings

Looking for the perfect dish for your summer gatherings? Classic potato salad hits the mark! With creamy texture and fresh

- 250g spaghetti or fettuccine pasta - 300g mushrooms (cremini or button), sliced - 1 cup heavy cream - 1 teaspoon dried thyme - Fresh parsley, finely chopped - Olive oil, garlic, salt, and pepper - 1 cup vegetable broth (low-sodium preferred) Gathering these ingredients is simple, but they make a big difference. The pasta acts as the base, while the mushrooms bring rich flavor. Heavy cream adds creaminess, making the sauce smooth and tasty. Dried thyme gives a hint of earthiness, and fresh parsley brightens each bite. For cooking essentials, use good olive oil for sautéing. Garlic adds a wonderful aroma and flavor. Salt and pepper enhance everything, so don’t be shy with them! Low-sodium vegetable broth helps keep the dish balanced. This recipe is flexible. Feel free to swap the pasta type or mushroom kind. You can mix ingredients based on what you have. That's the beauty of cooking! For the complete method, check the Full Recipe. Start by filling a large pot with salted water. Bring it to a boil. Once boiling, add your spaghetti or fettuccine. Cook for about 8 to 10 minutes until it is al dente. This means it should be firm but not hard. After cooking, drain the pasta in a colander. Be sure to save about ½ cup of the pasta water. Set the pasta aside for later. Next, take a large, deep skillet. Heat 2 tablespoons of olive oil over medium heat. Once it’s warm, add 3 cloves of minced garlic. Sauté this for about 1 minute. You want the garlic to smell great and turn slightly golden. Then, add 300 grams of sliced mushrooms. Spread them out in the skillet. Cook these for about 5 to 7 minutes. Stir them occasionally until they are tender and golden brown. Now it’s time to make the cream sauce. Pour in 1 cup of vegetable broth and bring it to a gentle simmer. Once it starts to bubble, slowly stir in 1 cup of heavy cream. Add in 1 teaspoon of dried thyme. Let the sauce simmer for 3 to 4 minutes. Stir it occasionally until it thickens to your liking. This creamy mix is where all the flavors come together perfectly. For the full recipe details, check out the [Full Recipe]. To bring out the best taste in your creamy garlic mushroom pasta, consider these tips: - Adding fresh herbs and spices: Fresh herbs like basil or thyme add a bright flavor. Try adding a pinch of nutmeg for warmth. - Tips for perfect seasoning: Always taste your sauce as you cook. Adjust salt and pepper to get the balance just right. A squeeze of lemon juice can also lift the flavors. The texture is key for a great pasta dish. Here are some ways to get it just right: - Adjusting sauce consistency with pasta water: If your sauce is too thick, add a bit of the reserved pasta water. It helps make the sauce creamy without losing flavor. - Recommended cheese varieties for melting: Parmesan is a classic choice, but you can also try mozzarella or fontina. They melt beautifully and add extra creaminess. A lovely dish is all about how it looks. Here are some ideas for a beautiful presentation: - Serving dish recommendations: Use a shallow bowl to show off the pasta. A white dish makes the colors pop. - Garnishing tips for visual appeal: Sprinkle fresh parsley on top for color. A light drizzle of olive oil adds shine. For an extra touch, grate more Parmesan over the top before serving. This creamy garlic mushroom pasta is not just tasty; it's a feast for the eyes too! For the complete guide, check out the Full Recipe. {{image_4}} You can easily make creamy garlic mushroom pasta vegetarian. Start by adding more veggies to the dish. Try spinach, zucchini, or bell peppers. These vegetables add color and flavor. You can also use plant-based cream instead of heavy cream. Options like coconut cream or cashew cream work well. They will give you a tasty and creamy sauce without dairy. Want to add some protein? Chicken, shrimp, or bacon are great choices. For chicken, cook bite-sized pieces in the skillet until golden brown. If you like shrimp, add them when the mushrooms are almost done. They only need a few minutes to cook. For bacon, chop it up and fry it first. Then, cook the garlic and mushrooms in the bacon fat for extra flavor. Don’t be afraid to mix up the herbs and spices. Fresh basil, parsley, or oregano can change the flavor. You can also add a splash of lemon juice or white wine. This adds a bright taste to the creamy sauce. Just a little can make a big difference. Feel free to experiment and find what you love! How long does creamy garlic mushroom pasta last? It lasts about three to four days in the fridge. Store it in an airtight container to keep it fresh. What are proper container recommendations? Use glass or plastic containers with tight lids. This helps prevent odors from getting in and keeps your pasta tasty. What are the best practices for freezing pasta? Let the pasta cool completely before freezing. Portion it into smaller containers. This way, you can thaw just what you need. What are the thawing and reheating instructions? To thaw, place it in the fridge overnight. You can reheat it in a skillet over low heat, adding a little broth or water to keep it creamy. What are creative ways to use remaining pasta? You can make a pasta bake by adding cheese and baking it until bubbly. Or, toss it with fresh veggies for a light salad. What recipes can incorporate leftovers? Try adding it to a frittata for breakfast or mix it into a soup for a hearty meal. You can check the Full Recipe for more ideas! You can use several things to replace heavy cream. Here are some great alternatives: - Whole milk and butter: Mix 3/4 cup of whole milk with 1/4 cup of melted butter. This mix gives a creamy texture. - Coconut milk: Use full-fat coconut milk for a rich flavor. It adds a nice twist to the dish. - Greek yogurt: Blend Greek yogurt with a bit of milk. This option gives a creamy feel with less fat. - Silken tofu: Blend silken tofu until smooth. This option is great for a vegan choice. These options work well and keep your dish creamy. Yes, you can easily make this dish dairy-free. Here are some ideas: - Use plant-based cream: Brands offer cashew or almond cream that works well in sauces. - Coconut cream: It gives a rich texture and flavor, perfect for a dairy-free choice. - Nutritional yeast: Add this for a cheesy flavor without dairy. It’s full of nutrients too. These swaps help you enjoy creamy garlic mushroom pasta while keeping it dairy-free. If you want some heat in your pasta, try these ideas: - Red pepper flakes: Sprinkle them in while cooking the garlic for a good kick. - Hot sauce: Add a splash to the sauce for a spicy boost. - Jalapeños: Sauté sliced jalapeños with the garlic and mushrooms for fresh heat. - Cayenne pepper: Stir in a pinch to the sauce for an extra spicy touch. Feel free to adjust the heat to match your taste! Access the Full Recipe for detailed instructions and more! This creamy garlic mushroom pasta uses simple ingredients and steps. You can cook pasta, sauté garlic and mushrooms, and make a rich sauce. I shared tips on flavor, texture, and presentation to elevate your dish. You can switch up ingredients for different tastes, too. Store leftovers properly or use them in new recipes. Try this dish, and enjoy the creamy goodness!

Creamy Garlic Mushroom Pasta Delightful Dinner Recipe

Are you ready to elevate your dinner game? In this blog post, I’ll guide you through a scrumptious Creamy Garlic

Older posts
Newer posts
← Previous Page1 … Page53 Page54 Page55 … Page117 Next →

dsad

© 2025 spoonfulsavory • Built with GeneratePress

Our Policies

  • Copyright Policy
  • Cookie Policy
  • GDPR Policy
  • Privacy Policy
  • Disclaimer
  • Terms Of Use

More Information

  • Home
  • About
  • Contact
  • Appetizers
  • Dessert
  • Dinner
  • Drinks
©2025, spoonfulsavory About Back To Top