![- 1 cup stone-ground grits - 4 cups chicken broth - 1 lb large shrimp, peeled and deveined - 1 cup shredded sharp cheddar cheese - 1/2 cup milk - 4 slices smoked gouda cheese (for garnishing) - 3 tablespoons butter, divided - 4 green onions, chopped (separate white and green parts) - 2 cloves garlic, minced - 1 teaspoon paprika - 1/2 teaspoon cayenne pepper (adjust based on spice preference) - 1 tablespoon olive oil - Salt and pepper to taste - Fresh parsley, chopped for garnish In this dish, we start with stone-ground grits. They give you that nice, creamy base. Chicken broth adds a rich flavor. Large shrimp are the star of the show. They soak up all the good spices. Sharp cheddar cheese and milk help make the grits smooth and cheesy. Smoked gouda cheese is for garnishing. It melts beautifully on top. Butter keeps everything rich and adds depth. Green onions and garlic bring bright flavors. I love how paprika and cayenne pepper give the dish a kick. Olive oil is great for cooking the shrimp. Finally, salt and pepper are key for seasoning. Fresh parsley is for a pop of color. For the full experience, refer to the [Full Recipe]. This will guide you through every step to make this delightful dish. First, cook the grits in a medium saucepan. Bring the chicken broth to a boil over medium-high heat. Gradually whisk in the stone-ground grits. This helps to avoid clumps. Lower the heat and let them simmer. Stir often for about 30 minutes. The grits should be thick and creamy. Next, make the grits even creamier. Remove the saucepan from heat. Stir in the sharp cheddar cheese and milk. Add 2 tablespoons of butter for richness. Mix until smooth and creamy. Season with salt and pepper to taste. Keep them warm by covering the pot. Now, let’s add flavor with garlic and onions. In a large skillet, heat olive oil over medium heat. Add the white parts of the green onions and minced garlic. Sauté for about 1-2 minutes. You want the garlic to smell good, not burn. This step adds a nice base flavor to your dish. It's time to cook the shrimp. Add the peeled and deveined shrimp to the skillet. Season them with paprika, cayenne pepper, salt, and pepper. Cook the shrimp for 2-3 minutes on each side. They should turn pink and opaque. This means they are done! Stir in the last tablespoon of butter for extra flavor. Now we can assemble our dish. Spoon a large portion of creamy grits onto each plate. Layer the cooked shrimp on top. Drizzle any leftover pan juices over everything. This adds more flavor and makes it look great. For the final touch, add smoked gouda cheese on top. Let it melt slightly from the heat of the dish. Garnish each plate with the green parts of the green onions. Don’t forget a sprinkle of fresh parsley for color. This makes your shrimp and grits look inviting and delicious. For the full recipe, check the details above! To make perfect, creamy grits, slow cooking is key. Cook your grits over low heat. This helps them become soft and fluffy. Stir often to avoid lumps. I like to use a whisk for this. A whisk lets you break up any clumps easily. To boost flavor, consider adding seasonings like garlic powder or onion powder. You can also mix in old bay seasoning for a nice kick. Pair your shrimp and grits with a side of sautéed greens. Collard greens or spinach work well. A squeeze of lemon adds a fresh touch too. For the complete shrimp and grits recipe, check out the Full Recipe. {{image_4}} You can make shrimp and grits even better by adding crispy bacon or sausage. The salty, smoky flavor of bacon pairs well with the creamy grits. Just cook the bacon first, then use the fat to sauté the shrimp. If you use sausage, choose a spicy kind for a nice kick. This twist adds depth and makes each bite more satisfying. To make a lighter version, substitute low-fat ingredients. Use low-fat milk or cheese. You can also swap the chicken broth for vegetable broth. This gives you a tasty vegetarian option. It’s still rich and creamy without all the calories. You can enjoy the flavors you love while being kinder to your waistline. If you want to switch up the protein, try other seafood like crab or scallops. Both are great options and add a unique taste. You could also use chicken for a land-based choice. If you prefer veggies, mix in sautéed mushrooms or bell peppers. These options keep the dish fresh and fun, allowing you to explore new flavors. To keep shrimp and grits fresh, store them in separate containers. Use airtight containers for both. Place the grits in the fridge within two hours of cooking. They can last for about three days. The shrimp should also be refrigerated and eaten within two days for best taste. When reheating, add a splash of water or milk to the grits. This helps restore their creaminess. Heat them gently on the stove over low heat. Stir often to avoid sticking. For shrimp, microwave them in short intervals. Heat until warm, but do not overcook. This keeps them tender and tasty. You can freeze shrimp and grits, but it is not ideal. Grits freeze well, but they may lose some texture. To freeze, place grits in a freezer-safe bag. Flatten to save space. Shrimp do not freeze well. If you must freeze them, use them within a month. Thaw overnight in the fridge before reheating. For the best flavor, it is best to enjoy shrimp and grits fresh. For the full recipe, check the earlier section. Shrimp and grits started in the Southern United States. It began as a simple meal for fishermen. They cooked shrimp with grits, which was cheap and filling. Over time, it grew into a beloved dish. Today, it appears in many restaurants and homes. The dish blends flavors from Africa, Native America, and European cooking. It shows how cultures can mix to create something great. Yes, you can prep Shrimp and Grits ahead. Cook the grits and shrimp separately. Store them in the fridge. When ready to eat, gently heat the grits. Sauté the shrimp fresh for best taste. This method saves time and keeps flavors strong. Just be mindful of reheating them properly to avoid mushiness. Some great sides to serve with Shrimp and Grits include: - Collard greens - Fried green tomatoes - A simple salad - Cornbread For drinks, I suggest: - Sweet tea - A light white wine - Beer These sides and drinks enhance the meal's flavors and make it special. To make Shrimp and Grits milder, reduce or skip the cayenne pepper. You can also use sweet paprika instead of regular paprika. For a spicier kick, add more cayenne or a dash of hot sauce. Taste as you go to find your perfect spice level. This way, you can create a dish that suits your taste. Yes, you can create a vegetarian version. Swap the shrimp for sautéed mushrooms or roasted vegetables. Use vegetable broth instead of chicken broth for the grits. Adding some smoked paprika gives a nice depth of flavor. You can still enjoy creamy, rich grits with a fun twist. Shrimp and grits combine rich flavors with texture for a warm dish. We learned the essential ingredients, like stone-ground grits and different cheeses. The step-by-step guide helps you cook perfectly creamy grits and tender shrimp. With tips for storing and reheating, you can enjoy this dish later. Consider fun variations to make it your own. Shrimp and grits are versatile and full of flavor, sure to please anyone at your table. Enjoy your cooking journey!](https://spoonfulsavory.com/wp-content/uploads/2025/06/ea0da99b-b44c-41f0-997f-ecf1cd34996a.webp)
60. Shrimp and Grits Delightful Creamy Comfort Food
Shrimp and grits is a classic dish that warms the soul. In this blog post, I’ll guide you through making
Shrimp and grits is a classic dish that warms the soul. In this blog post, I’ll guide you through making
![- 2 medium-sized eggplants - 3 tablespoons white miso paste - 2 tablespoons maple syrup - 1 tablespoon soy sauce - 1 teaspoon sesame oil - 1 tablespoon rice vinegar - 1 tablespoon freshly grated ginger - 2 cloves garlic, minced - 2 tablespoons sesame seeds - 2 green onions, finely chopped - Olive oil for drizzling - Salt and pepper, to taste Miso glazed eggplant uses simple ingredients that pack a punch. The eggplant is the star here, and its soft texture pairs well with the rich miso glaze. White miso paste gives a sweet and salty taste, while maple syrup adds depth. Soy sauce brings umami, and sesame oil gives a nutty note. Rice vinegar adds brightness. Fresh ginger and garlic boost the flavor even more. - Calories per serving: About 150 - Protein: 4g - Fat: 6g - Carbs: 22g This dish is rich in vitamins and minerals. Eggplants are high in fiber and low in calories. They provide important nutrients like potassium and vitamin C. Miso is a fermented food, which means it’s good for gut health. You also get healthy fats from sesame oil. For the full recipe, check out the detailed instructions. 1. Preheat your oven to 400°F (200°C). Line a baking sheet with parchment paper. 2. Slice each eggplant in half lengthwise. Score the flesh in a diamond pattern. This helps the glaze soak in. 1. In a bowl, combine white miso paste, maple syrup, soy sauce, sesame oil, rice vinegar, grated ginger, and minced garlic. 2. Whisk the mixture until smooth and well blended. 1. Place the scored eggplant halves on the baking sheet with the cut sides up. 2. Drizzle the eggplants with olive oil and season with salt and pepper. 3. Brush the miso glaze on the cut sides of the eggplants. Make sure they are well covered. 4. Roast the eggplants for about 25-30 minutes. They should be tender and caramelized. Brush with more glaze halfway through. 5. After roasting, remove the eggplants from the oven. Sprinkle sesame seeds and chopped green onions on top for garnish. For the complete guide, check the Full Recipe. To make the miso glaze just right, start by adjusting the sweetness. I often add maple syrup for a nice touch. A little sweetness balances the salty miso. You can taste as you mix to find your perfect balance. Next, ensure even coating when applying the glaze. Using a brush helps cover all surfaces. Be generous with the glaze, especially in the scored areas. This way, the eggplant soaks up all the flavors. Broiling is a great way to enhance the caramelization of your eggplant. After roasting, turn on the broiler for a few minutes. This step adds a delightful crunch while keeping the inside soft. Consider scoring patterns on the eggplant skin. Scoring helps the glaze penetrate deeper. You can create fun patterns or stick to simple diamonds. The choice is yours! For plating, serve the miso glazed eggplant on a large, colorful platter. This makes it eye-catching. Drizzle some extra sesame oil on top for shine. Garnish with sesame seeds and chopped green onions. This adds a pop of color and flavor. Pair your dish with steamed rice or a light salad for a complete meal. Enjoy your beautiful creation! For the full recipe, refer to the section above. {{image_4}} You can use different types of miso for this dish. Switching to red or brown miso adds a deeper flavor. Red miso has a stronger, saltier taste. It pairs well with the sweetness of the glaze. Brown miso offers a rich, earthy flavor. Each miso type changes the taste, so feel free to experiment! To make this dish even better, try adding lemon juice. A splash of lemon brightens the flavor. You can also include other vegetables. Bell peppers or zucchini work well in this mix. This creates a colorful medley that adds more nutrition. If you need a gluten-free option, switch the soy sauce for tamari. This keeps the flavor while making it safe for gluten-free diets. For a vegan option, use maple syrup instead of honey. You can also reduce the sugar by using less maple syrup or a sugar-free sweetener. These changes keep the dish tasty and healthy. For the full recipe, visit [Full Recipe]. To keep your leftover miso glazed eggplant fresh, store it in an airtight container. This helps prevent drying out and keeps the flavors intact. Place it in the fridge right after it cools. If stored properly, it lasts about 3-4 days. You can reheat miso glazed eggplant in the oven or microwave. For the oven, preheat to 350°F (175°C). Place the eggplant on a baking sheet and cover it with foil to keep it moist. Heat for about 10-15 minutes. If using the microwave, place the eggplant on a microwave-safe plate. Heat in short bursts of 1-2 minutes. Check often to avoid overcooking. To freeze, let the eggplant cool completely. Then, wrap each piece tightly in plastic wrap. Place the wrapped pieces in a freezer bag, removing as much air as possible. Label the bag with the date. For best results, use it within 2-3 months. To thaw, move the eggplant to the fridge for several hours or overnight. Reheat it as described earlier for the best texture. You can serve Miso Glazed Eggplant with many side dishes. Here are some ideas: - Steamed rice - Quinoa - Noodles - Stir-fried vegetables - A simple salad These sides match the rich miso flavor well. You can also pair it with Asian dishes like sushi or dumplings. The sweet and salty glaze enhances many meals. Yes, you can make this recipe ahead of time. You can prepare the eggplants and glaze. Store them separately in the fridge for up to two days. When ready to eat, just roast the eggplants. They will taste fresh and delicious. Yes, Miso Glazed Eggplant is great for meal prep. Cut the eggplants and mix the glaze in advance. Portion them into containers for easy meals. This dish reheats well, making it a smart choice for quick lunches or dinners. To add spice, mix in chili paste or red pepper flakes. Start with a small amount and taste. You can balance the heat with a bit more maple syrup. This adds sweetness while keeping the dish tasty. This blog post provided you with a tasty miso glazed eggplant recipe. You learned about the key ingredients, nutritional information, and easy instructions. I shared tips to perfect the glaze and enhance cooking techniques. You also discovered ideas for variations, storage, and answers to common questions. Now you can enjoy this flavorful dish while making it your own. I hope you feel inspired to create and share this delicious recipe with others. Happy cooking!](https://spoonfulsavory.com/wp-content/uploads/2025/06/7a2d61da-5709-4b28-89fb-3f1a8f66e501.webp)
Miso glazed eggplant is a simple yet flavorful dish that will impress your taste buds. It combines rich miso and

Craving a simple yet delicious dessert? You’re in the right place! This Rustic Apple Galette is easy to make and
![Let’s gather the ingredients for these tasty beef tacos with chipotle sauce. Each item brings unique flavors that make this dish special. - Ground beef, 1 lb - Small onion, finely chopped, 1 - Garlic cloves, minced, 2 - Olive oil, 1 tablespoon - Ground cumin, 1 teaspoon - Smoked paprika, 1 teaspoon - Chipotle powder, 1 teaspoon (adjust to taste) - Salt, 1/2 teaspoon - Black pepper, 1/2 teaspoon - Tomato sauce, 1 can (8 oz) - Adobo sauce (from chipotle peppers), 1 tablespoon - Corn tortillas, 8 small - Fresh cilantro, chopped (for garnish) - Lime wedges (for serving) These ingredients create a rich and flavorful filling. The ground beef serves as the base. The spices like cumin and smoked paprika add warmth. Chipotle powder gives a nice kick, while the tomato and adobo sauces bring depth. Fresh cilantro and lime add brightness to each bite. If you want the full experience, check out the Full Recipe for cooking instructions. Enjoy the process and the delicious results! - Sauté the onion until soft. In a large skillet, heat olive oil over medium heat. Once hot, add the finely chopped onion. Cook for about 5 minutes. Stir it to avoid burning. You want it soft and translucent. - Add garlic and cook until fragrant. After the onion softens, add the minced garlic. Cook for another minute. Stir well to release its aroma. - Cook ground beef thoroughly. Add the ground beef to the skillet. Use a spatula to break it apart as it cooks. Brown it for about 6-8 minutes. - Drain excess fat if necessary. If you see a lot of fat, drain it. This keeps the tacos healthy and tasty. - Add spices to the beef. Sprinkle ground cumin, smoked paprika, chipotle powder, salt, and black pepper over the beef. Stir well for even seasoning. - Pour in tomato and adobo sauces. Add the tomato sauce and adobo sauce to the skillet. Mix everything together. - Let it simmer to meld flavors. Allow it to simmer for about 5 minutes. This helps the flavors blend nicely. - Warm corn tortillas in a dry skillet. Heat a separate dry skillet over medium heat. Place each tortilla in the skillet for about 30 seconds on each side. This makes them warm and pliable. - Spoon chipotle beef mixture into tortillas. Take a warm tortilla and add a generous amount of the chipotle beef mixture. - Garnish with cilantro and lime. Top each taco with chopped cilantro. Serve with lime wedges for a burst of flavor. For the full recipe, check out the complete instructions above. Enjoy your flavorful fiesta dish! - Adjust chipotle powder for spice level. If you like it hot, add more. If you prefer it mild, start with less. This lets you control how spicy the tacos get. - Use fresh ingredients for better taste. Fresh onions and garlic will boost flavor. Always choose ripe limes and bright cilantro for the best garnish. - Serve on a colorful platter. A bright dish makes the tacos look more fun and inviting. You can use red, blue, or even green plates to add some flair. - Garnish with lime wedges and cilantro. This adds a bright touch. Plus, it gives your guests a chance to add more flavor to their tacos. - Use a skillet for sautéing. A heavy skillet heats evenly and helps brown the beef well. This makes sure every bite is full of flavor. - A spatula is helpful for breaking beef apart. Use it to stir and crumble the meat while cooking. This keeps the beef cooked evenly and prevents clumping. For the full recipe of these delightful tacos, check out the [Full Recipe]. {{image_4}} You can easily switch from beef to a plant-based choice. I often use lentils or mushrooms in my tacos. Lentils give a hearty texture. They soak up flavors well. Mushrooms add a nice umami taste. Both options create a delicious vegetarian meal. Want to mix it up? Try using shredded chicken or pork instead of beef. These proteins work great with the chipotle sauce. They soak up the spices, making every bite tasty. For something unique, shrimp can be a fun twist. Shrimp cooks quickly and pairs well with chipotle. Toppings can elevate your tacos. I love adding avocado for creaminess. Salsa brings freshness and zest. Cheese adds a rich flavor. You can also try pickled onions or jalapeños for extra kick. Each topping enhances the overall taste and makes your dish more fun. For the full taco experience, check out the [Full Recipe]. To keep your beef tacos fresh, refrigerate them in airtight containers. This helps prevent drying out. Consume the leftovers within 3-4 days for the best taste and safety. If you want to save some beef mixture for later, freeze it in a safe container. This is great for long-term storage. When you’re ready to eat, thaw it in the fridge overnight before reheating. To reheat your beef mixture, use a skillet or microwave. In a skillet, heat it over medium until hot. If using a microwave, warm it in short bursts, stirring in between. Enjoy your tacos as if they were just made! For the full recipe, check out the recipe section above. To make chipotle sauce, blend these simple ingredients: - 1 cup sour cream or Greek yogurt - 2-3 chipotle peppers in adobo sauce - 1 tablespoon lime juice - 1 teaspoon garlic powder - Salt to taste Combine all in a blender. Blend until smooth. This sauce adds depth and heat to your tacos. Adjust the chipotle peppers based on your spice preference. Yes, you can prep ahead. Cook the beef mixture and store it in the fridge. It stays good for about 3-4 days. Warm it when ready to serve. You can also warm tortillas in advance. Just keep them in a towel to stay soft. Try these tasty sides: - Mexican rice - Refried beans - Grilled corn - Fresh salsa or guacamole - A light salad with lime dressing Drinks like margaritas or iced tea also work great. To make your tacos gluten-free, use corn tortillas. Check the label to ensure they are certified gluten-free. You can also use lettuce wraps as a fresh, low-carb option. Both choices taste great with the chipotle beef. For the full recipe, check out the complete guide! In this blog post, we covered how to make delicious chipotle beef tacos using simple ingredients and easy steps. I shared tips on perfecting flavor and presented options for variations to suit your taste. Remember, fresh ingredients make a big difference. Don't hesitate to experiment with proteins and toppings. With proper storage, you can enjoy these tacos later. Now, gather your ingredients and get cooking! You’ll create a tasty meal that everyone will love.](https://spoonfulsavory.com/wp-content/uploads/2025/06/bec9aaa1-7dd5-484c-bca1-664185e1476b.webp)
Craving a bold and tasty meal? These Beef Tacos with Chipotle Sauce are your answer! Packed with flavor and easy

Are you ready to whip up something delicious? These Savory Zucchini and Corn Fritters are not only tasty but easy
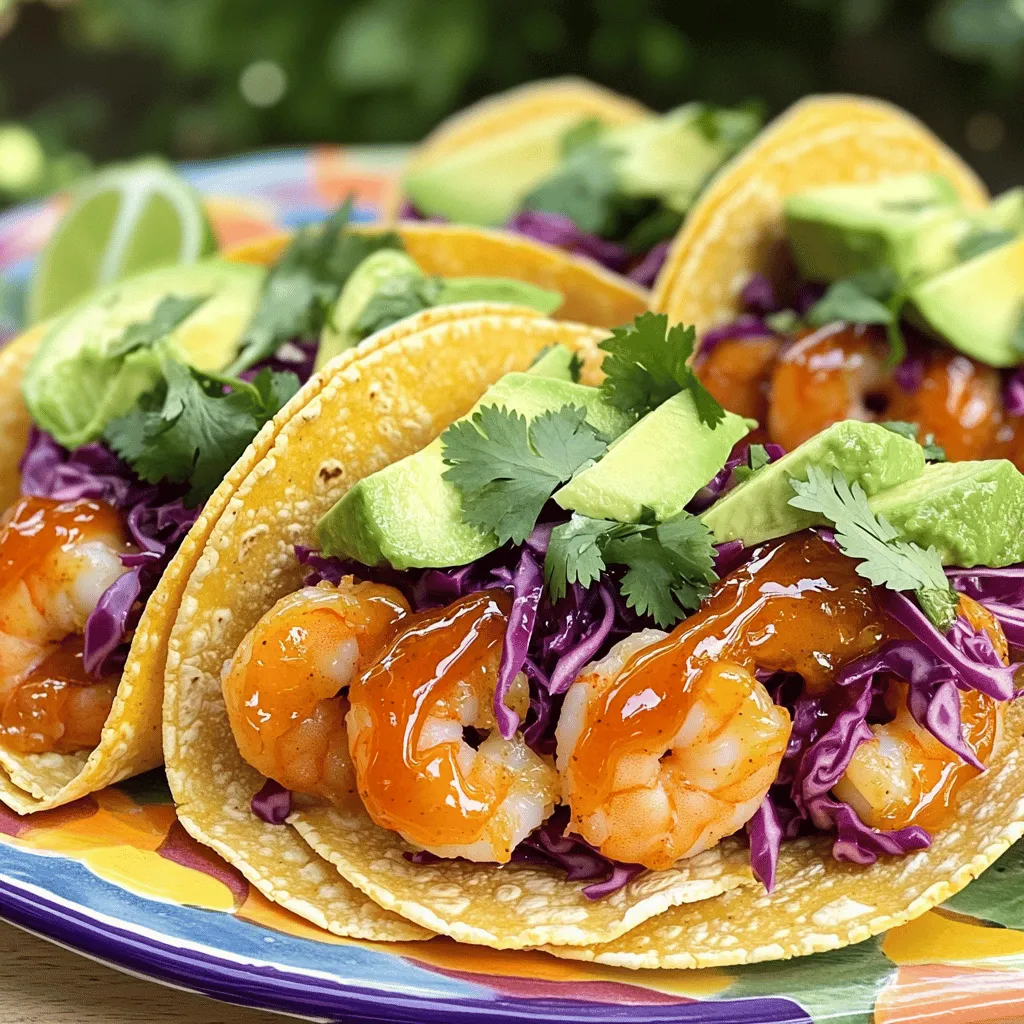
Craving a flavorful meal that combines sweet and spicy in every bite? These Sweet and Spicy Shrimp Tacos will ignite
![- 2 pounds baby potatoes - 4 tablespoons extra virgin olive oil - 6 cloves garlic, finely minced - 1 teaspoon dried rosemary - 1 teaspoon smoked paprika - Sea salt and freshly cracked black pepper - Fresh parsley, chopped The base of crispy garlic roasted potatoes uses simple and fresh ingredients. Baby potatoes work best because they are small and tender. Their natural sweetness shines when roasted. The extra virgin olive oil adds richness and crispiness. Garlic, minced finely, brings a strong flavor. Seasonings are key to enhancing the dish. Dried rosemary gives a warm, herbal note. Smoked paprika adds a subtle smokiness that complements the garlic. Sea salt and freshly cracked black pepper elevate all the flavors. For garnish, chopped parsley adds freshness and color. It makes the dish look bright and inviting. This combination creates a flavorful side dish that pairs well with many meals. The full recipe will guide you through the steps to make this delicious dish at home. First, set your oven to 425°F (220°C). This high heat helps the potatoes get crispy. A hot oven is key for roasting. Take 2 pounds of halved baby potatoes in a large bowl. Drizzle 4 tablespoons of extra virgin olive oil over them. Add 6 finely minced garlic cloves, 1 teaspoon of dried rosemary, and 1 teaspoon of smoked paprika. Sprinkle sea salt and freshly cracked black pepper for taste. Mix well. Make sure every potato gets the tasty coating. Grab a large baking sheet and line it with parchment paper. Spread the seasoned potatoes in a single layer. Leave space between each potato. This allows them to cook evenly and get crispy. Put the baking sheet in the oven and roast the potatoes for 25-30 minutes. Halfway through, turn the potatoes over. This helps them brown nicely and become crispy all around. When the potatoes turn golden brown, take them out of the oven. Let them cool for about 5 minutes. Just before serving, sprinkle chopped fresh parsley on top. This adds color and freshness. You can find the Full Recipe for more details on cooking these delicious potatoes! To get those crispy garlic roasted potatoes just right, temperature matters. Preheat your oven to 425°F (220°C). This hot oven makes the outside crisp while the inside stays soft. Air circulation is also key. Space the potatoes well on the baking sheet. If they touch, they will steam instead of crisp. Want to up the flavor game? Try adding lemon zest. It brings a bright twist that pairs well with garlic. When it comes to herbs, fresh is best. Fresh rosemary or parsley can add a burst of flavor. If you use dried herbs, remember to use less. They are stronger than fresh ones. Use a sturdy baking sheet for roasting. A heavy sheet helps prevent warping in the hot oven. Parchment paper is a must for easy cleanup and prevents sticking. For best results, use a large mixing bowl to coat the potatoes well. This ensures every bite is packed with flavor. For the full recipe, check out the detailed steps provided earlier. {{image_4}} You don’t have to stick to baby potatoes. You can use Yukon Gold, red potatoes, or even fingerlings. Each type has its own taste and texture. For instance, Yukon Gold has a creamy feel, while red potatoes are waxy and hold their shape well. Using different potatoes can change the dish's flavor and texture. If you want a more earthy taste, try using purple potatoes. They add a fun color and a unique flavor. To make crispy garlic roasted potatoes even better, you can add cheese or spices. For a spicy twist, sprinkle cayenne pepper on top. This adds heat and depth. You can also mix in some grated Parmesan or cheddar cheese. This will give a rich, savory flavor. If you want fresh herbs, try thyme or chives instead of rosemary. These herbs will change the taste and offer a new experience. Crispy garlic roasted potatoes pair well with many main dishes. They go great with grilled chicken or steak. You can also serve them alongside roasted veggies for a full meal. For dips, garlic aioli or a yogurt-based dip is perfect. You can even try a spicy salsa for a zesty kick. These options will make your meal even more enjoyable. For the complete recipe, check out the [Full Recipe]. To keep your crispy garlic roasted potatoes fresh, use an airtight container. Glass or plastic containers work well. Store them in the fridge for up to four days. Place a paper towel inside to absorb moisture. This helps keep them crisp longer. Avoid stacking them on top of each other to prevent sogginess. To restore the crispiness of your potatoes, use the oven. Preheat it to 400°F (200°C). Spread the potatoes on a baking sheet. Heat them for about 10-15 minutes. Turn them halfway to ensure even crisping. This method keeps them crunchy while warming them through. You can also use an air fryer for a quick reheat. Set it to 375°F (190°C) for about 5-7 minutes. Yes, you can freeze roasted potatoes. However, they may lose some crispiness. To freeze, let them cool completely. Place them in a single layer on a baking sheet and freeze for about one hour. Once frozen, transfer them to a freezer-safe bag. Remove as much air as possible. For reheating, bake them from frozen at 425°F (220°C) for 25-30 minutes until heated through. Enjoy your crispy garlic roasted potatoes any time! You can find the Full Recipe above. To make your roasted potatoes crispy, use a few key techniques: - High Heat: Always roast at a high temperature, like 425°F (220°C). - Space Them Out: Arrange potatoes in a single layer. Give them room to breathe. - Flip Halfway: Turn the potatoes halfway through cooking. This helps them brown evenly. - Use Oil Wisely: Coat your potatoes well with olive oil. This promotes crispiness. These tips ensure you achieve that perfect crunch we all love in crispy garlic roasted potatoes. Yes, you can use other types of potatoes. Here are some good options: - Yukon Gold: These potatoes have a buttery flavor and creamy texture. - Red Potatoes: They hold their shape well and have a slightly sweet taste. - Russet Potatoes: These are starchy and yield a fluffy inside. Each type of potato brings its own unique taste and texture to crispy garlic roasted potatoes, so feel free to experiment. Crispy garlic roasted potatoes pair well with many main dishes. Here are some great options: - Grilled Chicken: The crispiness of the potatoes complements juicy chicken perfectly. - Steak: The hearty flavors of steak match the rich garlic notes. - Roasted Vegetables: Pairing with other veggies creates a colorful plate. You can also serve them with a garlic aioli or yogurt dip for an extra flavor kick. Check out the Full Recipe for more serving ideas! In this blog post, we explored how to make crispy garlic roasted potatoes. We covered essential ingredients, step-by-step instructions, and tips for perfecting flavors. Different variations and storage methods help you get the most out of your dish. Enjoy experimenting with seasonings and serving choices. Remember, a great potato dish adds joy to any meal. You can impress family and friends with ease. Now get cooking and enjoy your delicious creation!](https://spoonfulsavory.com/wp-content/uploads/2025/05/f11425cf-1c36-49c9-8e74-dbb95f611e3d.webp)
If you crave a side dish that packs a punch, you’re in the right place! These Crispy Garlic Roasted Potatoes
![- 300g pasta (fusilli or penne) - 2 cups fresh spinach (roughly chopped) - 150g feta cheese (crumbled) - 2 tablespoons extra virgin olive oil - 3 cloves garlic (finely minced) - 1 teaspoon chili flakes - 1 tablespoon freshly grated lemon zest - 2 tablespoons fresh lemon juice - Fresh basil leaves for garnish - Salt and freshly ground black pepper to taste - 2 tablespoons toasted pine nuts I love using fresh ingredients that make this dish pop. The pasta serves as a hearty base, while the spinach and feta bring bright flavors. The olive oil adds richness, and garlic gives a warm aroma. I use chili flakes to give it a little kick, but you can adjust that. The fresh lemon zest and juice brighten the dish and make it feel light. Basil not only looks nice but adds a fragrant touch when you serve it. Optional ingredients like toasted pine nuts add a nice crunch. If you want more flavor, don't skip the salt and pepper. Each component works together to create a simple yet tasty meal. For the full recipe, check out the Spinach & Feta Fiesta Pasta. - Bring salted water to a rolling boil. - Add 300g of pasta and cook until al dente. - Reserve 1 cup of starchy pasta water before draining. - Heat 2 tablespoons of olive oil in a skillet. - Add 3 cloves of minced garlic and 1 teaspoon of chili flakes. - Cook until fragrant, about 1-2 minutes. - Add 2 cups of chopped spinach to the skillet. - Cook until just wilted, which takes about 2-3 minutes. - Stir frequently for even cooking. - Combine the drained pasta with the spinach in the skillet. - Fold in 150g of crumbled feta, 1 tablespoon of lemon zest, and 2 tablespoons of lemon juice. - Adjust creaminess with reserved pasta water to your liking. - Taste the dish and season with salt and pepper. - Add toasted pine nuts if you like some crunch. - Serve the pasta hot, garnished with fresh basil leaves. - You can add more feta and a drizzle of olive oil for extra flavor. Follow the [Full Recipe] for more details and tips! - Use high-quality olive oil for better flavor. - Adjust chili flakes according to spice preference. Using good olive oil makes a big difference. It adds richness to the dish. If you like spice, add more chili flakes. If you prefer mild, use less. - Substitute feta with goat cheese for a creamier texture. - Use frozen spinach if fresh isn't available. If you want a creamier taste, try goat cheese. It melts nicely and adds a smooth flavor. If fresh spinach is hard to find, frozen works too. Just thaw and squeeze out excess water. - Serve in wide, shallow bowls for elegance. - Drizzle with olive oil for added appeal. For a nice look, serve the pasta in wide, shallow bowls. This creates a beautiful plate. A drizzle of olive oil on top makes it shine and adds more flavor. For more ideas, check the Full Recipe. {{image_4}} You can boost your meal with protein. For a tasty twist, add grilled chicken or shrimp. Both options give your dish a hearty feel. If you want a vegetarian choice, chickpeas work great too. They add protein and a nice texture to the pasta. Try adding sun-dried tomatoes for a burst of flavor. They bring a sweet, tangy taste that pairs well with spinach. You can also toss in olives for a salty kick. They add depth and contrast to the creamy feta. If you need a gluten-free option, use gluten-free pasta. Many brands offer great flavors and textures. For those who want a dairy-free dish, vegan feta is a smart choice. It melts nicely and adds creaminess, just like regular feta. For the full recipe, check out the Spinach & Feta Fiesta Pasta section above. To keep your pasta fresh, store leftovers in an airtight container. Make sure to consume them within 3 days for the best flavor. This way, you can enjoy your meal again without losing quality. For long-term storage, you can freeze the pasta, but leave out the feta. This helps keep the texture nice. Use the frozen pasta within a month for the best taste and quality. When you’re ready to eat, reheat your pasta in a skillet. Add a splash of water to keep it moist. You can also use a microwave. Heat in short intervals to warm evenly without drying out the dish. You’ll have a tasty meal in no time! Yes, prepare the base and store separately from pasta. This way, the pasta stays firm and does not get mushy. You can cook the pasta fresh when you’re ready to eat. More garlic or herbs can intensify the flavor profile. Try adding fresh basil or oregano for a burst of freshness. You can also add a pinch of black pepper for depth. A side salad or garlic bread complements the dish well. A light green salad adds crunch and freshness. Garlic bread brings in a warm, comforting touch. Yes, it’s great for meal prep as it reheats well. Store the pasta and sauce in separate containers. This keeps the flavors fresh and the pasta perfect. It’s naturally vegetarian; just ensure your feta is vegetarian-friendly. Some feta brands use animal rennet. Check the label for the best choice. For the full recipe, check out the Spinach & Feta Fiesta Pasta. This pasta dish blends fresh spinach and feta for a tasty meal. You learned about essential ingredients, cooking steps, and helpful tips. Remember, you can customize this dish to fit your taste. Add protein or adjust spices as needed. Store leftovers properly to keep flavors fresh. Enjoy creating this simple yet delicious recipe at home. It’s perfect for any occasion, and your taste buds will thank you!](https://spoonfulsavory.com/wp-content/uploads/2025/05/088ff945-3447-470f-84ec-220eb2ce9dfd.webp)
Ready to tantalize your taste buds? This Pasta with Spinach and Feta recipe is quick, simple, and packed with flavor.
![- 2 large chicken breasts, cut into bite-sized pieces - 1 cup broccoli florets (fresh or frozen) - 1 cup bell peppers, sliced (choose between red, yellow, or orange for a vibrant look) - 1 cup snap peas, trimmed - 2 cups cooked brown rice (or substitute with quinoa for a twist) - ¼ cup low-sodium soy sauce - 2 tablespoons honey (preferably raw for extra flavor) - 1 tablespoon sesame oil (adds a nutty aroma) - 1 tablespoon rice vinegar (can use apple cider vinegar in a pinch) - 2 garlic cloves, minced (fresh for a more intense flavor) - 1 teaspoon fresh ginger, minced (or ½ teaspoon ginger powder) - 1 tablespoon cornstarch mixed with 2 tablespoons water (for thickening the sauce) - Sesame seeds - Green onions In this recipe, each ingredient plays an important role. The chicken gives protein and flavor. The vegetables add color and crunch. The sauce combines sweet and savory notes, making every bite exciting. I love using fresh veggies, as they bring life to the dish. You can also swap in your favorites! For the garnishes, sesame seeds and green onions add a nice touch. They make the bowl look fancy and add extra flavor. For the full recipe, check this out: [Full Recipe]. - In a medium bowl, mix together the following: - ¼ cup low-sodium soy sauce - 2 tablespoons honey - 1 tablespoon sesame oil - 1 tablespoon rice vinegar - 2 minced garlic cloves - 1 teaspoon minced ginger - Whisk until the honey dissolves. Set the sauce aside for later use. - Heat a teaspoon of oil in a large skillet over medium-high heat. - Add the chicken pieces and sauté for 5-7 minutes. Cook until they are golden and fully cooked. - Remove the chicken from the skillet and keep it warm on a plate. - Without rinsing the skillet, add the broccoli, bell peppers, and snap peas. - Stir-fry the vegetables for about 3-4 minutes. This will keep them tender-crisp and colorful. - Return the cooked chicken to the skillet with the vegetables. - Pour the prepared teriyaki sauce over everything. Stir gently to coat all the ingredients. - Add the cornstarch mixture and stir continuously for 2-3 minutes. This will thicken the sauce nicely. - Place a scoop of cooked brown rice in each bowl. - Top with the teriyaki chicken and veggies. - Garnish with toasted sesame seeds and sliced green onions for extra flavor. - For a great look, arrange everything artfully and serve with chopsticks. For the full recipe, check out the complete instructions. - Achieving the right texture for chicken: Start with fresh chicken breasts. Cut them into even, bite-sized pieces. This helps them cook evenly. Sauté them over medium-high heat until golden brown. This gives a nice crust while keeping the inside juicy. Don't crowd the pan; cook in batches if needed. - Preventing vegetables from overcooking: Add vegetables to the skillet after you cook the chicken. Stir-fry them quickly for 3 to 4 minutes. This keeps them crisp and colorful. Broccoli, bell peppers, and snap peas work great. Remove them from the heat when they are tender-crisp. - How to store teriyaki chicken bowls safely: Let the bowls cool down before storing them. Use airtight containers. This keeps the food fresh for up to 3 days in the fridge. Label the containers with the date for easy reference. - Reheating suggestions: When ready to eat, reheat the chicken bowls in the microwave. Use a microwave-safe dish and cover it to keep moisture in. Heat for 1 to 2 minutes or until hot. You can also reheat in a skillet over medium heat. Add a splash of water to keep it from drying out. Enjoy your flavorful teriyaki chicken bowls from the fridge! {{image_4}} You can easily make a tasty teriyaki bowl without chicken. Just swap in tofu for a great protein. Firm tofu works best. Start by pressing the tofu to remove extra moisture. Then, cut it into cubes and sauté until it’s golden. You can also make a vegetable-only teriyaki bowl. Use a mix of your favorite veggies like carrots, mushrooms, and zucchini. Stir-fry these until they are tender. This option is colorful and full of flavor. If you need a gluten-free option, choose gluten-free soy sauce. Look for brands that are clearly labeled. You can also use tamari, which is naturally gluten-free. For your rice, stick with brown rice or quinoa. Both give a nice texture and taste. When picking veggies, be sure they are fresh and free from any gluten-containing sauces. Get creative and try regional twists! For a Mexican flair, add black beans and corn. Top with avocado slices for creaminess. If you want a Thai taste, mix in some basil and lime juice. For a Mediterranean vibe, use olives and feta cheese. Each of these variations brings unique flavors to your teriyaki bowl. Experiment with different ingredients to find your favorite combination. A serving of teriyaki chicken bowls has about 500 calories. Here’s how the calories break down: - Protein: 30 grams - Carbohydrates: 60 grams - Fats: 15 grams This dish packs a good balance of nutrients. The chicken provides protein for muscle repair and growth. The brown rice adds fiber and energy, while the vegetables offer vitamins and minerals. Chicken is a great source of lean protein. It helps build and repair tissues. It also contributes to strong bones and muscles. Vegetables like broccoli and bell peppers are rich in vitamins A and C. They boost your immune system and promote healthy skin. Brown rice stands out for its health benefits. It’s whole grain, so it has more fiber than white rice. This helps with digestion and keeps you full longer. Plus, it has essential minerals like magnesium, which helps with energy production. Serve Teriyaki Chicken Bowls in a deep bowl. This allows for a lovely presentation. I recommend pairing them with: - Steamed edamame for added protein. - Crispy seaweed snacks for crunch. - A side of pickled vegetables for a tangy kick. You can also serve them with extra soy sauce on the side. This way, everyone can add more flavor if they want. Yes, you can prepare Teriyaki Chicken Bowls ahead of time. This is great for meal prepping. Here are some tips: - Cook the chicken and veggies, then cool them before storing. - Keep the rice separate to prevent it from getting soggy. - Store everything in airtight containers in the fridge. You can enjoy them within three days. Just reheat in the microwave before serving. To change the sweetness of the sauce, you have options. If you want it sweeter: - Add more honey or a touch of maple syrup. - Try a splash of orange juice for a fruity twist. If you prefer it less sweet: - Reduce the amount of honey you use. - Add a bit more soy sauce for a saltier taste. Taste the sauce as you go. Adjust until it suits your preference. Here are some mistakes to watch out for: - Don’t overcook the chicken. It should be juicy and tender. - Avoid boiling the vegetables too long. They need to stay crisp. - Make sure to mix the cornstarch well with water. This avoids lumps in the sauce. Following these tips will help you make the perfect Teriyaki Chicken Bowls every time. Enjoy your cooking journey! Teriyaki chicken bowls are a simple and tasty meal. We covered the main ingredients, like chicken and vegetables, and how to make a flavorful sauce. I shared tips for perfect cooking and storage. You learned about variations, including vegetarian and gluten-free options. Remember, balance the flavors and make it your own. Whether for a weeknight dinner or meal prep, these bowls suit many tastes. Enjoy creating your perfect teriyaki chicken bowl!](https://spoonfulsavory.com/wp-content/uploads/2025/05/e5e2f2da-df3c-4155-be13-34bc61a03fbe.webp)
Welcome to your new favorite dish: Teriyaki Chicken Bowls! This easy recipe combines tender chicken, crisp veggies, and a flavorful
![- 1 cup stone-ground grits - 4 cups water - 1 ½ cups milk - 1 teaspoon salt - 1 pound large shrimp, peeled and deveined - 4 tablespoons unsalted butter, divided - 4 cloves garlic, minced - 1 teaspoon smoked paprika - ½ teaspoon cayenne pepper (adjust to taste) - 1 lemon, juiced and zested - ¼ cup green onions, chopped (plus extra for garnish) - ½ cup grated Parmesan cheese - Fresh parsley, chopped (for garnish) - Freshly cracked black pepper to taste Gathering these ingredients is the first step to making garlic butter shrimp and grits. Each item plays a key role in creating a comforting dish that bursts with flavor. Stone-ground grits give a rich texture. The shrimp add a nice protein and flavor, while garlic and butter create a savory base. The smoked paprika adds depth and a slight smokiness. Adjust the cayenne pepper to fit your spice level. Fresh lemon juice and zest brighten the dish. Green onions and parsley add freshness and color. The Parmesan cheese brings creaminess and umami. Don't forget to check out the Full Recipe for the complete cooking instructions! - Step 1: Bring 4 cups of water and 1 teaspoon of salt to a boil in a medium pot. The water should bubble up nicely. This is key for cooking the grits right. - Step 2: Gradually whisk in 1 cup of stone-ground grits. Stir well to blend them in. This helps avoid lumps and ensures a smooth texture. - Step 3: Cook the grits on low heat for 20-25 minutes. Stir often until the mixture gets thick and creamy. Taste to check if they are done to your liking. - Step 4: In a skillet, melt 2 tablespoons of unsalted butter over medium heat. Once the butter melts, add 4 cloves of minced garlic. Sauté for about 1 minute until it smells amazing. - Step 5: Add 1 pound of peeled and deveined shrimp into the skillet. Sprinkle in 1 teaspoon of smoked paprika and ½ teaspoon of cayenne pepper. Stir well to coat the shrimp. - Step 6: Cook the shrimp for 3-4 minutes. They should turn pink and opaque. This shows they are fully cooked and ready to go. - Step 7: Remove the skillet from heat. Squeeze the juice of 1 lemon over the shrimp and stir in the lemon zest and ¼ cup of chopped green onions. This will brighten the flavors. - Step 8: Once the grits are creamy, mix in 1 ½ cups of milk, the remaining 2 tablespoons of butter, and ½ cup of grated Parmesan cheese. Stir until it’s smooth and delicious. Season with freshly cracked black pepper to taste. - Step 9: To serve, place a generous helping of grits on each plate. Top with the garlic butter shrimp mixture. Add extra green onions and fresh parsley for a pop of color. This dish is a true comfort food, perfect for any meal. For the complete recipe, you can check out the [Full Recipe]. Enjoy! - Use stone-ground grits for best texture. - Stir often to prevent lumps for a smooth consistency. - Adjust cooking time based on desired creaminess. To make great grits, start with stone-ground grits. They give a rich, nutty taste. Stirring is key to avoid lumps. If you want creamy grits, cook them a bit longer. You can add more milk to make them even smoother. - Marinate shrimp ahead for deeper flavor. - Experiment with garlic levels based on preference. - Adjust cayenne pepper for desired spice level. Marinating shrimp adds great taste. You can use garlic, lemon juice, or even hot sauce. Adjust the garlic to match your taste. If you like heat, increase the cayenne pepper. If you want it milder, use less. - Use shallow bowls for a beautiful presentation. - Garnish with fresh herbs and lemon zest. - Consider complementary colors for an appealing visual. For a stunning look, serve your dish in shallow bowls. This allows the colors of the grits and shrimp to shine. A sprinkle of fresh herbs and lemon zest makes it pop. Using contrasting colors adds to the visual appeal. For a full recipe, check the link provided. {{image_4}} You can switch up the proteins in this dish easily. Here are a few ideas: - Substitute shrimp with chicken or scallops for a different taste. - Add crab meat for a luxurious touch that elevates the dish. - For a vegetarian option, use tofu instead of shrimp. These swaps can bring new flavors and textures to your meal while still keeping it comforting. You can also play with the flavors in Garlic Butter Shrimp and Grits. Here are some swaps: - Swap lemon juice for lime juice for a zesty twist. - Replace Parmesan cheese with feta or goat cheese for a creamier bite. - Try different herbs like dill or cilantro to freshen up the dish. These changes can give your meal a whole new vibe and keep things exciting. If you need gluten-free choices, here are some tips: - Make sure to use grits labeled gluten-free for safety. - Serve with a side salad to lighten the meal and add freshness. - Pair with gluten-free bread to add texture and make it filling. These options help you enjoy this dish while keeping your dietary needs in mind. For more details, check the Full Recipe. After enjoying your garlic butter shrimp and grits, let the dish cool completely. Place the leftovers in airtight containers. This keeps them fresh and safe to eat later. When it's time to reheat, use the stovetop. Add a splash of milk to the grits for creaminess. Heat gently while stirring until warm. You can also use the microwave. Heat in short bursts, stirring often to avoid hot spots. If you want to store your dish longer, freeze it. For the best results, freeze the cooked grits and shrimp separately. This helps maintain texture. Use freezer-safe containers to prevent freezer burn. When ready to eat, thaw overnight in the fridge. Then reheat as mentioned above. Enjoy your savory comfort food anytime! Cook grits for 20-25 minutes for ideal creaminess. Stir often to avoid lumps. This ensures the grits become thick and smooth. You want that perfect, velvety texture. Yes, prep steps can be done ahead; heat before serving. You can cook the grits and shrimp separately. Store them in the fridge until you’re ready to eat. Just reheat gently on the stove. Pair with a side salad or sautéed veggies for balance. These sides add freshness to the meal. They also complement the rich flavors of the shrimp and grits. Spice level can be adjusted by varying cayenne pepper. If you like heat, add more cayenne. For a milder dish, reduce the amount. This way, you can make it just right for your taste. Reheat with milk on the stovetop for a creamy texture. Milk adds moisture and richness. Stir often to keep them from sticking to the pan. This will bring back their smooth feel. For the full recipe, check out the detailed instructions above. In this post, we covered how to make Garlic Butter Shrimp and Grits from scratch. We walked through the main ingredients, step-by-step cooking, and useful tips for success. We even explored variations for added creativity. As you try this dish, remember to adjust flavors to your liking. Enjoy the creamy grits and flavorful shrimp. With practice, you’ll impress everyone at the table. Happy cooking!](https://spoonfulsavory.com/wp-content/uploads/2025/05/ceacde37-75f9-4d44-add9-190d6df7d79d.webp)
Craving a dish that warms your soul? Look no further than Garlic Butter Shrimp and Grits! This savory blend of
