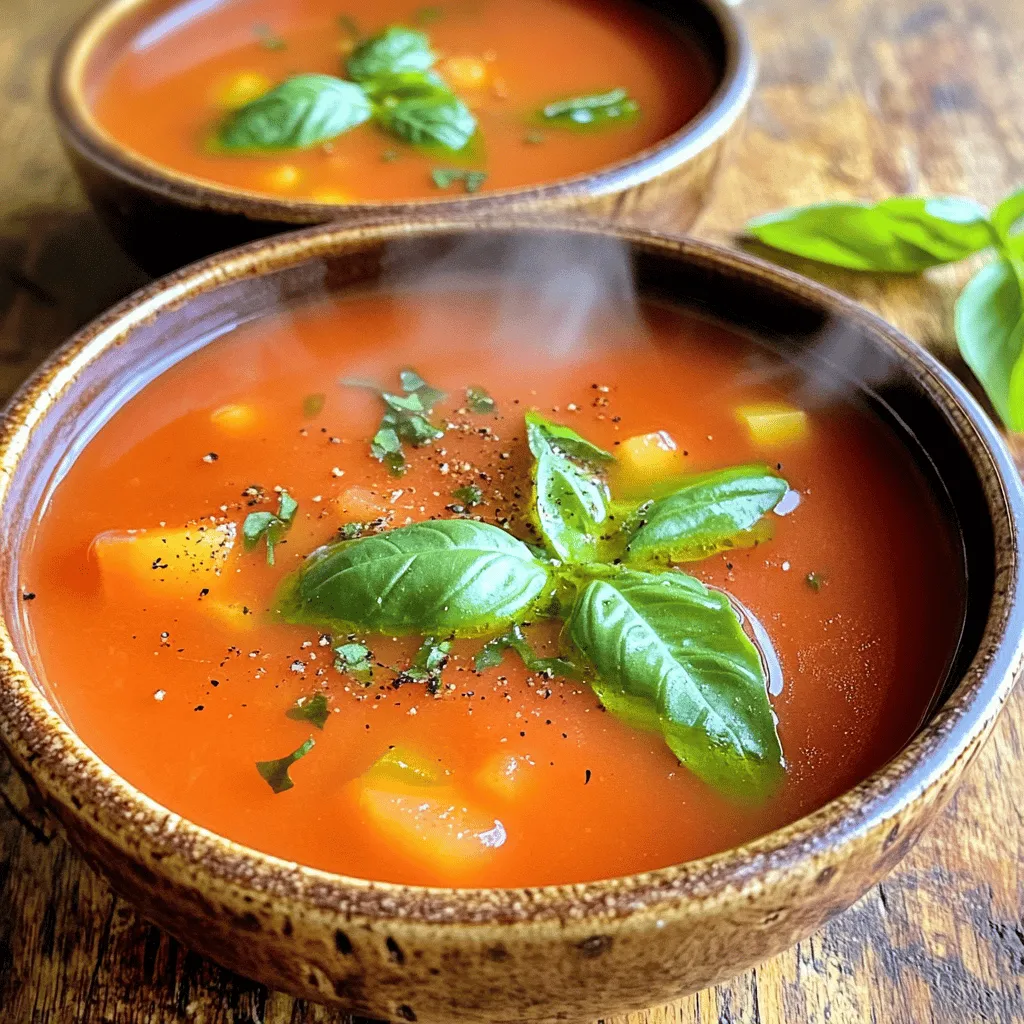
Savory Tomato Basil Soup Delightful Comfort Dish
Are you ready to enjoy a bowl of pure comfort? My Savory Tomato Basil Soup is simple, fresh, and delicious.
Are you ready to enjoy a bowl of pure comfort? My Savory Tomato Basil Soup is simple, fresh, and delicious.
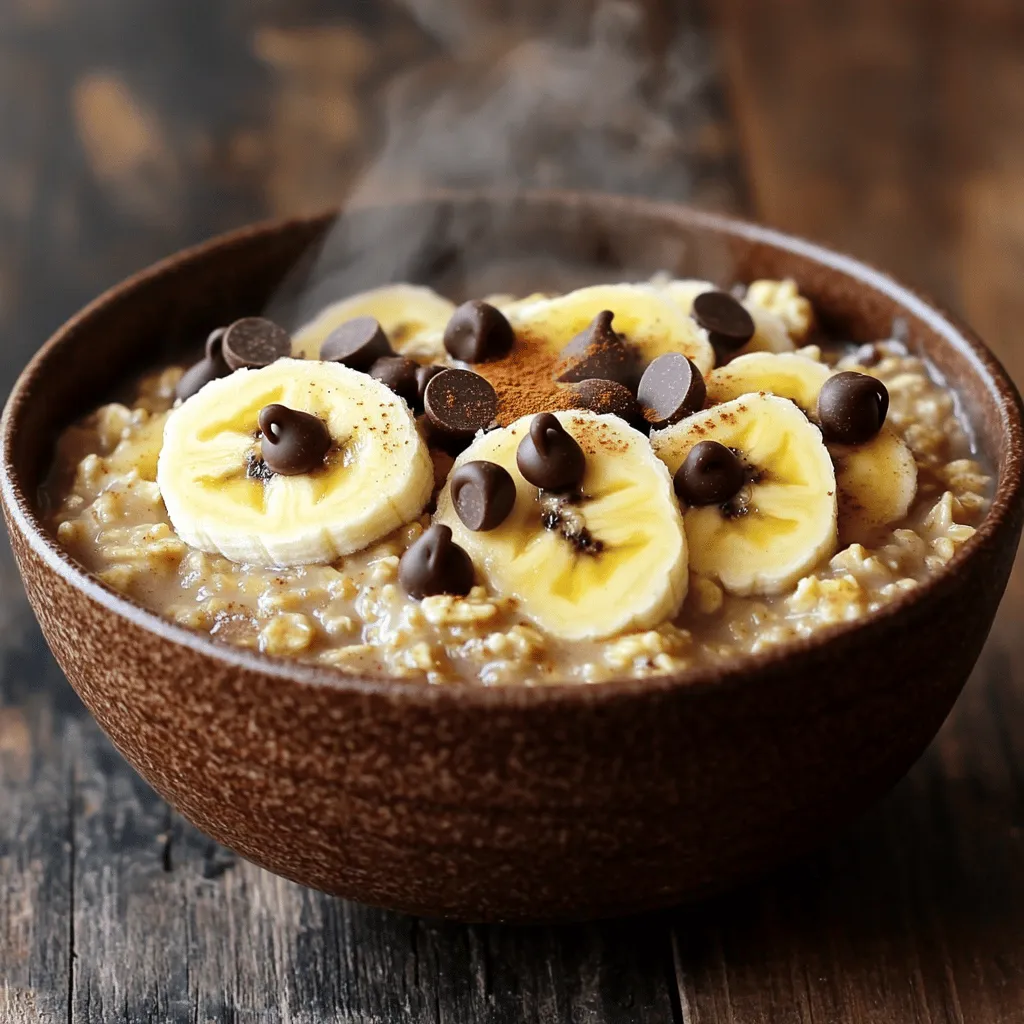
Start your day right with my Chocolate Chip Banana Oatmeal! This creamy breakfast treat combines sweet bananas and rich chocolate
![- Boneless, skinless chicken breasts - All-purpose flour, panko breadcrumbs, and Parmesan cheese - Marinara sauce for dipping The main star of this dish is the chicken. I like using boneless, skinless chicken breasts. They are easy to cut and cook evenly. Cut them into bite-sized pieces so they cook quickly. Next, panko breadcrumbs add great crunch. Combine them with grated Parmesan cheese for a rich taste that really shines. - Garlic powder and Italian seasoning - Salt and pepper to enhance flavors Seasoning is key. I always add garlic powder for that warm, savory flavor. Italian seasoning brings a mix of herbs that makes every bite more exciting. Remember to sprinkle in salt and pepper, too. These simple seasonings will boost the overall taste of your chicken bites. - Fresh basil leaves and olive oil spray For a pop of color and flavor, fresh basil leaves work wonders. I love tearing them and scattering them over the finished dish. A quick spray of olive oil before baking gives the bites a crispy, golden finish. This small step makes a big difference in texture and taste. You can find the full recipe [here]. Start by cutting your boneless chicken breasts into bite-sized pieces. Make sure each piece is about the same size for even cooking. Next, preheat your oven to 400°F (200°C). This temperature helps achieve a crispy finish. While it's heating, line a baking sheet with parchment paper. This prevents the chicken from sticking. Now it's time for the fun part—coating the chicken! First, prepare your flour mixture. In a shallow bowl, mix the all-purpose flour, garlic powder, salt, and pepper. This mixture adds great flavor. In another bowl, beat the two eggs until they are smooth. This egg wash helps the coating stick. For the third bowl, combine panko breadcrumbs, finely grated Parmesan cheese, and Italian seasoning. This mix will give your bites that extra crunch and flavor. Take a piece of chicken and coat it in the flour mixture. Make sure it is fully covered and shake off any extra flour. Then, dip it into the egg wash, letting the excess drip off. Finally, roll it in the breadcrumb and Parmesan mix. Press lightly to ensure the coating sticks well. Lay all the coated chicken pieces on the prepared baking sheet, leaving space between them. Lightly spray the tops with olive oil spray to help them get crispy. Bake the bites for 15 to 20 minutes. Flip them halfway through to get an even golden-brown color. Enjoy these crispy chicken parmesan bites hot with marinara sauce for dipping. Check out the Full Recipe for more details! To get the best crunch, always use panko breadcrumbs. Panko gives a light and airy texture. Regular breadcrumbs can make the bites dense and chewy. For the crispiest finish, lightly spray the chicken with olive oil before baking. This helps the coating brown evenly. It also adds a nice golden hue that makes these bites tempting. Serve your crispy chicken parmesan bites with warm marinara sauce. This dip adds a rich flavor that pairs perfectly with the chicken. For a great look, use a small bowl for the sauce. Place it in the center of a colorful platter. Add some torn basil leaves and extra Parmesan around the bites for a vibrant touch. Use a sturdy baking sheet lined with parchment paper. This will help the bites cook evenly and prevent sticking. A non-stick baking mat also works well. For the coating process, have shallow bowls ready for each layer. This makes coating the chicken quick and easy. A pair of tongs is helpful for transferring the bites from one bowl to another. For the full recipe, refer to the detailed instructions above. {{image_4}} You can make Crispy Chicken Parmesan Bites even more exciting with flavor tweaks. Add a pinch of cayenne or paprika for some heat. This small change can give your bites a bold kick. If you want a twist, try different cheeses. Mozzarella or provolone can make the bites creamier and richer. Each cheese will give a unique taste and texture. If you need gluten-free options, swap all-purpose flour for almond flour or gluten-free breadcrumbs. This way, everyone can enjoy these tasty bites. For a low-carb option, just use chicken breast and cheese. This keeps the flavor high and the carbs low, perfect for those watching their intake. These bites can shine as a main dish too. Pair them with a fresh salad or a side of pasta. This makes a delightful meal that’s both filling and flavorful. You can also serve them as a snack for game day or a party. They fit well on any table and will surely impress your guests. For the full recipe, check the earlier section to get started! To keep your crispy chicken parmesan bites fresh, store them in the fridge. Place them in an airtight container. This helps prevent moisture, which can make them soggy. If you want to save them for later, freezing is a great option. Wrap each bite in plastic wrap, then place them in a freezer bag. This keeps them safe from freezer burn. How long do crispy chicken parmesan bites last in the fridge? They stay good for about 3 to 4 days. If you freeze them, they can last up to 2 months. Check for freshness by looking for any off smells or changes in texture. If they smell strange or feel slimy, it’s best to toss them out. To reheat, use an oven for the best results. Preheat your oven to 350°F (175°C). Place the chicken bites on a baking sheet. Bake for about 10-15 minutes until heated through. This method keeps them crispy. Avoid the microwave, as it can make them soggy. For a quick fix, you can also use an air fryer. This method will help maintain their crunchy texture. Yes, you can use chicken thighs. They add more flavor and stay juicy. Thighs have more fat, which keeps them moist during cooking. If you prefer dark meat, thighs are a great choice. Just ensure they are boneless and skinless for easy cooking. Cut them into bite-sized pieces, just like the breasts. Bake the chicken bites for 15-20 minutes. Preheat your oven to 400°F (200°C) for best results. Flip the bites halfway through to ensure even cooking. Check for a golden brown color to know they are done. They should also be crispy on the outside while remaining juicy inside. Besides marinara, try ranch dressing or garlic aioli. These dips add a tasty twist to your bites. You can also use spicy buffalo sauce for a kick. Honey mustard or barbecue sauce can bring a sweet and tangy flavor. Experiment with different sauces to find your favorite. Serve these bites with a fresh salad or steamed veggies. Pasta with a light sauce pairs well too. You can also add garlic bread for a complete meal. For a fun twist, serve them in a slider bun with lettuce and tomato. These bites are perfect for any gathering! Crispy chicken parmesan bites offer tasty layers of flavor and texture. We discussed key ingredients, like chicken breasts and panko breadcrumbs, needed for the perfect crunch. I shared steps to prep, coat, and bake these bites until golden. You also learned tips for maximum crispiness and fun serving suggestions. Consider trying variations to make this dish your own. With simple storage and reheating methods, leftovers can shine again. Enjoy experimenting with flavors and making these bites a favorite in your home!](https://spoonfulsavory.com/wp-content/uploads/2025/05/b13b8bb4-ff92-45e7-b4f3-af7116d655c2.webp)
Looking for a fun and tasty snack? You’ll love these Crispy Chicken Parmesan Bites! Packed with flavor and perfect for
![- 1 cup all-purpose flour - 1 tablespoon baking powder - 1 tablespoon pumpkin pie spice - ½ teaspoon salt - 1 tablespoon brown sugar - 1 cup milk (dairy or non-dairy) - 1 cup canned pumpkin puree - 1 large egg - 2 tablespoons vegetable oil - 1 teaspoon vanilla extract - Optional toppings: maple syrup, whipped cream Gather these ingredients before you start. Each one plays a key role in making your pumpkin spice pancakes fluffy and tasty. The all-purpose flour gives structure. The baking powder helps them rise and become light. Pumpkin pie spice adds warmth and flavor. Salt enhances the taste and balances the sweetness from the brown sugar. You'll use milk to create a smooth batter. Canned pumpkin puree brings moisture and a delicious pumpkin flavor. The egg helps bind everything together, while vegetable oil keeps the pancakes tender. Vanilla extract adds a sweet aroma. Feel free to top your pancakes with maple syrup or whipped cream for extra yumminess. These simple ingredients come together to create a delightful breakfast. You can find the full recipe with cooking steps and tips in the article. In a large bowl, I whisk together the dry ingredients. First, I add 1 cup of all-purpose flour. Then, I mix in 1 tablespoon of baking powder, 1 tablespoon of pumpkin pie spice, ½ teaspoon of salt, and 1 tablespoon of brown sugar. This step is key. It helps distribute the flavors and leavening agents evenly. Next, I focus on the wet ingredients. In a separate bowl, I blend 1 cup of milk, 1 cup of canned pumpkin puree, 1 large egg, 2 tablespoons of vegetable oil, and 1 teaspoon of vanilla extract. I whisk until smooth. This mixture adds moisture and richness to the pancakes. Now comes the fun part! I gently pour the wet mixture into the dry ingredients. I stir with a spatula until just combined. It’s okay if a few lumps remain. Overmixing can make the pancakes tough, and I want them light and fluffy! I preheat my non-stick skillet over medium heat. I lightly grease it with a little oil to prevent sticking. I pour about ¼ cup of batter for each pancake. I watch for bubbles forming on the surface. When this happens, I know it’s time to flip. I cook for about 3 to 4 minutes on one side, then gently flip and cook for 2 to 3 more minutes until golden brown. Enjoy this delightful recipe! Check the [Full Recipe] for more details. To make your pancakes fluffy, avoid overmixing the batter. Mix just until combined. A few small lumps are fine. Overmixing turns pancakes dense and tough. Fluffiness is key to a great pancake! Keep your skillet at medium heat. This setting ensures even cooking. If the heat is too high, pancakes can burn. If the heat is too low, they may not cook through. A good test is to sprinkle a few drops of water on the skillet. If they dance and evaporate, you’re ready to cook! Presentation makes your pancakes even more inviting. Serve them on a warm plate. A light dusting of cinnamon adds warmth. For a festive touch, add slivers of fresh pumpkin on top. You can also sprinkle toasted pecans for extra crunch. These touches make your pancakes look as good as they taste! {{image_4}} You can make these pancakes gluten-free with a simple swap. Use a gluten-free flour blend instead of all-purpose flour. Look for a blend that has xanthan gum, as this helps mimic the texture of traditional flour. Mix the gluten-free flour with the other dry ingredients just like the original recipe. Make sure to check the label for any added sugar or salt. To create vegan pumpkin spice pancakes, replace the egg and milk. Use a flaxseed meal mixed with water as an egg substitute. Mix one tablespoon of flaxseed meal with two and a half tablespoons of water, and let it sit for a few minutes until it thickens. For milk, choose almond milk, soy milk, or any plant-based milk you prefer. This keeps the pancakes fluffy and moist. Looking to jazz up your pancakes? Consider adding chocolate chips or nuts. Fold in half a cup of chocolate chips for a sweet treat. If you prefer nuts, walnuts or pecans add a nice crunch. Add these ingredients to the batter right before cooking. This gives your pancakes a fun twist and lets you customize them to your taste. For the [Full Recipe], follow the steps above and enjoy making these delicious pancakes! After you make pumpkin spice pancakes, let them cool. Place any leftovers in an airtight container. You can keep them in the fridge for up to three days. To enjoy them later, just warm them up. This keeps them soft and tasty. If you want to save pancakes for later, freezing works great. Stack the pancakes with parchment paper between each one. Then, place them in a freezer-safe bag or container. They will stay fresh for up to three months. When you want some, just take out as many as you need. To reheat pancakes, use a few methods. The microwave is quick. Heat them for 20 to 30 seconds. For a crispy finish, use a skillet. Warm the skillet on low. Add the pancakes and heat for about 1 to 2 minutes on each side. This keeps them fluffy and delicious. To make your pancakes fluffier, add more baking powder. You can also use buttermilk instead of regular milk. Buttermilk gives a nice rise and adds a tangy flavor. Just remember, too much baking powder can make them taste bitter. Aim for one tablespoon of baking powder for perfect lightness. Yes, you can use fresh pumpkin. However, it takes more time to prepare. You need to cook and puree the pumpkin first. Fresh pumpkin has a different texture and may not be as smooth as canned. This can change how your pancakes feel. Canned pumpkin is convenient and gives consistent results. You can use several non-dairy milk options. Almond milk, soy milk, or oat milk work well. Each has a unique flavor. Almond milk adds a nutty taste, while soy milk is creamy. Choose what you like best. Just keep in mind that some non-dairy milks might change the pancake's texture a little. For the full recipe, check out the details above. This blog post covered everything you need for making delicious pumpkin spice pancakes. We discussed the ingredients, step-by-step instructions, and great tips for cooking. We also explored variations for gluten-free and vegan diets. Plus, we shared storage info and answered common questions. Now you have all the tools to enjoy fluffy pancakes any time. Remember, cooking should be fun. Experiment with flavors and enjoy your meals!](https://spoonfulsavory.com/wp-content/uploads/2025/05/532c509c-644c-4757-b538-04d187634d29.webp)
Fall is here, and what better way to embrace the season than with Pumpkin Spice Pancakes? These fluffy and delicious
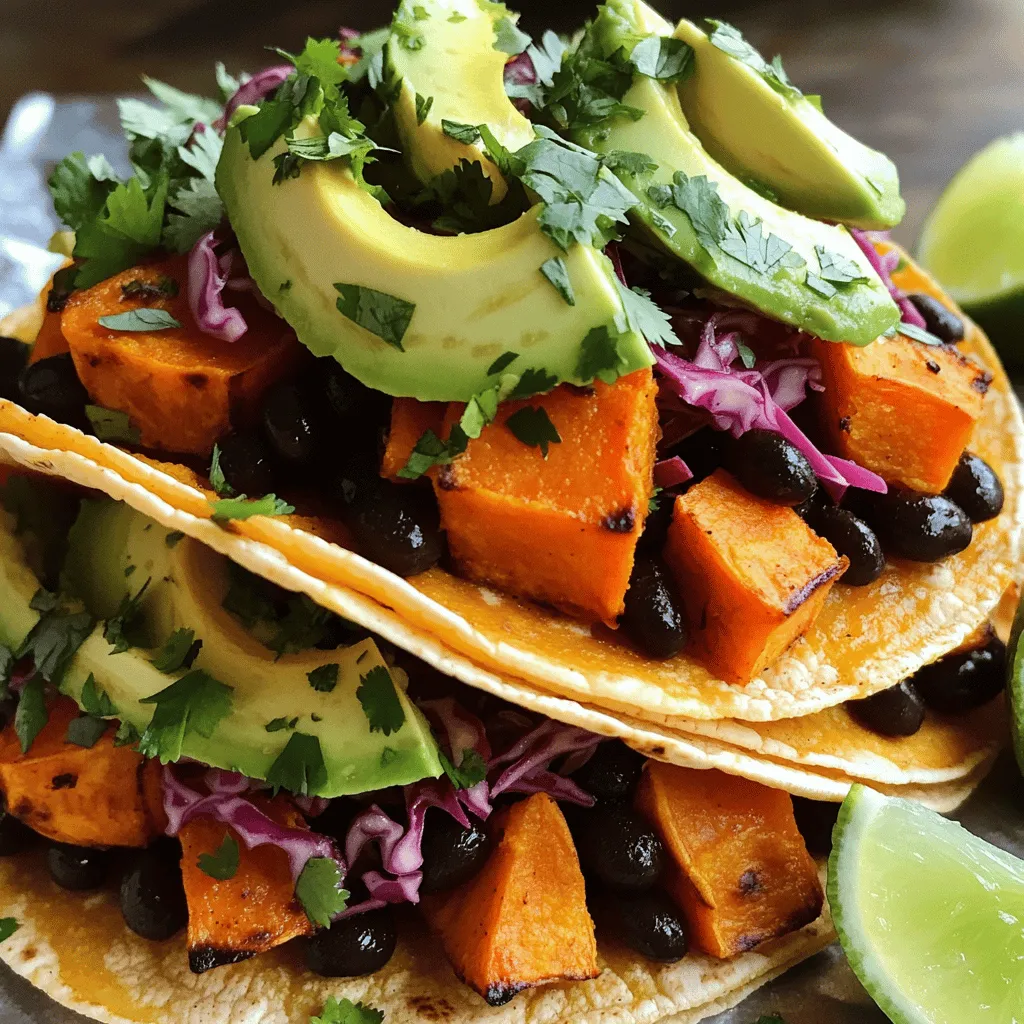
Looking for a tasty and easy meal? Sweet Potato Black Bean Tacos are your answer! This recipe is simple, quick,
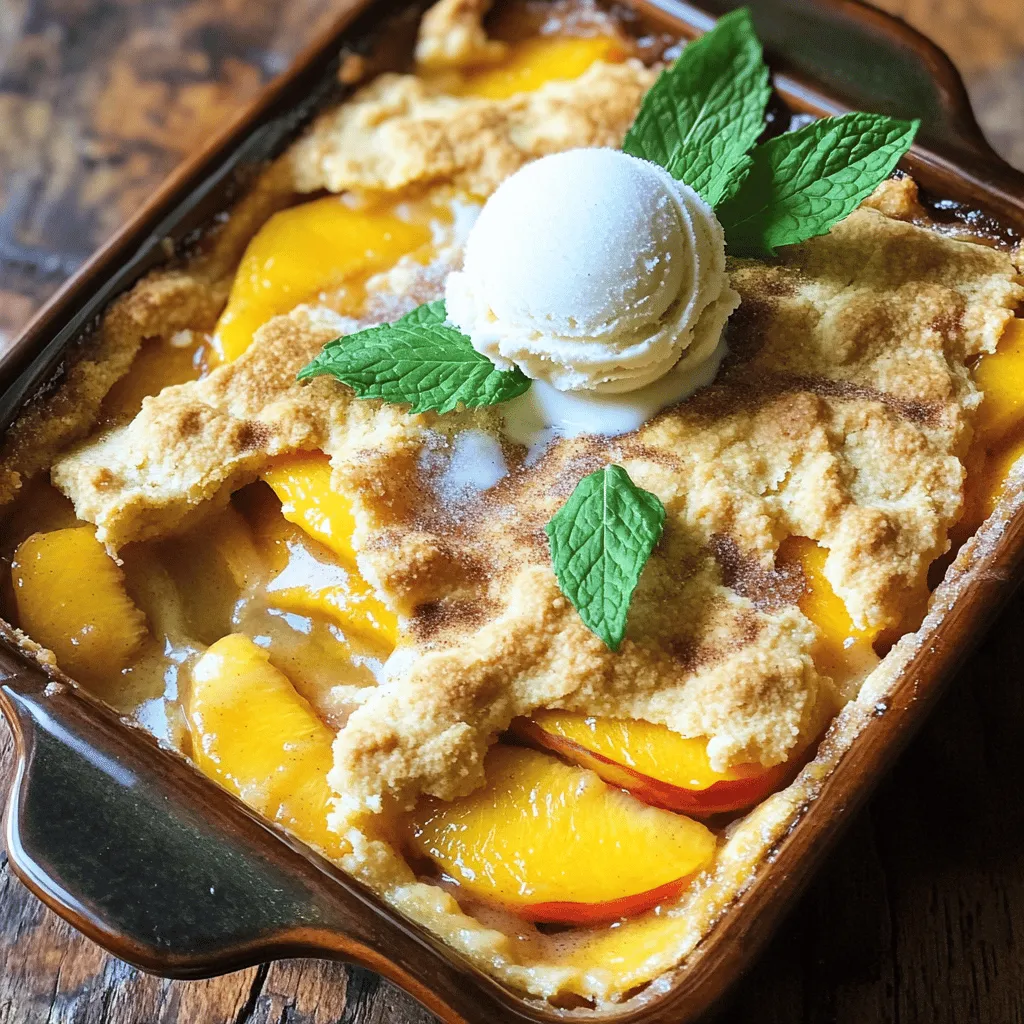
Ready to treat your family to a delicious dessert? This Peach Cobbler with Bisquick is a simple delight that even
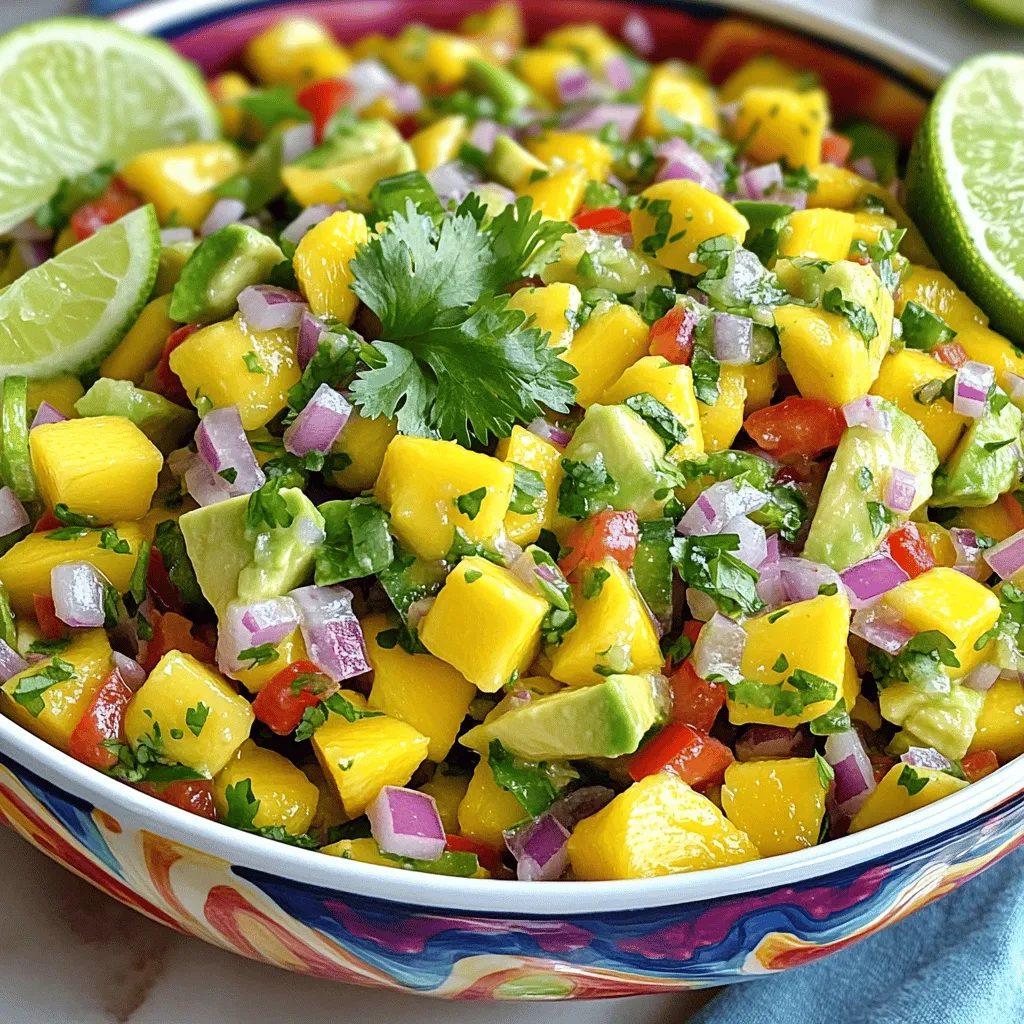
Are you ready to elevate your snack game? Mango Avocado Salsa is a burst of fresh flavor that will impress
![To make this tasty dip, gather these main ingredients: - 1 cup all-purpose flour - 1/2 cup unsalted butter, softened - 1/2 cup brown sugar, packed - 1/4 cup granulated sugar - 1 teaspoon pure vanilla extract - 1/2 teaspoon salt - 1 cup cream cheese, softened - 1/2 cup mini chocolate chips - 1/2 cup powdered sugar - 1-2 tablespoons milk (optional) These items create a rich and creamy dip that tastes just like cookie dough. The butter and sugars give it a sweet base, while the cream cheese adds a smooth texture. The mini chocolate chips provide that perfect chocolatey crunch. You can make this dip your own by adding these optional ingredients: - Peanut butter for a nutty twist - Cocoa powder for a deeper chocolate flavor - Chopped nuts for added crunch - A sprinkle of sea salt for balance These extras can change the taste and make it more fun. Feel free to mix and match based on what you like! When serving your dip, choose some great dippers: - Graham crackers - Apple slices - Pretzels These dippers provide a nice contrast to the sweet dip. They add a crunchy texture and make for a fun, interactive dessert. You can also use cookies for an extra indulgence. Just remember, the Full Recipe will guide you through every step to achieve this delightful treat! To start, prepare the flour. Take 1 cup of all-purpose flour and put it in a microwave-safe bowl. Heat it for 1 minute. Make sure it reaches 160°F (70°C). This step is key. It kills any bacteria, making the flour safe to eat raw. Once heated, let the flour cool completely before using it. Now, it’s time to mix the dough. In a large bowl, add the softened unsalted butter, 1/2 cup brown sugar, and 1/4 cup granulated sugar. Use a hand or stand mixer on medium speed. Beat the mixture until it becomes light and fluffy, which should take about 2-3 minutes. Next, add 1 cup of softened cream cheese, 1 teaspoon of vanilla extract, and 1/2 teaspoon of salt. Mix on low speed until the mixture is smooth. Gradually add the cooled flour to this mix. Keep mixing on low speed until everything combines well. Use a spatula to scrape down the sides of the bowl as you mix. For the final touches, gently fold in 1/2 cup of mini chocolate chips and 1/2 cup of powdered sugar. If the dip seems too thick, add 1-2 tablespoons of milk to reach your desired consistency. Once blended, transfer the dip to a nice serving bowl. Smooth the top with a spatula. For a great presentation, arrange dippers like graham crackers, apple slices, or pretzels around the bowl. You can also drizzle melted chocolate on top or sprinkle extra mini chocolate chips for an appealing look. Enjoy your treat! For the full recipe, check the details above. To get a smooth dip, start with softened butter and cream cheese. This helps them mix easily. If the dip is too thick, add 1-2 tablespoons of milk. This will make it creamy without losing taste. Mix well after adding milk to ensure it blends in nicely. Taste your dip as you mix. Some like it sweeter, while others prefer less sugar. You can add more brown sugar or powdered sugar to make it sweeter. If you want less sweetness, reduce the sugar in the recipe. This way, you can make the dip just how you like it. First, choose a nice bowl for the dip. A decorative bowl makes it look fun. Arrange dippers like graham crackers, apple slices, or pretzels around the bowl. To impress, drizzle melted chocolate on top. You can also sprinkle extra mini chocolate chips for a pretty finish. This makes it a treat that everyone will enjoy! For the complete recipe, check the [Full Recipe]. {{image_4}} You can make this dip even more fun by adding extra flavors. Peanut butter brings a nutty taste that pairs well with chocolate. Just mix in half a cup of creamy peanut butter. Nutella adds a rich, chocolate-hazelnut twist. Use a similar amount, about half a cup, for a decadent treat. A sprinkle of sea salt on top brings balance to the sweetness. This simple touch makes each bite pop with flavor. Switching up your chocolate chips can change the whole dip. You can use dark chocolate chips for a richer flavor. Semi-sweet chocolate chips provide classic sweetness. Try milk chocolate chips for a sweeter experience. White chocolate chips add a creamy touch that many love. For a crunchy surprise, mix in some toffee bits or butterscotch chips. This gives the dip texture and extra sweetness. If you want a lighter version, try using low-fat cream cheese. It keeps the dip creamy while cutting down on fat. You can also use Greek yogurt for a protein boost. For sweetness, consider using natural sweeteners like honey or maple syrup. These options can help reduce refined sugars. Always taste as you go to find your perfect balance. These swaps keep the dip delicious while being mindful of health. For the full recipe, check out the Decadent Chocolate Chip Cookie Dough Dip section. To keep your Chocolate Chip Cookie Dough Dip fresh, store it in an airtight container. This helps prevent it from drying out. I always recommend placing a piece of plastic wrap directly on the surface of the dip before sealing the container. This extra step keeps the dip creamy and delicious. When stored properly, your dip can last about 3 to 5 days in the fridge. Be sure to check for any signs of spoilage, like a change in smell or texture. If you notice anything off, it’s best to toss it. Always trust your senses! Yes, you can freeze this dip! Just place it in a freezer-safe container. It will stay fresh for up to 2 months. When you want to enjoy it again, thaw it in the fridge overnight. You may need to stir it a bit to bring back its creamy texture. Enjoy your tasty treat whenever you want! No, raw flour can have harmful bacteria. To make it safe, you must heat it. Place the all-purpose flour in a microwave-safe bowl and heat it for about one minute. The flour should reach 160°F (70°C). This step is key to keeping you safe while enjoying this dessert. Yes, you can make a vegan version of this dip. Use vegan butter instead of regular butter. For cream cheese, select a plant-based alternative. Also, swap granulated sugar with coconut sugar or another vegan sweetener. This way, you can enjoy the dip without any animal products. If you lack cream cheese, try using Greek yogurt or silken tofu. Both options give a creamy texture. For a sweet twist, you can use a vanilla-flavored yogurt. Just mix it well with the other ingredients to keep that tasty flavor. If you want to try making this dip, check out the Full Recipe. This blog covered making a tasty chocolate chip cookie dough dip. We discussed key ingredients and how to prepare them. I shared tips for a creamy texture and ways to make it your own. You learned about storage options and answered common questions. In closing, this dip is fun to make and share. Don't hesitate to try different flavors and dippers. Enjoy your tasty creation!](https://spoonfulsavory.com/wp-content/uploads/2025/05/50387759-cad8-4c19-86e3-b98f76a829e6.webp)
Get ready to dive into a sweet treat that will put a smile on your face! This Chocolate Chip Cookie
Are you craving a tasty snack that’s both healthy and delicious? Look no further! I’ll show you how to make
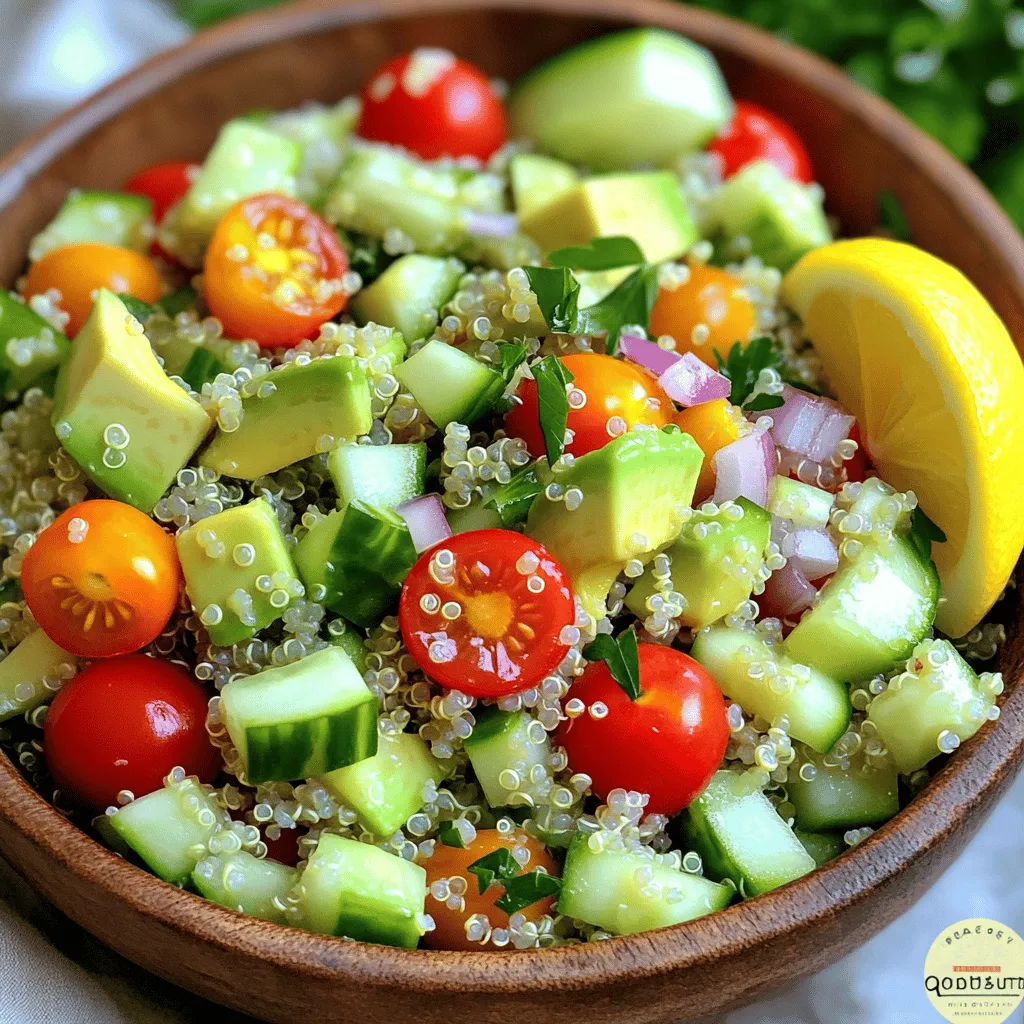
Welcome to your new favorite dish: Savory Quinoa Salad with Avocado! This healthy delight packs a punch of flavor and
