Skip to content
DisclaimerTerms Of UseGDPR PolicyCookie Policy

spoonfulsavory

  • Home
  • Drinks
  • Appetizers
  • Dinner
  • Dessert
  • About
  • Contact
  • Privacy Policy
DisclaimerTerms Of UseGDPR PolicyCookie Policy

Sarah

- 1 cup all-purpose flour - 2 tablespoons unsweetened cocoa powder - 2 tablespoons granulated sugar - 1 tablespoon baking powder - 1/4 teaspoon sea salt - 1 cup milk (dairy or non-dairy) - 1 large egg - 2 tablespoons vegetable oil - 1/2 cup chocolate hazelnut spread (such as Nutella) - 1/2 cup chopped hazelnuts - Fresh fruit for garnish (bananas or strawberries) - Maple syrup for serving When I make Chocolate Hazelnut Spread Pancakes, the ingredients are key to their fluffy goodness. For the dry mix, I start with all-purpose flour, cocoa powder, sugar, baking powder, and sea salt. Each adds a layer of flavor and texture to the pancakes. Next, I turn to the wet ingredients. I use milk, which can be dairy or non-dairy, to keep things flexible. The large egg adds fluffiness, and vegetable oil keeps the pancakes moist. The star of this recipe, of course, is the chocolate hazelnut spread. It brings rich flavor and a sweet surprise. For toppings, I love adding chopped hazelnuts for crunch. Fresh fruit like bananas or strawberries brightens the dish. A drizzle of maple syrup ties it all together, making each bite a delight. You can find the full recipe above to create these treats at home! Combine the following in a mixing bowl: - 1 cup all-purpose flour - 2 tablespoons unsweetened cocoa powder - 2 tablespoons granulated sugar - 1 tablespoon baking powder - 1/4 teaspoon sea salt Whisk these dry ingredients together. Make sure they are well blended and free of lumps. This step is key for fluffy pancakes. In a separate bowl, whisk together: - 1 cup milk (your choice of dairy or non-dairy) - 1 large egg - 2 tablespoons vegetable oil Mix until the texture is smooth. This helps to create a rich batter. Now, gradually pour the wet mixture into the dry mix. Stir gently with a spatula or wooden spoon. Stop mixing when just combined. A few lumps are okay. Overmixing can lead to tough pancakes. Preheat a non-stick skillet or electric griddle over medium heat. Lightly grease it with vegetable oil or cooking spray. Pour about 1/4 cup of batter onto the skillet. Immediately add about 1 teaspoon of chocolate hazelnut spread in the center. Use a spoon to cover the spread with a bit more batter if needed. Cook for 2-3 minutes. Look for small bubbles on top and firm edges. Carefully flip the pancakes and cook for another 1-2 minutes until fluffy and cooked through. Transfer the pancakes to a plate and cover them loosely with a kitchen towel to keep warm. Stack them neatly. Drizzle generously with maple syrup. Sprinkle chopped hazelnuts on top. Add fresh fruit slices for a colorful touch. Enjoy your delicious chocolate hazelnut spread pancakes! For the full recipe, check out the detailed steps above. To get fluffy pancakes, use a non-stick skillet. This helps the pancakes cook evenly. Avoid overmixing your batter. When you mix too much, the pancakes can turn tough. Remember, a few lumps in the batter are okay. You want your batter to have a slightly lumpy texture. This means it’s ready to cook. If the batter is too smooth, your pancakes may not rise well. Look closely and trust your instincts. You can make your pancakes even tastier by adding spices. A dash of cinnamon brings warmth and depth. A splash of vanilla extract adds sweetness. Feel free to mix and match flavors to find what you love most. For the full recipe, check the section above. {{image_4}} If you need a nut-free option, you can still enjoy these pancakes. Simply swap the chocolate hazelnut spread with sunflower seed butter. This will give you a similar flavor and creaminess without the nuts. Sunflower seed butter is tasty, and it keeps the pancakes fluffy. Want to make these pancakes vegan? No problem! Just use plant-based milk instead of regular milk. You can also replace the egg with an egg replacer like flaxseed meal or a store-bought option. This way, you keep the same great taste while making it dairy-free. Fruits can add a fun twist to your pancakes. Try mixing in some mashed bananas or fresh blueberries directly into the batter. The bananas will add sweetness, while the blueberries bring a burst of juicy flavor. Both options make your pancakes even more delicious and nutritious. For the full recipe, check out the detailed instructions above. Refrigerate leftover pancakes in an airtight container for up to 3 days. Keeping them sealed helps maintain their soft texture and taste. When you want a quick snack or breakfast, just grab them from the fridge. Freeze individual pancakes with parchment paper in between for easy reheating. This method prevents them from sticking together. Use freezer-safe bags or containers to keep them fresh. They can last up to a month in the freezer. Microwave or toast pancakes for a quick warm-up. For the microwave, heat for about 30 seconds. If you use a toaster, set it on medium. Both methods bring back the fluffiness and warmth, making your pancakes taste fresh again. Enjoy them with a drizzle of maple syrup or extra chocolate hazelnut spread. For the full recipe, check the earlier sections. Yes, you can make these pancakes in advance. Just cool them down first. Then, store them in the fridge or freeze them. When you want to eat them, just reheat in the microwave or toaster. If you don’t have chocolate hazelnut spread, don’t worry! You can use peanut butter, almond butter, or any other spread you like. Each will give the pancakes a unique taste. To check if your pancakes are done, look for bubbles on the surface. The edges should also look firm. Once you see this, it’s time to flip them over. These pancakes combine the best dry and wet ingredients for a delicious treat. You learned how to prepare, cook, and serve them for a perfect breakfast. Tips help you achieve fluffiness and flavor. You can customize these pancakes to fit your needs, whether vegan or nut-free. Store leftovers for easy reheating. Enjoy experimenting with toppings and variations. Now, you have all the tools to create your perfect stack of chocolate hazelnut pancakes. Happy cooking!

Chocolate Hazelnut Spread Pancakes Fluffy and Irresistible

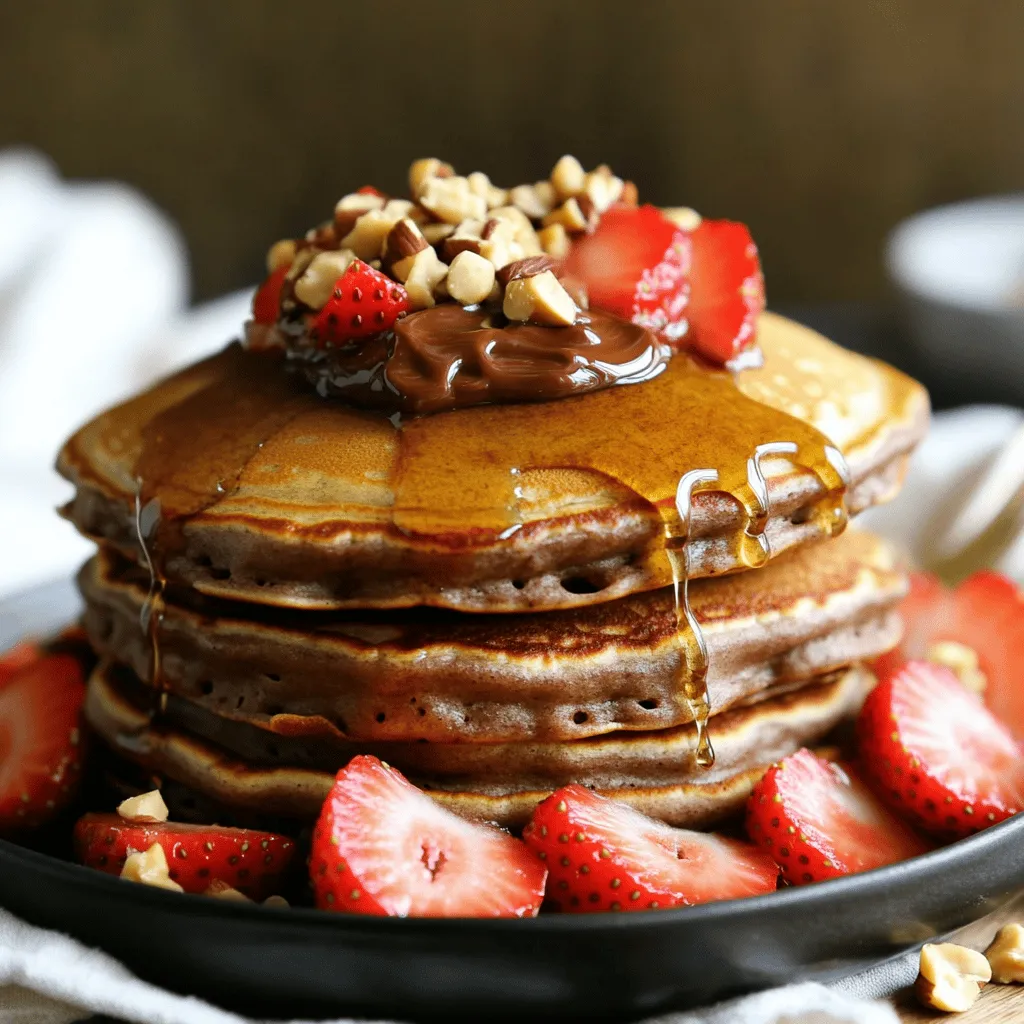
Craving a breakfast that’s both sweet and fluffy? You’re in the right place! These Chocolate Hazelnut Spread Pancakes are the

- 1 ½ cups almond flour - ½ cup all-purpose flour - ¼ cup cold unsalted butter, cubed - 4 ripe peaches, pitted and sliced The almond flour gives the crust a nutty flavor. The all-purpose flour adds structure. Cold unsalted butter helps the crust stay flaky. Using ripe peaches ensures a sweet filling. - 1 tablespoon granulated sugar - 2 tablespoons honey or pure maple syrup - 1 tablespoon freshly squeezed lemon juice Granulated sugar enhances the sweetness of the peaches. Honey or maple syrup adds a rich flavor. Lemon juice brightens the overall taste and balances the sweetness. - 1 tablespoon cornstarch - 1 egg, whisked (for egg wash) - Turbinado sugar, for sprinkling on crust Cornstarch thickens the peach filling as it bakes. The egg wash creates a shiny, golden crust. Turbinado sugar adds a lovely crunch and sparkle to the top. For the full recipe, check out the detailed instructions. Each ingredient plays a vital role in making this peach galette a true delight. 1. Mixing dry ingredients: In a large mixing bowl, whisk together 1 ½ cups of almond flour, ½ cup of all-purpose flour, 1 tablespoon of granulated sugar, and ¼ teaspoon of sea salt. Make sure these ingredients are well combined. 2. Incorporating butter: Now, add ¼ cup of cubed cold unsalted butter. Use a pastry cutter or your fingers to blend it in. You want the mixture to look like coarse crumbs, with small pea-sized chunks of butter still visible. 1. Adding ice water: Gradually add ¼ cup of ice water, one tablespoon at a time. Mix with a fork after each addition. Stop when the dough starts to hold together. 2. Forming the dough: Shape the dough into a disk. Wrap it in plastic wrap and refrigerate it for at least 30 minutes. This helps the dough firm up, making it easier to roll out later. 1. Mixing ingredients: In a medium bowl, combine 4 sliced peaches, 2 tablespoons of honey or pure maple syrup, 1 tablespoon of lemon juice, 1 teaspoon of vanilla extract, and 1 tablespoon of cornstarch. 2. Marinating peaches: Toss the peaches gently. Let them sit for about 10 minutes. This allows the peaches to soak up the sweet flavors and become even tastier. 1. Rolling out dough: Take the chilled dough and roll it out on a lightly floured surface. Aim for a rough circle about 12 inches wide. Remember, a rustic look is key! 2. Filling and folding edges: Move the rolled dough to a baking sheet lined with parchment. Spoon the peach mixture into the middle, leaving a 2-inch border. Fold the edges over the filling, creating overlapping pleats. 1. Preheating oven: While you work, preheat your oven to 375°F (190°C). This ensures even baking. 2. Applying egg wash: In a small bowl, whisk 1 egg until smooth. Brush this over the crust to get a golden finish. Sprinkle turbinado sugar on top for extra crunch. 1. Cooling time: Once baked for 30-35 minutes, take the galette out and let it cool for about 5-10 minutes. This helps it set before slicing. 2. Serving suggestions: Serve warm or at room temperature. I love pairing it with creamy vanilla ice cream or light whipped cream for a special touch. For the full recipe, check out the detailed instructions above and enjoy making this delightful dessert! For the best almond crust, focus on the texture. You want it to be crumbly and light. Here are some tips: - Use cold butter. Cold butter creates flaky layers. - Cut the butter into the flour until it looks like tiny pebbles. Next, butter temperature matters. Use butter straight from the fridge. This keeps the dough firm. If the butter is too warm, the crust may get tough. To bring out the best in your peach galette, choose ripe peaches. Ripe peaches are sweet and juicy. Look for peaches that yield slightly to pressure and have a sweet aroma. You can also enhance the peach flavor with a few hints: - Add a pinch of cinnamon for warmth. - A splash of almond extract pairs nicely too. These small additions can make a big difference in taste. Presentation is key for a stunning galette. For serving styles, consider these options: - Slice the galette into wedges. - Arrange the wedges on a rustic wooden board. For garnish, I recommend: - Fresh mint leaves for a pop of color. - A light dusting of powdered sugar for a sweet touch. These simple steps will make your galette look as great as it tastes! {{image_4}} You can swap peaches for other stone fruits like plums or cherries. These fruits bring their own sweet and tart notes. Mixing peaches with berries creates a fun twist. Try adding blueberries or raspberries for extra color and flavor. If you need a gluten-free version, use only almond flour or a gluten-free blend. This keeps the galette crunchy and tasty. You may need to adjust the liquid to keep the right dough texture. Always check the flour mix for a good balance. Add spices like cinnamon for warmth and depth. Just a sprinkle can enhance the dish's flavor. You can also try fresh herbs like basil or thyme. These herbs give a fresh kick, pairing well with the sweetness of the peaches. To keep your peach galette fresh, store it in the fridge. Place it in an airtight container or wrap it tightly in plastic wrap. This method helps to keep the crust crisp and the peaches juicy. Your leftover galette can last for about 3 to 4 days in the fridge. If you notice any signs of spoilage, like mold or an off smell, it’s best to discard it. You can freeze your peach galette for later enjoyment. If you want to freeze it before baking, wrap it tightly in plastic wrap and then in foil. This method helps prevent freezer burn. When you are ready to bake, just remove it from the freezer and bake it straight from frozen. If you prefer freezing after baking, let the galette cool completely. Then, wrap it tightly in plastic wrap and place it in a freezer-safe bag. It can last for up to 2 months in the freezer. When you want to enjoy your frozen galette, thaw it in the fridge overnight. For best results, reheat it in the oven at 350°F (175°C) for about 15-20 minutes. This step helps restore its crispiness, making it taste fresh again. For the full recipe, check back to see all the steps needed for making this delightful treat! Yes, you can prepare the galette in advance. Make the almond crust and peach filling the day before. Keep the crust wrapped in plastic and chill it in the fridge. Store the filling in a covered bowl. When ready to bake, roll out the dough, fill it, and fold the edges. Bake it fresh for the best taste. Look for a golden-brown crust. The edges should be crisp, and the peaches will bubble with juice. If the crust looks brown and the filling is hot, your galette is ready. Yes, frozen peaches work well! Thaw them first and drain any excess liquid. Frozen peaches may be softer than fresh ones. Adjust the cornstarch to help absorb extra juice. The taste will still be delightful. Serve your peach galette warm with a scoop of vanilla ice cream. You can also add whipped cream for extra sweetness. Pair it with fresh berries for color and flavor. To reheat, place slices in a 350°F (175°C) oven for about 10 minutes. This keeps the crust crisp and the filling warm. Avoid using the microwave, as it can make the crust soggy. This galette recipe combines almond crust and sweet peaches for a delightful treat. We covered ingredients, step-by-step instructions, and storage tips. You now have all you need to create a tasty dessert. With variations and expert tips, you can customize your galette to your liking. Remember, using ripe peaches makes all the difference. Enjoy baking and sharing this wonderful dessert with friends and family!

Peach Galette with Almond Crust Flavorful Treat Guide

If you crave a dessert that’s both simple and delicious, you’re in the right place! Today, I’ll walk you through

To make a savory Eggplant Parmesan Bake, you'll need the following ingredients: - 2 medium eggplants - 1 teaspoon salt - 2 cups marinara sauce - 2 cups ricotta cheese - 1 cup grated Parmesan cheese - 3 cups shredded mozzarella cheese - 1 teaspoon dried basil - 1 teaspoon dried oregano - Olive oil, for drizzling - Fresh basil leaves for garnish (optional) Each ingredient plays a key role in creating a rich and tasty dish. Eggplants provide a meaty base, while the cheeses add creaminess and depth. Marinara sauce brings a bright, tangy flavor that ties everything together. The herbs give the bake that extra pop, making it truly special. Using fresh ingredients matters. When selecting eggplants, look for firm ones with smooth skin. They should feel heavy for their size. A good marinara sauce can be homemade or store-bought, but go for quality. This makes a big difference in taste. By gathering these ingredients, you set yourself up for success in making a delicious Eggplant Parmesan Bake. For the full recipe, follow the steps to bring this dish to life and impress your family or friends! 1. Preheat the oven: Set your oven to 375°F (190°C). This helps the bake cook evenly. 2. Slice and salt the eggplant: Cut the eggplants into ½-inch thick rounds. Sprinkle salt on them. Let the slices sit in a colander for about 30 minutes. The salt draws out moisture and bitterness. 3. Rinse and pat dry: After 30 minutes, rinse the eggplant slices under cold water. Use paper towels to gently pat them dry. This step is key for a tasty bake. 1. Sautéing the eggplant: In a large skillet, drizzle olive oil over medium heat. Add the eggplant slices in batches. Cook each side for about 3-4 minutes, until golden brown and tender. Transfer to a paper towel-lined plate to absorb excess oil. 2. Preparing the ricotta filling: In a medium bowl, mix the ricotta cheese, half of the grated Parmesan, dried basil, and oregano. Add a pinch of salt and pepper. Stir until creamy and well combined. 1. Layering ingredients in the baking dish: Start by spreading a thin layer of marinara sauce on the bottom of your baking dish. Place half of the sautéed eggplant slices on top. 2. Instructions for baking: Spoon half of the ricotta mixture over the eggplant. Then, add another layer of marinara sauce, followed by a generous layer of mozzarella cheese. Repeat this process until all ingredients are used. Finish with a final layer of marinara sauce, mozzarella, and remaining Parmesan cheese. Drizzle a little olive oil on top for a golden finish. Cover the dish with aluminum foil and bake for 30 minutes. After that, remove the foil and bake for another 15 minutes, until the cheese is bubbly and golden. For the complete steps, refer to the Full Recipe. - Choosing the right eggplants: Look for firm, shiny, and unblemished eggplants. They should feel heavy for their size. Smaller eggplants tend to be sweeter and less bitter. Try to select medium-sized ones for the best texture. - Importance of salting the eggplant: Salting helps remove moisture and bitterness. Slice the eggplants and sprinkle salt on both sides. Let them rest in a colander for about 30 minutes. Rinse the slices and pat them dry with a paper towel. This step is key for a tasty bake. - Tips for layering: Start with a layer of marinara sauce at the bottom. Then, add a layer of eggplant slices. Spoon half of the ricotta mixture over the eggplant, followed by another layer of sauce and mozzarella. Repeat this process. Finish with sauce and cheese on top. This method creates a rich, flavorful dish. - Recommended marinara sauce types: Use a homemade sauce if you can. It often tastes fresher. If you choose store-bought, look for brands that use high-quality ingredients. A sauce with herbs can add great flavor. - Alternative cheeses for different tastes: While mozzarella is classic, try mixing in gouda or fontina for a twist. They melt well and add depth. You can also use vegan cheese if you're going dairy-free. Mixing different cheeses can enhance the overall flavor of your bake. If you want more details, refer to the Full Recipe. Enjoy your cooking adventure! {{image_4}} If you want a vegan eggplant parmesan, you can swap out the dairy. Use cashew cheese or store-bought vegan cheese. Nutritional yeast is a great option for a cheesy flavor without dairy. Also, make sure your marinara sauce is vegan-friendly. For gluten-free options, replace regular breadcrumbs with gluten-free ones. You can also use ground almonds or cornmeal for a crunchy layer. Just be sure to check all labels when buying pre-made items. To boost the flavor, try adding veggies like spinach or mushrooms. You can layer them in between the eggplant slices. Bell peppers or zucchini are great choices too. Sprinkle in some red pepper flakes for a little heat. Experimenting with different cheeses can also elevate your dish. Swap mozzarella for provolone or gouda for a twist. Each cheese adds its own flavor, making your eggplant bake unique. The full recipe can guide you in making these adjustments. To keep your Eggplant Parmesan Bake fresh, store it in the fridge. Place leftovers in an airtight container. This will help maintain flavor and texture. The bake stays good for about three to five days. If you want to save it longer, freezing is a great option. To freeze the Eggplant Parmesan Bake, let it cool completely. Then, wrap it tightly in plastic wrap and aluminum foil. This keeps out moisture and protects it from freezer burn. It can last up to three months in the freezer. When you're ready to eat, just thaw it overnight in the fridge before reheating. You can reheat your Eggplant Parmesan Bake in two ways: the oven or the microwave. The oven gives you a crispy top. Preheat it to 350°F (175°C). Place the bake in an oven-safe dish and cover it with foil. Heat for about 20-25 minutes, or until it’s hot all the way through. If you’re short on time, the microwave works too. Just place a slice on a microwave-safe plate. Heat for 1-2 minutes, checking every 30 seconds. The microwave may not keep the bake as crispy, but it’s quick! To keep the bake moist while reheating, add a splash of water or extra marinara sauce before heating. This helps prevent it from drying out. Enjoy your delicious leftovers! How long does Eggplant Parmesan Bake last in the fridge? Eggplant Parmesan Bake lasts about 3 to 5 days in the fridge. Make sure to store it in an airtight container. This keeps it fresh and tasty. Can I prepare Eggplant Parmesan Bake in advance? Yes, you can prepare it in advance. Assemble the layers, then cover and refrigerate. Just bake it when you are ready to eat. This makes meal prep easy and fun. What can I serve alongside Eggplant Parmesan Bake? I love serving this dish with a fresh salad or garlic bread. You can also pair it with pasta for a heartier meal. The flavors complement each other well. How can I make it spicier? To add heat, try using crushed red pepper flakes in the marinara sauce. You can also mix in some spicy sausage or jalapeños for an extra kick. What type of eggplant is best for this recipe? I recommend using globe eggplants. They have a nice texture and flavor. Japanese or Italian eggplants work too. They are smaller and sweeter, which can add a unique taste. Is it necessary to peel eggplants? No, it is not necessary to peel eggplants. The skin adds texture and nutrients. However, if you prefer a softer bite, you can peel them. It is all about your personal taste. For the full recipe and detailed steps, check out the [Full Recipe]. Making Eggplant Parmesan Bake is simple and fun. You learned about the key ingredients, preparation steps, and cooking tips. My tips on choosing the right eggplant and salting it will help you perfect your dish. You can even explore variations to suit your taste or diet. Remember, storing leftovers and reheating correctly keeps your dish tasty. Enjoy making this delicious recipe and share it with others. Happy cooking!

Savory Eggplant Parmesan Bake Simple and Tasty Meal

Welcome to the irresistible world of Eggplant Parmesan Bake! If you’re searching for a simple yet tasty meal that’s both

To make this coconut curry lentil soup, gather these simple items: - 1 tablespoon coconut oil - 1 medium onion, diced - 3 cloves garlic, minced - 1 tablespoon fresh ginger, grated - 1 tablespoon red curry paste - 1 teaspoon ground cumin - 1 teaspoon ground coriander - 1 can (14 oz) coconut milk - 4 cups vegetable broth - 1 cup red lentils, thoroughly rinsed - 1 medium carrot, diced - 1 bell pepper, diced (any variety) - 2 cups fresh spinach (or kale) - 2 tablespoons fresh lime juice - Salt and pepper, to taste - Fresh cilantro, for garnish (optional) Use fresh ingredients for the best taste. Look for firm onions and bright carrots. Choose good-quality coconut milk; this gives the soup a rich flavor. Fresh herbs should look vibrant and smell fragrant. For spices, check the date on the label. Fresh spices give more flavor and aroma. You can swap ingredients based on what you have. Use olive oil if you lack coconut oil. Any lentils can work, but red lentils cook faster. If you prefer a different color, use green or brown lentils. For veggies, try zucchini or sweet potatoes. You can skip spinach or kale and add other greens you like. Lastly, lime juice can change to lemon juice for a different tang. For the full recipe, check the instructions section. To make Coconut Curry Lentil Soup, gather your ingredients first. This will help you stay organized. The key to a great soup is prep. You will need to chop your onion, garlic, ginger, carrot, and bell pepper. Rinse the lentils well under cold water. This step is very important for good texture. 1. In a large pot, heat the coconut oil over medium heat until it shimmers. 2. Add the diced onion. Sauté it for about 5 minutes. The onion should become soft and clear. 3. Stir in the minced garlic and grated ginger. Cook them for 1-2 minutes. This will make your kitchen smell amazing! 4. Next, mix in the red curry paste, ground cumin, and ground coriander. Cook this mixture for another minute. Let those spices release their flavors. 5. Gradually pour in the coconut milk and vegetable broth. Stir well to combine everything into a creamy base. 6. Add the rinsed red lentils, diced carrot, and diced bell pepper. Increase the heat until the soup boils gently. Then, lower the heat to let it simmer. 7. Cover the pot and let the soup simmer for about 25-30 minutes. Check occasionally. The lentils should be tender and most liquid absorbed. 8. Once the lentils are cooked, add the fresh spinach or kale. Stir until the greens wilt and look bright. 9. Remove the pot from heat. Stir in fresh lime juice and add salt and pepper to taste. 10. Serve the soup hot, with cilantro on top for extra flavor. To check if the lentils are done, take a spoonful and taste them. They should be soft but not mushy. You can also look for a thick, creamy texture in the soup. If it seems too watery, let it simmer a bit longer. Enjoy your Coconut Curry Lentil Soup! For more detailed instructions, see the Full Recipe. To boost flavor, use fresh spices. Fresh spices are more potent than old ones. Add more red curry paste for heat. If you like it spicy, try adding chopped chili peppers. Fresh lime juice adds brightness. You can also finish the soup with a splash of coconut milk for creaminess. Avoid cooking lentils too long. Overcooked lentils turn mushy. Make sure to rinse them well to remove any dust. Don't skip the sautéing step. This helps build a strong flavor base. Lastly, taste as you cook. Adjust salt and spice levels to your liking. Prep your veggies ahead of time. Diced onions or carrots can save you minutes. Use canned coconut milk for quick creaminess. You can also make a double batch for leftovers. Store it in the fridge or freezer. This soup tastes even better the next day! For the full recipe, check out the section above. {{image_4}} This soup is naturally vegan and gluten-free. You can keep it that way easily. Use vegetable broth, which is safe for everyone. The main ingredients, like lentils and coconut milk, are already plant-based. Just make sure your red curry paste is free from fish sauce. Check the label to be sure. Want to add protein? Chickpeas work great. They pair well with the spices. You can also try tofu for a nice texture. Cook the tofu until golden for the best flavor. If you prefer meat, add cooked chicken or shrimp. Just toss them in during the last few minutes of cooking. You can change the soup with seasonal veggies. In fall, add sweet potatoes or butternut squash. In summer, zucchini or corn can brighten the dish. Use kale in winter for a hearty touch. You can also swap spices. Try yellow curry paste for a milder flavor. Each swap gives you a new twist on this dish and keeps it exciting. For the full recipe, check the details above. To keep your coconut curry lentil soup fresh, store it in an airtight container. Let the soup cool to room temperature before sealing. This will prevent condensation and keep it from getting soggy. You can keep it in the fridge for about four days. If you want to eat it later, freezing is a great option. For freezing, use a freezer-safe container. Make sure to leave some space at the top. Liquid expands when frozen, and you don’t want any spills. The soup can last in the freezer for about three months. When you're ready to eat, thaw it overnight in the fridge. To reheat, pour the soup into a pot and warm it over medium heat. Stir well to ensure even heating. Serve the soup hot, in vibrant bowls for a great look. You can drizzle a bit of extra coconut milk on top for creaminess. Garnish with fresh cilantro for a pop of green. Lime wedges on the side add a zesty touch. This soup pairs well with crusty bread or jasmine rice for a complete meal. For the full recipe, check out the detailed instructions provided! To make Coconut Curry Lentil Soup vegan, use vegetable broth. This replaces any meat broth. Ensure the red curry paste is vegan-friendly. Most brands are, but check the label. You can also add more veggies for extra nutrition. Try adding mushrooms or zucchini for great taste. This soup is already dairy-free, thanks to coconut milk. It’s easy to make it vegan without losing flavor. Yes, you can use different types of lentils. While red lentils cook quickly and become soft, other lentils hold their shape better. Green or brown lentils are great options. They will give the soup a heartier texture, but cooking time will be longer. Just remember to adjust the cooking time based on the type of lentils you choose. Rinse and check for stones before use. You can serve Coconut Curry Lentil Soup with several sides. Rice is a great match and soaks up the soup's flavor. Naan bread is also nice for dipping. A fresh salad adds a crunchy texture. If you like, serve it with lime wedges for an extra zing. These options will enhance your soup experience and make the meal more filling. For the full recipe, check out the Cooking section. In this article, we explored the ingredients and steps for making Coconut Curry Lentil Soup. We highlighted the importance of ingredient quality and offered handy substitutions. You learned clear cooking steps and tips for checking doneness. I shared tricks to enhance flavor while avoiding common mistakes. Different variations allow for unique tastes, and I covered best practices for storage. Coconut Curry Lentil Soup is versatile, filling, and fairly easy to make. Your kitchen adventures can now include this delicious soup anytime!

Coconut Curry Lentil Soup Flavorful and Easy Recipe

Are you ready for a warm, cozy bowl of Coconut Curry Lentil Soup? This easy recipe brings a burst of

- 4 ears of fresh corn, husked - 2 tablespoons extra virgin olive oil - 1 teaspoon chili powder - 1/2 teaspoon smoked paprika - Juice from 2 fresh limes - 1/4 cup crumbled feta cheese or cotija cheese - Fresh cilantro, chopped, for garnish - Salt and freshly ground black pepper, to taste To make Chili Lime Grilled Corn, you need the best ingredients. Start with fresh corn. Look for ears with bright green husks. They should feel firm and heavy. This means they are sweet and juicy. Next, gather your seasoning and marinade ingredients. Extra virgin olive oil adds richness. Chili powder gives it heat. The smoked paprika adds a nice depth. Fresh lime juice adds a zesty kick. You want to balance the flavors well. Finally, choose your cheese and garnish. Feta or cotija cheese brings creaminess. Fresh cilantro adds color and flavor. You can adjust these toppings based on your taste. For a full recipe, check the details above. Enjoy making this tasty side dish! Start by preheating your grill to medium-high heat. Aim for about 400°F (204°C). This temperature helps to sear the corn well. While the grill heats, make sure to keep safety in mind. Always use long-handled tools to avoid burns. Keep a spray bottle of water nearby in case of flare-ups. Next, it’s time to prepare the corn. First, remove the husks and silk from the ears of corn. This is important for a clean grill experience. Rinse the corn under cold water to wash off any dirt. This step ensures your corn is ready for the grill and will taste fresh. Now, let's make the marinade. In a small bowl, combine 2 tablespoons of olive oil, 1 teaspoon of chili powder, 1/2 teaspoon of smoked paprika, and the juice from 2 fresh limes. Add a pinch of salt and pepper to taste. Whisk it all together until mixed well. Use a basting brush to coat each ear of corn with the marinade. Make sure every side is covered to get that full flavor. Once the corn is marinated, place it directly on the grill. Grill the corn for about 10 to 12 minutes. Turn the corn every few minutes. This helps achieve even charring on all sides. You want it to be tender with a nice char. After grilling, carefully take the corn off the grill. For the finishing touch, sprinkle some crumbled feta or cotija cheese over the corn while it’s still hot. This lets the cheese melt slightly. Drizzle any leftover marinade on top and add fresh chopped cilantro for a burst of color and flavor. For the full recipe, check out the details above. Enjoy your delicious Chili Lime Grilled Corn! To make your chili lime grilled corn even better, consider adding spices like cumin or garlic powder. These spices bring a warm, savory note that complements the corn well. If you want more heat, add cayenne pepper or diced jalapeños. Adjust the chili powder based on your taste. Less for a mild flavor or more for a spicy kick. Using the right tools can help you grill corn with ease. A basting brush is perfect for applying the marinade. A grill basket keeps the corn secure and makes flipping easy. Avoid common mistakes like cooking on too high heat. This can burn the corn before it cooks through. Turn the ears every few minutes for even cooking. For an eye-catching presentation, serve the grilled corn on a rustic wooden platter. This adds a nice touch to your table. Place lime wedges around the corn for a pop of color. You can also sprinkle extra cilantro on top for a fresh look. Pair it with grilled meats or salads to create a complete meal. Enjoy the vibrant flavors and visual appeal of this summer side dish with these tips! For the full recipe, check out the complete guide. {{image_4}} You can easily change the cheese in this dish. If you want a vegan option, try using a plant-based feta. It gives a similar taste without dairy. For a twist, you can also use goat cheese. It adds a nice tang. You can also switch up herbs and spices. Instead of cilantro, try fresh parsley or green onions. If you want more heat, add jalapeño or cayenne pepper to the marinade. For a sweeter note, sprinkle some chili flakes or smoked paprika. No grill? No problem! You can roast corn in the oven. Wrap the corn in foil and bake it at 400°F (204°C) for 25-30 minutes. This method keeps the corn juicy and tender. Another way is to use a stovetop grill pan. Heat the pan over medium-high heat and grill the corn for about 10 minutes. Turn it often for even cooking. If you choose to roast corn in the husk, soak it in water for 30 minutes. This keeps the corn moist while cooking. Just make sure to remove the silk before grilling. Chili lime grilled corn pairs well with many dishes. Serve it alongside grilled chicken or fish for a complete meal. It also goes great with summer salads, like a fresh tomato salad or a cucumber salad. For drinks, a cold beer or a zesty lemonade complements the corn's flavors. If you prefer wine, try a light white wine like Sauvignon Blanc. It enhances the meal without overpowering it. Don't forget to check out the Full Recipe to get all the details on this tasty dish! To store grilled corn, let it cool first. This helps keep moisture in check. Wrap each ear in plastic wrap or foil. You can also place them in an airtight container. This method keeps the corn fresh for up to three days. Refrigerate the corn right after it cools down. If you have leftover marinade, store it in a separate container. It can last for a week in the fridge. Reheating corn can keep it tasty and fresh. The best way is to use a grill. Heat the grill to medium. Grill the corn for about 5 minutes, turning it often. This keeps the flavor and texture just right. If you don't have a grill, use a microwave. Place the corn on a plate and cover it with a damp paper towel. Heat it on high for about 1-2 minutes. Check to see if it's warm enough. You can also use the oven. Preheat it to 350°F (175°C). Wrap the corn in foil and heat for 10-15 minutes. This way, the corn stays soft and moist. For easy preparation, you can follow the Full Recipe for additional tips. How long do you grill corn for maximum flavor? Grill the corn for about 10-12 minutes. Turn it every few minutes. This helps it char evenly. You want that perfect blend of sweetness and smokiness. Can I use frozen corn for this recipe? Frozen corn works, but fresh corn shines here. If using frozen, thaw it first. Then, grill it just until warm. You may miss some flavor, but it can still taste good. What should I do if my corn is overcooked? If your corn is overcooked, don’t panic. You can slice the kernels off and add them to salads or salsas. This way, you still enjoy the corn’s flavor without its tough texture. How to fix bland flavors in marinated corn? To fix bland flavors, add more lime juice or salt. You can also sprinkle extra chili powder. This will boost the taste and give it a nice kick. Can I add other toppings, and what are some suggestions? Yes, you can add many toppings! Try avocado, diced tomatoes, or jalapeños for heat. You can also use different cheeses like queso fresco or Parmesan. Is there a way to make this dish spicier? To make it spicier, add cayenne pepper or red pepper flakes to your marinade. You can also sprinkle hot sauce over the corn before serving. Enjoy the heat! Grilled corn is a tasty treat that shines with great flavors. We covered the ingredients, preparation, and grilling steps to make it easy. I shared tips to enhance its taste and ways to present it beautifully. You learned about variations and storage to enjoy leftovers. Try these ideas on your next cookout. With a few tweaks, you’ll impress your friends and family with tasty grilled corn. Enjoy this simple and delicious dish!

Chili Lime Grilled Corn Flavorful Summer Side Dish

Looking for a fun and tasty summer side dish? Look no further than Chili Lime Grilled Corn! This recipe combines

- 1 pound fresh Brussels sprouts, trimmed and halved - 3 tablespoons pure maple syrup - 2 tablespoons extra-virgin olive oil - 1 tablespoon balsamic vinegar - 1 teaspoon garlic powder - Salt and freshly ground black pepper, to taste - 1/4 teaspoon cayenne pepper (optional, for added spice) - 1/2 cup pecans, roughly chopped I love using fresh Brussels sprouts for this dish. They have a nice crunch and a slight bitterness that pairs well with the sweet maple syrup. The maple syrup adds a rich flavor that balances the sprouts. The olive oil helps them roast perfectly, while balsamic vinegar gives a hint of tang. You can play with seasonings too. Garlic powder adds a nice depth, while salt and pepper bring out the flavors. If you like some heat, a bit of cayenne pepper is great. The pecans at the end add a lovely crunch and nutty taste. This simple mix of ingredients makes your Brussels sprouts shine. If you want to know how to make them, check out the Full Recipe. - Preheat your oven to 400°F (200°C). - In a large bowl, mix the halved Brussels sprouts with olive oil, maple syrup, balsamic vinegar, garlic powder, salt, and pepper. If you like heat, add cayenne pepper now. - Spread the coated Brussels sprouts on a baking sheet. Ensure they are in a single layer for even cooking. Roast them for 20 minutes. - After 20 minutes, take the baking sheet out. Add the chopped pecans and stir them in. Return the baking sheet to the oven. Roast for another 10 to 15 minutes until the sprouts are tender and caramelized. - Once done, let the Brussels sprouts cool for a few minutes. - To serve, transfer them to a nice dish. Drizzle any leftover maple glaze from the pan on top. Garnish with extra pecans for crunch. Enjoy your tasty roasted delight! For the complete recipe, check out the Full Recipe section. To get that perfect roast, space your Brussels sprouts well on the baking sheet. This allows hot air to circulate. If sprouts are too close, they will steam instead of roast. Checking doneness is easy. Simply pierce a sprout with a fork. It should be tender. If it’s hard, give it more time. You can add more flavor to your dish. Try spices like smoked paprika or thyme. They work well with maple. If you want a savory twist, add some grated Parmesan cheese before roasting. For a complete meal, serve these sprouts with roasted chicken or a hearty grain like quinoa. They pair wonderfully, creating a balanced plate. Always use oven mitts when handling hot baking sheets. The oven gets hot, and you want to avoid burns. When you take out the baking sheet, place it on a heat-safe surface. Be careful of the hot steam that escapes. This is crucial for safety in the kitchen. {{image_4}} You can use honey or agave syrup instead of maple syrup. Both add sweetness. Honey gives a floral note. Agave syrup has a mild taste. Each sweetener changes the flavor a bit. Try them to find your favorite. If you want a vegan dish, skip the honey and stick with maple syrup. For gluten-free, all the ingredients are safe. You can also leave out the pecans if you need a nut-free option. Use pumpkin seeds or sunflower seeds for crunch instead. Add seasonal veggies to make it unique. Think carrots, squash, or sweet potatoes. They roast well and add color. You can also try spices like cinnamon in fall or fresh herbs in spring. These will elevate the dish and bring in fresh flavors. To store leftover Brussels sprouts, first let them cool. Place them in a container. Use an airtight one to keep them fresh. You can use glass or plastic containers. Remember, they stay good for about 3-5 days in the fridge. For the best taste when reheating, use the oven. Preheat your oven to 350°F (175°C). Spread the Brussels sprouts on a baking sheet. Heat for about 10-15 minutes. This method keeps them crispy. Avoid using the microwave. It can make them soggy and less tasty. To freeze Brussels sprouts, first cook them. Let them cool completely. Next, spread them out on a baking sheet. Freeze for about 1-2 hours. Once frozen, place them in a freezer bag. Squeeze out as much air as possible. They can last for up to 3 months in the freezer. You can easily use them later in soups or stir-fries. To enhance the flavor, try these tips: - Roast them longer for crispiness. - Add herbs like thyme or rosemary. - Use fresh garlic instead of garlic powder. - Toss in grated Parmesan cheese before serving. - Mix in citrus zest for brightness. You can also experiment with spices. A pinch of smoked paprika can add a nice kick. Try different nuts for crunch. Pecans work well, but walnuts or almonds are great too. Yes, you can prep Brussels sprouts ahead of time. Trim and halve them a day early. Store them in the fridge in a sealed bag. This keeps them fresh. You can also mix the glaze in advance. Just combine the maple syrup, olive oil, and spices. Store it in the fridge. When you’re ready to cook, toss the sprouts in the glaze. Maple glazed Brussels sprouts pair well with many dishes. Consider these main dishes: - Roast chicken or turkey is a classic match. - Pork chops add a nice savory balance. - Grilled salmon offers a tasty contrast. - Quinoa or rice can make a hearty meal. You can also serve them as part of a big salad. Mix them with greens, nuts, and a light dressing for a fresh option. Cooked Brussels sprouts last about 3 to 5 days in the fridge. Store them in an airtight container. This helps keep them fresh. Always check for signs of spoilage before eating. If they smell off or look slimy, it’s best to toss them. Reheat them thoroughly before serving. Enjoy them warm for the best taste! For the full recipe, check out the delicious maple glazed Brussels sprouts delight! In this post, we explored how to make maple glazed Brussels sprouts. We discussed the main ingredients, detailed step-by-step instructions, and shared tips to perfect your dish. We also looked at variations for different tastes and how to store leftovers. Brussels sprouts are healthy and tasty. With a little creativity, they can fit into any meal. Enjoy trying out these flavors and impress your family with this easy recipe. Happy cooking!

Maple Glazed Brussels Sprouts Tasty Roasted Delight

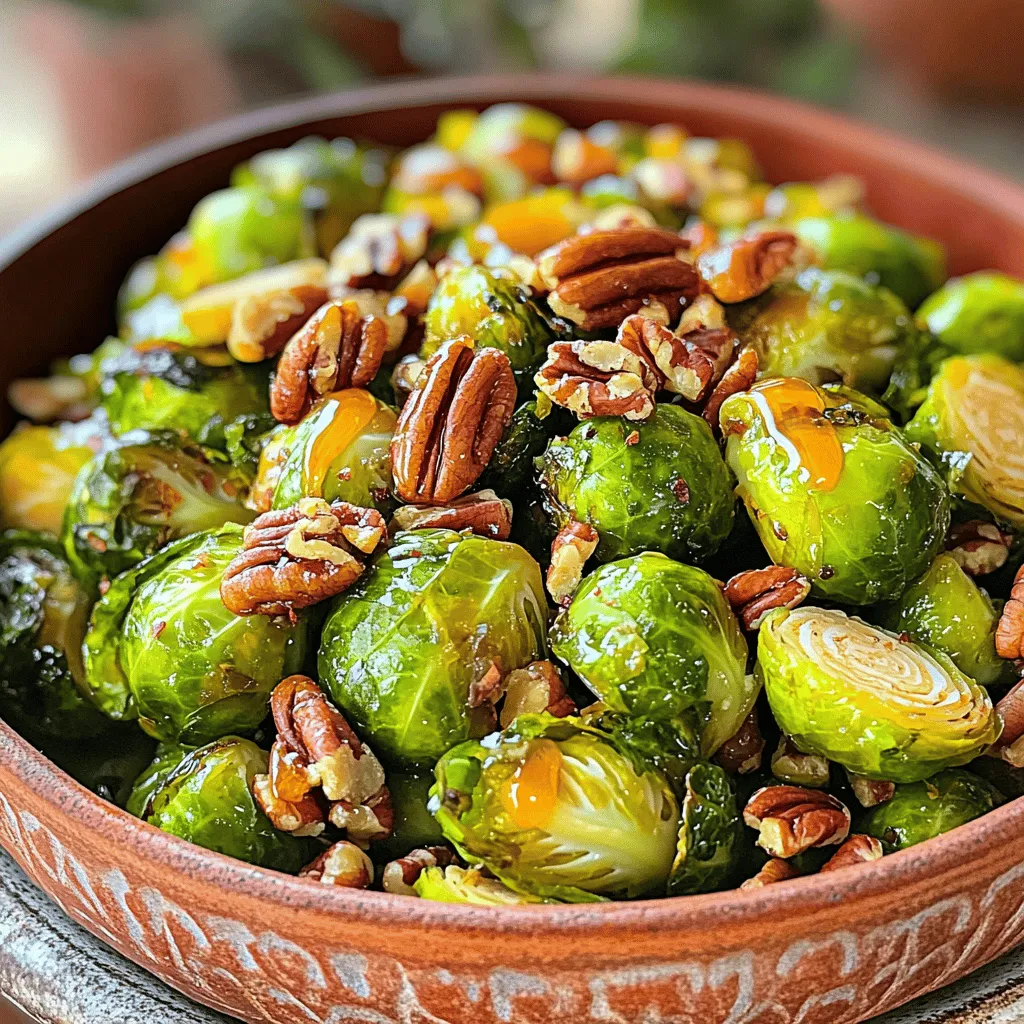
Looking for a delicious way to enjoy Brussels sprouts? You’re in the right place! My Maple Glazed Brussels Sprouts recipe

To make Zesty Shrimp and Grits, you'll need: - 1 pound large shrimp, peeled and deveined - 1 cup stone-ground grits - 4 cups water or low-sodium chicken broth - 1 cup sharp cheddar cheese, shredded - 1/4 cup heavy cream or half-and-half - 2 tablespoons olive oil - 2 tablespoons unsalted butter - 1 clove garlic, minced - 1/2 teaspoon smoked paprika - 1/2 teaspoon cayenne pepper - Kosher salt and freshly ground black pepper, to taste - 2 green onions, thinly sliced - Fresh parsley, chopped If you want to switch things up, here are some great ideas: - Shrimp: You can use chicken or sausage if you prefer. - Grits: Instant grits work, but stone-ground gives the best texture. - Cheese: Try pepper jack for a spicy kick or omit for a dairy-free option. - Broth: Use vegetable broth for a lighter taste or water for simplicity. Using high-quality ingredients is key to making this dish shine. Fresh shrimp adds bright flavor, while stone-ground grits create a creamy base. Good cheese makes the sauce rich and smooth. Each ingredient works together, so don't skimp on quality. Your taste buds will thank you! For the full recipe, check out the details above. To make Zesty Shrimp and Grits, follow these simple steps: 1. Boil the Liquid: Start by boiling four cups of water or chicken broth in a medium pot. Bring it to a strong boil on high heat. 2. Add the Grits: Gradually whisk in one cup of stone-ground grits. This helps to avoid clumps. 3. Simmer the Grits: Lower the heat to low and stir often. Let them simmer for 20-25 minutes, until creamy. 4. Mix in Cheese and Cream: Once thickened, remove from heat. Stir in one cup of shredded sharp cheddar cheese and a quarter cup of heavy cream. Add salt and pepper to taste. Cover to keep warm. 5. Cook the Shrimp: In a large skillet, heat two tablespoons of olive oil and two tablespoons of unsalted butter over medium-high heat. Once melted, add one minced garlic clove and cook for about 30 seconds. 6. Season the Shrimp: Add one pound of peeled and deveined shrimp to the skillet. Sprinkle with half a teaspoon of smoked paprika, half a teaspoon of cayenne pepper, and salt and pepper to taste. 7. Sear the Shrimp: Cook the shrimp for 2-3 minutes without stirring until they turn bright pink. Flip and cook for another 1-2 minutes until fully cooked. 8. Serve: Spoon creamy grits onto plates. Top with the zesty shrimp and drizzle any pan juices over the top. 9. Garnish: Finish with thinly sliced green onions and chopped parsley. Timing is key for this dish. Start with the grits. They need time to cook down and become creamy. While the grits simmer, prepare the shrimp. This keeps everything hot and fresh. Follow these steps: - Boil the broth and add the grits. - While the grits cook, prep and cook the shrimp. - Mix the shrimp with spices as the grits finish. This sequence keeps your dish warm and ready to eat. For the best texture and flavor, here are some tips: - Stir the Grits: Stir often to prevent clumping. The more you stir, the creamier they get. - Cheese Quality: Use sharp cheddar for a rich, bold taste. - Adjust Spice: If you want less heat, reduce the cayenne pepper. - Fresh Ingredients: Always use fresh shrimp for the best flavor. - Rest the Shrimp: Let the shrimp sit in the pan for a moment after cooking to soak up the flavors. Following these tips will elevate your dish and make every bite memorable. For a complete recipe, check out the Full Recipe section. When making grits, avoid these common mistakes: - Not whisking well: Mix the grits into boiling water slowly. This helps prevent lumps. - Too much heat: Keep the heat low after adding the grits. High heat can make them grainy. - Not stirring enough: Stir the grits often. This keeps them creamy and smooth. - Skipping the cheese: Cheese adds rich flavor. Don't skip it! To make your dish shine, try these enhancements: - Add herbs: Fresh herbs like thyme or basil elevate the taste. - Use broth instead of water: Chicken or vegetable broth adds depth. - Top with crispy bacon: Bacon bits add a nice crunch and flavor. - Drizzle with hot sauce: A touch of hot sauce can spice things up. For a well-rounded meal, consider these pairings: - Serve with a side salad: A light green salad balances the richness of the dish. - Add a crusty bread: A warm bread helps soak up the sauce and grits. - Choose a refreshing drink: Lemonade or iced tea complements the flavors well. For a full taste experience, check out the Full Recipe. Enjoy making your Zesty Shrimp and Grits! {{image_4}} If you want to switch things up, you can use other proteins in this dish. Chicken or sausage can make great substitutes. For chicken, use boneless thighs for a juicy bite. Cook them until golden brown before adding spices. If you prefer sausage, try andouille for a spicy kick. Slice it and cook it in the skillet until browned. Both options keep the flavors rich and satisfying. You can enjoy Zesty Shrimp and Grits even if you follow a vegetarian or vegan diet. Replace the shrimp with hearty vegetables like mushrooms or zucchini. For the grits, use vegetable broth instead of chicken broth. Swap the cheese with a vegan cheese or nutritional yeast for a cheesy taste. You’ll still get that creamy texture while keeping it plant-based. Changing up the spices can take this dish to new heights. You can use Cajun seasoning for a different flavor profile. For a citrus twist, try adding lemon zest or juice. Fresh herbs like cilantro or basil can also brighten the dish. A dash of hot sauce can bring extra heat if you like spice. Feel free to experiment and find your perfect flavor blend. To store your Zesty Shrimp and Grits, let them cool first. Place the dish in an airtight container. This helps keep the flavors fresh. You can store the leftovers in the fridge for up to three days. Always remember to label your container with the date so you can track freshness. When you are ready to enjoy leftovers, reheat them gently. The best way is using a saucepan on low heat. Add a splash of water or broth to keep the grits creamy. Stir often to avoid sticking. You can also use a microwave. Heat in short bursts, stirring in between. This ensures even heating without drying out the dish. If you want to save Zesty Shrimp and Grits for later, freezing is a great option. Separate the shrimp from the grits before freezing. The grits can get mushy when thawed. Place the grits in a freezer-safe container. The shrimp can go in a separate bag. They will last for about two months in the freezer. When you're ready to eat, thaw them in the fridge overnight before reheating. Shrimp and grits come from the Southern United States. This dish has roots in Lowcountry cooking, mainly in South Carolina. Fishermen made it with local shrimp and corn grits. Over time, it grew into a beloved comfort food. Today, you can find many versions across the South. To make grits creamy, use stone-ground grits and cook them slowly. Start with a good ratio of water or broth. Use about four cups of liquid for every cup of grits. Stir them often while they cook. Adding cheese and cream helps achieve that smooth texture. Yes, you can prepare shrimp and grits ahead of time. Cook the grits and shrimp separately, then store them in the fridge. Reheat them before serving. Just remember that grits may thicken when stored. You can add a splash of water or broth to loosen them. If you want a dairy-free version, try using nutritional yeast or dairy-free cheese. Coconut milk can also add creaminess without dairy. These options keep the dish rich and tasty while being friendly for those avoiding dairy. The spice level is mild to medium, depending on your taste. The cayenne pepper adds a nice kick. You can easily adjust the heat. Use less cayenne for a milder dish, or add more for extra heat. You control the spice! For the full recipe, visit the link provided. In this article, we explored how to make Zesty Shrimp and Grits. We detailed quality ingredients and how they enhance flavor. The step-by-step instructions help simplify the cooking process. You learned key tips to avoid mistakes and elevate your dish. Dishes can adapt to various proteins or dietary needs. Lastly, we discussed storage tips for leftovers. Enjoy creating this tasty meal, and feel free to experiment with flavors. Cooking should be fun and rewarding. Enjoy your delicious creation!

Zesty Shrimp and Grits Flavorful Comfort Food Dish

Experience the joy of cooking with my Zesty Shrimp and Grits recipe—your new favorite comfort food! This dish combines rich

To make a Crispy Tofu Buddha Bowl, you will need these main ingredients: - 1 block firm tofu, pressed and cut into cubes - 2 tablespoons cornstarch - 2 tablespoons soy sauce - 1 tablespoon sesame oil - 1 cup cooked quinoa - 1 cup fresh kale, chopped - 1 cup cherry tomatoes, halved - 1/2 cucumber, sliced - 1 avocado, sliced - 1/4 cup shredded carrots - 1 tablespoon sesame seeds, for garnish - Salt and pepper to taste These ingredients create a balanced mix of protein, grains, and veggies. The crispy tofu adds texture and flavor to the dish. You can customize your bowl with these optional ingredients and toppings: - 1 tablespoon sriracha or hot sauce for heat - Fresh herbs like cilantro or parsley for freshness - Nuts or seeds for crunch, like almonds or sunflower seeds - Pickled veggies for tanginess These extras can enhance your meal and make it unique to your taste. If you don’t have some ingredients, here are some easy swaps: - Use tempeh instead of tofu for a different texture. - Brown rice or farro can replace quinoa for grains. - Spinach or arugula can substitute for kale. - If you want a creamy touch, use hummus in place of avocado. These substitutions help you adapt the recipe to what you have on hand or your dietary needs. You can find the Full Recipe for more detailed steps. Start by preheating your oven to 400°F (200°C). This ensures the tofu cooks evenly. Next, take your block of firm tofu. Press it well to remove excess water. Water makes the tofu soggy instead of crispy. Cut the pressed tofu into bite-sized cubes. In a medium bowl, mix the cubed tofu with soy sauce, sesame oil, and a pinch of salt and pepper. Toss gently to coat each piece. Let the tofu marinate for about 10 minutes. This step helps the tofu soak up all the flavors. After marinating, sprinkle cornstarch over the tofu. Toss once more to coat. This will give it that amazing crispy texture when baked. While the tofu marinates, it's time to cook the quinoa. Rinse the quinoa under cold water to remove its natural coating, called saponin. This helps to keep it from tasting bitter. Use a medium saucepan for cooking. Add 1 cup of quinoa and double that amount in water—2 cups. Bring it to a boil, then reduce the heat. Cover the pan and let it simmer for about 15-20 minutes. The quinoa is ready when it’s fluffy and the little tails have popped out. Once done, set it aside and fluff it with a fork. Now, you can start putting your Buddha bowl together. Grab a large serving bowl and add a generous base of cooked quinoa. Next, add a layer of chopped kale. It adds great color and nutrition. Then, place the thinly sliced cucumber, halved cherry tomatoes, and shredded carrots on top. Finally, delicately arrange the slices of avocado. Once your tofu is golden and crispy, gently add it on top of the vegetables and quinoa. For a kick, drizzle some sriracha or your favorite hot sauce. Finish by sprinkling sesame seeds over the top for extra crunch. Serve your Buddha bowl right away while the tofu is warm. Enjoy this healthy and flavorful meal! For the complete recipe, refer to the Full Recipe. To make your tofu crispy, start with firm tofu. Press it well to remove extra water. This helps it hold its shape and crisp up. Cut the tofu into bite-sized cubes. Coat these cubes in soy sauce and sesame oil. Let them marinate for ten minutes. This adds flavor as they absorb the liquid. Next, sprinkle cornstarch over the cubes. Toss well to coat each piece. The cornstarch is key for that crunchy texture! Bake them at 400°F for 25-30 minutes. Turn them halfway for even crispiness. Keep an eye on them to avoid burning. Seasoning is important for a tasty dish. Besides soy sauce, try adding garlic powder or onion powder. These spices give a nice depth of flavor. For a kick, mix in sriracha or a dash of cayenne pepper. You can also play with herbs like thyme or rosemary for a fresh twist. Use fresh lemon juice for brightness. Don’t forget salt and pepper to taste. Experiment with different flavors to find what you love best! Presentation matters, even for a simple bowl. Start with a base of colorful quinoa. Layer your chopped kale, cherry tomatoes, and sliced cucumber. Add shredded carrots for crunch and bright color. Finally, top with beautifully sliced avocado. This adds creaminess and richness. A sprinkle of sesame seeds gives a nice touch. For an extra pop, drizzle some hot sauce on top. Serve it warm for a beautiful, healthy meal. You can find the full recipe for more details on making this bowl a hit! {{image_4}} You can switch out quinoa for other grains. Brown rice is a great choice. It has a nutty taste and chewy texture. Farro adds a hearty flavor and is rich in fiber. If you want something lighter, try cauliflower rice. It’s low-calorie and full of nutrients. Each grain gives a new twist to your Buddha bowl. Feel free to mix up the veggies in your bowl. Spinach can replace kale for a milder taste. Bell peppers add crunch and color. Roasted sweet potatoes bring sweetness and warmth. You could also use broccoli or snap peas for a fresh touch. The key is to add what you love and what’s in season. If you want a break from tofu, there are many options. Chickpeas are a fantastic plant-based protein. They add texture and flavor. Grilled chicken or shrimp can make the dish heartier. For a vegan twist, try tempeh or seitan. Each protein can change the flavor profile while keeping it healthy. For more ideas, check out the Full Recipe! To store leftovers, let the Buddha bowl cool to room temperature. Place the tofu and veggies in an airtight container. Keep the quinoa separate to avoid sogginess. Store everything in the fridge for up to three days. This keeps your meal fresh and tasty. To reheat, use the oven for best results. Preheat the oven to 350°F (175°C). Spread the tofu and veggies on a baking sheet. Heat for about 10-15 minutes until warm and crispy again. You can also microwave, but it may make the tofu less crispy. For meal prep, make a batch of quinoa and tofu ahead. Store them in separate containers. Chop your veggies and keep them in the fridge. You can mix and match throughout the week. This saves time and gives you healthy meals ready to go! Yes! The Crispy Tofu Buddha Bowl is already vegan. Tofu is made from soybeans, making it a great plant-based protein. All the other ingredients, like quinoa and fresh veggies, are also vegan-friendly. You can enjoy this meal without any animal products. Feel free to experiment with different sauces or toppings to keep it exciting. Crispy tofu can last up to four days in the fridge. Store it in an airtight container to keep it fresh. When you reheat it, the texture may change a bit. It might not be as crispy, but it will still taste good. If you want to keep it crispy, try reheating it in the oven for a few minutes. To get the best texture, start with firm or extra-firm tofu. Press it to remove excess water. This step helps the tofu absorb flavors better. Cut it into even cubes for frying or baking. Marinate it for at least 10 minutes with soy sauce and spices. Lastly, coat it in cornstarch for a crispy finish. You can follow the Full Recipe for detailed steps to make it even easier. This blog post covered how to make a Crispy Tofu Buddha Bowl. We talked about main ingredients, cooking steps, and tips for success. You learned how to store leftovers and reheat them well. Remember, this dish is flexible; you can swap grains, veggies, and proteins to fit your taste. In conclusion, enjoy making this healthy meal your own. You will love the flavors and crunch.

Crispy Tofu Buddha Bowl Healthy and Flavorful Meal

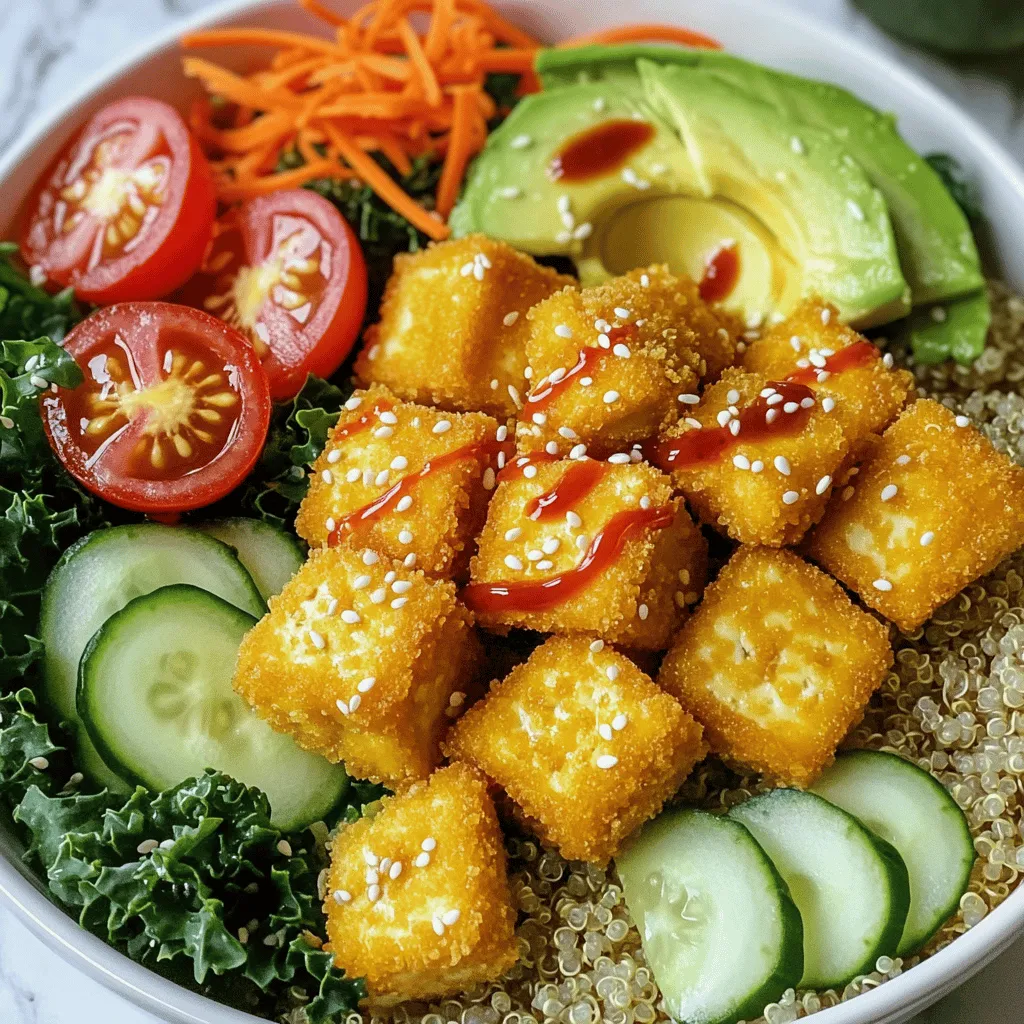
Are you ready to enjoy a healthy and tasty meal? My Crispy Tofu Buddha Bowl hits the spot! You’ll learn

To make Honey Garlic Chicken Stir-Fry, gather these items: - 1 lb (450 g) boneless chicken breast, thinly sliced - 2 tablespoons honey, preferably raw - 3 tablespoons low-sodium soy sauce - 1 tablespoon rice vinegar - 2 cloves fresh garlic, minced - 1-inch piece of ginger, grated - 1 medium bell pepper, sliced - 1 cup fresh broccoli florets - 1 medium carrot, peeled and julienned - 1 tablespoon cornstarch (optional) - 2 tablespoons vegetable oil - Salt and pepper to taste - 2 green onions, sliced (for garnish) - Sesame seeds, toasted (for garnish) You can swap ingredients if needed. Here are some ideas: - Use chicken thighs instead of chicken breast for more flavor. - Maple syrup works well in place of honey for a vegan option. - Use apple cider vinegar instead of rice vinegar for a different taste. - Try any veggies you have on hand, like snap peas or zucchini. - Coconut aminos can replace soy sauce for a gluten-free choice. - Canola oil is a good substitute for vegetable oil. Select fresh and high-quality ingredients for the best taste. Here’s what I recommend: - Choose organic chicken for better flavor and health benefits. - Opt for raw honey as it has more nutrients and taste. - Use fresh garlic and ginger for maximum flavor impact. - Pick vibrant, crisp vegetables for better texture and appearance. - Look for low-sodium soy sauce to control salt intake. Using these tips will help create a tasty Honey Garlic Chicken Stir-Fry. If you're curious about the full recipe, make sure to check the Full Recipe section! To start, gather all your ingredients. This makes the cooking process easier and fun. Here’s what you need: - 1 lb boneless chicken breast, thinly sliced - 2 tablespoons honey - 3 tablespoons low-sodium soy sauce - 1 tablespoon rice vinegar - 2 cloves garlic, minced - 1-inch piece of ginger, grated - 1 medium bell pepper, sliced - 1 cup fresh broccoli florets - 1 medium carrot, julienned - 1 tablespoon cornstarch (optional) - 2 tablespoons vegetable oil - Salt and pepper to taste - 2 green onions, sliced (for garnish) - Toasted sesame seeds (for garnish) Next, mix the honey, soy sauce, rice vinegar, minced garlic, and grated ginger in a bowl. Stir well until the honey dissolves. If you want a thicker sauce, mix cornstarch with water in a separate bowl and set it aside. Now, heat 1 tablespoon of oil in a large skillet over medium-high heat. Add the sliced chicken and season with salt and pepper. Cook for 5-7 minutes until the chicken is no longer pink. Remove the chicken and set it aside on a plate. In the same skillet, add the other tablespoon of oil. Toss in the sliced bell pepper, broccoli, and julienned carrot. Stir-fry for about 3-4 minutes. You want them bright and slightly tender. Return the chicken to the skillet. Pour the honey garlic sauce over everything and mix well. If you used cornstarch, add that now too. Cook for another 2-3 minutes until the sauce thickens and shines. Make sure everything is hot. Taste and adjust seasoning if needed. - Prep Ahead: Chop all your veggies and chicken before cooking. This saves time. - High Heat: Use high heat to get a nice sear on the chicken and veggies. - Fresh Ingredients: Always use fresh garlic and ginger for the best flavor. - Serving: Serve this stir-fry over fluffy jasmine rice or noodles. Add sliced green onions and sesame seeds on top for flair. Follow these steps for a simple and tasty meal. For the full recipe, check the details above. Enjoy your cooking! To make your chicken tender, choose boneless chicken breast. Thinly slice it into bite-sized pieces. This helps it cook quickly and evenly. Stir-fry over medium-high heat to lock in moisture. Don't overcrowd the pan; cook in batches if needed. This ensures even cooking and a nice sear. To boost flavor, use raw honey instead of regular honey. Raw honey has a richer taste. Adding ginger gives a fresh kick, while garlic adds depth. Use low-sodium soy sauce for a healthier option. A splash of rice vinegar adds tang. Don’t forget to taste and adjust as you go. A sprinkle of sesame seeds at the end adds crunch and visual charm. One common mistake is overcooking the chicken. Keep an eye on it; cook until just done. Another mistake is not preparing the sauce ahead. Mixing the sauce first saves time. Lastly, don’t skip the veggies. They add color and nutrients to your dish. Follow these tips for a great Honey Garlic Chicken Stir-Fry! For the full recipe, check out the guide above. {{image_4}} You can switch the chicken for other proteins. Try shrimp, beef, or tofu. Each option brings its own taste. Shrimp cooks fast and adds a nice flavor. Beef gives a hearty feel, while tofu is great for vegans. Use the same cooking steps but adjust the time based on what you choose. Feel free to change the veggies in this stir-fry. You can use snap peas, green beans, or zucchini. Each adds a unique crunch and color. If you want, add mushrooms for a rich taste. Just make sure to cut them into small pieces for even cooking. You can tweak the sauce to match your taste. For a spicy kick, add red pepper flakes. If you like it sweeter, add more honey. For a tangy flavor, try lime juice instead of rice vinegar. These small changes can make a big difference in flavor. Follow the Full Recipe for the best results while experimenting! To store your Honey Garlic Chicken Stir-Fry, let it cool first. Then, place it in an airtight container. You can keep it in the fridge for up to three days. Make sure to separate any rice or noodles to keep them fresh. When you’re ready to enjoy your leftovers, heat them on the stove. Use medium heat to warm the stir-fry evenly. Stir it often to prevent sticking. You can also microwave it in a microwave-safe bowl. Heat for 1-2 minutes, stirring halfway through. If you want to freeze your stir-fry, let it cool completely. Store it in a freezer-safe container or bag. It will last up to three months in the freezer. When you're ready to eat, thaw it overnight in the fridge. Then reheat it as mentioned above. Enjoy your tasty meal again! For the full recipe, check out the entire guide! To keep the chicken moist, use boneless chicken breast and cut it thin. This helps it cook quickly and evenly. Do not overcook the chicken, as it can dry out. Stir-frying over medium-high heat also locks in moisture. Yes, you can use a different sauce. Try teriyaki or hoisin for a new taste. You can also make a spicy sauce by adding chili paste. Just keep the basic flavors balanced to ensure it tastes great. Leftovers will last about three to four days in the fridge. Store them in an airtight container. Be sure to cool the stir-fry before placing it in the fridge to keep it fresh longer. To make this dish gluten-free, use tamari instead of soy sauce. Tamari is a great substitute and maintains the same flavor. Always check labels to confirm that all ingredients are gluten-free. To make the stir-fry healthier, use more vegetables like spinach or snap peas. You can also reduce the honey for less sugar. Use lean chicken or swap in tofu for a plant-based option. The key is to balance flavors while keeping it nutritious. For a full recipe, check out the Honey Garlic Chicken Stir-Fry. To sum up, we explored the key ingredients and their substitutes for your dish. We walked through each preparation step and shared tips for cooking chicken perfectly. You learned techniques to enhance flavor and avoid common mistakes. We also discussed variations and how to store leftovers properly. Remember, using quality ingredients and following these tips will give you the best results. Enjoy experimenting with your cooking and make each dish your own!

Honey Garlic Chicken Stir-Fry Simple and Tasty Meal

Are you ready to whip up a meal that’s both easy and delicious? My Honey Garlic Chicken Stir-Fry is the

For the perfect Caramel Apple Monkey Bread, you need: - 2 cans (16 oz each) refrigerated biscuit dough - 1 cup granulated sugar - 1 tablespoon ground cinnamon - 1/2 cup unsalted butter, melted - 2 apples (Granny Smith or Honeycrisp), peeled, cored, and diced - 1 cup caramel sauce (store-bought or homemade) - 1/2 cup chopped pecans or walnuts (optional) - Powdered sugar, for dusting If you need gluten-free options, you can swap the biscuit dough for gluten-free dough. Make sure the caramel sauce is also gluten-free. You can add a twist to your monkey bread by including different nuts or fruits. Try: - Chopped hazelnuts or almonds for a nutty crunch - Diced pears or peaches for a fruity flavor For caramel sauce, you can use: - Salted caramel for a sweet and salty mix - Chocolate caramel sauce for an indulgent treat These options can make your Caramel Apple Monkey Bread even more delightful! Start by preheating your oven to 350°F (175°C). This is key for perfect baking. Next, grease a bundt pan well with non-stick cooking spray. This helps the monkey bread come out easily later. In a large bowl, mix 1 cup of granulated sugar with 1 tablespoon of ground cinnamon. Stir it until it blends well. Open both cans of refrigerated biscuit dough. Cut each biscuit into quarters. Toss these biscuit pieces into the cinnamon sugar mix until they are fully coated. This step brings out that sweet flavor. Now it’s time to layer the ingredients. Place half of the coated biscuit pieces in the bottom of the greased bundt pan. Spread them evenly to form the first layer. Next, add half of the diced apples on top of the biscuit layer. Make sure to distribute them evenly. If you chose to use nuts, sprinkle half of the chopped pecans or walnuts over the apples. Drizzle about 1/4 cup of caramel sauce over this first layer. This will make each bite rich and tasty. Repeat the layering with the remaining biscuit pieces, apples, and nuts. Drizzle more caramel sauce on top again. This ensures every layer is sweet and gooey. Place the bundt pan in your preheated oven and bake for 30-35 minutes. You’ll know it’s done when the top is golden brown and a toothpick comes out clean. This means the biscuits are fully cooked. Once baked, take it out and let it cool in the pan for about 10 minutes. This helps it set. To serve, gently invert the bundt pan onto a plate. Carefully lift off the pan. Drizzle any remaining caramel sauce over the top. A light dusting of powdered sugar adds a sweet finish. For the full recipe, refer to the section above. Enjoy every bite of your warm and delicious caramel apple monkey bread! To avoid soggy bread, make sure to coat the biscuit pieces well. The sugar mix helps absorb moisture. Layering is key. Place those biscuit pieces in a single layer in the pan. This keeps the air flowing during baking. For even baking, rotate the pan halfway through. This ensures all parts get the same heat. Keep an eye on the color. The top should turn golden brown. If it looks too dark, cover it with foil. Garnishing can make your monkey bread stand out. I love adding extra diced apples on top. A dollop of whipped cream also adds sweetness. Pair your monkey bread with warm apple cider or a cup of coffee. You could also serve it with vanilla ice cream on the side for a special touch. These drinks enhance the flavors and create a fun experience. Enjoy your Caramel Apple Monkey Bread with family and friends! For the complete recipe, check out the [Full Recipe]. {{image_4}} To elevate your caramel apple monkey bread, try adding different spices. Nutmeg and allspice can add warmth and depth. A pinch of vanilla extract also enhances the flavor. You can switch up the fruit too. Instead of apples, use pears or bananas for a fresh twist. Both fruits add sweetness and moisture. If you want a vegan version, replace the butter with coconut oil. Use plant-based milk in place of regular milk in your caramel sauce. For gluten-free options, choose gluten-free biscuit dough. This way, everyone can enjoy this sweet treat without worry. Just ensure all other ingredients are also gluten-free. To keep your Caramel Apple Monkey Bread fresh, store it in an airtight container. This helps prevent it from drying out. If you have leftovers, let them cool first. Then, wrap them tightly in plastic wrap before placing them in the container. You can also use aluminum foil for extra protection. When reheating, preheat your oven to 350°F (175°C). Place the monkey bread in an oven-safe dish. Cover it with foil to keep it moist. Heat for about 10-15 minutes or until warm. This method helps maintain the soft texture and gooey caramel. Avoid using the microwave, as it can make the bread tough. In the fridge, your monkey bread can last up to 3 days. Make sure it remains covered to avoid drying out. If you want to keep it longer, freeze it. Wrap the bread in plastic wrap and then in foil. It can last for about 2 months in the freezer. Watch for signs of spoilage, like a sour smell or mold. If you see any signs, it's best to throw it away. Keeping track of storage times helps you enjoy this treat at its best! Monkey bread is a sweet pull-apart bread. It comes from the United States. The dish gets its name from how people tear it apart. You can enjoy it warm or at room temperature. Many families serve it at brunch or special occasions. It often includes dough pieces coated in cinnamon and sugar. Yes, you can prepare this recipe ahead of time. You can assemble the monkey bread and store it in the fridge. Cover the bundt pan with plastic wrap. Bake it the next day. Just remember to let it sit at room temperature for about 30 minutes before baking. This allows for even cooking. You can also refrigerate leftovers for up to three days. Caramel Apple Monkey Bread pairs well with many things. Consider serving it with a scoop of vanilla ice cream. The cold ice cream complements the warm bread. You can also serve it with fresh fruit, like berries or sliced bananas. For drinks, consider coffee or warm apple cider. These choices enhance the flavors and make your meal memorable. This blog post covered the essential ingredients and easy steps to make monkey bread. You learned how to layer, bake, and store it well. We shared tips, variations, and serving ideas to make your dish the best. Monkey bread is fun to share with others. You can switch ingredients to fit your taste. With these tips, your caramel apple monkey bread will impress everyone! Enjoy making this delightful dish and happy baking!

Caramel Apple Monkey Bread Delightfully Sweet Recipe

Craving a fun twist on dessert? Our Caramel Apple Monkey Bread recipe is the answer! This delightful, gooey treat combines

Older posts
Newer posts
← Previous Page1 … Page59 Page60 Page61 … Page88 Next →

dsad

© 2025 spoonfulsavory • Built with GeneratePress

Our Policies

  • Copyright Policy
  • Cookie Policy
  • GDPR Policy
  • Privacy Policy
  • Disclaimer
  • Terms Of Use

More Information

  • Home
  • About
  • Contact
  • Appetizers
  • Dessert
  • Dinner
  • Drinks
©2025, spoonfulsavory About Back To Top