Skip to content
DisclaimerTerms Of UseGDPR PolicyCookie Policy

spoonfulsavory

  • Home
  • Drinks
  • Appetizers
  • Dinner
  • Dessert
  • About
  • Contact
  • Privacy Policy
DisclaimerTerms Of UseGDPR PolicyCookie Policy

Sarah

The ingredients for banana oatmeal pancakes are simple and healthy. You will need the following: - 1 cup rolled oats - 1 ripe banana, thoroughly mashed - 1 cup milk (your choice of dairy or plant-based) - 1/2 teaspoon baking powder - 1/2 teaspoon ground cinnamon - 1 tablespoon honey or maple syrup (optional, for added sweetness) - 1/4 teaspoon vanilla extract - A pinch of salt - Olive oil or butter, for greasing the skillet These ingredients make for a nutritious start to your day. The rolled oats serve as the base and provide fiber. A ripe banana adds natural sweetness and moisture. You can use any milk you prefer, whether it is dairy, almond, or oat milk. Baking powder and cinnamon give flavor and help the pancakes rise. Honey or maple syrup can sweeten them more, while vanilla adds a lovely aroma. A pinch of salt balances the flavors. Lastly, you will need olive oil or butter to grease the skillet. For the full recipe, check out the details to make these tasty pancakes. Start by placing the rolled oats in a blender. Blend them until they become a fine, flour-like consistency. This oat flour is the heart of your pancakes. It gives them a nice, hearty texture. Using rolled oats is key, as they hold their shape during cooking. Now, it’s time to mix all the ingredients. Add the mashed banana to the oat flour in the blender. Pour in the milk of your choice, along with baking powder, cinnamon, honey (if you want it sweeter), vanilla extract, and a pinch of salt. Blend everything together until it’s smooth and creamy. This batter should be thick, but pourable. Adjust the milk if needed. Next, preheat a non-stick skillet or griddle over medium heat. Once it’s warm, lightly grease it with olive oil or butter. This will help prevent the pancakes from sticking. Pour about 1/4 cup of the batter onto the skillet for each pancake. Cook for about 2-3 minutes, watching for small bubbles to form on the surface. This tells you they’re ready to flip. Gently turn each pancake with a spatula, cooking for another 2-3 minutes until golden brown. Repeat this until you finish all the batter. Adjust the heat if needed to avoid burning. Cooked pancakes should be fluffy and light, ready to enjoy! For more detailed instructions, check the Full Recipe. To get the best texture, focus on the batter thickness. A thicker batter makes denser pancakes, while a thinner one gives fluffier results. Try adding a bit more milk if your batter feels too thick. If it's too thin, just blend in a touch more oats. The right thickness can change your pancake game. Heat control is key to cooking perfect pancakes. Start with medium heat. If your pancakes burn, lower the heat. If they don't brown, raise it a little. Always grease the skillet lightly with olive oil or butter to keep the pancakes from sticking. This way, you will get a nice golden color without burning. How you serve your pancakes matters! Stack them high on a plate for a showstopper look. Top with fresh banana slices and a drizzle of honey or maple syrup. A sprinkle of cinnamon adds flavor and looks great too. This simple touch makes your meal feel special every time you serve it. Enjoy your delicious banana oatmeal pancakes! You can find the full recipe above. {{image_4}} You can make banana oatmeal pancakes even better by adding fun mix-ins. Try adding chocolate chips for a sweet treat. They melt and create gooey pockets of chocolate. Nuts add a nice crunch and healthy fats. Walnuts or pecans work great. Fresh or frozen berries also brighten the flavor. Blueberries or strawberries can add a pop of color and taste. These add-ins make each bite exciting. If you need gluten-free options, use certified gluten-free oats. They work just as well as regular oats. For milk, you can swap dairy for almond, soy, or oat milk. This keeps the pancakes tasty while fitting your diet. You can also try coconut milk for a creamy twist. These substitutions make this recipe easy for everyone to enjoy. Feeling adventurous? You can turn these pancakes savory. Add herbs like chives or parsley to the batter. This gives your pancakes a fresh taste. You can also mix in shredded cheese. Cheddar or feta adds a rich flavor. These savory pancakes can be a fun breakfast or a unique brunch item. Don't be afraid to try new flavors! For the full recipe, check the section above. To keep your banana oatmeal pancakes fresh, store them in an airtight container. You can place a piece of parchment paper between the pancakes. This prevents them from sticking together. If you plan to eat them within a few days, refrigerate them. They can last up to three days in the fridge. For longer storage, freeze the pancakes. Just stack them with parchment paper in between. Place the stack in a freezer-safe bag. They can last up to three months in the freezer. When you’re ready to enjoy your pancakes again, there are a few great ways to reheat them. The microwave is quick and easy. Place your pancakes on a microwave-safe plate. Heat them for about 20-30 seconds. Check to see if they are warm enough. If not, heat them in 10-second intervals. For a fluffy texture, try the skillet method. Preheat a non-stick skillet over low heat. Add a small amount of water to the pan. This creates steam that warms the pancakes. Cover the skillet with a lid. Heat for about 1-2 minutes. Flip the pancakes halfway through to warm both sides. Enjoy your fluffy pancakes just like the first time! You can easily skip eggs by using substitutes. Here are some great options: - Flaxseed meal: Mix 1 tablespoon of flaxseed meal with 2.5 tablespoons of water. Let it sit for 5 minutes to thicken. - Chia seeds: Combine 1 tablespoon of chia seeds with 2.5 tablespoons of water. Allow it to gel for 5 minutes. - Applesauce: Use 1/4 cup of unsweetened applesauce instead of one egg. - Mashed banana: You can add more mashed banana. Use 1/4 cup extra for moisture and sweetness. These substitutes work well and keep the pancakes moist. Yes, you can use quick oats. However, there are some differences: - Texture: Quick oats are smaller and cook faster, leading to a softer pancake. - Cooking time: Pancakes made with quick oats may cook faster. Watch them closely to avoid burning. If you prefer a heartier texture, rolled oats are a better choice. There are many tasty options to serve with your pancakes: - Fresh fruits: Sliced bananas, berries, or diced apples add sweetness and color. - Nut butter: Spread almond or peanut butter for a protein boost. - Yogurt: A dollop of Greek yogurt adds creaminess. - Syrups: Drizzle with honey or maple syrup for extra flavor. Mix and match toppings to create your perfect pancake stack! You now know how to make tasty banana oatmeal pancakes. We covered key ingredients, step-by-step cooking, and tips for the best texture. You learned fun variations, storage tips, and answers to common questions. Try these pancakes for a healthy breakfast that everyone will love. Enjoy your cooking adventure and share your delicious results!

Delicious Banana Oatmeal Pancakes Easy and Healthy Recipe

Looking for a breakfast that’s both delicious and healthy? You’re in the right place! These banana oatmeal pancakes are easy

- Ripe avocados - Cherry tomatoes - Fresh mozzarella balls (bocconcini) - Fresh basil leaves - Balsamic glaze - Extra virgin olive oil - Salt and pepper How to properly measure balsamic glaze To measure balsamic glaze, use a tablespoon. Pour the glaze in slowly to avoid spills. You want two tablespoons for this recipe. This gives it a sweet and tangy kick. Tips for selecting fresh mozzarella When choosing mozzarella, look for soft, plump balls. Check the packaging for a recent date. Fresh mozzarella should smell mild and creamy. This adds a rich taste to your dish. Choosing the right avocados Pick avocados that yield slightly to gentle pressure. They should feel firm but not hard. If they are too soft, they may be overripe. Use two ripe avocados for the best flavor. For the full recipe, check out the Caprese Stuffed Avocados section. To start, slice each avocado in half lengthwise. Use a knife to cut around the pit, then twist to open. Gently pull out the pit with a spoon or your fingers. Next, scoop out a small amount of the avocado flesh from the center. This creates extra space for stuffing. You can save that avocado flesh for another dish, like guacamole. In a medium bowl, combine the halved cherry tomatoes, halved mozzarella balls, and torn basil leaves. This mix brings bright colors and fresh flavors together. Drizzle the olive oil and balsamic glaze over the mixture. Add salt and pepper to taste. Stir gently with a spoon. Make sure the basil evenly coats the tomatoes and mozzarella. Now, take your prepared avocado halves. Fill each one generously with the Caprese mixture. Press it down lightly to pack it in well. For an extra flavor boost, drizzle any leftover balsamic glaze over the top of the filled avocados. Enjoy the vibrant colors and fresh tastes of this dish. For the full recipe, check out the details above. To keep avocados fresh, store them at room temperature. Once ripe, put them in the fridge. This slows down the ripening process. If you want to eat them later, do this right after they ripen. Serve the stuffed avocados right away for the best taste. If you prepare them in advance, chill them briefly. This helps the flavors blend well. Adding spices can boost your dish's flavor. Try a pinch of garlic powder or red pepper flakes. These spices bring a nice kick. For cheese lovers, consider mixing in feta or goat cheese. These options give a different taste and texture to your dish. You can also sprinkle some fresh herbs on top for extra flavor. These simple additions can make your Caprese stuffed avocados even better. For the full recipe, check the details above. {{image_4}} You can make Caprese stuffed avocados even more fun by adding seasonal vegetables. Try diced bell peppers or thinly sliced zucchini. These veggies not only add flavor but also color. You can also use seasonal herbs like dill or chives for a twist. If you want a vegan-friendly version, swap the mozzarella for vegan cheese. There are great options that melt and taste similar. For gluten-free needs, this dish is already safe! Just ensure your balsamic glaze is gluten-free. You can enjoy this dish without worries. For the full recipe, check out [Full Recipe]. To store filled avocados, place them in an airtight container. Cover them tightly to keep air out. If you have leftover stuffing, store it separately. This helps keep the avocados fresh. Avocados can brown quickly. Look for signs of freshness in storage. The flesh should stay green and firm. If it turns brown, it may not taste good anymore. Can you reheat stuffed avocados? It's not the best idea. They taste best fresh. If you have to reheat them, do it gently. Use a microwave at low power for a short time. Enjoying leftovers cold can also be great! The flavors often blend nicely when chilled. You can also add a fresh drizzle of balsamic glaze for extra taste when serving. You can get creative with your Caprese stuffed avocados. Here are some fun ideas: - Pine nuts: Add a crunchy texture. - Olives: Black or green olives give a salty kick. - Prosciutto: For a savory flavor, add thin slices. - Roasted red peppers: They will add some sweetness. - Spinach: Fresh spinach can boost the nutrients. Mix and match these options to fit your taste! Yes, you can prep these avocados ahead of time, but keep some tips in mind: - Prep the filling: Mix the tomatoes, mozzarella, and basil. - Store separately: Keep the avocado halves and filling apart. - Assemble later: Fill the avocados just before serving. - Chill: If you want, chill the filling for 30 minutes. This way, your dish stays fresh and tasty! Choosing ripe avocados is easy once you know what to look for. Here are the signs: - Color: Look for dark green to almost black skin. - Feel: Gently squeeze; it should feel soft but not mushy. - Stem test: If the stem comes off easily and is green underneath, it's ripe. Avoid avocados that are too hard or have dark spots. A perfect avocado makes your dish shine! In this blog post, we explored how to create delicious Caprese stuffed avocados. We covered the fresh ingredients you need and tips for measuring them correctly. You learned step-by-step instructions on preparing, mixing, and assembling your dish. We also shared valuable tips for freshness and flavor enhancements. By using seasonal ingredients and adjusting for dietary needs, you can make this dish your own. Remember to store leftovers properly for the best taste. Enjoy this fresh and tasty meal that’s easy to prepare!

Caprese Stuffed Avocados Bold and Flavorful Delight

Are you ready for a fresh twist on a classic favorite? Caprese Stuffed Avocados are a bold, flavorful delight you’ll

- 8 oz fusilli pasta - 1 cup cherry tomatoes, halved - 1 cucumber, diced into bite-sized pieces - 1/4 cup red onion, thinly sliced - 1/2 cup fresh basil leaves, gently torn - 1/4 cup feta cheese, crumbled - 1/3 cup extra-virgin olive oil - 3 tablespoons freshly squeezed lemon juice - 1 teaspoon lemon zest - Salt and freshly ground pepper to taste The main ingredients in this salad give it a fresh and vibrant taste. The fusilli pasta serves as the base. It holds onto the dressing and other ingredients well. Cherry tomatoes add a burst of sweetness. The cucumber brings a crisp texture. Next, we add the red onion, which gives a nice bite. Fresh basil leaves add a fragrant aroma. They create a beautiful look with their bright green color. Feta cheese adds creaminess and a salty kick to the dish. Now, let’s talk about the dressing. The extra-virgin olive oil forms the heart of the dressing. It adds richness and depth. Freshly squeezed lemon juice brightens the flavors. It's like sunshine in your bowl! Lemon zest adds an extra layer of citrus scent. Finally, salt and freshly ground pepper bring out all the flavors. This Lemon Basil Pasta Salad is simple and full of flavor. You can find the full recipe above to guide you through the steps. Enjoy this fresh delight any time of year! To start, boil a pot of salted water. Add the fusilli pasta and cook for 8-10 minutes. You want it al dente, with a slight bite. Once cooked, drain the pasta well. Rinse it under cold water to stop the cooking. This makes the pasta cool and ready for the salad. Next, grab a large mixing bowl. Add the halved cherry tomatoes, diced cucumber, and thinly sliced red onion to the pasta. Toss them gently together. This helps mix the flavors and textures. You want each piece to join the party! Now, let’s whip up the dressing. In a small bowl, mix the extra-virgin olive oil, freshly squeezed lemon juice, and lemon zest. Add salt and freshly ground pepper to taste. Whisk it all together until it blends well. This dressing gives your salad a bright, fresh taste. Time to bring everything together! Pour the lemon dressing over the pasta and veggies. Use a spatula or tongs to toss gently. You want to coat everything evenly but don’t mash the ingredients. Each piece should shine with flavor. Now, sprinkle crumbled feta cheese on top of the salad. Give it one last gentle toss to mix the cheese without breaking it too much. Taste the salad and adjust seasoning if needed. A little extra salt or pepper can make a big difference! Cover the bowl with plastic wrap or use an airtight container. Chill the salad in the fridge for at least 30 minutes. This step helps the flavors blend beautifully together. When ready to serve, scoop the salad into a decorative bowl. Enjoy this fresh and flavorful delight! For a complete guide, check out the Full Recipe. To make a tasty Lemon Basil Pasta Salad, cook the fusilli pasta until al dente. This means it should be firm but not hard. To do this, boil salted water and add the pasta. Check it after 8 minutes. If it feels firm but chewy, it’s ready. Drain the pasta and rinse it under cold water. This stops the cooking and keeps it from getting mushy. When adding vegetables, like cherry tomatoes and cucumber, make sure they stay crisp. Add them to the pasta after it cools down. This keeps their bright colors and fresh taste. Toss them in gently, so they don't break apart. To boost flavor, think about adding fresh herbs or spices. You could try parsley or chives for a different taste. A pinch of crushed red pepper adds a nice kick. Balance the salad's acidity by using more lemon juice or a bit of honey. This will round out the flavors and make each bite pop. For the best pairings, serve this salad with grilled chicken or shrimp. They add protein and make a complete meal. You can also serve it alongside a crisp green salad for extra crunch. When garnishing, use whole basil leaves for a fresh look. A sprinkle of extra feta cheese right before serving adds a nice touch. This salad looks great in a big bowl, so don’t be shy with the presentation. {{image_4}} You can easily add protein to your Lemon Basil Pasta Salad. Here are some tasty options: - Grilled Chicken: Cooked and diced, it adds a nice touch. - Shrimp: Lightly sautéed or grilled shrimp brings a fresh flavor. - Tofu: For a plant-based option, use firm tofu. Just cube and sauté it in olive oil. Each of these choices adds texture and makes the salad more filling. Feel free to mix and match based on what you like! If you're looking for vegan-friendly options, there are simple swaps to make. - Substitutes for feta cheese: Use crumbled tofu mixed with lemon juice and a pinch of salt. This gives a similar texture without dairy. - Dressing modifications for a vegan diet: Replace the honey (if used) with maple syrup or agave. This keeps the dressing sweet without using animal products. These changes make the salad just as tasty while fitting a vegan diet. Incorporating seasonal veggies can elevate your salad. Here are some ideas: - Spring: Add peas or asparagus for a fresh crunch. - Summer: Include bell peppers or zucchini for extra color and taste. - Fall: Try roasted butternut squash or broccoli for warmth. You can also use leftover produce to avoid waste. Toss in any extra veggies you have on hand. This not only saves food but also adds unique flavors! To keep your Lemon Basil Pasta Salad fresh, store it in an airtight container. This helps keep out air and moisture. Make sure to cover it well. If you have leftovers, place them in the fridge right away. This will help maintain the flavor and texture. You can store this salad in the fridge for about 3 days. After that, the flavors may fade. Look out for signs of spoilage, like a sour smell or slimy texture. If you see mold, throw it away. Always trust your senses when checking for freshness. Before serving the salad again, give it a good stir. This helps redistribute the dressing and flavors. If it seems dry, add a splash of olive oil or lemon juice. This will brighten it up. It’s best not to reheat this salad, as it tastes best cold. You can make this salad about a day in advance. Prepare the pasta, veggies, and dressing separately. Store them in airtight containers. Mix everything together just before serving. This keeps the pasta from getting mushy. For storage, use a bowl with a lid or plastic wrap. Chilling it in the fridge helps the flavors blend well. Yes, you can use gluten-free pasta for this recipe. Look for options made from rice, quinoa, or chickpeas. Cook it just like regular pasta. Be sure to rinse it after cooking to keep it from sticking. This way, everyone can enjoy the salad without worry. If you don’t like basil, try using parsley or arugula. They add a fresh taste, too. You can also use mint for a different flavor. Just chop the leaves finely and mix them in. Each option gives a unique twist to the salad. For the best results, choose herbs that you enjoy. Lemon Basil Pasta Salad is fresh and easy to make. You start with fusilli pasta and bright veggies. We mixed in a zesty dressing with flavors from lemon and olive oil. Don’t forget the crumbled feta for creaminess! You can swap in proteins or seasonal veggies for variety. Store leftovers properly to enjoy later. This salad is great for sharing and perfect for any meal. Try it out and impress your friends and family with a tasty dish. Enjoy your cooking!

Lemon Basil Pasta Salad Fresh and Flavorful Delight

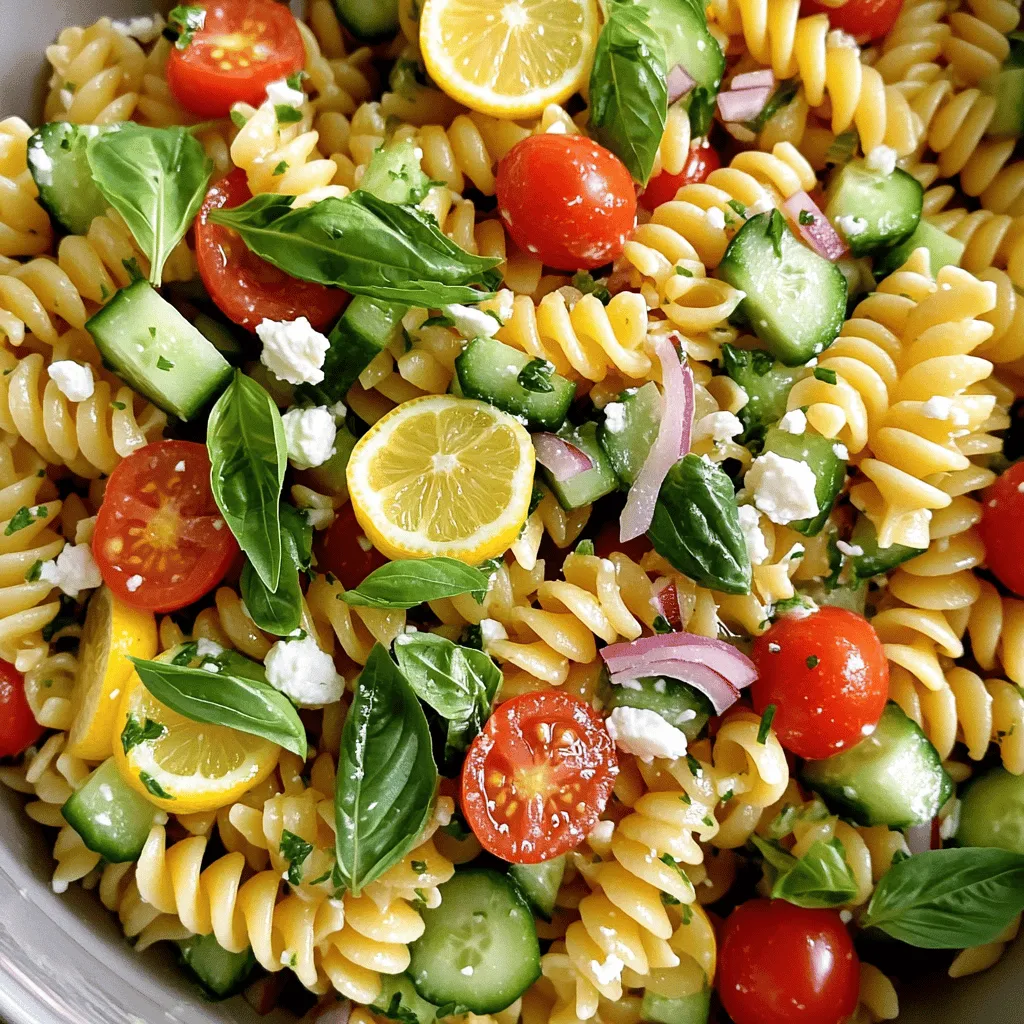
Looking for a fresh and tasty dish that’s easy to make? My Lemon Basil Pasta Salad is the answer! This

To make classic deviled eggs, you need simple ingredients that blend well together. Here’s what you’ll need: - 6 large eggs - 3 tablespoons mayonnaise - 1 teaspoon Dijon mustard - 1 teaspoon apple cider vinegar - ½ teaspoon garlic powder - Salt and freshly ground black pepper, to taste - Paprika, for garnish - Fresh chives or parsley, finely chopped (for garnish) These ingredients create a rich and creamy filling. The eggs serve as a perfect canvas. The mayonnaise adds creaminess, while the mustard gives a slight kick. Apple cider vinegar brings a nice tang. Garlic powder enhances the overall flavor. Salt and pepper balance everything out. A sprinkle of paprika adds color and a hint of spice. Finally, the chives or parsley provide a fresh touch. If you want to explore more, check out the Full Recipe for detailed steps and tips! To start, prepare your saucepan. Place the eggs in a single layer. Fill it with cold water, covering the eggs by about an inch. Heat the pot over medium-high heat. When the water boils, cover the pot and remove it from heat. Let the eggs sit for 12 minutes. Next, create an ice bath. Fill a large bowl with ice and cold water. After 12 minutes, use a slotted spoon to transfer the eggs into the ice bath. This cools the eggs quickly and makes peeling easier. Let them cool for at least 5 minutes. When the eggs are cool, it’s time to peel them. Tap each egg gently on a hard surface to crack the shell. Roll the egg to loosen the shell. Peel the shell under cool running water to help remove any stubborn bits. Now, slice each peeled egg in half lengthwise. Scoop out the yolks into a medium bowl. Now it’s time to mix the filling. Use a fork to mash the yolks until crumbly. Add mayonnaise, Dijon mustard, apple cider vinegar, garlic powder, and a pinch of salt and pepper. Stir until smooth and creamy. For filling, use a spoon, spatula, or piping bag. Generously fill the egg whites with the yolk mixture. Garnish by dusting with paprika and adding chopped chives or parsley for a fresh touch. For the full recipe, you can refer to the section above. To make great deviled eggs, start with perfect boiled eggs. For ideal boiling, place the eggs in a single layer in a pot. Cover them with cold water by about an inch. Heat on medium-high until the water boils. Once boiling, cover the pot and remove it from heat. Let the eggs sit for 12 minutes. Avoid overcooked eggs. If you cook them too long, the yolks turn green and taste bad. Cooling is also key. After 12 minutes, transfer the eggs to an ice bath. This stops the cooking and helps with peeling. Store leftover deviled eggs in the fridge. Use an airtight container to keep them fresh. They taste best within two days. If you need to store them longer, try not to fill the whites until ready to serve. This keeps the texture nice. Presentation makes your deviled eggs shine. Arrange them on a pretty platter. You can use a bed of leafy greens for color. Garnish each egg with paprika and fresh herbs. Chives or parsley look great and add flavor. This simple touch elevates your dish! {{image_4}} You can spice up classic deviled eggs in fun ways. For a kick, add sriracha to the filling. Start with a teaspoon and adjust to your taste. This gives a nice heat that pairs well with the creamy yolk. You can also mix in classic items like relish or capers. Relish adds sweetness, while capers bring a salty zing. Both options add depth to your eggs. If you follow a vegetarian or vegan diet, you can still enjoy deviled eggs. Use silken tofu instead of eggs. Blend it until smooth, then add your usual mix-ins like mayo and mustard. This gives you a creamy texture without the eggs. For gluten-free options, ensure all your ingredients are labeled gluten-free. Most common ingredients are safe, but check labels to be sure. Get creative with toppings to wow your guests! Try adding crispy bacon bits for a savory crunch. Smoked salmon also works well, giving a rich flavor. For a lighter touch, consider avocado. It adds creaminess and good fats. You can also sprinkle feta cheese on top for a tangy twist. These toppings can transform your deviled eggs into gourmet bites. To keep your deviled eggs fresh, store them in the fridge. Place them in an airtight container. They will stay good for up to two days. Make sure to cover the eggs well. This helps keep them from drying out. If you have leftovers, try to eat them soon. The taste is best fresh. Many people think you can freeze deviled eggs. However, freezing is not a good idea. The texture changes when frozen. Instead, make only what you need. If you have filling left over, store it in the fridge. Use it within two days for good flavor. To serve fresh deviled eggs, prepare them close to your meal time. If you make them early, keep them in the fridge. Before serving, place them on a chilled platter. This keeps them cool and tasty. You can also add garnishes right before serving. This way, they stay bright and colorful. For added appeal, arrange them on a bed of greens. Enjoy your delicious creation! To make traditional deviled eggs, follow these steps: 1. Boil the Eggs: Place six large eggs in a pot. Cover them with water, about one inch above the eggs. Heat until boiling. Once boiling, turn off the heat and cover the pot. Let the eggs sit for 12 minutes. 2. Cool the Eggs: Fill a bowl with ice and cold water. After 12 minutes, transfer the eggs into the ice bath. Let them cool for at least 5 minutes. 3. Peel the Eggs: Tap each egg on a hard surface to crack it. Roll the egg gently to loosen the shell, then peel it under running water. 4. Prepare the Filling: Cut the peeled eggs in half. Separate the yolks from the whites. Place the yolks in a bowl. 5. Mix the Ingredients: Mash the yolks with a fork. Add mayonnaise, Dijon mustard, apple cider vinegar, garlic powder, salt, and pepper. Mix until smooth. 6. Fill the Egg Whites: Spoon or pipe the yolk mixture into the egg whites. 7. Garnish: Dust with paprika and sprinkle with chopped chives or parsley. This process makes the perfect classic deviled eggs, a simple and flavorful delight. You can use several alternatives to mayonnaise in deviled eggs. Some popular options include: - Greek Yogurt: This adds creaminess and a tangy flavor. - Avocado: Mashed avocado gives a smooth texture and healthy fats. - Hummus: This adds a unique taste and is great for plant-based diets. - Sour Cream: This adds a rich flavor but is a bit thicker. Each of these options will change the taste slightly. Greek yogurt makes it lighter. Avocado adds a fresh twist. Hummus gives a nice depth. Yes, you can prepare deviled eggs ahead of time. Here’s how: - Boil and peel the eggs a day before serving. - Store the egg whites and yolks separately in airtight containers in the fridge. - Mix the yolk filling just before serving. This keeps the eggs fresh and prevents sogginess. If stored properly, deviled eggs can last up to two days in the fridge. Deviled eggs should not be left out for long. Follow these guidelines: - One Hour Rule: Keep deviled eggs at room temperature for no more than one hour. This helps avoid bacterial growth. - Chill When Possible: Serve deviled eggs chilled. Use ice trays or cold packs under your serving tray. By following these tips, you ensure your deviled eggs are safe and tasty for all to enjoy. Making deviled eggs is simple and fun. We covered the ingredients, cooking steps, and tips for perfect results. You learned how to create unique variations and store your eggs safely. Remember, fresh eggs yield the best flavor, and the right garnishes make your dish shine. Enjoy experimenting with flavors and adding your twist. Deviled eggs can be a hit at any gathering. Now, grab those eggs and start creating your tasty treats!

Classic Deviled Eggs Simple and Flavorful Delight

Deviled eggs are a classic dish that packs big flavor in every bite. Whether you’re hosting a party or enjoying

To make no-bake chocolate oatmeal cookies, you need a few key ingredients. Each ingredient plays a vital role in creating that rich, tasty treat we all love. Here’s what you will gather: - 1 cup rolled oats - 1/2 cup natural peanut butter (or almond butter for a nutty twist) - 1/2 cup honey (or maple syrup for a vegan option) - 1/3 cup unsweetened cocoa powder - 1/4 cup milk (dairy or plant-based) - 1 teaspoon pure vanilla extract - A pinch of salt to enhance flavor - Optional add-ins: 1/4 cup chocolate chips for extra richness, 1/4 cup shredded coconut for texture, or 1/4 cup chopped nuts for crunch Each ingredient adds something special. Rolled oats give texture and chewiness. Peanut butter adds creaminess and protein. Cocoa powder gives that rich chocolate flavor. Honey or maple syrup brings sweetness and binds everything together. Milk helps blend the mixture, while vanilla and salt boost the overall taste. You can get creative with the optional add-ins. Chocolate chips make your cookies extra chocolaty. Shredded coconut adds a fun chew, and nuts give a nice crunch. For the full recipe, check out the details in the recipe section. Enjoy gathering these ingredients, as they will come together to form a delicious treat! Start by grabbing a medium saucepan. Place it on low heat. Add the peanut butter, honey, cocoa powder, milk, and a pinch of salt. Stir with a wooden spoon. Keep stirring until the mix is smooth and well-blended, about 2-3 minutes. This step is key to a great cookie. Next, remove the pan from the heat. Stir in the pure vanilla extract. This step adds a lovely flavor that shines through in every bite. In a large mixing bowl, pour in the rolled oats. If you want, add any optional goodies like chocolate chips, shredded coconut, or chopped nuts. These add-ins can boost flavor and texture. Now, gently pour the warm chocolate mixture over the oats. Use a spatula to stir it all together. Make sure every oat is coated well. This ensures the cookies hold together after you shape them. Using a spoon or cookie scoop, drop rounded spoonfuls of the mixture onto a lined baking sheet. Make sure to space them apart. To give the cookies their shape, lightly flatten each mound with the back of the spoon. After shaping, place the baking sheet in the fridge. Let the cookies chill for at least 30 minutes. This helps them firm up, making them easy to eat. Enjoy your no-bake chocolate oatmeal cookies! For the full recipe, check out the details above. Ensuring the Right Consistency To make great no-bake chocolate oatmeal cookies, you need the right mix. The chocolate mixture should be smooth and not too runny. If it's too thick, the cookies won't set well. If it's too runny, they won't hold together. Aim for a slightly gooey texture. This balance helps the cookies firm up nicely when they chill. Making Uniform Cookie Shapes For a neat look, use a cookie scoop or a spoon. Scoop out the mixture and drop it onto your lined baking sheet. I like to flatten them a bit with the back of the spoon. This makes them look even and helps them set better. Keeping the shapes uniform also helps with serving. Adding Textures with Nuts or Coconut Want to change up your cookies? Add some nuts or shredded coconut. Chopped walnuts or almonds give a nice crunch. Shredded coconut adds a chewy texture. You can mix and match according to your taste. This way, you create a fun twist on a classic recipe. Customizing the Sweetness Level You can control how sweet your cookies are. Use honey for a sweet touch or maple syrup for a milder flavor. If you want less sweetness, cut back on the honey. You can also leave out the chocolate chips or reduce them. Taste the mixture before you drop it. Adjust it until it’s just right for your sweet tooth. For the complete recipe, check out the [Full Recipe]. {{image_4}} Vegan Replacement Options You can easily make these cookies vegan. Swap honey for maple syrup. Use almond butter instead of peanut butter. These changes keep the cookies sweet and tasty without animal products. Gluten-Free Suggestions For a gluten-free version, ensure your oats are certified gluten-free. You can use other grains like quinoa flakes if you like. This way, everyone can enjoy these yummy cookies. Adding Spices (cinnamon, nutmeg) Want to spice things up? Add a dash of cinnamon or nutmeg. Just a small amount can make a big difference. These spices add warmth and depth to the flavor. Mixing Different Nut Butters Try mixing different nut butters. Sunflower seed butter or cashew butter can give a new twist. Each nut butter has its own flavor, making your cookies unique every time. For the full recipe, check the details above! To keep your no-bake chocolate oatmeal cookies fresh, store them in an airtight container. This helps to lock in moisture and prevents them from drying out. You can stack the cookies neatly, but place parchment paper between layers to avoid sticking. You have two main options for storage: refrigeration or freezing. If you plan to eat them soon, keeping them in the fridge works great. Just pop them in for up to one week. For longer storage, freeze the cookies. They can last up to three months in the freezer. When you're ready to enjoy them, thaw them in the fridge overnight. In the fridge, your cookies will last about one week. After that, they might start to lose their taste and texture. If you freeze them, they stay good for about three months. Look out for signs of spoilage. If the cookies smell off or have an unusual color, it’s best to toss them. A change in texture, such as becoming overly hard or sticky, is also a sign they may not be safe to eat. Keeping an eye on these details ensures your tasty treats always stay delicious! Can I make these cookies without peanut butter? Yes, you can! You can use almond butter instead. If you need a nut-free option, try sun butter or soy nut butter. These substitutes still give a creamy texture. What’s the best way to change the sweetness? You can adjust sweetness by using less honey. You can also use maple syrup for a different flavor. If you want, add more chocolate chips for extra sweetness. How do I know when they are set? The cookies are set when they feel firm to the touch. They should not be sticky. You can check them after 30 minutes in the fridge. Can I add different kinds of chocolate? Absolutely! You can use dark, milk, or white chocolate chips. Mixing different chocolates adds fun flavors. Just remember to melt them slightly if they are in a solid form. What if the mixture is too dry? If your mixture is dry, add a splash of milk. Stir the mixture well to combine. You can also warm it a bit to help blend everything together. How can I make them more chocolatey? To boost the chocolate flavor, add more cocoa powder. You can also mix in chocolate chips. You can even drizzle melted chocolate on top for a rich finish. These no-bake cookies are simple and fun to make. We covered the key ingredients like oats, nut butter, and cocoa powder. I walked you through each step, from preparing the chocolate mixture to forming and storing the cookies. Remember, you can customize the sweetness and add your favorite extras. Get creative with flavors! These cookies fit different diets, too. Enjoy every bite, and share them with friends. You’ll love how easy they are to make and how delicious they taste!

No-Bake Chocolate Oatmeal Cookies Easy and Tasty Treat

Craving a sweet treat but short on time? You’re in luck! In this blog, I will show you how to

- 1 lb (450 g) Brussels sprouts, trimmed and halved - 3 tablespoons extra virgin olive oil - 2 tablespoons pure maple syrup - 1 tablespoon Dijon mustard - 1 teaspoon garlic powder - ½ teaspoon fine sea salt - ½ teaspoon freshly ground black pepper - ¼ cup (30 g) chopped pecans (optional) - Fresh parsley, finely chopped (for garnish, optional) - Large mixing bowl - Whisk - Baking sheet - Parchment paper When you make Maple Dijon Roasted Brussels Sprouts, gather these fresh ingredients first. Start with the Brussels sprouts. Look for firm, green sprouts. Trim and cut them in half for even cooking. You will also need extra virgin olive oil for healthy fat. Pure maple syrup adds a sweet touch. Dijon mustard gives a nice kick. Garlic powder brings flavor, while sea salt and black pepper enhance it all. Pecans are optional but add crunch. Fresh parsley works as a bright garnish. To bring it all together, you need a large mixing bowl for mixing. A whisk helps blend your dressing smoothly. A baking sheet lined with parchment paper makes cleanup easy. This simple setup will help you create a delicious dish. For the full recipe, check the details above. - Preheat oven to 400°F (200°C). - Line baking sheet with parchment paper. Start by heating your oven. This temperature helps the Brussels sprouts roast well. Lining the baking sheet with parchment paper makes cleaning easier. - Mix olive oil, maple syrup, Dijon mustard, garlic powder, sea salt, and black pepper. In a bowl, combine olive oil, maple syrup, and Dijon mustard. Add garlic powder, sea salt, and black pepper. Whisk these ingredients together. You want a smooth dressing that coats the sprouts well. - Toss halved Brussels sprouts in the dressing. - Spread sprouts on the baking sheet. Take the halved Brussels sprouts and put them in a large bowl. Pour the dressing over them and toss gently. Make sure every sprout is covered. This step ensures great flavor. After coating, spread the sprouts on the prepared baking sheet. - Roast for 20 to 25 minutes. - Shake the pan halfway through. Put your baking sheet in the oven. Roast the sprouts for 20 to 25 minutes or until they turn golden brown. Halfway through, shake the pan gently. This helps them cook evenly. Enjoy the amazing aroma filling your kitchen! For the full recipe, check out the details above. To make your Maple Dijon Roasted Brussels Sprouts even better, you can adjust the Dijon mustard. If you like it spicier, add more mustard. If you prefer a milder taste, reduce the amount. Another great idea is adding lemon juice. A splash of lemon juice brightens the dish. It adds a fresh and zesty kick that balances the sweetness of the maple syrup. Achieving that perfect golden-brown exterior is key. Roast your Brussels sprouts at a high temperature. Make sure they are well spaced on the baking sheet. This allows hot air to circulate around each sprout, helping them crisp up nicely. If they are too close together, they will steam instead of roast, losing that great texture. Maple Dijon Roasted Brussels Sprouts shine as a side dish. They pair beautifully with roasted chicken or grilled fish. You can also serve them with rice or quinoa for a hearty meal. For a festive touch, consider adding these sprouts to a holiday table. They not only taste great but look stunning too. For a delicious twist, drizzle any leftover sauce from the baking sheet on top before serving. This adds extra flavor and a lovely shine to the dish. For the full recipe, check out the details above. {{image_4}} If you have nut allergies, you can skip the pecans. Instead, try sunflower seeds or pumpkin seeds for a nice crunch. They add texture without the risk of allergies. You can also use toasted breadcrumbs as a topping for added flavor. For a tangy twist, consider adding balsamic vinegar to the dressing. This addition brings a nice depth of flavor that pairs well with the sweetness of maple syrup. Just mix in one tablespoon of balsamic vinegar with the other ingredients for a tasty change. Want to boost nutrition? Add dried cranberries for sweetness. They give a pop of color and flavor. You can also sprinkle some feta cheese over the sprouts after roasting. This adds creaminess and a salty kick. Both options make your dish more exciting and nutritious. For the full recipe, check out the Maple Dijon Roasted Brussels Sprouts. To keep your Maple Dijon Roasted Brussels sprouts fresh, let them cool first. Place them in an airtight container. Store them in the fridge for up to four days. Make sure to label the container with the date. This helps you remember when you made them. When you want to reheat your Brussels sprouts, try the oven for best results. Preheat your oven to 350°F (175°C). Spread the sprouts on a baking sheet. Heat them for about 10 to 15 minutes. This method keeps them crispy and tasty. You can also use a microwave. Place them in a microwave-safe bowl, cover with a damp paper towel, and heat for about one to two minutes. Just be careful not to overcook them. If you have more sprouts than you can eat, freezing is a great option. Blanch them first by boiling them for two minutes, then quickly cooling them in ice water. Afterward, dry them well and place them in a freezer-safe bag. Squeeze out as much air as possible before sealing. You can freeze them for up to three months. To thaw, just place them in the fridge overnight before cooking. This way, they maintain their flavor and texture. For the full recipe, check out the Maple Dijon Roasted Brussels Sprouts. Yes, you can use frozen Brussels sprouts. However, they may have a softer texture after cooking. To adjust cooking time, roast them for about 30 to 35 minutes. Check for tenderness and a nice brown color. If they are too wet, you might want to pat them dry before adding your maple Dijon mix. You can use yellow mustard or whole grain mustard. If you want a sweeter flavor, try honey mustard. For a spicy kick, go for spicy brown mustard. Each will change the taste a bit, so choose based on what you like best. Leftovers of your Maple Dijon roasted Brussels sprouts can last 3 to 5 days in the fridge. Store them in an airtight container to keep them fresh. When you reheat, make sure they are heated through and check for texture. Yes, you can prepare this recipe ahead of time. Mix the dressing and coat the Brussels sprouts a few hours before roasting. Keep them covered in the fridge. When you’re ready, roast them as directed. This saves time for gatherings and makes serving easy. For the full recipe, check the earlier section. This article covered all you need for Maple Dijon Roasted Brussels Sprouts. We listed ingredients, tools, and simple steps for perfect roasting. You learned tips for flavor, texture, and serving ideas. Variations help you adapt to any taste. Plus, we shared how to store and reheat leftovers properly. Maple Dijon Roasted Brussels Sprouts are not just tasty; they’re also easy to make. Enjoy this dish at your next meal or gathering!

Maple Dijon Roasted Brussels Sprouts Simple Delight

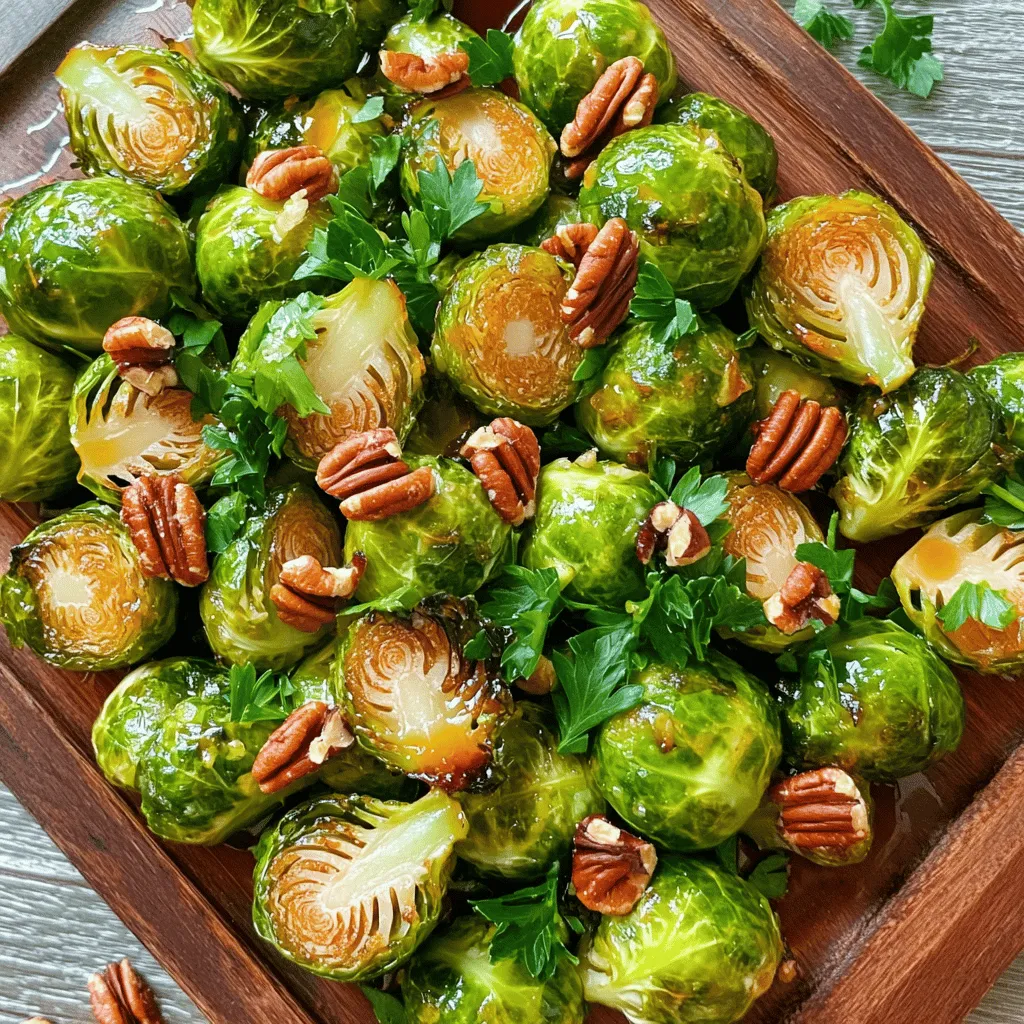
Looking for a simple yet delicious side dish? Maple Dijon Roasted Brussels Sprouts will brighten your dinner table! With their

- 3 cups shredded unsweetened coconut - 1 cup sweetened condensed milk - 2 large egg whites The main ingredients are simple yet effective. Shredded coconut gives the macaroons their chewy texture. Sweetened condensed milk adds sweetness and moisture. Egg whites help bind everything together and create fluffiness. - 1 teaspoon pure vanilla extract - 1/4 teaspoon almond extract For extra flavor, add vanilla extract and almond extract. Vanilla brings warmth, while almond adds a nutty note. These two can make your macaroons even more delightful. - 1/2 cup dark chocolate chips A chocolate drizzle is a fun touch. Melt dark chocolate chips for a rich flavor. It contrasts well with the sweet coconut. This step is optional, but it takes your macaroons to the next level. For the full recipe, you can check the detailed instructions to create these tasty treats. First, preheat your oven to 325°F (160°C). This step warms up your oven for even baking. While the oven heats, line a baking sheet with parchment paper. This prevents the macaroons from sticking and makes cleanup easy. In a large bowl, combine 3 cups of shredded unsweetened coconut with 1 cup of sweetened condensed milk. Add 1 teaspoon of pure vanilla extract and a pinch of sea salt. If you want a hint of almond flavor, add 1/4 teaspoon of almond extract now. Mix everything well until it's smooth and well combined. In a separate bowl, crack 2 large egg whites. Whisk them vigorously until they become frothy. Keep whisking until soft peaks form. This step is key for light and fluffy macaroons. Now, gently fold the whipped egg whites into the coconut mixture. Use a spatula for this. Be careful not to stir too hard; you want to keep the air in the egg whites. This will make your macaroons light and airy. Using a small cookie scoop or your hands, shape the mixture into small mounds. Place them on the lined baking sheet, leaving about an inch between each mound. This space helps them bake evenly. Bake the macaroons for 20 to 25 minutes until they turn a lovely golden brown. After baking, take the macaroons out and let them cool on the baking sheet. This helps them firm up. While they cool, melt 1/2 cup of dark chocolate chips in a microwave-safe bowl. Heat in 30-second intervals, stirring in between until smooth. Once melted, drizzle the chocolate over the cooled macaroons. Let the chocolate set, or chill them in the fridge if you want it done quicker. For the full recipe, refer to the earlier section. To make the best coconut macaroons, whip the egg whites well. Start with clean, dry bowls. Beat the egg whites until they get frothy and soft peaks form. This step is key. It helps your macaroons rise and stay light. If you don’t whip them enough, your treats may turn out dense. Keep an eye on your macaroons while they bake. The ideal baking time is between 20 to 25 minutes. You want them golden brown on top. If you take them out too soon, they may be soggy. If you bake them too long, they could burn. Every oven is different, so check often! Presentation matters for these treats. Arrange the macaroons on a pretty platter. You can sprinkle a few extra coconut flakes around them for fun. This makes your display inviting. A well-presented dessert always looks more appetizing. If you drizzle chocolate on top, it adds a touch of elegance. For more ideas, check out the Full Recipe! {{image_4}} To make chocolate-dipped coconut macaroons, follow these extra steps after baking. First, let your macaroons cool completely. Then, melt about 1/2 cup of dark chocolate chips in a microwave. Heat in 30-second bursts, stirring each time until smooth. Once melted, dip the bottom of each macaroon into the chocolate. Place them back on parchment paper to harden. This adds a rich layer of flavor and a nice touch to your treats. Coconut macaroons are naturally gluten-free! To keep them that way, use sweetened condensed milk that is labeled gluten-free. You can also use certified gluten-free oats as a base for added texture. Just grind them into a fine powder before mixing. This will keep your macaroons light and chewy, perfect for those avoiding gluten. Want to mix things up? Consider adding different extracts! Along with vanilla, you can use almond extract, coconut extract, or even orange extract. Just swap out half of the vanilla for your chosen extract. This small change can create a whole new flavor experience. Try each variation to see which one you enjoy most! For the full recipe, check out Coconut Bliss Macaroons. To keep macaroons fresh, store them in an airtight container. Place them in a cool, dry spot. Avoid direct sunlight and heat. At room temperature, they can stay good for about three days. This method works well if you plan to enjoy them soon. Refrigerating your treats can extend their life. If you want to keep them longer, put them in the fridge. They will last up to a week this way. Make sure to use an airtight container to prevent them from drying out. Refrigeration may slightly change their texture, making them chewier. To freeze coconut macaroons, first, let them cool completely. Place them in a single layer on a baking sheet. Freeze them for about an hour until firm. Then, transfer them to a freezer-safe bag or container. Be sure to remove as much air as possible. They can last up to three months in the freezer. When ready to eat, thaw them in the fridge overnight. This method keeps them tasty and fresh for later enjoyment. For more detailed directions, check the Full Recipe. Coconut macaroons stay fresh for about 5 days at room temperature. Store them in an airtight container to keep them moist. If you want them to last longer, place them in the fridge. They can stay fresh for a week there. Just remember to let them come to room temperature before enjoying. Yes, you can use sweetened coconut. It adds a nice flavor but changes the sweetness. If you do this, cut back on the sweetened condensed milk in the recipe. This helps to keep the macaroons from getting too sweet. Try using about three-quarters of a cup of sweetened condensed milk if you prefer a sweeter treat. Dry macaroons usually happen if you overbake them. Make sure to watch them closely in the oven. They should be golden brown on top but not too dark. Another reason could be using too much coconut or not enough wet ingredients. Always stick to the recipe for the best results. If you find them dry, try adding a little more sweetened condensed milk next time to keep them moist. In this post, we covered how to make delicious coconut macaroons. We explored the key ingredients like shredded coconut, sweetened condensed milk, and egg whites. We walked through simple steps, from prepping the oven to making the perfect chocolate drizzle. I also shared tips for achieving a nice texture and beautiful presentation. Remember, you can store these treats easily, too. With a few variations, these macaroons can fit any taste. Enjoy creating your batch!

Coconut Macaroons Delightful Treats to Savor

Coconut macaroons are a sweet escape to treat your taste buds! These delightful bites are simple to make and packed

To make garlic Parmesan roasted broccoli, you need fresh items for the best taste. Gather these: - 2 large heads of broccoli, cut into bite-sized florets - 4 cloves fresh garlic, minced - Zest of 1 lemon - Fresh parsley, finely chopped (for garnish) These fresh ingredients bring bright flavors. The garlic adds a strong kick, while the lemon zest gives a nice zing. Next, you'll need some common kitchen items. These are simple to find: - 4 tablespoons extra virgin olive oil - ½ cup freshly grated Parmesan cheese - 1 teaspoon garlic powder - ½ teaspoon red pepper flakes (optional for heat) - Salt and freshly cracked black pepper, to taste These staples help enhance the dish. The olive oil is key for roasting, while the Parmesan gives that rich, cheesy flavor. For an extra touch, consider these garnishes: - Extra lemon slices for presentation - More grated Parmesan for a cheesier bite These additions make your dish shine. They also add a pop of color and flavor that make it more appealing. You can find the full recipe at [Full Recipe]. Start by setting your oven to 425°F (220°C). This hot temperature helps the broccoli roast well. A hot oven gives it a nice crisp. Take two large heads of broccoli and cut them into bite-sized florets. In a big bowl, mix the broccoli with four tablespoons of olive oil. Next, add four cloves of minced garlic, one teaspoon of garlic powder, and salt and pepper to taste. If you like some heat, toss in half a teaspoon of red pepper flakes. Use your hands or a spatula to mix everything well. Make sure each floret is coated with oil and spices. Spread the broccoli mixture evenly on a large baking sheet. This step helps each piece roast evenly. Place the baking sheet in the oven and roast for 15 to 20 minutes. Check if the broccoli is tender with a fork. It should have crispy edges, which means it’s done right. Once the broccoli is roasted, take it out of the oven. Immediately sprinkle half a cup of freshly grated Parmesan cheese over the hot broccoli. It melts beautifully. Put it back in the oven for another five minutes. This makes the cheese bubbly and delicious. Afterward, take it out, and brighten it up with lemon zest and chopped parsley on top. This step adds flavor and looks great. For the full recipe, you can refer to the instructions above! Roasting broccoli is easy, but a few tips help. First, always use fresh broccoli. Fresh florets taste better and roast nicely. Cut the broccoli into even pieces. This helps them cook at the same rate. If the pieces are too big, they may not get crispy. Use a large bowl to mix your ingredients. This gives you room to toss the broccoli without making a mess. To get those crispy edges, space the florets out on the baking sheet. If they are too close, they will steam instead of roast. A hot oven is key. Preheat your oven to 425°F (220°C) before placing the broccoli inside. Avoid opening the oven door often. Each time you open it, heat escapes, making it harder for the broccoli to crisp up. You can boost the flavor of your garlic Parmesan roasted broccoli. Add lemon zest for a fresh kick. Use different cheeses like cheddar or feta for a unique taste. If you like spice, mix in more red pepper flakes. You can also try herbs like thyme or oregano. Adding nuts like almonds or pine nuts gives a nice crunch. For more ideas, check the Full Recipe for options on enhancing flavors. {{image_4}} You can mix in other veggies for extra flavor and color. Try adding carrots, bell peppers, or cauliflower. Cut them to the same size as the broccoli. This helps them roast evenly. Toss them in with the broccoli and seasonings. The mix will make your dish more exciting and tasty. While Parmesan cheese adds a nice touch, you can switch it up. Try using Pecorino Romano for a sharper taste. You can also use cheddar or even feta. Each cheese brings a unique flavor that can change the whole dish. Just remember to grate or crumble it for easy melting. If you like heat, sprinkle in some cayenne or chili powder. You could also add smoked paprika for a different twist. Fresh herbs like thyme or rosemary can enhance the flavor too. Experimenting with spices can make this dish your own. A pinch of this or that can turn simple broccoli into a flavor-packed side. For the full recipe, check out Garlic Parmesan Roasted Broccoli 🧄. To store leftover garlic Parmesan roasted broccoli, let it cool first. Place it in an airtight container. Keep it in the fridge for up to three days. If you want to keep it longer, freezing is a good option. When you’re ready to eat the leftovers, preheat your oven to 350°F (175°C). Spread the broccoli on a baking sheet. Bake for about 10-15 minutes until it's hot. This keeps the broccoli crispy and delicious. You can also reheat it in the microwave. Just warm it for 1-2 minutes, but it may not be as crisp. If you want to freeze the roasted broccoli, place it in a single layer on a baking sheet. Freeze it for about an hour. Once frozen, transfer it to a freezer-safe bag. It can last for up to three months. When you’re ready to use it, thaw it in the fridge overnight and reheat as mentioned above. This way, you can enjoy garlic Parmesan roasted broccoli whenever you like! Find the full recipe to make this tasty dish. You can pair garlic Parmesan roasted broccoli with many dishes. It works well as a side with grilled chicken or fish. You can also serve it with pasta or a hearty grain like quinoa. For a complete meal, add a fresh salad. This combination makes a colorful and healthy plate. Yes, you can prepare garlic Parmesan roasted broccoli ahead. You can wash and cut the broccoli a day before. Store it in the fridge in an airtight container. You can also toss the florets with oil and seasonings ahead of time. Just roast them fresh when you are ready to serve. To keep broccoli green, blanch it first. Boil water and add the broccoli for two minutes. Then, place it in ice water to stop cooking. After that, dry the broccoli well before roasting. This method helps keep the bright green color. It enhances the visual appeal of your garlic Parmesan roasted broccoli. You can find the full recipe in the earlier section. Roasting broccoli brings out its best flavors with simple steps and fresh ingredients. You learned how to prepare and enhance your dish using pantry staples and optional garnishes. My tips help you achieve crispy edges and add your twist with different veggies or spices. Store leftovers easily, and you'll enjoy this dish anytime. Embrace your creativity, and make this roasted broccoli a go-to meal for any occasion.

Garlic Parmesan Roasted Broccoli Simple Flavor Boost

Welcome to a delicious way to enjoy your veggies! Garlic Parmesan Roasted Broccoli is your quick, tasty side for any

- 2 ripe avocados, pitted and peeled - 12 oz spaghetti or preferred pasta variety - 3 cloves garlic, finely minced - 2 tablespoons freshly squeezed lemon juice - 1/4 cup grated Parmesan cheese (or nutritional yeast for vegan) - A handful of cherry tomatoes, halved (for garnish) - Additional fresh basil leaves (for garnish) - Food processor or high-speed blender - Large pot for boiling pasta - Cooking utensils (spatula, measuring cups) To make creamy avocado pasta, you need fresh and ripe ingredients. The star of this dish is the avocado, which gives the pasta a rich and creamy texture. Make sure to pick avocados that yield slightly when you press them. The garlic adds a nice kick, while the lemon juice brings a bright flavor. If you want to add a cheesy taste, use Parmesan or nutritional yeast. Having the right tools is key. A food processor or blender helps blend the sauce smoothly. A large pot is important for boiling pasta. You will also need basic utensils like a spatula and measuring cups to keep things easy. This simple setup will help you create a delightful meal that impresses anyone. For the full recipe, check out the details above. - Bring salted water to a rolling boil. - Cook pasta according to package instructions until al dente. - Reserve 1 cup of pasta cooking water before draining. Cooking pasta is easy and important. First, fill a large pot with water and add salt. The salt helps the pasta taste better. Wait until the water boils. Then, add your pasta. Follow the package instructions to check when it's done. Al dente means it should still be a bit firm. Before you drain the pasta, remember to save that cup of water. This water will help make your sauce creamy later. - Combine avocados, garlic, lemon juice, basil, Parmesan, and olive oil in a food processor. - Blend until smooth; adjust consistency with reserved pasta water if needed. Next, we prepare a tasty avocado sauce. Grab two ripe avocados and cut them open. Scoop out the green flesh and put it in your food processor. Add the minced garlic, lemon juice, fresh basil, grated Parmesan, and olive oil. Blend everything until it’s nice and smooth. If it’s too thick, you can add some of that reserved pasta water. This will help you reach the perfect creamy consistency. Taste it! If you need more flavor, add a pinch of salt or pepper. - Toss the drained pasta with the avocado sauce in the pot. - Adjust thickness with reserved pasta water; serve immediately. Now, it’s time to mix everything together. Put your drained pasta back in the pot. Pour the creamy avocado sauce over it. Toss it well so the pasta is covered in sauce. If it feels too thick, add a little more pasta water until it looks just right. Serve it hot! You can add cherry tomatoes and fresh basil on top for a nice look. Enjoy your delicious, creamy avocado pasta! For the full recipe, check out the earlier section. Using ripe avocados is key. They should feel soft when you gently squeeze them. If they are hard, wait a few days. Ripe avocados blend smoothly, creating a rich sauce. Add pasta water slowly while mixing. This helps you control the sauce's thickness. Start with a little and keep adding until you find the right creaminess. Spices and herbs can make your dish pop. Try adding red pepper flakes for heat. Fresh thyme also adds a nice touch. You can elevate flavors with different oils. For a fancy twist, use truffle oil. It gives a rich, earthy taste that pairs well with avocado. Creamy avocado pasta pairs well with a side salad. A fresh salad adds crunch and brightness. You can also serve it with crusty bread to soak up the sauce. For the best taste, serve it warm. The flavors shine when the dish is hot. Enjoy every bite of this delightful pasta! For the full recipe, check the section above. {{image_4}} For a vegan twist, swap the Parmesan cheese with nutritional yeast. Nutritional yeast gives a cheesy flavor without any dairy. It’s a great choice for flavor and nutrition. You can also use gluten-free pasta. Many good brands offer tasty gluten-free options. Look for rice, quinoa, or chickpea pasta. They work well with the creamy sauce and keep the dish exciting for everyone. Try adding other greens. Spinach or arugula can give extra color and taste. They blend well into the avocado sauce. Just add them to the food processor with the other ingredients. If you want more protein, add chicken or shrimp. Cook them first, then mix with the pasta and sauce. This makes the dish heartier and more filling. You can use various pasta shapes. Penne, fettuccine, or even rotini can be fun alternatives. Different shapes hold sauce in unique ways. For example, penne has tubes that trap the sauce inside. Fettuccine has flat strands that coat well. Experiment with what you like best! For the full recipe, check out the detailed instructions above. To store creamy avocado pasta, place it in an airtight container. Cover it well to keep air out. This helps maintain its freshness. You can keep it in the fridge for up to three days. After that, it may lose flavor and texture. When it's time to eat your leftovers, you can use a microwave or stovetop. If using the microwave, heat in short bursts. Stir between each burst to avoid hot spots. For stovetop, place pasta in a pan over low heat. Add a splash of water or olive oil. This helps revive the creaminess. Freezing creamy avocado pasta isn't ideal. The sauce may change texture when thawed. If you want to freeze it, separate the sauce from the pasta. Place the sauce in a freezer-safe bag or container. It can last up to three months. When ready to eat, thaw overnight in the fridge. Reheat gently and add fresh pasta. This gives you a fresher taste. Yes, you can prepare creamy avocado pasta ahead of time. Just be aware that avocado can brown quickly. To keep it fresh, store the sauce separately from the pasta. Use an airtight container for both. You can also add a bit of lemon juice to the sauce. This helps slow down the browning. When you're ready to eat, mix the sauce with freshly cooked pasta. This method keeps the flavors bright. To check if your avocados are ripe, gently squeeze them in your palm. They should feel slightly soft but not mushy. Look for dark green or black skin, which often indicates ripeness. If the skin is bright green, the avocado is still hard. You can also remove the small stem at the top. If it comes off easily and reveals green underneath, the avocado is ripe. Ripe avocados will give you the best flavor and creamy texture. Yes, adding protein is a great idea! You can easily mix in cooked chicken, shrimp, or even plant-based proteins like chickpeas. For chicken, grill or sauté it before adding. For shrimp, sauté until they turn pink. If you want a plant-based option, try adding tofu or tempeh. Just ensure the protein complements the creamy avocado sauce. This way, you get a balanced meal with added nutrition. In this article, we explored the creamy avocado pasta recipe. We covered the key ingredients, tools, step-by-step instructions, and helpful tips to perfect the dish. You learned how to enhance flavor, serve delicious meals, and store leftovers. Using ripe avocados makes a big difference in texture and taste. With variations and options for dietary needs, you can create a dish that suits any palate. Enjoy crafting your perfect creamy pasta dish!

Creamy Avocado Pasta Delightfully Simple Recipe

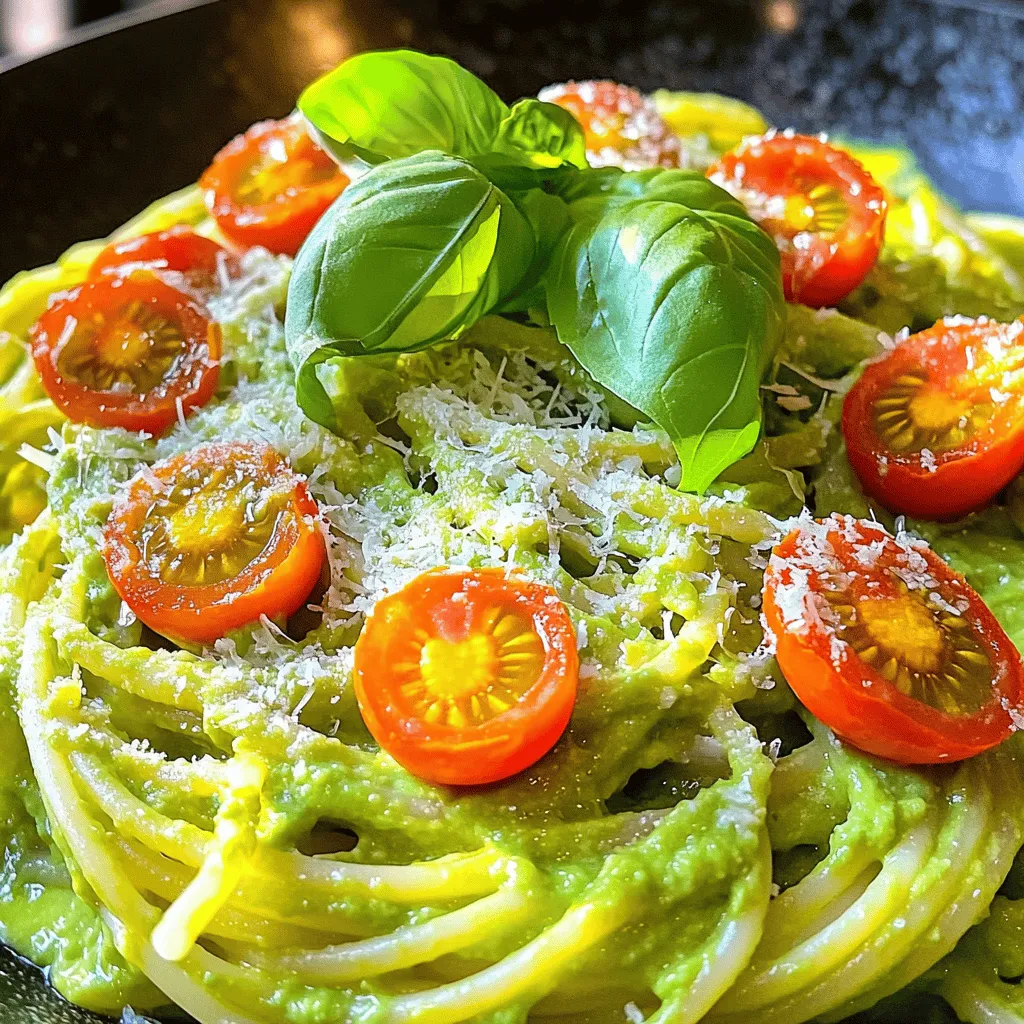
Looking for a quick and tasty meal? This Creamy Avocado Pasta recipe has got you covered! With just a few

For honey mustard chicken skewers, you need: - 1 pound chicken breast, trimmed and cut into 1-inch cubes - 1 bell pepper (red, yellow, or green), cut into 1-inch squares - 1 red onion, cut into generous wedges - Skewers (wooden or metal) The marinade brings out great flavors. For this, gather: - 1/4 cup honey - 1/4 cup Dijon mustard - 2 tablespoons extra-virgin olive oil - 2 cloves garlic, finely minced - 1 teaspoon smoked paprika - 1 teaspoon sea salt - 1/2 teaspoon freshly ground black pepper - 1/2 teaspoon dried thyme You can get creative with add-ins. Consider: - Cherry tomatoes for sweetness - Zucchini slices for extra veggies - Pineapple chunks for a tropical twist - Fresh herbs like rosemary or basil for more flavor These ingredients make the skewers juicy and fun. You can find the full recipe above to get started right away! To start, you need to make the marinade. In a bowl, mix honey, Dijon mustard, olive oil, minced garlic, smoked paprika, sea salt, black pepper, and dried thyme. Whisk it well until smooth. This mix adds great flavor. Next, add the chicken cubes. Make sure they are fully coated. Cover the bowl with plastic wrap. Place it in the fridge for at least 30 minutes. If you have time, let it sit for up to 4 hours. This helps the chicken absorb the flavors. Now, it’s time to assemble your skewers. If you use wooden skewers, soak them in water for 30 minutes first. This keeps them from burning. Take the marinated chicken from the fridge. Thread the chicken onto the skewers. Alternate the chicken with bell pepper squares and red onion wedges. This makes the skewers look tasty and colorful. Aim for a nice pattern for a fun presentation. Preheat your grill or grill pan to medium-high heat. When it’s hot, place the skewers on it. Grill for about 12 to 15 minutes. Turn the skewers occasionally. This helps them cook evenly and get those nice grill marks. Check the chicken's temperature. It should reach 165°F (75°C). When done, take the skewers off the grill. Let them rest for a few minutes. This helps the juices stay in the chicken, making it tender and juicy. For the full recipe, be sure to check out the detailed instructions above. To get the best taste from your honey mustard chicken skewers, marinate the chicken well. Use a mix of honey and Dijon mustard for balance. Letting the chicken sit in the marinade for at least 30 minutes allows the flavors to soak in. For even better results, try marinating for up to four hours. This extra time boosts the taste and makes the chicken juicy. Even cooking is key for great skewers. Start with chicken pieces that are similar in size. This helps them cook at the same rate. If you use wooden skewers, soak them in water first. This prevents burning on the grill. Grill the skewers over medium-high heat. Turn them every few minutes for even grilling. Check the chicken’s internal temperature; it should reach 165°F (75°C) for safe eating. Presentation makes a big difference in how food looks and tastes. When serving, arrange the skewers on a nice platter. Drizzle some extra honey mustard sauce on top for a shiny look. Add freshly chopped herbs like parsley or cilantro for color. Pair your skewers with a light salad or grilled veggies. This creates a complete meal that is as pleasing to the eyes as it is to the palate. Check out the Full Recipe for more tips! {{image_4}} You can swap chicken for other proteins. Try pork or beef for a tasty twist. Just cut the meat into 1-inch cubes like the chicken. Adjust the marinade time based on the protein you use. For pork, marinate for one hour. For beef, aim for 30 minutes. If you prefer a meatless meal, you can use tofu or tempeh. Both options soak up flavor well. Cut them into cubes and use the same marinade. You can also add more veggies, like zucchini or mushrooms. Skewer them with the tofu or tempeh for a colorful dish. Get creative with flavors! Try adding spices like cumin or curry powder for a unique taste. You can also mix in different mustards, like spicy brown or whole grain. For a sweeter twist, add maple syrup instead of honey. Experiment to find what you love! For the full recipe, check out the Honey Mustard Chicken Skewers. You can store leftover honey mustard chicken skewers in the fridge. Place them in an airtight container. They will stay fresh for about 3 to 4 days. To keep them juicy, avoid leaving them out at room temperature. When ready to eat, just take them out and let them warm up a bit. If you want to save skewers for later, freezing is a great option. Wrap each skewer tightly in plastic wrap. Then, place them in a freezer-safe bag or container. They can last up to 3 months in the freezer. When you’re ready to cook, just thaw them overnight in the fridge. To reheat your chicken skewers, I suggest using an oven or a grill. Preheat the oven to 350°F (175°C) and bake for about 10-15 minutes. If grilling, heat the grill to medium and cook for a few minutes until warm. This keeps the chicken moist and tasty. Avoid using the microwave, as it can make the chicken rubbery. For full recipe details, check the earlier sections! Yes, you can use other meats for skewers. Pork, beef, and shrimp all work well. Each meat has its own unique taste. Adjust the marinade to suit the meat you choose. For example, beef might need a bolder flavor. I recommend marinating the chicken for at least 30 minutes. For even better flavor, marinate it for up to 4 hours. This allows the chicken to soak up the honey mustard mix. It helps keep the chicken moist and tasty. Many sides go great with honey mustard chicken skewers. Here are some tasty options: - Light salad with fresh greens - Grilled vegetables like zucchini and mushrooms - Rice or quinoa for a hearty touch - Sweet potato fries for a fun twist To check if the chicken is done, use a meat thermometer. The internal temperature should reach 165°F (75°C). Additionally, the chicken should be opaque and no pink should show. If you cut into it, the juices should run clear. This ensures your skewers are safe and delicious. In this post, we covered the key parts of making chicken skewers. You learned about main ingredients, marinade options, and fun add-ins. I shared step-by-step instructions for marinating, assembling, and grilling your skewers. We also looked at tips for great flavor and even cooking. Variations included proteins and vegetarian choices. Lastly, we discussed storage and answered your most asked questions. With these tools, you're ready to create tasty skewers that impress. Enjoy experimenting and savoring your dishes!

Honey Mustard Chicken Skewers Juicy and Simple Delight

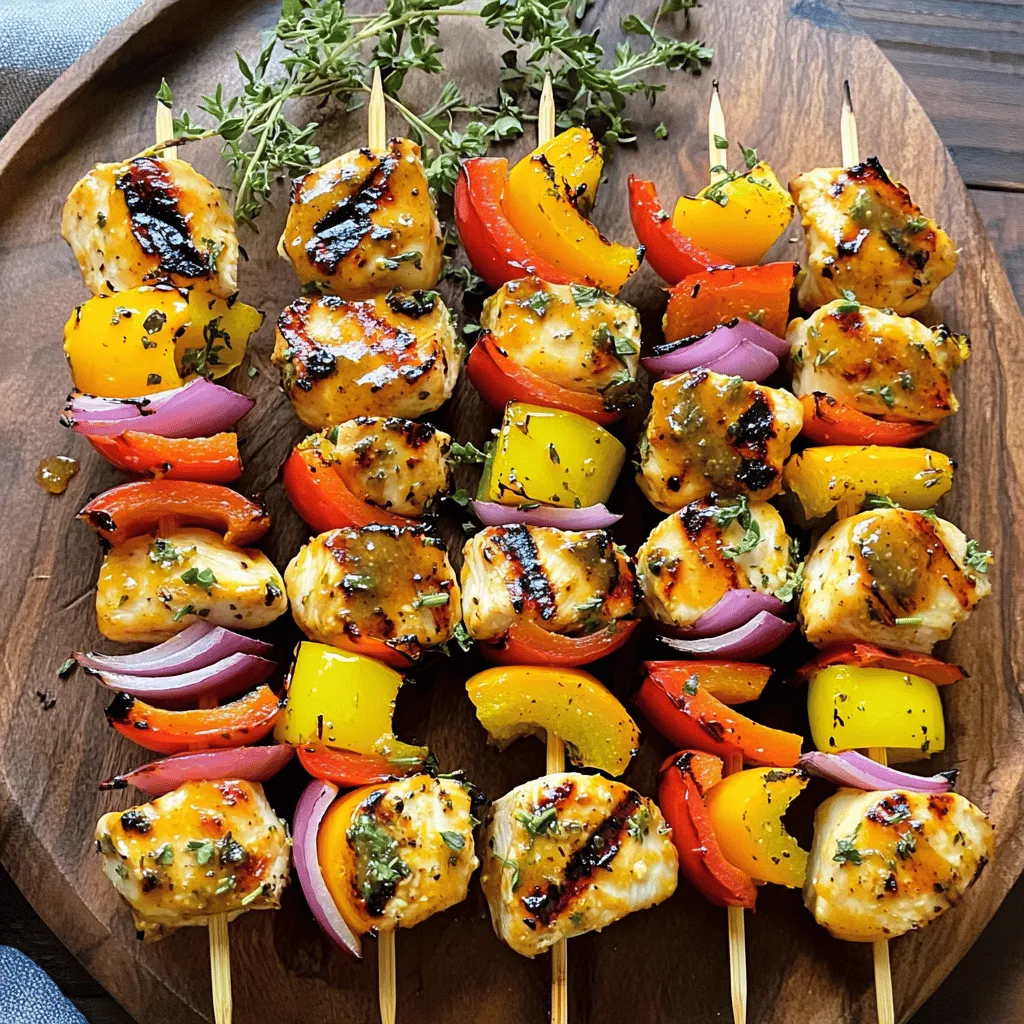
Ready to elevate your grilling game? Honey mustard chicken skewers are the answer! Juicy, simple, and bursting with flavor, these

Older posts
Newer posts
← Previous Page1 … Page61 Page62 Page63 … Page88 Next →

dsad

© 2025 spoonfulsavory • Built with GeneratePress

Our Policies

  • Copyright Policy
  • Cookie Policy
  • GDPR Policy
  • Privacy Policy
  • Disclaimer
  • Terms Of Use

More Information

  • Home
  • About
  • Contact
  • Appetizers
  • Dessert
  • Dinner
  • Drinks
©2025, spoonfulsavory About Back To Top