Skip to content
DisclaimerTerms Of UseGDPR PolicyCookie Policy

spoonfulsavory

  • Home
  • Drinks
  • Appetizers
  • Dinner
  • Dessert
  • About
  • Contact
  • Privacy Policy
DisclaimerTerms Of UseGDPR PolicyCookie Policy

Sarah

- 1 cup semi-sweet chocolate chips - 1 cup mini marshmallows - 1 tablespoon coconut oil (or unsalted butter) - 1/2 cup crushed graham crackers (plus additional for serving) - 1/2 teaspoon pure vanilla extract - A pinch of flaky sea salt To make the best s'mores dip, you need these key ingredients. The semi-sweet chocolate chips give a rich flavor. The mini marshmallows add that gooey, sweet touch. Coconut oil or butter helps the chocolate melt smoothly. Crushed graham crackers give a nice crunch when you dip. The vanilla extract adds depth, while the sea salt enhances all the flavors. - Alternative chocolate varieties (dark, milk, or white chocolate) - Flavor enhancements (e.g., almond extract, espresso powder) You can switch up the chocolate for a fun twist. Dark chocolate adds richness, while white chocolate brings a sweet creaminess. If you want a flavor boost, try almond extract or a bit of espresso powder. These small changes can make your dip even more special! For the full recipe, check out the details above. - Preheat the oven to 350°F (175°C). This helps the dip cook evenly. - In a medium mixing bowl, combine 1 cup of semi-sweet chocolate chips, 1 tablespoon of coconut oil, and 1/2 teaspoon of pure vanilla extract. Stir until smooth. - Pour the chocolate mixture into a cast-iron skillet or an oven-safe dish. Spread it evenly. - Layer 1 cup of mini marshmallows on top of the chocolate. Make sure they cover the chocolate completely. - Sprinkle 1/2 cup of crushed graham crackers over the marshmallows. This adds a nice crunch. - Place the dip in the oven. Bake for 10 to 12 minutes. The marshmallows should turn golden brown and puff up. - Once it's ready, take it out of the oven and let it cool for about a minute. Be careful; it will be very hot! For the best experience, serve your dip warm with extra graham crackers for dipping. You can also add pretzel sticks or fresh fruit for fun options. To get that smooth chocolate consistency, start by mixing the semi-sweet chocolate chips with the coconut oil. Stir them well in a bowl. This will help the chocolate melt evenly when you bake it. If you want a richer dip, try using a mix of dark and milk chocolate. When it comes to baking time, watch the marshmallows closely. I usually bake the dip for about 10 to 12 minutes. The marshmallows should puff up and turn golden brown. If you prefer them extra toasted, add a couple of minutes. Just be careful not to burn them! For dippers, you can use more than just graham crackers. I love offering crunchy pretzel sticks or fresh fruit, like strawberries and bananas. They add a nice contrast to the sweet dip. For a creative presentation, serve the dip in a cast-iron skillet. This adds a rustic touch. You can also drizzle warm chocolate sauce over the top for an extra treat. Don't forget to set out some extra crushed graham crackers on the side for fun! For the full recipe, check out the section above. {{image_4}} You can easily create fun twists on the classic s'mores dip. One of my favorites is a peanut butter s'mores dip. Just add a layer of creamy peanut butter on top of the chocolate before adding the marshmallows. This addition gives a rich flavor that pairs perfectly with the sweet chocolate. You can also try different chocolate combinations. Instead of semi-sweet chocolate chips, use dark chocolate for a richer taste. Or, use white chocolate for a sweeter, creamier dip. Mixing and matching different types of chocolate can create exciting flavors. If you need gluten-free options, look for gluten-free graham crackers. They are widely available and work well in this recipe. You can still enjoy the same great taste without the gluten. For vegan adaptations, swap the chocolate and marshmallows for dairy-free versions. Many brands now offer plant-based chocolate and vegan marshmallows. This way, everyone can indulge in this tasty treat! For the full recipe, check out the complete guide above. Enjoy creating your own variations! To store leftovers of s'mores dip, let it cool first. Then, place it in an airtight container. This keeps it fresh. I recommend using a glass container. Glass helps keep the flavor and texture. If you have leftover graham crackers, store them separately. They stay crisp that way. To reheat the dip, use an oven or microwave. The oven method warms it evenly. Preheat to 350°F (175°C). Place the dip in the oven for about 5-7 minutes. Check often to avoid burning the marshmallows. If you use a microwave, heat in short bursts. Start with 20 seconds and check. Stir between heats for even warming. Keep in mind, the texture may change after reheating. To maintain that gooey goodness, add a splash of water before reheating. This helps keep it creamy. Can I use a different type of chocolate? Yes, you can switch to dark, milk, or even white chocolate. Each type brings a unique flavor to the dip. Dark chocolate offers a rich taste, while milk chocolate is sweeter. White chocolate adds a creamy twist. Feel free to mix and match to find your favorite! How can I make this recipe in a microwave? For a quick microwave version, use a microwave-safe bowl. Combine the chocolate chips and coconut oil. Heat in short bursts, stirring in between, until melted. Then add marshmallows and graham crackers, and microwave for about 30 seconds. Keep an eye on it to avoid overflow! What should I do if my dip is too runny? If your dip is runny, it might need more graham crackers. Sprinkle in some extra crushed crackers to thicken it up. You can also let it cool for a few minutes. The dip will set more as it cools. Can I prepare the dip ahead of time? Yes, you can prep the dip in advance! Layer the chocolate, marshmallows, and graham crackers in your dish. Cover it and store it in the fridge. When ready, just bake it fresh for about 10-12 minutes. What is the best way to serve s'mores dip? Serve the dip warm for the best taste. Place it in a cute dish and add extra graham crackers, pretzels, or fruit on the side. This allows everyone to dip in and enjoy the gooey goodness. For a fun twist, drizzle chocolate sauce on top! This blog post shared a fun s'mores dip recipe, highlighting essential ingredients, baking steps, and tips. You can modify flavors and accommodate dietary needs easily. Remember to store leftovers well and reheat for the best taste. Now, you’re ready to impress friends and family with a tasty treat. Enjoy making this simple and delicious dessert!

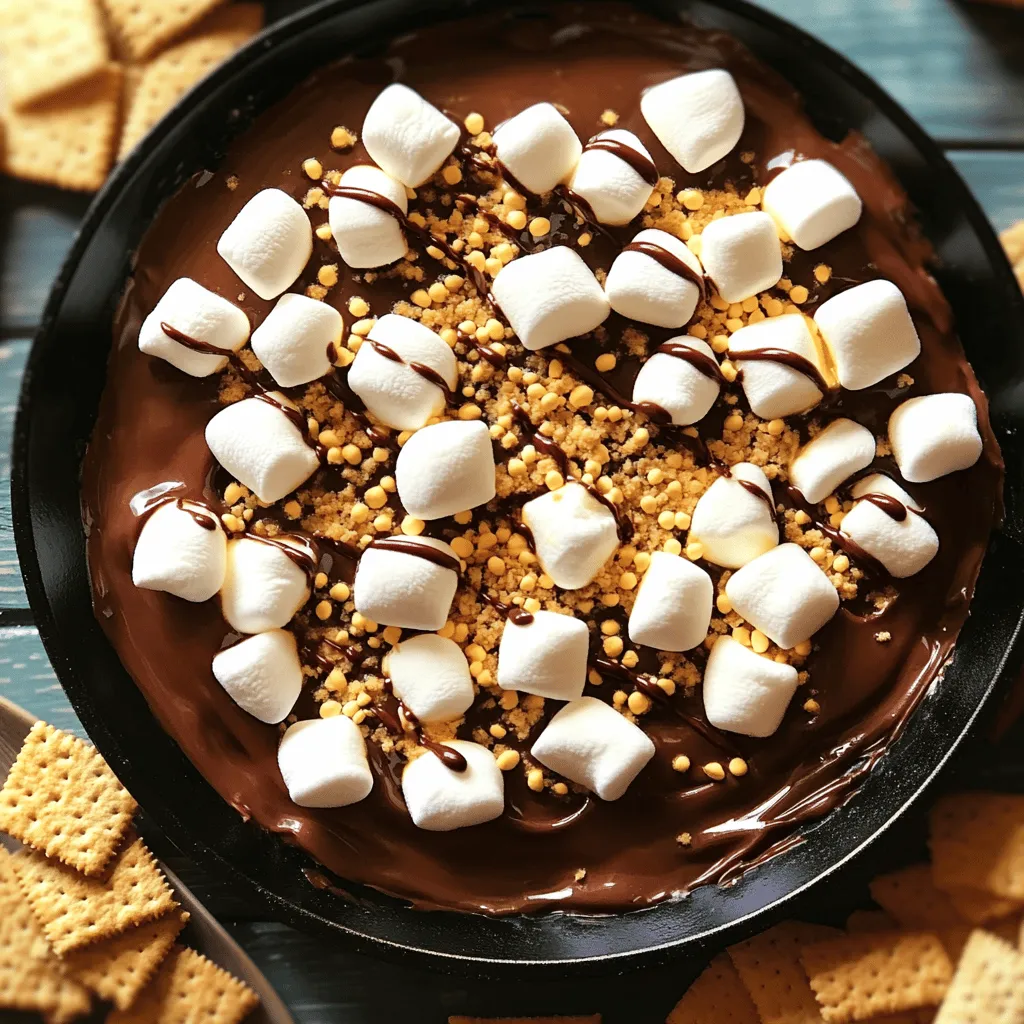
S’mores Dip in the Oven Irresistible and Easy Recipe

Craving a sweet treat that’s both fun and easy? This S’mores Dip in the Oven recipe combines gooey chocolate, toasted

For a tasty berry smoothie bowl, gather these key ingredients: - 1 cup frozen mixed berries (strawberries, blueberries, raspberries) - 1 medium ripe banana, sliced - 1/2 cup Greek yogurt (or plant-based yogurt) - 1/2 cup almond milk (or any milk you prefer) - 1 tablespoon honey or maple syrup (optional) - 1 tablespoon chia seeds These ingredients create a creamy base full of flavor and nutrition. The frozen berries give a cool taste, while the banana adds natural sweetness. Greek yogurt brings protein, and almond milk keeps it smooth. You can adjust the sweetness of your berry smoothie bowl. If you like it sweeter, consider these options: - Honey - Maple syrup - Agave nectar Adding sweeteners is simple. Just mix in one tablespoon or less, depending on your taste. Remember, too much can hide the fruit's natural flavor. Toppings make your berry smoothie bowl fun and colorful. Here are some great choices: - Sliced fresh fruit (like kiwi and banana) - Your favorite granola - Coconut flakes - Assorted nuts (like almonds or walnuts) - Seeds (like pumpkin or sunflower) These toppings add crunch and extra nutrition. You can mix and match your favorites to make it unique. Feel free to get creative! For the complete recipe, check the Full Recipe. To make your berry smoothie bowl, start with the right ingredients. Gather these: - 1 cup frozen mixed berries (strawberries, blueberries, raspberries) - 1 medium ripe banana, sliced - 1/2 cup Greek yogurt (or plant-based yogurt) - 1/2 cup almond milk (or any milk you like) - 1 tablespoon honey or maple syrup (optional) - 1 tablespoon chia seeds - Toppings like fresh fruit, granola, coconut flakes, nuts, and seeds First, take your blender and add the frozen berries, banana, yogurt, almond milk, and sweetener if you want it sweeter. Make sure the fruits mix well for smooth blending. Blend the mix on high speed. You want it creamy and smooth. If the mix is too thick, add a little more almond milk. Blend again until it feels just right. The goal is a thick yet pourable mixture, perfect for your bowl. Now, it’s time to serve! Pour your smoothie into a wide bowl. This shape lets you add lots of toppings. Sprinkle chia seeds on top for a nice crunch and nutrition. Be creative! Arrange your fresh fruit, granola, and coconut flakes on top. A colorful design makes it look appetizing. Let your berry smoothie bowl shine! Enjoy every bite of this berrylicious treat. For the full recipe, check the earlier section. To get the right texture, use frozen berries. They help create a thick, creamy bowl. If your mix is too thick, add a little almond milk. Blend it until smooth. You want it thick enough to hold toppings but smooth enough to eat with a spoon. Always layer your ingredients in the blender. Start with the liquids at the bottom. Then, add the soft ingredients like yogurt and banana. Top with the frozen berries. This order helps blend well. Use a high-speed blender for a silkier result. If your blender struggles, stop it, and stir the mix. This helps everything combine nicely. To make your berry smoothie bowl pop, try adding a splash of vanilla extract. You can also mix in a pinch of cinnamon for warmth. Fresh lemon juice wakes up the flavors too. Experiment with different toppings to add texture and taste. Nuts, seeds, and fresh fruit can change each bite. You can find the full recipe to create your personalized berry bliss. {{image_4}} You can easily make this berry smoothie bowl dairy-free. Swap the Greek yogurt for a plant-based yogurt. Coconut yogurt or almond yogurt works well. Use almond milk, soy milk, or oat milk instead of cow's milk. These changes keep the bowl creamy and tasty without any dairy. While mixed berries are great, you can switch them up. Try using only strawberries or blueberries for a different taste. Blackberries or cranberries can also add a fun twist. Each berry brings its own flavor and health benefits. Experimenting with berries keeps your smoothie bowl fresh and exciting. To boost nutrition, add extras to your smoothie. A scoop of protein powder can increase protein. Ground flaxseed adds fiber and omega-3s. You can also add spinach for greens without changing the taste. These add-ins elevate your bowl, making it even healthier. For the full recipe, check out the Berry Bliss Smoothie Bowl. If you have leftover berry smoothie bowl, you can store it easily. Place it in an airtight container. It will stay fresh in the fridge for up to two days. Before eating, give it a good stir. The toppings may need adjusting, so keep that in mind. You can freeze the smoothie bowl for a longer shelf life. Pour the smoothie into a freezer-safe container, leaving some space at the top. The mixture will expand as it freezes. It can last up to a month in the freezer. When you want to enjoy it, let it thaw in the fridge overnight. If you freeze your berry smoothie bowl, you may want to warm it up slightly. Place the bowl in the microwave for about 30 seconds. Check it often to avoid overheating. You want it to be creamy, not hot. If it is too thick, add a splash of milk and stir well. Enjoy your berry bliss smoothie bowl even after storage! You can use fresh berries! They will give your smoothie bowl a bright taste. Just keep in mind that fresh berries may make your bowl thinner. If you want it thicker, add more banana or yogurt. Frozen berries help create a creamy texture. I love the way frozen berries chill the bowl, too! Berry smoothie bowls pack a punch of vitamins. They are high in fiber, which helps digestion. Berries also have antioxidants that fight free radicals in your body. Bananas provide potassium for heart health. Greek yogurt adds protein, helping you feel full. This bowl is a tasty and balanced meal! To make your smoothie bowl vegan, swap Greek yogurt for plant-based yogurt. Use almond milk, coconut milk, or oat milk. For sweetness, opt for maple syrup instead of honey. With these swaps, your bowl stays just as delicious and creamy as the original recipe. Get creative with your toppings! Here are some fun ideas: - Sliced fresh fruits like kiwi, strawberries, or peaches - Crunchy granola for texture - Coconut flakes for a tropical taste - Mixed nuts and seeds for added nutrients - Dark chocolate chips for a sweet treat Feel free to mix and match! Each topping adds a unique flavor and look to your bowl. Enjoy making it your own! For the full recipe, check out my Berry Bliss Smoothie Bowl. Berry smoothie bowls are easy to make and delicious. We covered main ingredients, optional sweeteners, and suggested toppings. I shared preparation steps, blending techniques, and presentation tips. You learned how to get the right consistency and enhance flavors. We also discussed dairy-free options and how to store leftovers. The world of berry smoothie bowls is wide and fun. Experiment and enjoy your creations. Make it your own!

Berry Smoothie Bowl Refreshing and Nutritious Treat

Looking for a refreshing and nutritious treat? A berry smoothie bowl is your answer! Packed with flavor and vibrant colors,

To make orange glazed carrots, gather these ingredients: - 1 pound baby carrots (or peeled and chopped regular carrots) - 1/4 cup freshly squeezed orange juice - 2 tablespoons honey or maple syrup (your choice) - 1 tablespoon unsalted butter - Zest from 1 medium-sized orange - 1 teaspoon ground cinnamon - 1/4 teaspoon fine sea salt - Fresh parsley, chopped, for garnish (optional) If you need to swap ingredients, here are some ideas: - Instead of baby carrots, you can use regular carrots. Just chop them into small pieces. - For a vegan option, use maple syrup and coconut oil instead of honey and butter. - You can replace orange juice with tangerine juice for a different flavor. - Ground nutmeg can be used instead of cinnamon for a warm spice twist. When selecting carrots, look for these signs: - Choose carrots that are firm and smooth without any cracks. - A bright color indicates freshness. Look for deep orange hues. - Avoid carrots that are limp or shriveled as they may be past their prime. - If possible, buy organic carrots to reduce pesticide exposure. By following these tips, you ensure your orange glazed carrots are delicious and vibrant. Enjoy this recipe for a sweet and savory delight! For the full recipe, check out our guide. Start by prepping the carrots. If you have regular carrots, rinse and peel them. Cut them into bite-sized pieces. For baby carrots, just rinse them under cold water. This step gets rid of dirt and makes them clean for cooking. Next, cook the carrots. In a medium saucepan, add water until it covers the carrots. Bring the water to a boil. Once boiling, add the carrots and cook for 5 to 7 minutes. You want them tender but still a little crisp. After cooking, drain the carrots and set them aside. Now, let’s make the orange glaze. In the same saucepan, melt the unsalted butter over medium heat. Add the freshly squeezed orange juice, honey or maple syrup, orange zest, ground cinnamon, and fine sea salt. Stir until everything combines well. Bring this mixture to a gentle simmer. Finally, glaze the carrots. Carefully add the drained carrots back into the saucepan. Stir gently so each piece gets coated in the glaze. Let the carrots simmer in the sauce for 3 to 5 minutes. This allows the glaze to thicken and stick to the carrots. When done, remove from heat and let them rest for a few minutes. This step helps the flavors soak in. Transfer the glazed carrots to a serving dish. You can add freshly chopped parsley on top for color if you like. For the full recipe, check out the details provided earlier. To get that shiny glaze, start with fresh ingredients. Use real orange juice and zest to boost flavor. When you melt the butter, watch it closely. You want it to foam but not brown. Add the orange juice and sweetener right after. This helps the glaze stick well to the carrots. Stir often for even coating. Simmer the glaze gently. This helps it thicken without burning. Finding the right balance is key. Try using honey for a sweeter taste. Maple syrup gives a nice twist, too. If the glaze seems too sweet, add a touch more salt. This will help cut the sweetness. Adding some lemon juice can brighten the flavor even more. Taste the glaze as you mix. Adjust it until it feels just right for you. These orange glazed carrots shine on any dinner table. Serve them with roasted meats or grilled fish. They pair well with rice or quinoa, too. For a fun twist, add chopped nuts for crunch. Fresh herbs like parsley or thyme add color and flavor. You can even serve these carrots cold for a refreshing salad. For the full recipe and more ideas, check out the [Full Recipe]. {{image_4}} You can easily add fresh herbs to your orange glazed carrots. Try using thyme or rosemary. These herbs bring an earthy taste that pairs well with the sweet orange glaze. Just chop a teaspoon of fresh herbs and add them during the glaze step. It adds a nice twist and makes the dish more aromatic. For those who enjoy some heat, consider making spicy orange glazed carrots. Add a pinch of red pepper flakes or diced jalapeño to the glaze. This will give your dish a warm kick. Start with a small amount and increase it to your taste. This variation balances the sweetness with a fun, spicy element. You can also add a crunchy texture by including nuts. Chopped walnuts or pecans work great. Toast the nuts in a dry pan for a few minutes before adding them to the glazed carrots. This adds flavor and crunch to each bite. Just sprinkle them on top right before serving for a delicious, nutty finish. These variations keep the dish fresh and fun. You can mix and match based on your taste and what you have at home. For the full recipe, check out the Zesty Orange Glazed Carrots section. After enjoying your orange glazed carrots, you might have some leftovers. To store them, let the carrots cool down first. Place them in an airtight container. This keeps them fresh and tasty. You can store them in the fridge for up to three days. If you want to enjoy them later, consider freezing. When you’re ready to eat your leftover carrots, there are some great ways to reheat them. You can use the microwave for a quick fix. Place the carrots in a bowl and add a splash of water. Cover the bowl with a lid or a plate to keep the steam in. Heat them for about one to two minutes. Stir halfway through to ensure even heating. If you prefer, you can also reheat them on the stovetop. Just warm them gently in a pan over low heat. This will help keep the glaze nice and sticky. If you plan to freeze your orange glazed carrots, use a few simple steps. First, let the carrots cool completely. Then, spread them out on a baking sheet. This prevents them from sticking together. Freeze them for about one hour. Once frozen, transfer the carrots to a freezer-safe bag. Remove as much air as possible before sealing. They will stay good for three to six months. When you're ready to enjoy them again, thaw them in the fridge overnight before reheating. Yes, you can use different types of carrots. Baby carrots work great, but regular carrots are also fine. Just peel and chop them into small pieces. You will get the same sweet and savory flavors. To make this recipe vegan, simply replace the butter with a plant-based option. Use coconut oil or vegan butter instead. You can also swap honey for maple syrup. This keeps the dish sweet without any animal products. These carrots pair well with many dishes. Serve them alongside roasted chicken or grilled fish. They also work great with quinoa or rice for a healthy meal. Add a salad for extra crunch and freshness. Once cooked, orange glazed carrots can stay fresh for about 3 to 5 days in the fridge. Seal them in an airtight container to keep them tasty. If you want to store them longer, consider freezing them. This post covered everything you need for orange glazed carrots. We explored ingredients, cooking steps, and tips to enhance flavors. You now know variations and how to store leftovers, too. Try adding herbs or spices for new twists. Serve these delicious carrots at your next meal to impress everyone. With these simple tips, making orange glazed carrots will be easy and tasty. Enjoy this dish, and watch it become a family favorite!

Orange Glazed Carrots Sweet and Savory Delight

Welcome to a sweet and savory adventure with orange glazed carrots! These tasty treats brighten up any meal. With just

- 1 lb (450g) beef sirloin, cut into thin strips - 2 tablespoons extra virgin olive oil - 1 medium onion, finely chopped - 2 cloves of garlic, minced - 8 oz (225g) fresh mushrooms, sliced - 1 cup rich beef broth (low sodium) - 1 tablespoon Dijon mustard - 1 cup creamy sour cream - 2 tablespoons all-purpose flour - 1 tablespoon Worcestershire sauce - Salt and freshly cracked black pepper, to taste - Fresh parsley, finely chopped (for garnish) - Cooked egg noodles or egg dumplings for serving In this dish, I use beef sirloin. It is tender and flavorful. You want to cut it into thin strips. This helps it cook quickly and stay juicy. The olive oil adds richness and helps to sear the beef. The onion and garlic add depth to the flavor. Mushrooms are key in stroganoff. They bring a nice earthiness. I prefer cremini or button mushrooms for this recipe. They cook down beautifully and soak up the sauce. The beef broth gives the sauce a rich base. I use low sodium to control the saltiness. Dijon mustard adds a tangy kick. Sour cream is what makes the sauce creamy and smooth. Flour helps thicken the sauce, making it perfect for coating the beef and noodles. Worcestershire sauce adds a savory note that makes the dish come alive. For garnish, use fresh parsley. It brings a bright color and fresh taste. Always season with salt and freshly cracked black pepper to enhance the flavors. Serve this stroganoff over cooked egg noodles or egg dumplings to soak up the rich sauce. For the full recipe, you can check the previous section. - Sear the beef sirloin in olive oil over medium-high heat. - Transfer cooked beef to a plate after browning. Cooking the beef first gives it a nice flavor. I like to use sirloin because it’s tender. Heat the olive oil in a large skillet. When it shimmers, add the beef strips. Let them cook for about 4-5 minutes. Make sure to turn them for even browning. Once browned, take the beef out and set it aside on a plate. This step makes sure the beef stays juicy. - Cook onions and garlic until translucent. - Add sliced mushrooms and cook until golden brown. Next, you will want to work on the veggies. Lower the heat to medium. Add the chopped onion and minced garlic to the same skillet. Cook them for about 3-4 minutes. You want the onion to be soft and see-through. Then, add the sliced mushrooms. Stir them often and cook for about 5-7 minutes. They should be golden and fragrant. This adds a great depth of flavor to your dish. - Incorporate flour, then slowly add beef broth while whisking. - Stir in mustard, Worcestershire sauce, and sour cream until smooth. Now it’s time to make the sauce. Sprinkle the flour over the mushroom mix. Stir it in well and cook for about a minute. This will help remove the raw taste of the flour. Slowly pour in the beef broth while whisking. This keeps the sauce smooth. Let this simmer for about 3-4 minutes until it thickens. Now, stir in the Dijon mustard and Worcestershire sauce. Finally, fold in the sour cream. Mix until the sauce is creamy and smooth. - Return beef to skillet, mix well and season with salt and pepper. - Heat through before serving on a bed of noodles. Now, it's time to bring everything together. Put the cooked beef back into the skillet. Stir it well to coat the beef with the sauce. Season with salt and pepper to taste. Let it heat for another 2-3 minutes. This warms everything through. Serve your beef stroganoff over cooked egg noodles. You can find the full recipe for this dish to impress your family and friends! - Sear beef in batches for better browning. This step gives your beef a great crust. - Use low-sodium beef broth for controlled salt levels. It helps balance the dish. - Allow sour cream to be mixed in at low heat to prevent curdling. This keeps the sauce smooth. - Adjust thickness of sauce with additional flour or broth as needed. This helps you reach your desired consistency. - Serve in shallow bowls with a drizzle of olive oil and a sprinkle of paprika. It adds color and flair. - Pair with crusty bread for a complete meal experience. This makes it easy to soak up the rich sauce. For a complete recipe, check out [Full Recipe]. {{image_4}} You can easily change the main protein in beef stroganoff. Substitute beef with chicken or mushrooms for a vegetarian option. This switch keeps your dish tasty without losing flavor. If you want a creamy twist, try Greek yogurt instead of sour cream. This makes the dish lighter while giving it a nice tang. To make your stroganoff even better, add a splash of white wine. This small addition brings depth to the dish. You can also think about using fresh herbs like thyme or rosemary. These herbs add a lovely aroma and bring out the flavors of the other ingredients. While egg noodles are classic, you can serve stroganoff over rice or mashed potatoes. This gives you different textures and flavors. For a healthier side, pair it with steamed vegetables. This adds color and nutrition, making your meal even more balanced. For the full recipe, check out the cooking instructions above. Store leftovers in an airtight container in the refrigerator. This keeps the dish fresh and tasty. Consume within 3-4 days for optimal freshness. After this time, the flavor might fade. Always check for any off smells before eating. You can freeze portions in freezer-safe containers for up to 3 months. This is a great way to save extra stroganoff for later. When ready to eat, thaw in the refrigerator overnight before reheating. This slow thawing helps maintain texture and taste. Reheat on the stove over low heat. If the sauce is too thick, add a splash of broth. Stir gently to ensure even heating. This helps maintain quality and flavor. Keep the heat low to avoid burning or curdling the sour cream. Enjoy your meal just like the first time! Beef Stroganoff comes from Russia. This dish has many different versions around the world. It is made with tender beef, creamy sauce, and served over noodles or rice. Each country adds its own twist, making it a beloved comfort food everywhere. Yes, you can make Beef Stroganoff in advance. Cook it, then store it in an airtight container. Keep it in the fridge for up to four days. Just reheat it gently when you are ready to serve. This makes for easy meals during busy days. Beef Stroganoff tastes great with several sides. You can serve it over egg noodles or rice. Crusty bread is also a fantastic choice to soak up the sauce. A fresh side salad adds crunch and balance to the meal. To make Beef Stroganoff gluten-free, switch out regular flour. Use gluten-free flour or cornstarch as a thickening agent instead. This way, you can enjoy this dish without worry. The flavors will still be rich and delicious. For the full recipe, check out the details above. This recipe for Beef Stroganoff uses simple ingredients and clear steps. You learned how to sear beef, sauté vegetables, and make a creamy sauce. I shared tips for flavor and texture, along with storage guidelines. You can even try delicious swaps or serving ideas to mix things up. Now, get cooking and enjoy a hearty meal with family or friends!

Classic Beef Stroganoff Savory and Comforting Dish

Are you craving a dish that’s both savory and comforting? Look no further than classic Beef Stroganoff! This easy recipe

To make Caprese Salad Skewers, you need simple and fresh ingredients. Here’s what you will need: - 1 pint cherry tomatoes, halved - 8 ounces fresh mozzarella balls (bocconcini), drained - Fresh basil leaves (about 15-20 leaves) - 2 tablespoons balsamic glaze - 2 tablespoons extra-virgin olive oil - Fine sea salt and freshly cracked black pepper to taste - Skewers (8-10 inch bamboo or metal) Each ingredient plays a key role in the dish. The cherry tomatoes bring sweetness and juiciness. The mozzarella adds creaminess, while the basil gives a fresh herbal taste. The balsamic glaze adds a sweet and tangy touch. Extra-virgin olive oil enhances the flavors and gives richness. Salt and pepper balance everything out. Using fresh ingredients is crucial. Fresh mozzarella should be soft and slightly wet. Cherry tomatoes should be bright and firm. The basil leaves should be vibrant green and fragrant. Make sure to gather all these items before starting your prep. For the full recipe, check out Caprese Salad Skewers Delight. - Rinse and dry cherry tomatoes. - Rinse fresh basil leaves gently. - Drain mozzarella balls. Start by rinsing the cherry tomatoes under cool water. Pat them dry with a clean towel. Next, take fresh basil leaves and rinse them gently. This helps keep their bright green color and flavor. Then, drain the mozzarella balls in a colander. Let all the ingredients sit at room temperature. This extra step makes the flavors pop! - Thread cherry tomato half, basil leaf, and mozzarella ball. - Repeat pattern until skewer is full. Now it’s time for some fun! Grab a skewer and begin by sliding on a cherry tomato half. Next, add a fresh basil leaf right next to it. Follow with a mozzarella ball. Repeat this pattern until your skewer is nearly full. Leave about 1-2 inches of empty space at each end. This makes it easy to hold! - Drizzle olive oil, sprinkle salt and pepper. - Drizzle balsamic glaze. Once you finish your skewers, place them on a nice serving platter. Drizzle extra-virgin olive oil over the skewers. Then, sprinkle fine sea salt and fresh black pepper on top. This enhances the great flavors. Finally, drizzle balsamic glaze over the skewers. This adds a sweet and tangy kick that makes each bite special. These Caprese salad skewers are simple yet bursting with flavor. For the full recipe, you can check the details above. Enjoy making this vibrant dish! - Use room temperature ingredients for optimal flavor. - Leave space at both ends of skewers for easy handling. When you use room temperature ingredients, flavors blend better. This simple step makes your Caprese Salad Skewers taste fresh and bright. Remember to leave space on the skewers. It helps with grabbing and eating them without mess. - Serve on a colorful platter with basil garnishes. - Include a small bowl of balsamic glaze for dipping. To make your skewers pop, choose a bright platter. A splash of color draws the eye. Adding fresh basil leaves as a garnish looks great and adds aroma. A small bowl of balsamic glaze offers a tasty dip. It invites everyone to enjoy more. - Customize seasoning based on preference. - Explore other oils or vinegar options for variety. You can adjust the seasoning to fit your taste. If you like it spicy, add a pinch of red pepper flakes. Feel free to try different oils, too. For a twist, use flavored oils like garlic or herbs. Different vinegars can also change the taste. Try red wine vinegar for a new flavor dimension. {{image_4}} You can change the cheese to mix things up. Try smoked mozzarella for a unique taste. Aged mozzarella also adds depth to the flavors. If you want something different, use feta or goat cheese. These cheeses bring a creaminess that pairs well with the fresh flavors. Feel free to add more ingredients for extra flavor. Olives can add a nice briny touch. Sliced peppers can bring color and crunch. Prosciutto adds a savory bite that complements the dish. You can also play with herbs. Mint gives a fresh twist, while oregano adds a classic Italian flavor. Make your skewers special for holidays or events. For summer, use seasonal fruits like peaches or watermelon. These add a sweet contrast to the savory cheese and basil. You can also tailor them for barbecues. Use mini meatballs or grilled chicken pieces to make heartier skewers. Personalizing your skewers can impress your guests! You can store Caprese salad skewers in the fridge for up to one hour. To keep them fresh, cover the skewers with plastic wrap. This prevents them from drying out and losing flavor. For long-term storage, you should not freeze the skewers. The fresh ingredients do not hold up well when frozen. It is best to consume them within a few days for peak freshness. If you use bamboo skewers, wash them in warm, soapy water after use. Rinse them well to remove any soap. Let them dry completely before storing them. For metal skewers, hand wash them or place them in the dishwasher for easy cleaning. Store both types in a dry place to prevent rust. Look for fresh mozzarella with a creamy texture and slight milk flavor. This cheese should be soft and moist. Avoid mozzarella that feels hard or dry. Fresh mozzarella enhances the taste of your skewers. Yes, but assemble them shortly before serving for best quality. This keeps the ingredients fresh. If you need to prepare in advance, store the items separately. Assemble them just before your guests arrive for the best taste. Pair with Italian bread, charcuterie, or refreshing drinks for a complete experience. These skewers work well as a light appetizer. You can also serve them at picnics or parties. They add a fresh touch to any meal. While it adds flavor, you can substitute with balsamic vinegar or omit entirely. The skewers taste great without it too. If you want a lighter option, skip the glaze. The fresh ingredients stand out on their own. The recipe serves approximately 4-6 people, depending on serving size. This makes it perfect for small gatherings. You can easily double the recipe for larger groups. Enjoy these skewers as a tasty treat anytime! This blog post covered how to create delicious Caprese Salad Skewers. We discussed the fresh ingredients, preparation steps, and seasoning tips. You learned about variations and how to store these skewers. Keep this recipe handy for your next barbecue or gathering. With simple changes, you can make it your own. Enjoy making and sharing this fun dish with friends!

Caprese Salad Skewers Simple and Flavorful Appetizer

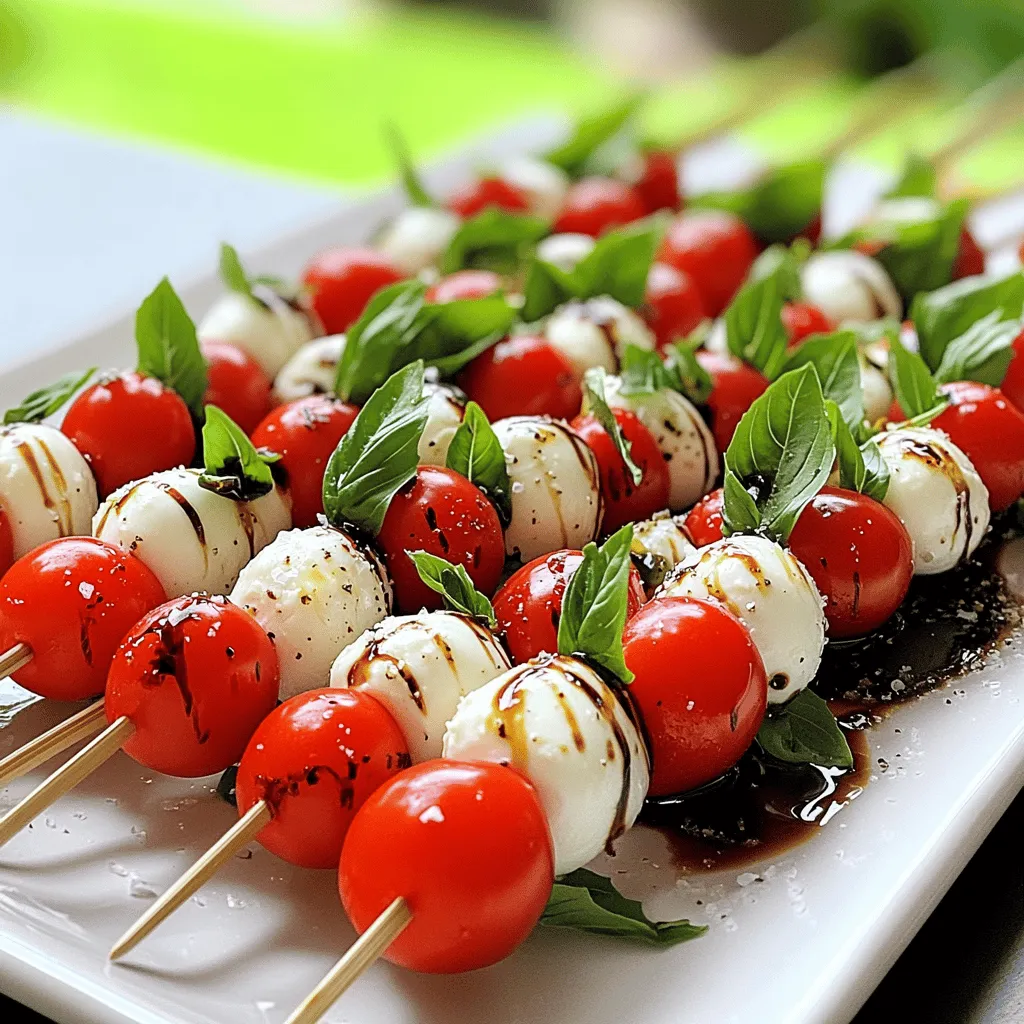
If you want a simple and tasty appetizer that impresses, try Caprese Salad Skewers! These easy-to-make bites bring together fresh

To make zucchini noodles with pesto, you need: - 3 medium zucchinis - 1 cup fresh basil leaves, packed - 1/4 cup pine nuts, lightly toasted - 1/4 cup freshly grated Parmesan cheese - 2 cloves garlic, finely minced - 1/4 cup extra virgin olive oil - 1 tablespoon fresh lemon juice - Sea salt and freshly ground black pepper, to taste - Cherry tomatoes, halved (for garnish) I always choose fresh ingredients for this dish. Look for firm zucchinis with a bright green color. Fresh basil should smell fragrant and vibrant. Quality pine nuts should be golden and toasted. This adds depth to your pesto. Use freshly grated Parmesan for the best flavor. Avoid pre-grated cheese as it may not melt well. If you're vegan, swap the Parmesan cheese for nutritional yeast. For nut allergies, use sunflower seeds instead of pine nuts. If zucchini is not your thing, you can use spaghetti squash or carrots. These options will give you a similar texture while keeping the dish fresh and tasty. To make zucchini noodles, start by spiralizing the zucchinis. A spiralizer works best, but you can also use a julienne peeler. Cut the ends off the zucchinis before you begin. This helps create even noodles. Aim for long, thin strands that resemble spaghetti. After spiralizing, the next step is to drain excess moisture. Place the noodles on a clean kitchen towel. Let them sit for a few minutes. This step is key because it helps keep the dish from getting watery. Now, let's make the pesto. Gather your food processor. In the bowl, add fresh basil leaves, toasted pine nuts, grated Parmesan cheese, and minced garlic. Pulse the mixture until it finely chops and blends. Next, while the food processor runs, slowly drizzle in the olive oil. This helps create a smooth and creamy pesto. Once mixed, add lemon juice, salt, and pepper. Pulse a few more times to blend everything well. Heat a large skillet over medium heat. When hot, add the zucchini noodles. Sauté them for about 2-3 minutes. You want them to be tender but still have a slight crunch. Be careful, as overcooking can make them mushy. After sautéing, remove the skillet from the heat. It's time to mix in the pesto. Toss the noodles gently to coat them in the vibrant pesto sauce. For the complete dish, check out the Full Recipe for Zesty Zucchini Noodles with Pesto. Enjoy your flavorful fresh delight! To make your zucchini noodles with pesto pop, consider adding spices or herbs. A pinch of red pepper flakes can bring heat. Fresh parsley or chives can add brightness. Experiment with these to find your favorite mix. You can also try different cheese variations. While Parmesan adds a rich flavor, you might enjoy using Pecorino Romano for a sharper taste. Nutritional yeast can be a great vegan option too. Each choice changes the whole dish. Serving matters as much as taste. For a fun twist, serve your noodles in shallow bowls. Create a nest shape with the noodles. This makes the dish look fancy and inviting. Garnishing can elevate your dish. Top it with halved cherry tomatoes for color. A sprinkle of extra Parmesan or whole basil leaves adds flair. These small touches can impress your guests and make your meal even more enjoyable. For the full recipe, check out the Zesty Zucchini Noodles with Pesto. {{image_4}} You can add proteins to your zucchini noodles for a heartier meal. Chicken, shrimp, or tofu work great. For chicken, use cooked and sliced breast. For shrimp, sauté them until pink. If you prefer tofu, choose firm tofu, press it, and cut it into cubes. Cook the tofu until golden brown. When adding proteins, timing is key. Cook proteins first, and set them aside. Sauté the zucchini noodles, then mix in the proteins at the end. This keeps everything warm and flavorful. Mixing up ingredients keeps your dish fun and fresh. Try different greens like arugula or spinach for your pesto. You can also swap pine nuts for walnuts or almonds. Each nut gives a unique taste and texture. If you need a vegan option, skip the cheese and use nutritional yeast. For a gluten-free choice, ensure your pasta is made from zucchini only. These alternatives still make a delicious meal while catering to your needs. For the Full Recipe, visit the link and see all the details! To keep your zucchini noodles fresh, place them in an airtight container. This helps keep moisture out. You can layer paper towels between the noodles to absorb extra water. How long will it last? Properly stored, your leftovers will stay fresh for about 2-3 days. After that, the noodles may become soggy and lose their taste. To reheat zucchini noodles, I suggest using a skillet. Heat it over medium heat, and add a splash of olive oil. This method keeps the texture nice. Stir gently for about 2-3 minutes until warm. Avoiding sogginess is key. Do not microwave the noodles, as they can become mushy. Instead, reheating on the stove helps maintain their crunch. Yes, you can prepare zucchini noodles in advance. To do this, spiralize the zucchinis and store them in a container. Keep them in the fridge for up to two days. Make sure to place a paper towel in the container. This towel absorbs extra moisture, keeping the noodles fresh and crisp. If you cannot find pine nuts, don’t worry. You can use other nuts. Here are some great options: - Walnuts - Pecans - Almonds - Cashews These nuts provide similar flavors and textures. Toast them lightly to enhance their taste before adding them to your pesto. To check if your zucchini noodles are cooked, look for these signs: - They should be tender but still firm. - A slight crunch is a good sign. - They will change color from bright green to a softer shade. Cook them for just 2-3 minutes on medium heat. Overcooking can make them mushy. For the complete recipe, check out the Full Recipe for Zesty Zucchini Noodles with Pesto. This blog covered key ingredients and steps for making zesty zucchini noodles with pesto. I shared essential tips on preparing, cooking, and storing your dish. Remember to experiment with flavors and proteins to make it your own. Making zucchini noodles is simple and fun. With the right techniques, you'll enjoy a delicious meal every time. Don't forget to check the full recipe for more details. Dive in and enjoy your cooking adventure!

Zucchini Noodles with Pesto Flavorful Fresh Delight

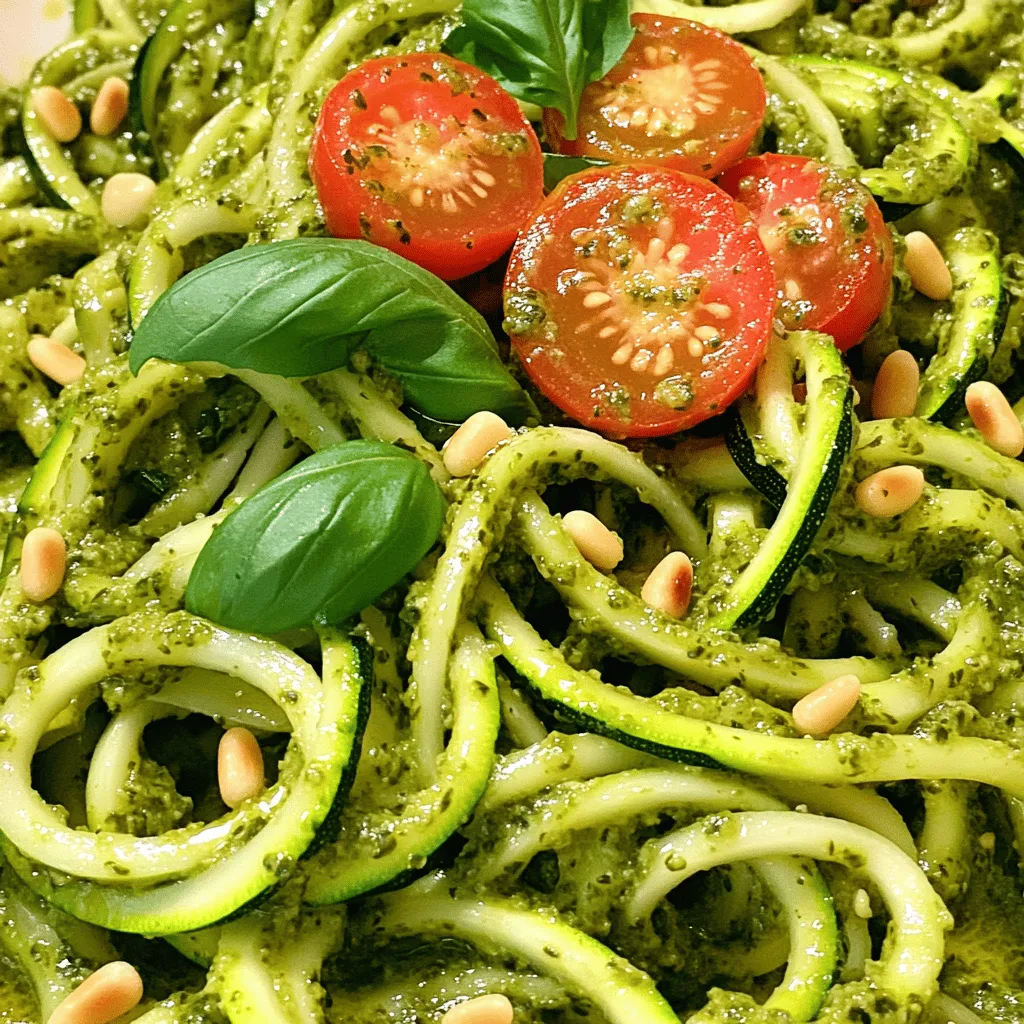
Are you looking for a fresh and tasty dish? Zucchini noodles with pesto offer a fun and healthy twist on

For Chocolate Peanut Butter Protein Balls, you need these simple ingredients: - 1 cup rolled oats - 1/2 cup natural peanut butter (smooth or crunchy) - 1/4 cup honey or maple syrup - 1/4 cup chocolate protein powder - 1/4 cup mini dark chocolate chips - 1 teaspoon vanilla extract - A pinch of sea salt - Optional: 2 tablespoons chia seeds These ingredients come together to create a tasty treat that packs a protein punch. The oats add bulk, while peanut butter brings that creamy flavor. Honey or maple syrup sweetens the mix, and chocolate protein powder boosts nutrition. - Rolled oats: They are great for heart health. Oats provide fiber that helps with digestion and keeps you full longer. - Natural peanut butter: This nut butter is rich in protein and healthy fats. It supports muscle growth and provides lasting energy. - Honey or maple syrup: Both are natural sweeteners. They offer quick energy and have antioxidants that can help fight inflammation. - Chocolate protein powder: This adds protein to your snack. Protein is key for muscle repair and recovery. - Mini dark chocolate chips: These chips add a bit of sweetness and antioxidants. Dark chocolate is known for improving mood too. - Vanilla extract: It adds a lovely flavor without extra calories. Vanilla can also have calming effects. - Sea salt: A pinch enhances all the flavors. It also helps balance electrolytes, especially after exercise. - Chia seeds (optional): They are packed with fiber, omega-3s, and protein. Chia seeds can help you feel full and support heart health. If you have special diet needs, you can easily swap some ingredients: - Gluten-free: Use certified gluten-free oats to keep the recipe safe for those with gluten allergies. - Nut-free: Substitute peanut butter with sunflower seed butter or another nut-free butter. - Vegan: Replace honey with maple syrup or agave nectar for a fully plant-based option. - Low-sugar: Use a sugar-free protein powder and lessen the sweetener to fit your diet. These alternatives keep the flavor and protein while meeting your needs. Make these protein balls fit your lifestyle! For the full recipe and instructions, check out the [Full Recipe]. To make these tasty protein balls, start by gathering your ingredients. In a large mixing bowl, combine: - 1 cup rolled oats - 1/4 cup chocolate protein powder - A pinch of sea salt If you want extra texture, add 2 tablespoons of chia seeds. Mix these dry ingredients well. Next, add your wet ingredients. This includes: - 1/2 cup natural peanut butter - 1/4 cup honey or maple syrup (for sweetness) - 1 teaspoon vanilla extract Use a spatula or your hands to mix until everything is combined. The mix should feel thick and sticky. When combining the ingredients, use your hands if you can. This helps you feel the texture better. Make sure all the dry ingredients are fully coated with the peanut butter and honey. This step is key for great flavor and texture. After mixing, gently fold in: - 1/4 cup mini dark chocolate chips Distribute the chocolate chips evenly through the mixture. This ensures you get a piece in every bite. Once the mixture is ready, take small portions and roll them into balls about 1 inch wide. Place the balls on a parchment-lined baking sheet. After you form all the balls, put the sheet in the fridge. Let the protein balls chill for at least 30 minutes. This helps them firm up and hold their shape. You can enjoy these protein balls right away or store them in an airtight container. They stay fresh in the fridge for up to one week. Try them as a quick snack or a post-workout treat. Enjoy your nutrient-packed delight from the full recipe! When making Chocolate Peanut Butter Protein Balls, some common mistakes can ruin your snack. First, don’t skip the chilling step. Chilling helps the balls hold their shape. If you skip it, they may fall apart. Second, avoid using too much liquid. If the mixture is too wet, the balls won’t form well. Lastly, don’t forget to mix well. You want every ingredient combined for the best flavor. You can easily customize these protein balls. Want more crunch? Use chunky peanut butter instead of smooth. You can also switch out the chocolate protein powder for vanilla or strawberry. For a unique twist, add different mix-ins. Try shredded coconut, dried fruit, or nuts. You can even change the sweetener. Use agave syrup or date syrup if you prefer something different. To make your protein balls even tastier, consider adding spices. A dash of cinnamon or a hint of sea salt can elevate the flavor. For extra richness, include a tablespoon of cocoa powder. This adds depth without too much sweetness. If you want a firmer texture, roll the balls in crushed nuts or seeds. This not only adds crunch but also makes them look appealing. Follow the Full Recipe for more tips on perfecting these delicious snacks. {{image_4}} You can switch up the taste of your protein balls. Try coconut for a tropical twist. Use almond butter instead of peanut butter for a nutty flavor. You can even mix in some cocoa powder for extra chocolate goodness. Adding different flavors keeps things fun and exciting! Want to boost the nutrition? Toss in some seeds like chia or flaxseeds. These add healthy fats and fiber. You can also mix in dried fruits like cranberries or raisins. They add sweetness and chewiness to the balls. Get creative with your add-ins for more health benefits! If you need vegan options, use maple syrup instead of honey. Choose a plant-based protein powder too. For gluten-free protein balls, ensure your oats are certified gluten-free. These changes make it easy for everyone to enjoy a tasty snack. You can easily adapt this recipe to fit different diets. Check out the Full Recipe for more ideas! To keep your chocolate peanut butter protein balls fresh, store them in the fridge. Use an airtight container to avoid moisture and keep them tasty. This method helps to lock in flavor and maintain texture for longer. Always let the balls cool completely before sealing them in the container. These protein balls last up to one week in the fridge. If you want to enjoy them longer, freeze them! Place the balls in a single layer on a baking sheet. Once frozen, transfer them to a freezer-safe bag or container. They can last for up to three months in the freezer. When you're ready to enjoy, just thaw them in the fridge overnight. To keep chocolate peanut butter protein balls fresh, avoid adding too much sweetener. Too much moisture can make them soggy. If you plan to eat them throughout the week, consider making smaller batches. This way, you can enjoy them fresh each time. Another tip is to add a pinch of sea salt to enhance flavor and help preserve them. These protein balls stay fresh for up to one week in the fridge. Store them in an airtight container. This keeps them safe from moisture and helps maintain their texture. You can also freeze them for longer storage. If frozen, they can last for about three months. Just let them thaw in the fridge before enjoying. Yes, you can use any protein powder you like. Whether it's whey, plant-based, or casein, the choice is yours. Each powder has a unique taste and texture. Just remember that it might change the flavor of your protein balls. Experiment with flavors like vanilla or berry for a fun twist. One protein ball contains about 100 calories. This can vary based on your specific ingredients. If you make them smaller or larger, the count will change too. You can reduce calories by using less sweetener or chocolate chips. These protein balls are a healthy snack, packed with energy and nutrients. In this blog post, we explored protein balls' key ingredients and health benefits. You learned preparation steps, mixing techniques, and storing tips to keep them fresh. We also discussed common mistakes, flavors, and add-ins to customize your snacks. Remember, making protein balls can be fun and simple. With these tips, you can enjoy healthy snacks that fit your needs. Get creative, stay healthy, and enjoy every bite!

Chocolate Peanut Butter Protein Balls Healthy Snack Idea

Looking for a quick and tasty snack that packs a healthy punch? Try my Chocolate Peanut Butter Protein Balls! These

For my delicious banana oatmeal muffins, you'll need some simple and wholesome ingredients. Here’s the list: - 2 ripe bananas, thoroughly mashed - 1 cup rolled oats - 1 cup whole wheat flour - 1/3 cup honey or maple syrup - 2 large eggs, beaten - 1/2 cup almond milk (or your preferred milk type) - 1 teaspoon baking powder - 1/2 teaspoon baking soda - 1 teaspoon ground cinnamon - 1/4 teaspoon sea salt - 1/2 cup chopped walnuts or semi-sweet chocolate chips (optional but recommended) These ingredients blend well together. The ripe bananas add natural sweetness. Rolled oats give the muffins a hearty texture. Whole wheat flour makes them filling and healthy. You can choose honey or maple syrup based on your taste. Eggs bind everything nicely, while almond milk keeps them moist. Baking powder and baking soda help them rise. Cinnamon adds warmth and spice, and sea salt balances the flavors. You can mix in walnuts or chocolate chips for extra crunch or sweetness. This recipe is easy to customize. You can swap ingredients based on your diet or what you have at home. Check out the Full Recipe for more details on how to make them. Start by preheating your oven to 350°F (175°C). This step is key for even baking. Prepare a muffin tin with liners or grease it well to stop sticking. This will make your muffin experience much better. In a big bowl, combine your mashed bananas and honey or maple syrup. Mix them well until smooth. This sweetness is what makes the muffins yummy. Next, add in the beaten eggs and almond milk. Whisk gently to blend everything. This creates a moist base for the muffins. In another bowl, sift together the rolled oats, whole wheat flour, baking powder, baking soda, cinnamon, and salt. Sifting helps to break up lumps and ensures even mixing. These dry ingredients give the muffins their structure and flavor. Now, gradually fold the dry ingredients into the wet mixture. Stir gently until just combined. Be careful not to overmix! This keeps your muffins light and fluffy. If you want, fold in some chopped walnuts or chocolate chips. They add a nice crunch and extra flavor. Use a spoon or ice cream scoop to distribute the batter into your muffin cups. Fill them about three-quarters full for the best rise. Place the muffin tin in your preheated oven and bake for 18-20 minutes. To check if they are done, insert a toothpick into the center of a muffin; it should come out clean. Once baked, let the muffins cool in the pan for about 5 minutes. Then, transfer them to a wire rack to cool completely. Enjoy your delicious banana oatmeal muffins! You can find the full recipe above. Do not overmix your batter. Mixing too much makes muffins tough. Stir gently until the dry and wet mix just blend. This helps keep the muffins light and fluffy. Bake your muffins for 18 to 20 minutes. Check with a toothpick; it should come out clean when done. Serve your muffins warm for the best taste. For a nice touch, add a spread of almond butter on top. Drizzle honey over them for a sweet glaze. These simple toppings make them even more delicious. If your muffins sink, check your oven temperature. A hot oven can cause them to rise too fast. If they are too dense, try not to add too much flour. Use the right amount and mix carefully. This will help you get the perfect muffin texture. For the full recipe, visit [Full Recipe]. {{image_4}} To make these muffins fit your needs, you can try gluten-free options. You can replace whole wheat flour with a gluten-free flour mix. This keeps the texture light and fluffy. If you want vegan alternatives, swap the eggs for flax eggs. Mix one tablespoon of flaxseed meal with three tablespoons of water. Let it sit for five minutes. This will help bind the muffins together without using eggs. You can add spices like nutmeg or vanilla to boost flavor. A pinch of nutmeg gives a warm, earthy taste. A splash of vanilla adds sweetness and richness. These tweaks make the muffins even more delightful. Different mix-ins can also change the taste. Try adding dried fruits like cranberries or apricots. Nuts like pecans or almonds are great too. These additions bring new textures and flavors to each bite. Using seasonal fruits can make the muffins special. In summer, add fresh blueberries or strawberries. In the fall, you can include chopped apples or pears. Each fruit will give a unique twist to your banana oatmeal muffins. By experimenting with these variations, you can find the perfect version that suits your taste. For the full recipe, check out our complete guide. To keep your banana oatmeal muffins fresh, store them in an airtight container. You can leave them at room temperature for up to two days. If you want them to last longer, put them in the fridge. This helps to keep the muffins moist. Just remember to let them cool completely before sealing. Freezing muffins is a great way to save them for later. Wrap each muffin in plastic wrap, then place them in a freezer bag. This prevents freezer burn and keeps them tasty. To defrost, just take one muffin out and let it sit at room temperature for about an hour. You can also microwave it for 15-30 seconds if you want it warm quickly. At room temperature, your muffins will stay good for about two days. In the fridge, they can last up to a week. If you freeze them, they can stay fresh for about three months. This makes banana oatmeal muffins a smart choice for meal prep. You can enjoy them for breakfast or a snack anytime you want. For the full recipe, check out the link above. You can replace eggs with flaxseed meal. Mix 1 tablespoon of flaxseed meal with 3 tablespoons of water. Let it sit for 5 minutes to thicken. This acts as a good binder. You can also use unsweetened applesauce. Use 1/4 cup for each egg. Both options keep the muffins moist and tasty. Yes, you can use quick oats. They will give your muffins a slightly different texture. Quick oats absorb moisture faster. This can make your muffins softer. If you want a chewier texture, stick with rolled oats. You can use agave nectar or brown sugar. If you want a sugar-free option, try mashed dates. Blend them with a little water to make a paste. This will sweeten your muffins naturally. Insert a toothpick into the center of a muffin. If it comes out clean, they are done. The tops should be golden brown and spring back when lightly pressed. This shows they are baked through. Yes, adding yogurt is a great idea! It makes muffins moist and adds a slight tang. Use about 1/2 cup of plain yogurt. You can mix it into the wet ingredients. It enhances flavor and texture. You can find the full recipe for these delicious banana oatmeal muffins including yogurt tips. You learned how to make delicious banana oatmeal muffins with simple ingredients. I shared tips on texture, serving ideas, and variations for different diets. These muffins are easy to prepare and perfect for any occasion. Try different mix-ins and flavors to keep things fun. Always remember to store them properly to maintain freshness. Enjoy baking these tasty treats, and share them with friends or family! Your kitchen will smell amazing, and you’ll create lasting memories.

Delicious Banana Oatmeal Muffins Simple and Healthy

Are you ready for a treat that’s both simple and healthy? These Banana Oatmeal Muffins blend the sweetness of ripe

To make Lemon Garlic Roasted Brussels Sprouts, you need simple, fresh ingredients. Each part plays a role in creating bold flavors. - Brussels sprouts and their preparation - 1 lb Brussels sprouts, trimmed and halved. Buy firm sprouts and avoid yellow leaves. Halve them for even cooking and more surface area for flavor. - Garlic and seasoning essentials - 4 cloves garlic, finely minced. Fresh garlic adds a strong taste. You can adjust the amount to fit your taste. - 1 teaspoon sea salt. This enhances the natural flavor of the sprouts. - ½ teaspoon freshly ground black pepper. This adds a mild heat without being overwhelming. - ¼ teaspoon red pepper flakes (optional for a spicy kick). Use if you enjoy a bit of heat. - Oils, acids, and optional ingredients - 3 tablespoons extra virgin olive oil. This oil adds richness and helps the sprouts crisp up. - Zest of 1 fresh lemon. The zest gives a strong lemon flavor. - 2 tablespoons freshly squeezed lemon juice. This adds brightness and acidity. - 1 teaspoon honey (optional for a hint of sweetness). This balances the tartness of the lemon. - Fresh parsley, finely chopped, for a bright garnish. This adds color and freshness to the dish. Using these ingredients, you will create a tasty side dish. They come together to make a dish that is both vibrant and satisfying. For the full recipe, refer to the section above. Enjoy your cooking! First, set your oven to 400°F (200°C). This temperature helps the sprouts roast evenly. While the oven heats up, grab your Brussels sprouts. Trim the ends and cut them in half. Place them in a large mixing bowl. Add four cloves of finely minced garlic to the bowl. The garlic will add a rich flavor to your dish. In a smaller bowl, mix together three tablespoons of olive oil, the zest of one lemon, and two tablespoons of lemon juice. If you like a hint of sweetness, add one teaspoon of honey. Sprinkle in one teaspoon of sea salt, half a teaspoon of black pepper, and if you want some heat, add a quarter teaspoon of red pepper flakes. Whisk these ingredients together. This sauce will coat the Brussels sprouts and give them a vibrant flavor. Pour the sauce over the Brussels sprouts and garlic. Use your hands or a spatula to toss them together. Make sure each sprout is well coated. Now, line a baking sheet with parchment paper. Spread the seasoned sprouts in a single layer on the sheet. Roast them in the oven for 25 to 30 minutes. Stir them halfway through to ensure they brown nicely. When they are golden brown and crispy, they are ready. Garnish with freshly chopped parsley before serving. Enjoy this tasty side dish! For the full recipe, check here. To get the best flavor, choose fresh Brussels sprouts. Look for firm and bright green ones. Trim the ends and cut them in half. This helps them cook evenly. Spread the sprouts out on the baking sheet. Make sure they are in a single layer. Crowding them can lead to steaming instead of roasting. Stir them halfway through cooking for even browning. Avoid using old or wilted Brussels sprouts. They will taste bitter and mushy. Don’t skip the seasoning either. The lemon and garlic are key for flavor. If you forget to toss them in the sauce, they will lack zest. Also, don’t roast them for too long. Watch closely to prevent burning. They should be golden brown and crispy, not charred. For a stunning dish, use a nice bowl or platter. Line it with parchment paper for style. Garnish with fresh parsley to add color. A drizzle of lemon juice on top makes it pop. You can also add lemon wedges around the dish. This adds brightness and invites people to dig in. For the full recipe, check out the detailed steps above. {{image_4}} To change the flavor, try different spices. You can use paprika for a smoky touch. Cumin adds warmth, while Italian herbs boost freshness. Lemon zest shines in every option, so keep it! You can add more ingredients for a flavor boost. Try crispy bacon bits for a savory crunch. Toss in grated Parmesan for a cheesy finish. Nuts like walnuts or almonds give a nice texture and taste. If you need swaps, here are some great ideas. For a vegan option, skip honey and use agave syrup. You can also replace olive oil with avocado oil for a different flavor. Need gluten-free? This recipe is naturally gluten-free, so you’re good to go! For the complete cooking process, check out the Full Recipe. After enjoying your Lemon Garlic Roasted Brussels Sprouts, store any leftovers in the fridge. Place them in an airtight container. This helps keep them fresh. Make sure to store them within two hours of cooking. They will last for about three to four days. If you want to keep them longer, consider freezing them. To reheat your Brussels sprouts, use the oven or an air fryer. Preheat your oven to 375°F (190°C). Spread the sprouts on a baking sheet. Heat them for about 10 to 15 minutes. This will help them regain their crispiness. Avoid using the microwave, as it can make them soggy. Choose glass or BPA-free plastic containers for storing your Brussels sprouts. These materials keep the sprouts fresh and prevent odors. Look for containers with tight seals to keep air out. This way, you can enjoy your tasty side dish later without losing flavor. For the full recipe, check out the complete guide on making these delicious sprouts! Yes, you can use frozen Brussels sprouts. Thaw them first and pat them dry. This helps them roast better. Frozen sprouts may take a bit longer to cook. Keep an eye on them to ensure they get crispy. Lemon Garlic Roasted Brussels Sprouts pair well with many dishes. Here are some ideas: - Grilled chicken or fish - Quinoa or brown rice - A fresh salad with lemon vinaigrette - Pasta dishes with light sauces - Roasted meats like pork or beef These options will make a colorful and tasty meal. To make this recipe vegan, simply leave out the honey. You can use maple syrup instead. It adds a nice sweetness without animal products. The rest of the recipe is already vegan-friendly. Enjoy this tasty side dish with your favorite vegan mains. For the full recipe, check out the earlier sections! You now know how to make delicious, lemon garlic roasted Brussels sprouts. We covered ingredients, step-by-step cooking, and helpful tips. Avoid common mistakes and try unique variations for new flavors. Always store leftovers wisely to enjoy later. With these easy skills, you can make a tasty dish that impresses anyone at your table. Enjoy cooking and serving your Brussels sprouts!

Lemon Garlic Roasted Brussels Sprouts Flavorful Side Dish

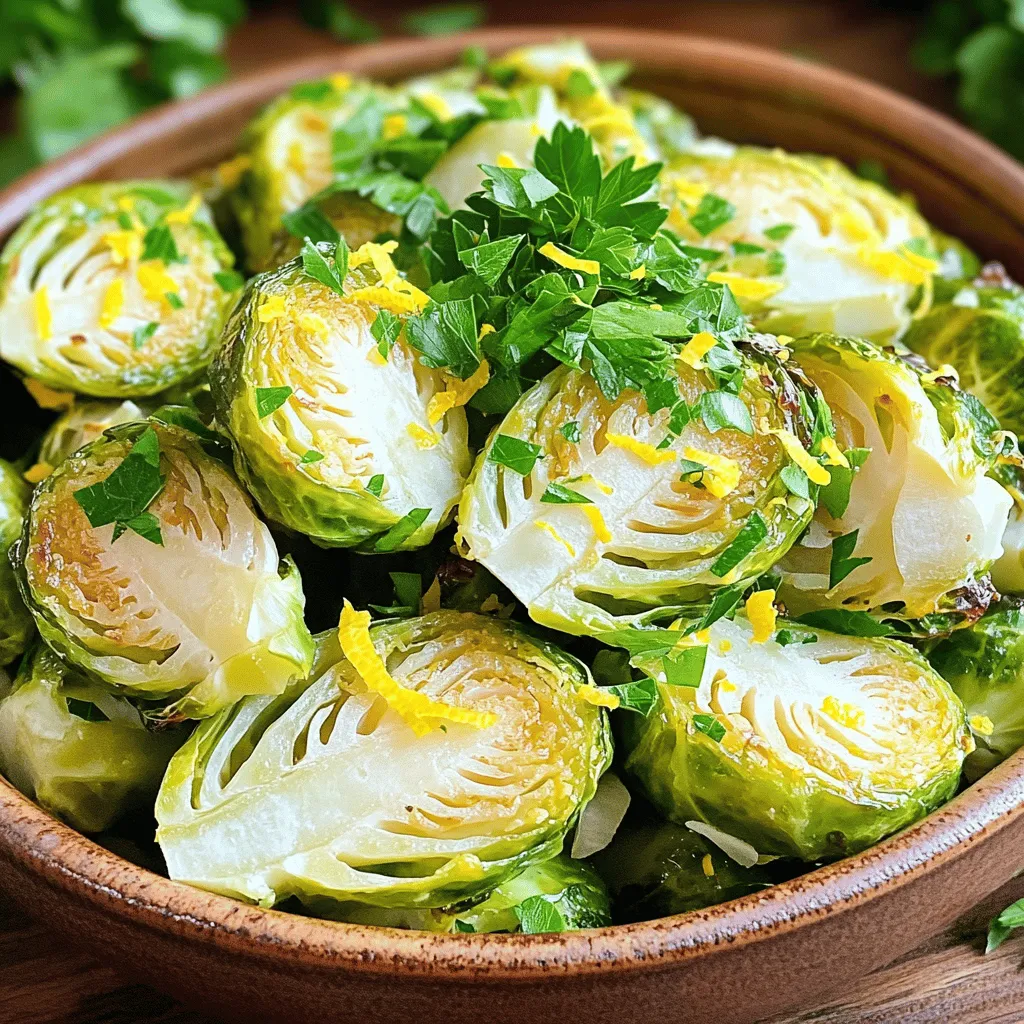
If you’re looking to elevate your dinner table, Lemon Garlic Roasted Brussels Sprouts are the answer. You can turn this

To make delicious cinnamon sugar churros, you need a few key items. Here’s the list: - 1 cup water - 2 tablespoons granulated sugar (for dough) - 1/2 teaspoon salt - 1/4 cup unsalted butter - 1 cup all-purpose flour - 2 large eggs - 1 teaspoon vanilla extract - Oil for frying - 1/2 cup granulated sugar (for coating) - 1 tablespoon ground cinnamon Each ingredient plays a special role. The water and butter create a rich dough. The sugar gives it sweetness, while the eggs help it rise. The flour provides structure, making churros light and airy. The cinnamon sugar coating adds a warm flavor. If you lack an ingredient, don’t worry! You can swap some items. Here are a few ideas: - Instead of butter, use coconut oil or margarine. - You can replace all-purpose flour with gluten-free flour. - For a sugar-free option, try using a sweetener like erythritol. These swaps can help you enjoy churros even if you have dietary needs. Want to get creative? You can add some fun flavors to your churros. Here are some options: - Mix in some orange zest for a citrus twist. - Add a touch of almond extract for a nutty flavor. - Try incorporating chocolate chips into the dough for a sweet surprise. These add-ins can take your churros to a whole new level of deliciousness! For the full recipe, check out the instructions provided. To make the dough, start by gathering your ingredients. You need water, sugar, salt, and butter. In a medium saucepan, mix these together. Heat the pan on medium until the butter melts. Keep stirring until the mixture boils. It should bubble up nicely. Once it's boiling, take it off the heat. Add the flour and stir with a wooden spoon. Keep mixing until it forms a ball. This dough should pull away from the sides of the pan. Let it cool for five minutes. Then, add the eggs, one at a time. Stir hard after each egg until it’s smooth. Finally, add the vanilla extract for flavor. Now it's time to fry! Get a deep frying pan and fill it with oil. You want the oil hot, around 350°F or 175°C. While the oil heats, put your dough into a pastry bag with a star tip. When the oil is ready, carefully pipe 5-inch strips of dough into it. Use kitchen scissors to cut the dough as you go. Fry each churro for about 2-3 minutes on each side. Turn them so they cook evenly. They should look golden brown when done. Use a slotted spoon to take them out. Let them drain on paper towels to soak up extra oil. While the churros cool, mix sugar and cinnamon in a shallow dish. You need 1/2 cup of sugar and 1 tablespoon of cinnamon. Once the churros are warm, roll them in the cinnamon sugar mixture. Make sure they are well coated. This gives them that sweet, crunchy finish. Serve the churros right away for the best taste. For a treat, dip them in chocolate sauce. You can find the full recipe [here](#). To get churros that are crispy on the outside, follow these key steps. First, make sure your oil is hot enough, around 350°F (175°C). This helps the churros fry quickly, sealing in moisture. Second, fry the churros in small batches. This keeps the oil temperature steady. If you crowd the pan, they may turn soggy. Finally, let them drain on paper towels after frying. This removes excess oil and keeps them crispy. Many people make simple mistakes when making churros. One common error is not letting the dough rest before frying. This can lead to dense churros. Another mistake is piping the dough too thick. Thin strips fry better and have a nice crunch. Lastly, don’t skip the cinnamon sugar coating. It adds flavor that makes churros truly special. Churros are best served warm right after frying. Pair them with a rich chocolate sauce for dipping. You can also serve churros with a scoop of vanilla ice cream for a fun dessert. For a twist, try adding fruit or whipped cream on top. If you want a drink with your churros, hot chocolate or coffee works great. Get creative and enjoy your delicious treats! For the full recipe, check out the detailed instructions that bring these crispy and delicious churros to life! {{image_4}} You can add a fun twist to your churros by dipping them in chocolate. For this, melt some good-quality chocolate in a bowl. Once the churros cool slightly, dip one end into the melted chocolate. Place them on parchment paper to set. This adds a rich flavor and makes them even more exciting. Stuffing churros can make them extra special. You can fill them with chocolate or cream. After frying, use a piping bag to inject your filling into the churro. Choose a sweet cream or a rich chocolate ganache. This makes each bite a delightful surprise. If you need a gluten-free option, swap the all-purpose flour for a gluten-free blend. Many blends work well in this recipe. Just make sure your other ingredients are also gluten-free. Try to keep the same cooking method and enjoy delicious churros without the gluten. For the complete guide to making these tasty snacks, check the Full Recipe. Store leftover churros in an airtight container. This keeps them fresh and prevents them from getting soggy. You can place a paper towel in the container to absorb extra moisture. If you plan to eat them within a day or two, this method works well. If you need to keep them longer, consider freezing. To reheat churros, preheat your oven to 350°F (175°C). Place the churros on a baking sheet. Heat them for about 5 to 10 minutes. This makes them warm and crispy again. Avoid the microwave, as it can make them chewy instead of crunchy. You can freeze churros for up to two months. Place them in a single layer on a baking sheet. Freeze them for about an hour until firm. Then, transfer them to a freezer bag or container. When ready to eat, follow the reheating tips. Enjoy them fresh and crispy anytime! Churros taste best when fresh. They stay good for about 1 day at room temperature. After that, they might get soft. Store them in an airtight container to keep them for a bit longer. If you want to keep them fresh for more days, freeze them. Just make sure to wrap them well. Yes, you can bake churros! Baking makes them a bit healthier. Just pipe them onto a baking sheet. Bake at 375°F (190°C) for about 20 minutes. They won't be as crispy, but they still taste great. For extra flavor, brush them with melted butter and roll them in cinnamon sugar right after baking. The best oil for frying churros is one with a high smoke point. Canola oil and vegetable oil work well. They heat up nicely and don't burn easily. Avoid oils with strong flavors, like olive oil. You want your churros to shine with their own taste, not the oil's. Cinnamon sugar churros are easy to make and fun to eat. We covered key ingredients, simple steps, and helpful tips. You can change the recipe with fun add-ins or variations. Want to keep them fresh? Storing and reheating ideas keep them tasty for later. Remember, every churro can be special! With practice, you’ll master this treat and impress others with your skills. Enjoy making churros for friends and family. Their smiles will be your best reward. Now, grab your ingredients and start cooking!

Cinnamon Sugar Churros Crispy and Delicious Snack

If you crave a sweet, crispy snack, homemade cinnamon sugar churros are your answer! In this guide, I’ll share everything

Older posts
Newer posts
← Previous Page1 … Page62 Page63 Page64 … Page88 Next →

dsad

© 2025 spoonfulsavory • Built with GeneratePress

Our Policies

  • Copyright Policy
  • Cookie Policy
  • GDPR Policy
  • Privacy Policy
  • Disclaimer
  • Terms Of Use

More Information

  • Home
  • About
  • Contact
  • Appetizers
  • Dessert
  • Dinner
  • Drinks
©2025, spoonfulsavory About Back To Top