![The heart of my savory sweet potato black bean chili lies in its vibrant ingredients. Each one adds flavor and nutrition. Here’s what you need: - 2 medium sweet potatoes, peeled and diced into 1-inch cubes - 1 can (15 oz) black beans, thoroughly drained and rinsed - 1 can (14 oz) diced tomatoes with green chilies, undrained - 1 medium yellow onion, finely chopped - 2 cloves garlic, minced - 1 bell pepper (any color), seeds removed and chopped - 2 cups low-sodium vegetable broth - 1 tablespoon extra virgin olive oil - 2 teaspoons ground cumin - 1 teaspoon smoked paprika - 1 teaspoon chili powder - Salt and freshly ground black pepper, to taste - 1 ripe avocado, diced (for topping) - Fresh cilantro, roughly chopped (for garnish) - Lime wedges, for serving These ingredients bring together a mix of sweet and savory. Sweet potatoes add a creamy texture. Black beans provide protein and richness. Diced tomatoes with green chilies offer a nice kick. The spices create warmth and depth. You can find the full recipe to see how they come together. Enjoy! - Start by peeling and dicing 2 medium sweet potatoes into 1-inch cubes. - Finely chop 1 medium yellow onion and mince 2 cloves of garlic. - Remove seeds from 1 bell pepper, then chop it into small pieces. - Gather 2 cups of low-sodium vegetable broth and measure out your spices. - In a large pot, warm 1 tablespoon of extra virgin olive oil over medium heat. - Once hot, add the chopped onion and minced garlic. Sauté for about 5 minutes. - Stir until the onion turns translucent and fragrant. - Next, add the chopped bell pepper and sweet potatoes to the pot. - Continue to sauté for 2-3 minutes until the bell pepper softens. - Now, sprinkle in 2 teaspoons of ground cumin, 1 teaspoon of smoked paprika, and 1 teaspoon of chili powder. - Add a pinch of salt and freshly ground black pepper. Stir to coat the vegetables well. - Pour in 1 can of diced tomatoes with green chilies (undrained) and the vegetable broth. - Increase the heat to bring the mixture to a rolling boil. - Once boiling, reduce the heat to low and cover the pot. - Let the chili simmer for about 20-25 minutes. Stir occasionally. - You want the sweet potatoes to be fork-tender but not mushy. - Afterward, gently stir in 1 can of drained black beans. - Allow the chili to cook for an additional 5 minutes to warm the beans. - Taste the chili and adjust the seasoning if needed. For the full step-by-step instructions, check the [Full Recipe]. This chili is rich in flavor and easy to make, perfect for cozy nights! To get great flavor, start by heating olive oil in your pot. Add chopped onion and minced garlic. Sauté them until the onion is soft and clear. This should take about 5 minutes. Stir them often to keep them from burning. Next, add the chopped bell pepper. Cook it for 2-3 minutes until it starts to soften. This builds a tasty base for your chili. When you add the sweet potatoes, stir well to mix everything. Cook them for about 5 minutes. This helps them soak in the flavors. While simmering, stir the chili every few minutes. This keeps it from sticking to the pot. If it does stick, add a splash of broth to loosen it. Want more spice? You can add chopped jalapeños or a splash of hot sauce. This gives your chili a nice kick. If you want it milder, use less chili powder. Always taste as you go. This way, you can adjust the flavors to match your taste. If you find it too salty, add a bit of sugar. It can help balance the flavors. You can also use lime juice for a fresh zing. Just squeeze some in and taste again. Serve the chili in lovely bowls. Top each bowl with diced avocado for creaminess. A sprinkle of fresh cilantro adds color and flavor, too. For an extra touch, add lime wedges on the side. This lets everyone add a splash of citrus to their own bowl. It makes the dish even more fun! Now, you’re ready to make this savory sweet potato black bean chili a hit at your table. For the full recipe, don't forget to check [Full Recipe]. {{image_4}} You can easily boost the protein in your Sweet Potato Black Bean Chili. Here are some ideas: - Ground meat: Use turkey, beef, or chicken. Brown it before adding the veggies. This makes the chili heartier. - Plant-based options: Add lentils or tofu for a vegan twist. Cook lentils separately, then mix them in. - Chorizo: Spice things up with chorizo. Cook it with the onion and garlic to infuse flavor. These options let you customize your chili. Adding protein makes it filling and satisfying. If you want to switch things up, consider these substitutions: - Sweet potatoes: Try butternut squash or regular potatoes. They bring different flavors and textures. - Black beans: Pinto or kidney beans can work well too. Just make sure to rinse them well. - Spices: If you like heat, add cayenne or jalapeños. For a smoky touch, try chipotle powder. These swaps can change your chili’s taste. Feel free to experiment with what you have on hand. You can create different styles of chili with simple changes: - Creamy chili: Stir in some coconut milk or cream. This adds richness and a nice texture. - Veggie-packed chili: Toss in corn, zucchini, or spinach. These veggies add color and nutrients. These style variations let you enjoy the chili in new ways. Each version can become a family favorite. To store leftovers, let the chili cool first. Place it in an airtight container. I recommend using glass containers, as they keep food fresh and allow you to see the contents. You can also use plastic containers if they are BPA-free. Store the chili in the fridge for up to four days. For freezing, cool the chili completely, then transfer it to freezer-safe bags. Remove as much air as possible to prevent freezer burn. You can also use airtight containers to freeze the chili. It stays fresh for up to three months. When you are ready to eat, thaw it overnight in the fridge. Reheat it on the stove over low heat, stirring often. You can also microwave it, but stir it occasionally for even heating. In the fridge, the chili lasts about four days. If you freeze it, the shelf life extends to about three months. Always check for off smells or changes in color before eating. Enjoying Sweet Potato Black Bean Chili fresh is the best choice, but it stores well for later meals. Sweet Potato Black Bean Chili is a hearty and flavorful dish. It combines sweet potatoes and black beans with spices and veggies. The key ingredients are: - 2 medium sweet potatoes, peeled and diced - 1 can (15 oz) black beans, drained - 1 can (14 oz) diced tomatoes with green chilies - 1 medium yellow onion, chopped - 2 cloves garlic, minced - 1 bell pepper, chopped - 2 cups low-sodium vegetable broth - Spices: cumin, smoked paprika, and chili powder This dish is perfect for cold nights. It warms you up and satisfies your hunger. Yes, this recipe is vegan-friendly. It uses no animal products. All the ingredients are plant-based. The black beans and sweet potatoes offer protein and fiber. This chili is great for anyone who follows a vegan diet. Absolutely! You can make Sweet Potato Black Bean Chili in a slow cooker. Just follow these steps: 1. Sauté the onion and garlic in a pan first. 2. Add all the ingredients to the slow cooker. 3. Set it on low for 6-8 hours or on high for 3-4 hours. This way, the flavors blend nicely, and the sweet potatoes become tender. You can serve this chili with many tasty sides. Here are some ideas: - Cornbread for a sweet touch - Rice to soak up the chili - Fresh salad for crunch - Tortilla chips for a fun snack These sides enhance the meal and add variety. Enjoy! You learned how to make Sweet Potato Black Bean Chili, a tasty and healthy dish. We covered ingredient choices, cooking steps, and storage tips. You now have ideas for variations and how to serve it too. This meal is easy to customize and perfect for any occasion. Enjoy making this chili and share it with friends and family. Try different toppings or sides to make it unique. With each bowl, you’ll create warmth and comfort in every bite. Enjoy your cooking adventure!](https://spoonfulsavory.com/wp-content/uploads/2025/05/c4053be4-f074-4d3a-99e6-27b0e0fc1fd0.webp)
Savory Sweet Potato Black Bean Chili Recipe Delight
If you’re looking for a cozy meal that warms your soul, try my Savory Sweet Potato Black Bean Chili. This
If you’re looking for a cozy meal that warms your soul, try my Savory Sweet Potato Black Bean Chili. This

If you crave a fun and tasty snack, let me introduce you to Carrot Cake Energy Bites! These little treats
![- 2 pounds Yukon Gold potatoes - 4 cloves garlic - 1 cup heavy cream - ½ cup unsalted butter - ¼ cup cream cheese - Salt to taste - Freshly ground black pepper - Fresh chives or parsley To make creamy garlic mashed potatoes, you need simple and fresh ingredients. Yukon Gold potatoes give the best texture. Their creamy flesh makes them perfect for mashing. Garlic adds a wonderful flavor that shines in this dish. You will also want heavy cream and butter. They create a rich, smooth base. Cream cheese adds extra creaminess and a slight tang. For seasoning, use salt and freshly ground black pepper. These will enhance the flavors of your potatoes. Finally, fresh chives or parsley will make your dish bright and colorful. When you gather these ingredients, you set the stage for a comforting and tasty dish. For the full recipe, check out the Ultimate Creamy Garlic Mashed Potatoes. Start by placing the cubed Yukon Gold potatoes into a large pot. Pour in enough cold salted water to cover them completely. Set the pot on high heat and bring the water to a rapid boil. Once the water boils, reduce the heat to medium. Let the potatoes simmer for about 15-20 minutes. They should be fork-tender. You can check for doneness by piercing a piece with a fork. While the potatoes cook, take a small saucepan. Combine the heavy cream, minced garlic, and softened butter in it. Set the saucepan over low heat. Stir gently until the butter melts and the mixture warms through. Be careful not to let it boil. Once the potatoes are done, drain them and return them to the pot. This will help steam off any extra moisture for fluffier mashed potatoes. Now, use a potato masher or an electric mixer to mash the potatoes. You can make them smooth or keep them slightly chunky, based on your taste. Slowly pour in the warm garlic cream mixture and add the softened cream cheese. Keep mixing until everything blends well and you get a rich and creamy texture. Finally, taste your mashed potatoes. Season them with salt and freshly ground black pepper until the flavors are just right. Transfer your creamy garlic mashed potatoes to a serving bowl and enjoy! Use Yukon Gold potatoes for the best results. They have a buttery flavor and smooth texture. When you cut them into 1-inch cubes, they cook evenly. To reduce moisture, drain the potatoes well after boiling. Return them to the pot for a minute to let steam escape. This step makes them light and fluffy. Roasted garlic gives a sweet and mellow taste. I prefer it for a rich flavor. If you choose raw garlic, add it to the cream mixture while warming. This timing helps the garlic flavor infuse well. Adjust the amount of garlic based on your taste. More garlic means stronger flavor! Creamy garlic mashed potatoes pair well with roasted meats and grilled vegetables. They also go nicely with a rich beef stew. For casual meals, serve smaller portions. For special occasions, you can use larger servings. These potatoes shine as a side dish at any dinner table. Check the [Full Recipe] for all the details! {{image_4}} You can make creamy garlic mashed potatoes healthier by changing a few things. Reduce the butter and cream to cut calories. Try using low-fat milk instead. You can also swap in olive oil for butter. Adding vegetables is a great way to boost nutrition. Consider mixing in steamed cauliflower or carrots. These veggies mix well and add flavor without much extra fat. If you want to change the flavor, add some cheese. Grated Parmesan or feta can make a big difference. They add richness and depth. You can also mix in different herbs. Try fresh thyme or rosemary for a unique twist. If you need vegan options, use plant-based butter and almond milk. These swaps keep the taste rich without dairy. For gluten-free mashed potatoes, just stick to the basic ingredients. All the main items are naturally gluten-free. For the full recipe, be sure to check the Ultimate Creamy Garlic Mashed Potatoes. This guide lets you explore all the tasty options! After enjoying your creamy garlic mashed potatoes, store leftovers properly. Place them in an airtight container. Refrigerate them for up to three days. Make sure to let them cool before sealing the container to avoid condensation. If you want to keep them longer, freezing is an option. Use freezer-safe containers or bags. You can freeze them for up to two months. Just remember to label the container with the date. Reheating mashed potatoes can be tricky. You want them warm without losing their creamy texture. The best method is to use the stove. 1. Place the potatoes in a saucepan. 2. Add a splash of milk or cream to keep them moist. 3. Heat gently over low heat, stirring often. If you prefer the microwave, use a microwave-safe bowl. Heat in short bursts, about 30 seconds at a time. Stir in between to ensure even heating. Aim for a temperature of about 165°F. This keeps your potatoes safe to eat and delicious. To make creamier mashed potatoes, use Yukon Gold potatoes. They have a smooth texture. Add warm milk or cream slowly as you mash. This helps keep them creamy. Make sure to mash while the potatoes are hot. This method keeps the starch from getting gummy. Yes, you can use other potatoes. Russet potatoes work well for a fluffy texture. They are starchy and absorb flavors nicely. Red potatoes have a waxy feel and stay moist. They create a creamier bite, but can be lumpier. To avoid gummy mashed potatoes, do not overmix them. Overmixing breaks down the starch too much. Use a potato masher or a fork for best results. Also, drain the potatoes well after boiling. Any extra water can make them sticky. You can garnish your creamy garlic mashed potatoes with fresh chives or parsley. These herbs add color and flavor. You might also sprinkle some crispy bacon bits for crunch. A touch of melted butter on top is always a hit. Refer to the Ultimate Creamy Garlic Mashed Potatoes recipe for detailed steps and ingredients. In this blog post, we explored how to make delicious creamy garlic mashed potatoes. We covered key ingredients, detailed instructions, helpful tips, tasty variations, and storage advice. With the right techniques, you can achieve a perfect creamy texture and rich garlic flavor. Don’t hesitate to tweak the recipe to fit your tastes or dietary needs. These mashed potatoes will elevate any meal. Enjoy creating this comforting dish that everyone will love!](https://spoonfulsavory.com/wp-content/uploads/2025/05/46b8ac9c-689f-4804-84ed-5789d1fece1b.webp)
If you crave rich, velvety mashed potatoes, you’ve come to the right place! My creamy garlic mashed potatoes blend buttery
![To make a delicious Cheddar Broccoli Soup, you need fresh and simple ingredients. Here’s what you will need: - 4 cups fresh broccoli florets - 2 tablespoons olive oil - 1 medium onion, finely chopped - 2 cloves garlic, minced - 4 cups vegetable broth - 2 cups shredded sharp cheddar cheese - 1 cup heavy cream (or coconut milk for a dairy-free alternative) - 1 teaspoon mustard powder - 1 teaspoon paprika - Salt and freshly ground black pepper, to taste - Optional: Croutons for garnish These ingredients blend together to create a rich and creamy soup. Fresh broccoli gives the soup a bright color and a slight crunch. Olive oil adds a smooth richness that enhances the flavor. Onion and garlic form the base, giving depth to each sip. The vegetable broth is key for a tasty base. Sharp cheddar cheese makes the soup creamy and flavorful. You can use heavy cream, or coconut milk, depending on your needs. Mustard powder and paprika provide a subtle kick. Finally, season with salt and pepper to make the flavors pop. If you want a fun twist, add croutons on top for crunch. This simple list of ingredients sets you up for a comforting bowl of Cheddar Broccoli Soup. For the full recipe, check out Cheddar Broccoli Bliss Soup. 1. Sautéing onions and garlic: Start by heating olive oil in a large pot over medium heat. Once the oil shimmers, add the chopped onion. Sauté for about five minutes until the onion is soft and clear. This step builds a great flavor base. Next, add the minced garlic and stir it for about a minute. Be careful not to let it burn, as burnt garlic can ruin your soup. 2. Cooking broccoli: Now, it's time to add the fresh broccoli florets to the pot. Pour in the vegetable broth and increase the heat to bring it all to a gentle boil. Once boiling, reduce the heat and let it simmer for 10 to 15 minutes. You want the broccoli to be bright green and soft enough to pierce with a fork. 3. Blending the soup: After the broccoli has cooked, use an immersion blender to purée the soup until smooth. If you don’t have one, you can use a countertop blender. Just remember to secure the lid tightly to avoid any splashes. Return the smooth soup to the pot and keep it on low heat. 1. Adding the cream and spices: It's time to enrich your soup! Stir in the heavy cream or coconut milk, depending on your preference. Add the mustard powder and paprika for extra flavor. Remember to wash your hands after handling any spices to avoid transferring them elsewhere. 2. Melting the cheese: Gradually sprinkle in the shredded cheddar cheese. Stir it continuously until the cheese fully melts into the soup. This will create a creamy and silky texture that makes the soup feel indulgent. 1. Adjusting seasoning: Taste your soup and add salt and freshly ground black pepper as needed. This is where you can adjust the flavors to make the soup perfectly yours. 2. Serving suggestions with garnishes: Serve the soup hot. For a fun touch, top it with croutons for added crunch. This simple step makes your dish look even more inviting. Enjoy this comforting bowl of cheddar broccoli bliss! For the complete cooking process, check the Full Recipe. When making cheddar broccoli soup, fresh broccoli makes a big difference. Look for vibrant green florets. The stems should be firm, not limp. Avoid yellowing or browning spots. These signs show broccoli is not fresh. For a smooth soup, blending is key. I recommend using an immersion blender. It blends right in the pot, which is easy. If using a countertop blender, let the soup cool first. Fill only halfway and hold the lid tight. Hot soup can splatter, so be careful. Overcooking broccoli is a common mistake. Cook just until it’s bright green and tender, about 10-15 minutes. If you overdo it, the broccoli can lose its flavor and color. Not seasoning properly can ruin your soup. Add salt and pepper during cooking, but taste before serving. Adjust as needed. A well-seasoned soup is key to great flavor. For more details on making this delicious soup, check out the Full Recipe. {{image_4}} You can make this soup dairy-free with simple swaps. First, use coconut milk instead of heavy cream. It adds a nice creaminess and a hint of sweetness. Just pour in the coconut milk after blending the soup. The flavor stays rich while being lighter. Next, try using vegan cheese. There are many brands that melt well. Look for cheese labeled as “shredded” or “meltable.” Stir in the vegan cheese right after adding the coconut milk. It gives you the cheesy flavor without dairy. These options let everyone enjoy a warm bowl of comfort. Want to spice things up? Adding spices can make your soup exciting. Try a pinch of cayenne pepper or chili powder for warmth. You can also add a dash of nutmeg for a cozy flavor. Just sprinkle in the spices while blending for a well-rounded taste. You can also mix in other vegetables. Carrots or cauliflower work well with broccoli. They add color and nutrients. Chop them finely and add them when you cook the broccoli. This way, they’ll become tender and blend smoothly. These variations keep your Cheddar Broccoli Soup fresh and fun! For the complete recipe, check out the [Full Recipe]. To keep your Cheddar Broccoli Soup fresh, follow these steps: - Refrigeration guidelines: Store leftovers in an airtight container. Place the soup in the fridge within two hours of cooking. It will stay good for about 3 to 4 days. - Freezing for future use: If you want to keep it longer, freeze the soup. Use freezer-safe containers or bags to avoid freezer burn. It can last up to 3 months. When ready to eat, thaw it in the fridge overnight. When you want to enjoy your soup again, reheating is easy: - Best practices for reheating soup: Pour the soup into a pot and heat it on low to medium heat. Stir often to avoid hot spots. You can also use the microwave. Heat it in short bursts, stirring in between. This helps the soup heat evenly. Always check the temperature before serving it again. How to make Cheddar Broccoli Soup creamy? To make your Cheddar Broccoli Soup creamy, add heavy cream or coconut milk. This gives the soup a rich texture. Blend the soup until smooth before adding cheese. This ensures a velvety finish. Stir in shredded cheese gradually, letting it melt fully. This step helps to thicken the soup while adding flavor. Can I make this soup in advance? Yes, you can make this soup in advance. Cook and blend the soup, then store it in the fridge. This soup tastes even better the next day as flavors meld. Reheat slowly on the stove to keep it creamy. If needed, add a splash of cream to restore its rich texture. What to serve with Cheddar Broccoli Soup? Pair your Cheddar Broccoli Soup with crusty bread or a fresh salad. Grilled cheese sandwiches are also a great choice. They complement the soup's rich, cheesy flavor. You can even serve it with croutons for a crunchy topping. For a light option, try a fruit salad to balance the meal. For the full recipe, check out the Cheddar Broccoli Bliss Soup. You have learned how to craft a delicious Cheddar Broccoli Soup. We covered key ingredients, from fresh broccoli to spices, and explored each step of the cooking process. You now know how to blend, season, and serve this hearty dish. Don't forget the helpful tips to avoid common mistakes and try variations for different tastes. Store your leftovers properly and easily reheat them. I hope you feel ready to enjoy this warm, creamy soup anytime! Cooking can be simple and fun, so get started and share your cooking adventures!](https://spoonfulsavory.com/wp-content/uploads/2025/05/64591fef-38db-4a8b-86c3-c5f35e40fb77.webp)
Welcome to my cozy kitchen paradise where I’m sharing my favorite Cheddar Broccoli Soup! This soup is simple, tasty, and
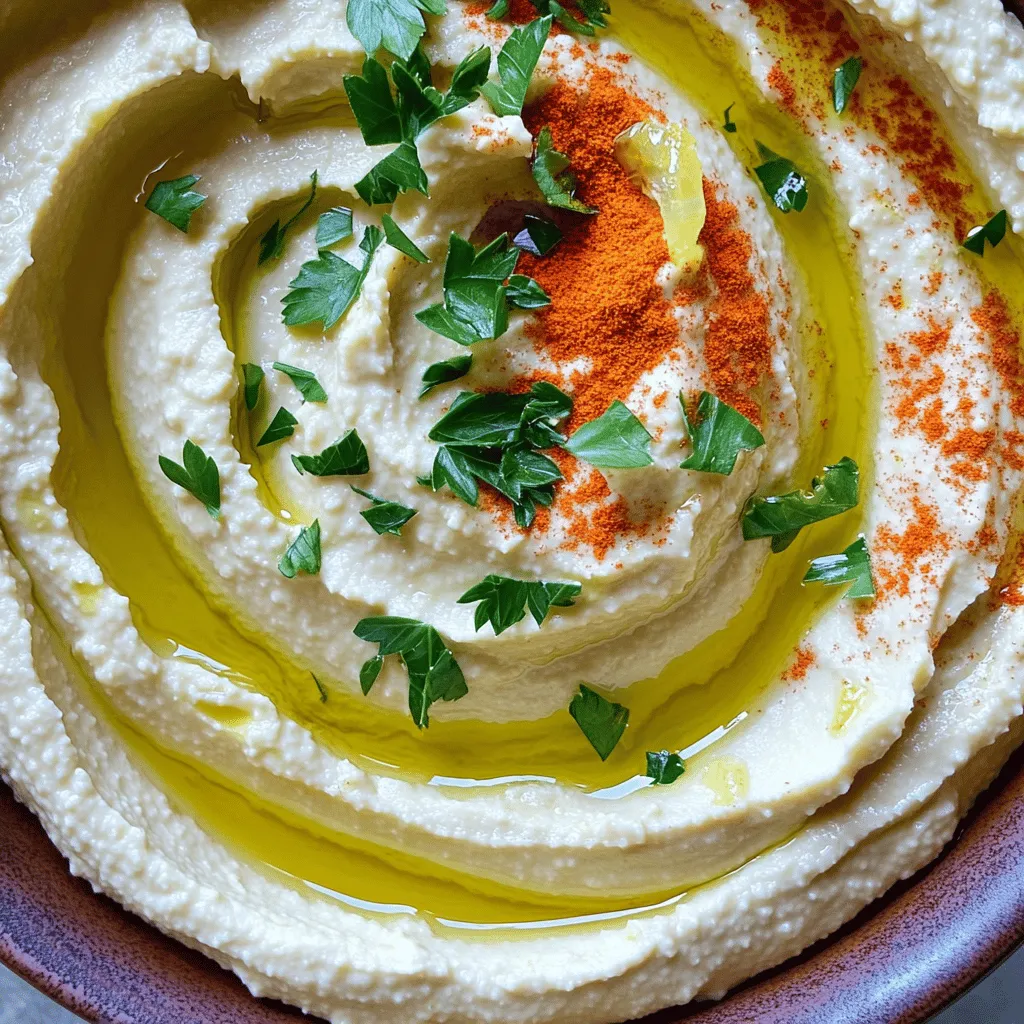
Are you ready to whip up a delicious classic hummus that’s simple and flavorful? I love this recipe because it’s
![For this tasty dish, you need just a few key ingredients: - 4 bone-in, skin-on chicken thighs - 1/4 cup honey - 1/4 cup soy sauce - 4 cloves garlic, minced - 1 tablespoon fresh ginger, minced - 1 tablespoon apple cider vinegar - 2 tablespoons sesame oil - Salt and pepper, to taste These ingredients create a sweet and savory flavor that makes the chicken shine. The honey gives a nice glaze, while soy sauce adds depth. Garlic and ginger bring warmth and spice to the mix. To elevate your Honey Garlic Chicken Thighs, consider these garnishes: - 1 tablespoon sesame seeds (for garnish) - 2 green onions, sliced (for garnish) These toppings add a fresh crunch and a pop of color. You can also serve the chicken with steamed rice or vegetables for a complete meal. Feel free to add your favorite sides to make it your own! If you’re missing an ingredient, here are some easy swaps: - Use chicken breasts if you prefer leaner meat. - Maple syrup can replace honey for a different sweetness. - Tamari works well if you need a gluten-free option for soy sauce. - Instead of apple cider vinegar, try rice vinegar or lemon juice for a tangy twist. These substitutions keep the dish delicious while allowing you to use what you have at home. For the full recipe, check out the details provided earlier. First, we need to marinate the chicken. In a big bowl, mix honey, soy sauce, minced garlic, minced ginger, apple cider vinegar, and sesame oil. Whisk this mixture well. Next, take your chicken thighs. Season them with salt and pepper on both sides. Now, put the thighs in the marinade. Make sure they are fully coated. For the best flavor, let them sit in the fridge for at least 30 minutes, or up to 2 hours. This helps the chicken absorb all that tasty goodness. While the chicken is marinating, preheat your oven to 400°F (200°C). This step is key for even cooking. Once done, grab a large ovenproof skillet. Heat it over medium-high heat. Take the chicken thighs out of the marinade, but keep the marinade for later. Place the thighs skin-side down in the hot skillet. Sear them for about 5 minutes until the skin gets golden and crisp. After that, flip each thigh and sear the other side for another 5 minutes. This browning adds flavor. Now, it’s time to bake the chicken. Pour the reserved marinade over the seared chicken thighs. Ensure they are well coated. Move the skillet into the preheated oven. Bake for 25-30 minutes. Check the internal temperature; it should reach 165°F (74°C). To make it even tastier, baste the chicken with the pan sauce halfway through cooking. After baking, take the skillet out of the oven. Let the chicken rest for a few minutes. This step keeps the meat juicy. Before serving, sprinkle sesame seeds and sliced green onions on top. This adds a nice touch. You can find the full recipe [Full Recipe]. Searing chicken is key to great flavor. Start with a hot skillet. Use medium-high heat to get that nice sizzle when the chicken hits the pan. Place the thighs skin-side down first. This helps to create a crispy skin. Sear for about five minutes without moving them. Flip the chicken and sear the other side for another five minutes. You want a golden brown color. To keep your chicken thighs tender, marinate them well. The honey and soy sauce mix adds moisture. Let them soak for at least 30 minutes. For the best taste, aim for two hours. When cooking, avoid overcooking. Use a meat thermometer to check for 165°F. Let the chicken rest after cooking. This helps the juices stay inside. Basting adds extra flavor and moisture. Halfway through baking, use a spoon to scoop the pan sauce and drizzle it over the chicken. This keeps it juicy and helps build a rich taste. You can do this a few times for the best results. The sauce will soak into the chicken, making each bite delicious. For the full recipe, check out the honey garlic chicken thighs. {{image_4}} You can add veggies for a complete meal. Think of carrots, bell peppers, or broccoli. Simply chop them into bite-size pieces. Toss them in the marinade with the chicken. When you bake the chicken, the vegetables soak up all that honey garlic flavor. This makes them tender and tasty. You can also roast them on a separate tray if you want them crispy. Want some heat? Add red pepper flakes or sriracha to the marinade. Start with a small amount, then taste it. You can always add more. This spicy twist gives your chicken a kick. It pairs well with rice or cooling sides like cucumber salad. You can grill the chicken for a smoky flavor. Marinate as usual, then grill on medium heat. Cook until the thighs reach 165°F (74°C). If you prefer a slow cooker, place the marinated chicken in it. Set it on low for 6-8 hours or high for 4 hours. Both methods yield juicy chicken with that sweet and savory taste. For more details on making this dish, check the Full Recipe. To keep your honey garlic chicken thighs fresh, place them in an airtight container. Make sure the chicken is cool before storing. If you have extra marinade, you can keep that too. Store everything in the fridge for up to three days. This keeps the flavors intact and ready for your next meal. When you reheat, aim for juicy thighs. The oven or stovetop works best. Preheat your oven to 350°F (175°C). Place the chicken in a baking dish and cover it with foil. Heat for about 15-20 minutes. For the stovetop, use medium heat. Add a splash of water to keep moisture. Cook until the chicken is hot throughout. Freezing is a great option for longer storage. Place the cooled chicken thighs in a freezer-safe bag. Make sure to remove as much air as you can. Label the bag with the date. You can freeze for up to three months. When ready to eat, thaw in the fridge overnight. Then, reheat as mentioned above for the best taste. I recommend marinating the chicken for at least 30 minutes. For the best flavor, let it sit for up to 2 hours. This time allows the chicken to soak up the honey and garlic flavors. The longer it marinates, the tastier it becomes. Yes, you can use chicken breast. Chicken breasts cook faster than thighs, so check them sooner. They may lack the same richness as thighs, but the dish will still be great. Just ensure you don’t overcook them to keep them tender. I love serving this dish with steamed rice or roasted vegetables. The rice soaks up the sauce well. You can also try a fresh salad or sautéed greens for a nice contrast. Any of these sides will round out your meal perfectly. For more ideas, check the Full Recipe for inspiration. You learned the key ingredients for honey garlic chicken thighs and their swaps. We explored the steps to marinate, prepare, and bake perfectly juicy thighs. Tips on cooking techniques and variations help you create your dish. Lastly, storage options ensure you enjoy leftovers. Remember, your choice of sides can enhance the flavors. Dive in and make this dish your own. Enjoy your tasty creation!](https://spoonfulsavory.com/wp-content/uploads/2025/05/305aaf72-e74f-4308-bb7e-ae96f9593c90.webp)
Looking for a quick and tasty meal? Honey Garlic Chicken Thighs are your answer! This dish is flavorful, simple, and

Imagine biting into a crispy, flavorful Veggie Spring Roll, perfectly cooked in an air fryer. In this post, I’ll share
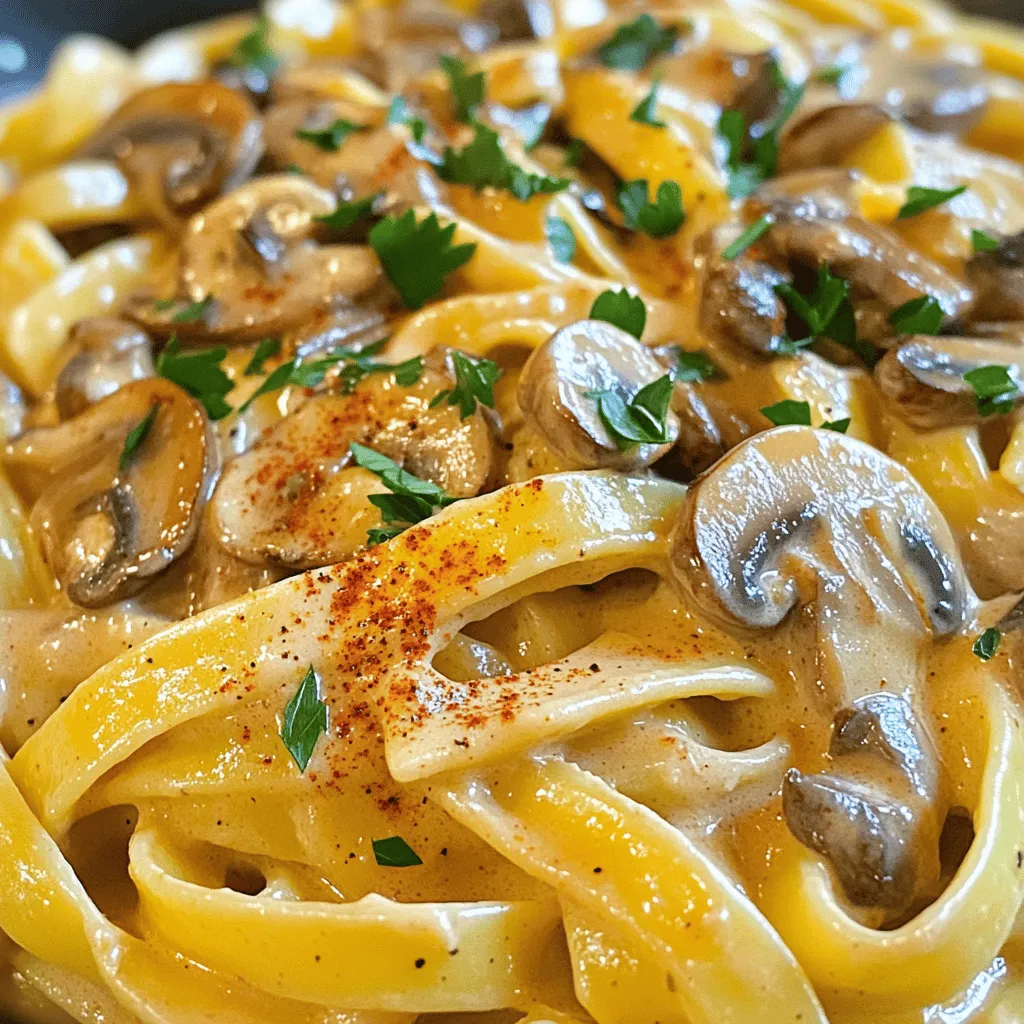
Looking for a simple and tasty meal? This Vegan Mushroom Stroganoff is your answer! Packed with flavor, it’s easy to
![- 2 boneless, skinless chicken breasts - 1 red bell pepper - 1 yellow bell pepper - 1 medium onion - 2 tablespoons extra virgin olive oil - 1 tablespoon chili powder - 1 teaspoon ground cumin - 1 teaspoon smoked paprika - 1 teaspoon garlic powder - Salt and freshly ground black pepper - Flour or corn tortillas - Optional toppings: sour cream, guacamole, fresh salsa, shredded cheese Gathering the right ingredients is key to making tasty chicken fajitas. I always start with fresh chicken and colorful veggies. The chicken should be boneless and skinless for easy cooking. I love using red and yellow bell peppers for their sweet flavor and vibrant color. A medium onion adds more depth to the dish. For the seasoning, I use simple spices that pack a punch. Chili powder gives a warm kick, while ground cumin and smoked paprika add rich, smoky notes. Garlic powder boosts the flavor even more. Don’t forget to add salt and black pepper to taste. When it comes to serving, I recommend warm flour or corn tortillas. They hold all the delicious fillings well. You can also offer toppings like sour cream, guacamole, fresh salsa, and shredded cheese. These extras let everyone customize their fajitas just how they like. For the full recipe, check out the details above. To start, take the chicken breasts and cut them into thin strips. This helps them cook evenly. Next, grab a large mixing bowl. In this bowl, drizzle 2 tablespoons of olive oil over the chicken. Then, add the spices: chili powder, cumin, smoked paprika, garlic powder, salt, and pepper. Use your hands or a spatula to toss the chicken. Make sure each piece is coated well with the spices. This step adds a lot of flavor to your fajitas. You can even prepare the sliced onions and bell peppers in the same bowl. This saves time and adds more flavor. Now, it’s time to cook the chicken. Preheat your skillet over medium-high heat. Once it’s hot, add the seasoned chicken strips. Cook them for about 5-7 minutes. Stir occasionally to ensure they cook evenly. Look for a golden brown color. This shows they are ready. The chicken should no longer be pink inside. Once done, remove the chicken from the skillet and set it aside on a plate. In the same skillet, do not clean it. Add the sliced onions and bell peppers. Sauté these vegetables for about 4-5 minutes. Stir them frequently. You want them to soften and get a slight char. This adds sweetness to the dish. After they are cooked, return the chicken to the skillet. Combine the chicken and vegetables. Stir everything together and cook for 2 more minutes. This helps all the flavors mix nicely. While the chicken and vegetables are cooking, warm the tortillas. You can heat them in a dry skillet over low heat for about 30 seconds on each side. Another way is to wrap them in a damp paper towel and microwave them for 30 seconds. When ready, lay the warm tortillas on plates. Fill them with the chicken and vegetable mixture. You can also add your favorite toppings, like sour cream, guacamole, or fresh salsa. For the full recipe, check out the detailed instructions above. Enjoy your delicious chicken fajitas! To boost the flavor of your chicken fajitas, consider these tips: - Seasoning adjustments: Add more chili powder or smoked paprika for a deeper taste. You can also add lime juice to brighten the flavors. - Marinating chicken ahead of time: For even juicier chicken, marinate it. Mix olive oil, spices, and lime juice in a bowl. Let the chicken soak for at least 30 minutes, or overnight if you can. This extra step adds great flavor. Getting the right cook is key to tasty fajitas: - Achieving the perfect sear on chicken: Heat your skillet until it’s very hot. This helps the chicken brown well. When you add the chicken, avoid crowding the pan. Cook in batches if needed. - Alternative cooking methods: You can also grill or bake your chicken. For grilling, simply cook over medium heat for about 6-8 minutes per side. If you bake, set the oven to 400°F (200°C) and cook for around 20 minutes, until fully cooked. Making your meal look good is fun and easy: - Creative plating options: Use a large platter to serve your fajitas. Layer the chicken and veggies in the center. Surround them with warm tortillas and toppings. This makes it easy for guests to help themselves. - DIY fajita bar for gatherings: Set up a fajita bar. Place all the ingredients out in bowls. Include chicken, veggies, tortillas, and toppings like sour cream and guacamole. This lets everyone build their own fajitas, making it a fun way to eat! For a full recipe to get you started, check out the [Full Recipe]. {{image_4}} You can easily swap chicken for other proteins. Beef works great in fajitas. Use thinly sliced flank steak for a hearty taste. Shrimp is another tasty option. It cooks quickly and adds a lovely flavor. For a vegetarian twist, try using tofu or mushrooms. Tofu absorbs flavors well when marinated. Mushrooms give a meaty texture that many enjoy. Want a kick? Make spicy chicken fajitas by adding more chili powder. You can also try cayenne pepper for extra heat. Mixing in fresh jalapeños adds a zesty touch. Experimenting with herbs and spices can create unique tastes. Try cilantro or oregano for fresh notes. Each adjustment leads to a new flavor experience. Pair your fajitas with tasty side dishes. Rice and beans make a filling combo. A fresh salad adds a crisp touch. For drinks, consider serving margaritas or iced tea. They complement the flavors well. Don't forget about salsas and sauces! Chunky salsa or creamy guacamole can elevate your meal. They bring freshness and richness to every bite. To keep your chicken fajitas fresh, store them in an airtight container. Place the fajitas in the fridge within two hours of cooking. This helps prevent bacteria growth. Chicken fajitas last for up to three days in the fridge. If you plan to eat them later, make sure to check for any signs of spoilage. You can freeze cooked chicken fajitas for up to three months. Let them cool completely before packing them in a freezer-safe bag. Remove as much air as you can to avoid freezer burn. When you're ready to eat, thaw the fajitas in the fridge overnight. Reheat them in a skillet over medium heat. This method helps maintain their texture and flavor. Make sure they are heated through before serving. Meal prepping makes busy days easier. You can slice the chicken and veggies a day ahead. Store them in separate containers in the fridge. This saves time when you are ready to cook. You can also cook the chicken and veggies in advance. Just reheat them when you want a quick meal. Building fajitas in advance can be fun. Set up a fajita bar with warm tortillas and toppings for family or friends. Everyone can customize their meal! To boost the flavor of your chicken fajitas, use fresh spices. Try marinating the chicken for at least 30 minutes. You can mix olive oil with chili powder, cumin, and garlic powder. This adds depth to your dish. If you have time, use lime juice for a tangy kick. You can also add fresh herbs like cilantro for extra freshness. Yes, you can use frozen chicken. Just make sure to thaw it first. I suggest defrosting it in the fridge overnight or using the microwave. Once thawed, follow the same steps in the recipe. It will taste just as good as fresh chicken. For tasty toppings, consider sour cream, guacamole, or fresh salsa. Shredded cheese also works well. You can add sliced jalapeños for some heat. Fresh cilantro and lime wedges can brighten up your fajitas, too. Feel free to mix and match to your liking! To make fewer servings, simply halve the ingredients. Use one chicken breast instead of two. Adjust the peppers and onions accordingly. This will keep the flavors balanced. You can always save leftovers for a quick meal later. In this post, I shared a simple way to make delicious chicken fajitas. We covered essential ingredients like chicken and bell peppers, as well as key seasonings. The step-by-step instructions made cooking easy. I also gave tips to enhance flavor and suggested fun variations. Remember, you can customize this dish to your taste. Enjoy your cooking and make these fajitas your own!](https://spoonfulsavory.com/wp-content/uploads/2025/05/a6bf5bdf-5165-44f6-89bb-68e9acc3d10a.webp)
Looking for a dinner that’s both quick and tasty? My Easy Chicken Fajitas recipe has got you covered. With just
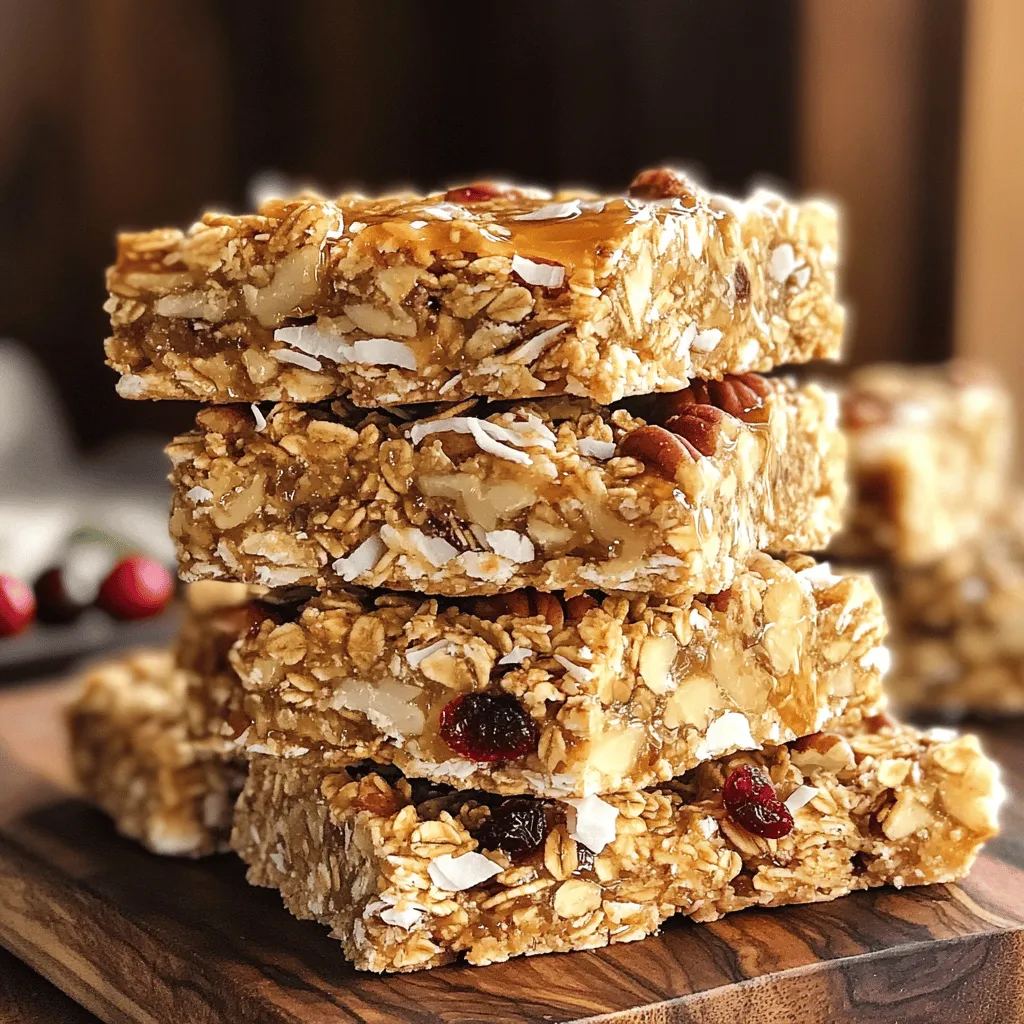
Are you craving a delicious snack that’s quick to make? Look no further! My Maple Pecan Granola Bars recipe is
