Strawberry Banana Smoothie Bowl Fresh and Flavorful Treat
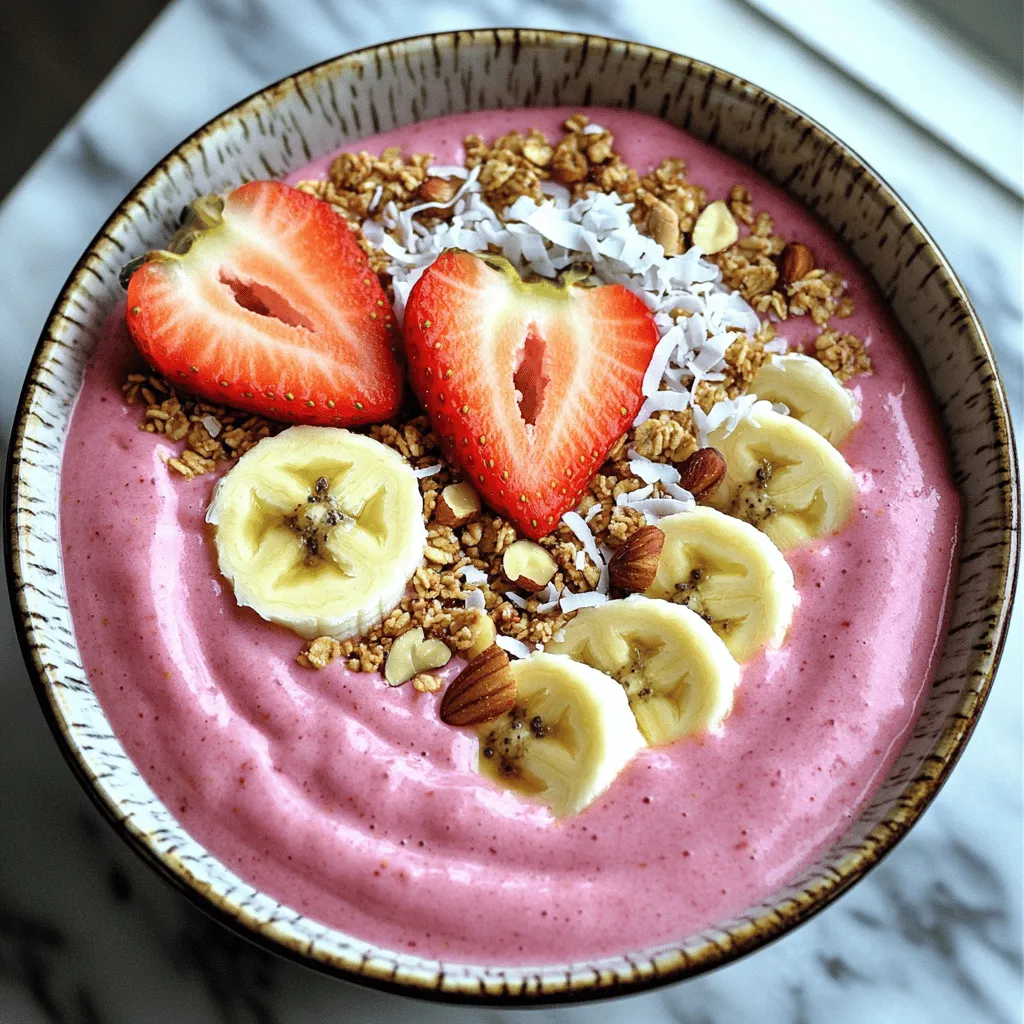
Ready to brighten your day? The Strawberry Banana Smoothie Bowl is a fresh and flavorful treat that’s perfect for breakfast
Ready to brighten your day? The Strawberry Banana Smoothie Bowl is a fresh and flavorful treat that’s perfect for breakfast
![To make this dish shine, you need fresh and simple ingredients. Here’s what you should gather: - 4 bone-in, skin-on chicken thighs - 1/4 cup honey - 4 cloves garlic, minced - 2 tablespoons low-sodium soy sauce - 1 tablespoon apple cider vinegar - 1 teaspoon fresh ginger, grated - 1 tablespoon olive oil - Salt and pepper, to taste These ingredients create a sweet and savory mix that makes each bite enjoyable. The chicken thighs provide a juicy base, while the honey and garlic bring depth of flavor. Adding garnishes can enhance the dish's look and taste. Consider these: - Chopped green onions - Sesame seeds These add color and crunch, making your dish even more appealing. They also boost the flavor profile with fresh and nutty notes. Don’t worry if you can’t find an ingredient. You can swap some items without losing taste: - Use boneless chicken thighs if you prefer less fat. - Maple syrup can replace honey for a different sweetness. - Coconut aminos work well in place of soy sauce for a gluten-free option. - Lemon juice can substitute for apple cider vinegar if needed. These swaps keep your dish tasty while accommodating your pantry. For the full recipe, refer to the instructions provided earlier. Enjoy your cooking adventure! Start by mixing the marinade. In a bowl, whisk together honey, minced garlic, soy sauce, apple cider vinegar, grated ginger, olive oil, and a pinch of salt and pepper. This mix gives the chicken its sweet and savory flavor. Next, place the chicken thighs in a resealable bag or dish. Pour the marinade over the chicken, making sure each piece is coated well. Seal the bag or cover the dish. Let it sit in the fridge for at least 30 minutes. For even richer flavor, marinate for up to 2 hours. Now, preheat your oven to 400°F (200°C). Heat a large, oven-safe skillet over medium-high heat. Take the chicken out of the marinade and save the marinade for later. Place the chicken thighs skin-side down in the hot skillet. Let them sear for 5-6 minutes until the skin is golden and crispy. Carefully flip the chicken and sear the other side for another 3-4 minutes. This step locks in the juices and adds a great texture. After searing, pour the reserved marinade evenly over the chicken thighs. Transfer the skillet to your preheated oven. Bake the chicken for 25-30 minutes. The internal temperature should reach 165°F (75°C). The skin will be caramelized and sticky. If you want a thicker glaze, move the skillet back to the stovetop after baking. Simmer the sauce for 5-6 minutes to thicken it. Once done, let the chicken rest for a few moments. Before serving, garnish with chopped green onions and sesame seeds. This adds color and a nice crunch. Serve it right from the skillet or on a plate with rice. For extra flair, add a lime wedge on the side. For the full recipe, refer to the earlier section. To keep chicken thighs juicy, start with bone-in, skin-on pieces. The skin helps lock in moisture while cooking. Avoid overcooking by using a meat thermometer. Aim for an internal temperature of 165°F (75°C). Let the thighs rest for a few minutes after cooking. This step allows the juices to settle. Marinating is key for flavor in honey garlic chicken thighs. Use a mix of honey, soy sauce, and garlic for the best taste. Allow the chicken to marinate for at least 30 minutes. For deeper flavors, marinate for up to 2 hours. Always coat the chicken well to ensure every piece absorbs the marinade. Store the chicken in a resealable bag or dish, and refrigerate while marinating. To speed up your cooking time, prepare the marinade ahead of time. You can even marinate the chicken the night before. This makes meal prep faster on busy days. Use a large skillet to sear the chicken, as it can go directly into the oven. This saves you from extra dishes. Lastly, consider using pre-minced garlic to cut down on prep time. For the full recipe, check out the details above. {{image_4}} You can easily add heat to this dish. Just mix in some red pepper flakes or sriracha. Use about one teaspoon of red pepper flakes in the marinade for a mild kick. If you love heat, use up to a tablespoon of sriracha. This change gives your chicken a spicy twist while keeping that sweet garlic flavor. Make this dish even more filling by adding vegetables. Consider using broccoli, bell peppers, or snap peas. Toss them into the skillet alongside the chicken. They will soak up the tasty sauce. This adds color and nutrients. Plus, it turns your meal into a one-pan wonder. You can grill the chicken for a smoky flavor. Preheat your grill to medium heat. Sear the chicken for about 6-8 minutes on each side. Just be sure to use a grill-safe pan for the marinade. Baking is easy, but grilling adds a unique taste. Both methods yield juicy, flavorful chicken thighs. Try them both to find your favorite way! If you want to try making this dish, check out the [Full Recipe]. After enjoying your honey garlic chicken thighs, you may have some left. To store them, let the chicken cool to room temperature. Place the thighs in an airtight container. Make sure to cover them well. They will last in the fridge for up to four days. Always label the container with the date you made them. This way, you’ll keep track of freshness. When you’re ready to eat your leftovers, reheating is key. For the best results, use an oven. Preheat the oven to 350°F (175°C). Place the chicken thighs on a baking sheet. Cover them with foil to keep them moist. Heat for about 15-20 minutes, or until warmed through. You can also use a microwave if you’re in a hurry. Just place the thighs on a microwave-safe plate and cover them. Heat in short bursts to avoid drying them out. If you want to save your honey garlic chicken thighs for later, freezing is a great option. First, let the chicken cool completely. Wrap each thigh tightly in plastic wrap. Then, place them in a freezer bag. Remove as much air as possible before sealing. They can last in the freezer for up to three months. When you're ready to eat, thaw the chicken in the fridge overnight. After thawing, reheat as mentioned for the best taste. For the full recipe, check the section above. You should marinate the chicken for at least 30 minutes. This helps the flavors soak in. For a deeper taste, I recommend marinating for up to 2 hours. Just remember not to exceed 24 hours, as the chicken can become too soft. Yes, you can use boneless chicken thighs. They cook faster and are easier to eat. Just reduce the cooking time by about 10 minutes to keep them juicy and tender. You can serve honey garlic chicken thighs with several delicious sides. Here are some great options: - Steamed rice - Roasted vegetables - A fresh green salad - Mashed potatoes - Quinoa These sides complement the sweet and savory flavors of the chicken. Enjoy your meal! For the complete recipe, check the Full Recipe section. Honey garlic chicken thighs offer a blend of rich flavors and simple prep. We covered key ingredients, cooking steps, and tips for juicy results. You can switch things up with spicy versions or add veggies. Proper storage ensures your meal stays fresh for later. With these tips, cooking this dish can be quick and fun. Enjoy exploring all the variations and make it your own!](https://spoonfulsavory.com/wp-content/uploads/2025/05/de8adac9-ba3b-4a01-957e-e6db3884f8d9.webp)
If you’re craving a meal that bursts with flavor but doesn’t take all day to make, you’ve landed in the
![To make cauliflower fried rice, you need a few key items. Here’s what you will need: - 1 medium head of cauliflower, grated or processed into rice-sized pieces - 2 tablespoons sesame oil - 2 cloves garlic, minced - 1 small onion, finely chopped - 1 carrot, diced - 1 cup frozen peas - 2 large eggs, beaten - 3 tablespoons soy sauce (or tamari for a gluten-free version) - 2 green onions, sliced finely - Salt and freshly ground black pepper to taste - Optional: 1 teaspoon sriracha or chili sauce for an extra kick These ingredients come together to create a dish that is both easy and packed with flavor. The cauliflower acts as a great rice substitute, making this recipe healthier. You can customize your cauliflower fried rice with some fun add-ins. Here are a few ideas: - Bell peppers for color and crunch - Cooked chicken or shrimp for protein - Broccoli florets for extra veggies - Peanuts or cashews for a nutty taste - Fresh herbs like cilantro or basil for brightness Feel free to get creative! These add-ins can boost flavor and texture, making each bite unique. If you have dietary needs, you can swap some ingredients. Here are some substitutes: - Use olive oil instead of sesame oil for a lighter option. - Swap soy sauce for coconut aminos to make it soy-free. - For a vegan version, skip the eggs or use tofu instead. - Replace frozen peas with green beans or corn if you prefer. These swaps keep the dish tasty while meeting your needs. The full recipe can guide you to a delicious meal that fits your lifestyle. To start, grab a medium head of cauliflower. Remove the leaves and stem. Then, use a box grater or food processor to break it down into rice-sized pieces. This is your cauliflower rice. Set it aside for later. It’s simple and a great low-carb swap for regular rice. Next, take a large skillet or wok and heat up two tablespoons of sesame oil over medium heat. Once hot, add two cloves of minced garlic and one small chopped onion. Sauté this mix for about 2-3 minutes. You want the garlic to smell great and the onion to look clear. Then, toss in one diced carrot. Cook for another 3-4 minutes. Stir it up until the carrot is soft but still has a bit of crunch. Now, push the veggies to one side of the skillet. This makes room for the eggs. Pour in two beaten eggs into the open space. Scramble them until fully cooked. Once they are done, mix them with the veggies. Next, add your cauliflower rice and one cup of frozen peas. Stir everything together. Cook for 5-7 minutes. This lets the cauliflower soften a little while keeping some crunch. For flavor, pour in three tablespoons of soy sauce. If you like heat, add a teaspoon of sriracha. Season with salt and pepper to taste. Toss it all so the ingredients are well mixed and heated through. Cook for another 2 minutes. Finally, remove the skillet from heat and stir in sliced green onions for a fresh taste. For the complete cooking details, check the Full Recipe. To get the best cauliflower rice, start with a medium head of cauliflower. Cut off the leaves and stem. You can use a box grater or a food processor to make the rice-sized pieces. If you process it, pulse gently to avoid mush. After processing, let the cauliflower sit for a bit. This helps to remove excess moisture. Cooking it on medium heat keeps it from getting too soft. Aim for a tender yet crunchy texture. For a boost of flavor, use sesame oil to sauté your garlic and onion. It adds a lovely nutty taste. You can also mix in soy sauce, which gives a nice salty kick. If you want more heat, add sriracha or chili sauce. Fresh green onions at the end add brightness. You can also try adding a splash of lime juice for a zing. One common mistake is not drying the cauliflower rice well enough. Wet cauliflower can lead to soggy fried rice. Another mistake is overcooking the vegetables. Keep them crunchy for the best texture. Always season at the end. This helps keep all the flavors bright. Check your seasoning before serving to make sure it’s just right. If you follow these tips, your cauliflower fried rice will be easy and flavorful. For the complete recipe, check the [Full Recipe]. {{image_4}} Cauliflower fried rice is easy to make vegetarian or vegan. You can skip the eggs for a vegan dish. Instead, add extra veggies like bell peppers, mushrooms, or zucchini. These add flavor and nutrition. Consider using nutritional yeast for a cheesy taste without dairy. This gives your dish a savory boost. For added protein, you can include chicken, shrimp, or tofu. If you use chicken, cook it first in the skillet. Dice it into small pieces and add it back with the vegetables. For shrimp, sauté them until pink and firm before mixing in. Tofu is a great plant-based option. Cube it and fry until golden, then add it to the mix. Each option makes the dish heartier and more filling. Adjust the heat to your taste. If you like spice, add sriracha or chili sauce. Mixing in fresh jalapeños gives a bright kick. For a milder flavor, skip the heat altogether or add a dash of soy sauce instead. You can always serve hot sauce on the side for those who want extra heat. This way, everyone at the table can enjoy the dish their way. For the full recipe, check out the details above! Store leftover cauliflower fried rice in an airtight container. Let it cool down first. Place it in the fridge for up to three days. If you want to keep it longer, freezing is a great option. To reheat, you can use the microwave or a skillet. For the microwave, place the rice in a bowl and cover it. Heat for about one to two minutes. Stir halfway for even heating. If you prefer the skillet, add a little oil and heat over medium. Stir the rice until it’s hot. To freeze, portion the fried rice into freezer-safe bags. Squeeze out excess air and seal tightly. Label the bags with the date. You can freeze cauliflower fried rice for up to three months. When ready to eat, thaw it overnight in the fridge. Reheat as mentioned above for a quick meal. Yes, you can make cauliflower fried rice ahead of time. Just cook and cool it completely. Store it in an airtight container in the fridge for up to three days. When you’re ready to eat, heat it in a pan until warm. This saves time on busy days! You can easily make cauliflower rice without a food processor. Use a box grater to grate the cauliflower. This method gives you small, rice-sized pieces. If you want a finer texture, chop the grated cauliflower with a knife. It takes a little longer, but it works well! Yes, cauliflower fried rice is healthier than regular fried rice. It uses cauliflower instead of rice, which lowers carbs and calories. Cauliflower is high in fiber and vitamins. You still get great flavors and texture, making it a smart choice for meals. Plus, it fits into many diets, like keto and paleo. Cauliflower fried rice is a tasty and healthy choice. We covered its main ingredients, cooking steps, and helpful tips. You learned about variations for different diets and how to store your leftovers. Cauliflower rice gives you all the good things of regular fried rice with fewer carbs. By using these tips, you can make a dish that is simple and delicious. Enjoy experimenting with flavors and sharing your results. Healthy meals can be fun and easy to create!](https://spoonfulsavory.com/wp-content/uploads/2025/05/153fffec-71b3-4a0f-b754-bce0aeeee787.webp)
Looking for a quick and tasty meal? Look no further than cauliflower fried rice! This easy recipe packs flavor without

Are you ready to dive into a dish that’s both tasty and packed with good for you ingredients? My Mediterranean

If you love sweet treats, Coconut Macaroon Cookies will quickly become your favorite! These chewy delights blend shredded coconut and

Fall is here, and what better way to celebrate than with Pumpkin Spice Latte Cupcakes? These tasty treats combine the
![This Baked Eggplant Parmesan recipe is simple and fun. It uses fresh eggplants, marinara sauce, and cheeses. You can easily adapt it for your taste. - 2 medium eggplants, sliced into 1/4-inch rounds - 1 teaspoon salt - 2 cups marinara sauce (homemade or store-bought) - 2 cups shredded mozzarella cheese (freshly shredded for best melting) - 1 cup grated Parmesan cheese (preferably freshly grated) - 1 teaspoon dried oregano - 1 teaspoon dried basil - 1/2 teaspoon black pepper - 1 cup all-purpose flour - 2 large eggs, beaten until frothy - 1 cup Italian-seasoned breadcrumbs - Olive oil spray You can swap eggplant for zucchini or mushrooms. Use any marinara sauce you like. For a cheese change, try provolone or gouda. If you need a gluten-free option, use almond flour or gluten-free breadcrumbs. Start by washing the eggplants. Slice them into 1/4-inch rounds. Next, sprinkle salt on each slice. This helps to draw out moisture and bitterness. Let them sit for about 30 minutes. Afterward, use paper towels to pat the slices dry. This step is key for a nice texture. Now, set up your breading station. Grab three shallow dishes. In the first dish, place the all-purpose flour. In the second dish, pour in the beaten eggs. For the third dish, mix the Italian-seasoned breadcrumbs with dried oregano, basil, and black pepper. Take each eggplant slice. Coat it in flour first, shaking off any extra. Then dip it in the eggs, letting any excess drip off. Finally, cover the slice with the breadcrumb mix, pressing gently to stick. Preheat your oven to 375°F (190°C). Line a baking sheet with parchment paper. Lay the breaded eggplant slices in a single layer. Lightly spray the tops with olive oil spray. Bake for 25-30 minutes. Flip the slices halfway through to get them crispy on both sides. After baking, assemble your dish. Spread a thin layer of marinara sauce in a 9x13 inch baking dish. Layer half of the baked eggplant on top. Add 1 cup of mozzarella and 1/2 cup of Parmesan cheese. Repeat with another layer of sauce and the remaining eggplant. Finish with the last of the cheeses on top. Bake again for 25-30 minutes until golden and bubbly. Let it cool for a few minutes before serving. Enjoy your homemade Baked Eggplant Parmesan! For the complete process, check the Full Recipe. To make the best Baked Eggplant Parmesan, start with good eggplants. Choose firm, shiny ones. Slice them into 1/4-inch rounds for even cooking. Salting the slices helps remove bitterness. Let them sit for 30 minutes to draw out moisture. This step is key for a great texture. When you bake, preheat your oven to 375°F (190°C). A hot oven cooks the eggplant evenly. Crispiness makes this dish amazing. After salting, pat the slices dry with paper towels. This removes extra moisture. For a crispy crust, use three bowls for the breading. Coat each slice in flour, dip in egg, then roll in seasoned breadcrumbs. Press the breadcrumbs onto the eggplant. A light spray of olive oil helps the breading crisp up in the oven. Flip the slices halfway through baking for even browning. To boost flavor, add herbs to your breadcrumbs. Mix in oregano, basil, and black pepper. For a twist, try adding minced garlic or crushed red pepper. If you like extra cheese, layer more mozzarella or Parmesan. Fresh herbs on top before serving adds brightness. Pair your dish with a simple side salad to balance the richness. For the full recipe, check out the details above. {{image_4}} You can easily make this dish vegetarian or vegan. For a vegetarian twist, skip the eggs and use a plant-based milk instead. Dip the eggplant in the milk, then coat it with the breadcrumbs. If you want a vegan version, choose dairy-free cheeses made from nuts or soy. Many brands offer tasty mozzarella and Parmesan substitutes. This way, you keep the creamy, cheesy goodness while sticking to a plant-based diet. If you need a gluten-free option, swap the all-purpose flour with a gluten-free blend. You can also use gluten-free breadcrumbs. These adjustments let you enjoy the same crispy texture without the gluten. Just check the labels to ensure all ingredients are gluten-free. It's simple, and you won’t miss out on the delicious flavors! To boost protein in your meal, consider adding cooked lentils or chickpeas. Layer them between the eggplant slices for added texture and flavor. You can also use shredded chicken or turkey if you prefer meat. This gives your dish a heartier feel while keeping it delicious. Customize it to fit your taste and dietary needs! After enjoying your baked eggplant Parmesan, let it cool down. Place any leftovers in an airtight container. This will keep the flavors fresh. You can store it in the fridge for up to three days. If you want to eat it later, follow the freezing instructions below. Reheating is easy! Preheat your oven to 350°F (175°C). Place the leftover eggplant Parmesan in an oven-safe dish. Cover it with foil to keep it moist. Heat for about 20 minutes or until the cheese melts. You can also microwave it. Just heat for 1-2 minutes on high, checking often. To freeze, cut the baked eggplant Parmesan into portions. Wrap each piece tightly in plastic wrap. Then, place them in a freezer bag. Remember to remove as much air as possible. This will prevent freezer burn. You can freeze it for up to three months. To reheat, just thaw it in the fridge overnight before using the reheating guidelines. For more details on the full recipe, check the [Full Recipe]. Yes, you can make Baked Eggplant Parmesan ahead. Prepare it fully, but don’t bake it yet. Cover it and place it in the fridge for up to 24 hours. When ready, bake it straight from the fridge. Just add a few extra minutes to the baking time to ensure it heats through. Baked Eggplant Parmesan pairs well with many sides. Here are some ideas: - A simple green salad with vinaigrette - Garlic bread or crusty Italian bread - Steamed vegetables like broccoli or green beans - A light pasta tossed in olive oil and garlic To add heat to your Baked Eggplant Parmesan, try these tips: - Mix crushed red pepper flakes into the marinara sauce. - Use spicy Italian sausage in the sauce. - Add jalapeños or banana peppers in layers. Adjust the amount based on your spice tolerance. Baked eggplant parmesan is healthier than fried. Baking uses less oil, making it lighter. Frying can add a crispy texture but can also add more fat. Baking still gives you a great flavor, with soft layers of cheese and sauce. Both styles bring joy, but baking is easier and less messy. In this post, you learned how to make a tasty Baked Eggplant Parmesan. We covered all the ingredients and their substitutes. You found clear step-by-step instructions for prep, baking, and tips for great results. I shared variations for different diets, plus storage and reheating tips. Baked Eggplant Parmesan is easy and fun to make. Enjoy personalizing it to fit your taste! Now, go ahead and try this dish; I know you'll love it.](https://spoonfulsavory.com/wp-content/uploads/2025/05/d9c3b3b7-57ed-49b2-9d9d-f0b0ac344e37.webp)
Are you ready to enjoy a dish that’s both tasty and simple? My Baked Eggplant Parmesan offers a healthy twist

Craving the perfect slice of pizza? You’re in the right place! This Classic Margherita Pizza recipe combines fresh ingredients and

Looking for a light and tasty treat? Meringue cookies with fruit are the perfect solution! These crunchy delights are simple
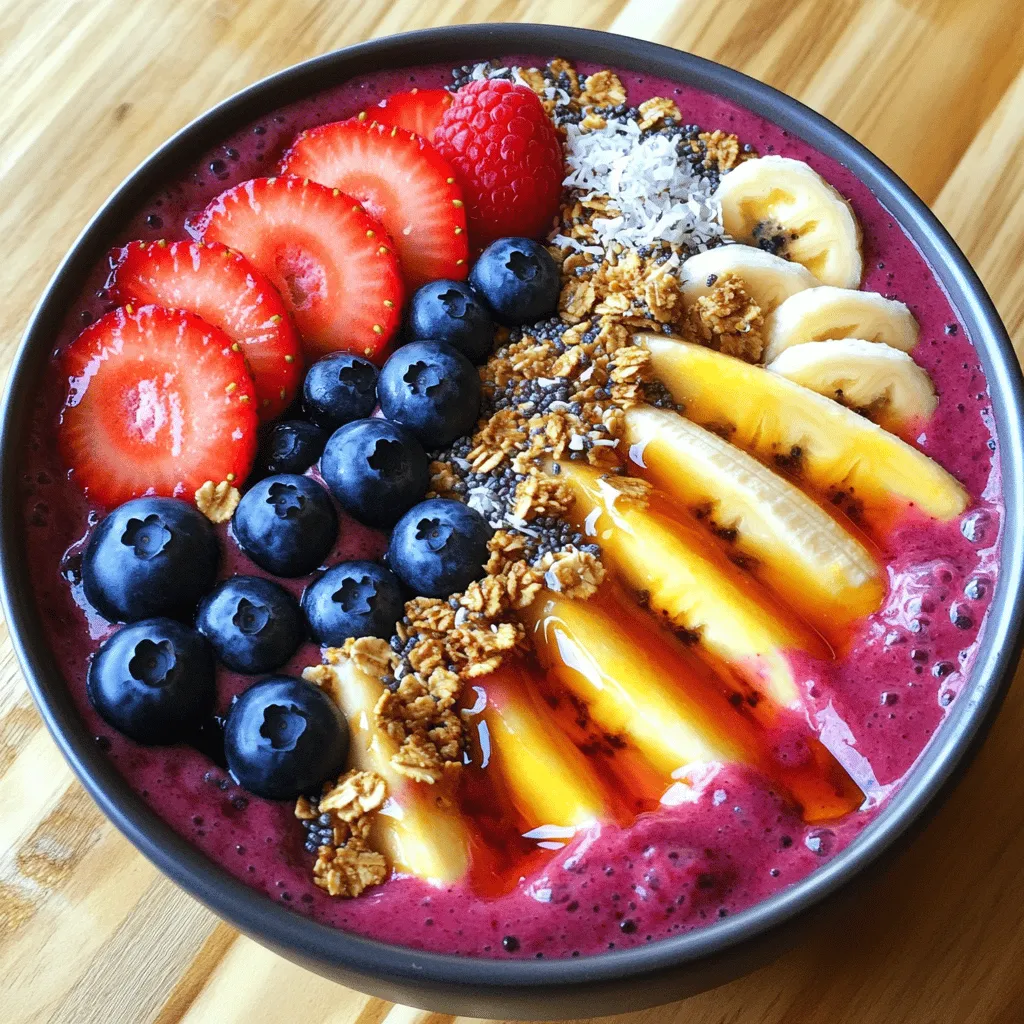
Are you ready to kick-start your day with a delicious Berry Smoothie Bowl? Packed with nutrients and bursting with flavor,
