Skip to content
DisclaimerTerms Of UseGDPR PolicyCookie Policy

spoonfulsavory

  • Home
  • Drinks
  • Appetizers
  • Dinner
  • Dessert
  • About
  • Contact
  • Privacy Policy
DisclaimerTerms Of UseGDPR PolicyCookie Policy

Sarah

- 1 cup basmati rice - 2 cups vegetable broth - 1 tablespoon olive oil - 1 teaspoon garlic powder - Juice of 1 lime - Zest of 1 lime - 1/2 cup fresh cilantro, finely chopped - Salt to taste - Freshly ground black pepper to taste Alternatives for Basmati Rice If you cannot find basmati rice, you can use jasmine rice or long-grain rice. Both options work well and will give a nice texture. Vegan options for broth You can use mushroom broth or homemade vegetable broth. This keeps the dish vegan and packed with flavor. Choosing the right cilantro Look for bright green leaves with no wilting. Fresh cilantro has a strong, pleasant aroma. Avoid any bunches with yellowing leaves. Picking limes for zest and juice Choose limes that feel heavy for their size. The skin should be smooth and slightly shiny. This indicates that they are juicy and flavorful. - Rinsing the rice: Start by rinsing 1 cup of basmati rice under cold water. Swirl the rice gently until the water runs clear. This step removes excess starch and keeps the rice fluffy. - Sautéing the rice: In a medium saucepan, heat 1 tablespoon of olive oil over medium heat. Once the oil shimmers, add the rinsed rice. Sauté the rice for 2-3 minutes, stirring often. The rice should turn slightly golden and release a nice aroma. - Combining with broth: Pour in 2 cups of vegetable broth and 1 teaspoon of garlic powder. Add a pinch of salt for flavor. Increase the heat to get a rolling boil, then lower the heat. Cover the saucepan tightly. - Simmering the rice: Let the rice simmer on low heat for 15 minutes. This allows the rice to absorb the broth. Check that all the liquid is gone and that the rice is tender. - Steaming finish: After 15 minutes, take the saucepan off the heat. Keep it covered for 5 more minutes. This resting time helps the rice finish cooking and soak up even more flavor. - Fluffing and adding flavor: Use a fork to fluff the rice. Add the juice and zest of 1 lime, along with 1/2 cup of finely chopped fresh cilantro. Taste and adjust with more salt and black pepper if needed. This zesty cilantro lime rice is now ready to serve! You can find the full recipe above for all the details. To make perfect cilantro lime rice, pay attention to the water-to-rice ratio. For basmati rice, I use a 2:1 ratio of broth to rice. This helps the rice cook evenly. If you want your rice a bit softer, you can add a little extra broth. To ensure fluffy rice, rinse it well. Rinsing removes excess starch, which can make rice sticky. After cooking, let the rice rest with the lid on for 5 minutes. This helps it finish cooking and keeps it fluffy. You can enhance the flavor by adding spices or herbs. Try adding a pinch of cumin or some chopped green onions if you want to change things up. These additions can give your rice a whole new vibe. Adding toppings is another way to boost flavor. Fresh avocado slices, diced tomatoes, or black beans work great. They add color and taste, making your dish more exciting. Cilantro lime rice pairs well with many main dishes. It’s excellent alongside grilled chicken, fish, or even tacos. The zesty flavors brighten up any plate. For a fun twist, use it as a base for grain bowls. Top it with roasted veggies, beans, and a drizzle of your favorite sauce. This makes for a hearty and colorful meal. For the complete recipe, check out the [Full Recipe]. {{image_4}} You can make zesty cilantro lime rice even better by adding vegetables. Try mixing in diced bell peppers, peas, or corn. This not only adds color but also boosts nutrition. You can also incorporate beans or legumes. Black beans or chickpeas work well. They add protein and make the dish heartier. Each bite becomes more satisfying! To spice things up, consider making spicy cilantro lime rice. Add diced jalapeños or a pinch of cayenne pepper while cooking. This will give it a nice kick! Another fun idea is coconut cilantro lime rice. Use coconut milk instead of vegetable broth. This creates a rich, creamy texture and a subtle sweetness that pairs perfectly with lime. You can find many Latin American variations of cilantro lime rice. Each region has its own twist. For example, some might add diced tomatoes or a touch of cumin for warmth. Indian influences can also be seen in some recipes. You could spice up your rice with turmeric or mustard seeds. This adds a unique flavor and a beautiful golden color. For more ideas, check out the Full Recipe for zesty cilantro lime rice! To store cilantro lime rice, let it cool first. Place it in an airtight container. This keeps the rice fresh and tasty. You can store it in the fridge for up to three days. If you wait longer, it may lose flavor and texture. You can freeze cilantro lime rice for later use. First, let the rice cool completely. Then, divide it into portions. Use freezer-safe bags or containers. Press out any extra air to prevent freezer burn. Frozen rice lasts for about three months. To reheat your rice, I recommend using the microwave or stovetop. If using a microwave, add a splash of water. This helps to keep the rice moist. Cover the dish to trap steam. On the stovetop, heat it in a pan. Add a touch of water and stir until warm. This method helps keep the rice flavorful and fluffy. Enjoy your rice just like it was fresh! Can I make this dish ahead of time? Yes, you can make cilantro lime rice in advance. Cool the rice after cooking and store it in an airtight container. It stays fresh in the fridge for about three days. Reheat it on the stovetop or microwave. Add a splash of lime juice to restore some flavor. How can I make cilantro lime rice spicy? To add some heat, mix in diced jalapeños or red pepper flakes. You can also add a pinch of cayenne pepper. Just a little goes a long way, so start small and taste as you go. What to do if the rice is sticky? If your rice turns out sticky, it likely has too much starch. Next time, rinse the rice under cold water until the water runs clear. If it’s already cooked, try fluffing it gently with a fork. Adding a little olive oil can also help separate the grains. Fixing overcooked or undercooked rice For overcooked rice, try to drain excess water and spread the rice out on a baking sheet to cool. For undercooked rice, add a splash of water, cover, and cook for a few more minutes. Keep an eye on it to avoid overcooking. Caloric content per serving Each serving of cilantro lime rice has about 180 calories. This varies based on the specific brands of ingredients you use. Dietary considerations (gluten-free, vegan options) This recipe is naturally gluten-free and vegan. Use vegetable broth to keep it plant-based. Always check labels to ensure all ingredients meet your dietary needs. For a heartier meal, consider adding black beans or corn for extra protein and fiber. For the full recipe, check out the detailed instructions. Cilantro lime rice is a simple and tasty dish. We covered ingredients, cooking steps, and storage tips. Remember, select fresh cilantro and limes for the best flavor. Adjust spices to match your taste. This dish can pair with many meals or stand alone in a grain bowl. You can easily modify it with veggies or beans. Explore variations and enjoy your cooking journey. With these tips, you’ll make delicious cilantro lime rice each time!

Zesty Cilantro Lime Rice Flavorful and Easy Recipe

Are you ready to elevate your meals with a burst of flavor? My Zesty Cilantro Lime Rice recipe is not

To make a tasty quinoa vegetable pilaf, gather these simple ingredients: - 1 cup quinoa, well rinsed - 2 cups vegetable broth - 1 medium onion, finely chopped - 2 cloves of garlic, minced - 1 bell pepper, diced - 1 medium carrot, diced - 1 medium zucchini, diced - 1 cup green peas - 1 teaspoon ground cumin - 1 teaspoon paprika - 2 tablespoons olive oil - Salt and freshly cracked pepper - Fresh parsley, finely chopped You can easily swap some ingredients for different flavors. Here are a few ideas: - Use chicken broth instead of vegetable broth for a richer taste. - Try adding mushrooms for an earthy flavor. - Switch the bell pepper for cherry tomatoes for a sweet twist. - Consider using kale or spinach for extra greens. If you have dietary needs, this recipe can adapt: - For a vegan option, stick with vegetable broth and avoid any animal products. - This dish is already gluten-free since quinoa is naturally gluten-free. - To make it low-carb, use cauliflower rice instead of quinoa. With these ingredients and options, you can create a healthy and delicious meal. For the complete cooking process, check out the Full Recipe. Before you start cooking, gather all your ingredients. You will need: - 1 cup quinoa, well rinsed - 2 cups vegetable broth - 1 medium onion, finely chopped - 2 cloves of garlic, minced - 1 bell pepper, diced - 1 medium carrot, diced - 1 medium zucchini, diced - 1 cup green peas - 1 teaspoon ground cumin - 1 teaspoon paprika - 2 tablespoons olive oil - Salt and pepper to taste - Fresh parsley for garnish Rinsing the quinoa is key. It removes bitterness and makes it taste better. 1. Heat the olive oil in a medium pot over medium heat. 2. Add the chopped onion and cook for 3-4 minutes. The onion should be soft and clear. 3. Stir in the minced garlic, bell pepper, and diced carrot. Cook for another 3-4 minutes, stirring often. 4. Sprinkle in cumin and paprika. This step adds lovely flavor. Cook for 1 minute. 5. Now, add the zucchini and green peas. Mix well and cook for 2-3 minutes. 6. Stir in the rinsed quinoa and pour in the vegetable broth. Mix everything well. 7. Bring the mixture to a boil. Once boiling, reduce the heat and cover the pot. Let it simmer for 15 minutes. 8. After 15 minutes, remove the pot from heat. Let it sit for another 5 minutes. 9. Fluff the quinoa with a fork. Add salt and pepper to taste. Your pilaf is ready. Serve it warm, and garnish with parsley for a fresh touch. - Always rinse quinoa before cooking. This step is very important. - Use a ratio of 2:1 for liquid to quinoa. This ensures it cooks evenly. - Let it sit after cooking to make it fluffy. - Taste before seasoning. Adjust salt and pepper to your liking. For the full recipe, refer to the detailed instructions above. Enjoy your tasty quinoa vegetable pilaf! To make your quinoa vegetable pilaf even tastier, use fresh herbs and spices. Here are some ideas: - Herbs: Add fresh thyme, basil, or cilantro for brightness. - Spices: Try turmeric for color and a warm taste. You can also use curry powder for a unique twist. - Acidity: A splash of lemon juice or vinegar can brighten the dish. These simple tweaks can elevate your pilaf and make it pop with flavor. When making quinoa pilaf, avoid these common errors: - Not rinsing quinoa: Rinse it well. This removes a bitter coating called saponin. - Overcooking: Keep an eye on the cooking time. Overcooked quinoa becomes mushy. - Skipping seasoning: Don’t forget to season your dish. Salt and pepper make a big difference. By steering clear of these pitfalls, you’ll create a more enjoyable dish. To make your cooking easier, use these handy tools: - Medium pot: This is perfect for cooking your pilaf evenly. - Strainer: Use it to rinse quinoa easily before cooking. - Wooden spoon: Great for stirring without scratching your pot. - Lid: A tight-fitting lid helps retain steam for cooking. These tools will help you make the best quinoa vegetable pilaf with ease. For the full recipe, check out the recipe section. {{image_4}} You can make your quinoa vegetable pilaf more filling by adding proteins. Try black beans, kidney beans, or chickpeas for a hearty touch. Cooked lentils also work well. If you prefer, add tofu for a plant-based option. Simply cube it and sauté with the veggies. This addition not only boosts protein but also makes your meal more satisfying. Feel free to change the vegetables based on the season. In spring, add asparagus or peas. In summer, zucchini and corn shine bright. Fall brings sweet potatoes and squash, while winter calls for root veggies like carrots and parsnips. Each swap adds unique flavors and keeps your meal fresh and exciting. You can mix and match based on what you have at home. Change the flavor profile to keep things interesting. For a Mediterranean twist, add olives, sun-dried tomatoes, and feta cheese. Use herbs like oregano and basil for a fresh touch. For an Asian-inspired dish, use soy sauce, ginger, and sesame seeds. Toss in some green onions and bell peppers for crunch. These small changes can transform your pilaf into something new and delicious. To store leftover quinoa vegetable pilaf, let it cool first. Place it in an airtight container. This keeps the pilaf fresh and prevents it from drying out. Store it in the fridge for up to four days. If you want to keep it longer, freezing is a great option. When reheating, use a microwave or a stovetop. In the microwave, place the pilaf in a bowl. Add a splash of water to keep it moist. Heat it in short bursts, stirring in between. On the stovetop, add the pilaf to a pan. Add a little broth or water and heat on low. Stir gently until warm. This way, the quinoa stays fluffy and tasty. Freezing quinoa vegetable pilaf is simple. Portion it into individual containers. Make sure they are freezer-safe. Seal them tightly to avoid freezer burn. It can last up to three months in the freezer. When ready to eat, thaw it in the fridge overnight before reheating. This makes meal prep easy and convenient. For the full recipe, check out the detailed instructions above. The best way to cook quinoa is with a 2:1 ratio of liquid to quinoa. Use water or broth for extra flavor. After rinsing the quinoa, bring the liquid to a boil. Add the quinoa and reduce the heat to low. Cover and simmer for about 15 minutes, or until all the liquid is absorbed. Fluff with a fork before serving. This method gives you fluffy quinoa every time. Yes, you can make Quinoa Vegetable Pilaf ahead of time. It stores well in the fridge for up to three days. Allow it to cool completely before storing it in an airtight container. When you're ready to eat, simply reheat it on the stove or in the microwave. This makes it a great option for meal prep. To add more flavor to quinoa, try cooking it in broth instead of water. You can also add herbs and spices like garlic, cumin, or turmeric. Sauté the quinoa with onions and vegetables for a more robust taste. Drizzling some lemon juice or adding fresh herbs before serving can elevate the flavors. Yes, quinoa is a good source of protein. It has all nine essential amino acids, making it a complete protein. This makes quinoa an excellent choice for vegetarians and vegans. One cup of cooked quinoa has about 8 grams of protein, which helps keep you full and satisfied. You learned how to make a tasty Quinoa Vegetable Pilaf. We discussed ingredients, cooking steps, and flavor tips. You now know how to adapt the recipe for diets and swap in seasonal veggies. Remember, good storage is key for leftovers. With practice, you'll make perfect pilaf. Enjoy cooking and experimenting with flavors!

Tasty Quinoa Vegetable Pilaf Simple and Healthy Meal

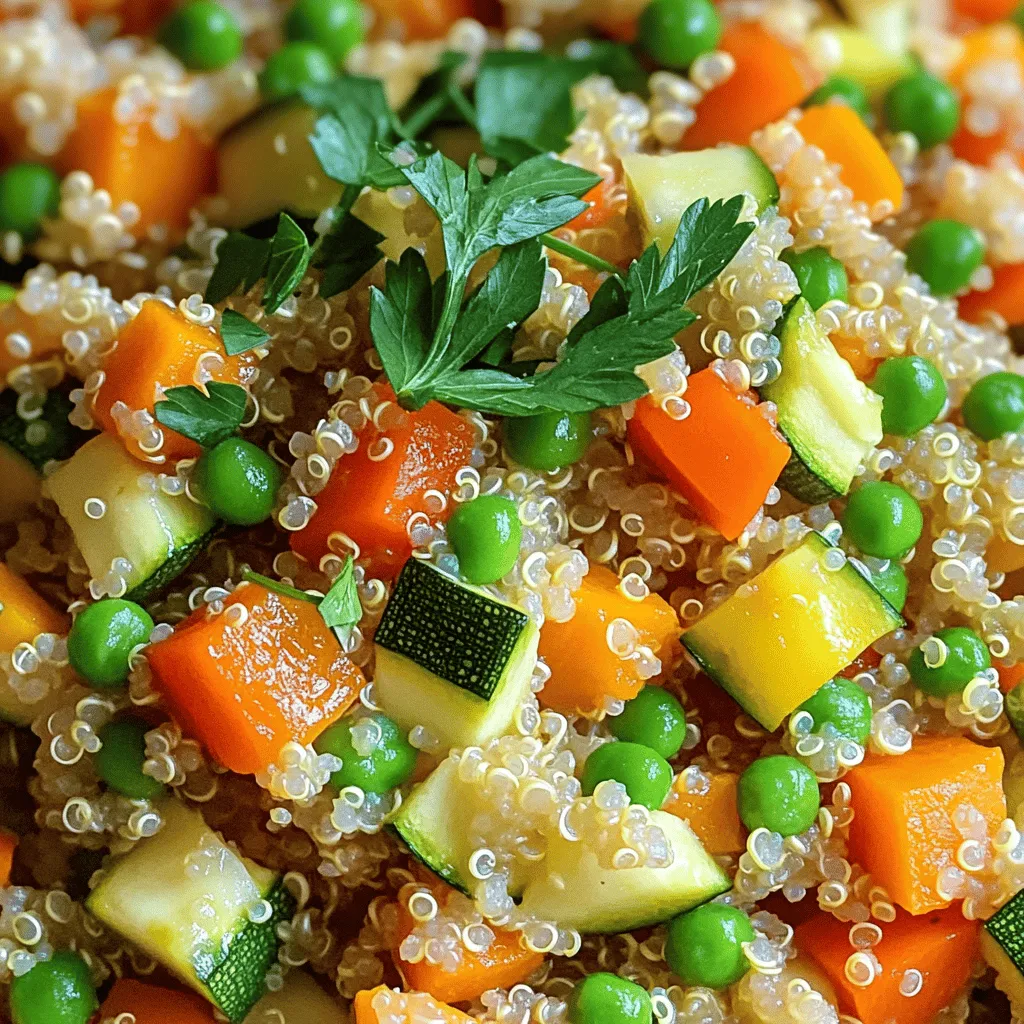
Looking for a meal that’s tasty, simple, and good for you? You’ve found it! My Tasty Quinoa Vegetable Pilaf is

To make creamy avocado pasta, you need fresh, simple ingredients. Here’s what you will need: - 2 ripe avocados, peeled and pitted - 2 cloves garlic, minced - 2 tablespoons fresh lemon juice - 1/4 cup extra virgin olive oil - 1/4 teaspoon red pepper flakes - Salt and freshly ground black pepper to taste - 12 ounces of spaghetti (or your preferred pasta variety) - 1/4 cup fresh basil leaves, finely chopped - 1/4 cup grated Parmesan cheese (optional) Each ingredient plays a vital role in creating that rich, creamy texture. The avocados bring a buttery feel, while garlic adds a nice punch. Fresh lemon juice brightens the dish, and olive oil contributes smoothness. Red pepper flakes add just the right kick. You can adjust salt and pepper based on your taste. When you choose your pasta, remember that spaghetti is traditional, but you can use any kind you like. Fresh basil leaves give your dish a fresh aroma and flavor. If you enjoy cheese, sprinkle some Parmesan on top for extra richness. Let’s gather these ingredients and get ready for a flavorful cooking adventure! For the full recipe, check out the instructions I provided earlier. - Bring a large pot of salted water to a rolling boil. - Add spaghetti and cook per package instructions. - Reserve 1 cup of pasta water before draining. Cooking the pasta is simple. First, fill a large pot with water and add salt. This helps the pasta taste better. Once the water boils, toss in the spaghetti. Follow the package’s cooking time, usually 8 to 10 minutes. When the pasta is ready, save a cup of that salty water. You’ll use it for the sauce later. After saving the water, drain the pasta and place it in a large mixing bowl. - Blend avocados, garlic, lemon juice, olive oil, red pepper flakes, salt, and pepper until smooth. - Adjust consistency with reserved pasta water if necessary. For the sauce, grab a blender. Add the ripe avocados, minced garlic, fresh lemon juice, and olive oil. Toss in the red pepper flakes, salt, and pepper too. Blend everything until it’s smooth and creamy. If it feels too thick, add a bit of the reserved pasta water. Blend again until you get the right creaminess. You want a silky sauce that clings to the pasta perfectly. - Pour avocado sauce over drained spaghetti. - Toss to coat evenly. - Incorporate any additional reserved water if needed. Now it’s time to mix! Pour the creamy avocado sauce over the drained spaghetti in your mixing bowl. Toss the pasta gently. Make sure each strand has a nice coat of the green goodness. If the sauce seems too thick, add a bit more of that reserved pasta water. Keep tossing until it’s all well mixed. This step is key to a delicious meal! To get that perfect creamy texture in your avocado pasta, you need to use reserved pasta water wisely. After cooking your pasta, save about a cup of the starchy water. This water helps adjust the sauce's thickness. If your sauce is too thick, slowly add a little pasta water. Stir well until you reach a creamy consistency. Also, blend the avocado sauce thoroughly. Use a blender or food processor to mix the avocados, garlic, and other ingredients. A smooth blend gives you that silky texture that makes this dish so delightful. Serve your creamy avocado pasta right after mixing. This dish tastes best fresh. If you let it sit, the sauce may thicken and lose its charm. For a beautiful finish, garnish with extra basil leaves and a sprinkle of Parmesan cheese. The basil adds a fresh touch, while the cheese gives it a rich flavor. One common mistake is overcooking the pasta. Make sure to follow the package instructions closely. Al dente pasta holds up better with the creamy sauce. Another mistake is not reserving enough pasta water. That starchy water is key for making your sauce smooth. If you forget to save it, your dish might end up too thick or dry. Follow these tips, and your creamy avocado pasta will shine! If you want the full details, check out the Full Recipe. {{image_4}} You can turn this dish into a heartier meal. Incorporate grilled chicken, shrimp, or chickpeas. Each option adds a unique taste and texture. Grilled chicken gives a nice, smoky flavor. Shrimp brings a sweet, briny bite. Chickpeas add protein and a nutty touch. Choose what you like best! To make this dish vegan, simply omit the Parmesan cheese. The avocado sauce alone is creamy enough. You won’t miss the cheese’s flavor. Instead, the fresh herbs and garlic will shine. This option keeps the dish plant-based and just as delicious! Want to elevate the taste? Add sun-dried tomatoes, olives, or capers. Sun-dried tomatoes add a sweet and tangy twist. Olives bring a briny punch, while capers offer a zesty kick. Mix and match these ingredients to create your perfect blend. They all enhance the creamy avocado sauce! Store any leftover creamy avocado pasta in an airtight container. This helps keep it fresh. It tastes best when consumed within 1-2 days. If you store it longer, the avocado may brown and lose its flavor. Freezing the creamy avocado pasta is not a good idea. The texture changes when it thaws. You will end up with a mushy sauce that does not taste great. It’s best to enjoy the dish fresh. To reheat, use low heat on the stove. Add a splash of water if the sauce seems too thick. Stir gently to warm it up without cooking it further. This way, you can enjoy your pasta again without losing its creamy goodness. Yes, feel free to substitute with whole wheat, gluten-free, or any preferred pasta variety. I love using whole wheat spaghetti for a nuttier taste. Gluten-free pasta works well too, especially made from brown rice or chickpeas. Just follow the cooking instructions on the package. You can easily add more red pepper flakes to the sauce. If you want extra heat, slice up some jalapeños and toss them in. I often start with a little, then taste and adjust. This way, you control the spice level based on your taste. Yes, it's rich in healthy fats from avocados and offers beneficial nutrients. Avocados are full of good fats, fiber, and vitamins. This dish gives you energy and fills you up without weighing you down. Plus, it’s quick to make and tastes fantastic! For the full recipe, check out the earlier section. This blog post covered a simple yet tasty avocado pasta recipe. You learned about fresh ingredients, cooking steps, and helpful tips. The creamy avocado sauce gives flavor without heavy cream. Remember to reserve pasta water for the right texture. You can also customize the dish with proteins or spices. With proper storage, you can enjoy leftovers for a few days. This dish is both healthy and satisfying. Try it out and make it your own!

Creamy Avocado Pasta Flavorful and Simple Delight

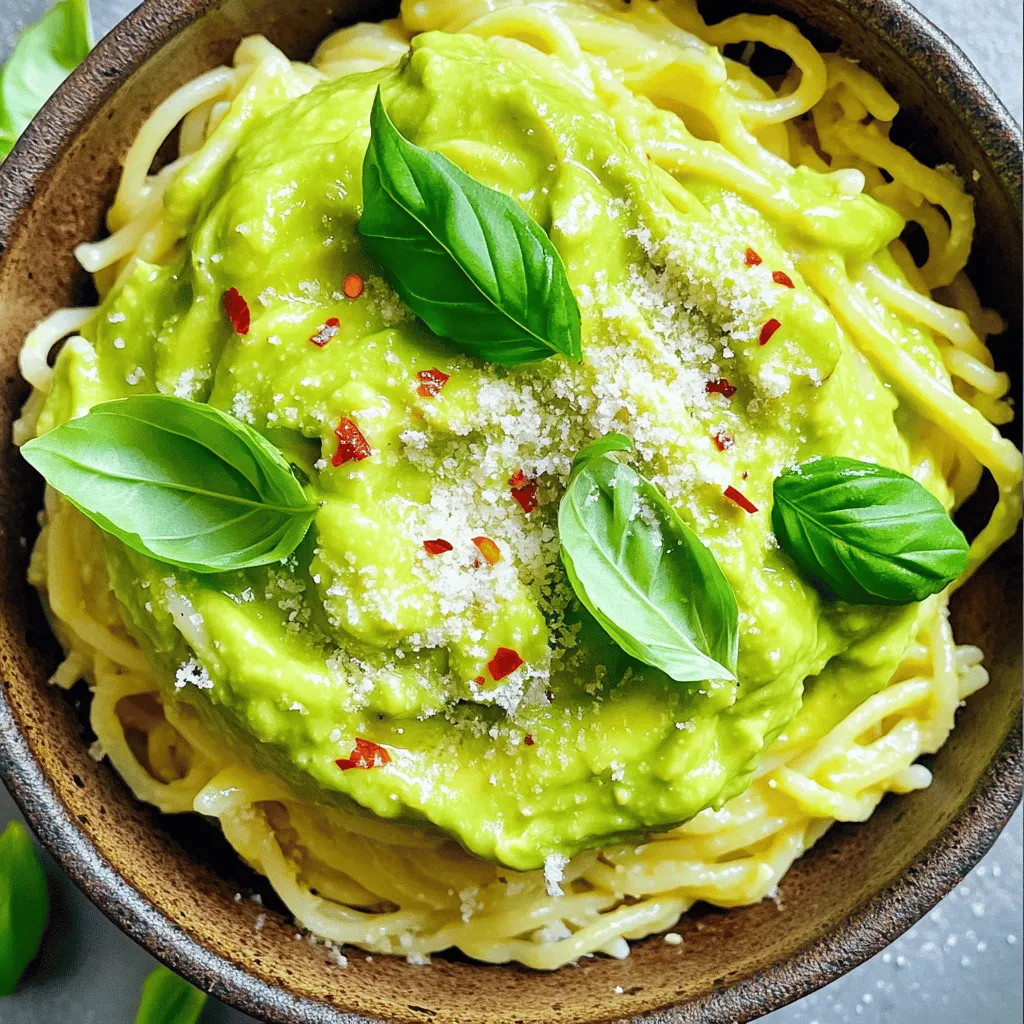
Looking for a dish that’s both tasty and easy? Creamy avocado pasta is your answer! This recipe mixes ripe avocados

- Cauliflower florets - All-purpose flour or chickpea flour - Plant-based milk - Garlic powder - Onion powder - Smoked paprika - Buffalo sauce options - Vegan butter - Celery sticks - Carrot sticks - Vegan ranch dressing To create the perfect Vegan Cauliflower Buffalo Wings, start with the main ingredients. You will need a large head of cauliflower. Break it into bite-sized florets. You can use all-purpose flour or chickpea flour for a gluten-free option. For the wet mixture, plant-based milk works best. Almond or soy milk are great choices. Next, let’s talk about seasoning and sauce. Garlic powder, onion powder, and smoked paprika add depth. You have options for buffalo sauce. You can buy it or make your own. To finish, add melted vegan butter for richness. For serving, you need fresh celery sticks and carrot sticks. These crunchy veggies balance the heat. A side of vegan ranch dressing makes the dish even better. This combination is perfect for dipping and cooling the spice. If you want the full recipe, check out the complete guide. Enjoy crafting this delicious snack! 1. Preheat the oven and prepare the baking sheet: Start by setting your oven to 450°F (232°C). Line a baking sheet with parchment paper. This prevents sticking and makes cleanup easy. 2. Prepare the cauliflower florets: Take a large head of cauliflower and cut it into bite-sized florets. Aim for uniform pieces. This helps them cook evenly. 1. Combine dry ingredients: In a big mixing bowl, add 1 cup of all-purpose flour (or chickpea flour for gluten-free). Then, add 1 teaspoon of garlic powder, 1 teaspoon of onion powder, 1 teaspoon of smoked paprika, 1 teaspoon of salt, and 1/2 teaspoon of black pepper. Mix these dry ingredients well. 2. Whisk in plant-based milk: Pour in 1 cup of plant-based milk, like almond or soy. Whisk the mixture until it is smooth and free of lumps. You want a thick batter that clings to the cauliflower. 1. Coat the cauliflower in the batter: Take each cauliflower floret and dip it into your batter. Ensure each piece gets a good coating. Shake off any extra batter before placing them on the baking sheet. Arrange them in a single layer. 2. Initial baking and flipping process: Place your baking sheet in the oven. Bake the cauliflower wings for 25-30 minutes. Halfway through, flip the florets. This helps them get crispy and golden on all sides. 3. Preparing the buffalo sauce: While the wings bake, mix 1 cup of buffalo sauce with 2 tablespoons of melted vegan butter in a small bowl. Stir until well combined. This sauce will add that spicy kick to your wings. For the complete cooking experience, refer to the Full Recipe. Enjoy making these tasty vegan buffalo wings! To get that perfect crunch, set your oven to 450°F (232°C). This high heat helps the wings cook quickly and become crispy. Bake them for 25-30 minutes. Halfway through, flip the florets to ensure they crisp up evenly. Spacing is key. Place the cauliflower wings in a single layer on the baking sheet. If they are too close, they will steam instead of crisp. Leave some space between each piece for the hot air to flow around them. Want to kick up the flavor? Add some spices like cayenne pepper or smoked paprika. You can also try a dash of cumin for a unique twist. These small changes can make a big difference in taste. For a homemade buffalo sauce, mix 1 cup of hot sauce with 2 tablespoons of melted vegan butter. Stir until smooth. You can adjust the heat by adding more or less hot sauce, depending on your taste. Presentation matters! Arrange the wings on a large platter, and garnish with fresh parsley or extra carrot sticks. Serve the vegan ranch dressing in a small bowl at the center. This makes it easy for guests to dip their wings. For the best experience, pair these wings with celery sticks and carrot sticks. They add a nice crunch and freshness. Plus, they help cool down the heat from the wings. Enjoy this spicy snack with friends or family! {{image_4}} If you want a gluten-free version, use chickpea flour. It gives a nice texture and flavor. You can also try other gluten-free flours, like rice flour or almond flour. These will work well too. For breading, you can opt for crushed cornflakes or gluten-free panko. Both options add a crunchy layer to your wings. Just mix them with your seasonings for a tasty twist. You can spice up your buffalo wings! Add cayenne pepper or chili powder for extra heat. You can also try different hot sauces, like sriracha or harissa. Each sauce gives a unique kick. If buffalo sauce isn’t your thing, explore other flavors. BBQ sauce works great, or use teriyaki for a sweet twist. Toss the cauliflower in your choice of sauce for a new experience. For a quicker method, use an air fryer. Preheat it to 400°F (200°C). Place the coated cauliflower in a single layer. Cook for about 15 minutes, shaking the basket halfway through. If you prefer stovetop frying, heat oil in a pan. Cook the cauliflower in batches until golden brown. This method gives a nice crispy texture. Just be careful with the hot oil! To keep your Vegan Cauliflower Buffalo Wings fresh, follow these tips: - Allow the wings to cool completely before storing. - Use an airtight container to prevent moisture. - Place parchment paper between layers if stacking. - Store in the fridge for up to 3 days. When it's time to enjoy your wings again, choose your method: - Oven: Preheat to 350°F (175°C). Bake wings for about 10-15 minutes. - Microwave: Heat on a microwave-safe plate for 30-60 seconds. To keep them crispy, use the oven method. You can save wings for later! Here's how: - Place cooled wings in a single layer on a baking sheet. - Freeze until solid, then transfer to an airtight container. - For best taste, use within 2 months. To enjoy, thaw in the fridge overnight and reheat in the oven. For the full recipe, check out the complete guide. Yes, you can prep these wings ahead of time. To do this, follow these tips: - Make the batter and coat the cauliflower florets. - Place the coated florets on a baking sheet and cover with plastic wrap. - Store in the fridge for up to 24 hours before baking. - Bake right before serving for a fresh and crispy treat. If you want to switch things up, here are some great substitutes: - Barbecue sauce offers a sweet and tangy flavor. - Hot sauce mixed with vegan butter gives a spicy kick. - Teriyaki sauce provides a sweet and salty twist. - Experiment with your favorite sauces for a personal touch. There are easy ways to add heat to your buffalo wings: - Use hot sauce with a higher Scoville rating. - Add cayenne pepper or crushed red pepper flakes to the batter. - Toss the wings in a spicy chili sauce after baking. - Serve with a spicy dip for extra heat. For a tasty presentation, consider these suggestions: - Serve with fresh celery and carrot sticks on the side. - Pair with vegan ranch dressing for dipping. - Garnish the platter with fresh parsley for color. - Add lemon wedges for a fresh zing. Yes, you can use frozen cauliflower. Here’s what to keep in mind: - Thaw the cauliflower completely before coating it. - Pat it dry to remove excess moisture for better crispiness. - The cooking time may vary slightly, so check for doneness. - Fresh cauliflower provides a firmer texture, but frozen works well too. For the full recipe, visit [Full Recipe]. In this post, I covered how to make tasty vegan cauliflower buffalo wings. We started with the main ingredients, including cauliflower, flour, and spices. Then, I provided step-by-step instructions, from prepping the cauliflower to achieving the perfect bake. I shared tips for keeping them crispy and suggestions for serving. You can even make gluten-free or spicy versions! Enjoy experimenting with these wings. With different flavors and cooking methods, you can truly make them your own.

Vegan Cauliflower Buffalo Wings Irresistible Snack Recipe

Looking for a tasty snack that pleases both vegans and non-vegans? Try my Vegan Cauliflower Buffalo Wings! They pack a

You need fresh strawberries for this treat. About 2 cups will work well. Make sure to hull and slice them. This step helps release their sweet juices. You can use ripe strawberries for the best flavor. Gather these other ingredients to complete your trifle: - 1/4 cup granulated sugar (divided) - 1 cup heavy whipping cream - 1/2 teaspoon vanilla extract - 1 cup pound cake, cut into cubes (store-bought or homemade) - 1/2 cup vanilla pudding (store-bought or homemade) - Fresh mint leaves for garnish These ingredients come together to create sweet layers. The cream and pudding add a soft touch. The pound cake gives a nice base, while the strawberries shine through. If you want to change some ingredients, you can! Here are a few ideas: - Use angel food cake instead of pound cake for a lighter base. - You can swap vanilla pudding with lemon pudding for a zingy twist. - For dairy-free options, try coconut cream in place of heavy cream. These swaps still keep your trifle tasty and fun. Make it your own! Start by washing your strawberries. You want them clean and fresh. Hull and slice the strawberries into thin pieces. In a bowl, mix the strawberries with 2 tablespoons of granulated sugar. Toss them gently until they are well coated. Let them sit for about 15 minutes. This process is called macerating. It helps the strawberries get sweeter and juicier. The sugar pulls out their natural juices, making them even more delicious. While your strawberries are resting, it’s time to whip the cream. Take a clean bowl and pour in 1 cup of heavy whipping cream. Use an electric mixer on medium speed. Beat the cream until you see soft peaks form. Then, add the remaining 2 tablespoons of granulated sugar and the vanilla extract. Keep mixing until you see stiff peaks. This fluffy cream will add a light texture to your trifle. Now, let's make your trifle! Grab a large trifle bowl or some individual serving glasses. Start with a layer of pound cake cubes at the bottom. Spread them out evenly. Next, add a layer of your sweet, macerated strawberries on top. Make sure to let the strawberry juice soak into the cake. After the strawberries, spoon in a layer of smooth vanilla pudding. Then, gently add a layer of whipped cream. Repeat this process, layering pound cake, strawberries, pudding, and whipped cream until you reach the top. Finish with a fluffy dome of whipped cream. For a pretty touch, place extra sliced strawberries and fresh mint leaves on top. Chill your trifle in the fridge for at least 30 minutes before serving. This resting time lets all the flavors blend nicely. Feel free to check the Full Recipe for more details! To make your trifle shine, use a clear bowl. This lets guests see those lovely layers. For individual servings, clear glasses work well too. Place a mint leaf on top for a pop of color. You can drizzle some strawberry juice on the plate for a fun touch. Serve your trifle cold. It tastes best after chilling in the fridge for at least 30 minutes. This time lets the flavors mix and blend. Pair it with a scoop of vanilla ice cream for extra creaminess. It’s a perfect treat for parties or family dinners. Don’t skip the macerating step for the strawberries. This makes them sweet and juicy. Avoid using too much cream; it can overpower the dessert. Layer the ingredients gently to keep them from mixing too much. Lastly, don’t rush the chilling time. Letting it set makes it even better. For the full recipe, check out the Strawberry Shortcake Trifle Delight . {{image_4}} When you make strawberry shortcake trifle, you can have fun with it. There are many ways to change it up. Here are a few tasty ideas. Do you love chocolate? You can easily make a chocolate strawberry shortcake trifle. Just swap out the pound cake for chocolate cake. Use chocolate pudding instead of vanilla pudding. Layer it the same way, and you’ll have a rich dessert. The chocolate pairs well with the sweet strawberries. You can sprinkle chocolate shavings on top for extra flair. If you need a gluten-free treat, you can still enjoy this dessert. Use gluten-free pound cake or sponge cake. Check that your pudding mix is gluten-free, too. Layer it just like the original recipe. The flavors will still shine through. This way, everyone can enjoy the trifle without worries. Want a vegan version? You can make a vegan strawberry shortcake trifle easily. Use plant-based cream instead of heavy whipping cream. Opt for a vegan pound cake or a light sponge cake. For the pudding, choose a plant-based option, or make your own using coconut milk. Layer it all up, and you have a delicious dessert that suits your diet. It’s a great way to share a treat with friends who follow a vegan lifestyle. Feel free to explore these variations and make the trifle your own. For the full recipe, check out the ingredients and steps provided above. To store leftover trifle, cover it with plastic wrap. This keeps the flavors fresh. If you use individual glasses, place lids on them. Store in the fridge for up to three days. The layers may blend but will still taste great. If you want to keep it pretty, serve fresh layers next time. Freezing trifle is tricky. The whipped cream and pudding don’t freeze well. If you must freeze it, layer only the pound cake and strawberries. Seal in an airtight container. When ready to eat, let it thaw in the fridge overnight. After thawing, add fresh whipped cream and pudding for the best taste. For the best taste, use fresh strawberries and make the trifle close to serving time. Always chill it for at least 30 minutes. This helps the flavors mix well. If you have leftover whipped cream, store it in a separate container. Add it just before serving for a fresh look. Enjoy your delightful strawberry shortcake trifle! Yes, you can use frozen strawberries. Just remember to thaw them first. Drain excess liquid to avoid a soggy trifle. Frozen strawberries may not have the same fresh taste, but they work well in a pinch. The trifle lasts up to three days in the fridge. Store it in an airtight container to keep it fresh. The layers may start to blend slightly, but it remains tasty. Absolutely! You can prepare the trifle a day ahead. This helps the flavors meld nicely. Just keep it covered in the fridge until you’re ready to serve. For the best taste, add the whipped cream layer right before serving. Check out the Full Recipe for more tips! In this post, we explored making a delicious strawberry trifle. We covered fresh strawberries and other key ingredients, plus tasty substitutions. You learned step-by-step how to prepare, whip cream, and assemble the layers. We shared tips to make your trifle shine, serving ideas, and common mistakes to avoid. You discovered fun variations, storage tips, and answers to FAQs. Enjoy creating your perfect trifle and feel free to mix things up! Your dessert can be as unique as you are.

Strawberry Shortcake Trifle Simple and Tasty Treat

Ready to impress your friends and family with a dessert that’s both simple and delicious? The Strawberry Shortcake Trifle is

- 4 boneless, skinless chicken breasts - 2 cups cherry tomatoes, halved - 1 cup fresh mozzarella balls (bocconcini) - 1 cup fresh basil leaves, roughly chopped - 3 tablespoons balsamic glaze - 3 tablespoons olive oil - 3 cloves garlic, minced - Salt and freshly cracked black pepper, to taste - Optional: Extra fresh basil leaves for garnish Using fresh ingredients makes a big difference in flavor. Fresh basil has a sweet, bright taste. Look for firm cherry tomatoes. They should feel heavy for their size. Choose high-quality olive oil for cooking. A good oil adds depth and richness. Lastly, pick fresh mozzarella for a creamy texture. Store it in water for the best taste. You can swap out chicken breasts for thighs if you prefer darker meat. If you can't find cherry tomatoes, regular tomatoes will work. Just chop them into smaller pieces. For a lighter option, use part-skim mozzarella. You can even use a different cheese, like goat cheese or feta. If you don't have balsamic glaze, regular balsamic vinegar can work too; just reduce it for a thicker sauce. {{ingredient_image_2}} Start by heating 2 tablespoons of olive oil in a large skillet over medium heat. While the oil heats, season both sides of the chicken breasts with salt and black pepper. This step adds flavor right from the start. Once the oil shimmers, carefully place the seasoned chicken breasts in the skillet. Sear each side for 5-7 minutes until golden brown. Check the internal temperature; it should reach 165°F (75°C). Remove the chicken from the skillet and cover it with foil to keep it warm. In the same skillet, add 1 tablespoon of olive oil. Then, toss in the minced garlic. Sauté it for about 30 seconds, stirring constantly. This helps release its lovely aroma. After that, add the halved cherry tomatoes. Cook them for 3-4 minutes until they soften and release their juices. This creates a tasty sauce base. Lower the heat and place the cooked chicken back in the skillet. Scatter the fresh mozzarella balls over each chicken breast. Cover the skillet with a lid for 2-3 minutes. This step melts the cheese, making it gooey and delicious. Once the cheese is melty, take the skillet off the heat. Drizzle balsamic glaze over the chicken and tomatoes for a flavor boost. Sprinkle chopped fresh basil on top for color. Serve hot right from the skillet for a rustic and inviting look. To make juicy chicken, start with the right cut. Use boneless, skinless chicken breasts. They cook evenly and stay moist. Season the chicken well with salt and pepper. This step adds flavor. Sear the chicken in a hot skillet. This creates a nice crust. Avoid overcooking; aim for an internal temperature of 165°F. Let the chicken rest after cooking. Cover it loosely with foil to keep it warm and juicy. Cooking chicken well means using the right times and temps. Heat the skillet to medium heat before adding oil. Cook each side of the chicken for about 5-7 minutes. You should see a golden-brown color. Use a meat thermometer for accuracy. Pull the chicken out when it hits 165°F. This ensures it's safe to eat and still tender. You can add extra ingredients for more flavor. A splash of white wine can deepen the taste. Consider adding a pinch of red pepper flakes for some heat. Fresh herbs like oregano or thyme can bring a new level of taste. You can also try sun-dried tomatoes or olives for variety. These simple swaps make the dish your own. Experiment and find your favorite flavor combinations! Pro Tips Use Fresh Ingredients: For the best flavor, opt for fresh basil, ripe cherry tomatoes, and high-quality mozzarella. Fresh ingredients elevate the dish significantly. Let Chicken Rest: After cooking, allow the chicken to rest for a few minutes before slicing. This helps the juices redistribute, keeping the meat juicy and tender. Experiment with Cheese: Feel free to mix different types of cheese, such as provolone or goat cheese, for a unique flavor twist that complements the tomato and basil. Customize the Balsamic Glaze: If you prefer a sweeter touch, reduce balsamic vinegar on the stove until it thickens into a glaze, enhancing the flavor profile of the dish. {{image_4}} You can add a twist to your Caprese Chicken Skillet by using pesto. Just stir in 1/4 cup of pesto into the sautéed cherry tomatoes. This adds a rich, herby flavor to the dish. The bright taste of basil in the pesto enhances the freshness of the meal. You can even drizzle a little more pesto on top before serving for extra flavor. If you're watching your carbs, you can still enjoy this dish. Instead of chicken, use zucchini noodles or cauliflower rice as a base. Skip the balsamic glaze or use it sparingly since it contains sugar. You can also add more non-starchy vegetables, like spinach or bell peppers, to boost flavor without adding carbs. This keeps the dish light and fresh while maintaining its delicious taste. For a vegetarian version, swap chicken for portobello mushrooms or eggplant. These ingredients offer a hearty texture that will fill you up. Cook them the same way you would the chicken, ensuring they get nice and golden brown. Add the mozzarella and tomatoes as usual to keep that classic Caprese flavor. This way, you still enjoy the same great taste while keeping it plant-based. To store your leftover Caprese Chicken Skillet, let it cool first. Place the chicken and tomatoes in an airtight container. Make sure to cover it tightly to keep out air and moisture. You can store it in the fridge for up to three days. If you want to enjoy it later, freezing is a great option. When it’s time to reheat, take the leftovers out of the fridge. You can use a skillet or microwave. If using a skillet, heat it over medium-low heat. Add a splash of olive oil to keep it moist. If you use a microwave, cover the dish to keep the steam in. Heat in short bursts, checking often until warm. If you wish to freeze your Caprese Chicken Skillet, follow these steps. Cut the chicken into smaller pieces for easier thawing. Place it in a freezer-safe container. Make sure to label the container with the date. It can last up to three months in the freezer. When ready to eat, thaw it in the fridge overnight before reheating. You can serve Caprese Chicken Skillet with several sides to make a full meal. Here are some ideas: - Garlic Bread: It pairs well and is great for soaking up the sauce. - Steamed Vegetables: Broccoli or green beans add color and nutrition. - Quinoa or Rice: These grains complement the chicken and add texture. - Mixed Salad: A fresh salad brightens the plate and adds crunch. Yes, you can use dried herbs if fresh basil is not available. However, use less dried basil than fresh. A good rule is to use one-third the amount of dried herbs. For example, if the recipe calls for one cup of fresh basil, use only about one-third cup of dried basil. Dried herbs have a more concentrated flavor. This recipe is naturally gluten-free. The main ingredients, chicken, tomatoes, cheese, and basil, contain no gluten. Just ensure that any additional ingredients, like balsamic glaze, are gluten-free as well. Always check labels to be safe. Serve Caprese Chicken Skillet directly from the skillet for a rustic look. This makes it feel special and allows guests to help themselves. Garnish with extra fresh basil leaves and a drizzle of balsamic glaze. This adds color and flavor, making the dish even more inviting. In this article, I shared how to make a delicious Caprese Chicken Skillet. We covered the right ingredients, cooking steps, and helpful tips for great results. You can enhance flavor and even try variations to fit your needs. Remember to store leftovers properly for later enjoyment. Whether you prefer fresh basil or creative substitutions, this dish is versatile and satisfying. Have fun making your own version and enjoy every bite!

Caprese Chicken Skillet Flavorful and Easy Recipe

If you’re looking for a quick and delicious meal, you’ve found it! This Caprese Chicken Skillet recipe is packed with

- 1 sheet of puff pastry, thoroughly thawed - 2 cups fresh spinach, roughly chopped - 1 cup feta cheese, crumbly goodness - 1 medium onion, finely chopped - 2 cloves garlic, minced - 1 egg, beaten (for a glossy egg wash) - 2 tablespoons olive oil - Sea salt and freshly cracked pepper to taste - 1 teaspoon dried oregano These ingredients create a rich, flavorful filling that blends well together. The spinach adds a fresh taste, while the feta brings a lovely creaminess. Puff pastry gives that delightful crunch and flaky texture. - Sesame seeds (optional, for a delightful garnish) - Fresh herbs like parsley or dill for serving - Lemon wedges for a zesty touch Using these garnishes not only enhances the look of your dish but also adds extra flavor. You can sprinkle sesame seeds on top before baking for a nutty twist. - Large skillet for sautéing - Mixing bowl for combining ingredients - Rolling pin for pastry - Baking sheet lined with parchment paper - Pastry brush for the egg wash Having the right tools makes cooking easier and more fun. Each item plays a key role in making your savory spinach and feta puff pastry a success. Use the full recipe for step-by-step guidance through the cooking process. To start, heat olive oil in a large skillet on medium heat. Add finely chopped onion. Sauté the onion until soft, about 3-4 minutes. Then, add minced garlic and cook for another minute. You will notice a lovely smell. Next, add the chopped spinach to the skillet. Cook it until it's wilted, which takes about 2-3 minutes. Season with sea salt, pepper, and dried oregano. After that, remove the skillet from heat and let it cool a bit. In a mixing bowl, combine the spinach mixture with crumbled feta cheese. Stir well to make a delicious filling. Now, let's work on the puff pastry. Roll out the thawed sheet on a lightly floured surface. Aim for a large rectangle, about 1/8 inch thick. Cut it into squares or rectangles, each about 4x4 inches. Place a generous spoonful of the filling in the center of each square. Make sure not to overfill! Next, fold the corners over the filling to make triangles or rectangles. Press the edges firmly to seal them. This step is key to keeping all that tasty filling inside. Preheat your oven to 400°F (200°C). Arrange the filled pastries on a baking sheet lined with parchment paper. This prevents sticking. Brush the tops with the beaten egg for a nice glaze. If you want, sprinkle sesame seeds on top for extra flavor. Bake the pastries for 20-25 minutes. They should look puffy and golden brown, making your kitchen smell amazing. Once baked, let them cool slightly before serving. These pastries are perfect warm and look great on a platter. Enjoy the delight of savory spinach and feta puff pastry! For the full recipe, check out the detailed steps above. To achieve a crisp puff pastry, keep a few things in mind. First, make sure your oven is hot. Preheating it to 400°F (200°C) helps the pastry rise quickly and become flaky. Next, avoid overworking the dough. When rolling it out, use gentle pressure. Lastly, brush the tops with an egg wash before baking. This gives them a golden, shiny finish. You can enhance the flavor of your filling with some easy tips. Try adding fresh herbs like dill or parsley for a bright taste. A pinch of nutmeg gives a warm flavor to the spinach. For a kick, consider a dash of red pepper flakes. Don’t forget to taste the mixture before sealing the pastries. Adjust the salt and pepper to your liking for the best results. Watch out for common pitfalls when making these pastries. One mistake is overfilling them. It can lead to messy pastries that burst open. Also, don’t skip the cooling step for your filling. If it’s too warm, it can make the dough soggy. Lastly, always use parchment paper on your baking sheet. This prevents sticking and makes cleanup easier. For the complete recipe, check out the Full Recipe. {{image_4}} You can make this dish even more vibrant by adding different veggies. Try chopped bell peppers, mushrooms, or artichokes. These add flavor and color. You can also use fresh herbs like basil or dill for extra brightness. Get creative and mix in your favorites! If you want more protein, add cooked chicken or sausage. Dice the meat into small pieces and mix it with the spinach and feta. This makes each bite heartier. Use grilled chicken for a smoky flavor or spicy sausage for a kick. Both options work well! Feta cheese is delicious, but other cheeses can shine too. Try ricotta for a creamier filling or mozzarella for a gooey texture. You can also mix cheeses for added depth. Just remember to adjust the seasoning based on the cheese you choose. Each option brings a new taste to this classic recipe. For the full recipe, refer to the beginning of this article. Once your savory spinach and feta puff pastry cools, store it in the fridge. Place each pastry in an airtight container. This keeps them fresh for up to three days. If you want to enjoy them later, make sure they are completely cool before sealing. You can freeze these pastries too! Allow them to cool completely. Then, wrap each pastry tightly in plastic wrap. After that, place them in a freezer-safe bag. They will last for about one month. When you're ready to eat, just take out the desired amount. Reheating is easy! Preheat your oven to 350°F (175°C). Place the pastries on a baking sheet. Bake for about 10-15 minutes, or until hot. This method keeps them crispy. You can also microwave them, but they may become soft. For the best taste, I recommend using the oven. For the full recipe, check out my cooking guide. You can serve these pastries with a fresh salad. A simple green salad works great. Try adding cherry tomatoes, cucumbers, and a light vinaigrette. You might also enjoy them with a side of tzatziki sauce. This cool and creamy dip pairs well with the savory filling. For a heartier meal, serve them alongside a bowl of warm soup, like tomato basil or lentil soup. These pairings create a balanced and satisfying meal. Baking these puff pastries usually takes 20 to 25 minutes. Preheat your oven to 400°F (200°C) for the best results. Keep an eye on them as they bake. You want them to be golden brown and puffy. The time may vary slightly based on your oven. Baking them perfectly ensures a crispy outside and a warm, delicious filling. Yes, you can use frozen spinach! Just make sure to thaw and drain it well. Remove as much moisture as possible. Wet spinach can make the filling soggy. The flavor will still be great, and it saves time in the kitchen. Frozen spinach is a convenient option if fresh is not available. Just remember to chop it into smaller pieces before mixing it with the feta. This ensures even distribution in your filling. This blog post covers the key ingredients for Savory Spinach and Feta Puff Pastry, from essentials to optional garnishes. I outlined step-by-step instructions to make the dish, shared tips for keeping the pastry crispy, and discussed common mistakes. We explored variations like vegetarian options and different cheese choices. Finally, I provided storage tips and answered common questions. Enjoy bringing this tasty dish to your table. It’s simple, versatile, and sure to please!

Savory Spinach and Feta Puff Pastry Delight Recipe

Ready to impress your friends at the next gathering? My Savory Spinach and Feta Puff Pastry Delight is the perfect

Here’s what you need for the Dairy-Free Chocolate Avocado Mousse: - 2 ripe avocados, pitted and peeled - 1/2 cup unsweetened cocoa powder - 1/4 cup maple syrup (or agave syrup) - 1/4 cup almond milk (or other dairy-free milk) - 1 teaspoon vanilla extract - A pinch of sea salt - Optional: 1/4 cup coconut cream - Optional toppings: fresh berries, shredded coconut, sea salt Each ingredient plays a key role. The avocados give a creamy base. Cocoa powder adds rich chocolate flavor. Maple syrup or agave sweetens it naturally. Almond milk keeps it light and dairy-free. Vanilla extract boosts the overall taste. A pinch of sea salt enhances all the flavors perfectly. If you want a creamier texture, coconut cream blends in smoothly. For toppings, fresh berries add a pop of color and flavor. Shredded coconut brings a nice crunch, while sea salt gives that extra zing. Don’t skip the chill time! It makes the mousse set nicely and melds the flavors. For the full recipe, be sure to check out the complete guide. To start, you need ripe avocados. Ripe avocados are soft to the touch. Cut them in half, and remove the pit. I recommend using a sharp knife for safety. Scoop the green flesh into a food processor. Blend until it is smooth. This is key to a creamy mousse. Next, add the unsweetened cocoa powder and a pinch of sea salt. Pulse the mixture. This helps blend the dry ingredients with the avocados. Make sure you get a uniform smoothness. Stop and scrape down the sides if needed. Now, pour in your maple syrup, almond milk, and vanilla extract. For a richer taste, add coconut cream. Blend for about 30 seconds. This creates a luscious texture. Pause to taste the mousse. If it needs more sweetness, add more maple syrup. Blend again until it is perfectly combined. Transfer the mousse into small bowls. Cover them and place in the fridge. Chilling for at least 30 minutes is important. This helps the mousse firm up. It also allows the flavors to blend well. When ready to serve, take the mousse out of the fridge. Decorate each bowl with fresh berries or shredded coconut. A light sprinkle of sea salt adds a great touch. Serve it in clear cups to show off the rich color. You can even add a mint leaf for a fresh look. For the full recipe, check out the detailed instructions above. Enjoy your smooth delight! To make the best mousse, start with ripe avocados. Ripe avocados are creamy and smooth, giving the mousse a buttery texture. You can tell if an avocado is ripe by gently pressing on its skin. If it gives slightly, it is ready to use. Avoid hard avocados, as they will make the mousse chunky. Sweetness is key for balancing flavors. I suggest starting with the recipe's maple syrup. Blend it in, then taste. If you want it sweeter, add more syrup a little at a time. This way, you can control the sweetness to fit your taste. Remember, chocolate can be intense, so don’t overdo it. Feel free to get creative! You can add optional ingredients to change the flavor. Consider a pinch of cinnamon for warmth or a dash of cayenne for heat. Nut butters like almond or peanut can add richness, too. Each addition brings a new twist to the classic mousse. {{image_4}} You can make this mousse even better! Try adding spices like cinnamon for warmth. A dash of cayenne pepper can add a fun kick. If you love nutty flavors, mix in your favorite nut butter. Almond butter or cashew butter works great. Both add creaminess and depth. If you need nut-free options, use oat milk instead of almond milk. You can also try sunflower seed butter instead of nut butter. For those who want less sugar, use a sugar-free sweetener. Stevia or erythritol can work well here, keeping the mousse sweet with fewer calories. You can easily adjust the recipe for more or fewer servings. If you need to serve six, just multiply the ingredients by 1.5. For a smaller treat, halve the amounts. This way, you can enjoy this delicious mousse anytime. Check the full recipe for exact measurements. To keep your mousse fresh, use airtight containers. This helps lock in moisture and flavor. A well-sealed container prevents air from spoiling the mousse. Glass or plastic containers both work well. Just make sure they close tightly. The mousse lasts about five days in the fridge. Keep it covered to prevent it from absorbing other odors. Check for signs of spoilage. If it smells off or changes color, it's best to toss it. Fresh mousse should have a rich, chocolatey aroma. You can freeze the mousse for later. Portion it into small containers or ice cube trays. Make sure to leave room for expansion as it freezes. When you're ready to enjoy it, thaw it in the fridge overnight. Stir well before serving to restore its creamy texture. This way, you can savor a delightful chocolate treat anytime! For the full recipe, check out the details above. No, you cannot taste the avocado. The chocolate hides the flavor well. The rich cocoa makes the mousse taste like a dessert, not avocado. You’ll enjoy a smooth, creamy treat without any green taste. Yes, this recipe is vegan-friendly. It uses avocados and dairy-free milk. There are no animal products, so it fits perfectly in a vegan diet. Enjoy the mousse without worry! To check if your avocado is ripe, gently squeeze it. A ripe avocado should feel slightly soft but not mushy. You can also remove the small stem. If it’s green underneath, it’s ripe. If it’s brown, it’s overripe. You can use many toppings for the mousse. Fresh berries like raspberries or strawberries add a nice touch. Shredded coconut adds texture. A sprinkle of sea salt enhances the chocolate flavor. Get creative with your favorite toppings! Yes, you can use another sweetener. Agave syrup is a great choice for lower glycemic options. You can also use dates or coconut sugar. Just adjust the amount to match your taste. This blog post covered making a rich chocolate mousse with ripe avocados. We discussed key ingredients, step-by-step instructions, and important tips for a great texture. Exploring flavor variations and storage methods gives you options to enjoy this treat longer. You now have the tools to create a delicious dessert that is healthy and simple. Remember, every ingredient matters. Experiment and find what you love! Enjoy your cooking journey and share your tasty results.

Dairy-Free Chocolate Avocado Mousse Smooth Delight

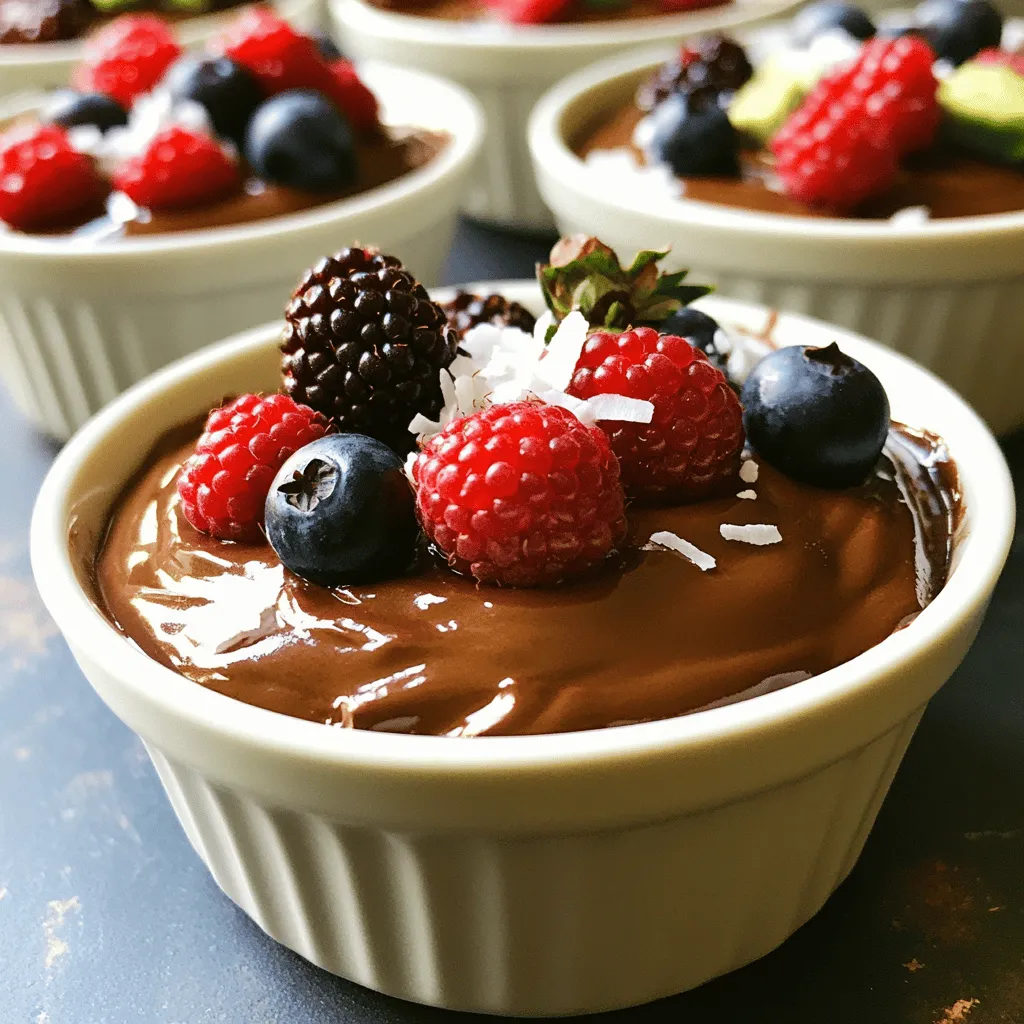
Craving something sweet yet healthy? You’re in for a treat with my Dairy-Free Chocolate Avocado Mousse! This smooth delight is

- 12 oz pasta (fettuccine or penne) - 16 oz sliced mushrooms (cremini or button) - 1 small onion and 3 cloves garlic To start, the pasta is the heart of this dish. I like using fettuccine or penne. Both types hold the sauce well. Next, mushrooms add a rich flavor. You can choose cremini or button mushrooms. They both work great! The onion and garlic bring a nice aroma, making your kitchen smell amazing. - 2 cups vegetable or chicken broth - 1 cup heavy cream (or coconut cream for dairy-free) The broth is key to a tasty sauce. You can use vegetable or chicken broth. The choice is yours! The heavy cream makes it creamy and smooth. If you need a dairy-free option, coconut cream is perfect too. It adds a slight sweetness. - Dried thyme, oregano, salt, and black pepper - ½ cup grated Parmesan cheese (optional) and fresh parsley for garnish Seasonings bring the dish to life! Dried thyme and oregano add earthy notes. Salt and pepper boost all the flavors. If you love cheese, add Parmesan for a savory touch. Finally, sprinkle fresh parsley on top for color and freshness. It makes the dish look and taste even better. You can find the full recipe in the earlier sections to guide you through this delicious journey! Start by heating two tablespoons of extra virgin olive oil in a large pot. Use medium heat for the best results. Add one small, finely diced onion. Sauté it for about three to four minutes. You want it soft and clear. This step builds great flavor. Next, add three minced cloves of garlic. Stir it in for about thirty seconds. Then, toss in sixteen ounces of thinly sliced mushrooms. I prefer cremini or button mushrooms for their taste. Cook them for five to seven minutes. Stir occasionally, so they cook evenly. The mushrooms will soften and release their tasty juices. Now, it’s time to add the pasta. Use twelve ounces of fettuccine or penne for the best texture. Pour in two cups of vegetable broth. You can swap it for chicken broth if you want a richer flavor. Then, add one cup of heavy cream. If you need a dairy-free option, coconut cream works well here. Sprinkle in one teaspoon of dried thyme and one teaspoon of dried oregano. Don't forget salt and black pepper to taste. Stir everything well. Make sure the pasta is completely covered in liquid. Increase the heat slightly and bring it to a gentle boil. Once it’s boiling, reduce the heat to low. Cover the pot and let it simmer for about twelve to fifteen minutes. Stir occasionally to prevent sticking. The pasta should be cooked al dente, and the sauce will become creamy. After cooking, it’s time for the final touches. Stir in half a cup of freshly grated Parmesan cheese if you like. This adds a rich flavor to the dish. Taste it and adjust the seasoning with more salt and pepper if needed. Once everything is mixed well, remove the pot from heat. Let it sit for a couple of minutes. This helps the sauce thicken even more. Before serving, garnish with fresh parsley for a pop of color. Enjoy your creamy mushroom pasta! For the full recipe, check out the complete instructions. To get that creamy texture, you may need to adjust your liquid amounts. If you want it creamier, add a bit more broth or cream. Stir the mixture often to keep everything from sticking. This helps the pasta soak up all those tasty flavors while cooking. Adding herbs and spices can really boost the taste. Try some fresh basil or a dash of nutmeg for a twist. When picking mushrooms, go for cremini or shiitake. They add a rich, earthy flavor that makes your dish shine. Always make sure the mushrooms are fresh. Check for firmness and avoid any dark spots. For a cozy vibe, serve directly from the pot. If you're feeling fancy, plate individual servings to impress your guests. Top each plate with extra cheese and a sprinkle of parsley for a pop of color. A drizzle of olive oil can add shine and extra flavor. Enjoy this creamy mushroom pasta in style! {{image_4}} You can make this dish healthier by swapping regular pasta for whole grain or gluten-free options. Whole grain pasta adds fiber, which is great for digestion. Gluten-free pasta is perfect for those with gluten sensitivities. For the cream, consider using coconut cream instead of heavy cream. Coconut cream keeps the dish rich and creamy while being dairy-free. You can also use low-fat dairy options if you prefer. These substitutes can help reduce calories while still giving you that creamy texture. Want to boost the protein in your meal? You can add cooked chicken, shrimp, or even chickpeas for a hearty touch. Chicken adds a nice flavor and texture, while shrimp cooks quickly and brings a seafood twist. Chickpeas are a great choice for a plant-based option. For vegetarians, try adding lentils or tofu. They absorb the flavors of the dish, making every bite delicious and filling. The type of mushrooms you choose can change the flavor of your dish. Cremini mushrooms offer a deep, earthy taste. On the other hand, button mushrooms are mild and classic. You might even try shiitake or portobello for a different flair! If you like a kick, add red pepper flakes to spice things up. Just a little can make a big difference in flavor. You can also experiment with fresh herbs like basil or rosemary for added freshness. For the full recipe, check out the detailed instructions above! To keep your One-Pot Creamy Mushroom Pasta fresh, follow these tips: - Refrigerate promptly. Allow the pasta to cool down for no more than two hours after cooking. - Use airtight containers. Glass or plastic containers with tight lids work best. This helps prevent moisture loss and keeps flavors intact. Reheating pasta can be tricky, but I have great methods for you: - Stovetop method: Place your pasta in a pan. Add a splash of broth or cream to keep it creamy. Heat on low, stirring gently until warmed through. - Microwave method: Put the pasta in a microwave-safe bowl. Add a bit of water or cream. Cover with a damp paper towel and heat in short bursts, stirring in between. Yes, you can freeze One-Pot Creamy Mushroom Pasta! Here’s how: - Cool completely before freezing. This prevents ice crystals from forming. - Use freezer-safe containers or bags. Remove as much air as possible to avoid freezer burn. - Thawing and reheating: To thaw, place the pasta in the fridge overnight. Reheat using the stovetop method for the best texture. Add a splash of cream to refresh the flavors. For the full recipe, check out the Full Recipe section above. Enjoy your creamy pasta delights! Yes, you can prepare this dish ahead of time. Cook the pasta and sauce, then let it cool. Store it in an airtight container in the fridge for up to three days. When you are ready to eat, reheat it on the stove over low heat. Add a splash of broth or cream to bring back the creamy texture. Stir well to heat it evenly. Both fettuccine and penne work great for this recipe. Fettuccine gives you a nice, flat surface to hold the creamy sauce. Penne has a fun shape and holds the sauce inside. You can also use spaghetti or farfalle. Choose the type you like best! Yes, you can use dried mushrooms if you prefer. To use them, rehydrate them first. Soak the dried mushrooms in warm water for about 20-30 minutes. Once soft, slice them and add them to your dish. This gives a deep, rich flavor to the pasta. Just remember to use the soaking liquid as part of your broth for added taste. This blog post explained how to make a delicious One-Pot Creamy Mushroom Pasta. You learned about the main ingredients, steps to follow, useful tips, and variations. You can adjust textures and flavors to suit your taste. Enjoy playing with ingredients and garnishes for a tasty meal. Whether you're cooking for yourself or sharing with friends, this dish is sure to impress. Try it out and discover your favorite version!

One-Pot Creamy Mushroom Pasta Easy Dinner Delight

Looking for a quick and easy dinner that impresses? Try my One-Pot Creamy Mushroom Pasta! This dish combines tender pasta,

- 3 medium zucchinis, spiralized - 1 cup fresh basil leaves - 1/4 cup pine nuts, toasted - 1/4 cup freshly grated Parmesan cheese - 2 garlic cloves, peeled - 1/4 cup extra-virgin olive oil - Sea salt and freshly ground black pepper to taste - 1 cup cherry tomatoes, halved (for garnish) - Optional: A pinch of red pepper flakes Zucchini noodles are a great alternative to traditional pasta. You get a fresh taste and a light feel. For this dish, you need three medium zucchinis. Spiralize them to make long, noodle-like strands. This gives your plate a fun and colorful look. Next, fresh basil is essential for a tasty pesto. Use one cup of bright green leaves. They add a vibrant flavor. Pine nuts give the pesto a nice crunch and nutty taste. Toast a quarter cup to bring out their best flavor. You will also need Parmesan cheese. A quarter cup of freshly grated cheese adds richness. Garlic is key too. Two peeled cloves will infuse the pesto with a bold taste. Extra-virgin olive oil ties everything together. You will want a quarter cup of this, too. Don’t forget to season with sea salt and black pepper to taste. They enhance every flavor. Cherry tomatoes make a lovely garnish. Halve one cup to add color and freshness to your dish. For a little kick, add a pinch of red pepper flakes if you like spice. With these ingredients, you can make a delicious zucchini noodles with pesto dish. Check out the Full Recipe for more details. To make zucchini noodles, start with a spiralizer. Cut the ends off each zucchini. Secure the zucchini in the spiralizer and twist to create long, noodle-like strands. It’s easy and fun! Once you finish, place the spiralized noodles in a large mixing bowl. Set them aside while you make the pesto. Next, let’s whip up the pesto. Grab a food processor and add a cup of fresh basil leaves, a quarter cup of toasted pine nuts, a quarter cup of grated Parmesan cheese, and two peeled garlic cloves. Sprinkle in a little sea salt and freshly ground black pepper. Pulse the mixture until it's finely chopped. You want a grainy texture, not too smooth. Now, we need to make the pesto creamy. With the food processor running on a low setting, slowly drizzle in a quarter cup of extra-virgin olive oil. Keep blending until it’s smooth and creamy. Taste your pesto and adjust the seasoning if needed. You might want to add more salt or pepper for extra flavor. Heat a large skillet over medium heat. Add the spiralized zucchini noodles to the pan. Sauté them gently for about 2 to 3 minutes. You want them tender but still crunchy. Avoid overcooking to keep that fresh texture. Now it’s time to bring it all together! Remove the skillet from the heat and pour the fresh pesto over the zucchini noodles. Toss gently, ensuring each noodle is coated with the vibrant sauce. For a beautiful presentation, transfer the zoodles to individual plates. Top with halved cherry tomatoes for color and freshness. If you like a little spice, drizzle with extra olive oil and sprinkle some red pepper flakes. Enjoy your lively zucchini noodle pesto delight! For the full recipe, refer to the recipe section above. To make great zucchini noodles, use a spiralizer. This tool turns your zucchini into fun noodle shapes. Place the zucchini in the spiralizer and twist until you get long strands. To avoid a mess, do it over a large bowl. This catches any stray bits. After spiralizing, it is key to keep the texture. To do this, do not soak the noodles in salt. Instead, just toss them gently in a bowl. This keeps them firm and ready for cooking. Fresh ingredients make the best pesto. Use bright basil leaves, ripe garlic, and good olive oil. These items add a rich taste to your dish. Try different nuts in your pesto too. While pine nuts are classic, walnuts or cashews can work well. Each nut gives a unique flavor. For sautéing zoodles, a non-stick skillet is best. It helps the noodles cook evenly without sticking. Heat the skillet on medium. This way, your zoodles will cook just right. Be careful not to overcook your zoodles. They only need 2-3 minutes of cooking. This keeps them crunchy and full of nutrients. Overcooked zoodles can turn mushy and lose their bright color. When ready, follow the Full Recipe for the perfect finish! {{image_4}} Zucchini noodles are naturally gluten-free. You can easily make this dish without any gluten. If you want extra texture, try adding gluten-free grains. Quinoa or brown rice work well for this dish. You can also use gluten-free pasta if you prefer. To make this recipe vegan, just swap out the Parmesan cheese. Nutritional yeast gives a cheesy flavor without dairy. You can also blend in some avocado for creaminess. If you want to make a nut-free pesto, use sunflower seeds instead of pine nuts. This keeps it light and fresh. You can add protein to your dish for a well-rounded meal. Chicken, shrimp, or tofu are great options. Grilled chicken adds a nice flavor. Sauté shrimp with garlic for a quick boost. If you prefer plant-based protein, use firm tofu. Just make sure to keep the balance. Add protein without overpowering the fresh taste of the zucchini and pesto. For the full recipe, check out the detailed steps above. To keep your zucchini noodles fresh, store leftovers in an airtight container. Make sure to place a paper towel inside to absorb extra moisture. This helps keep the zoodles from getting soggy. You can keep them in the fridge for up to three days. After that, they might lose their nice crunch. If you want to freeze your zoodles, it’s best to blanch them first. Boil the zoodles for about one minute, then place them in ice water to stop cooking. Drain and dry them well. Then, fill a freezer-safe bag with the zoodles. Press out as much air as possible before sealing. They can stay frozen for up to three months. When you’re ready to use them, thaw in the fridge overnight or use the microwave for quick thawing. Sauté them briefly to heat through, but don’t overcook! To store leftover pesto, pour it into a jar and drizzle a thin layer of olive oil on top. This helps keep it fresh and prevents it from browning. Seal the jar tightly and keep it in the fridge for up to a week. For longer storage, you can freeze pesto in ice cube trays. Once frozen, transfer the cubes to a freezer-safe bag. They can last for several months. When ready to use, just thaw the cubes in the fridge or mix them directly into a warm dish. Yes, you can use regular pasta. However, the texture will change. Zucchini noodles are lighter and have a fresh taste. Regular pasta is denser and has a more chewy feel. If you want a low-carb option, zucchini noodles are perfect. For a heartier meal, stick with pasta. Zucchini noodles last for about 3 to 5 days in the fridge. Store them in an airtight container. They can lose their crunch over time, so eat them fresh. If you notice any signs of wilting, it’s best to toss them out. If you don’t have pine nuts, you can use almonds, walnuts, or sunflower seeds. Each nut gives a different flavor. Almonds add a nice crunch, while walnuts bring earthiness. Sunflower seeds are great if you need a nut-free option. Yes, this recipe is great for meal prep. You can spiralize the zucchini and make the pesto ahead of time. Store them separately for best results. When you're ready to eat, just sauté the zucchini and mix in the pesto. This makes for a quick and tasty meal later. Absolutely, you can make the pesto in advance. Store it in a jar with a layer of olive oil on top to keep it fresh. It lasts about a week in the fridge. If you freeze it, it can last for months. Just thaw before using. To add some heat, you can sprinkle red pepper flakes on top. You can also add sliced jalapeños or a dash of hot sauce in the pesto. Adjust the heat to your taste. Enjoy the kick it brings to your dish! For the full recipe, check out the details above! This blog post walks you through making tasty zucchini noodles with fresh pesto. You learned how to prepare zoodles and create a rich, flavorful sauce. I shared tips for perfecting your dish, plus variations for gluten-free and vegan options. Remember, fresh ingredients make a difference in flavor. Store leftovers properly to keep them fresh. With a little practice, you can master this healthy meal that everyone will enjoy. Enjoy making this dish your own!

Zucchini Noodles with Pesto Simple and Tasty Dish

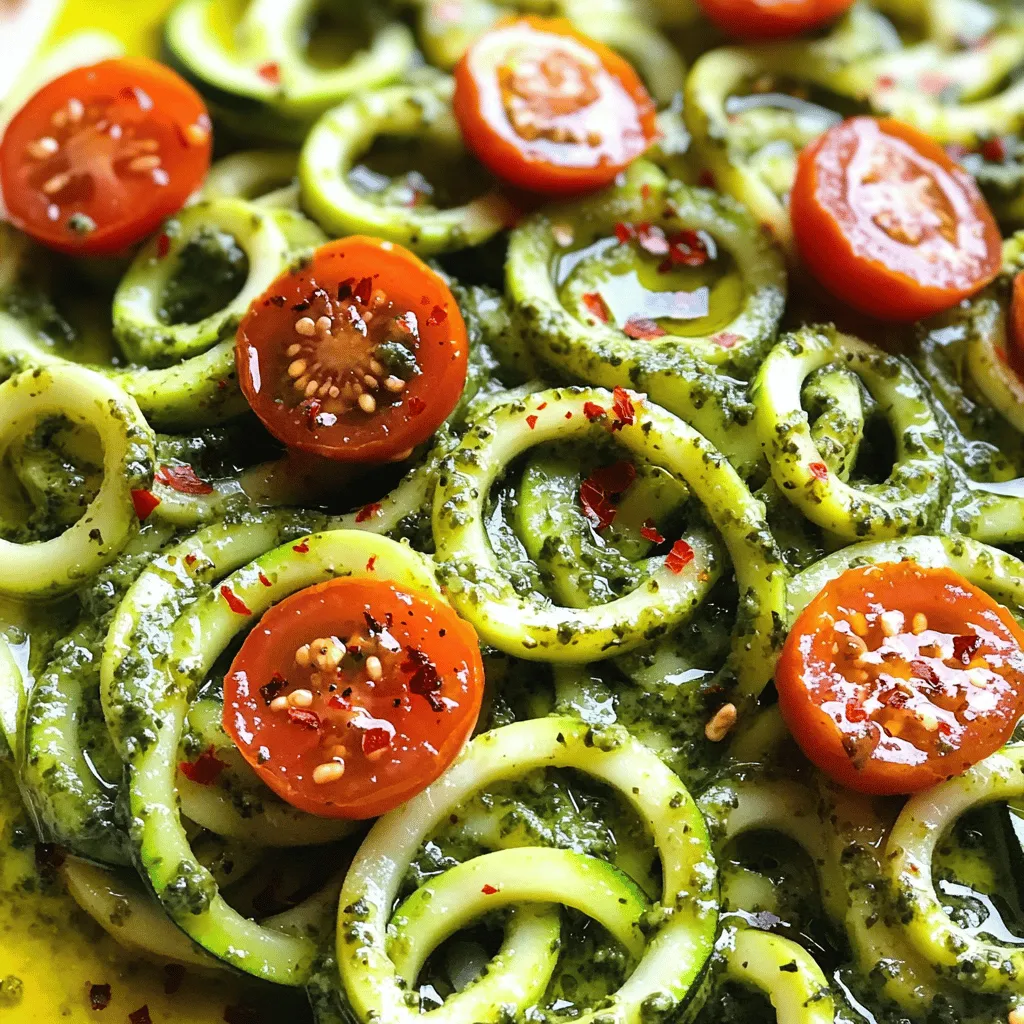
Looking for a dish that’s simple and bursting with flavor? Let me introduce you to zucchini noodles with pesto! This

Older posts
Newer posts
← Previous Page1 … Page67 Page68 Page69 … Page88 Next →

dsad

© 2025 spoonfulsavory • Built with GeneratePress

Our Policies

  • Copyright Policy
  • Cookie Policy
  • GDPR Policy
  • Privacy Policy
  • Disclaimer
  • Terms Of Use

More Information

  • Home
  • About
  • Contact
  • Appetizers
  • Dessert
  • Dinner
  • Drinks
©2025, spoonfulsavory About Back To Top