Skip to content
DisclaimerTerms Of UseGDPR PolicyCookie Policy

spoonfulsavory

  • Home
  • Drinks
  • Appetizers
  • Dinner
  • Dessert
  • About
  • Contact
  • Privacy Policy
DisclaimerTerms Of UseGDPR PolicyCookie Policy

Sarah

To make Peanut Butter Chocolate Chip Blondies, gather these key ingredients: - 1 cup creamy peanut butter - 1 cup packed brown sugar - 1/2 cup granulated sugar - 2 large eggs - 1 teaspoon vanilla extract - 1 cup all-purpose flour - 1/2 teaspoon baking powder - 1/4 teaspoon salt - 1 cup semi-sweet chocolate chips For fun twists, consider these optional ingredients: - 1/2 cup chopped peanuts (for added crunch) - A pinch of cinnamon (to enhance flavor) - 1/2 cup white chocolate chips (for a different taste) Here’s a quick guide for those using different units: - 1 cup = 240 ml - 1 teaspoon = 5 ml - 1/2 cup = 120 ml - 1/4 teaspoon = 1.25 ml - 1 cup of flour = 125 grams - 1 cup of sugar = 200 grams This recipe is simple and fun, making it easy to whip up a batch. Check out the Full Recipe for detailed steps and tips. First, you need to preheat your oven to 350°F (175°C). This step helps the blondies bake evenly. Next, take a 9x9 inch baking pan. Grease it well or line it with parchment paper. Using parchment makes it easy to lift the blondies out later. In a large mixing bowl, add 1 cup of creamy peanut butter. Then, mix in 1 cup of packed brown sugar and 1/2 cup of granulated sugar. Use a spatula or an electric mixer to blend these ingredients. You want a smooth and creamy mix. Next, add 2 large eggs, one at a time. Blend well after each addition. Finally, stir in 1 teaspoon of vanilla extract until mixed. In a separate bowl, whisk together 1 cup of all-purpose flour, 1/2 teaspoon of baking powder, and 1/4 teaspoon of salt. This ensures the dry ingredients mix evenly. Then, add this dry mixture to the peanut butter blend. Fold it in gently until just combined. Be careful not to overmix. Lastly, fold in 1 cup of semi-sweet chocolate chips and, if you like, 1/2 cup of chopped peanuts for crunch. Now you're ready to pour the batter into your prepared pan! For the full recipe, check out the detailed instructions provided. To get the best texture in your blondies, mix well but don’t overdo it. Blend your peanut butter and sugars until smooth. When adding flour, fold it in gently. This keeps your blondies soft and chewy. Bake until the edges turn golden brown. A toothpick should come out with a few moist crumbs. This means they are done but still moist inside. One common mistake is overmixing the batter. This can make the blondies tough. Always fold gently when adding flour and chocolate chips. Another mistake is not greasing the pan well. If you want easy removal, use parchment paper. Make sure to keep an eye on the baking time. Every oven is different, so check early to avoid overbaking. For a fun presentation, cut your blondies into neat squares. Serve them on a colorful plate to catch the eye. You can dust them with powdered sugar for a sweet touch. Drizzling melted chocolate on top adds flair and flavor. If you like crunch, sprinkle chopped peanuts over the top. These small details make your blondies look fancy and inviting. For the full recipe, check back at the start! {{image_4}} You can switch peanut butter for other nut butters. Almond butter gives a nice twist. Cashew butter adds a rich, creamy taste. Sunflower seed butter works well for nut-free options. Each nut butter changes the flavor and texture of your blondies. Feel free to get creative with add-ins. You can use butterscotch chips for a sweeter touch. Chopped chocolate or white chocolate chips create a different look and taste. Try adding dried fruits like cranberries or apricots for a fruity kick. Coconut flakes can also add a fun texture. If you're looking for gluten-free options, use almond flour instead of all-purpose flour. For a vegan version, substitute eggs with flaxseed meal or applesauce. Make sure to choose dairy-free chocolate chips if you're avoiding dairy. These tweaks help you enjoy blondies while meeting dietary needs. To keep your peanut butter chocolate chip blondies fresh, store them in an airtight container. Place parchment paper between layers to prevent sticking. Keep them at room temperature for up to three days. If you want to keep them longer, the fridge is a good option. Just remember, blondies can dry out in the fridge, so cover them well. Freezing blondies is easy and great for meal prep. Allow them to cool completely before freezing. Wrap each blondie in plastic wrap or foil. Then, place them in a freezer-safe bag or container. This way, you can enjoy a sweet treat any time. They can last up to three months in the freezer. When stored properly, blondies last about three days at room temperature. If refrigerated, they can stay fresh for a week. If you freeze them, they keep well for three months. Always check for any changes in texture or smell before eating. Enjoy your treats knowing they will stay fresh for a while! Yes, you can use crunchy peanut butter! It adds a fun texture and taste. The bits of peanuts will give your blondies a nice crunch. Just remember that it may change the smoothness a bit, but they will still be delicious. If you need a substitute, try using mashed banana or applesauce. Use 1/4 cup of either for each egg. This will keep your blondies moist and sweet. You can also use flaxseed meal mixed with water. Mix 1 tablespoon of flaxseed meal with 2.5 tablespoons of water and let it sit for a few minutes until it thickens. Check the edges of the blondies. They should look golden brown. Insert a toothpick into the center. If it comes out mostly clean with a few crumbs, they are done. If it’s wet, give them a few more minutes in the oven. Blondies are sweeter and chewier than brownies. They use brown sugar and no cocoa powder, giving them a rich, buttery flavor. Brownies, on the other hand, are chocolatey and often denser. Both are great treats, but they have distinct tastes and textures. We’ve covered all the key steps to make great blondies. Remember your ingredients, oven prep, and mixing method for the best results. Use our tips to avoid mistakes and improve presentation. Don't forget the fun variations to personalize your treats. Lastly, follow the storage advice to enjoy them later. With these insights, you can bake delicious blondies with confidence. Now, it’s time for you to get started and impress your family and friends!

Peanut Butter Chocolate Chip Blondies Irresistible Treat

Get ready to indulge in my Peanut Butter Chocolate Chip Blondies! These treats combine creamy peanut butter with sweet chocolate

To make the delicious eggnog cake, gather these ingredients: - 2 cups all-purpose flour - 1 ½ teaspoons baking powder - ½ teaspoon baking soda - ½ teaspoon salt - 1 teaspoon ground nutmeg - 1 teaspoon ground cinnamon - 1 cup unsalted butter, softened - 1 cup granulated sugar - 1 cup packed brown sugar - 4 large eggs, at room temperature - 1 ½ cups eggnog, preferably homemade or store-bought - 1 teaspoon vanilla extract - ½ teaspoon almond extract - 1 cup chopped walnuts (optional) If you want to switch up the eggnog, here are some great options: - Use milk or cream mixed with a bit of nutmeg and cinnamon. - Try coconut milk for a dairy-free option. - Almond milk with spices can also work well. These alternatives still keep that festive feel. To bake this cake, you will need a few tools: - Mixing bowls (large and medium) - Electric mixer for creaming - Measuring cups and spoons - Spatula for mixing and spreading - 9x13 inch baking pan, greased or lined - Toothpick for checking doneness These tools make the process smooth and easy, allowing you to focus on the fun part—baking! For the full recipe, refer to the earlier sections. Start by preheating your oven to 350°F (175°C). This temperature is perfect for our eggnog cake. A hot oven helps the cake rise and bake evenly. Next, prepare your 9x13 inch baking pan. Lightly grease it with butter. Dust it with flour to help the cake release easily. If you prefer, use parchment paper instead. This makes cleanup a breeze. In a medium bowl, whisk together the dry ingredients. Combine 2 cups of flour, 1 ½ teaspoons of baking powder, ½ teaspoon of baking soda, and ½ teaspoon of salt. Add 1 teaspoon of ground nutmeg and 1 teaspoon of ground cinnamon. This mix adds warmth and spice to your cake. Set this bowl aside for later. In a larger bowl, cream together 1 cup of softened butter, 1 cup of granulated sugar, and 1 cup of brown sugar. Use an electric mixer for about 3-4 minutes. The mixture should become light and fluffy. This step adds air to your batter, making it nice and soft. Now, add 4 large eggs. Do this one at a time. Mix well after each egg to keep everything smooth. Then, pour in 1 ½ cups of eggnog, along with 1 teaspoon of vanilla extract and ½ teaspoon of almond extract. This brings rich flavors that make the cake special. Gradually mix the dry ingredients into the wet mix. Alternate adding the flour mix and the eggnog. Start with some flour, add half the eggnog, then more flour, and finish with the rest of the eggnog. Stir gently until just combined. Overmixing can make the cake dense. Finally, pour the batter into your prepared pan. Bake for 30-35 minutes. Use a toothpick to check for doneness; it should come out clean. Let it cool for about 10 minutes in the pan, then move it to a wire rack. Enjoy your festive creation! You can find the full recipe to guide you through this delightful dessert. To get a soft and moist cake, use room temperature eggs. Cold eggs can make the batter heavy. Cream the butter and sugars until fluffy. This adds air, making the cake light. Don't overmix the batter. Mix just until combined for the best texture. Even baking is key for cake success. Preheat your oven fully before putting in your cake. Place the pan in the center of the oven. This helps heat circulate. Avoid opening the oven door too soon. Opening it can drop the temperature. Check for doneness at 30 minutes with a toothpick. If you have allergies, there are easy swaps. For eggs, you can use flaxseed meal mixed with water. This works well in baking. Use almond milk or coconut milk in place of eggnog for a dairy-free option. For nuts, leave out the walnuts or use seeds instead. This makes the cake safe for everyone. Feel free to explore the Full Recipe for more details on making this delightful dessert! {{image_4}} To make your eggnog cake even more special, try adding extra flavors. You can mix in a splash of rum or bourbon for a warm kick. A bit of orange zest brings a fresh twist. You can also try adding peppermint extract for a minty touch. All these flavors blend well with the eggnog. You can customize your eggnog cake by adding mix-ins. Chopped cranberries or dried fruits add a nice tartness. For a crunch, consider adding chopped nuts like pecans or almonds. Chocolate chips also work great if you love chocolate. These mix-ins can make your cake unique and fun. If you need a gluten-free option, it's easy to adapt this recipe. Use gluten-free all-purpose flour instead of regular flour. Make sure to check the baking powder for gluten-free labeling. This way, everyone can enjoy your delightful holiday cake without worry. You can still enjoy the same great taste! To keep your eggnog cake fresh, store it in an airtight container. This helps prevent it from drying out. Place the cake at room temperature if you plan to eat it within a few days. If longer storage is needed, refrigerate it. Just make sure to wrap it well to avoid fridge odors. Freezing eggnog cake is easy and keeps it tasty. First, let the cake cool completely. Then, slice it into pieces. Wrap each slice in plastic wrap, then place them in a freezer bag. Label the bag with the date. Your cake can stay fresh in the freezer for up to three months. To reheat your eggnog cake, take a slice from the fridge or freezer. If it’s frozen, let it thaw in the fridge overnight. For reheating, place the slice on a microwave-safe plate. Heat it for 10-15 seconds. You can also warm it in the oven at 350°F for about 5-10 minutes. This will bring back its soft texture. Enjoy your cake warm for a cozy treat! Yes, you can make eggnog cake ahead of time. I often bake it a day or two in advance. Just let it cool completely, then wrap it in plastic wrap. This keeps it moist and fresh. You can store it at room temperature for a day. For longer storage, place it in the fridge. The best eggnog to use is the one you enjoy the most. You can use homemade or store-bought eggnog. If you make your own, you can control the flavors. I like using a rich, creamy eggnog for a fuller taste. Look for one with real dairy and spices for the best result. Absolutely! You can customize eggnog cake for any season. In spring, try adding lemon zest for a fresh twist. In summer, include berries for a fruity touch. For fall, you can boost the spices like cinnamon and nutmeg. In winter, add peppermint extract for a festive flavor. Eggnog cake pairs well with many things. Here are some great options: - Fresh whipped cream - A scoop of vanilla ice cream - Spiced coffee or hot chocolate - Chopped nuts for added crunch - A drizzle of caramel sauce Each of these enhances the cake's rich flavor. For the full recipe, check out the earlier section. This blog post covered everything you need to know about baking an eggnog cake. We discussed key ingredients, step-by-step instructions, and valuable tips to improve your baking. I shared variations for flavor and how to store your cake properly. You can customize the recipe for any season, making it a versatile treat. With the right tools and techniques, you'll create a delicious eggnog cake everyone will love. Now, you’re ready to bake a perfect cake, impressing your family and friends. Happy baking!

Eggnog Cake Delightful Holiday Dessert Recipe

Are you ready to impress your holiday guests? This Eggnog Cake recipe transforms the classic holiday drink into a delightful

Here are the ingredients you need for crispy garlic parmesan potatoes: - 1.5 pounds baby potatoes, halved - 4 tablespoons extra virgin olive oil - 4 cloves garlic, finely minced - 1 teaspoon dried rosemary - 1 teaspoon dried thyme - 1/2 cup freshly grated Parmesan cheese - Sea salt and freshly cracked black pepper to taste - Fresh parsley, finely chopped (for garnish) These simple ingredients make a flavorful and comforting dish. Using baby potatoes gives a nice bite, while garlic adds a rich taste. The herbs enhance the overall flavor of the dish. You can find the full recipe in the article for easy cooking steps. Set your oven to 425°F (220°C) for optimal crispiness. A hot oven is key to making the potatoes crunchy and golden. In a large bowl, combine the halved baby potatoes with 4 tablespoons of extra virgin olive oil. Add 4 cloves of minced garlic, 1 teaspoon of dried rosemary, and 1 teaspoon of dried thyme. Finish with a sprinkle of sea salt and black pepper. Toss the potatoes well until every piece is coated in the flavorful mix. This step ensures that each bite bursts with taste. Line a baking sheet with parchment paper for easy cleanup. Spread the seasoned potatoes in a single layer. Make sure they have space to breathe; this helps them crisp up nicely. Roast in your preheated oven for 25-30 minutes. Stir the potatoes halfway through. You want them to turn a deep golden brown color. Once the potatoes are roasted, take them out and sprinkle 1/2 cup of freshly grated Parmesan cheese over the top. Return the baking sheet to the oven for an additional 5 minutes. The cheese will melt and form a deliciously crisp topping. After the cheese has melted and is slightly golden, remove the baking sheet from the oven. Let the potatoes cool for a few minutes. Just before serving, garnish with finely chopped fresh parsley for a pop of color. Now, you have a dish that is flavorful and simple, perfect for any meal. For the full recipe, check the earlier section. Spacing on the baking sheet is key for crispiness. When you lay out the potatoes, give them room. This allows hot air to flow around each piece, making them golden and crunchy. If they touch, they will steam instead of roast. Aim for a single layer with space in between. You can roast in batches if needed. Using fresh herbs can really boost taste. Fresh rosemary and thyme add a bright flavor that dried herbs can’t match. If you only have dried herbs, that’s okay! Just use less, as dried herbs are stronger. I often mix both types for a layered taste, giving the dish a nice depth. Oven types can vary, so keep an eye on your potatoes. If your oven runs hot, check them a few minutes early. For larger potatoes, cut them smaller to ensure even cooking. Smaller pieces will crisp up better and cook faster. Always stir halfway through to ensure even roasting. This will help you achieve that perfect golden brown color on all sides. {{image_4}} You can spice up your garlic parmesan potatoes. Just add some chili flakes. This gives the dish a nice kick. You can control the heat to suit your taste. Use a pinch for mild heat or more for a fiery flavor. This simple change adds depth and makes the dish even more exciting. If you're vegan, don’t worry! You can swap the Parmesan cheese for nutritional yeast. Nutritional yeast has a cheesy flavor and is packed with nutrients. It gives a nice umami taste without using dairy. This way, you can still enjoy crispy garlic parmesan potatoes without the cheese. Not all potatoes are the same. You can use different types of potatoes for variety. Yukon Gold potatoes are a great choice. They are creamy and hold up well when roasted. You could also try red potatoes for a slightly different texture. Each type brings its own unique flavor and style to the dish. For the full recipe, check out the [Full Recipe]. To store leftover crispy garlic parmesan potatoes, let them cool first. Place them in an airtight container. This keeps them fresh. You can refrigerate them for up to three days. Make sure to label the container with the date. This helps you remember when you made them. For reheating, I suggest using the oven. Preheat it to 400°F (200°C). Spread the potatoes on a baking sheet. Bake them for about 10 to 15 minutes. This helps restore their crispiness. You can also use a skillet. Heat it on medium and add a splash of olive oil. Cook the potatoes for a few minutes, stirring gently. You can freeze cooked crispy garlic parmesan potatoes, but they may lose some crispiness. Allow them to cool completely, then place them in a freezer-safe bag. Squeeze out the air before sealing. You can freeze them for up to two months. When ready to eat, thaw them overnight in the fridge before reheating. Yes, you can prep these potatoes a day in advance. Start by washing and halving the baby potatoes. Toss them with olive oil, garlic, and herbs. Store them in the fridge in an airtight container. When you're ready to cook, just take them out and roast. This saves you time and still gives you that crispy texture. These potatoes pair well with many dishes. Try them with grilled chicken or fish. They also go great with a fresh salad. For a vegetarian meal, serve them alongside roasted vegetables or a hearty soup. They add a nice crunch to any plate. To make them in an air fryer, first, prepare the potatoes just like the oven method. Place them in the air fryer basket in a single layer. Cook them at 400°F for 15-20 minutes. Shake the basket halfway through for even cooking. Add the cheese during the last 5 minutes for a delicious finish. Halving baby potatoes is simple. Start by washing them thoroughly. Use a sharp knife for clean cuts. Place the potato flat side down for stability. Cut through the middle to create two equal halves. This ensures they cook evenly and get that crispy texture. Crispy garlic parmesan potatoes can last up to 3 days in the fridge. Store them in an airtight container to keep them fresh. Reheat them in the oven or air fryer to regain their crispiness. Avoid microwaving, as it can make them soggy. This blog post covered a simple yet delicious recipe for crispy garlic Parmesan potatoes. You learned about key ingredients, step-by-step instructions, and helpful tips for perfect results. Variations and storage methods were also discussed, making it easy to customize and enjoy your potatoes later. In summary, these potatoes are a tasty side dish for any meal. With just a few steps, you can create a flavorful and crispy treat that everyone will love. Enjoy making this dish and impress your family and friends!

Crispy Garlic Parmesan Potatoes Flavorful and Simple Dish

Are you ready to elevate your potato game? Crispy Garlic Parmesan Potatoes are a tasty and simple dish perfect for

- 2 cans of refrigerated biscuit dough - 2 cups shredded mozzarella cheese - 1 cup diced pepperoni - 1 teaspoon Italian seasoning - 1 cup pizza sauce (for dipping) - 1/4 cup olive oil - 1/4 cup grated Parmesan cheese - 1 teaspoon garlic powder - 1/2 teaspoon crushed red pepper flakes (optional) Gathering the right ingredients is key for making Cheese Pizza Monkey Bread. First, you’ll need two cans of refrigerated biscuit dough. This forms the base and gives you those fluffy bites. Next, grab two cups of shredded mozzarella cheese. This cheese melts wonderfully and adds a gooey texture. You should also have one cup of diced pepperoni. This classic topping adds great flavor. Remember to include one teaspoon of Italian seasoning. It brings a nice herbal note to the dish. For dipping, have one cup of pizza sauce on hand. This makes eating even more fun! Now, for some added richness, get 1/4 cup of olive oil and 1/4 cup of grated Parmesan cheese. The olive oil helps everything crisp up, while the Parmesan adds a salty kick. Lastly, one teaspoon of garlic powder will enhance the taste. If you like a little heat, add 1/2 teaspoon of crushed red pepper flakes. - Bundt pan - Mixing bowl - Kitchen scissors or knife - Cooking spray or brush You will need some basic equipment to make this treat. A Bundt pan is essential for shaping the monkey bread. A mixing bowl helps combine all the ingredients easily. You’ll also need kitchen scissors or a knife to cut the biscuit dough into smaller pieces. Lastly, have some cooking spray or a brush ready to grease the Bundt pan. This will stop the bread from sticking. - Alternatives for cheese - Gluten-free biscuit options - Using different toppings like vegetables or other meats If you want to mix things up, consider cheese alternatives. You can use sharp cheddar or gouda for a different taste. For gluten-free options, select gluten-free biscuit dough. This way, everyone can enjoy the dish! You can also change the toppings. Try adding vegetables like bell peppers or mushrooms for extra flavor. Want to switch the meat? Use cooked sausage or ham instead of pepperoni. The possibilities are endless, making this dish fun and versatile. For the full recipe, check out the details above. 1. Preheat your oven to 350°F (175°C). 2. Generously grease a Bundt pan with cooking spray or olive oil. 3. Open the biscuit dough cans. Cut each biscuit into quarters with scissors or a knife. 1. In a large mixing bowl, combine the biscuit pieces, mozzarella cheese, and pepperoni. 2. Add the Italian seasoning, garlic powder, and crushed red pepper flakes if you like spice. 3. Mix gently until all ingredients are evenly distributed. 4. Drizzle the olive oil over the mixture and toss until every piece is coated. 1. Sprinkle half of the grated Parmesan cheese in the bottom of your Bundt pan. 2. Layer half of the biscuit mixture into the pan, spreading it out evenly. 3. Add the rest of the Parmesan cheese on this first layer. 4. Top with the remaining biscuit mixture, pressing down gently. 5. Place the Bundt pan in the preheated oven and bake for 30-35 minutes. 6. Keep an eye on it until the top turns golden brown and the biscuits are cooked. 7. After baking, let it cool for about 10 minutes before flipping it onto a serving plate. 8. Serve warm with pizza sauce in a bowl for dipping. For the full recipe, be sure to check the ingredients and details mentioned above! To avoid soggy bread, always coat your biscuit pieces in olive oil. This helps them crisp up. Bake the monkey bread until golden brown. The time should be around 30 to 35 minutes. Keep an eye on it; ovens do vary. For even baking, layer the biscuit mixture loosely in the Bundt pan. This allows hot air to circulate and cook the dough well. Pressing down too hard can lead to uneven results. Try adding garlic powder or Italian seasoning. These spices make the cheese pizza monkey bread even tastier. You can also mix in some fresh herbs, like basil or oregano, for a fresh twist. To customize the taste, add your favorite toppings. Consider bell peppers, onions, or even olives. You can switch the cheese too, using cheddar or provolone for a new flavor. Serve your cheese pizza monkey bread warm straight from the oven. It looks great on any table. Pour the pizza sauce into a small bowl for easy dipping. For extra visual appeal, garnish with fresh basil leaves. A sprinkle of grated Parmesan cheese on top adds a nice touch. Arrange everything on a colorful plate for a fun dining experience. {{image_4}} You can mix things up with different cheeses. Sharp cheddar adds a bold taste. Gouda brings a creamy texture. You can also use provolone or a blend of cheeses. Each cheese gives a unique flavor. Experiment to find your favorite combo! For those who prefer no meat, there are great alternatives. You can use mushrooms, bell peppers, or spinach. These options keep the dish tasty and filling. For a vegan twist, try using plant-based cheese. It melts and tastes just as good! You can change the sauce for fun new flavors. Try BBQ sauce for a sweet twist. Hot sauce adds spice and heat. You can even go with pesto for a fresh taste. The options are endless! Feel free to create your own theme. Make it your special dish. For the full recipe, check out the complete guide. To keep your Cheese Pizza Monkey Bread fresh, store it in the fridge. Place it in an airtight container. If you do not have one, wrap it tightly in plastic wrap or aluminum foil. This method helps to keep the bread moist and tasty. For longer storage, you can freeze it. Cut the bread into pieces and place them in a freezer bag. Squeeze out as much air as you can before sealing. When reheating, you want to keep the bread warm and soft. The oven is the best option. Preheat your oven to 350°F (175°C). Place the bread on a baking sheet. Cover it with aluminum foil to prevent it from drying out. Heat for about 10-15 minutes, or until warmed through. You can also use the microwave. Heat it in short bursts of 20 seconds. Check to make sure it does not get tough. In the fridge, your Cheese Pizza Monkey Bread can last for about 3-4 days. If you freeze it, it can stay good for up to 2-3 months. Just remember, the longer it sits, the more flavor it loses. So, enjoy your delicious creation soon! For the full recipe, refer back to the earlier section. Cheese Pizza Monkey Bread is a fun twist on classic pizza. It combines biscuit dough, cheese, and toppings in a pull-apart bread. The dish likely comes from the U.S., where monkey bread is popular. It’s a great snack for parties or movie nights. Each piece pulls apart easily, making it great for sharing. Plus, you get all the cheesy, savory flavors of pizza in each bite. Yes, you can prepare Cheese Pizza Monkey Bread ahead of time. To do this, follow these steps: - Assemble the monkey bread as directed. - Cover it tightly with plastic wrap or foil. - Store it in the fridge for up to 24 hours. When you are ready to bake, just remove the wrap and bake it straight from the fridge. You may need to add a few extra minutes to the baking time. Serving Cheese Pizza Monkey Bread is easy and fun! Here are some great ideas: - Serve it warm right from the oven. - Place a bowl of pizza sauce on the side for dipping. - Add fresh basil leaves around the dish for color. - You can also serve it with ranch dressing or garlic butter for extra flavor. These tips make the dish even more enjoyable for everyone! This blog post covered making Cheese Pizza Monkey Bread. You learned about essential ingredients and equipment, plus helpful tips for perfect texture and flavor. I shared how to mix and layer the dough, ensuring a tasty result every time. You can even try different cheese and meat choices. With the right storage and reheating methods, your leftovers can taste just as good. This dish is fun, easy, and sure to impress. Enjoy creating your own version of Cheese Pizza Monkey Bread!

Cheese Pizza Monkey Bread Irresistible and Fun Treat

Are you ready for a fun and tasty treat? Cheese Pizza Monkey Bread takes your favorite pizza flavors and turns

To make Wild Blueberry Coffee Cake Danishes, gather the following ingredients: - 2 cups all-purpose flour - 1/2 cup granulated sugar - 1 tablespoon baking powder - 1/2 teaspoon salt - 1/2 cup unsalted butter, cold and cubed - 1/2 cup buttermilk - 1 large egg - 1 teaspoon vanilla extract - 1 cup wild blueberries (fresh or frozen) - 1 teaspoon lemon zest - 1 egg wash (1 egg beaten with 1 tablespoon water) - Confectioners' sugar for dusting These ingredients create a lovely balance of sweet and tart flavors. The wild blueberries shine through, and the lemon zest adds a fresh touch. The cold butter is key; it helps the danishes stay flaky. I always have these on hand for a delightful treat. You can find the full recipe to guide you through the process. - Preheat the Oven: Start by setting your oven to 375°F (190°C). This ensures your danishes bake evenly. Line a large baking sheet with parchment paper. This makes cleanup easy and prevents sticking. - Prepare the Dough: In a large bowl, mix 2 cups of flour, 1/2 cup of sugar, 1 tablespoon of baking powder, and 1/2 teaspoon of salt. Stir these dry ingredients well. Then, add 1/2 cup of cold, cubed butter. Use your fingers or a pastry cutter. Work the butter into the flour until it looks like coarse crumbs. Small butter pieces give the danishes flakiness. - Combine Wet Ingredients: In another bowl, whisk together 1/2 cup of buttermilk, 1 large egg, and 1 teaspoon of vanilla extract. Mix until smooth. Pour this mixture into the dry ingredients. Stir gently until just combined. The dough should be a bit sticky but hold together nicely. - Incorporate Blueberries: Carefully fold in 1 cup of wild blueberries and 1 teaspoon of lemon zest. Be gentle to keep the blueberries whole. This helps your danishes look great and taste fresh. - Shape the Danishes: Lightly flour a clean surface. Turn the dough out onto it and knead a few times. Pat the dough into a rectangle about 1 inch thick. Cut it into squares or triangles based on your choice. - Create Wells and Add Extra Blueberries: For each piece, use your fingers to make a small well in the middle. If you like, add a few extra blueberries in each well. This boosts the fruity flavor and makes them even better. - Apply Egg Wash: Take 1 egg and beat it with 1 tablespoon of water to make an egg wash. Use a pastry brush to coat the edges of each Danish. This gives them a lovely golden finish when baked. - Bake Danishes: Place the danishes on the lined baking sheet, leaving space between each. Bake in the preheated oven for 15-20 minutes. They should be golden brown and puffed up. - Cooling Time After Baking: Once done, take the danishes out of the oven. Let them cool on the baking sheet for about 5 minutes. This helps them set and makes them easier to handle. - Dust with Confectioners' Sugar: Before serving, generously sprinkle confectioners' sugar on top. This adds sweetness and makes the danishes look fancy. - Presentation Tips: Serve the danishes on a nice platter. For a pop of color, add fresh blueberries and a sprig of mint. Enjoy them warm with a cup of coffee or tea. For the full recipe, check the earlier section! To make the best Wild Blueberry Coffee Cake Danishes, start with cold butter. This helps make your pastry flaky. When you mix in the butter, keep some chunks. This adds texture and creates layers. Be gentle with the blueberries. If you crush them, your danishes will have a messy look. Whole berries keep each bite juicy and vibrant. Adjust the baking time based on your oven. If your danishes are not golden brown after 20 minutes, give them a few more minutes. Ovens can vary, so stay close and check often. Use good mixing bowls. A large bowl helps you mix the dough easily. Choose a bowl that won’t slip while you mix. Essential baking sheets and pans are key. A flat, sturdy baking sheet helps your danishes bake evenly. If you have a non-stick pan, that can help too. Helpful measuring tools ensure accuracy. Use measuring cups for dry and wet ingredients. A digital scale can also help for precise measurements. Having accurate tools makes a big difference in your baking. {{image_4}} You can make Wild Blueberry Coffee Cake Danishes fun and unique. Here are some ideas: - Adding different fruits: Try using raspberries or peaches. They add a new flavor that pairs well with blueberries. - Incorporating spices: Adding cinnamon or nutmeg gives the danishes warmth. Use a pinch to boost the flavor profile. - Swapping out buttermilk for yogurt: Greek yogurt works well. It makes the dough creamy while keeping it tangy. Want to make your danishes fit special diets? Here’s how: - Gluten-free option: Use almond or coconut flour instead of all-purpose flour. This makes them gluten-free and still tasty. - Dairy-free substitutions: Swap butter for coconut oil and buttermilk for almond milk. These choices keep the flavor rich while being dairy-free. These variations help you customize your danishes to fit any taste or diet. For the full recipe, check above! To keep your Wild Blueberry Coffee Cake Danishes fresh, store them at room temperature. Place them in an airtight container. This helps retain their soft texture. They can last for two days on the counter. If you want them to last longer, refrigerate them. Wrap each Danish in plastic wrap before placing them in the fridge. This keeps moisture in and prevents them from drying out. For long-term storage, you can freeze the danishes. First, let them cool completely. Then, wrap each one tightly in plastic wrap. Place them in a freezer-safe bag or container. They can stay fresh in the freezer for up to three months. When you're ready to enjoy them, thaw the danishes in the fridge overnight. Reheat them in an oven at 350°F (175°C) for about 10 minutes. This will restore their warm and flaky texture. Can I use frozen blueberries? Yes, you can use frozen blueberries. They work great in this recipe. Just fold them in like fresh berries. They may add extra juice, but that makes the danishes even more tasty. How do I know when the danishes are done? You will know the danishes are done when they are golden brown and puffed up. They should feel firm to the touch. If you see a nice golden color, they are ready to come out. Can I make the dough ahead of time? Yes, you can make the dough ahead of time. Wrap it tightly in plastic wrap and place it in the fridge. Use it within two days for the best results. What to serve with Wild Blueberry Coffee Cake Danishes? These danishes pair well with coffee or tea. You can also serve them with fresh fruit or yogurt. Adding a drizzle of honey makes a nice touch. Can these be made mini-sized? Absolutely! You can cut smaller squares or triangles for mini danishes. Just adjust the baking time slightly to ensure they cook through. How to adapt for a vegan recipe? To make these danishes vegan, replace the egg with a flax egg. Use plant-based butter and almond milk instead of buttermilk. These swaps keep the flavor while making them vegan-friendly. For the complete recipe, check the Full Recipe section. Making Wild Blueberry Danishes is simple and fun. You mix ingredients, shape the dough, and bake. Each bite brings fresh flavors and a touch of sweetness. Remember, using cold butter keeps your pastries flaky. Feel free to try new fruits or spices for your own twist. Store extras properly to keep them fresh. Whether you share them or enjoy them yourself, these danishes will impress. Get baking, and enjoy every delicious moment!

Wild Blueberry Coffee Cake Danishes Delightful Treat

Are you ready to treat yourself to something truly delightful? These Wild Blueberry Coffee Cake Danishes are the perfect mix

To make the perfect pistachio filled croissants, you need a few simple items. Here is the list of ingredients you will need: - Puff pastry sheets - Shelled pistachios - Granulated sugar - Unsalted butter - Almond extract - Egg (for egg wash) - Powdered sugar (for dusting) These ingredients come together to create a delicious treat. The puff pastry gives a flaky texture, while the pistachios add a rich flavor. The sugar sweetens the filling, and the butter keeps it smooth. Almond extract enhances the nutty taste, making every bite special. The egg wash helps the croissants turn golden, while the powdered sugar adds a sweet touch on top. You can find the full recipe for Pistachio Dreams Croissants that guides you step-by-step through this delightful process. Enjoy gathering your ingredients and prepare for a fun baking adventure! 1. Begin by preheating your oven to 400°F (200°C). This ensures even baking. 2. Line a baking sheet with parchment paper. This prevents sticking and makes cleanup easy. 3. In a medium bowl, mix the finely chopped pistachios, granulated sugar, softened butter, and almond extract. Use a spatula or fork until the mixture turns smooth. 4. Lightly dust your work surface with flour. Roll out each puff pastry sheet until it is thin and even. 1. Cut each pastry sheet into triangles, aiming for about 4 inches wide at the base. 2. At the base of each triangle, place a heaping tablespoon of the pistachio filling. Avoid overfilling to prevent mess. 3. Starting from the base, carefully roll the triangle up towards the tip. Maintain tightness for a nice crescent shape. 1. Place the rolled croissants seam side down on your lined baking sheet. Leave space between each for puffing. 2. In a small bowl, beat the egg. Using a pastry brush, apply the egg wash on the tops of each croissant. This gives them a golden brown color. 3. Bake the croissants for 15-18 minutes. Watch them closely to avoid over-baking. They should puff up and turn golden brown. 4. After baking, let the croissants cool on the sheet for a few minutes. Dust the tops with powdered sugar for a sweet touch. Now, you can enjoy your Pistachio Dreams Croissants! For a complete guide, check the Full Recipe. To make your croissants light and flaky, start with cold ingredients. Cold butter helps create steam during baking. This steam lifts the layers of pastry, giving you that perfect puff. When rolling out your pastry, keep it even and thin. Use gentle pressure with your rolling pin. This ensures each layer stays distinct and gets nice and airy. You can boost the flavor of your pistachio croissants by adding flavored extracts. Almond extract is a great choice, but you can also try vanilla or citrus zest. If you want to mix it up, consider adding other nuts or spices. Chopped hazelnuts or a pinch of cinnamon can bring a new twist to your filling. If your filling spills out while baking, you might have overfilled your croissants. Be sure to use just a heaping tablespoon of filling per pastry. To achieve even browning, place your croissants with enough space on the baking sheet. This way, the heat circulates well around each pastry. If they are too close, they may bake unevenly. {{image_4}} You can play with the filling to make it your own. Try using chocolate or almond paste instead of pistachios. Both of these options add rich flavor and a nice texture. You could also use fruit preserves or cream cheese for a fruity twist. These fillings bring a different taste and can surprise your guests. If you want to make these croissants gluten-free, look for gluten-free puff pastry. Many brands offer good options that work well. For a vegan version, substitute the butter with coconut oil or vegan butter. Skip the egg wash and use a plant-based milk instead to help with browning. Add a chocolate glaze or drizzle for a sweet finish. It adds a beautiful look and extra flavor. You can also sprinkle crushed pistachios on top for a crunchy touch. Edible flowers can give your croissants a lovely and fancy feel. These simple garnishes can turn a good pastry into a great one. Store baked croissants at room temperature. Keep them in an airtight container. This keeps them fresh for two days. If you want to store them longer, refrigerate them. However, this can make them less flaky. To freeze croissants, place them in a freezer bag. Ensure to squeeze out as much air as possible. Label the bag with the date. They can last up to three months in the freezer. When it's time to enjoy your croissants again, reheating is key. The best method is using an oven. Preheat the oven to 350°F (175°C). Place the croissants on a baking sheet. Heat for about 10 minutes. This restores their flakiness and warmth. If you're short on time, you can use a microwave. Heat each croissant for about 10-15 seconds. However, this method can make them a bit soft. You can keep baked croissants for up to two days at room temperature. After that, they start to lose their texture. If refrigerated, they last about a week. Look for signs of spoilage. If they smell off or feel dry, it's best to toss them. Enjoy your pistachio filled croissants fresh for the best flavor! For the full recipe, check out the Pistachio Dreams Croissants. Pistachio filled croissants are flaky pastries with a rich, nutty filling. They blend buttery layers of puff pastry with a smooth pistachio paste. This treat has roots in French baking, often found in bakeries across Europe. The use of pistachios adds a unique twist, making these croissants stand out. Yes, you can prepare the croissants in advance. Make the pistachio filling and roll the croissants. Place them on a baking sheet and cover with plastic wrap. Refrigerate them overnight. In the morning, let them warm up for about 30 minutes before baking. This quick step makes them fresh and ready to enjoy. You can find ready-made pistachio croissants at local bakeries and cafes. Look for places that focus on fresh pastries. Some grocery stores with a bakery section may also carry them. Check reviews online to find the best spots near you. To get the best pistachio flavor, choose high-quality shelled pistachios. Look for ones that are bright green and have a fresh scent. Avoid any that are dull in color or have an off smell. Grinding them just before use will help keep their flavor strong. Always store them in a cool, dark place to maintain freshness. For the full recipe, check out the detailed instructions above! This recipe for pistachio-filled croissants is a true delight. We covered the key ingredients, from puff pastry to pistachios, and shared simple steps for preparation and assembly. You can now create layers of flaky goodness with helpful tips for the perfect puff. There are also tasty variations and storage tips to keep your croissants fresh. With a little practice, you will serve up delicious pastries that impress. Enjoy making and sharing these delightful treats with family and friends!

Pistachio Filled Croissants Delightfully Flaky Treat

Get ready to treat yourself! Pistachio filled croissants are a delightful way to enjoy a flaky pastry packed with nutty

To make a crispy chickpea salad, gather these great ingredients: - 1 can (15 oz) chickpeas, thoroughly drained and rinsed - 2 tablespoons high-quality olive oil - 1 teaspoon smoked paprika - 1 teaspoon garlic powder - Fresh sea salt and cracked black pepper to taste - 4 cups of mixed salad greens - 1 cup cherry tomatoes, halved - 1 cucumber, diced - 1 bell pepper, diced - 1 ripe avocado, sliced - ¼ cup feta cheese, crumbled (optional) - 2 tablespoons fresh lemon juice - 1 tablespoon balsamic vinegar - Fresh herbs, such as parsley or cilantro, chopped Fresh ingredients make a big difference in taste. When using fresh greens, your salad will taste crisp and bright. Fresh vegetables add color and nutrients. If you use wilted greens or old veggies, your salad will lack flavor and crunch. Always choose the freshest options for the best results. Chickpeas are a great source of protein and fiber. They help keep you full and satisfied. Plus, they are low in fat. Vegetables like tomatoes, cucumbers, and peppers add vitamins and minerals. They also bring antioxidants that fight disease. Eating this salad gives you energy and supports your health. You can find the full recipe to enjoy this delightful dish. To start, preheat your oven to 400°F (200°C). This heat will make the chickpeas crispy. Drain and rinse the canned chickpeas well. Spread them out on a clean baking sheet. Drizzle 2 tablespoons of olive oil over the chickpeas. Sprinkle 1 teaspoon of smoked paprika, 1 teaspoon of garlic powder, sea salt, and black pepper on top. Toss them until all the chickpeas get coated well. This step is key for that crispy texture. While the chickpeas bake, grab a large bowl. Add 4 cups of mixed salad greens, such as baby spinach and crunchy romaine. Toss in 1 cup of halved cherry tomatoes and 1 diced cucumber for freshness. Don’t forget to add 1 diced bell pepper for color. Gently fold in 1 sliced avocado. This will keep the slices nice and pretty. In a small bowl, whisk together 2 tablespoons of fresh lemon juice and 1 tablespoon of balsamic vinegar. Add a pinch of salt and pepper. Mix until it is smooth. This dressing will add bright flavor to your salad. Set it aside for now while the chickpeas finish baking. Once the chickpeas are golden and crispy, take them out of the oven. Let them cool for a few minutes before adding them to the salad. Gently stir the chickpeas into the salad mix. Drizzle the dressing over everything. Toss it all together carefully so that each bite is packed with flavor. If you like, sprinkle ¼ cup of crumbled feta cheese and some fresh herbs on top for a lovely finishing touch. For the full recipe, be sure to check out the detailed instructions provided. To get crispy chickpeas, start with a good rinse. Drain and dry them well. Any moisture will make them soggy. Use a single layer on the baking sheet. This allows hot air to circulate around them. Toss them in oil and spices before baking. I like using smoked paprika and garlic powder for great flavor. Bake at 400°F (200°C) until golden, about 20-25 minutes. Shake the pan halfway through for even cooking. Let them cool slightly for the best crunch. This salad shines with a mix of fresh veggies. I love using baby spinach, arugula, and romaine. For sweetness, add halved cherry tomatoes. Diced cucumbers give a refreshing crunch. A bell pepper adds color and flavor. You can also toss in sliced avocado for creaminess. If you like cheese, crumbled feta takes it to the next level. Fresh herbs like parsley or cilantro can add a nice touch too. For a beautiful presentation, use wide, shallow bowls. This lets the colors pop. Start with a base of greens, then layer on the other veggies. Sprinkle the crispy chickpeas on top. This way, they stay crunchy. Drizzle the dressing just before serving. Add extra herbs on top for a final touch. This makes the salad look lovely and appetizing. For the full recipe, check out the Crispy Chickpea Salad Delight. {{image_4}} You can add protein to your crispy chickpea salad for a heartier meal. Grilled chicken works well, bringing a juicy texture. Simply slice it and mix it in. If you prefer a plant-based option, try tofu. Firm tofu, cubed and sautéed, adds protein and a nice chew. You can even use tempeh for a nutty flavor. The right dressing can elevate your salad. A creamy tahini dressing adds richness. For a spicy kick, mix in some sriracha. You could also try a yogurt-based dressing for a tangy taste. Experiment with different herbs and spices to create your own signature dressing. Using seasonal ingredients keeps your salad fresh and exciting. In summer, add juicy peaches or strawberries for sweetness. In fall, roasted pumpkin or sweet potatoes provide warmth. Winter calls for hearty greens like kale, while spring is perfect for fresh peas or radishes. Swap ingredients based on what’s in season for the best flavors. For the full recipe, check out the Crispy Chickpea Salad Delight. To keep your salad fresh, store it in an airtight container. This helps prevent sogginess. Make sure to separate the crispy chickpeas from the salad greens. This way, the chickpeas stay crunchy. You can store the salad in the fridge for up to three days. Enjoy it fresh for the best taste. If you have leftover chickpeas, you can reheat them. Spread them out on a baking sheet. Preheat your oven to 350°F (175°C). Bake for about 10 minutes or until they are hot and crispy again. Avoid using a microwave, as it will make them soft. Most salad ingredients last a while. Chickpeas can last in the fridge for about three days. Greens should be eaten within two days for freshness. Avocado will brown quickly, so eat it the same day. Cherry tomatoes and cucumbers stay fresh for about three days too. Always check for any signs of spoilage before eating. To make chickpeas crispy, start by preheating your oven to 400°F (200°C). Drain and rinse your chickpeas well. Spread them on a baking sheet in a single layer. Drizzle with olive oil and sprinkle with spices like smoked paprika and garlic powder. Toss to coat evenly. Bake for 20 to 25 minutes, shaking the pan halfway through. You want them golden and crunchy. Yes, you can use canned chickpeas. They are convenient and save time. Just drain and rinse them before using. This helps remove excess sodium and improves the taste. Canned chickpeas work great in the salad and still get crispy when baked. You can add many healthy toppings to your salad. Here are some ideas: - Sliced almonds for crunch - Chopped walnuts for healthy fats - Sliced radishes for a peppery kick - Grated carrots for sweetness - Diced apple for a fruity touch These toppings can enhance flavor and texture. Yes, this salad is gluten-free. All the ingredients, like chickpeas, vegetables, and dressing, do not contain gluten. You can enjoy this dish worry-free if you avoid gluten. It’s a great option for those with gluten sensitivities or celiac disease. For a complete recipe and more details, check out the Full Recipe for Crispy Chickpea Salad Delight. This blog post covered how to make a crispy chickpea salad. We discussed key ingredients, their freshness, and the health benefits of chickpeas. I shared easy steps to prep, assemble, and dress your salad. You learned tips for crispiness and pairing, plus ideas for presentation and variations. Finally, I covered storage tips and answered common questions. This salad is a quick, tasty meal you can customize. Enjoy exploring different flavors!

Crispy Chickpea Salad: Healthy and Filling Delight

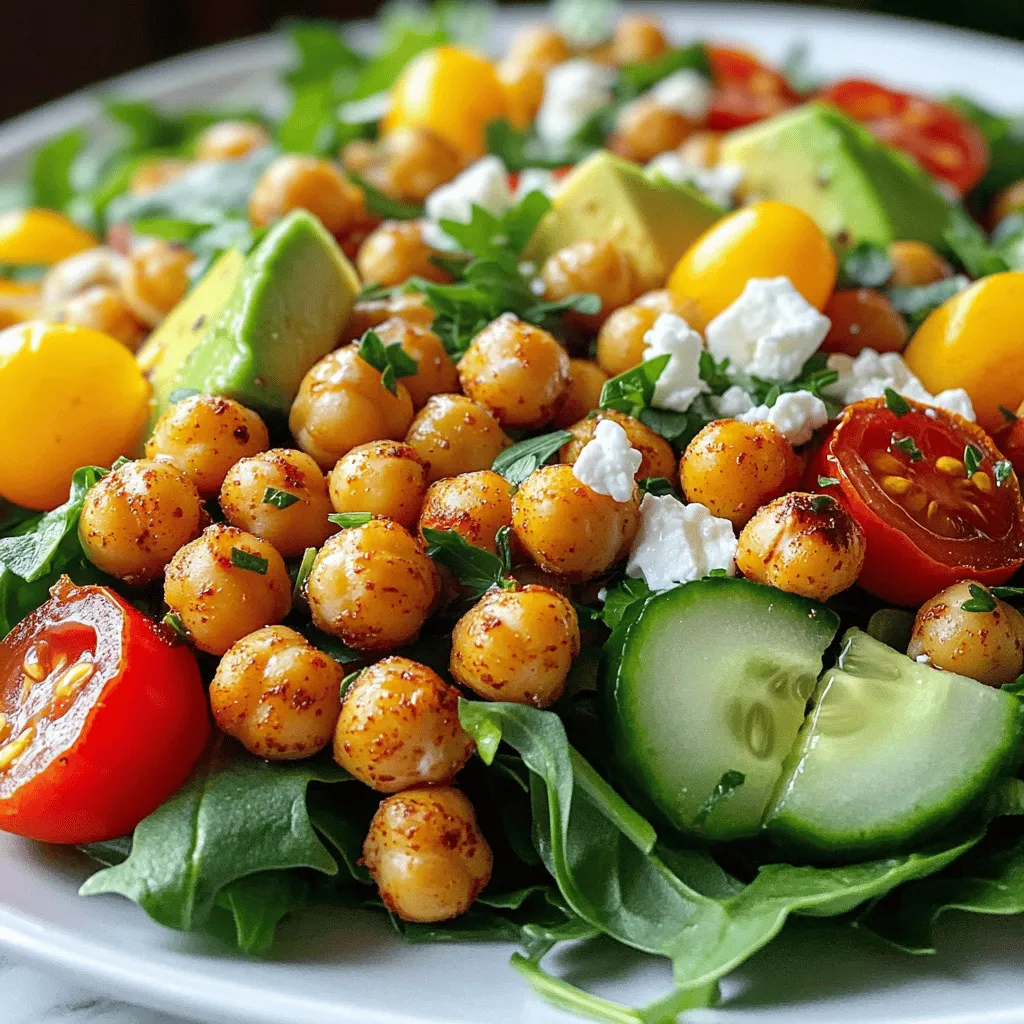
Looking for a tasty, healthy dish that keeps you full? Look no further! My Crispy Chickpea Salad is not only

To make tasty and nutritious homemade granola bars, you need the right ingredients. Here’s what you will need: - 2 cups rolled oats - 1 cup mixed nuts (almonds, pecans, walnuts), coarsely chopped - 1/2 cup sunflower seeds - 1/2 cup honey or maple syrup - 1/4 cup almond butter or peanut butter - 1/2 teaspoon pure vanilla extract - 1/2 teaspoon ground cinnamon - 1/4 teaspoon sea salt - 1/2 cup dried fruits (such as cranberries, apricots, or raisins), chopped if large Each ingredient adds flavor and texture. Oats provide a hearty base. Nuts give crunch and healthy fats. Sunflower seeds add a nice bite. Honey or maple syrup brings sweetness. Almond butter or peanut butter adds richness. Vanilla and cinnamon enhance the taste. Sea salt balances all the flavors. Dried fruits add a chewy texture. Feel free to adjust these ingredients. You can swap nuts or fruits based on your taste. This recipe is flexible and fun! For the full recipe, check out the Crunchy Nutty Granola Bars section. - Preheat the oven to 350°F (175°C) - Line an 8x8 inch baking dish with parchment paper Start by preheating your oven. This helps the granola bars bake evenly. While the oven warms up, line your dish with parchment paper. This makes it easy to remove the bars later. - Combine rolled oats, chopped mixed nuts, and sunflower seeds Next, grab a large bowl. Add the rolled oats, chopped mixed nuts, and sunflower seeds. Stir these together well. This mix gives the bars a great texture and crunch. - Melt honey and almond butter over low heat - Stir in vanilla extract, ground cinnamon, and sea salt Now, take a small saucepan. Melt the honey and almond butter on low heat. Stir until it is smooth. Remove it from heat and add vanilla, cinnamon, and sea salt. Mix well. This sticky mixture binds everything together. - Pour the sticky mixture over the dry ingredients - Fold in dried fruits Pour your warm mixture over the dry ingredients in the bowl. Use a spatula to mix it all together. Make sure every piece gets coated. Then, gently fold in your dried fruits. This adds sweetness and flavor. - Press mixture into the prepared baking dish - Bake for 20-25 minutes until golden brown Transfer the mixture to your lined dish. Press it down firmly to create an even layer. Bake in your preheated oven for about 20 to 25 minutes. Keep an eye on it until the top turns golden brown. - Allow to cool completely before cutting into bars After baking, take the dish out of the oven. Let it cool completely. This is important! Once cool, lift the granola out using the parchment paper. Cut into bars or squares as you like. Enjoy your homemade granola bars! For the complete recipe, check out the Full Recipe. To get the best texture in your granola bars, you must press the mixture firmly into the dish. This step ensures your bars hold together well. Use a spatula or your hands to really pack it down. If you want chewier bars, bake them for about 20 minutes. For crunchier bars, let them bake for 25 minutes. Just keep an eye on the color; golden brown is the goal! You can make your granola bars even tastier by experimenting with flavors. Try adding spices like nutmeg or ginger for a warm kick. Swapping almond butter for peanut butter can change the taste, too. If you love chocolate, mix in some chocolate chips. Seeds like chia or flax can add a fun crunch and boost nutrition. There are endless ways to customize your bars! When serving, you can top your granola bars with yogurt or fresh fruit for extra flavor. They pair well with a glass of milk or a smoothie. Store them in an airtight container to keep them fresh. You can keep them on the counter or in the fridge. Wrapping each bar in parchment paper makes for easy grab-and-go snacks. Enjoy your tasty, healthy creation! {{image_4}} You can make your granola bars nut-free easily. Replace nuts with seeds like pumpkin or sesame. You can also use puffed rice for a light crunch. This change keeps the bars tasty and safe for those with nut allergies. Want to spice things up? Add coconut flakes for a tropical taste. You can also mix in chocolate chips for a sweet treat. Another fun idea is to use nut extracts. Almond or hazelnut extracts can give your bars a unique flavor that is truly delightful. If you're watching your sugar intake, you can still enjoy these bars. Substitute maple syrup with stevia or agave nectar. These alternatives can make your bars low in sugar while keeping them sweet and enjoyable. You won't miss the extra sugar at all. For the full recipe, check out the Crunchy Nutty Granola Bars. To keep your granola bars fresh, store them in an airtight container. This method prevents moisture from getting in and keeps the bars crunchy. You can store them at room temperature on your kitchen counter. However, if you live in a hot climate, consider placing them in the fridge. This will help maintain their texture and flavor. Homemade granola bars last about one week at room temperature. In the fridge, they can stay fresh for about two weeks. Watch for signs of spoilage. If you see any mold or if the bars smell off, it's best to toss them. You can prepare granola bars in bulk and freeze them. Wrap each bar in plastic wrap and place them in a freezer bag. They will keep well for up to three months. When you want to enjoy a bar, just take it out and let it thaw. This method keeps them tasting fresh, just like when you made them. For a quick snack, you can even eat them straight from the freezer! Yes, you can. If you want a different sweetener, try these options: - Maple syrup - Agave nectar - Brown rice syrup These alternatives work well in most recipes. They keep the bars sticky and sweet. Each has a unique flavor, so pick one you enjoy. To keep your bars together, follow these tips: - Press the mixture firmly into the dish. - Use enough sticky ingredients, like honey or nut butter. - Let the bars cool completely before cutting. These steps help bind the mixture. The more compact your mixture, the less likely it will crumble. Yes, they are! These granola bars offer several health benefits: - Rolled oats provide fiber, which aids digestion. - Nuts add healthy fats and protein. - Dried fruits bring vitamins and minerals. This recipe is nutrient-rich. It fuels your body and keeps you full longer. You can enjoy a tasty snack while keeping health in mind. For the detailed recipe, check out the [Full Recipe]. You've learned how to make delicious granola bars with simple, healthy ingredients. From mixing the oats and nuts to baking the bars just right, every step matters. Remember to experiment with flavors and storage to make them your own. These bars are great for snacks or breakfast. With a little care, you can enjoy them longer. Now, it’s time to get baking and enjoy your homemade treats!

Homemade Granola Bars Easy Recipe Tasty and Nutritious

Looking for a tasty snack that’s both easy to make and healthy? You’re in the right place! Homemade granola bars

To make a delicious sweet potato and black bean chili, you need a mix of fresh and canned ingredients. This blend gives the chili its rich flavor and texture. Here’s what you will need: - 2 medium sweet potatoes, peeled and diced into 1-inch cubes - 1 can (15 oz) black beans, rinsed thoroughly and drained - 1 can (14 oz) diced tomatoes with green chilies, including juices - 1 medium onion, finely chopped - 3 cloves garlic, minced to a paste - 1 red bell pepper, chopped into bite-sized pieces - 1 tablespoon extra virgin olive oil - 2 teaspoons ground cumin - 2 teaspoons chili powder - 1 teaspoon smoked paprika - 1 cup vegetable broth (low sodium preferred) - Salt and freshly ground black pepper to taste - Fresh cilantro leaves, roughly chopped, for garnish - Sliced avocado, for serving (optional but recommended) - Lime wedges, for a zesty finish (optional but recommended) Each ingredient brings its unique flavor to the pot. Sweet potatoes add a creamy texture, while black beans provide protein. Diced tomatoes give a tangy base, and spices like cumin and chili powder add warmth. This recipe creates a hearty meal perfect for any day. For the full recipe and more details, check the [Full Recipe]. To start, I heat the olive oil in a large pot over medium heat. I add the finely chopped onion and sauté it for about five minutes. The onion will turn soft and clear. Then, I mix in the minced garlic and chopped red bell pepper. I cook this for another two to three minutes. The smell will be amazing as the bell pepper softens. Next, I add the diced sweet potatoes to the pot. I sprinkle in the ground cumin, chili powder, and smoked paprika. It's important to stir well to coat the sweet potatoes in the spices. I sauté the mix for another two to three minutes. This step brings out all the flavors. Now, I pour in the can of diced tomatoes along with their juices. I also add the drained black beans and the vegetable broth. I stir everything together to mix well. At this point, I turn up the heat until it reaches a gentle boil. Once it boils, I lower the heat to let the chili simmer. I leave it uncovered for about 25 to 30 minutes. I check the sweet potatoes by piercing them with a fork. They should be soft and tender. When the chili is almost done, I taste it to adjust the seasonings. I add salt and freshly ground black pepper as needed. For those who like it spicy, I suggest a pinch of chili flakes or some diced jalapeños. After it's cooked just right, I remove the pot from the heat. I let the chili rest for a few minutes before serving. This helps the flavors blend nicely. For the full recipe, refer to the section on ingredients. Using low sodium vegetable broth makes a big difference. It keeps the chili tasty without too much salt. This way, you can control the flavor better. The broth adds depth and helps the sweet potatoes cook nicely. When cutting sweet potatoes, aim for even pieces. This ensures they cook at the same time. Try to cut them into 1-inch cubes. This size allows the sweet potatoes to become tender while keeping their shape. To spice things up, add chili flakes or diced jalapeños. Adjust the heat to your liking. If you want a milder chili, skip the spicy stuff. Fresh herbs like cilantro can brighten up the dish. Sprinkle them on top just before serving for a fresh taste. For a stunning presentation, serve the chili in deep bowls. Top it with fresh cilantro and slices of avocado. The creamy avocado contrasts the chili's heat. Don't forget a lime wedge on the side. A squeeze of lime gives a bright finish to each bite. If you're looking for sides, cornbread or a simple salad works well. They complement the chili's flavors and add texture to your meal. For the full recipe, check out the Sweet Potato and Black Bean Chili Delight. {{image_4}} For a vegan or vegetarian version, make sure all your ingredients are plant-based. Most of the ingredients in Sweet Potato and Black Bean Chili are already vegan. Use olive oil for cooking and avoid any animal products. You can also add more veggies for texture. Consider adding zucchini, corn, or even spinach. These additions boost flavor and nutrition. If you want to add meat, ground turkey or beef works great. Brown the meat in the pot before adding the onions. This step adds depth to the chili’s flavor. Adjust cooking times to ensure the meat is fully cooked. After browning the meat, follow the same steps for the chili. The cooking time might extend by 5-10 minutes. For gluten-free options, check labels to ensure all ingredients are gluten-free. Most canned items are safe, but it's good to verify. If you're looking for a low-carb version, swap out the sweet potatoes for cauliflower. Cauliflower adds a nice texture without the carbs. These adaptations let you enjoy a delicious bowl of chili while meeting your dietary needs. To keep your sweet potato and black bean chili fresh, use airtight containers. Glass or plastic containers work well. Make sure the containers seal tightly. This keeps air out and preserves flavor. When you reheat chili, use a pot on the stove. Heat it over medium-low. Stir often to avoid burning. You can also use a microwave. Place the chili in a microwave-safe bowl. Cover it with a damp paper towel. This keeps moisture in. To keep your chili tasty, add a splash of vegetable broth if it seems dry. This brings back its rich flavor. Freezing chili is a great way to save it for later. Divide your chili into meal-sized portions. Use freezer-safe bags or containers. Remove as much air as possible before sealing. This helps prevent freezer burn. When you want to eat it, thaw the chili overnight in the fridge. To reheat, use the stove or microwave, just like before. Enjoy the same delightful flavors even after freezing! For the complete recipe, check the Full Recipe link. What can I substitute for sweet potatoes? You can use butternut squash or carrots as a substitute. Both offer sweetness and texture. If you want more fiber, try using cubed pumpkin. Can I make this chili in a slow cooker? Yes, you can! Just combine all the ingredients in your slow cooker. Cook on low for 6-8 hours or on high for 3-4 hours. This method makes the flavors even better. How long does the chili last in the fridge? Your chili will stay fresh for about 4-5 days in the fridge. Make sure to store it in an airtight container for best results. Approximate nutritional values per serving - Calories: 300 - Protein: 12g - Fat: 5g - Carbohydrates: 55g - Fiber: 12g Caloric content and dietary considerations This chili is rich in fiber and vitamins. It is vegan and gluten-free, making it suitable for many diets. Best practices for meal prepping chili Try cooking a big batch on the weekend. Store it in small containers for easy meals during the week. This saves time and effort. How flavors develop when made in advance Chili tastes even better the next day! The spices and ingredients meld together, creating a rich, deep flavor. You’ll love how much the taste improves. This blog covered how to make Sweet Potato and Black Bean Chili. We discussed the ingredients you need and the steps to prepare the dish. You learned some tips for cooking and enhancing flavor, along with storage options. Don't forget to try variations to suit your taste or dietary needs. Chili is versatile and offers countless possibilities. I hope you feel inspired to whip up this delicious, hearty meal!

Sweet Potato and Black Bean Chili Flavorful Delight

Craving a warm, hearty dish that’s packed with flavor and nutrients? Look no further! My Sweet Potato and Black Bean

- 1 lb ground turkey - 1/2 cup whole wheat breadcrumbs - 1/4 cup freshly grated Parmesan cheese - 1/4 cup fresh parsley, finely chopped - 1 large egg, beaten - 2 cloves garlic, finely minced - 1 teaspoon onion powder - 1 teaspoon Italian seasoning blend - 1 jar (24 oz) marinara sauce, store-bought or homemade - Extra virgin olive oil, for frying - Salt and freshly ground black pepper, to taste When I make these easy turkey meatballs, I find that the right ingredients make all the difference. Ground turkey is lean and gives a great base. Whole wheat breadcrumbs add texture and help bind the meatballs together. Freshly grated Parmesan cheese brings a rich flavor that enhances every bite. Fresh parsley adds a burst of color and freshness. The large egg helps hold everything together. You can add garlic, onion powder, and Italian seasoning if you want to boost the flavor even more. For cooking, I always use extra virgin olive oil. It adds healthy fat and flavor. Salt and freshly ground black pepper are key to making every ingredient shine. You can find the full recipe [here](#). - In a big mixing bowl, combine: - 1 lb ground turkey - 1/2 cup whole wheat breadcrumbs - 1/4 cup freshly grated Parmesan cheese - 1/4 cup fresh parsley, finely chopped - 1 large egg, beaten - 2 cloves garlic, finely minced - 1 teaspoon onion powder - 1 teaspoon Italian seasoning blend - Salt and freshly ground black pepper, to taste - Use your hands or a spatula. Mix until all is well-distributed. This helps the flavors blend. - Roll the mixture into 1-inch balls. Aim for about 16 to 20 meatballs. - To get even sizes, use a small ice cream scoop. This makes every meatball look nice. - Heat a large skillet over medium heat. - Add enough extra virgin olive oil to coat the bottom. - Wait until the oil shimmers. Then gently place the meatballs in the skillet. - Leave space between them. This allows for even browning. - Sear the meatballs for about 3 to 4 minutes on each side. They should turn a rich, golden-brown. - Carefully pour marinara sauce over the meatballs in the skillet. - Reduce the heat to low. Cover the skillet. - Let the meatballs simmer for 15 to 20 minutes. This lets them soak up the delicious flavors. - After cooking, serve the meatballs hot. For a great look, garnish with more parsley. Follow the Full Recipe for a complete guide and enjoy your meal! To keep your turkey meatballs moist and tasty, add a bit more fat. You can use olive oil in the mix or even a splash of chicken broth. This helps prevent dryness. Make sure your ground turkey is fresh; that adds to the flavor, too. Cook your meatballs at medium heat. This gives them a nice brown crust. They should reach an internal temperature of 165°F to be safe. Use a meat thermometer for accuracy. When serving your meatballs, think about presentation. Place them on a bed of spaghetti for a classic look. You can also serve them with crusty bread. This makes for a hearty meal. For a nice touch, garnish with fresh parsley and grated Parmesan cheese. This adds color and extra flavor. A drizzle of marinara sauce over the top makes it even better. To boost the flavor of your meatballs, try adding more herbs and spices. Fresh basil or oregano works well. You can also add a pinch of red pepper flakes for heat. Serve your meatballs with side dishes like a green salad or roasted vegetables. These add balance to the meal. For even more flavor, consider serving with garlic bread or a light soup. For the full recipe, check the section above! {{image_4}} You can swap ground turkey for other meats. Ground chicken works well too. It has a mild taste and stays juicy. If you prefer pork, use ground pork instead. It adds richness to the meatballs. For those who want plant-based options, try using lentils or chickpeas. These give a great texture. You can also use store-bought meat substitutes. They often mimic the taste of meat and are easy to use. You can choose between homemade marinara or store-bought sauces. Homemade marinara often tastes fresher. It lets you control the flavors. If you’re short on time, store-bought is a great option. Just pick a brand that uses real ingredients. Want to try different flavors? You can use pesto or Alfredo sauce. They give a unique twist to your meatballs. Barbecue sauce can also add a sweet and smoky flavor. If you need gluten-free options, use gluten-free breadcrumbs. They work just as well as regular ones. You can also make your own by grinding gluten-free crackers. For a low-carb version, skip the breadcrumbs entirely. You can use ground nuts or seeds instead. These help bind the meatballs without extra carbs. For the full recipe, check out the instructions above. To keep your turkey meatballs fresh, use airtight containers. Glass or plastic containers work well. Label each container with the date. Store them in the fridge. Keep the marinara sauce separate to avoid soggy meatballs. The cold will help retain flavor and texture. To freeze turkey meatballs, let them cool completely first. Place them in a single layer on a baking sheet. Freeze until firm, then transfer them to a freezer bag. Remove as much air as possible. When you're ready to eat, thaw them in the fridge overnight. Reheat them in a skillet with a bit of marinara sauce for the best flavor and warmth. In the fridge, turkey meatballs last about three to four days. If you freeze them, they can last up to three months. Check for signs of spoilage. Look for any off smells, discoloration, or a slimy texture. If you spot these, it's best to discard them. Enjoy your tasty turkey meatballs while they are fresh! For the full recipe, you can refer back to the earlier sections. To make your meatballs tender, follow these tips: - Use lean ground turkey: Don't choose very lean turkey. A little fat helps. - Add moisture: Mix in a bit of milk or broth for extra moisture. - Avoid over-mixing: Mix just until combined. Over-mixing makes them tough. - Chill the mixture: Let it sit in the fridge for 30 minutes. This helps flavors meld and keeps the meatballs moist. These steps make a big difference in texture. You want a soft, juicy meatball that melts in your mouth! Yes, you can bake the meatballs! Here’s how: 1. Preheat your oven to 400°F (200°C). 2. Place the meatballs on a baking sheet lined with parchment paper. Space them out so they don’t touch. 3. Bake for about 20-25 minutes, or until they are cooked through and browned. Baking is a great way to cut down on oil. It’s easy and still gives good flavor! You can serve turkey meatballs with many tasty sides. Here are a few ideas: - Spaghetti: Classic pairing with marinara sauce. - Crusty bread: Perfect for dipping in sauce. - Salad: A fresh green salad can balance the meal. - Vegetables: Roasted or steamed veggies add color and nutrients. These sides create a well-rounded meal that everyone will enjoy! To ensure your turkey meatballs are safe to eat, follow these guidelines: - Use a meat thermometer: The internal temperature should reach 165°F (74°C). - Check for juices: They should run clear, not pink. - Look for browning: A nice golden color on the outside can signal they are ready. These checks are key to safe and delicious turkey meatballs. Enjoy the full recipe for more cooking tips! Now you know how to make delicious turkey meatballs from scratch. We covered the main ingredients, cooking steps, and tips to get it just right. Explore variations to suit your taste and dietary needs. Don’t forget to store leftovers properly for future meals. With practice, you’ll enjoy creating different flavors. It's all about trying new things and having fun in the kitchen. Enjoy your cooking adventure!

Easy Turkey Meatballs with Marinara Flavor Boost

Get ready to elevate your dinner game with my Easy Turkey Meatballs with Marinara Flavor Boost! These turkey meatballs are

Older posts
Newer posts
← Previous Page1 … Page68 Page69 Page70 … Page88 Next →

dsad

© 2025 spoonfulsavory • Built with GeneratePress

Our Policies

  • Copyright Policy
  • Cookie Policy
  • GDPR Policy
  • Privacy Policy
  • Disclaimer
  • Terms Of Use

More Information

  • Home
  • About
  • Contact
  • Appetizers
  • Dessert
  • Dinner
  • Drinks
©2025, spoonfulsavory About Back To Top