Skip to content
DisclaimerTerms Of UseGDPR PolicyCookie Policy

spoonfulsavory

  • Home
  • Drinks
  • Appetizers
  • Dinner
  • Dessert
  • About
  • Contact
  • Privacy Policy
DisclaimerTerms Of UseGDPR PolicyCookie Policy

Sarah

- 1/2 cup unsalted butter, plus extra for greasing - 1 cup dark chocolate (60-70% cocoa), chopped into small pieces - 2 large eggs - 2 large egg yolks - 1/2 cup granulated sugar - 1/4 cup all-purpose flour - 1/2 teaspoon pure vanilla extract - 1/4 teaspoon sea salt To create a perfect chocolate lava cake, you need a few key ingredients. Unsalted butter adds richness and helps with texture. Dark chocolate brings that deep, rich flavor we all love. Eggs and egg yolks make the cake fluffy and give it structure. Granulated sugar sweetens the batter and helps with browning. All-purpose flour binds everything together. Pure vanilla extract adds a warm, lovely aroma, while sea salt enhances the chocolate's flavor. - Powdered sugar - Fresh berries (raspberries, strawberries) - Fresh mint leaves Garnishes make your lava cake even more special. A light dusting of powdered sugar gives it an elegant look. Fresh berries add a juicy burst of flavor that pairs well with chocolate. Mint leaves bring a fresh touch that brightens each bite. You can mix and match these garnishes to create your own unique look and taste. For the full recipe, check out the complete guide. Start by preheating your oven to 425°F (220°C). Next, take four ramekins and grease them well with softened unsalted butter. Make sure you cover all the sides. After that, dust each ramekin lightly with all-purpose flour. Shake out the extra flour to stop the cakes from sticking. For the chocolate and butter, use a microwave-safe bowl. Add 1 cup of chopped dark chocolate and 1/2 cup of butter. Microwave this mix in 30-second bursts. Stir well after each burst until it's smooth. Let it cool for a few minutes before using. In a large bowl, whisk together 2 large eggs, 2 egg yolks, and 1/2 cup of granulated sugar. Beat them until they are light and fluffy. This should take about 3-4 minutes. Next, pour the melted chocolate-butter mix into this egg mixture. Stir it gently until it's blended. Then, add 1/4 teaspoon of sea salt and 1/2 teaspoon of pure vanilla extract. Mix until all is combined. Finally, fold in 1/4 cup of all-purpose flour. Be careful not to overmix; stop when you see no flour streaks. Now, evenly fill the prepared ramekins with the batter, about 3/4 full. Place them on a baking sheet for easy moving. Bake in the oven for 12-14 minutes. The edges should be firm, but the centers must be soft. A slight wobble in the center is good. Once baked, take the ramekins out of the oven and let them sit for 1 minute. Use a knife to run around the edges, loosening the cakes. Invert each ramekin onto a plate, tapping gently to release them. Dust the tops with powdered sugar while warm. You can also add fresh berries and mint leaves for a nice touch. Baking time is key for this dessert. Too little time makes the center too runny. Too much time makes it dry. Aim for 12 to 14 minutes in a hot oven. Look for firm edges and a soft center. The center should jiggle slightly when you shake the ramekin. That’s the sweet spot! Overmixing the batter can ruin your cake. Mix just until you see no more flour. This keeps it light and fluffy. Also, greasing the ramekins is crucial. Use softened butter and flour to prevent sticking. If not greased well, your cakes may break apart when served. For baking, choose sturdy ramekins. I recommend 6-ounce ramekins for the right portion. They should withstand high heat. Essential tools include a whisk for beating eggs, a spatula for folding, and a microwave-safe bowl for melting chocolate. These simple tools make cooking easier and more fun. For the full recipe, check the detailed instructions above. {{image_4}} You can mix up the flavor of your chocolate lava cake. Adding espresso or coffee gives a rich, bold taste. Just stir in one tablespoon of espresso powder with the melted chocolate. It boosts the chocolate flavor without overpowering it. For a refreshing twist, infuse the cake with orange or mint. Use orange zest for a citrus kick or fresh mint leaves for a cool touch. Both options make the dessert unique and fun. If you need a dairy-free option, swap the butter for coconut oil or a vegan butter substitute. This change keeps the cake moist and tasty. For gluten-free needs, replace all-purpose flour with a gluten-free blend. Look for one that has a mix of rice flour, almond flour, and tapioca starch. These substitutes allow everyone to enjoy this dessert without missing out. Serving your chocolate lava cake can be just as fun as making it. Pair it with a scoop of vanilla ice cream for a warm and cold treat. The ice cream melts into the cake, creating a creamy mix. Drizzle with chocolate or caramel sauce for extra flavor. You can also create a dessert platter. Include berries, whipped cream, or even other mini desserts. This way, your guests can enjoy a variety of flavors and textures. Check out the Full Recipe for more ideas! After you enjoy your chocolate lava cakes, store any leftovers in the fridge. Place them in an airtight container to keep them fresh. This helps prevent the cakes from drying out. Leftover lava cakes can stay good for up to three days. If you want to enjoy them later, make sure they are cool before storing. This keeps the texture nice. To bring back the warm, gooey center, reheating is key. You have two choices: microwave or oven. - Microwave: Place a cake on a microwave-safe plate. Heat it for about 20-30 seconds. Check to see if it is warm. If not, heat for another 10 seconds. - Oven: Preheat your oven to 350°F (175°C). Put the cakes on a baking sheet and cover them with foil. Heat for about 10-15 minutes. The oven keeps the outside soft while warming the center. Using these methods, you can enjoy that delightful molten chocolate again! Use dark chocolate with a cocoa percentage of 60-70%. Brands like Ghirardelli or Callebaut work well. They melt smoothly and offer a rich flavor. Higher cocoa content gives a deeper taste, while lower percentages may be too sweet. You can prepare the batter ahead and store it in the fridge for up to 24 hours. Just fill the greased ramekins and cover them with plastic wrap. When you're ready to bake, take them out and let them sit at room temperature for about 30 minutes before baking. If your cake doesn’t ooze, it may be overbaked. Aim for a baking time of 12-14 minutes. Check for firm edges and a soft center. If it’s undercooked, return it to the oven for 1-2 more minutes. Experiment with your oven's temperature, as it may vary. Pair your Lava Cake with vanilla ice cream or whipped cream for a nice contrast. Fresh berries like raspberries or strawberries add a fruity touch. A drizzle of chocolate or caramel sauce can enhance the flavor even more. Enjoy your dessert with a cup of coffee or dessert wine for a perfect finish. You learned how to make a delicious chocolate lava cake. We covered key ingredients, the step-by-step process, and useful tips and tricks. Remember to watch your baking time for that perfect gooey center. Don't forget to try different flavors and garnishes to make it your own. Enjoy your baking journey! With these techniques, you can impress anyone with a delectable dessert that looks and tastes great. Now, it’s time to treat yourself and others to this sweet delight!

Chocolate Lava Cake Delightful Dessert Recipe

Craving a dessert that’s both fancy and fun? Look no further than chocolate lava cake! This rich and gooey treat

To make a great crispy chickpea salad, gather these fresh ingredients: - 1 can (15 oz) chickpeas, thoroughly drained and rinsed - 4 cups mixed greens (spinach, arugula, romaine) - 1 cup cherry tomatoes, halved - 1 medium cucumber, diced - 1/2 medium red onion, thinly sliced - 1/4 cup feta cheese (optional for vegan option) The right seasonings and dressing bring everything together. You will need: - 1 tablespoon extra-virgin olive oil - 1 teaspoon smoked paprika - 1/2 teaspoon garlic powder - 1/2 teaspoon ground cumin - Salt and freshly ground black pepper, to taste - 2 tablespoons tahini - 1 tablespoon freshly squeezed lemon juice - Fresh parsley, chopped for garnish Gathering these ingredients is the first step to making your crispy chickpea salad. Make sure to use fresh greens and ripe tomatoes for the best flavor. For a vegan option, simply skip the feta cheese. You can find the full recipe in the previous sections. Happy cooking! 1. Preheat the oven to 400°F (200°C). This step is key for crispiness. 2. In a large bowl, combine the chickpeas with olive oil and your spices. Add smoked paprika, garlic powder, cumin, salt, and pepper. Mix well until all chickpeas are coated. 3. Spread the seasoned chickpeas on a baking sheet. Use parchment paper for easy cleanup. 1. Roast the chickpeas for 25-30 minutes. Remember to shake the pan halfway through. This step helps them cook evenly. 2. Check for a golden brown and crispy texture. You want them crunchy, not burnt. 1. In a big bowl, combine mixed greens, cherry tomatoes, cucumber, and red onion. Toss gently to mix all the fresh ingredients. 2. For the dressing, whisk together tahini and lemon juice. Add a little water if it’s too thick. Season with salt to taste. 1. Once your chickpeas are warm and crispy, add them to the salad mixture. 2. Drizzle the tahini dressing over the salad and toss gently. This ensures every bite is full of flavor. 3. If you like, garnish with feta cheese and fresh parsley. Serve right away for the best taste. Check out the [Full Recipe] for more details! To make your chickpeas crispy, start by drying them well. Drain and rinse the can of chickpeas, then pat them dry with a towel. This step is crucial. Moisture will make them soggy instead of crispy. After drying, spread them on a baking sheet lined with parchment paper. This helps with even roasting and makes cleanup easy. For a beautiful presentation, serve your salad in large, shallow bowls. This allows the colors to shine and the flavors to mix well. To add a pop of color and flavor, place lemon wedges around the salad. Guests can squeeze the lemon on their servings for a zesty touch. Feel free to switch up the greens. You can use kale, romaine, or even baby spinach. Seasonal vegetables like bell peppers or radishes also work great. If you want a vegan dressing, swap tahini with hummus or a simple olive oil and vinegar mix. This keeps the salad fresh and exciting every time you make it. {{image_4}} You can change the flavor of your crispy chickpea salad in fun ways. - For a spicy kick, add cayenne pepper. It brings heat and boldness. - Try a Mediterranean twist with olives and sun-dried tomatoes. This adds a lovely salty taste. These variations make the salad unique and exciting each time you make it. Adding protein to your salad makes it filling and nutritious. - Grilled chicken or shrimp can be great toppings. They make the salad heartier and satisfying. - You can also mix in quinoa or farro. These grains add texture and extra nutrients. These options keep your meal balanced and delicious. Changing up the dressing can enhance your salad’s flavor. - Swap the tahini dressing for a lemon vinaigrette. The bright taste of lemon is refreshing. - A yogurt-based dressing adds creaminess. This works well with the crispy chickpeas. Experimenting with dressings can lead to new favorites. For the full recipe, check out the details above. Store any leftover salad in an airtight container. Keep it in the fridge. This helps keep your salad fresh for up to three days. Avoid mixing the chickpeas with the greens until you eat it. This keeps the greens crisp and tasty. To maintain crispy chickpeas, place them in a separate container. Store them at room temperature. Keeping them away from moisture helps them stay crunchy. Prep your ingredients ahead of time for easy meals. You can rinse and drain the chickpeas a day before. Chop the veggies and store them in the fridge. This makes assembly quick and easy. When you are ready to eat, toss your salad together. Add the crispy chickpeas last to keep them crunchy. This way, your salad will taste fresh and vibrant. You can freeze the chickpeas if you have leftovers. Just let them cool first. Place them in a freezer-safe bag and remove all air. They can last up to three months in the freezer. When you want to eat them, thaw them in the fridge overnight. To reheat, pop them in the oven at 400°F until warm. This helps restore their crispiness. Avoid freezing the salad once it has dressing; fresh salads taste best! To make chickpeas crispy, start by drying them well after rinsing. Wet chickpeas will steam instead of roast. Use a clean towel for drying. Then, toss them with olive oil and your favorite spices. Smoke paprika and cumin work great! Spread them in a single layer on a baking sheet lined with parchment paper. Roast at 400°F (200°C) for 25-30 minutes. Shake the pan halfway through to help them cook evenly. The goal is golden brown and crunchy chickpeas. Yes, you can prepare this salad in advance. Cook the chickpeas and store them in an airtight container. You can also chop the veggies and mix them together. Keep the dressing separate to prevent sogginess. When you’re ready to eat, combine everything. This method keeps your salad fresh and crisp. If you need a substitute for tahini, consider using almond butter or sunflower seed butter. These options provide a creamy texture and nutty flavor. Another great choice is a simple dressing made from yogurt and lemon juice. This will give you a nice tang without the sesame taste. Yes, this salad is great for meal prep. Store the chickpeas, veggies, and dressing separately. Assemble your salad when you are ready to eat. This way, you’ll keep everything fresh and crunchy. Use glass containers for storage to avoid staining and make reheating easy. Leftovers will typically last for about 3 days in the fridge. Make sure to store the chickpeas separately from the veggies. This helps maintain their crispness. If the chickpeas lose their crunch, you can reheat them in the oven for a few minutes to restore their texture. Enjoy your delicious, fresh salad! This crunchy chickpea salad is easy to make and packed with flavor. You learned how to prepare, roast, and serve chickpeas. I shared tips to keep them crispy and ideas to customize your salad. Remember, you can switch dressings and add proteins for variety. Enjoy this healthy meal anytime you want a fresh, tasty dish!

Crispy Chickpea Salad Fresh and Flavorful Delight

Are you ready to tantalize your taste buds with a Crispy Chickpea Salad? This dish is not only fresh and

To make a tasty Savory Breakfast Hash, gather these key ingredients: - 2 medium russet potatoes, peeled and diced into small cubes - 1 small sweet potato, peeled and diced - 1 bell pepper (red, green, or yellow), chopped into bite-sized pieces - 1 small red onion, finely diced - 2 cloves of garlic, minced - 3 slices of bacon, chopped into small pieces (you can use turkey bacon for a leaner choice) - 4 large eggs - 1 teaspoon smoked paprika - Salt and freshly ground black pepper, to taste - Fresh parsley, finely chopped (for garnish) - Olive oil, for frying If you want to make this hash vegetarian, skip the bacon. You can add mushrooms or tempeh instead. For gluten-free needs, this recipe is already gluten-free! Just ensure your bacon is gluten-free. To boost the flavor, use these seasonings: - Smoked paprika adds a warm, smoky taste. - Salt and black pepper enhance all the flavors. - Fresh parsley gives a bright finish. To balance flavors, taste as you cook. If it feels bland, add a pinch of salt or extra seasoning. Enjoy experimenting with flavors to find what you like best! If you want more ideas, check the full recipe. To make your savory breakfast hash, start with preparing the ingredients. First, peel and dice the russet and sweet potatoes into small cubes. This helps them cook evenly. Chop the bell pepper and dice the red onion finely. Mince the garlic cloves and chop the bacon into small pieces. In a large skillet, heat 1 tablespoon of olive oil over medium heat. Add the chopped bacon. Cook for about 4-5 minutes, stirring often. You want it crispy and golden. Once done, take the bacon out and let it drain on a paper towel. Keep that tasty fat in the pan for flavor. Next, add the diced potatoes to the skillet. Season with salt, black pepper, and smoked paprika. Sauté for 8-10 minutes. Stir occasionally until the potatoes are golden and softening. Add the chopped onion, bell pepper, and garlic. Cook for another 5-7 minutes. Mix until the veggies are tender and the potatoes are fully cooked. To prevent sticking, make sure to stir often and adjust the heat as needed. If things start to brown too quickly, lower the heat. Now it’s time for the eggs! You can cook them sunny-side up or over-easy. Once the hash is ready, push it to one side of the skillet. Crack the eggs into the empty space. Cook the eggs until the whites are set. For sunny-side up, it takes about 2-4 minutes. If you prefer over-easy, gently flip them after the whites are firm. Timing is key here. Keep an eye on the yolks. You want them runny but not raw. When the eggs are done, sprinkle the crispy bacon back into the skillet. Gently fold everything together. Taste and adjust the seasoning if needed. For a complete meal, don’t forget to check out the Full Recipe. You can serve the hash in individual plates with the egg on top. A sprinkle of parsley adds a nice touch too! To make the potatoes perfect, choose the right size. Dice them small and even. This helps them cook quicker and more evenly. After you add them to the skillet, let them sit for a bit before stirring. This way, they can get that nice brown color. For crispiness in bacon alternatives, try using turkey bacon. Cook it in the same way as regular bacon. Keep it moving in the pan to avoid burning. You can also use a bit of oil to help it crisp up nicely. You can add your favorite veggies for a personal touch. Think about adding spinach, mushrooms, or zucchini. These add color and flavor. For meats, consider swapping bacon for sausage or ham. Each option gives a new taste to your hash. When using seasonal ingredients, let them guide your choices. In summer, add fresh tomatoes and corn. In fall, try sweet potatoes or butternut squash. This keeps your breakfast hash fresh and exciting. {{image_4}} To create a tasty vegetarian version of savory breakfast hash, you can swap out the bacon for hearty ingredients. Here are some ideas: - Ingredients: - 2 medium russet potatoes, peeled and diced into small cubes - 1 small sweet potato, peeled and diced - 1 bell pepper, chopped - 1 small red onion, finely diced - 2 cloves of garlic, minced - 1 cup of black beans or chickpeas - 4 large eggs (or tofu for a vegan option) - 1 teaspoon smoked paprika - Salt and black pepper, to taste - Olive oil, for frying - Fresh spinach or kale, for added greens Start by cooking the potatoes in a skillet with olive oil. After about ten minutes, add the onions, bell pepper, and garlic. When the veggies are tender, mix in black beans or chickpeas for protein. If using tofu, scramble it in after the veggies are cooked. Season with smoked paprika, salt, and pepper for flavor. You can give your breakfast hash a global flair with simple swaps. Here are a few ideas: - Mexican Twist: - Use chorizo or soy chorizo for spice. - Add diced tomatoes and corn. - Serve with avocado and salsa on top. - Mediterranean Twist: - Incorporate feta cheese and kalamata olives. - Use zucchini and eggplant along with potatoes. - Season with oregano and serve with tzatziki. For each twist, adjust the ingredients to match your taste. These flavors can make your breakfast unique and exciting. Get creative and enjoy different cultures on your plate! You can find the full recipe in the recipe section. To keep your savory breakfast hash fresh, store it in an airtight container. This helps seal in flavors and moisture. Place it in the fridge if you plan to eat it within four days. For longer storage, you can freeze it. Use freezer-safe containers or bags. Make sure to remove as much air as possible before sealing. This prevents freezer burn and keeps the hash tasty. Here are some tips to maintain freshness: - Allow the hash to cool before storing. - Separate eggs if possible, as they may change texture when frozen. - Label containers with the date so you know when to use them. When it’s time to enjoy your breakfast hash again, reheat it carefully. You want to keep the texture just right. The best method is to use a skillet. Heat on low to medium heat. Stir occasionally to ensure even warming. This usually takes about 5 to 10 minutes. You can also use a microwave. Place the hash in a microwave-safe dish. Cover it with a damp paper towel to keep it moist. Heat in short bursts, about 1 to 2 minutes at a time. Check often to avoid overheating. For perfectly reheated servings, remember these tips: - Add a splash of olive oil or water to keep it moist. - If the eggs are in the hash, be careful. Reheat them gently to avoid toughness. - Taste and adjust seasoning, as flavors may fade during storage. With these storage and reheating tips, your savory breakfast hash stays delicious and ready for any morning. Enjoy every bite! What types of potatoes are best for hash? I love using russet and sweet potatoes for my hash. Russet potatoes are starchy, making them crispy on the outside. Sweet potatoes add a nice sweetness and a pop of color. You can also try Yukon golds for their creamy texture. Experiment with different types to find your perfect mix. Can I make this dish ahead of time? Yes, you can make this dish ahead of time! Cook the hash and store it in the fridge. Just reheat it on the stovetop when you're ready to eat. If you want fresh eggs, cook those separately when serving. This way, you get a hot meal without much fuss. How to fix common issues (e.g., soggy potatoes)? If your potatoes turn out soggy, try these tips. First, make sure to dice them small so they cook evenly. Also, avoid overcrowding the pan. If they still get soggy, increase the heat to crisp them up. Let them sit for a bit without stirring. This helps them brown nicely. What to do if the eggs overcook? If your eggs overcook, don’t worry! You can still enjoy the dish. If they turn hard, add a little butter or cream when you reheat. This can help soften their texture. Next time, keep a close eye on the eggs. Cook them on low heat for better control. This blog covered how to create a savory breakfast hash. We explored key ingredients, cooking methods, and flavor tips. You can make it vegetarian and try global twists for variety. Proper storage and reheating keep your leftovers fresh. Use these ideas to customize your hash. Enjoy experimenting with flavors and find what you love. Have fun in the kitchen!

Savory Breakfast Hash Tasty and Hearty Morning Meal

If you’re ready to transform your mornings, this Savory Breakfast Hash is your answer. Packed with flavor and hearty ingredients,

- 2 tablespoons extra virgin olive oil - 1 medium onion, finely chopped - 3 cloves garlic, minced - 2 cans (14.5 ounces each) diced tomatoes, including juices - 2 cups vegetable broth - 1 teaspoon sugar (optional) - 1 cup heavy cream or coconut cream - 1 cup fresh basil leaves - Sea salt and freshly ground black pepper, to taste - Croutons or fresh basil sprigs for garnish (optional) To make the best creamy tomato basil soup, gather these fresh and simple ingredients. The olive oil adds a rich flavor, while the onion and garlic create a savory base. The diced tomatoes bring in natural sweetness and acidity, making them vital for our soup. You can use canned tomatoes for ease, but feel free to use fresh tomatoes if you prefer. Just remember to peel and chop them before adding to the pot. Vegetable broth gives the soup depth, but chicken broth works too if you want a meatier flavor. The sugar is optional, but it helps balance the acidity of the tomatoes. I love using heavy cream for a rich, creamy texture, but coconut cream is a great option for a vegan twist. Fresh basil adds a bright flavor that makes this soup special. Don’t forget to season with salt and pepper to taste! For garnish, croutons add crunch, and fresh basil sprigs look pretty on top. These ingredients come together to create a warm hug in a bowl, perfect for cold days. For the full recipe, check out the [Full Recipe]. Start by heating 2 tablespoons of extra virgin olive oil in a large pot over medium heat. Add 1 medium onion, finely chopped. Cook the onion until it becomes soft and clear, about 5 minutes. Then, add 3 cloves of minced garlic. Cook for just 1 more minute until the garlic smells great. Next, add 2 cans of diced tomatoes, including their juices, to the pot. Pour in 2 cups of vegetable broth. Stir everything well to mix. Bring this mixture to a gentle simmer. This step helps all the flavors blend nicely. To balance the soup's taste, stir in 1 teaspoon of sugar, if you like. This helps cut the acidity of the tomatoes. Then, add sea salt and freshly ground black pepper to taste. Let the soup simmer for about 15 minutes. Stir it occasionally to help the flavors come together. Once the soup has simmered, take it off the heat. You can use an immersion blender to puree it until smooth. If you prefer a traditional blender, let the soup cool for a bit before blending. Always be careful with hot liquids. Slowly mix in 1 cup of heavy cream or coconut cream. This gives the soup a rich texture. Then, gently fold in 1 cup of fresh basil leaves until they are well combined. Taste the soup and adjust the seasoning with salt and pepper as needed. Return the pot to low heat and warm the soup for another 5 minutes. Stir it often to keep it at the right temperature. Avoid boiling the soup. When serving, ladle the soup into bowls. You can add croutons or fresh basil sprigs on top for a nice touch. Follow the Full Recipe for more details. To make your creamy tomato basil soup even tastier, consider adding some herbs and spices. Fresh oregano and thyme give depth to the flavor. A pinch of red pepper flakes adds just the right amount of heat. For toppings, try croutons for crunch or a swirl of pesto for a burst of flavor. You can also add a sprinkle of grated parmesan cheese for a salty kick. These choices add texture and elevate your soup to new heights. One common mistake is overcooking the garlic. Garlic can turn bitter if cooked too long. Just sauté it until fragrant, about one minute. Another mistake is skipping the blending step. Blending gives the soup its creamy texture. If you don’t blend, the soup will be chunky. Make sure to blend until smooth for the best results. For making soup, a heavy-bottomed pot is ideal. It helps distribute heat evenly, preventing burning. A Dutch oven is a great choice for this. When it comes to blending, an immersion blender is your best friend. It’s safe and easy to use right in the pot. If you use a traditional blender, let the soup cool a bit before blending. This keeps you safe from hot splashes. {{image_4}} For a dairy-free twist, replace heavy cream with coconut cream. Coconut cream adds creaminess and a hint of sweetness. You get a rich flavor without using dairy. This option works well for those with lactose intolerance or dairy allergies. You can also try dairy-free garnishes. Instead of croutons or cheese, use avocado slices or toasted pumpkin seeds. They add texture and flavor while keeping the soup dairy-free. Adding proteins makes the soup heartier. You can include cooked chicken or beans. Shredded chicken gives a nice texture and boosts protein. On the other hand, beans like cannellini or chickpeas add creaminess and fiber. When adding proteins, balance the flavors. If you use chicken, season it well with salt and pepper. If you use beans, try adding some spices to enhance the taste. You can easily add more veggies to the soup. Consider spinach, carrots, or bell peppers. These vegetables not only boost nutrition but also add color. Adjust cooking times for different vegetables. For softer veggies like spinach, add them near the end. For harder ones like carrots, add them earlier to cook through. This ensures everything is tender and blends well in the soup. For the full recipe, check the [Full Recipe]. To store your creamy tomato basil soup, use airtight containers. Glass or plastic containers work well. The soup lasts about 4 to 5 days in the fridge. Before storing, let it cool to room temperature. This helps avoid condensation inside the container. Freezing creamy soups can be tricky. To freeze, pour the cooled soup into freezer-safe bags or containers. Leave space at the top as the soup expands. It can last up to 3 months in the freezer. When you want to eat it, thaw the soup overnight in the fridge. Avoid thawing at room temperature, as it can spoil. To reheat the soup without losing quality, use the stove or microwave. If using the stove, warm it over low heat. Stir it often to prevent sticking. If using a microwave, heat in short bursts. Stir in between to ensure even heating. Add a splash of fresh cream or a few basil leaves while reheating. This adds freshness and enhances flavor. To make this soup, you start with sautéing onion and garlic. You’ll need olive oil to warm in a pot. Add the chopped onion and cook until soft. Then, add minced garlic and cook until fragrant. Next, incorporate the diced tomatoes and vegetable broth. Stir the mixture and let it simmer. After about fifteen minutes, blend it until smooth. Finally, mix in cream and fresh basil. This simple process leads to a rich, comforting soup. Yes, you can use fresh tomatoes! Choose ripe tomatoes for the best flavor. You’ll need about six medium tomatoes. To prepare them, first, score the bottom with a knife. Blanch them in boiling water for about a minute. Then, transfer them to ice water. The skins will peel off easily. Chop them up and add them to the pot, just like you would with canned tomatoes. You have several options to replace heavy cream. Coconut cream is a great choice for a dairy-free version. You can also use cashew cream or almond milk mixed with a bit of cornstarch. These alternatives keep the soup creamy without the extra calories. Just remember that these options may slightly change the flavor, but they still taste great! Absolutely! Creamy tomato basil soup is perfect for meal prep. It stores well in the fridge for up to a week. You can also freeze it for up to three months. Just make sure to cool it completely before storing. When you’re ready to eat, reheat it slowly on the stove or in the microwave. This makes for a quick and delicious meal any day! If you want some heat, consider adding red pepper flakes or cayenne pepper. Start with a pinch and adjust to your taste. You can also add diced jalapeños while sautéing the onion. For a smoky flavor, try adding chipotle peppers in adobo sauce. These ingredients will give your creamy tomato basil soup a nice kick! For the full recipe, check out the [Full Recipe]. This blog post covered how to make a delicious Creamy Tomato Basil Soup. You learned about the key ingredients, like olive oil, tomatoes, heavy cream, and fresh basil. I shared step-by-step instructions to guide your cooking. With tips on storage and common mistakes, you can enjoy this soup any time. Don’t hesitate to try different ingredients and variations. Cooking is all about creativity. Enjoy your tasty soup!

Creamy Tomato Basil Soup Perfect for Cold Days

When cold days arrive, nothing warms you up like a bowl of creamy tomato basil soup. This comforting dish blends

To make a Mediterranean quinoa salad, you need fresh and tasty ingredients. Here is a list of essential ingredients: - 1 cup quinoa (uncooked) - 2 cups vegetable broth (or water) - 1 cup cherry tomatoes, halved - 1 cucumber, diced - 1 bell pepper (red or yellow), diced - 1/2 red onion, finely chopped - 1 cup kalamata olives, pitted and halved - 1/2 cup feta cheese, crumbled (omit for a vegan option) - 1/4 cup fresh parsley, chopped - 1/4 cup fresh mint, chopped - 3 tablespoons lemon juice - 3 tablespoons extra virgin olive oil - Salt and freshly ground black pepper, to taste These ingredients combine to create a colorful and nutritious dish. I love using fresh vegetables because they add crunch and flavor. Quinoa is a great base; it’s high in protein and gluten-free. You can also adjust the ingredients to suit your taste. For example, adding more herbs can brighten the flavor. If you want to try this recipe, you can find the full recipe here. Enjoy making your Mediterranean quinoa salad! Start by rinsing quinoa under cold water. This step is key to removing any bitterness. Use a fine mesh strainer for best results. Next, in a medium pot, combine the rinsed quinoa and vegetable broth. Bring this mixture to a rolling boil. After it boils, reduce the heat to low. Cover the pot and let it simmer for about 15 to 20 minutes. You'll know it's done when all the liquid is absorbed. Fluff the quinoa with a fork and set it aside to cool completely. While the quinoa cools, chop and dice your vegetables. Slice the cherry tomatoes in half. Dice the cucumber and bell pepper into small pieces. Finely chop the red onion. Once done, transfer all the chopped vegetables to a large mixing bowl. This bowl will be the base for your salad. In the bowl with your vegetables, add the halved kalamata olives. If you like feta cheese, crumble some and add it too. Toss in the fresh parsley and mint. Gently mix these ingredients to blend their flavors. Next, in a small bowl, combine the lemon juice and extra virgin olive oil. Season this mix with salt and freshly ground black pepper. Whisk until the dressing is smooth. Now, add the cooled quinoa to the large bowl with vegetables and herbs. Drizzle the dressing over everything. Using a large spoon or spatula, gently toss the salad. Make sure all ingredients are well combined and coated with the dressing. Taste your salad and adjust any seasonings if needed. Allow it to sit for at least 15 minutes before serving. This time helps the flavors meld nicely together. For a full recipe, refer to the earlier section. To make perfect quinoa, start by rinsing it. This removes any bitterness. Use a fine mesh strainer and run cold water over it. After rinsing, cook the quinoa in vegetable broth. This adds flavor. When the quinoa is done, fluff it with a fork. This step keeps it light and airy. Avoid using a spoon, as it can make the quinoa mushy. Let the quinoa cool before mixing it with the other ingredients. This helps the flavors blend well. If you add warm quinoa, it can soften the veggies. To boost the flavor of your salad, consider adding spices. Cumin or smoked paprika can add depth. You can also include fresh herbs like basil or dill for a twist. Balancing the dressing is key. Use equal parts lemon juice and olive oil. Taste it as you mix. If it’s too tangy, add more oil. If it’s flat, a bit more lemon can brighten it up. Serving your salad in a large bowl looks great. You can also divide it into individual plates for a fancy touch. For garnish, use fresh parsley or mint leaves. A few lemon wedges on the side add color and freshness. They also invite guests to add more zest to their plates. These small touches can elevate the look of your Mediterranean quinoa salad. {{image_4}} You can easily change some ingredients to suit your taste or diet. For a vegan option, skip the feta cheese. This keeps the dish light and plant-based. You can also try different grains like couscous or farro. They offer unique flavors and textures. Both grains cook quickly and pair well with the salad’s fresh veggies. Let the seasons guide your choice of vegetables. In summer, add juicy cucumbers and ripe tomatoes. In fall, roasted squash or Brussels sprouts can enhance the dish. You can also use greens like spinach or kale in winter. Adjusting the recipe with seasonal veggies keeps it fresh and exciting. This salad is naturally gluten-free since quinoa is a gluten-free grain. For those looking to cut carbs, use cauliflower rice instead of quinoa. It’s low in carbs and still delicious. If you want more protein, add chickpeas or grilled chicken. This boosts the nutritional value without losing flavor. For the full recipe, check the main article. To keep your Mediterranean quinoa salad fresh, store it in an airtight container. This will help prevent it from drying out. You can enjoy the leftovers for about 3 to 5 days in the refrigerator. When you’re ready to eat, just give it a gentle toss. If you want to warm it up, microwave in short bursts, stirring in between. This helps keep the texture nice and fluffy without overcooking the ingredients. If you want to freeze the salad, it’s best to do so without the dressing. Freezing can change the texture of fresh veggies. To freeze, pack the salad tightly in a freezer-safe container. It can last up to 2 months in the freezer. When you want to eat it, move it to the fridge to thaw overnight. After defrosting, add fresh herbs and a drizzle of dressing for a taste boost. Making this salad ahead of time has its perks. It allows the flavors to blend well, creating a more tasty dish. I suggest making it at least 1 hour before serving. This gives the salad time to rest. If you want the freshest taste, add the cucumbers and tomatoes right before serving. This keeps them crisp and bright. The Mediterranean quinoa salad is great for gatherings and meal prep, making it a win-win! Mediterranean Quinoa Salad is both healthy and tasty. Here’s a quick look at its nutrition: - Calories: About 250 per serving - Protein: Around 8 grams - Fat: About 10 grams - Carbohydrates: Roughly 35 grams This salad is rich in protein and fiber. It helps keep you full longer. The healthy fats come from olive oil and feta cheese. This makes it a great choice for a meal or side dish. Yes! You can prepare this salad ahead of time. Here are some best practices: - Make the salad up to a day in advance. - Store it in an airtight container in the fridge. - Wait to add the dressing until just before serving. This keeps the salad fresh and crisp. If you do add the dressing early, the salad might get soggy. You can enhance your salad in many ways. Here are some tasty suggestions: - Add grilled chicken or shrimp for more protein. - Use avocado for creaminess. - Sprinkle in some nuts for crunch. - Try different cheeses like goat cheese or mozzarella. These toppings add flavor and make the salad even more filling. Mix and match to find your favorite combination. Absolutely! This salad is perfect for meal prep. Here are some tips: - Cook a big batch of quinoa at the start of the week. - Prepare your veggies and store them separately. - Combine everything in a container before eating. This way, you can enjoy fresh and healthy meals throughout the week. This Mediterranean Quinoa Salad is simple to make and full of flavor. You learned the key ingredients and step-by-step instructions to prepare it. I shared tips for perfect texture, flavor boosts, and presenting your dish beautifully. You can adapt this recipe for dietary needs and seasonal changes. Remember to store leftovers correctly to keep them fresh. Enjoy your cooking, and let this salad bring joy to your meals!

Mediterranean Quinoa Salad Fresh and Healthy Dish

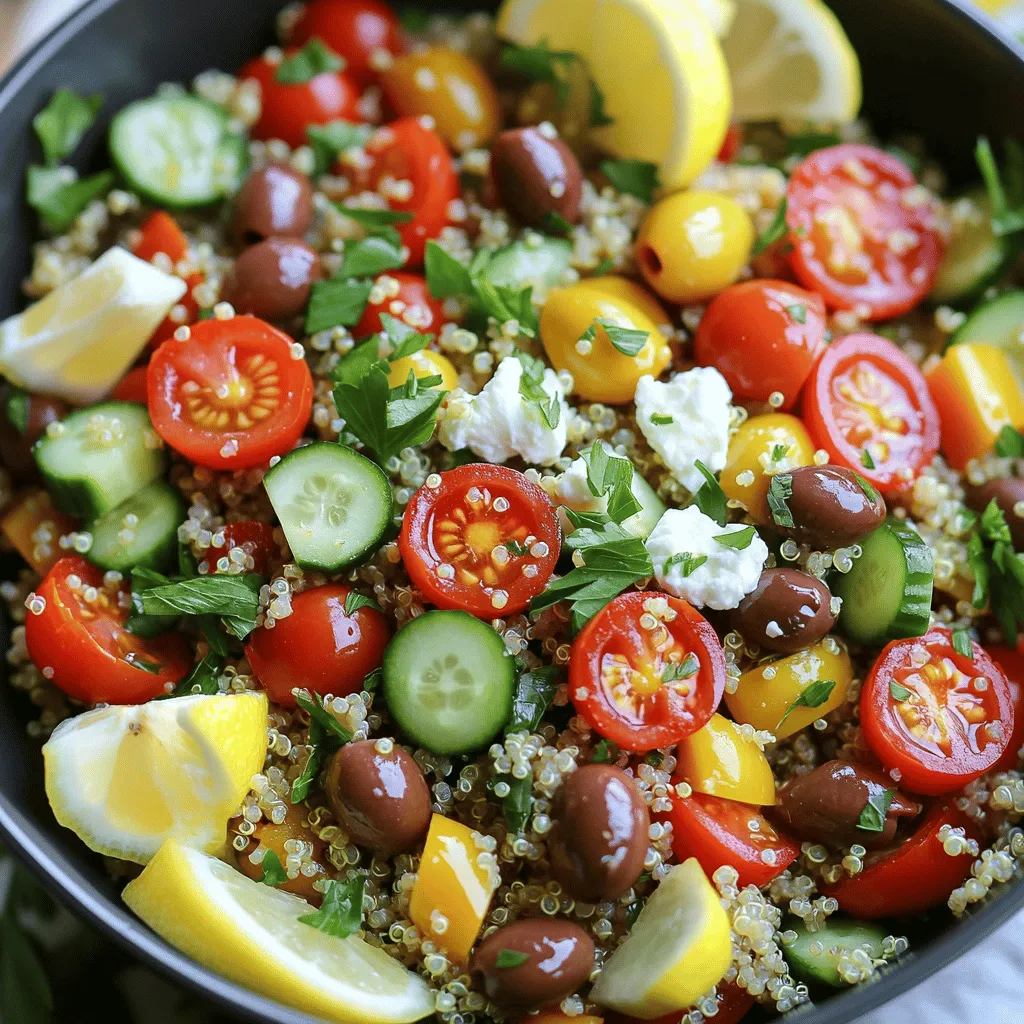
Looking for a fresh and healthy dish that dazzles your taste buds? The Mediterranean Quinoa Salad is your answer! Packed

To make delicious homemade granola bars, you need the right ingredients. Here’s the list you’ll need: - 2 cups rolled oats - 1 cup mixed nuts (almonds, walnuts, pecans, roughly chopped) - ½ cup unsweetened shredded coconut - ½ cup honey or maple syrup - ¼ cup almond butter (or any nut butter of your choice) - 1 teaspoon vanilla extract - ½ teaspoon sea salt - ½ cup dark chocolate chips (or chunks) - ¼ cup dried fruits (such as cranberries, apricots, or raisins) Each ingredient plays a key role in flavor and texture. The rolled oats form the base, giving the bars their hearty feel. Mixed nuts add crunch and healthy fats. Shredded coconut brings a touch of sweetness. Honey or maple syrup acts as a natural binder. Almond butter enhances creaminess and adds protein. Vanilla extract brings warmth, while sea salt balances the sweetness. Dark chocolate chips melt slightly and add rich flavor. Dried fruits offer bursts of sweetness and chewiness. Using these ingredients, you can create a tasty snack that fuels your day. For the full recipe, check out the Nutty Choco-Coconut Granola Bars. 1. Preheat your oven to 350°F (175°C). Get a baking pan ready by lining it with parchment paper. Leave some paper hanging over the edges for easy removal later. 2. In a large bowl, mix the dry ingredients. Add 2 cups of rolled oats, 1 cup of chopped mixed nuts, ½ cup of shredded coconut, and ½ teaspoon of sea salt. Stir them well so they blend together. 3. In a small saucepan over medium heat, combine ½ cup of honey (or maple syrup) and ¼ cup of almond butter. Stir for 2-3 minutes until the mixture becomes smooth. Remove from heat and add 1 teaspoon of vanilla extract. 4. Pour the warm wet mixture into the bowl with dry ingredients. Use a spatula to mix everything together. Make sure all the oats and nuts get coated well. 5. Gently fold in ½ cup of dark chocolate chips and ¼ cup of dried fruits. Be careful not to melt the chocolate during this step. 1. Transfer the mixture into your prepared pan. Spread it out evenly and press it down firmly. This helps the bars hold their shape when cool. 2. Place the pan in the oven and bake for 20-25 minutes. Look for a golden brown color around the edges. 3. Once done, take the pan out of the oven. Let the granola bars cool in the pan for about 10 minutes. After that, use the parchment paper to lift the whole block out and move it to a wire rack to cool completely. 1. Once cooled, use a sharp knife to cut the block into bars. You can make them as big or small as you like. 2. For a nice touch, wrap each bar in parchment paper and tie with twine. You can also stack them neatly on a plate for serving. These granola bars make a great snack or breakfast on the go. To get the right texture, press the mixture firmly in the pan. This step is key. It helps the bars hold together when you cut them. Don’t skip this part! If you want sweeter bars, adjust the sweetness to your taste. You can add more honey or maple syrup. Just remember that too much can make them too sticky. Add some spice to your bars for extra flavor. Cinnamon and nutmeg are great choices. They add warmth and depth. You can also mix in different ingredients. Try seeds like sunflower or pumpkin seeds. Nut butters can add richness, too. Peanut butter or cashew butter work well. These enhancements make your bars unique. If your bars are crumbly, don’t worry. You can fix this! Simply add a bit more honey or nut butter. This will help bind the ingredients. For bars that are too sticky, you can try baking them a little longer. Also, let them cool completely before cutting. This helps them firm up. {{image_4}} You can make your granola bars vegan by swapping honey for maple syrup. Maple syrup adds a nice, sweet flavor. It blends well with other ingredients. Also, try using plant-based nut butters, like cashew or sunflower seed butter. They keep the bars moist and tasty. For gluten-free granola bars, use gluten-free oats. They look and taste just like regular oats. You can also use alternative flours like almond or coconut flour for binding. These flours help hold the bars together while keeping them gluten-free. You can mix flavors to make your bars exciting. A popular combo is chocolate and peanut butter. They create a rich, satisfying taste. Another great mix is tropical fruits with coconut. This gives your bars a sunny, fresh flavor that will brighten your day. For the full recipe, check out the Nutty Choco-Coconut Granola Bars . Store your granola bars in an airtight container. This keeps them fresh for longer. Before you store them, let the bars cool completely. If you don’t cool them, they might become soggy. At room temperature, these bars will last about one week. If you want to keep them longer, freezing is a great option. Wrap each bar in plastic wrap and place them in a freezer bag. They can stay fresh for up to three months in the freezer. If you like warm bars, you can reheat them. Just pop them in the microwave for about 10-15 seconds. You can also crumble the bars on top of yogurt or mix them into oatmeal. They make a tasty addition to many recipes. For the full recipe, check out the Nutty Choco-Coconut Granola Bars. How long do homemade granola bars last? Homemade granola bars last up to two weeks when stored in an airtight container. If you freeze them, they can last up to three months. Just make sure they are cool before you pack them up. Can I use different nuts or seeds? Yes, feel free to swap nuts or seeds. Use your favorites like cashews, sunflower seeds, or pumpkin seeds. Try to keep the total amount the same for the best texture. Are these bars kid-friendly? Absolutely! Kids love the sweet taste and chewy texture. You can customize the mix-ins to suit their taste preferences, making them more appealing. How do I make these granola bars protein-rich? To boost protein, add protein powder to the mixture. You can also include ingredients like hemp seeds or substitute some oats with quinoa. This way, you enhance nutrition without changing the flavor. What if I don't have almond butter? If you lack almond butter, you can use peanut butter or sunflower seed butter. Each type gives a unique taste, so pick one you enjoy. How can I reduce sugar content? You can reduce sugar by using less honey or maple syrup. Try replacing some syrup with mashed bananas or unsweetened applesauce for sweetness without the extra sugar. Can I include chocolate in different forms? Yes, you can add cocoa powder for a chocolate flavor or use chocolate chips. You may even melt chocolate to drizzle on top for a fun touch. Are granola bars healthy for everyday snacks? Granola bars can be healthy if made with wholesome ingredients. They provide fiber, healthy fats, and energy. Just watch out for added sugars. Can I make these without baking? Yes, you can make no-bake granola bars! Just mix all ingredients and press them into a pan. Chill in the fridge until firm. This method is quick and still delicious! Homemade granola bars are easy to make and tasty. With simple ingredients, you can customize flavors and textures. Remember to press the mixture firmly to get the right consistency. Try different nuts or fruits to enhance your bars. Store them properly for the best taste. These snacks can fit many diets, like vegan or gluten-free. In the end, you control the sweetness and ingredients. Enjoy your homemade bars as a healthy snack or a fun treat!

Homemade Granola Bars Quick and Easy Recipe Guide

Making your own granola bars at home is quick and easy! With just a few simple ingredients, you can create

To make this Coconut Curry Chicken, you need: - 1 lb (450g) boneless, skinless chicken breast, cut into bite-sized cubes - 1 can (14 oz) full-fat coconut milk - 2 tablespoons coconut oil - 1 medium onion, finely chopped - 2 cloves garlic, minced - 1 tablespoon fresh ginger, minced - 2 tablespoons red curry paste (adjust to taste for spice) - 1 tablespoon fish sauce for umami depth - 1 tablespoon brown sugar to balance flavors - 1 fresh red bell pepper, chopped into bite-sized pieces - 1 cup broccoli florets, cut small for quick cooking - 1 cup snap peas, trimmed - Fresh cilantro leaves, for garnish - Lime wedges, for a zesty finish - Sea salt and freshly cracked black pepper to taste If you have allergies, here are some easy swaps: - Use tofu or chickpeas instead of chicken for a vegan option. - Replace fish sauce with soy sauce for a vegetarian version. - Use almond milk if you can't have coconut milk. - For a nut-free option, check the labels on curry paste. Choosing the right ingredients makes your dish shine. - Pick fresh chicken that looks pink and moist. Avoid any that looks dull or gray. - Use full-fat coconut milk for a rich and creamy sauce. Check for the highest fat content. - Select vibrant, firm vegetables. The red bell pepper should be shiny and smooth. - Fresh herbs like cilantro should be bright green with no wilting. - Always smell your spices; they should be fragrant, not stale. For the full recipe, check out the Tropical Coconut Curry Chicken section. Detailed preparation steps Start by gathering your ingredients. You will need chicken, coconut milk, and spices. Cut the chicken into small cubes. Chop the onion, garlic, and ginger. Prepare the veggies like bell pepper, broccoli, and snap peas. This makes cooking easier and faster. 1. Heat 2 tablespoons of coconut oil in a large skillet over medium heat. 2. Add the chopped onion and sauté for 3-4 minutes until soft. 3. Next, add minced garlic and ginger. Stir for one minute until fragrant. 4. Now, add the cubed chicken. Season with sea salt and black pepper. 5. Cook the chicken for about 5-7 minutes, stirring often, until it's browned. 6. Add 2 tablespoons of red curry paste. Stir well to coat the chicken. 7. Pour in 1 can of coconut milk, plus fish sauce and brown sugar. 8. Bring this to a gentle simmer. Stir all ingredients together. 9. Add the chopped red bell pepper, broccoli, and snap peas. Cook for 5-7 minutes, until veggies are tender. Cooking times and temperature guidance Keep the heat on medium throughout. This helps the chicken cook evenly. After you add the veggies, check them after 5 minutes. You want them bright and tender, not mushy. The total cooking time should be about 30 minutes from start to finish. Visual aids for each step I recommend taking pictures as you cook. This helps you see your progress. You can also look up images of Coconut Curry Chicken for inspiration. This visual guide will help you match your dish to the final look from the Full Recipe. When making Coconut Curry Chicken, you might face some common errors. One mistake is overcooking the chicken. Cook it just until it’s no longer pink. This keeps the meat juicy. Another mistake is not letting the flavors blend. Simmer the curry long enough for all the tastes to mix well. Avoid using low-quality coconut milk. A full-fat version gives a rich, creamy texture. Lastly, don’t skip the lime juice. It adds brightness to the dish. To boost flavors in your Coconut Curry Chicken, try these tips. First, toast the red curry paste in the coconut oil before adding other ingredients. This deepens its flavor. Second, add a splash of lime juice at the end. It brings a fresh zing. You can also include a pinch of brown sugar if the dish tastes too salty. Finally, fresh herbs like basil or mint can elevate the dish. They add a nice, fragrant finish. Coconut Curry Chicken pairs well with many sides. Serve it over fluffy jasmine rice. The rice soaks up the delicious sauce. You can also try warm naan bread for dipping. For a crunchy contrast, serve with a simple cucumber salad. Drizzle some yogurt on top for extra creaminess. If you want to add a drink, try coconut water or a light beer. These complement the curry's flavors perfectly. For the full recipe, check the section above. {{image_4}} You can use other proteins in this dish. Tofu works well for a vegetarian option. Just press and cube it before cooking. Shrimp is another great choice. It cooks quickly and adds a nice flavor. If you like beef, try thinly sliced flank steak. It will give the curry a rich taste. Adjust the spice to fit your taste. Use less red curry paste for milder flavor. You can also add more spices like cumin or coriander for depth. Want some heat? Toss in a chopped chili or some cayenne pepper. Experiment with fresh herbs like basil or mint for a fresh twist. Making this dish vegan is simple. Replace the chicken with tofu or chickpeas. Use vegetable broth instead of fish sauce. You can add more veggies like carrots or zucchini for added texture. Coconut milk keeps it creamy and rich. This way, everyone can enjoy a delicious bowl of coconut curry! For the full recipe, check out the Tropical Coconut Curry Chicken section. To keep your Coconut Curry Chicken fresh, let it cool first. Then, transfer it to an airtight container. This helps prevent spoilage and keeps flavors intact. Store it in the fridge for up to three days. If you want to save it longer, consider freezing. For freezing, use a freezer-safe container or heavy-duty freezer bags. Make sure to leave some space at the top, as the food will expand. Label the bags with the date for easy tracking. You can freeze the coconut curry for up to three months. Thaw it overnight in the fridge before reheating. When it's time to enjoy your leftovers, reheating properly is key. The best way is to use a skillet over medium heat. Stir occasionally to heat it evenly. If the curry seems thick, add a splash of coconut milk or water. You can also microwave it in a bowl with a cover. Heat in short bursts, stirring in between, until hot. Enjoy the rich flavors just like the first time! To make Coconut Curry Chicken from scratch, follow these steps: 1. Heat coconut oil in a skillet over medium heat. 2. Sauté chopped onion for 3-4 minutes until soft. 3. Add minced garlic and ginger; stir for one minute. 4. Add cubed chicken, seasoning with salt and pepper. Cook until brown. 5. Mix in red curry paste to coat the chicken. 6. Pour in coconut milk, fish sauce, and brown sugar. Simmer gently. 7. Add chopped bell pepper, broccoli, and snap peas. Cook until tender. 8. Taste and adjust seasoning if needed. 9. Serve hot, garnished with cilantro and lime wedges. You can find the Full Recipe for more detailed steps and tips. Coconut Curry Chicken pairs well with: - Steamed jasmine rice for a classic combo. - Warm naan bread for a nice dip. - Quinoa for a protein-packed option. - A fresh cucumber salad for crunch. - Roasted vegetables to add color and flavor. These sides enhance the taste and make the meal more filling. Yes, you can make Coconut Curry Chicken ahead of time! Just follow these tips: - Cook the curry and let it cool completely. - Store in an airtight container in the fridge for up to 3 days. - Reheat gently on the stove or in the microwave. - If you freeze it, use within 2 months for best taste. Making it ahead saves time and allows flavors to meld. In this article, we explored every aspect of making Coconut Curry Chicken. You learned about the key ingredients and substitutions for allergies. We detailed step-by-step cooking instructions, along with common mistakes to avoid. I provided tips for flavor enhancements and storage methods. Coconut Curry Chicken is adaptable to many diets, with variations for all tastes. Now, you have all the tools to create a delicious dish. Enjoy cooking and sharing this meal with others!

Coconut Curry Chicken Flavorful Comfort Meal Recipe

Are you ready to dive into a bowl of comfort? My Coconut Curry Chicken recipe is a delight for any

- 2 medium sweet potatoes, peeled and cut into 1-inch cubes - 1 can (15 oz) black beans, rinsed thoroughly and drained - 1 can (14 oz) diced tomatoes with green chilies - 1 medium onion, diced - 3 cloves garlic, minced - 1 bell pepper (any color), diced - 1 cup corn (can use frozen or fresh) - 2 cups vegetable broth - 1 tablespoon chili powder - 1 tablespoon ground cumin - 1 teaspoon smoked paprika - 1 teaspoon dried oregano - Salt and freshly ground black pepper, to taste - 2 tablespoons olive oil - Fresh cilantro leaves, for garnish - Slices of avocado, for topping (optional) I love the bright colors and flavors in this dish! Each ingredient plays a key role. Sweet potatoes bring a natural sweetness and creaminess. Black beans add protein and fiber, making the dish hearty. Diced tomatoes bring acidity and brightness, while the onion and garlic give depth of flavor. The bell pepper adds crunch, and corn brings a sweet burst. Vegetable broth serves as the base, tying everything together. The spices—chili powder, cumin, smoked paprika, and oregano—create a warm, savory taste. I always use fresh cilantro for garnish; it adds a fresh touch. And if you like avocado, it makes a great topping! You can find the full recipe for this delicious chili above. - Step 1: Sautéing Onion and Bell Pepper Start by heating olive oil in a large pot over medium heat. Add diced onion and bell pepper. Cook for about 5 minutes. You want the onion to look soft and clear. - Step 2: Add Minced Garlic Next, stir in the minced garlic. Keep stirring for 1 to 2 minutes. This helps to release the garlic's great smell without burning it. - Step 3: Incorporate Sweet Potatoes and Other Ingredients Now, it's time to add the sweet potatoes. Toss in corn, black beans, and diced tomatoes with their juice. Pour in the vegetable broth. Mix everything together well. - Step 4: Season and Bring to Boil Add chili powder, cumin, smoked paprika, oregano, salt, and pepper. Stir to blend the spices evenly. Increase the heat to bring the chili to a gentle boil. - Step 5: Simmer and Stir Once boiling, reduce the heat and cover the pot. Let it simmer for about 25 to 30 minutes. Stir occasionally to stop anything from sticking to the bottom. You want the sweet potatoes to be soft enough to pierce with a fork. - Step 6: Adjust Seasoning and Serve After cooking, taste your chili. Adjust any seasonings if needed, adding more salt, pepper, or spices. When ready, ladle the chili into bowls. Garnish with fresh cilantro and top with avocado slices if you like. You can check the Full Recipe for all the details. Enjoy your cooking! - Optimal cooking time for sweet potatoes: Sweet potatoes cook well in about 25-30 minutes. Check for tenderness with a fork. They should be soft but not mushy. - How to enhance flavor profiles: To boost flavor, use fresh herbs like cilantro. You can also squeeze lime juice for a zesty kick. Adding a pinch of sugar balances the spices. - Ensuring a thick chili consistency: If your chili is too thin, let it simmer a bit longer. You can also mash some sweet potatoes in the pot to create a thicker texture. - Suggested garnishes for presentation: Fresh cilantro adds color and flavor. Slices of avocado on top make it creamy. A sprinkle of cheese can also enhance the dish. - Best side dishes to serve with chili: Pair your chili with crunchy tortilla chips. A simple salad or cornbread also complements the meal well. For a heartier option, serve with rice or quinoa. {{image_4}} You can switch up the beans in this chili. Try kidney beans or pinto beans for a new twist. Both add flavor and texture. If you have chickpeas, those work well too. You can add more vegetables for variety. Zucchini, carrots, or spinach mix nicely with sweet potatoes. They add color and nutrients. You can even toss in some chopped kale for a hearty boost. Adjust the spice level to your taste. If you like it mild, skip the chili powder. For heat, add diced jalapeños or cayenne pepper. Start small, then add more if you want it spicier. To make this chili gluten-free, ensure your vegetable broth is gluten-free. Most brands are safe, but check the label. The rest of the ingredients are naturally gluten-free, so you’re good to go. For vegan options, this recipe is already vegan-friendly! All the ingredients fit within a plant-based diet. If you want extra protein, consider adding quinoa or lentils. Both are tasty and filling. For the full recipe, check out the Sweet Potato Black Bean Chili . To store leftover chili, let it cool to room temperature first. Transfer it to an airtight container. Make sure you seal it tightly. This will keep it fresh for your next meal. For freezing, use freezer-safe bags or containers. Portion the chili for easy reheating. Remove as much air as possible from the bags before sealing. When you are ready to enjoy it, thaw in the fridge overnight. Reheat it on the stove or in the microwave until hot. In the fridge, sweet potato black bean chili stays good for about 4 to 5 days. Always check for signs of spoilage before eating. If you see mold or an off smell, discard it. When frozen, the chili can last for 3 to 4 months. After that, it may lose flavor and texture. Always trust your senses. If it looks or smells bad, it's best to throw it away. What can I serve with sweet potato black bean chili? You can serve this chili with warm cornbread or rice. Tortilla chips are great too. Fresh avocado slices add a nice touch. A sprinkle of cheese or sour cream also works well. Can I make this chili in a slow cooker? Yes, you can make this chili in a slow cooker. Just add all ingredients and cook on low for 6-8 hours. Stir occasionally if you can. This method allows flavors to blend well. How do I store and reheat leftovers? Store leftover chili in an airtight container. It lasts up to 5 days in the fridge. To reheat, warm it on the stove or in the microwave. Add a splash of broth to keep it moist. What is the nutritional value of this chili recipe? This chili is packed with nutrients. It is rich in fiber and protein. Sweet potatoes provide vitamins A and C. Black beans add iron and additional protein. Can I prepare the chili ahead of time? Yes, you can prepare this chili a day ahead. Let it cool and store it in the fridge. This allows flavors to deepen. Reheat before serving for the best taste. Is sweet potato black bean chili healthy? Yes, it is very healthy. It is low in fat and high in fiber. Sweet potatoes and black beans make it nutritious. This chili is also filling, making it a great meal option. How can I make it spicier? To make it spicier, add chopped jalapeños or cayenne pepper. You can also increase the chili powder. Taste as you go to find your perfect spice level. What are some other variations of chili? You can try adding different beans, like kidney or pinto beans. Some people like to add meat, such as ground turkey or beef. You can also mix in other veggies like zucchini or carrots for variety. For the full recipe, check out the Sweet Potato Black Bean Chili section. To make this savory sweet potato black bean chili, gather your ingredients. Here’s what you need: - 2 medium sweet potatoes, peeled and cut into 1-inch cubes - 1 can (15 oz) black beans, rinsed thoroughly and drained - 1 can (14 oz) diced tomatoes with green chilies - 1 medium onion, diced - 3 cloves garlic, minced - 1 bell pepper (any color), diced - 1 cup corn (can use frozen or fresh) - 2 cups vegetable broth - 1 tablespoon chili powder - 1 tablespoon ground cumin - 1 teaspoon smoked paprika - 1 teaspoon dried oregano - Salt and freshly ground black pepper, to taste - 2 tablespoons olive oil - Fresh cilantro leaves, for garnish - Slices of avocado, for topping (optional) This chili is a great blend of flavors. Sweet potatoes add a nice sweetness. Black beans give it a hearty texture. The spices bring warmth and depth. You’ll enjoy how easy it is to prepare. Start by warming olive oil in a large pot. Add diced onion and bell pepper. Cook these for about 5 minutes. You want the onion to turn soft and clear. Next, add minced garlic. Stir it for 1-2 minutes. This step makes your kitchen smell amazing! Then, toss in the sweet potatoes, corn, black beans, and diced tomatoes. Pour in the vegetable broth, too. Season the mix with chili powder, cumin, smoked paprika, oregano, salt, and pepper. Stir everything well. Make sure the spices spread evenly. Now, turn up the heat until it boils gently. Once it’s bubbling, lower the heat and cover the pot. Let it simmer for 25-30 minutes. This makes the sweet potatoes fork-tender. After cooking, taste your chili. Adjust the seasoning if needed. Add more salt, pepper, or spices based on your taste. When ready, ladle the chili into bowls. Garnish with fresh cilantro and avocado slices if you like. For a fun touch, serve with crunchy tortilla chips on the side. This dish is not only tasty but also beautiful. The colors are vibrant, and the flavors are rich. Enjoy making this sweet potato black bean chili for yourself and others! This blog post shared a simple, tasty recipe for Sweet Potato Black Bean Chili. You learned about the key ingredients and step-by-step cooking method. Practical tips and serving ideas made it easier to enjoy this dish. Variations and storage advice offered more flexibility for your needs. In closing, this chili is not just healthy but also fun to make. I hope you feel inspired to try it soon!

Savory Sweet Potato Black Bean Chili Recipe Delight

Craving a warm, hearty meal that’s both satisfying and easy to make? Look no further! My Savory Sweet Potato Black

- 1 large head of cauliflower, broken into small florets - 4 cloves of garlic, finely minced - 1/4 cup freshly grated Parmesan cheese - 1/4 cup extra virgin olive oil - 1 teaspoon dried Italian seasoning - 1/2 teaspoon red pepper flakes (optional for heat) - Sea salt and freshly cracked black pepper, to taste - Fresh parsley, roughly chopped (for garnish) - Lemon wedges, for serving Gather these ingredients to create a tasty side dish. The cauliflower serves as a healthy base. The garlic adds a punch of flavor. Parmesan cheese gives a creamy touch. Olive oil keeps everything moist. Seasonings enhance the overall taste. You can adjust the red pepper flakes for heat. Use fresh parsley to add a pop of color. Lemon wedges brighten the dish and balance the richness. This recipe is simple yet flavorful. You can find the complete instructions in the Full Recipe section. Enjoy cooking! Start by setting your oven to 425°F (220°C). A hot oven gives the best roast. If your oven is not hot enough, the cauliflower won’t brown well. This step is key for a tasty side dish. To break down the cauliflower, remove the leaves and stem. Cut the head into small florets. Aim for even pieces so they cook at the same rate. If you have larger florets, cut them down further. This makes for a better texture. In a small bowl, add the extra virgin olive oil, minced garlic, Italian seasoning, red pepper flakes, sea salt, and black pepper. Whisk until smooth. This blend will coat the cauliflower and bring rich flavors. Drizzle the olive oil blend over the cauliflower. Use a spatula or your hands to mix everything well. Ensure all the florets are covered. This step is important for even flavor and crispiness. On a large baking sheet, spread the coated cauliflower in a single layer. Use parchment paper to keep them from sticking. Crowding the pan can lead to soggy cauliflower. Give each piece space to breathe. Place the baking sheet in the oven. Roast for 25-30 minutes. Halfway through, stir the florets for even cooking. You want them golden and tender. Check often to avoid burning. After roasting, take the sheet out and sprinkle the grated Parmesan over the hot cauliflower. Pop it back in the oven for about 5 minutes. This helps the cheese melt and bubble just right. Once done, sprinkle chopped parsley for color. Serve warm with lemon wedges on the side. The lemon adds a fresh zing that brightens the dish. For a lovely presentation, use a rustic bowl and drizzle with extra olive oil. For the full recipe, follow the detailed instructions provided above. Enjoy your delicious Garlic Parmesan Roasted Cauliflower! Overcooking and under-seasoning can ruin your dish. - Overcooking: Keep an eye on the time. If you roast cauliflower too long, it becomes mushy. Aim for a nice golden color. - Under-seasoning: Don't skip the salt and pepper. Season well to enhance the flavors. Add more if needed after roasting. You can try different spices to boost the taste. - Alternative Seasoning Options: Mix in smoked paprika or cumin for a twist. You can also add fresh herbs like thyme or rosemary. They add a lovely aroma and depth. - Cheese Variations: Instead of Parmesan, try Pecorino Romano or nutritional yeast for a vegan option. Each cheese brings its own special flavor. Make your dish look as good as it tastes. - Serving Suggestions for Visual Appeal: Use a rustic bowl to serve the cauliflower. Drizzle with extra olive oil for shine. - Garnishing: Add more Parmesan on top right before serving. Place lemon wedges around the bowl for a pop of color. This also invites your guests to add a zesty touch. For the full recipe, check out the Garlic Parmesan Roasted Cauliflower section. {{image_4}} If you want a vegan option, you can skip the Parmesan cheese. Instead, use nutritional yeast. It gives a cheesy flavor without dairy. You can also try a vegan Parmesan blend made from nuts. This keeps the dish tasty and plant-based. To add some heat, mix in extra red pepper flakes. You can add more or less depending on your taste. Another option is to drizzle hot sauce over the roasted cauliflower. This twist gives a nice kick and makes the dish even more exciting. Feel free to mix in other veggies. Broccoli or Brussels sprouts pair well with cauliflower. You can also add some bell peppers for color. These mix-ins will create a colorful and flavorful dish. Think of it as a fun, veggie medley. Enjoy testing different combinations to find your favorite! To keep your Garlic Parmesan Roasted Cauliflower fresh, place it in an airtight container. Make sure to cool it first before sealing. Store it in the fridge. It will stay good for about 3 to 5 days. When you reheat your cauliflower, aim to keep the flavor and texture. The best way is in the oven. Preheat the oven to 350°F (175°C). Spread the cauliflower on a baking sheet. Heat for about 10-15 minutes. This method helps keep it crispy. You can also use a microwave, but it may not be as crisp. If using a microwave, heat on high for 1-2 minutes. If you want to freeze Garlic Parmesan Roasted Cauliflower, start by letting it cool completely. Place it in a freezer-safe bag or container. Make sure to remove as much air as possible before sealing. It can last up to 3 months in the freezer. When ready to eat, thaw it in the fridge overnight. Reheat in the oven for the best results. Yes, you can use frozen cauliflower. It makes cooking easier and quicker. Just remember to thaw it first. After thawing, pat it dry with a towel. This keeps the cauliflower from getting soggy. You may need to adjust the roasting time. Frozen cauliflower may cook faster, so check it at 20 minutes. This recipe is naturally gluten-free. All the ingredients are safe for a gluten-free diet. Just ensure that your Parmesan cheese is gluten-free. Most cheese brands are safe, but it’s always good to check the label. You can enjoy this dish without worrying about gluten! Garlic Parmesan roasted cauliflower is very versatile. You can serve it with grilled chicken or fish. It also pairs well with pasta dishes. For a vegetarian meal, add a grain like quinoa or rice. This dish shines as a side for any meal! Roasting cauliflower takes about 25-30 minutes. Preheat your oven to 425°F (220°C) for the best results. Halfway through, stir the cauliflower for even browning. The edges should be golden brown and crispy when it's done. Keep an eye on it to avoid overcooking. Yes, you can prepare garlic parmesan roasted cauliflower ahead of time. You can wash and cut the cauliflower a day before. Store it in the fridge in an airtight container. For best results, roast it fresh on the day you serve it. If you must, you can reheat it, but fresh is best! This blog post covered how to make Garlic Parmesan Roasted Cauliflower. We talked about ingredients, preparation, cooking tips, and serving ideas. You learned how to avoid common mistakes and explore fun variations. Remember, the right cooking time and seasoning make all the difference. Try different flavors to keep things exciting. With practice, you'll master this dish and impress everyone at your table. Enjoy making and sharing your delicious creation!

Garlic Parmesan Roasted Cauliflower Easy Side Dish

Looking for a simple and tasty side dish? Garlic Parmesan Roasted Cauliflower checks all the boxes! With just a few

- 2 boneless, skinless chicken breasts - 1 ripe mango, diced - 1/2 cup red cabbage, finely shredded - 1/4 cup red onion, finely chopped - 1 fresh jalapeño, deseeded and minced - 2 tablespoons fresh lime juice - 2 tablespoons olive oil - 1 teaspoon chili powder - 1 teaspoon ground cumin - Salt and pepper, to taste - 8 small corn tortillas - Fresh cilantro leaves, for garnish - Avocado slices (optional) These ingredients create a simple yet tasty dish. The chicken brings protein, while the mango adds sweetness. The cabbage and onion give crunch, and the jalapeño adds heat. You will love the fresh lime juice and spices. When you shop for ingredients, look for bright colors and firm textures. Choose the mango that feels slightly soft but not mushy. A ripe mango will smell sweet near the stem. For the chicken, select breasts that are pink and moist. Avoid any that look dry or discolored. When picking cabbage and onion, choose ones without blemishes. Fresh cilantro should be bright green and fragrant. Freshness makes a big difference in flavor. Each serving of Spicy Mango Chicken Tacos offers a healthy balance of nutrients. You'll get about 350 calories, with 25 grams of protein and 15 grams of fat. It also has 30 grams of carbs and 5 grams of fiber. This dish is light yet satisfying. For more details, check the Full Recipe. To start, gather your chicken breasts. In a bowl, mix olive oil, lime juice, chili powder, cumin, salt, and pepper. Whisk them together well. This mix gives the chicken great flavor. Add the chicken to the bowl. Make sure each piece is coated with the marinade. Cover the bowl and put it in the fridge for at least 30 minutes. This step helps the chicken soak up all that tasty goodness. Once the chicken has marinated, it’s time to cook. Preheat your grill or skillet to medium heat. Take the chicken out of the marinade. Let any extra marinade drip off. Place the chicken in the hot skillet. Cook it for about 6-7 minutes on each side. You want the chicken to be cooked through and not pink in the middle. Check that it reaches 165°F (75°C) inside. After cooking, move the chicken to a cutting board. Let it rest for a few minutes, then slice it into thin strips. Now, let’s make the mango salsa! In a clean bowl, combine diced mango, shredded red cabbage, chopped red onion, and minced jalapeño. Add a pinch of salt. Gently toss everything together until it is mixed well. This salsa adds a fresh and fruity kick to your tacos. Let it sit for a while. This helps the flavors blend together nicely. For the full recipe, be sure to check out the entire guide on Spicy Mango Chicken Tacos! To grill chicken well, start with a hot grill. Preheating helps the chicken cook evenly. Use a little oil on the grill to prevent sticking. Make sure to cook the chicken for 6-7 minutes on each side. Check for a nice golden color. Always use a meat thermometer. The chicken should reach 165°F (75°C) inside. Let the chicken rest for a few minutes after grilling. This keeps it juicy and tender. Warming tortillas is easy. Use a dry skillet over medium heat. Heat each tortilla for 30 seconds on each side. Don’t let them get crispy; they should be soft. If you have a lot of tortillas, wrap them in a clean cloth. This keeps them warm and pliable until you're ready to serve. To make great mango salsa, choose a ripe mango. It should feel soft but not mushy. Combine the mango with red cabbage and red onion for color. The fresh jalapeño adds a nice kick. A pinch of salt brings out the flavors. Let the salsa sit for a few minutes before serving. This allows the tastes to blend well. For a fun twist, add some diced avocado for creaminess. With these tips, your salsa will shine on your tacos! For the full recipe, check the [Full Recipe]. {{image_4}} You can easily swap chicken for veggies. Try using grilled zucchini or mushrooms. You can also use chickpeas for protein. They add a nice texture and flavor. Tofu is another great option. Marinate it just like chicken for the best taste. This allows you to enjoy the same vibrant flavors without meat. Toppings can change the whole taco experience. Try adding diced tomatoes for freshness. Crumbled feta cheese gives a nice creamy taste. Sliced radishes add a crunchy bite. Pickled onions bring a tangy kick. You can also use a drizzle of sour cream or yogurt. Fresh lime juice brightens the flavors even more. Want more heat? Add extra jalapeños or some diced serrano peppers. For a milder taste, skip the jalapeños or remove the seeds. You can also use sweet bell peppers for flavor without heat. Experiment with different hot sauces to find your favorite. Adjusting spice is easy and makes the dish fun! For the full recipe, check out the Spicy Mango Chicken Tacos section. To keep your leftover tacos fresh, store them in an airtight container. Make sure to separate the chicken, salsa, and tortillas. This will help keep everything from getting soggy. You can store the chicken and salsa in the fridge for up to three days. The tortillas can stay fresh for about two days when stored properly. If you want to save some tacos for later, you can freeze the chicken and salsa. To freeze the chicken, let it cool completely. Then, place it in a freezer-safe bag or container. It can last for up to three months. For the salsa, make sure to leave out the onions and jalapeño before freezing. The salsa can also freeze well for up to two months. Just remember to label your bags with the date. To reheat the chicken, you can use a skillet over medium heat. Heat it for about 5-7 minutes until warm. If you prefer, you can also use the microwave. Just heat in short bursts, checking often to avoid drying it out. For the salsa, warm it gently on the stove or in the microwave for about 30 seconds. When ready to eat, warm the tortillas in a skillet for a minute on each side. This keeps them soft and tasty. Enjoy your Spicy Mango Chicken Tacos just like when they were fresh! For the complete recipe, check out the Full Recipe section. The best sides for these tacos are fresh and light. Try serving them with: - Black beans - Mexican rice - Corn salad - Grilled vegetables - A simple green salad These sides balance the taco's spice and sweetness. They add color and nutrition to your meal. Yes, you can prepare many parts of this dish ahead. Marinate the chicken a few hours earlier or even a day before. This helps the flavors develop well. You can also make the mango salsa ahead of time. Just store it in the fridge until you are ready to serve. Warm the tortillas just before serving for the best taste. To adjust servings, simply change the amount of chicken and toppings. For more servings, double the ingredients. If you need fewer servings, halve them. Use the same cooking times. Always check the chicken’s internal temperature to ensure it cooks correctly. In this article, I shared how to make Spicy Mango Chicken Tacos. I covered the key ingredients and tips for picking fresh ones. We explored cooking methods, from marinating the chicken to making mango salsa. My final thought is that these tacos are a fun and tasty meal. You can adjust the spice or add your favorite toppings. Enjoying this dish brings a burst of flavor to any table. Happy cooking!

Spicy Mango Chicken Tacos Flavorful and Easy Recipe

Are you ready to spice up your taco night? These Spicy Mango Chicken Tacos are not just flavorful; they are

Older posts
Newer posts
← Previous Page1 … Page73 Page74 Page75 … Page88 Next →

dsad

© 2025 spoonfulsavory • Built with GeneratePress

Our Policies

  • Copyright Policy
  • Cookie Policy
  • GDPR Policy
  • Privacy Policy
  • Disclaimer
  • Terms Of Use

More Information

  • Home
  • About
  • Contact
  • Appetizers
  • Dessert
  • Dinner
  • Drinks
©2025, spoonfulsavory About Back To Top