Skip to content
DisclaimerTerms Of UseGDPR PolicyCookie Policy

spoonfulsavory

  • Home
  • Drinks
  • Appetizers
  • Dinner
  • Dessert
  • About
  • Contact
  • Privacy Policy
DisclaimerTerms Of UseGDPR PolicyCookie Policy

Sarah

To make Peanut Butter Banana Overnight Oats, you need a simple set of ingredients: - 1 cup rolled oats - 1 ½ cups almond milk (or any milk of your choice) - 2 ripe bananas: 1 mashed and 1 sliced for topping - 3 tablespoons creamy peanut butter - 1 tablespoon honey or maple syrup (optional, for added sweetness) - 1 teaspoon chia seeds (optional, for added texture and nutrition) - ½ teaspoon ground cinnamon - A pinch of salt - Toppings: additional banana slices, chopped nuts (such as walnuts or almonds), and a drizzle of honey or maple syrup Each serving of Peanut Butter Banana Overnight Oats packs a healthy punch. Here’s a quick breakdown for one serving: - Calories: Approximately 380 - Protein: 12 grams - Carbohydrates: 55 grams - Fat: 15 grams - Fiber: 8 grams This meal is rich in good fats and fiber, making it a great breakfast choice. - Rolled oats: They provide long-lasting energy and are rich in fiber. This helps keep you full longer. - Peanut butter: It offers healthy fats and protein, which is great for muscle growth and repair. - Bananas: They are high in potassium and vitamin C, supporting heart health and boosting immunity. - Chia seeds: These tiny seeds add omega-3 fatty acids and additional fiber, enhancing heart health and digestion. These ingredients work together to create a meal that is tasty and beneficial for your body. You can enjoy this nutritious breakfast knowing it fuels your day well. If you want the full recipe, check out the details above. Making Peanut Butter Banana Overnight Oats is simple and fun. Start by gathering your ingredients. You will need rolled oats, almond milk, ripe bananas, creamy peanut butter, honey or maple syrup, chia seeds, ground cinnamon, and salt. 1. In a medium bowl, add 1 cup of rolled oats and 1 ½ cups of almond milk. If you want to include chia seeds for added nutrition, now is the time to add them. Mix these well. 2. Next, mash one banana and add it to the bowl. Then, spoon in 3 tablespoons of creamy peanut butter. If you like it sweeter, drizzle in 1 tablespoon of honey or maple syrup. Add ½ teaspoon of ground cinnamon and a pinch of salt. 3. Stir everything until it's creamy and well mixed. 4. Divide your mixture into two jars or bowls. Cover them tightly with lids or plastic wrap. 5. Place the jars in the fridge overnight or for at least 4 to 6 hours. This allows the oats to soak up the liquid and flavors. 6. When you're ready to eat, stir the oats again. Top with banana slices, nuts, or a drizzle of honey for extra taste. You can store your Peanut Butter Banana Overnight Oats in the fridge. They will stay fresh for up to 3 days. This makes them perfect for meal prep! When serving, use clear jars to show off the beautiful layers. Mixing is key to creamy oats. Make sure you mash the banana well before adding it to the mix. This ensures it blends smoothly. Stir the mixture thoroughly to avoid clumps. If you want to add different flavors, try using flavored yogurt or different nut butters. You can also adjust the sweetness by adding more or less honey or syrup. To get creamy oats, follow these tips: - Use rolled oats, not quick oats. Rolled oats absorb more liquid and create a better texture. - Soak oats overnight. This gives them time to soften and absorb flavors. - Stir well before eating. Mixing helps to combine all the flavors and smooths the texture. You can change the flavor of your oats easily. Here are some ideas: - Add cocoa powder for a chocolate twist. Just mix in a tablespoon before soaking. - Swap peanut butter for almond or cashew butter. Each nut butter brings its unique flavor. - Toss in berries or apples for fresh fruit taste. These add sweetness and texture. - Try spices like nutmeg or ginger for extra warmth and depth. A pinch goes a long way. Watch out for these common mistakes: - Skipping the soaking time. This step is key for creamy oats. - Using too much liquid. Stick to the recipe's measurements for best results. - Forgetting to stir. If you skip this, your toppings may sit on top instead of mixing in. - Not using ripe bananas. Ripe bananas add natural sweetness and creaminess. For a complete guide to making this delicious dish, check out the Full Recipe. Enjoy your cooking! {{image_4}} You can mix things up with other flavors. Try adding cocoa powder for a chocolate twist. If you like berries, toss in some strawberries or blueberries. You can also swap peanut butter for almond butter for a nutty change. Want a tropical vibe? Add coconut flakes and pineapple. These combos keep your breakfast fun and fresh. The type of milk you use can change the taste. Almond milk works great, but you can use oat milk or soy milk too. Dairy milk adds creaminess, while coconut milk brings a sweet flavor. Each milk type gives a unique touch to your oats. Feel free to experiment with what you have at home. Toppings can add crunch and flavor. Try adding chopped nuts like walnuts or almonds. Granola also gives a nice crunch. For sweetness, drizzle honey or maple syrup on top. You can sprinkle some chia seeds or ground flaxseed for extra nutrition. All these toppings make each bite exciting and tasty. For the complete recipe, check out the Full Recipe. To store your Peanut Butter Banana Overnight Oats, place them in airtight containers. Make sure to seal them well to keep the oats fresh. You can store them in the fridge for quick breakfasts or snacks. These oats last up to five days in the fridge. I recommend using glass jars or plastic containers. They help keep the oats from drying out. If you notice any changes in smell or texture, it’s best to toss them out. You can freeze these oats for up to three months. To do this, portion them into freezer-safe containers. Leave some space at the top, as the oats will expand when frozen. When you’re ready to eat, thaw them in the fridge overnight before enjoying. The Full Recipe makes meal prep easy and fun! Peanut Butter Banana Overnight Oats last for about 3 to 5 days in the fridge. Store them in airtight containers. The oats may thicken as they sit. If they become too thick, just add a splash of milk before eating. This makes them creamy again. Yes, you can use quick oats. They will cook faster and absorb liquid quicker. However, they may become a bit mushy compared to rolled oats. If you prefer a chewier texture, stick with rolled oats. You can use almond butter, sunflower seed butter, or cashew butter. Each option adds a unique flavor. If you need a nut-free choice, sunflower seed butter is great. Just pick what you like best! Yes, this recipe can be gluten-free. Make sure to choose certified gluten-free oats. Regular oats may contain gluten due to cross-contamination. Always check the labels to ensure they meet your needs. This blog post covered everything you need for Peanut Butter Banana Overnight Oats. We outlined the key ingredients and their health benefits, plus easy step-by-step instructions for preparation and serving. I shared tips to help you make creamy oats and avoid common mistakes. We explored fun variations and smart storage tips. In conclusion, try these oats for a tasty and healthy start. With simple ingredients and options, you can customize them to your liking. Enjoy your delicious creation and feel good about your choices!

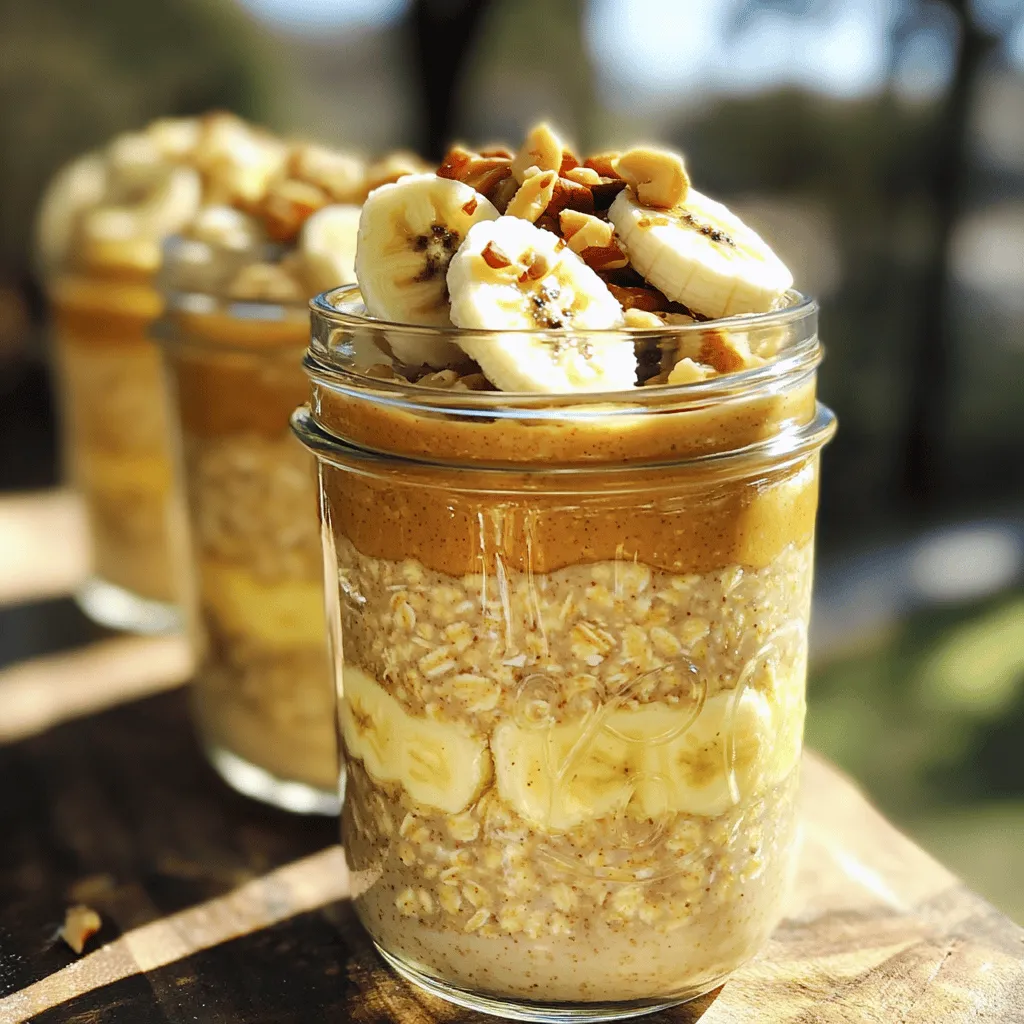
Peanut Butter Banana Overnight Oats Healthy Meal Prep

Welcome to your new favorite breakfast: Peanut Butter Banana Overnight Oats! This simple meal prep is not only tasty but

- 8 oz fettuccine or spaghetti - 3 tablespoons unsalted butter - 4 cloves garlic, finely minced - 1 cup heavy cream - 1 cup freshly grated Parmesan cheese (plus extra for serving) You need a few simple items to create creamy garlic Parmesan pasta. First, pick your pasta: fettuccine or spaghetti work best. Next, grab unsalted butter, garlic, and heavy cream. These ingredients form the creamy sauce. Finally, fresh Parmesan cheese gives the dish its rich flavor. - 1 teaspoon Italian seasoning blend - Salt and black pepper to taste - Optional: crushed red pepper flakes To spice things up, I suggest using Italian seasoning, salt, and black pepper. These flavors blend well with the creamy sauce. If you like some heat, add crushed red pepper flakes for a kick. - Fresh parsley, finely chopped (for garnish) - Additional Parmesan for serving - Variations for dietary preferences Garnish your dish with fresh parsley for color and flavor. You can also add more Parmesan on top before serving. If you have dietary interests, consider using gluten-free pasta or vegan cheese. This dish remains delicious while catering to various needs. For the full recipe, check out the detailed instructions. To cook your fettuccine or spaghetti, start with a large pot. Fill it with salted water and bring it to a rolling boil. Add the pasta and cook it as per the package instructions. This usually takes about 8 to 10 minutes. You want it to be al dente, which means it should be firm but not hard. To check, taste a piece a minute or two before the time is up. When it's just right, carefully reserve ½ cup of the starchy pasta water before you drain the rest. Set the pasta aside and keep it warm. Now, let's make the sauce. In a large skillet, melt 3 tablespoons of unsalted butter over medium heat. Once the butter is melted, add 4 finely minced garlic cloves. Sauté the garlic for 1 to 2 minutes, stirring often. You want it to smell great but not brown. Next, pour in 1 cup of heavy cream and let it come to a gentle simmer. Slowly whisk in 1 cup of freshly grated Parmesan cheese. Keep whisking until the cheese is smooth and the sauce is creamy. Next, it’s time to combine everything. Add the warm pasta to the skillet with the sauce. Gently toss the pasta until every piece is coated with the creamy sauce. If you find the sauce is too thick, mix in some of that reserved pasta water a little at a time. This helps get the right thickness. If you like a bit of spice, sprinkle in some crushed red pepper flakes and stir well. Enjoy this creamy garlic Parmesan pasta as a comforting meal any night! To get the right sauce texture, start with low heat. High heat can burn the garlic and ruin the flavor. When melting the butter, keep stirring. This helps mix in the garlic without browning it. To avoid clumping in your sauce, whisk in the cheese slowly. Add small amounts at a time. This way, it melts evenly. If your sauce feels too thick, add a splash of the reserved pasta water. Mix it in until you reach the perfect creaminess. You can boost the flavor by adding fresh herbs. Basil, oregano, or thyme work great. If you like a bit of heat, sprinkle in some crushed red pepper flakes. Adding proteins or veggies can make your meal heartier. Grilled chicken or sautéed shrimp pairs well. For a veggie option, try adding spinach or broccoli. They add color and nutrients. A fresh side salad goes well with this pasta. It balances the richness of the sauce. Garlic bread is another great choice. It adds crunch and flavor. When plating, use a large bowl. Twirl the pasta into a nest shape for height. Top with parsley and extra cheese for a nice look. This makes your dish as appealing as it is tasty. For the full recipe, you can check out my detailed guide. {{image_4}} For a lighter dish, try using light cream or milk. This swap reduces fat but keeps the creamy texture. You can also add vegetables like spinach, broccoli, or cherry tomatoes. These not only boost nutrition but also add color and flavor. You can easily customize this dish by adding proteins. Chicken or shrimp both work well. Cook them in the skillet before adding the garlic and cream. You can also experiment with different cheeses. Try using goat cheese or cheddar for a unique twist. Each cheese adds its own flavor. If you need gluten-free options, choose gluten-free pasta. Many brands offer great alternatives that cook well. For a vegan version, use plant-based cream and cheese. You can find these at most grocery stores. These options let everyone enjoy creamy garlic Parmesan pasta! To store Creamy Garlic Parmesan Pasta, let it cool first. Place it in an airtight container. This keeps the pasta fresh and flavorful. You can store it in the fridge for up to three days. After that, the quality may drop. Check for any odd smells or changes in texture before eating. When reheating, I suggest using the stove. Heat a pan over low heat. Add a splash of cream or water to keep it moist. Stir frequently to avoid sticking. This method helps maintain the creamy texture. If you prefer the microwave, use a microwave-safe dish. Add a little liquid and cover it with a lid. Heat in short bursts, stirring in between, to avoid dryness. Yes, you can freeze this pasta! It keeps well for up to two months. To freeze, let it cool completely and transfer it to a freezer-safe container. When ready to eat, thaw it overnight in the fridge. Reheat on the stove, adding a splash of cream or water to revive the sauce. This way, you’ll enjoy a delicious meal even after some time! For the detailed recipe, see the Full Recipe section. Yes, you can make Creamy Garlic Parmesan Pasta in advance. Store it in an airtight container in the fridge. It will stay fresh for 3 to 4 days. When you’re ready to eat, reheat it on low heat. Add a splash of cream or pasta water to keep it creamy. Avoid using high heat, as this can make the pasta dry. This dish pairs well with many sides. Here are some suggestions: - Garlic bread for a crunchy bite. - A fresh green salad to add crispness. - Roasted vegetables for extra flavor. - Grilled chicken or shrimp for protein. These options make your meal more complete and tasty. To add heat, try these options: - Mix in crushed red pepper flakes. Start with a small amount and add more to taste. - Use a spicy Italian sausage instead of regular sausage. - Add diced jalapeños or chili peppers to the sauce. These choices enhance flavor and make the dish exciting. You can use pre-grated cheese, but fresh cheese is better. Here are the pros and cons: Pros: - Convenient and saves time. - Easy to find in stores. Cons: - Pre-grated cheese may not melt as well. - It might contain anti-caking agents that affect taste. For the best results, I recommend using freshly grated cheese from a block. It adds creaminess and flavor. For the full recipe, check out the original dish! Creamy Garlic Parmesan Pasta is easy and tasty. We covered main ingredients like fettuccine, butter, and garlic. I shared tips for cooking pasta and making a creamy sauce. You learned how to enhance flavors and serve it nicely. Remember, you can adapt recipes for health needs or preferences. Whether you're feeding a crowd or just yourself, this dish is a winner. Try it today and make it your own!

Creamy Garlic Parmesan Pasta Flavorful Family Favorite

If you’re on the hunt for a dish that will impress your family and friends, look no further! My Creamy

To make savory stuffed bell peppers with quinoa, you need fresh, colorful ingredients. Here’s what you will need: - Bell Peppers: 4 large bell peppers, any vibrant color. - Quinoa and Vegetable Broth: 1 cup quinoa, thoroughly rinsed, and 2 cups vegetable broth. - Black Beans and Corn: 1 cup canned black beans, drained and rinsed, plus 1 cup corn (fresh or frozen). - Onions and Garlic: 1 medium onion, finely chopped, and 2 garlic cloves, minced. - Spices and Seasonings: 1 teaspoon ground cumin, 1 teaspoon smoked paprika, 1 teaspoon chili powder, plus sea salt and freshly cracked black pepper to taste. - Tomatoes and Cheese: 1 cup diced tomatoes (canned or fresh) and 1 cup shredded cheese (like cheddar or a dairy-free alternative). - Garnish Options: Fresh cilantro, chopped, for a vibrant finishing touch. These ingredients come together to create a dish that is not only tasty but also nutritious. The quinoa provides protein, while the bell peppers add vitamins and colorful appeal. You can find the full recipe in the linked section above. - Slicing and Cleaning: Start by cutting the tops off the bell peppers. Cut about 1/4 inch from the stem. Next, remove all the seeds and membranes inside. This way, you get a clean pepper ready for stuffing. - Setting Aside the Tops: You can set the tops aside if you want to use them later. They can add flavor to your dish. - Combining Ingredients: In a medium saucepan, combine 1 cup of rinsed quinoa with 2 cups of vegetable broth. The broth adds great flavor. - Simmering Process: Bring the mixture to a boil. Then, lower the heat to a simmer. Cover the pan and let it cook for about 15 minutes. The quinoa should be fluffy and absorb all the liquid. - Sautéing Onions and Garlic: While the quinoa cooks, heat a splash of olive oil in a skillet over medium heat. Add 1 finely chopped onion and 2 minced garlic cloves. Sauté for 3-4 minutes until the onion is soft. - Mixing in Other Ingredients: Stir in 1 cup of drained black beans, 1 cup of corn, and spices like 1 teaspoon of cumin, smoked paprika, and chili powder. Cook for another 3-5 minutes. This mix should smell amazing! - Stuffing Process: When the quinoa is ready, fluff it with a fork. Add it to the skillet and mix in 1 cup of diced tomatoes and half of the cheese. Now, stuff each bell pepper with this tasty mix. Press it down gently to pack it in. - Arranging in Baking Dish: Place the stuffed peppers upright in a baking dish. If you saved the tops, you can put them back on now. - Covering and Baking Time: Cover the dish with aluminum foil. Bake in your preheated oven at 375°F for 30 minutes. - Final Baking Touches: Remove the foil and sprinkle the remaining cheese on top. Bake for another 10-15 minutes until the cheese melts and the peppers are tender. Once you make these savory stuffed bell peppers, you will want to share this [Full Recipe] with friends! - Perfecting Quinoa Texture To cook quinoa just right, rinse it well to remove the natural coating. This step helps prevent bitterness. Use a pot with a lid. The ratio is one part quinoa to two parts vegetable broth. Bring it to a boil, then lower the heat and cover. Cook for about 15 minutes. Let it sit for a few minutes after cooking. Fluff it with a fork before mixing with other ingredients for the best texture. - Seasoning Suggestions Seasoning makes your dish shine. Try using ground cumin, smoked paprika, and chili powder for warmth and depth. Adjust salt and pepper to your taste. You can also add a squeeze of lime for brightness. Fresh herbs, like cilantro, can add a lovely touch before serving. - Presentation Ideas Arrange the stuffed peppers on a bright platter. You can drizzle a little olive oil on top. This adds flavor and makes them look fancy. Garnish with fresh cilantro for color. You might also add lime wedges for a fresh burst of flavor. - Accompaniments and Extras Serve the peppers with a side salad or some rice. A dollop of yogurt or guacamole can add creaminess. You can also serve them with tortilla chips for crunch. This makes the meal more fun and exciting! - Vegan and Gluten-Free Options This recipe is naturally vegan if you skip the cheese or use a dairy-free kind. It's also gluten-free since quinoa is a great grain. You can easily make it fit various diets without losing flavor. - Nutritional Information Each stuffed pepper is packed with protein from quinoa and beans. They are full of fiber from the veggies. This dish is low in calories and high in nutrients. It's a healthy choice that tastes great too! For more details, check the Full Recipe. {{image_4}} You can change the filling to make stuffed peppers even better. Here are some ideas: - Other Grains and Legumes: Try brown rice instead of quinoa. It adds a chewy texture. You can also use lentils or chickpeas for more protein and fiber. - Adding Vegetables: Mix in chopped spinach, zucchini, or mushrooms. These veggies add flavor and nutrients. You can even use leftover roasted vegetables for extra taste. Switching up the flavors can make your dish exciting. Consider these options: - Spices to Consider: Add oregano, thyme, or cayenne for a kick. You can also try curry powder for a fun twist. - Cheese Alternatives: Use feta or goat cheese for a tangy taste. If you want a vegan option, try nutritional yeast for a cheesy flavor without dairy. Using seasonal ingredients can keep your dish fresh and fun. Here’s how: - Spring and Summer Ingredients: Use fresh herbs like basil or parsley. Add cherry tomatoes or sweet corn for a burst of summer flavor. - Winter Comfort Additions: Consider using root vegetables like carrots or sweet potatoes. These add heartiness and warmth to each bite. Feel free to explore these variations to make your stuffed peppers unique and delicious! For the full recipe, check out the earlier sections. - Store leftovers in an airtight container. - Keep them in the fridge for up to 4 days. - Make sure to cool them before sealing. - Reheat only the portion you need each time. - You can freeze stuffed peppers for up to 3 months. - Wrap each pepper in plastic wrap, then foil. - To reheat, thaw in the fridge overnight. - Bake at 350°F (175°C) for about 25-30 minutes. - In the fridge, they last about 4 days. - Check for any changes in color or smell. - If they feel slimy or have an off odor, throw them away. - Always trust your senses when it comes to food safety. To prepare quinoa for stuffing, start by rinsing it well. Rinsing removes the bitter coating called saponin. After rinsing, cook the quinoa using a ratio of one part quinoa to two parts vegetable broth. Bring it to a boil, then lower the heat to a simmer. Cover it and let it cook for about 15 minutes. Once the quinoa is fluffy and all the liquid is absorbed, remove it from heat. Let it sit covered for a few minutes. This method gives you light and fluffy quinoa, perfect for stuffing. Yes, you can use different types of peppers. Sweet bell peppers are the most common choice for stuffing. They come in colors like red, yellow, green, and orange. However, you can also use spicy peppers for added heat. Jalapeños or poblanos are great options if you enjoy spice. Just remember that spicy peppers may change the overall flavor of your dish. Choose the peppers that match your taste and enjoy! Making stuffed peppers without cheese is easy. You can replace cheese with other tasty options. Try using avocado or some creamy hummus for a rich texture. You can also add extra spices or herbs to enhance the flavor. Nutritional yeast is a popular dairy-free alternative that adds a cheesy taste. It's packed with nutrients too. Experiment with these options to create a delicious, cheese-free stuffed pepper. Stuffed peppers are a tasty and healthy dish. We discussed key ingredients like bell peppers, quinoa, black beans, and spices. I shared step-by-step instructions for preparing and baking them. Tips on serving and storage keep your meal fresh longer. You can even change the filling or seasonings. This recipe is versatile and fits many diets. Enjoy these peppers, and feel free to try your own variations. You’ll create a meal that’s both simple and satisfying.

Savory Stuffed Bell Peppers with Quinoa Recipe

Are you ready for a delicious and healthy meal? My savory stuffed bell peppers with quinoa will delight your taste

To make these delicious lemon blueberry muffins, gather the following ingredients: - 1 ½ cups all-purpose flour - ¾ cup granulated sugar - ½ teaspoon baking powder - ½ teaspoon baking soda - ¼ teaspoon salt - 1 large lemon (for zest and juice) - ½ cup unsalted butter, melted - 1 large egg - ½ cup buttermilk (or substitute with milk and vinegar) - 1 cup fresh blueberries - 1 teaspoon vanilla extract - 2 tablespoons coarse sugar for topping Each ingredient plays a key role in creating the perfect muffin. The all-purpose flour gives structure, while sugar adds sweetness. Baking powder and baking soda help the muffins rise. Salt enhances flavor. The lemon zest and juice bring a refreshing zing that pairs perfectly with blueberries. Melted butter adds richness, and the egg binds everything together. Buttermilk ensures the muffins stay moist. Fresh blueberries burst with flavor, and vanilla extract adds warmth. Finally, coarse sugar on top creates a delightful crunch. For a full recipe, check out the section titled Full Recipe. Each ingredient is simple and easy to find, making your baking adventure enjoyable! Start by preheating your oven to 350°F (175°C). This step is key for even baking. While you wait, prepare your muffin tin. You can line it with paper liners or spray it with non-stick cooking spray. This ensures easy removal later. In a large mixing bowl, whisk together the dry ingredients. You need 1 ½ cups of all-purpose flour, ¾ cup of granulated sugar, ½ teaspoon of baking powder, ½ teaspoon of baking soda, and ¼ teaspoon of salt. Make sure they mix well. This creates a solid base for your muffins. In a separate medium bowl, combine the wet ingredients. Whisk ½ cup of melted unsalted butter with the juice and zest from one large lemon. Add one large egg, ½ cup of buttermilk, and 1 teaspoon of vanilla extract. Mix until it’s smooth. This mixture adds flavor and moisture to your muffins. Now it’s time to bring it all together. Carefully fold the wet mixture into the dry mixture. Use a spatula or wooden spoon. Mix only until you see no dry flour. Be gentle; overmixing can make your muffins dense. Take 1 cup of fresh blueberries and gently fold them into the batter. Make sure they are evenly spread throughout. If you break them, your muffins may turn blue! This adds a burst of flavor and color to each bite. Use a scoop or spoon to fill your muffin cups. Aim to fill each cup about three-quarters full. This gives them room to rise without overflowing. For a sweet touch, sprinkle 2 tablespoons of coarse sugar on top of each muffin. Place the muffin tin in your preheated oven. Bake for 18-20 minutes. To check if they are done, insert a toothpick into the center of one muffin. If it comes out clean, your muffins are ready. After baking, let the muffins cool in the tin for about 5 minutes. Then transfer them to a wire rack. This helps keep them fluffy. Serve them warm or at room temperature. For a nice touch, garnish with fresh blueberries and a sprinkle of lemon zest. Follow these steps from the Full Recipe for perfect lemon blueberry muffins every time! To get the best muffin texture, keep a few tips in mind. First, always measure your flour correctly. Use a spoon to scoop flour into your measuring cup, then level it off with a knife. This helps avoid heavy muffins. Second, don’t overmix the batter. Mix until you see no dry flour. Those little lumps? They are okay! Overmixing makes muffins tough. Lastly, let the batter sit for a few minutes before baking. This helps the muffins rise nicely. When adding blueberries, fresh is best, but frozen can work too. If you use frozen berries, do not thaw them. This keeps the color from bleeding into the batter. Gently fold the blueberries into the batter to prevent breaking. Also, sprinkle a little flour on the blueberries before adding them. This helps them stay suspended in the batter while baking. Lastly, fill your muffin cups about three-quarters full. This ensures they rise and have a nice dome shape. One common mistake is not preheating the oven. Always preheat to the right temperature. If you skip this step, the muffins may not rise well. Another mistake is using cold ingredients. Make sure your eggs and butter are at room temperature. This helps the batter mix well. Lastly, avoid overbaking. Check the muffins at 18 minutes. If the toothpick comes out clean, they are done. Overbaking makes them dry, which is not tasty. Enjoy baking these lemon blueberry muffins! For the complete recipe, check out [Full Recipe]. {{image_4}} You can switch some ingredients to fit your taste. For the flour, try whole wheat or almond flour. This change adds a nutty taste and more fiber. If you want less sugar, use honey or maple syrup. Just remember, these swaps can alter the texture a bit. You can also use Greek yogurt instead of buttermilk. This keeps your muffins moist and adds a protein boost. Want to mix it up? Add nuts like chopped walnuts or pecans. They add crunch and flavor. You can also throw in other fruits, like raspberries or strawberries. Just use the same amount as blueberries. Keep in mind that these fruits can change the taste and color of your muffins. A lemon glaze can add a sweet touch. To make it, mix powdered sugar with lemon juice. Start with one cup of powdered sugar and add lemon juice until you reach your desired thickness. Drizzle this on top of your cooled muffins for a zesty finish. This glaze makes them look fancy and taste even better. Explore more ideas and get the full recipe to create your own delicious lemon blueberry muffins! To keep your lemon blueberry muffins fresh, store them in an airtight container. This helps to keep them moist. Place the muffins at room temperature if you plan to eat them within two days. If you need to store them longer, consider freezing them. Freezing muffins is simple and keeps them tasty. Allow the muffins to cool completely. Then, wrap each muffin tightly in plastic wrap. You can also place them in a freezer-safe bag. Label the bag with the date. They will stay good for about three months in the freezer. To enjoy your muffins warm, preheat your oven to 350°F (175°C). Place the muffins directly on the oven rack or a baking sheet. Heat them for about 10-15 minutes. You can also microwave them for about 15-20 seconds. This makes them soft and warm again. For best results, check often to avoid overheating. These tips will help you enjoy your lemon blueberry muffins anytime! For the full recipe, check back to create these delicious treats. To enhance your muffins, add more lemon zest or a splash of lemon juice. You can also mix in spices like cinnamon or nutmeg for warmth. Consider using vanilla bean paste instead of extract for a richer flavor. Fresh herbs, like thyme, can also add a unique twist. Experiment with these ideas to find your favorite flavor boost! Yes, you can use frozen blueberries! They work well in this recipe. They may bleed into the batter, which can create a lovely marbled effect. Just be sure to fold them in gently to keep them whole. If using frozen berries, do not thaw them before adding them to your mix. This helps maintain their shape. If you don't have buttermilk, you can make a quick substitute. Just add 1 tablespoon of white vinegar or lemon juice to ½ cup of milk. Stir it and let it sit for about 5 minutes. This creates a similar tangy flavor. You can use any milk you have on hand, including almond or oat milk. These muffins stay fresh for about 2-3 days at room temperature when stored in an airtight container. For longer storage, place them in the fridge for up to a week. They also freeze well for up to 3 months. Just make sure to wrap them tightly before freezing to prevent freezer burn. Absolutely! You can easily make mini muffins using this recipe. Just fill the mini muffin tins about halfway and reduce the baking time to about 12-15 minutes. Check for doneness with a toothpick. Mini muffins are perfect for snacks or breakfast bites! To prevent sticking, use paper liners or spray the muffin tin with non-stick cooking spray. You can also lightly dust the tin with flour after greasing it. Allow the muffins to cool in the tin for a few minutes before removing them. This helps them release easily without tearing. You’ve learned how to make delicious lemon blueberry muffins from start to finish. We covered the key ingredients, step-by-step instructions, and helpful tips. The small changes, like adding a glaze or nuts, make a big difference. Remember to store or freeze extras for a tasty snack later. Enjoy baking and share your muffins with friends and family! This recipe can become a favorite for everyone. Happy baking!

Delicious Lemon Blueberry Muffins Easy Baking Guide

Lemon blueberry muffins are a perfect treat for any time of day. They are sweet, tangy, and bursting with flavor.

To make this comforting soup, gather the following ingredients: - 2 tablespoons extra virgin olive oil - 1 small onion, finely diced - 3 cloves garlic, minced - 6 cups ripe tomatoes, chopped (fresh or canned) - 1 cup vegetable broth (homemade or store-bought) - 1 tablespoon sugar (optional) - Salt and freshly ground black pepper, to taste - 1 cup fresh basil leaves, tightly packed - 1 teaspoon balsamic vinegar (optional) - 1/2 cup heavy cream (or coconut cream) You can elevate your soup with these optional ingredients: - A pinch of red pepper flakes for spice - A teaspoon of dried oregano for depth - A squeeze of lemon juice for brightness - Parmesan cheese for a savory finish This soup is not just tasty; it's also healthy. Here’s a breakdown of what you get in each serving: - Calories: 250 - Protein: 4g - Carbohydrates: 20g - Dietary Fiber: 4g - Total Fat: 18g - Saturated Fat: 9g - Sugars: 4g Enjoy every bite of this homemade tomato basil soup! For the complete cooking process, check out the Full Recipe. To start, gather your ingredients. You need fresh tomatoes, onion, garlic, and basil. Here’s what you need: - 2 tablespoons extra virgin olive oil - 1 small onion, finely diced - 3 cloves garlic, minced - 6 cups ripe tomatoes, chopped (fresh or canned) - 1 cup vegetable broth - 1 tablespoon sugar (optional) - Salt and freshly ground black pepper, to taste - 1 cup fresh basil leaves - 1 teaspoon balsamic vinegar (optional) - 1/2 cup heavy cream (or coconut cream) 1. In a large pot, heat the olive oil over medium heat. It should shimmer when ready. 2. Add the diced onion and sauté for about 5 minutes. Stir often until the onion is soft and clear. 3. Next, add the minced garlic. Cook for 1-2 minutes, stirring frequently. The garlic should smell great but not burn. 4. Now, stir in the chopped tomatoes and the vegetable broth. Bring the mix to a gentle simmer. - If you use fresh tomatoes, let it cook for about 20 minutes. - If using canned tomatoes, simmer for about 10 minutes. 5. After simmering, add the optional sugar. Season with salt and pepper to your liking. 1. Once cooked, take the pot off the heat. Fold in the fresh basil leaves. Let them wilt in the heat. 2. Use an immersion blender to blend the soup until smooth. If you don’t have one, pour the soup in batches into a blender. 3. Return the blended soup to the pot. If you want, add the balsamic vinegar and heavy cream. Mix well. 4. Gently heat the soup on low until warm. Be careful not to boil it, as this can change the cream’s texture. 5. Taste the soup. Adjust seasoning if needed. Add more salt, pepper, or sugar as desired. Now, you have a delicious homemade tomato basil soup ready to enjoy! For the full recipe, click here. When making tomato basil soup, avoid these common errors: - Not seasoning enough: Always taste your soup before serving. Adjust salt and pepper as needed. - Overcooking garlic: Garlic burns quickly. Cook it just until fragrant. - Skipping the blending step: A smooth soup is key for the best texture. - Using low-quality tomatoes: Fresh, ripe tomatoes or good canned ones taste best. To make your soup even better, try these tips: - Add a splash of balsamic vinegar for depth. - Stir in a touch of sugar to balance acidity. - Use homemade vegetable broth for richer flavor. - Fresh basil is a must. Add it at the end for the best taste. - For a creamy texture, mix in heavy cream or coconut cream. Make your soup look as good as it tastes: - Serve in warm bowls to keep it hot. - Drizzle extra virgin olive oil on top for shine. - Garnish with freshly chopped basil for color. - Swirl cream on top for a nice contrast. - Pair with crusty bread for a complete meal. Enjoy making your homemade tomato basil soup. Check out the Full Recipe for detailed steps! {{image_4}} To make a dairy-free version, swap heavy cream for coconut cream. This keeps the soup rich and creamy while adding a hint of coconut flavor. Many people enjoy this twist, and it works well with the tomatoes and basil. If you love heat, add red pepper flakes or diced jalapeños. Start with a small amount and taste as you go. You can also include a dash of hot sauce for an extra kick. This spicy version adds depth and warmth to the classic recipe. Feel free to boost nutrition by adding vegetables. Zucchini, carrots, or bell peppers work well. Chop them small and sauté with the onion. This adds flavor and color, making the soup even more inviting. You can also toss in a handful of spinach after blending for extra greens. For the full recipe, check out the step-by-step guide and ingredient list. Enjoy these variations to suit your taste! After you make your delicious soup, let it cool first. Pour it into airtight containers. You can store it in the fridge for up to five days. Make sure to label the containers with the date. This way, you won’t forget when you made it! You can freeze tomato basil soup for later. Use freezer-safe bags or containers. Leave some space in each container for the soup to expand. It can last up to three months in the freezer. When you want to eat it, just thaw it in the fridge overnight. To reheat, pour your soup into a pot. Warm it on low heat, stirring often. If you used cream, be careful not to boil it. You can also use the microwave. Heat it in short bursts, stirring in between. This keeps the soup smooth and tasty. Enjoy it with a side of crusty bread! Yes, you can use canned tomatoes. They are a great option. Canned tomatoes are already cooked, so they save time. If fresh tomatoes are not in season, canned tomatoes work well. Just pick high-quality canned tomatoes for the best taste. You can use them in the same amount as fresh tomatoes in the recipe. To thicken your soup, you have a few options. One way is to add more heavy cream. This makes the soup rich and creamy. Another method is to blend the soup longer, which helps thicken it. You can also add a small amount of cornstarch mixed with cold water. Stir it in and cook for a few minutes. This will help the soup thicken without changing the flavor. Homemade tomato basil soup lasts about 4 to 5 days in the fridge. Make sure to store it in an airtight container. This keeps it fresh and safe to eat. If you want to keep it longer, you can freeze it. Just remember to leave some space in the container, as the soup will expand when frozen. For the best flavor, try to eat it within three months. For the full recipe, check the earlier section! Homemade tomato basil soup is simple and tasty. We covered key ingredients and steps to make it. Remember to avoid common mistakes and enhance flavors for the best results. You can even try variations to fit your taste. Store leftovers to enjoy later. Always have fun while cooking! With these tips, you can create a delicious dish that delights everyone. Now, go ahead and make your own bowl of warmth!

Homemade Tomato Basil Soup Comforting Simple Recipe

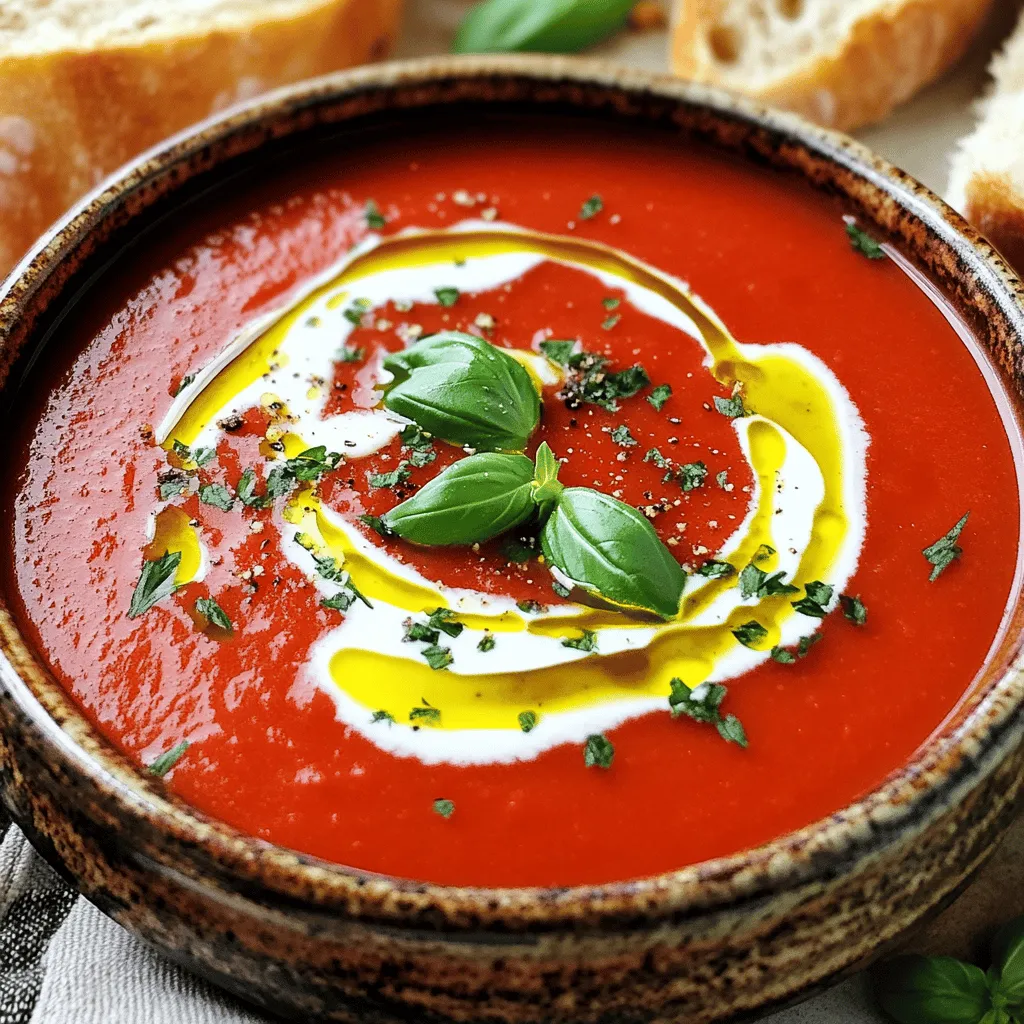
There’s nothing like a warm bowl of homemade tomato basil soup to chase away the chill. This comforting recipe is

- Zucchini - Bell pepper - Red onion - Cherry tomatoes - Mushrooms - Marinade ingredients: olive oil, balsamic vinegar, dried oregano, garlic powder - Seasonings: salt and pepper - Skewer options: wooden and metal For this recipe, you will need a mix of fresh vegetables. I love using zucchini, bell pepper, red onion, cherry tomatoes, and mushrooms. They all grill well and taste great together. Next, let’s talk about the marinade. You will need extra virgin olive oil and balsamic vinegar as the base. Add dried oregano and garlic powder for flavor. Don't forget salt and pepper to enhance the taste. When it comes to skewers, you have two options: wooden or metal. If you pick wooden skewers, soak them in water for 30 minutes. This step prevents burning on the grill. With these ingredients ready, you're all set to create a colorful and tasty dish. You can find the full recipe for grilled vegetable skewers in the next section. To start, gather the key ingredients for your marinade. You need: - 2 tablespoons extra virgin olive oil - 2 tablespoons balsamic vinegar - 1 teaspoon dried oregano - 1 teaspoon garlic powder - Salt and freshly ground black pepper, to taste Combine the olive oil, balsamic vinegar, oregano, garlic powder, and seasonings in a large bowl. Whisk them together until they blend well. This marinade adds rich flavor to the vegetables. Marinating time is key. Let the vegetables soak in the marinade for 15 to 20 minutes. This allows the flavors to meld and enhances the taste. Next, choose your vegetables. I like to use: - 1 medium zucchini, sliced into ½-inch rounds - 1 bell pepper (red or yellow), cut into 1-inch chunks - 1 medium red onion, cut into wedges - 1 cup cherry tomatoes, whole - 1 cup mushrooms, whole or halved Add the sliced zucchini, bell pepper, onion, tomatoes, and mushrooms to the bowl with the marinade. Gently toss them until they are well coated. The marinade helps lock in moisture while grilling. It also gives your skewers a burst of flavor. Preheat your grill to medium-high heat. Aim for about 400°F or 200°C. This step is crucial for cooking the skewers evenly. While the grill heats, thread the marinated vegetables onto the skewers. Alternate the vegetables to make them more colorful and appealing. Once the grill is ready, place the skewers on the grill. Cook them for about 10 to 12 minutes. Turn them every few minutes. This ensures they cook evenly and develop those beautiful grill marks. After cooking, let them rest briefly before serving. Enjoy your delicious grilled vegetable skewers! For the complete recipe, check the Full Recipe section. When making grilled vegetable skewers, choose fresh seasonal veggies. Seasonal options taste best and are easier to find. For example, summer brings zucchini, bell peppers, and tomatoes. These veggies not only taste great, but they also look colorful on your skewers. A mix of colors makes your dish pop and is more inviting. To make your skewers, alternate the veggies. This method helps them cook evenly. Start with a mushroom, add a bell pepper, then a cherry tomato. Repeat this pattern for a nice look. Make sure to push the veggies close together but not too tight. This way, they stay on the skewer and get enough heat. Grilling time is crucial for the perfect texture. Grill the skewers for about 10-12 minutes. Turn them every few minutes to avoid burning. This method gives you those beautiful grill marks. Keep an eye on the temperature, too. Medium-high heat works best, around 400°F (200°C). This heat cooks the veggies well without drying them out. {{image_4}} For vegan skewers, swap out any non-vegan ingredients. Use only plant-based items. You can add tofu or tempeh for protein. These options bring a nice texture and flavor. Tofu absorbs marinades well, making it a great choice. Tempeh has a hearty flavor, adding depth to your dish. To ensure your skewers are gluten-free, check all labels. Use gluten-free sauces and marinades. Tamari is a great alternative to soy sauce. It gives a nice taste without gluten. You can also make your own marinades easily. Just use olive oil, lemon juice, and herbs. Try fresh herbs like basil or thyme for extra flavor. These herbs boost the taste of your veggies. Add spices like cumin or smoked paprika for a twist. They can change the whole profile of your dish. For dipping, consider tzatziki or hummus. They pair well and add creaminess. Check the Full Recipe for more ideas on how to enhance your grilled vegetable skewers! For storing your grilled vegetable skewers, I recommend using airtight containers. Glass or plastic containers with tight seals work best. This keeps the flavors locked in and prevents moisture loss. You can keep them in the fridge for about 3 to 5 days. If you notice any off smells or changes in texture, it’s best to toss them. To reheat your skewers, the oven is my favorite method. Preheat it to 350°F (175°C). Place the skewers on a baking sheet and cover them with foil. Heat them for about 10-15 minutes. This method keeps them from becoming soggy. You can also reheat them on a skillet over medium heat. Just make sure to turn them often for even warmth. Yes, you can freeze grilled vegetable skewers! To do this, let them cool completely first. Then, place them in a single layer on a baking sheet. Freeze them for a few hours until solid. After that, transfer them to freezer bags. They can last up to 3 months in the freezer. When ready to eat, thaw them in the fridge overnight and reheat as mentioned above. You can easily make these skewers in your oven or on the stovetop. For oven-roasting, preheat your oven to 425°F (220°C). Place the skewers on a baking sheet. Roast them for 20-25 minutes, turning halfway through. For stovetop cooking, use a grill pan. Heat the pan over medium-high heat, and cook the skewers for about 10-12 minutes. Turn them often to get even cooking. Some favorites include zucchini, bell peppers, onions, mushrooms, and cherry tomatoes. Zucchini and bell peppers add great flavor and color. Red onions become sweet and tender when grilled. Mushrooms soak up the marinade well. Cherry tomatoes burst with juices, making every bite tasty. Use a mix of these veggies for fun and flavor. Yes, you can prepare the marinade ahead. Combine olive oil, balsamic vinegar, oregano, and garlic powder in a jar. Seal it and store it in your fridge. This step saves time and helps the flavors develop. Just remember to shake it well before using, so it mixes nicely. Soak wooden skewers for at least 30 minutes before grilling. This step is key to preventing them from burning. If you skip this, the skewers may char and break apart. Soaking also helps them hold moisture, leading to better grilling. Grilled vegetable skewers are easy and tasty. Start by gathering fresh veggies like zucchini and bell peppers. Marinate them in olive oil and balsamic vinegar for great flavor. Grill until tender with nice marks. You can customize with different vegetables and sauces to match your taste. Store leftovers properly, and enjoy them later. With simple steps and tips, you'll impress your friends and family. Now, go fire up that grill and create delicious skewers!

Grilled Vegetable Skewers Flavorful and Easy Recipe

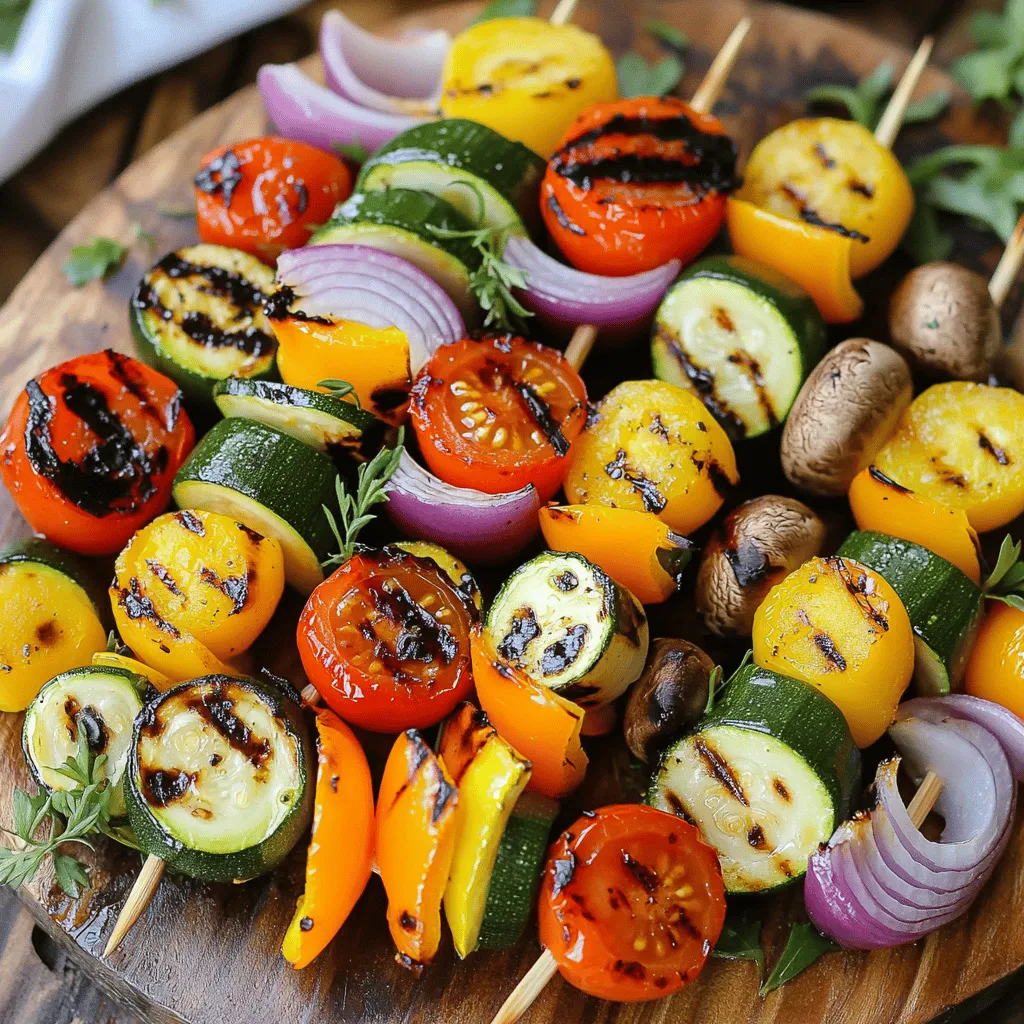
Are you ready to elevate your summer grilling game? My easy recipe for grilled vegetable skewers will make your taste

- 2 cups fresh strawberries, hulled and sliced - 1 tablespoon granulated sugar - 1 pound pound cake, cut into bite-sized cubes - 1 cup heavy whipping cream - 1/2 cup powdered sugar - 1 teaspoon pure vanilla extract - 1 cup creamy vanilla yogurt - Fresh mint leaves for garnish To make a great strawberry shortcake trifle, you need fresh, ripe strawberries. Their sweet taste makes the dessert shine. The granulated sugar helps bring out the strawberry juices. A pound cake works best for this recipe. It adds a soft, buttery layer that blends well with the cream and fruit. Next, heavy whipping cream is key for a rich topping. You'll whip it until fluffy, adding powdered sugar for sweetness. Pure vanilla extract gives a lovely flavor, making the cream even better. Creamy vanilla yogurt adds a nice tang and smooth texture. Finally, fresh mint leaves are perfect for garnish. They add a pop of color and a hint of freshness. These ingredients come together to create a beautiful, layered dessert. You can find the full recipe for the strawberry shortcake trifle above. Enjoy crafting this delightful treat! To prepare the strawberries, start by hulling and slicing them. Place the strawberries in a medium bowl. Next, sprinkle 1 tablespoon of granulated sugar over the berries. Gently toss them to coat. This process is called macerating. Let the strawberries sit for about 15 minutes. This resting time helps draw out their juices and boosts their sweetness. The result is juicy, flavorful strawberries that enhance your trifle. For perfect whipped cream, use heavy whipping cream. Pour it into a mixing bowl. With a hand mixer, whip the cream on medium speed. Slowly add the powdered sugar and pure vanilla extract as you whip. Keep an eye on it; stop when soft peaks form. Be careful not to overwhip, as this can turn the cream grainy. You want it to stay light and fluffy for a nice texture. Now, let’s lighten the yogurt. In a separate bowl, add 1 cup of creamy vanilla yogurt. Take a tablespoon of the whipped cream and stir it into the yogurt. This step makes it easier to mix. Next, gently fold in the rest of the whipped cream. Use a spatula to combine until the mixture is even. This technique keeps the texture airy and fluffy, making it perfect for your trifle. Begin layering your trifle in a clear glass dish. Start with a layer of pound cake cubes. This forms the base. Next, add a layer of the whipped cream and yogurt mixture. Follow that with a layer of the macerated strawberries and their tasty juices. Repeat these layers until you reach the top of the dish. Finish with a layer of whipped cream on top. This makes the trifle look beautiful and balanced. For an attractive finish, decorate the top of your trifle. Use fresh strawberry slices and a few mint leaves. This adds color and freshness. Choose garnishes that match the flavors. They should complement the sweet strawberries and creamy layers. This final touch makes your trifle even more inviting. Chill the trifle before serving. Cover it with plastic wrap or a lid and place it in the refrigerator. Let it chill for at least 1 hour. Chilling is important because it allows the flavors to blend beautifully. This enhances the overall taste. When you finally serve it, each bite will be refreshing and delicious. For the complete experience, check out the Full Recipe. To make your trifle just right, adjust the sweetness. If your strawberries are very sweet, cut back on the sugar. For a less sweet treat, add more sugar to the cream. You can also swap out ingredients for dietary needs. Use gluten-free pound cake for a gluten-free version. If you want a lighter dessert, try using a low-fat yogurt. This trifle shines at summer picnics and birthday parties. It’s great for family gatherings too. Pair it with a light salad or grilled foods for a full meal. You can serve it in clear glasses for a fun twist. This way, everyone can see the lovely layers. Top each glass with a mint leaf for a pop of color. For more tips and ideas, check out the Full Recipe. {{image_4}} You can change up the fruits in your trifle for fun. While strawberries are classic, other fruits work well too. Think about using blueberries, raspberries, or peaches. - Blueberries add a tart flavor that pairs nicely with cream. - Raspberries bring a juicy burst and vibrant color. - Peaches offer a sweet, juicy twist that feels like summer. You can also pick fruits based on the season. In spring, use fresh berries. In fall, try apples or pears. This helps keep the trifle exciting all year round. Adding flavors to the cream or yogurt makes your trifle even better. Start with the whipped cream. You can mix in flavors like almond or lemon extract. A splash of liqueur, such as Amaretto or Chambord, adds depth, too. In the yogurt, consider adding a bit of honey or maple syrup for sweetness. These small tweaks can elevate your dessert and make it uniquely yours. If you need a gluten-free trifle, use gluten-free pound cake. Many bakeries offer this option, or you can make your own. When layering, try using fruit puree or whipped cream instead of cake. This still gives you a delicious treat without gluten. You can also stack in jars for a fun presentation. These variations let you customize your trifle while keeping it simple and tasty. Check the Full Recipe for the basics, then get creative! To keep your strawberry shortcake trifle fresh, store it in the fridge. Use an airtight container to seal it tightly. This will help keep it from drying out. To prevent sogginess, avoid adding the strawberries until you are ready to serve. Store them separately if you have leftovers. You can store the trifle in the fridge for up to three days. After that, it may lose its texture and taste. Signs of spoilage include an off smell or watery layers. Always check your trifle before enjoying it again. If it doesn't look or smell right, it's best to toss it out. To keep the pound cake firm, use these tips: - Layer Quickly: Build your trifle soon after preparing the ingredients. - Use Fresh Cake: Fresh pound cake holds its shape better than older cake. - Limit Liquid: Don’t add too much syrup or juice to the layers. Yes, you can! Here’s how: - Assemble Ahead: Layer the trifle a few hours before serving. - Chill It: Keep it in the fridge for up to 4 hours. This allows flavors to mix. - Add Garnish Later: Wait to add mint and strawberries until just before serving. If you want lighter options, try these: - Greek Yogurt: It adds creaminess and tang. - Coconut Cream: It’s rich and dairy-free. - Whipped Topping: Use store-bought for ease. The original recipe is not gluten-free, but you can adapt it: - Gluten-Free Cake: Use gluten-free pound cake. - Check Other Ingredients: Make sure yogurt and other items are gluten-free. Absolutely! Here are some ideas: - Citrus Zest: Add lemon or orange zest to the cream. - Extracts: Use almond or mint extract for a twist. - Nutmeg or Cinnamon: Sprinkle some for added warmth. These desserts make great pairings: - Ice Cream: Vanilla or strawberry flavors complement it well. - Fruit Salad: A light, fresh fruit salad balances the richness. - Cookies: Shortbread or sugar cookies add a nice crunch. For a detailed guide, check the Full Recipe! You now have a solid guide to make a delicious Strawberry Shortcake Trifle. We explored fresh ingredients like strawberries and whipping cream. I showed you how to prepare, layer, and chill your trifle for maximum flavor. You learned to use tips and tricks for perfect sweetness and special dietary needs. Finally, I shared variations and storage tips to keep your dessert fresh. This trifle is perfect for any occasion, and you can have fun with it. Your dessert will impress everyone and be enjoyed all year round. Enjoy making your trifle!

Strawberry Shortcake Trifle Delightfully Simple Recipe

Are you ready to impress your friends with a delicious dessert? This Strawberry Shortcake Trifle is not only simple, but

For a great avocado toast, start with these simple ingredients: - 2 ripe avocados - 4 slices of multigrain or sourdough bread - 1 cup cherry tomatoes, halved - 1 small red onion, thinly sliced - 1 tablespoon olive oil - 1 tablespoon lemon juice - Salt and pepper to taste Want to elevate your toast? Try these optional ingredients: - Crumbled feta cheese or smoked salmon - Fresh herbs for garnish, like basil or cilantro - Chili flakes for heat Avocados are not just tasty; they are healthy too. A serving of avocado toast can have around 300-400 calories. Avocados provide good fats, fiber, and vitamins. They help keep your heart healthy and your skin glowing. Enjoying this meal can give you energy and help you feel full. To start, you need to toast your bread. Sourdough or multigrain works great. I recommend using a toaster or a skillet. If using a skillet, heat it over medium. Toast the bread for about 5 to 7 minutes. Look for a golden brown color. This gives you that nice crunch. For optimal crispiness, be patient. Let the bread cool for a minute after toasting. This helps keep it crisp. Now, let's make the avocado spread. First, cut the ripe avocados in half. Remove the pit and scoop the flesh into a bowl. You can mash the avocados smooth or leave them chunky. I like a mix of both for texture. Add lemon juice for freshness. Season with salt and pepper to taste. This simple blend makes the perfect base for your toast. When it comes to toppings, be creative! Start by layering the avocado spread on your toasted bread. Next, spoon the marinated tomatoes and onions on top. This adds a burst of flavor. To layer effectively, place the toppings gently to avoid a mess. You can also add optional toppings like feta or poached eggs for extra fun. Fresh herbs like basil or cilantro can brighten the dish. Enjoy your Avocado Toast Delight with your favorite toppings! [Full Recipe] When you choose avocados, look for ones that feel slightly soft. Press gently; if it gives a bit, it’s ripe. Dark green or black skin often means they are ready to eat. Avoid avocados that feel mushy or have dark spots. Those signs show they are overripened. Unripe avocados can take a few days to ripen at home. Place them in a brown paper bag to speed up the process. You can toast your bread in a skillet or a toaster. Each method has its perks. A skillet gives a nice golden crust and a warm, fresh taste. A toaster is quick and easy, perfect for busy mornings. Choose multigrain or sourdough bread for the best flavor. Homemade bread can add a special touch if you have the time. Store-bought bread works well, too, especially if you are short on time. For a beautiful plate, arrange your toast on a large platter. This makes everything look inviting. Use colorful toppings like cherry tomatoes and fresh herbs for pops of color. Drizzle some olive oil on top for a shiny finish. To garnish, add thin radish slices or crumbled feta to create contrast. Simple touches like these make your avocado toast look gourmet. {{image_4}} For a delightful twist, try Mediterranean avocado toast. This version brings sunny flavors from Greece right to your kitchen. Ingredients: - 2 ripe avocados - 4 slices of multigrain or sourdough bread - 1 cup cherry tomatoes, halved - 1 small cucumber, diced - 1/2 cup crumbled feta cheese - 1 tablespoon olive oil - 1 tablespoon lemon juice - Salt and pepper to taste - Fresh basil for garnish To prepare, start by toasting your bread until golden. While it toasts, mash the avocados in a bowl. Mix in lemon juice, salt, and pepper for flavor. In another bowl, combine cherry tomatoes, cucumber, olive oil, and a pinch of salt. Once your toast is ready, spread the avocado on each slice. Top with the tomato and cucumber mix, then sprinkle with feta and fresh basil. This toast is fresh, vibrant, and perfect for lunch or brunch. If you crave something sweet, consider a sweet and savory twist. This combo uses fruits to elevate your avocado toast. Ingredients: - 2 ripe avocados - 4 slices of multigrain or sourdough bread - 1 banana, sliced - 1/2 cup strawberries, sliced - 2 tablespoons honey or maple syrup - 1 tablespoon lemon juice - A sprinkle of cinnamon Toast the bread until crisp. Mash the avocados and mix in lemon juice. Layer the mashed avocado on the toast. Top with banana and strawberry slices. Drizzle honey or maple syrup over the fruit, and finish with a sprinkle of cinnamon. This toast is a sweet treat that still feels healthy. For those with dietary restrictions, you can easily adapt this recipe. Here’s how to make a vegan and gluten-free avocado toast. Ingredients: - 2 ripe avocados - 4 slices of gluten-free bread - 1 small carrot, grated - 1/4 cup hummus - 1 tablespoon lemon juice - Salt and pepper to taste - Fresh herbs for garnish Toast your gluten-free bread until it’s crisp. Mash the avocados with lemon juice, salt, and pepper. Spread a layer of hummus on each slice. Top with the mashed avocado and sprinkle grated carrot on top. Garnish with fresh herbs for a burst of flavor. This version is hearty, satisfying, and perfect for all diets. To keep leftover avocado toast fresh, place it in an airtight container. This helps seal in moisture and flavor. If you have extra slices, avoid stacking them. Instead, store them flat to prevent sogginess. To stop the avocado from browning, sprinkle some lemon juice on top before covering. Lemon juice works well because it slows down oxidation. When you want to reheat your toast, aim to keep it crispy. The best way is to use a toaster. Just pop it back in until it’s warm and crunchy. You can also use an oven. Preheat it to 350°F (175°C) and heat the toast for about 5-10 minutes. Avoid using a microwave, as it can make the bread chewy. For the best taste, store your toppings separately. Keep extra avocado spread in a small container with a lid. Add a little lemon juice to help keep it green. For toppings like tomatoes and onions, store them in a different container. This keeps everything fresh longer. When you’re ready to eat, simply assemble your toast with fresh ingredients. This way, every bite tastes great! Yes, you can prep for avocado toast ahead of time. You can choose to prepare the avocado spread in advance. Just mash the avocados and mix in lemon juice to keep them fresh. Store the mix in an airtight container. Slice the bread and keep it in a sealed bag. You can toast the bread right before serving. This way, you have all components ready without losing flavor. The best bread for avocado toast is multigrain or sourdough. Multigrain bread gives a nutty flavor and extra fiber. Sourdough has a tangy taste and a chewy texture. Both options pair well with creamy avocado. You can also try rye bread for a unique twist. Each bread type adds its own taste, so explore and find your favorite! To make your avocado toast more filling, add protein and fiber. You can top it with a poached egg for rich protein. Add smoked salmon for a savory twist. For a fiber boost, sprinkle some chia seeds or hemp seeds on top. You can also layer in crunchy veggies like cucumbers or radishes. These additions not only fill you up but also add more flavor. Yes, you can freeze avocado toast, but with care. Freeze the bread slices in a sealed bag. For the avocado spread, mash it and store it in an airtight container. When you want to enjoy it, toast the bread straight from the freezer. Thaw the avocado in the fridge overnight and spread it on top. This keeps your toast fresh and delicious! Avocado toast is easy and fun to make. We covered essential ingredients, like ripe avocados and fresh toppings. You learned step-by-step methods for toasting bread and making a tasty spread. I shared tips on selecting the best avocados and creative variations to try. Remember, presentation matters too! With these insights, you can enjoy delicious avocado toast your way. Get creative, and make it your own!

Creative Avocado Toast Variations for Every Palate

Are you ready to take your avocado toast game to the next level? In this article, I’ll show you creative

- 1/2 cup unsalted butter - 1 cup dark chocolate chips (70% cocoa) - 1 cup powdered sugar - 2 large eggs - 2 large egg yolks - 1 teaspoon vanilla extract - 1/2 cup all-purpose flour - 1/4 teaspoon salt - 1/2 teaspoon espresso powder (optional) To create the perfect chocolate lava cake, start with the right ingredients. The main ingredients are crucial. Unsalted butter adds richness, while dark chocolate chips give the cake its deep flavor. Powdered sugar sweetens the mix and helps with texture. Next, we add eggs and yolks. They help the cake rise and keep it soft. The vanilla extract brings a warm, sweet aroma that enhances the chocolate. For the dry mix, all-purpose flour gives structure. A pinch of salt balances the sweetness. If you want an extra kick, espresso powder adds depth to the chocolate taste. Gather these items for your chocolate lava cake. Follow the full recipe for a delightful treat that will impress everyone. First, preheat your oven to 425°F (220°C). This temperature is key for that gooey center. While the oven heats, take four 6-ounce ramekins. Grease each one with unsalted butter. Make sure to cover all sides. Next, dust the insides with cocoa powder. This helps the cakes release easily after baking. In a medium bowl, combine the unsalted butter and dark chocolate chips. Use a microwave to melt them. Heat in 30-second bursts. Stir after each time until smooth. This process keeps the chocolate from burning. Once melted, let it cool slightly. This step is important to avoid cooking the eggs later. In a separate bowl, add the powdered sugar, whole eggs, egg yolks, and vanilla extract. Whisk these ingredients together. Your goal is to make them frothy and well combined. This adds air, which helps the cake rise. A good mix makes all the difference in texture. Now, slowly pour the melted chocolate mixture into the egg mix. Stir gently to combine. Be careful not to overmix. You want the batter airy and light. Overmixing can lead to a dense cake, and we’re aiming for a soft center. Evenly distribute the batter into your prepared ramekins. Fill them about three-quarters full. This allows the cakes to rise without spilling over. Too much batter can lead to a messy oven! Place the filled ramekins on a baking sheet. This makes it easy to move them in and out of the oven. Bake for 12-14 minutes. Keep an eye on them. The edges should set, but the centers should still look soft. This is your cue for perfect gooeyness. Follow these steps closely, and you’ll create a beautiful chocolate lava cake that will impress everyone! For the full recipe, check out the details in the earlier section. Enjoy your baking adventure! To get the soft centers, look for a few signs. The edges should set while the center looks slightly wet. You want a slight jiggle in the middle when you gently shake the ramekin. This means it’s just right. Let the cakes cool for one minute before you flip them. This short time helps them hold their shape. If you cool too long, they might stick to the ramekin. When serving, add a scoop of vanilla ice cream or a dollop of whipped cream. This adds a creamy touch that goes well with the warm cake. For a fancy look, drizzle some chocolate sauce around the plate. Sprinkle cocoa powder or chocolate shavings on top of the ice cream for extra flair. One big mistake is overbaking. If you bake too long, the center won’t be gooey. Check your cakes at the 12-minute mark. Using the wrong ramekin size can ruin your cake. Make sure to use 6-ounce ramekins. This helps the cakes rise perfectly. If they are too small, the cakes may overflow. If they are too large, the centers might not cook well. For more delicious tips, check out the Full Recipe to master your chocolate lava cake! {{image_4}} You can play with chocolate types in your lava cake. Milk chocolate gives a sweeter taste. White chocolate adds a creamy twist. Both options change the cake's flavor and texture. If you want a low-sugar dessert, use alternative sweeteners. Try stevia or monk fruit. These sweeteners can cut calories without losing taste. Adding flavors makes your lava cake unique. A hint of orange zest brightens the chocolate. Mint leaves a refreshing aftertaste. You can also use flavored liqueurs, like raspberry or coffee. Just remember to mix in small amounts. These flavors should enhance, not overpower. Making your lava cake fit different diets is simple. For a gluten-free version, swap all-purpose flour for almond flour. This change keeps the cake moist and tasty. If you want a vegan option, use flax eggs. Mix one tablespoon of ground flaxseed with three tablespoons of water. Let it sit for a few minutes before using. These swaps let everyone enjoy this dessert! Check the Full Recipe for detailed steps and tips. To keep your chocolate lava cake fresh, store leftovers in an airtight container. This helps seal in moisture and flavor. I recommend using glass or plastic containers with tight lids. Place a piece of parchment paper between the cake and the lid to prevent sticking. This simple step can keep your dessert tasty for up to three days. When you're ready to enjoy your leftover cake, reheat it in the oven. Preheat your oven to 350°F (175°C). Place the cake on a baking sheet and cover it with aluminum foil. Heat for about 10 minutes. This method warms the cake without making it dry. You can also use a microwave for quick reheating. Heat for 15-20 seconds, but keep an eye on it. You want it warm, not hot, so the center stays gooey. If you want to store your lava cake for longer, freezing is a great option. Wrap each cooled cake tightly in plastic wrap, then place it in a freezer bag. This will help avoid freezer burn. You can freeze the cake for up to three months. To thaw, take it out and place it in the fridge overnight. When ready to eat, simply reheat it as mentioned above. Enjoy your chocolate lava cake at its best! Yes, you can prepare chocolate lava cake ahead of time. Make the batter and fill the ramekins. Cover them and keep them in the fridge for up to 24 hours. When you are ready to bake, take them out and let them sit for about 20 minutes at room temperature. Then bake as directed. This method saves time and keeps your dessert fresh. If your lava cake doesn’t ooze, it may have baked too long. Bake just until the edges set, and the center looks soft. Check the cakes at 12 minutes. If they are firm in the middle, it’s too late. You can also try lowering the oven temperature slightly for the next bake. You can use different ramekins, but size matters. Ramekins should hold about 6 ounces. If you use smaller ones, reduce the baking time. If you use larger ones, increase the time. Always grease and dust with cocoa powder to ensure easy removal. Yes, you can make this recipe dairy-free. Substitute unsalted butter with coconut oil or a plant-based butter. Use dairy-free chocolate chips instead of dark chocolate. This keeps the rich flavor while meeting dietary needs. Toppings can elevate your lava cake. Try adding: - Vanilla ice cream - Whipped cream - Fresh berries - Chocolate sauce - Crushed nuts - Mint leaves for color These add flavor and make your dessert look fantastic. Enjoy your chocolate lava cake with any of these delicious toppings for a delightful treat! In this post, we explored how to make a perfect chocolate lava cake. We covered key ingredients, step-by-step instructions, and helpful tips. Remember to avoid overbaking for that gooey center. You can also get creative with flavors and dietary options. Whether you enjoy it warm with ice cream or cold, this dessert always impresses. Try it out, and share it with friends! You'll love every bite.

Chocolate Lava Cake Irresistible Dessert Delight

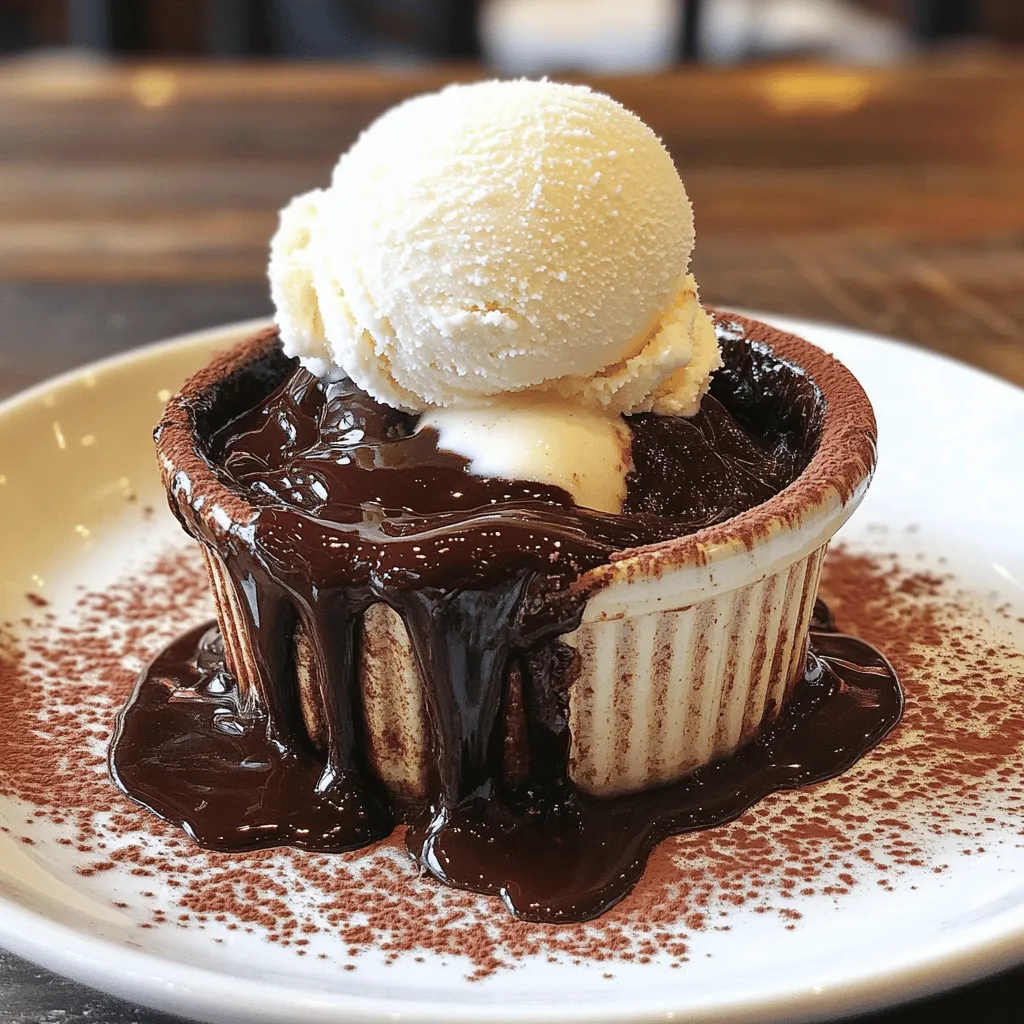
Are you ready to indulge in a dessert that oozes pure bliss? Chocolate Lava Cake is the ultimate sweet treat

To make these tasty nutty granola bars, gather the following ingredients: - 2 cups rolled oats - 1/2 cup almond butter - 1/4 cup honey or maple syrup - 1/2 cup mixed nuts (almonds, walnuts, pecans) - 1/4 cup pumpkin seeds - 1/4 cup sunflower seeds - 1/2 cup dried fruits (cranberries, raisins) - 1/2 teaspoon ground cinnamon - 1/4 teaspoon sea salt - 1 teaspoon pure vanilla extract These ingredients create a great balance of taste and nutrition. The oats provide fiber, while nuts and seeds add protein and healthy fats. Honey or maple syrup gives the bars sweetness and helps bind everything together. You can customize your granola bars by adding optional ingredients: - Chocolate chips - Coconut flakes - Chia seeds These add-ins let you play with flavors. Chocolate chips make the bars sweeter, while coconut adds a tropical twist. Chia seeds boost nutrition and add texture. Each bar has about 150 calories. The bars are rich in nutrients. They have a good mix of carbs, protein, and fat. Health benefits of ingredients: - Oats: Great for heart health. They lower cholesterol. - Nuts: Packed with protein. They help keep you full. - Seeds: Full of vitamins and minerals. They support overall health. - Dried fruits: They add natural sweetness and fiber. For the full recipe, check out the detailed cooking instructions. Start by preheating your oven to 350°F (175°C). This temperature helps the bars cook evenly. Next, grab an 8-inch square baking dish. Line it with parchment paper, so the bars lift out easily later. In a large mixing bowl, combine 2 cups of rolled oats with 1/2 cup of chopped mixed nuts. You can use almonds, walnuts, or pecans. Then, mix in 1/4 cup each of pumpkin seeds and sunflower seeds. Add 1/2 cup of dried fruits like cranberries or raisins. Finally, sprinkle in 1/2 teaspoon of ground cinnamon and 1/4 teaspoon of sea salt. Stir well to blend all the dry ingredients. In a small saucepan, melt 1/2 cup of almond butter and 1/4 cup of honey over low heat. Stir until the mixture is smooth. Once melted, take it off the heat and mix in 1 teaspoon of pure vanilla extract. This extra flavor makes a big difference! Pour the warm almond butter mixture over the dry ingredients in your bowl. Mix everything well, so each piece gets coated. This step is key for tasty bars! Carefully transfer your mixture into the lined baking dish. Press it down firmly and evenly. This helps the bars hold together. Bake in your preheated oven for 20-25 minutes. Watch for the edges to turn golden brown. Check often to avoid burning. After baking, let the granola cool in the pan for about 10-15 minutes. Then, use the overhanging parchment to lift it out. Place it on a cutting board and let it cool completely. Once cool, slice it into bars of your preferred size. For best results, store these delicious homemade granola bars in an airtight container at room temperature for up to a week. Enjoy your Nutty Granola Bars as a healthy snack! For the full recipe, check above. To make your nutty granola bars just right, press the mixture down firmly in the pan. This step helps the bars stay together after baking. If they feel loose, they may crumble when you cut them. If you want a softer bar, reduce the baking time by a few minutes. Keep an eye on them; golden edges mean they are ready! You can boost the flavor of your granola bars by adding spices. Try nutmeg or ginger for a warm kick. You can also experiment with different nut butters. Almond, peanut, or cashew butter will change the taste and texture. This way, you can create a unique version each time. For a beautiful display, stack the granola bars on a wooden board. This adds a rustic look. You can even sprinkle extra nuts or seeds on top for a bit of flair. If you want to give them as gifts, wrap them in colorful paper or place them in a nice box. This makes your homemade treat even more special. {{image_4}} You can easily change the taste of your nutty granola bars. For a rich, sweet twist, try making chocolate nut granola bars. Just add chocolate chips to the mix before baking. This will give you a delicious and sweet treat that satisfies your cravings. Another fun option is tropical fruit and nut bars. Add dried pineapple, mango, or coconut to your bars. These fruits will transport you to a sunny beach with each bite. If you need gluten-free options, you can swap regular oats for gluten-free oats. This simple change keeps your bars tasty and safe for those with gluten issues. For vegan substitutions, replace honey with maple syrup or agave nectar. This keeps the sweetness while making the bars vegan-friendly. As the seasons change, so can your granola bars. For fall, try adding pumpkin spice to your mix. Just a little cinnamon, nutmeg, and pumpkin puree will warm your heart during chilly days. In summer, go for a fruity version with cranberries and apricots. These dried fruits add a burst of flavor that brightens your snack. You can find many combinations to keep your nutty granola bars exciting and fresh. To keep your nutty granola bars fresh, store them in airtight containers. This helps lock in moisture and flavor. You can also freeze these bars for longer storage. Wrap each bar in plastic wrap, then place them in a freezer-safe bag. They will last several months in the freezer. When stored at room temperature, these bars stay fresh for up to a week. Keep them in a cool, dry place away from sunlight. If you choose to refrigerate them, they can last for two weeks. Refrigeration helps maintain freshness, especially if your kitchen is warm. Over time, granola bars can become stale. If they feel soft or chewy instead of firm, they may be past their prime. To revive old granola bars, you can bake them briefly at 300°F (150°C) for about 5-10 minutes. This can help restore some crunch. Enjoy these delicious snacks while they are fresh and tasty! Homemade granola bars can last up to a week at room temperature. If you keep them in an airtight container, they stay fresh longer. You can also freeze them for up to three months. Just remember to thaw before enjoying! Yes, you can customize the nuts in this recipe! Feel free to swap in your favorites. Almonds, walnuts, and pecans work great, but you can also use cashews or hazelnuts. Just chop them up and mix them in. It lets you create your own tasty blend. These granola bars are quite healthy! They pack in fiber from oats and healthy fats from nuts. Almond butter adds protein, while dried fruits give natural sweetness. This snack is a great choice for energy and nutrition. Plus, it keeps you full longer. To make these granola bars gluten-free, simply use gluten-free oats. Most oats are safe, but check the label to be sure. All other ingredients in the recipe are naturally gluten-free as well. This way, everyone can enjoy them without worry. You can serve granola bars in many fun ways! Pair them with yogurt for a great breakfast or snack. They also go well with fresh fruit or a glass of milk. You can even crumble them over ice cream for a treat. Enjoy exploring different combinations! In this post, you learned how to make nutty granola bars packed with healthy ingredients. We covered all the main components, from oats and nuts to tasty add-ins. You now have clear steps for preparing, baking, and storing these bars, plus tips for flavor and presentation. Making your own snacks is rewarding. Try different flavors and share them with friends! Enjoy your homemade treats, and keep experimenting with new ingredients!

Nutty Granola Bars Tasty and Nutritious Snack Recipe

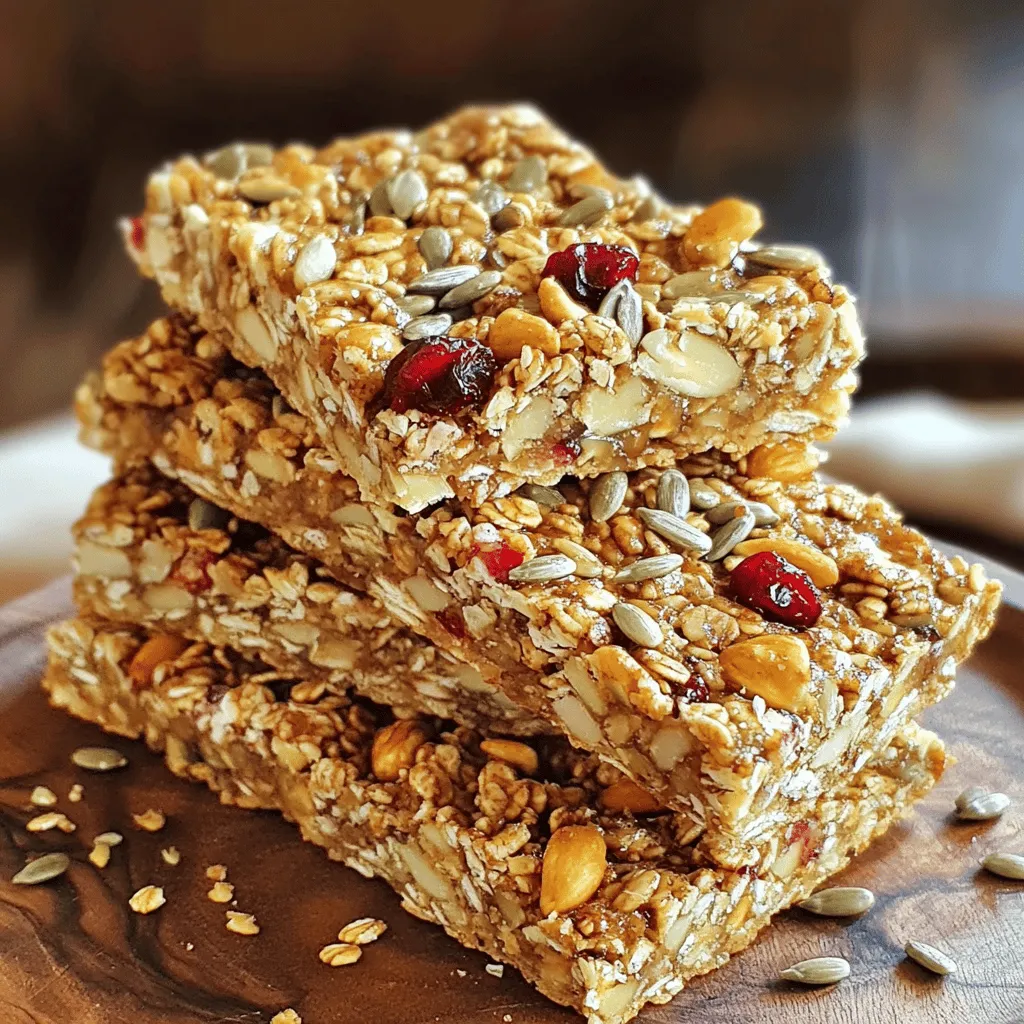
Craving a snack that’s both tasty and healthy? You’ve come to the right place! In this article, I’ll share my

Older posts
Newer posts
← Previous Page1 … Page74 Page75 Page76 … Page88 Next →

dsad

© 2025 spoonfulsavory • Built with GeneratePress

Our Policies

  • Copyright Policy
  • Cookie Policy
  • GDPR Policy
  • Privacy Policy
  • Disclaimer
  • Terms Of Use

More Information

  • Home
  • About
  • Contact
  • Appetizers
  • Dessert
  • Dinner
  • Drinks
©2025, spoonfulsavory About Back To Top