Skip to content
DisclaimerTerms Of UseGDPR PolicyCookie Policy

spoonfulsavory

  • Home
  • Drinks
  • Appetizers
  • Dinner
  • Dessert
  • About
  • Contact
  • Privacy Policy
DisclaimerTerms Of UseGDPR PolicyCookie Policy

Sarah

To make the best banana pudding, you need a few key items. Here’s what you need: - 3 ripe bananas, sliced into rounds - 1 cup instant vanilla pudding mix - 2 cups cold milk - 1 teaspoon pure vanilla extract - 1 cup heavy whipping cream - 1/4 cup powdered sugar - 1 box (12 oz) vanilla wafers

Best Banana Pudding Creamy and Delicious Dessert Recipe

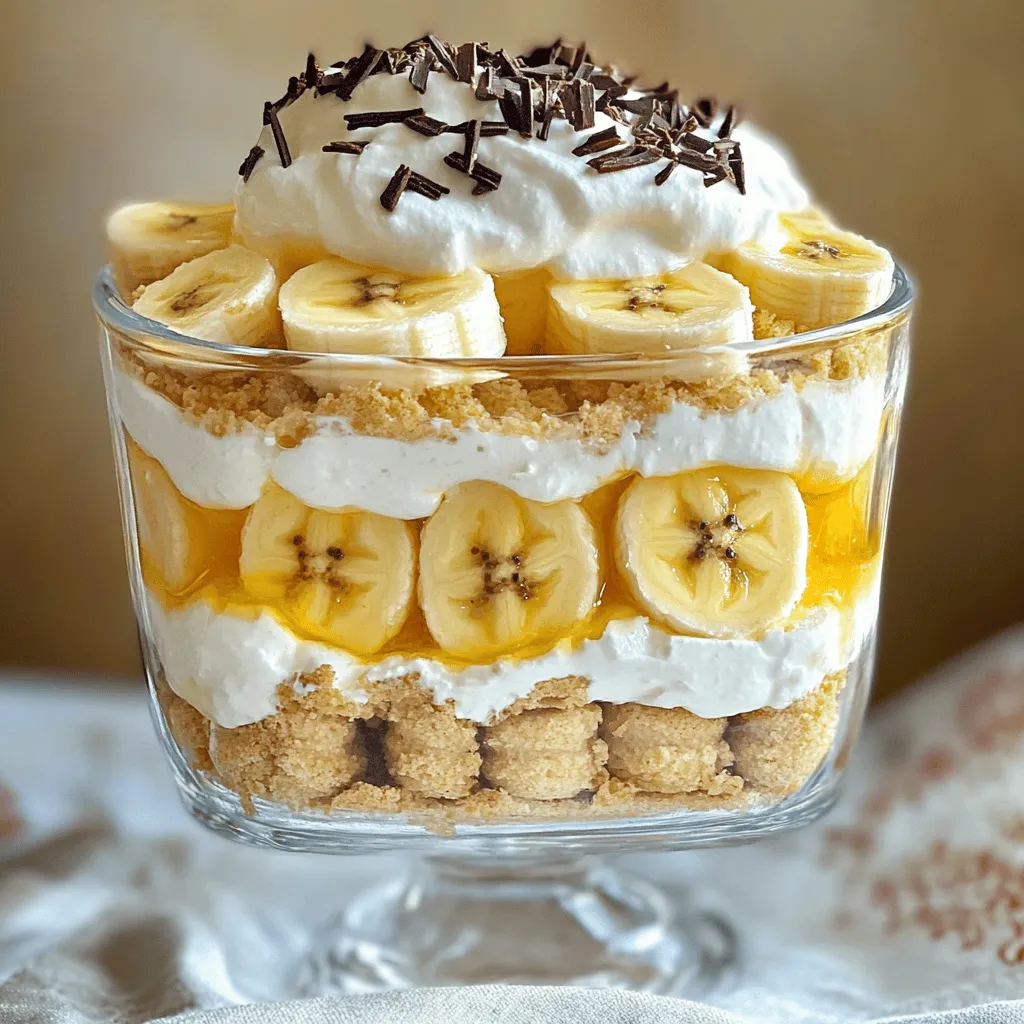
Are you ready to whip up the best banana pudding you’ve ever tasted? This creamy and delicious dessert will quickly

To make a great strawberry shortcake, you need fresh ingredients. Use ripe, sweet strawberries. They should be bright red and fragrant. You will need:

Easy Strawberry Shortcake Delightful Summer Dessert

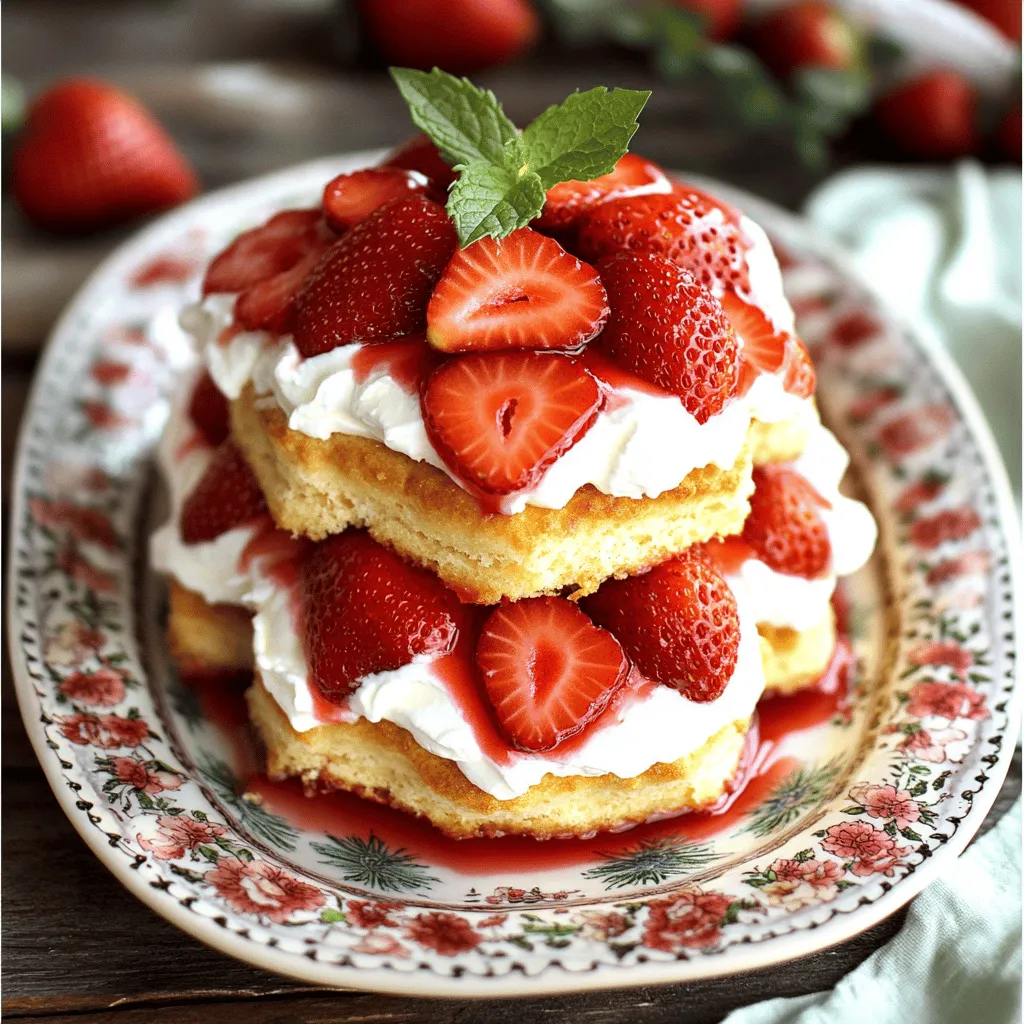
Summer is here, and nothing beats a light, tasty dessert like an Easy Strawberry Shortcake! You will love the fresh

- 4 salmon fillets (6 oz each) - 1 cup fresh spinach, finely chopped - 3 cloves garlic, minced - 1/2 cup cream cheese, softened at room temperature - 1/4 cup grated Parmesan cheese - 1/4 teaspoon crushed red pepper flakes (adjust for spice preference) - 1 tablespoon fresh lemon juice - Salt and fresh ground pepper, to taste - 1 tablespoon extra virgin olive oil - Lemon wedges, for garnish To make Creamy Garlic Spinach Stuffed Salmon, gather these ingredients. Start with fresh salmon fillets. They provide a rich taste and are easy to cook. Choose fillets that are firm and bright in color. Next, grab fresh spinach. It adds a nice green color and healthy nutrients. Garlic is a must for this dish. It brings a strong, pleasant flavor. Use fresh cloves and mince them finely. They will mix well with the other ingredients. Cream cheese makes the filling creamy and rich. Make sure it is softened for easy mixing. Parmesan cheese adds a salty touch. Grate it fresh for the best flavor. You can also add crushed red pepper flakes. They give a nice kick but adjust based on your taste. Don’t forget the lemon juice. It brightens the dish and balances the flavors. Salt and pepper are essential for seasoning. Use them to enhance the taste. Finally, have some extra virgin olive oil for cooking. It adds rich flavor and helps sauté the garlic. Lemon wedges will be perfect for serving. They add a fresh burst of flavor. With all these ingredients, you are ready to create a delightful meal! {{ingredient_image_2}} - Preheat the oven to 375°F (190°C). - Heat 1 tablespoon of olive oil in a medium skillet. Add 3 cloves of minced garlic. Sauté for 1 minute until fragrant. - Add 1 cup of finely chopped spinach to the skillet. - Cook for 2-3 minutes until the spinach wilts and turns bright green. - Remove from heat and let it cool slightly. - In a medium bowl, mix the spinach and garlic with 1/2 cup of softened cream cheese. - Add 1/4 cup of grated Parmesan cheese, 1/4 teaspoon of crushed red pepper flakes, 1 tablespoon of fresh lemon juice, salt, and pepper. - Stir until the filling is smooth and creamy. - Take 4 salmon fillets and cut a pocket into each one. - Spoon the creamy spinach filling into each salmon fillet pocket. Press gently to secure it inside. - Arrange the stuffed salmon on a baking sheet lined with parchment paper. - Bake the salmon in the oven for 15-20 minutes. - Check for doneness; the salmon should flake easily with a fork. - Let the salmon rest for a few minutes after baking. - Plate the salmon and serve with lemon wedges for a fresh touch. When picking salmon, go for fresh or frozen fillets. Fresh salmon has a bright color and smells like the sea. You can use types like Atlantic, sockeye, or coho salmon. These types have great flavor and texture. If fresh salmon is hard to find, frozen works well too. Just make sure it’s wild-caught for the best taste. To make your spinach filling shine, taste as you go. You can adjust the garlic or add more lemon for tang. If you want creaminess without cream cheese, try Greek yogurt or ricotta. You can also mix in herbs like dill or basil for extra flavor. Don't shy away from adding some chopped artichokes or sun-dried tomatoes for a twist! You can broil or bake your salmon. Broiling gives a nice crispy top but needs close watch. Baking is easier and lets the salmon cook evenly. To keep the salmon moist, use parchment paper or foil on the baking sheet. Keep an eye on the cooking time. Salmon is done when it flakes easily with a fork. Pro Tips Choose Fresh Salmon: Opt for wild-caught salmon if available; it has a richer flavor and better texture than farmed salmon. Adjust the Spice: Feel free to modify the amount of crushed red pepper flakes to suit your taste, or replace them with a dash of hot sauce for a different kick. Check for Doneness: Use a fork to gently flake the thickest part of the salmon; it should be opaque and flake easily when properly cooked. Make Ahead: Prepare the spinach and cheese filling a day in advance and store it in the refrigerator to save time on cooking day. {{image_4}} You can change the flavor by using different cheeses. Feta cheese gives a nice tang. It melts well and adds a unique taste. Goat cheese is a great option too. It has a creamy texture and a strong flavor. If you want to avoid dairy, use cashew cheese. It adds creaminess without milk. Vegan cream cheese works too. These options help everyone enjoy the dish. You can make this dish even better by adding more veggies. Sun-dried tomatoes add a sweet, tangy flavor. Chop them finely and mix them into the filling. You can also use other leafy greens. Kale or Swiss chard work well too. Just be sure to cook them down first, like the spinach. This makes the filling tasty and colorful. To make your meal shine, think about side dishes. Steamed asparagus pairs well with the salmon. It adds a fresh crunch. A crisp side salad is great too. Use mixed greens and a light dressing. For a party, serve the salmon on a colorful platter. Drizzle olive oil over the top. Garnish with lemon wedges for a pop of color. This makes the dish look and taste special. After you enjoy your creamy garlic spinach stuffed salmon, store leftovers in the fridge. Place the salmon in an airtight container. This helps keep it fresh and tasty. You can store it for up to 3 days. When you are ready to eat, reheat the salmon gently. Use the oven or microwave. If using the oven, set it to 350°F (175°C) and heat for about 10 minutes. This keeps the salmon moist and delicious. If you want to save the stuffed salmon for later, you can freeze it. Wrap each fillet tightly in plastic wrap, then place it in a freezer bag. Make sure to remove all the air from the bag. You can freeze it for up to 3 months. When you’re ready to eat, thaw the salmon in the fridge overnight. This slow thawing helps keep the texture nice. Creamy garlic spinach stuffed salmon remains fresh for 3 days in the fridge. If you freeze it, it can last for 3 months. Always check for spoilage before eating. Look for any off smells or changes in color. If the salmon looks or smells bad, it’s best to throw it away. Staying safe in the kitchen is very important! Yes, you can make the filling ahead of time. Mix the spinach, garlic, cream cheese, and other ingredients in advance. Store it in the fridge for up to two days. Just remember to bring it back to room temperature before stuffing the salmon. This makes meal prep easier. If you need a substitute for cream cheese, try Greek yogurt or ricotta cheese. Both can give a creamy texture. You can also use a dairy-free cream cheese for a vegan option. Each choice will add a unique flavor to your dish. Yes, you can grill the stuffed salmon! Just wrap the salmon in foil before placing it on the grill. This helps keep the filling inside and prevents burning. Grill over medium heat for about 15-20 minutes. Check for doneness as you would in the oven. The salmon is fully cooked when it flakes easily with a fork. The internal temperature should reach 145°F (63°C). You can use a meat thermometer to check. If it feels firm and looks opaque, it is likely done. Yes, this recipe is already low in carbs! The main ingredients are salmon and spinach, both low in carbs. You can skip the cream cheese if you want an even lower carb count. Use a low-carb cheese or extra spinach for more flavor without adding carbs. You learned how to make stuffed salmon with spinach and cream cheese. We covered each step, from choosing the right salmon to baking and serving. Remember, seasoning and garnishes add extra flavor. Feel free to experiment with different cheeses and veggies. This dish is easy to adapt and simple to store. Enjoy your cooking journey and share your tasty results!

Creamy Garlic Spinach Stuffed Salmon Delicious Dish

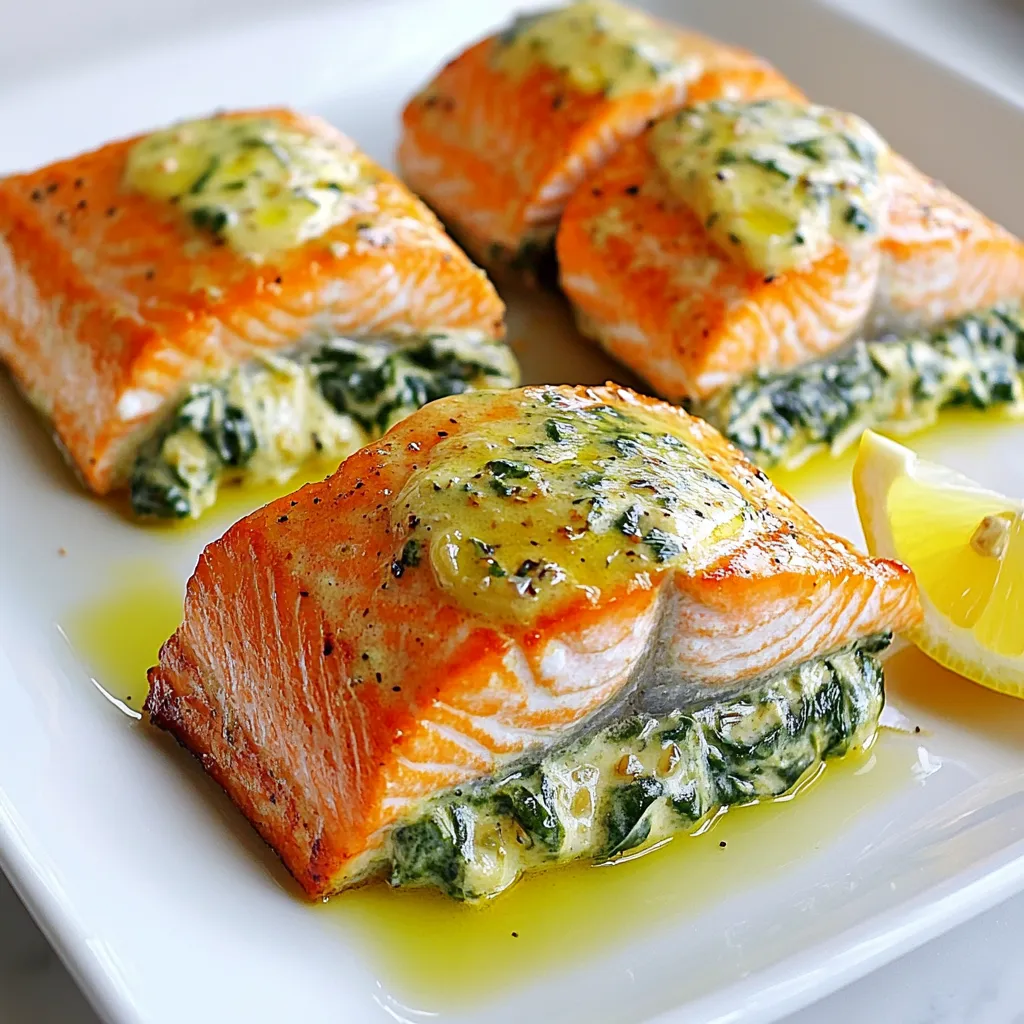
Looking for a quick and delicious dinner? You’ll love my Creamy Garlic Spinach Stuffed Salmon! This dish combines tender salmon

- Chicken and Protein Components - 2 lbs boneless, skinless chicken breasts

Crockpot Mexican Chicken Flavorful and Simple Recipe

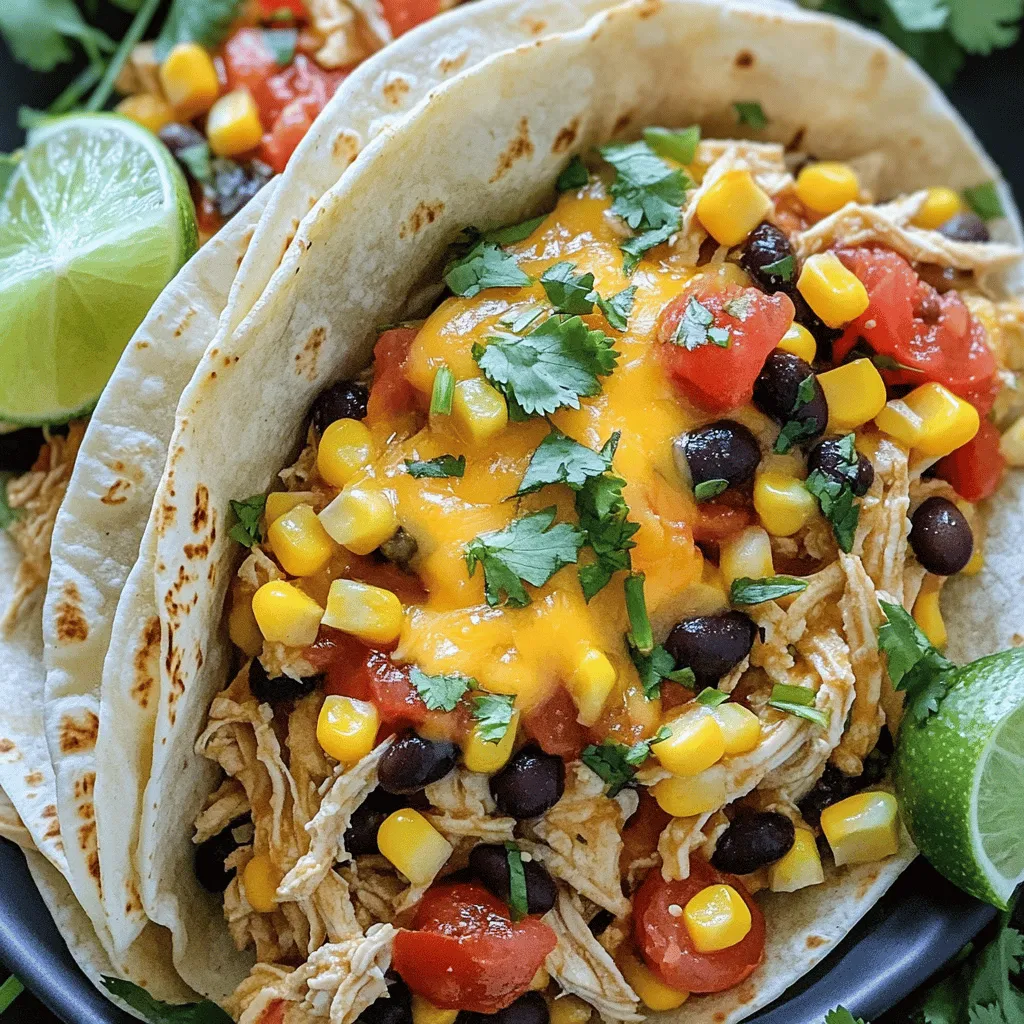
Are you ready to spice up your dinner routine? My Crockpot Mexican Chicken recipe is both flavorful and simple, perfect

Here are the ingredients you need for the Spring Hash Brown Crust Quiche:

Spring Hash Brown Crust Quiche Flavorful Brunch Recipe

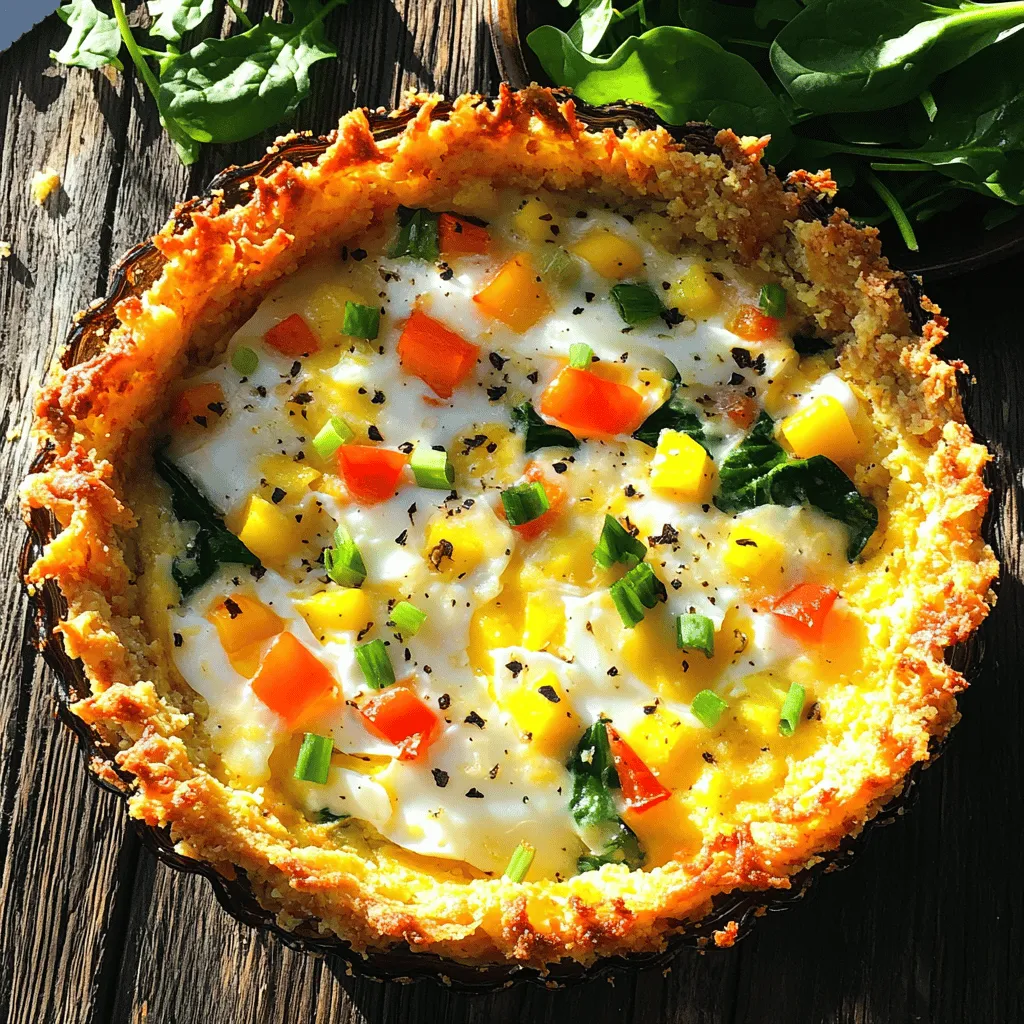
Spring is here, and it’s time to celebrate with a delicious quiche! This Spring Hash Brown Crust Quiche combines a

- 4 boneless, skinless chicken thighs - 2 tablespoons olive oil - 1 cup cherry tomatoes, halved - 3 cloves garlic, minced - 1 cup heavy cream - 1 teaspoon dried basil - 1 teaspoon dried oregano - Salt and pepper to taste - Fresh basil leaves for garnishing - Grated Parmesan cheese for serving - Spinach for serving - Garlic bread as a side - Large skillet - Cooking utensils (spatula, tongs) - Measuring cups and spoons When I make Creamy Tomato Chicken Skillet, I always gather my main ingredients first. I love the juicy chicken thighs and sweet cherry tomatoes. The garlic adds a nice punch, while the heavy cream makes everything rich and creamy. I like to sprinkle in dried herbs like basil and oregano for a bit of warmth. Don't forget the salt and pepper! They really bring out the flavors. If I want to make it extra special, I add spinach for a fresh touch. Garlic bread makes a perfect side to soak up that delicious sauce. I also grab my tools: a large skillet for cooking and some measuring cups for accuracy. This way, I can focus on creating a dish that impresses everyone at the table. {{ingredient_image_2}} - Heat the olive oil in a large skillet over medium-high heat. - Season the chicken thighs with salt and pepper. Start by heating the olive oil. You want it hot but not smoking. Once the oil shimmers, add your seasoned chicken thighs. This step locks in flavor right away. - Sear for 5-7 minutes on each side until golden brown. - Check for an internal temperature of 165°F (74°C). Now, let the chicken sear. Golden brown is your goal. Use a meat thermometer to check if it’s done. If it reads 165°F, it’s safe to take out. Place it on a plate to rest while you make the sauce. - Sauté minced garlic for about 30 seconds. - Add cherry tomatoes and cook until softened. - Stir in heavy cream, basil, and oregano. In the same skillet, add minced garlic. Sauté it for about 30 seconds. You want it fragrant, not burnt. Then, toss in halved cherry tomatoes. Cook them until they soften and blister, about 3-4 minutes. Now pour in heavy cream. Add dried basil and oregano. Stir this mix and let it simmer for 3-5 minutes. It should thicken nicely. - Reintroduce the chicken into the skillet. - Simmer for an additional 2-3 minutes. Bring the chicken back to the skillet. Nestle it in the creamy sauce. Spoon the sauce over the chicken. Let it simmer for another 2-3 minutes. This warms the chicken and coats it in flavor. - Use fresh herbs instead of dried for a brighter taste. Fresh basil makes a big difference. - Add a pinch of red pepper flakes for heat. This adds a nice kick to the dish. - Stir constantly to avoid scorching the cream. This helps keep the sauce smooth and rich. - Adjust heat as necessary to maintain a gentle simmer. Too high a heat can ruin the sauce. - Serve with sautéed spinach or garlic bread. Both pair well with the creamy sauce. - Use rustic plates for appealing presentation. It makes your meal look even more inviting. Pro Tips Use Fresh Ingredients: Whenever possible, opt for fresh cherry tomatoes and herbs. They will enhance the flavor and freshness of the dish significantly. Don’t Rush the Searing: Allow the chicken thighs to sear without moving them too much. This helps achieve a nice golden crust, which adds depth to the overall flavor. Adjust Creaminess: For a lighter version, feel free to substitute half of the heavy cream with chicken broth. This will still keep the sauce flavorful while reducing the richness. Garnish for Presentation: Fresh basil and Parmesan not only enhance flavor but also add a beautiful touch to your dish. Consider adding a drizzle of balsamic reduction for extra visual appeal. {{image_4}} You can easily swap chicken thighs for chicken breasts. Chicken breasts are leaner and cook faster. If you want a different texture, try diced tomatoes in place of cherry tomatoes. Diced tomatoes give a heartier feel to the dish. For a dairy-free option, use coconut cream instead of heavy cream. This will keep the dish creamy and rich without dairy. You can also add more veggies, like bell peppers or zucchini, for extra nutrition. These veggies add color and flavor while boosting health benefits. To give this dish a Mediterranean feel, add some Italian seasonings. Dried oregano and basil work well here. If you want more depth, include a splash of white wine in the sauce. This will enhance the flavors and add a nice twist to the dish. Store leftovers in an airtight container for up to 3 days. This keeps the dish fresh and tasty. I recommend letting it cool down before sealing. This helps maintain the creaminess. To reheat, use a skillet over low heat. This method keeps the cream sauce smooth. If the sauce thickens, add a splash of cream. This simple step brings back its rich texture. You can freeze this dish in a freezer-safe container for up to 2 months. Make sure it’s cool before you freeze it. When ready to eat, thaw it in the refrigerator. This method ensures even reheating later. Prep time is 10 minutes. Cooking takes about 20 minutes. The total time is 30 minutes. Yes, you can use frozen chicken. Just make sure it is fully thawed before cooking for even doneness. You can serve it with pasta, rice, or a fresh salad. These sides balance the rich sauce. Yes, this recipe can fit many diets. You can make it gluten-free, dairy-free, or low-carb. Just swap out the ingredients as needed. In this blog post, we explored how to make a delicious Creamy Tomato Chicken Skillet. We discussed the main ingredients and optional additions that enhance flavor. I shared step-by-step cooking instructions, tips to perfect the sauce, and variations to meet different diets. Remember, this recipe is easy to adjust based on your tastes. Whether you serve it with spinach or garlic bread, you can create a meal that's satisfying and fun. Enjoy making this dish and sharing it with loved ones!

Creamy Tomato Chicken Skillet Savory and Simple Dish

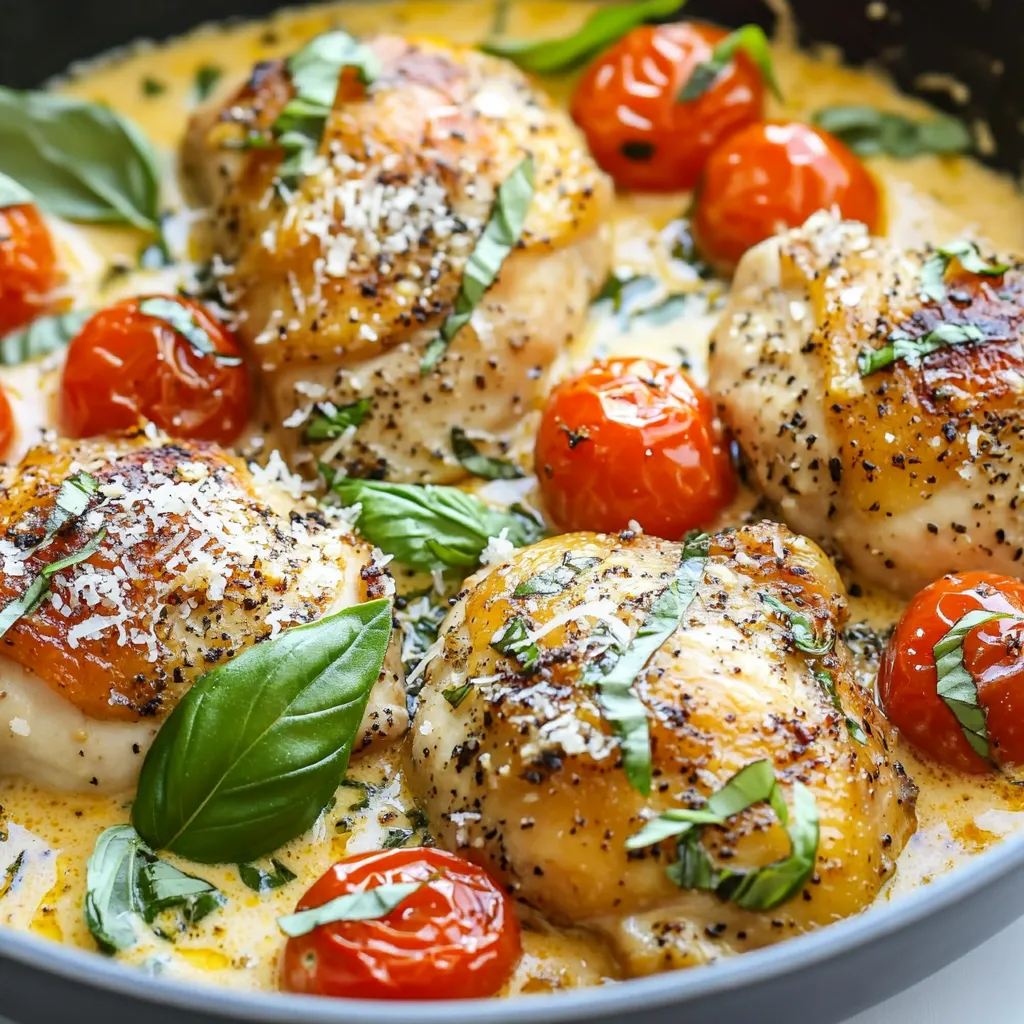
If you love easy and delicious meals, then this Creamy Tomato Chicken Skillet is for you! Packed with tender chicken,

- 1 cup fresh strawberries, hulled and pureed - 1/2 cup unsalted butter, softened to room temperature - 1 cup granulated sugar - 2 large eggs, at room temperature - 1 teaspoon pure vanilla extract - 1 1/2 cups all-purpose flour - 1 teaspoon baking powder - 1/2 teaspoon baking soda - 1/4 teaspoon salt - 1/2 cup buttermilk, at room temperature - Zest of 1 lemon - 1/4 cup fresh lemon juice When measuring ingredients, use dry measuring cups for flour and sugar. For liquids, use a liquid measuring cup. Always level off the flour with a knife for accuracy. Softening butter makes it easier to cream. You can do this by leaving it out for about 30 minutes. If you're short on time, cut the butter into small chunks and microwave for 10 seconds. Fresh strawberries give the best flavor and color. They also create a nice texture in the cupcakes. Look for ripe, bright red berries. If fresh strawberries are out of season, frozen berries work too. Just thaw and drain them before pureeing. This keeps the batter from getting too watery. {{ingredient_image_2}} Start by preheating your oven to 350°F (175°C). This helps the cupcakes bake evenly. Line a standard muffin tin with cheerful cupcake liners. Using liners makes it easy to remove the cupcakes after baking. Take one cup of fresh strawberries. Hull them to remove the green tops. Place the strawberries in a blender and puree them until they are smooth. This gives your cupcakes a fresh, fruity flavor. In a large mixing bowl, add 1/2 cup of softened butter and 1 cup of granulated sugar. Use an electric mixer to beat them together. Mix for about 3-4 minutes until the mixture is light and fluffy. This step adds air to your batter, making it rise well. Add two large eggs to the butter-sugar mix. Add one egg at a time, beating well after each addition. This helps make the batter smooth. Next, add 1 teaspoon of pure vanilla extract and the prepared strawberry puree. Mix until just combined. In a separate bowl, whisk together 1 1/2 cups of all-purpose flour, 1 teaspoon of baking powder, 1/2 teaspoon of baking soda, and 1/4 teaspoon of salt. This ensures the dry ingredients are well blended and ready for the batter. Gradually add the dry ingredients to the wet mix. Alternate with 1/2 cup of buttermilk, starting and ending with the dry mixture. Mix just until everything is combined. Overmixing can make the cupcakes tough, so be gentle here. Add the zest of one lemon and 1/4 cup of fresh lemon juice to the batter. Gently fold them in until evenly mixed. The lemon adds a bright, tangy flavor that pairs perfectly with the strawberries. Using a scoop or spoon, fill each cupcake liner about two-thirds full. This gives them room to rise. Make sure to distribute the batter evenly among the liners. Place the muffin tin in the preheated oven. Bake for 18-20 minutes. To check if they are done, insert a toothpick into the center of a cupcake. If it comes out clean, they are ready. After baking, remove the cupcakes from the oven. Let them cool in the pan for 5 minutes. Then, carefully transfer them to a wire rack. Allow them to cool completely before adding any frosting. Use fresh strawberries for the best taste. The pureed strawberries add a sweet and fruity flavor. Lemon juice and zest brighten the flavor profile. They balance the sweetness of the cupcake. Use ripe lemons for the best juice. Mix just until the ingredients combine. Overmixing can make the cupcakes tough. After adding the dry ingredients, fold gently. This keeps the batter light and fluffy. Room temperature ingredients help create a smooth batter. Butter and eggs should be at room temperature. This helps them blend better. Use buttermilk for moisture and tenderness. The acid in buttermilk makes the cupcakes soft. Top cupcakes with lemon-flavored buttercream frosting. Add fresh strawberry slices for color and taste. A sprinkle of lemon zest adds a nice touch. Use colorful cupcake liners to make them pop. These small details make a big difference in presentation. Pro Tips Use Room Temperature Ingredients: Ensuring that your butter, eggs, and buttermilk are at room temperature helps create a smoother batter and results in a lighter, fluffier cupcake. Don't Overmix the Batter: When combining the wet and dry ingredients, mix just until incorporated. Overmixing can lead to dense cupcakes, so be gentle! Test for Doneness: Use a toothpick to check if the cupcakes are done. Insert it into the center; if it comes out clean or with a few moist crumbs, they're ready! Frost When Cool: Wait until the cupcakes are completely cool before frosting. This prevents the frosting from melting and ensures a beautiful finish. {{image_4}} You can top your strawberry lemonade cupcakes with many frosting choices. A classic choice is lemon buttercream. This sweet and tangy frosting complements the cupcake perfectly. You can also try cream cheese frosting for a rich twist. It adds a nice tang and pairs well with the strawberry and lemon flavors. For a lighter option, consider a whipped cream frosting. It enhances the cupcake's fresh taste without being too heavy. You can play with flavors in your cupcakes. Adding lime zest can give a fun twist to the lemon flavor. Raspberry puree is another tasty option. It adds a tart kick and goes well with the strawberry. If you love tropical flavors, try mixing in some coconut. This gives your cupcakes a fun beach vibe. Don't be afraid to mix and match flavors to create your unique treat. To make gluten-free strawberry lemonade cupcakes, swap all-purpose flour for a gluten-free blend. Look for a blend that works well in baking. Ensure it contains xanthan gum for proper texture. You can also use almond flour for a nutty flavor. Just remember to adjust the baking time if needed. Your gluten-free friends will love these tasty treats! To keep your Strawberry Lemonade Cupcakes fresh, store them in an airtight container. This helps prevent them from drying out. You can keep them at room temperature for up to two days. If you live in a warm place, it's better to store them in the fridge. Just be sure to let them come back to room temperature before serving. If you want to save some cupcakes for later, freezing is a great option. Wrap each cupcake tightly in plastic wrap. Then, place them in a freezer bag. This keeps them from getting freezer burn. You can freeze the cupcakes for up to three months. When you're ready to eat them, take them out and let them thaw at room temperature for a few hours. Unfrosted Strawberry Lemonade Cupcakes last about three days at room temperature. Once you add frosting, they can last about two days. If you store them in the fridge, they can stay fresh for about a week. Remember, the fresher they are, the better they taste! Yes, you can use other fruits! Blueberries or raspberries work well. Just mash or puree them like the strawberries. Adjust the sugar based on the fruit's sweetness. Experiment with flavors to find your favorite mix! To make these cupcakes vegan, swap the eggs for flax eggs. Mix 1 tablespoon of ground flaxseed with 3 tablespoons of water for each egg. Use plant-based butter and vegan buttermilk made from almond milk and lemon juice instead. This will keep the cupcakes moist and tasty! Store cupcakes in an airtight container at room temperature. They stay fresh for about three days. If you want to keep them longer, place them in the fridge for up to a week. Just let them come to room temp before serving! Yes, you can make the batter ahead. Cover it and store it in the fridge for up to 24 hours. When ready, let it sit at room temp for about 30 minutes before baking. This helps the cupcakes rise nicely! To check if cupcakes are done, insert a toothpick into the center. If it comes out clean or with a few crumbs, they are ready! If wet batter sticks to the toothpick, bake for a few more minutes. Keep an eye on them! In this blog post, I covered how to make delicious strawberry cupcakes. We discussed the key ingredients, detailed step-by-step instructions, and shared helpful tips. I also offered variations to suit different tastes. Finally, I provided storage info and answered common questions. These cupcakes can bring joy to any occasion. With practice, you’ll perfect your baking skills and impress your friends. Enjoy your tasty creations and happy baking!

Strawberry Lemonade Cupcakes Simple and Tasty Treat

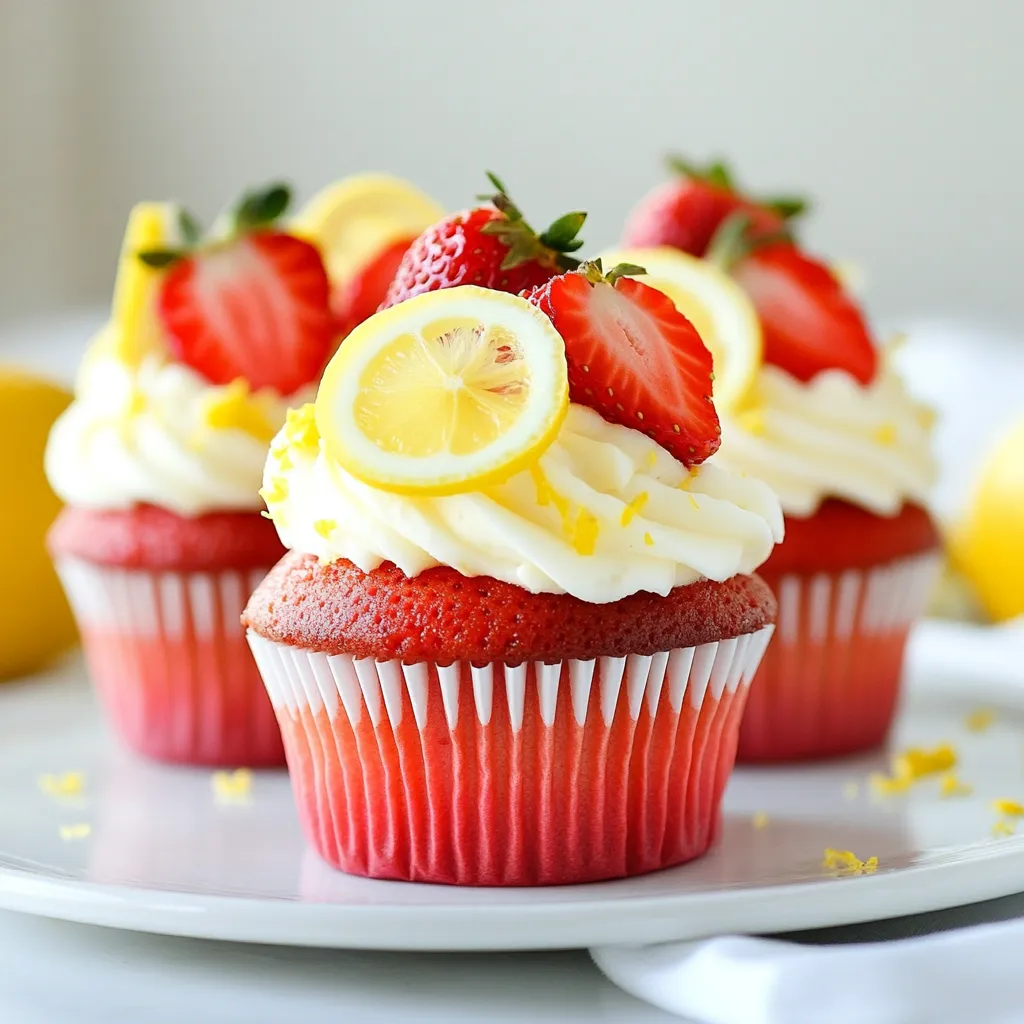
Looking for a fun and tasty treat? Try my Strawberry Lemonade Cupcakes! With fresh strawberry flavor and a zesty twist

sdfsa

dasdas

You need these key ingredients to make a great Ginger Soy Soba Noodle Stir Fry: - 200g soba noodles - 2 tablespoons sesame oil - 1 tablespoon fresh ginger, minced - 3 garlic cloves, minced - 1 bell pepper (choose red or yellow), sliced - 1 cup broccoli florets - 1 cup snap peas - 2 carrots, julienned - 3 green onions, chopped - 4 tablespoons soy sauce - 1 tablespoon rice vinegar - 1 tablespoon honey or maple syrup - 1 tablespoon sesame seeds If you lack some ingredients, don't worry. Here are some easy swaps: - Use whole wheat noodles instead of soba for more fiber. - Swap sesame oil with olive oil if needed. - Try using garlic powder if you don't have fresh garlic. - Any green veggie, like green beans or zucchini, can replace snap peas. - Maple syrup works well in place of honey for a vegan option. Make sure you have these tools ready: - A large pot for cooking noodles - A colander for draining noodles - A skillet or wok for stir-frying - A mixing bowl for the sauce - A whisk or fork for mixing the sauce - A knife and cutting board for chopping veggies With these ingredients and tools, you're ready to create a delicious Ginger Soy Soba Noodle Stir Fry! {{ingredient_image_2}} To start, bring a large pot of water to a vigorous boil. Once it’s boiling, add the soba noodles. Cook them for about 4 to 5 minutes. You want them al dente, so check often. After cooking, drain the noodles in a colander. Rinse them under cold water to stop the cooking. This step is key to keeping your noodles firm. Set them aside for later. In a small bowl, mix together the soy sauce, rice vinegar, honey or maple syrup, and minced ginger. Whisk these until they blend well. The sauce adds a nice sweet and salty flavor. Set this aside; you’ll use it soon. Grab a large skillet or wok. Heat it over medium-high heat and add the sesame oil. Wait until the oil shimmers. Then, add the minced garlic. Sauté it for about 30 seconds. Keep stirring to avoid burning. Next, add your sliced bell pepper, broccoli florets, snap peas, and julienned carrots. Stir-fry these for 5 to 7 minutes. You want them to soften but stay crisp and colorful. Now it's time to combine everything. Add the cooked soba noodles to the pan with the vegetables. Pour in the sauce you made earlier. Toss everything together well. Make sure the noodles and veggies get coated in the sauce. Stir-fry for another 2 to 3 minutes. This lets the flavors mix and heat everything through. Once your dish is ready, turn off the heat. Sprinkle the chopped green onions and sesame seeds on top. Give it a gentle toss to mix in the garnishes. For a nice touch, serve the stir-fry in wide bowls or on large plates. Add extra sesame seeds and a few sprigs of green onions for color. Enjoy your meal! To cook soba noodles, start with a large pot of water. Bring it to a rolling boil. Add the noodles and stir gently. Cook them for about 4-5 minutes. You want them to be al dente, so check often. Once done, drain the noodles and rinse them under cold water. This stops the cooking process and keeps them from getting sticky. Set them aside for later. When stir-frying, use a hot pan or wok. Heat the sesame oil until it shimmers. Add garlic first; it gives great flavor. Stir it for about 30 seconds. Next, add your veggies. Stir-fry them quickly to keep them crisp. This helps lock in color and nutrients. Keep things moving in the pan. Toss the noodles in last, so they mix well with the sauce and veggies. To boost flavor, try adding crushed red pepper flakes for some heat. You can also mix in fresh herbs like cilantro or basil for a fresh taste. If you love umami, consider adding a splash of mushroom sauce or a teaspoon of miso paste. For a sweet twist, use maple syrup or honey in your sauce. Experiment with these options to make the dish your own! Pro Tips Use Fresh Ingredients: Fresh vegetables and herbs will enhance the flavor and nutritional value of your dish. Opt for seasonal produce whenever possible. Don’t Overcook the Noodles: Soba noodles should be cooked just until al dente. Overcooking can lead to a mushy texture, which won't hold up in the stir-fry. Customize Your Vegetables: Feel free to mix and match your favorite vegetables. This recipe is versatile, so you can include zucchini, mushrooms, or bok choy based on your preference. Adjust the Sauce to Taste: The balance of soy sauce, vinegar, and sweetness can be adjusted according to your taste. Taste the sauce before adding it to the stir-fry and modify as needed. {{image_4}} You can easily make this dish vegetarian or vegan. Simply swap out the honey for maple syrup. This keeps the sweetness while making it vegan. You can also add more veggies like mushrooms or eggplant for extra texture. They soak up the sauce well and add depth to the dish. Adding protein boosts the meal's heartiness. For a vegan option, use firm tofu. Press it to remove excess water, then cube and pan-fry until golden. For meat lovers, chicken or shrimp work great. Cook chicken slices until they are no longer pink or sauté shrimp until they turn pink and opaque. Feel free to mix in your favorite veggies. Zucchini, bell pepper, or cabbage all work well. You can even toss in some spinach for a pop of green. The key is to keep the colors bright and the flavors fresh. Each vegetable adds its own unique taste and crunch to the stir fry. After enjoying your Ginger Soy Soba Noodle Stir Fry, you may have some leftovers. To store them, let the dish cool to room temperature. Then, place it in an airtight container. This helps keep the flavors fresh. Store it in the fridge for up to three days. If you use a glass container, it can help with keeping the food fresh longer. When you're ready to enjoy your leftovers, reheating is easy. You can use a skillet or a microwave. If using a skillet, add a splash of water or oil. Heat on medium until warm. Stir often to keep it from sticking. For the microwave, place the stir fry in a safe bowl. Cover it with a microwave-safe lid or plate. Heat in short bursts, stirring in between. This keeps it from getting too hot. If you want to save your stir fry for later, freezing works well. First, let the dish cool completely. Then, pack it into a freezer-safe bag or container. Make sure to squeeze out as much air as possible. This step helps prevent freezer burn. You can freeze the stir fry for up to three months. When you're ready to eat it, thaw it in the fridge overnight before reheating. Soba noodles are made from buckwheat flour. This gives them many health perks. They are high in protein and fiber. Eating them may help control weight. They also support heart health due to their low glycemic index. Plus, they are rich in vitamins and minerals. This makes soba a smart choice for balanced meals. Yes, you can swap soba noodles for other types. Try whole wheat spaghetti or rice noodles. Each will give a different taste and texture. Just remember to adjust cooking times based on the noodles you choose. This helps keep your dish fresh and fun. To make this stir fry gluten-free, use gluten-free soba noodles. These noodles are made from 100% buckwheat. Always check the label to ensure they are certified gluten-free. You can also use rice noodles instead. This makes the dish safe for those with gluten sensitivities. You can pair this stir fry with many sides. Try serving it with a light salad or steamed veggies. You can also add some grilled chicken or tofu for protein. This adds more flavor and makes your meal hearty. For extra crunch, sprinkle some toasted nuts on top. The total time to prepare this dish is about 20 minutes. This includes 10 minutes to prep and 10 minutes to cook. It’s quick and easy, perfect for busy days. You can have a delicious meal ready in no time! This blog post covered the key steps to make Ginger Soy Soba Noodle Stir Fry. We discussed the required ingredients, essential tools, and cooking techniques for perfect soba noodles. You can adapt this dish with various proteins and vegetables. Remember to store leftovers properly and reheat them for future meals. With these tips, you can enjoy a tasty, satisfying dish that suits your diet. Embrace your creativity and make this stir fry your own!

Ginger Soy Soba Noodle Stir Fry Flavor Boost Recipe

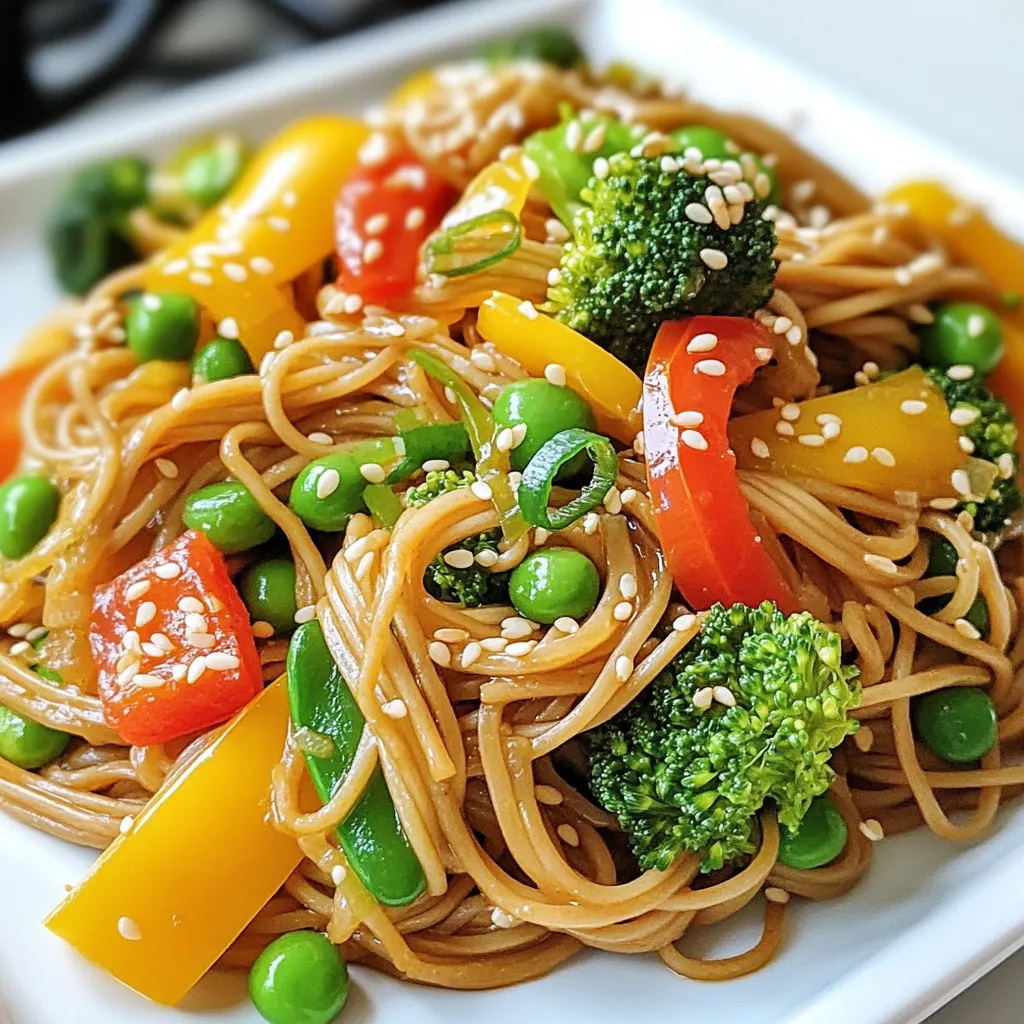
Get ready to elevate your dinner game with my Ginger Soy Soba Noodle Stir Fry! This dish combines chewy soba

- Sweet potatoes - Cooked chicken - BBQ sauce - Corn - Red onion - Black beans - Shredded cheese - Olive oil - Seasoning Gathering the right ingredients is key for BBQ chicken stuffed sweet potatoes. Each item plays an important role in making this dish flavorful and satisfying. First, choose sweet potatoes. I recommend medium-sized ones. They cook evenly and have great sweetness. Next, get cooked chicken. You can shred rotisserie chicken or use leftovers. BBQ sauce adds that smoky, tangy flavor. You can use store-bought or make your own if you're feeling adventurous. Corn gives a nice crunch. You can use canned or frozen corn, whichever you prefer. Red onion adds a sharp taste, while black beans bring protein and fiber. Shredded cheese melts beautifully. Cheddar or pepper jack works best. Don’t forget olive oil! It helps sauté the veggies. Finally, season with salt and pepper to your taste. Each ingredient matters in creating this delightful meal. Prepare to enjoy a mix of flavors and textures in every bite! {{ingredient_image_2}} 1. Preheat your oven to 400°F (200°C). This helps the sweet potatoes cook evenly. 2. Rinse the sweet potatoes under cold water to remove dirt. Use a fork to poke holes in each potato. This creates steam vents while they bake. 1. Arrange the sweet potatoes on a baking sheet lined with parchment paper. This makes cleanup easy. 2. Bake in the oven for 40-50 minutes. They should be tender when you poke them with a fork. 1. In a large bowl, mix the shredded chicken with BBQ sauce until well coated. 2. Heat olive oil in a medium skillet over medium heat. Add the diced red onion and sauté for 3-5 minutes until the onions become clear. 3. Stir in the corn and black beans. Cook for an additional 2-3 minutes until warmed through. 4. Combine the BBQ chicken mixture with the sautéed vegetables in the skillet. Mix well and season with salt and pepper to taste. 1. Once baked, remove the sweet potatoes from the oven and let them cool for about 5 minutes. 2. Cut each potato lengthwise down the center, but do not cut all the way through. 3. Use a fork to fluff the insides of each potato. This makes space for the filling. 4. Generously spoon the BBQ chicken mixture into each sweet potato, forming a nice mound on top. 5. Sprinkle a handful of shredded cheese over each stuffed sweet potato. 1. Place the stuffed sweet potatoes back in the oven for an additional 10 minutes. This melts the cheese and makes it bubbly. 2. Once done, remove the sweet potatoes from the oven. Let them cool slightly before serving. You can garnish with fresh cilantro for extra flavor. Enjoy your meal! - Size and freshness: Pick medium sweet potatoes for even cooking. Look for firm ones with smooth skin. Avoid any with soft spots or wrinkles. Fresh sweet potatoes help bring out the best flavor in your dish. - Organic vs. conventional: Organic sweet potatoes are grown without harmful chemicals. They may taste better too. Conventional sweet potatoes can be more affordable and still delicious. Choose based on your budget and values. - Store-bought options: Many brands offer great BBQ sauce. Look for one with simple ingredients. A smoky or tangy sauce can enhance your stuffed sweet potatoes. - Homemade variations: Making your own BBQ sauce is fun and easy. Combine ketchup, vinegar, honey, and spices for a quick mix. Customize it by adding your favorite flavors. - Pairing with sides: Serve your stuffed sweet potatoes with a fresh salad or coleslaw. These sides add crunch and balance to the meal. You can also serve them with rice or quinoa for extra heartiness. - Best toppings: Top your sweet potatoes with extra cheese, avocado, or jalapeños. Fresh cilantro adds a nice touch too. Get creative with your toppings to make each potato unique! Pro Tips Choose the Right Sweet Potatoes: Look for firm, smooth-skinned sweet potatoes without any blemishes. This ensures they are fresh and will bake evenly. Make Ahead: You can bake the sweet potatoes in advance and store them in the fridge. This makes assembling the dish quicker on busy days. Customize Your Toppings: Feel free to add other toppings like avocado, sour cream, or jalapeños for added flavor and texture. Keep It Warm: If you're serving a crowd, keep the stuffed sweet potatoes warm in a low oven until ready to serve, ensuring they stay delicious! {{image_4}} You can switch the chicken for turkey or beef. Both will add great flavor. If you want something meatless, try using lentils or chickpeas. These options give a nice texture and still taste amazing. Add your favorite spices to make the dish pop. Smoked paprika brings a lovely depth. You can also try cumin or garlic powder for a kick. When it comes to cheese, switch it up! Use mozzarella for a milder taste or feta for a tangy twist. If you need gluten-free options, you’re in luck! This dish is naturally gluten-free, as sweet potatoes and the filling are safe choices. For vegan substitutions, use jackfruit or tofu instead of chicken. Substitute the cheese with a plant-based option or skip it altogether. - To store leftovers, place them in an airtight container. - Keep the BBQ chicken stuffed sweet potatoes in the fridge for up to 3 days. - To reheat, use the microwave or oven. Microwave for 1-2 minutes or until hot. In the oven, heat at 350°F (175°C) for about 15 minutes. - For freezing, wrap each stuffed sweet potato tightly in plastic wrap. - Place them in a freezer-safe bag or container. They can last up to 3 months in the freezer. - To thaw, move them to the fridge for a few hours or overnight. - Reheat by placing them in the oven at 350°F (175°C) for about 25 minutes. Sweet potatoes are done when they feel soft. You can check this by poking them with a fork. If the fork slides in easily, they are ready. You can also look for a slightly wrinkled skin. This means they cooked well. Remember, baking usually takes about 40-50 minutes at 400°F. Yes, you can prep this recipe ahead of time. Cook the sweet potatoes and fill them with the BBQ chicken filling. Store them in the fridge for up to two days. When ready to eat, just heat them in the oven. This keeps the flavors fresh and tasty. These sweet potatoes pair well with many sides. Here are some great options: - A fresh green salad - Steamed broccoli - Coleslaw - Grilled corn on the cob These sides balance the meal and add more flavor. Yes, you can use other types of potatoes. Here are some recommendations: - Regular russet potatoes for a classic taste - Yukon gold potatoes for a creamy texture - Red potatoes for a slightly sweet flavor Experiment with different types to find what you like best! This blog post shows you how to make BBQ Chicken Stuffed Sweet Potatoes. We explored key ingredients like sweet potatoes, chicken, and cheese. You learned step-by-step instructions, tips for choosing ingredients, cooking alternatives, and storage tips. Now, you can impress your friends and family with a tasty, healthy meal. These sweet potatoes are easy to make and can be changed to fit any diet. Enjoy your cooking!

BBQ Chicken Stuffed Sweet Potatoes Delightful Meal

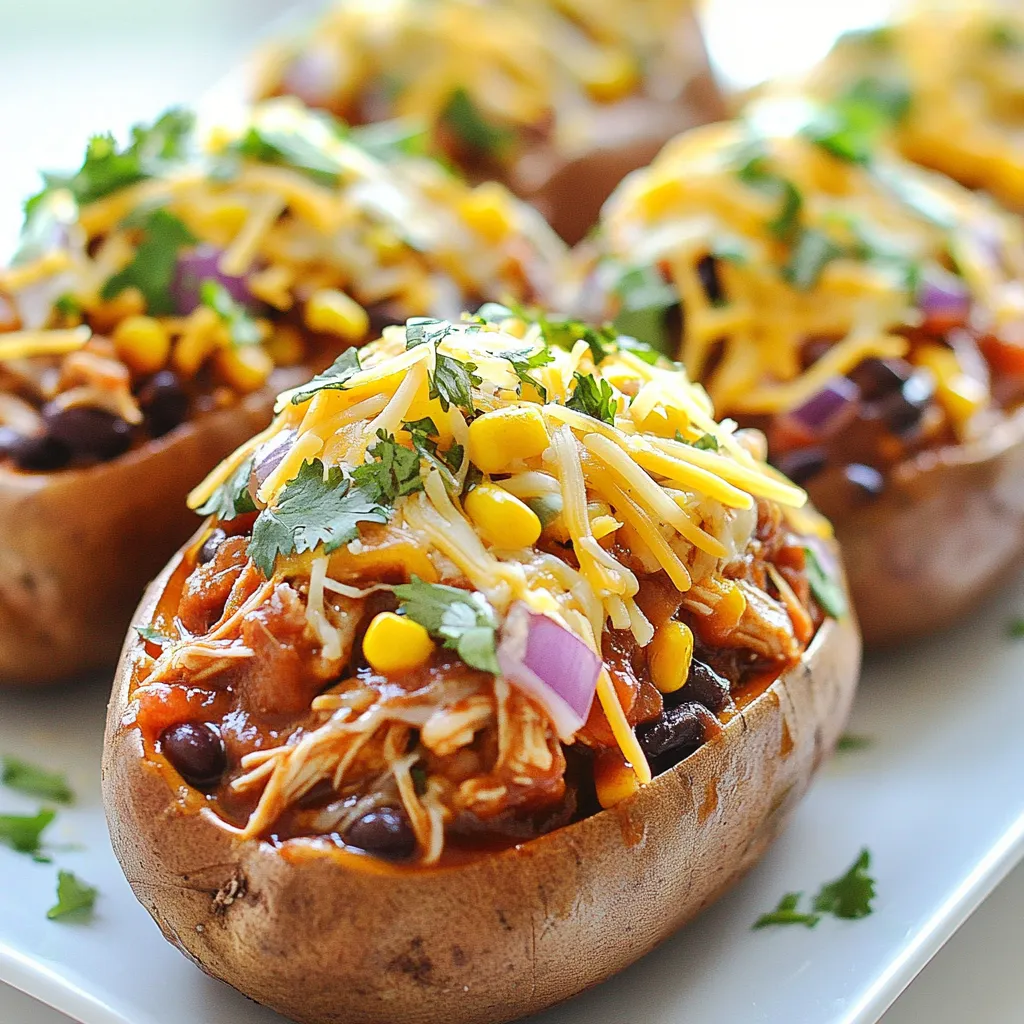
If you crave a hearty meal that packs flavor and nutrition, BBQ Chicken Stuffed Sweet Potatoes are the perfect choice.

Older posts
Newer posts
← Previous Page1 … Page85 Page86 Page87 Page88 Next →

dsad

© 2025 spoonfulsavory • Built with GeneratePress

Our Policies

  • Copyright Policy
  • Cookie Policy
  • GDPR Policy
  • Privacy Policy
  • Disclaimer
  • Terms Of Use

More Information

  • Home
  • About
  • Contact
  • Appetizers
  • Dessert
  • Dinner
  • Drinks
©2025, spoonfulsavory About Back To Top