Skip to content
DisclaimerTerms Of UseGDPR PolicyCookie Policy

spoonfulsavory

  • Home
  • Drinks
  • Appetizers
  • Dinner
  • Dessert
  • About
  • Contact
  • Privacy Policy
DisclaimerTerms Of UseGDPR PolicyCookie Policy

Sarah

These coconut chocolate chip granola bars are simple yet tasty. Here’s what you need: - 2 cups rolled oats - 1 cup shredded unsweetened coconut - 1/2 cup almond butter (or any nut butter you like) - 1/2 cup honey or pure maple syrup - 1/2 cup dark chocolate chips - 1/4 cup sunflower seeds - 1/4 cup chopped nuts (like almonds or walnuts) - 1/4 teaspoon sea salt - 1/2 teaspoon vanilla extract (optional, but nice to add) Each ingredient plays a key role. The oats give a hearty base. Coconut adds a tropical twist. Almond butter binds it all together. Honey or maple syrup sweetens the mix. You can switch out ingredients based on your taste or what you have: - Use peanut butter instead of almond butter for a different flavor. - Swap honey for agave syrup to make it vegan. - Choose any nut butter if you want a nut-free option. - Change dark chocolate chips for milk chocolate or white chocolate. Each swap can change the taste and texture, so feel free to experiment! Want to make your bars even more fun? Here are some ideas to consider: - Add dried fruits like cranberries or raisins for sweetness. - Mix in chia seeds or flaxseeds for extra nutrition. - Toss in spices like cinnamon or nutmeg for warmth. - Try protein powder for a protein boost. These add-ins can make your granola bars unique. Customize them to fit your cravings! {{ingredient_image_2}} First, prepare your workspace. Preheat your oven to 350°F (175°C). Grab an 8x8-inch baking pan. Line it with parchment paper, leaving some paper hanging over the sides. This helps you lift the bars out later. Next, let’s mix the dry ingredients. In a large bowl, combine 2 cups of rolled oats, 1 cup of shredded unsweetened coconut, 1/4 cup of sunflower seeds, and 1/4 cup of chopped nuts. Stir everything well to blend the flavors. Now, we need to melt the wet ingredients. In a microwave-safe bowl, add 1/2 cup of almond butter, 1/2 cup of honey or maple syrup, and 1/2 teaspoon of vanilla extract. Microwave this mixture for 30 to 45 seconds. Stir it until it becomes smooth. Pour the melted mixture over the dry ingredients. Use a spatula to mix it all together. Make sure every bit of the dry mix is coated. Then, gently fold in 1/2 cup of dark chocolate chips. Be careful not to break the chips. Transfer the granola mixture to your prepared baking pan. Use the back of your spatula to press it down firmly. This helps the bars stick together. Now, place the pan in the oven. Bake for 20 to 25 minutes. You want the edges to turn a light golden brown. After baking, let the bars cool in the pan for 10 to 15 minutes. Use the parchment paper to lift the bars out. Place them on a wire rack to cool completely. Once cool, cut them into squares or rectangles. Enjoy your tasty granola bars! To get the right texture, follow these tips. Use rolled oats, not instant or quick oats. Rolled oats give a nice chew. Press the mixture firmly into the pan. This helps the bars hold their shape. Bake until the edges are golden. This step adds a crunchy bite. If you want softer bars, bake for a shorter time. Store the bars in an airtight container. They stay fresh for up to a week. For longer storage, wrap bars in parchment paper. Then place them in a freezer-safe bag. They stay tasty for up to three months in the freezer. Always allow the bars to cool fully before storing. This keeps them from getting soggy. Serve the bars as a snack or breakfast. Pair them with yogurt or fresh fruit for a balanced meal. Cut them into smaller pieces for kids. You can also crumble them over ice cream for a fun treat. For a pretty presentation, sprinkle extra coconut and chocolate chips on top. Pro Tips Use Fresh Ingredients: For the best flavor, make sure to use fresh rolled oats and coconut. Stale ingredients can affect the texture and taste of your granola bars. Adjust Sweetness: Depending on your preference and dietary needs, feel free to adjust the amount of honey or maple syrup. You can also use agave syrup or a sugar substitute. Customize Your Mix-ins: Don't hesitate to personalize your granola bars! Add different dried fruits, seeds, or spices like cinnamon for a unique twist. Store Properly: To keep your granola bars fresh, store them in an airtight container at room temperature for up to a week, or refrigerate them for longer shelf life. {{image_4}} You can change the flavor of these bars easily. If you want nut-free bars, use sunflower seed butter. For a chocolate-free option, skip the dark chocolate chips. You can add dried fruits like cranberries or raisins for a sweet twist. Try adding spices like cinnamon or nutmeg for extra warmth. Seasonal changes can inspire new flavors. In fall, add pumpkin spice and chopped apples. In winter, consider adding peppermint extract and crushed candy canes. For summer, mix in fresh berries or tropical fruits like mango and pineapple. Each season brings a chance to enjoy different tastes. To make these bars healthier, swap honey with mashed bananas or unsweetened applesauce. You can also reduce the chocolate chips to cut sugar. Use whole grain oats for more fiber. Adding chia seeds or flaxseeds can boost nutrition too. These small changes keep your bars tasty and good for you. These Coconut Chocolate Chip Granola Bars pack a tasty punch. Each bar has about 170 calories. You get around 7 grams of protein, 8 grams of fat, and 21 grams of carbs. These numbers may change based on your exact ingredients. - Rolled oats: They are great for your heart. Oats can lower cholesterol and keep you full. - Shredded unsweetened coconut: This adds healthy fats and fiber. It can boost your energy. - Almond butter: Packed with protein and good fats, this helps with muscle and brain health. - Honey or maple syrup: These natural sweeteners give a quick energy boost. They also have antioxidants. - Dark chocolate chips: They contain antioxidants and can even improve mood. - Sunflower seeds: These are full of vitamins. They help skin and heart health. - Chopped nuts: Almonds or walnuts add healthy fats and protein. They support brain health. To avoid overindulging, cut the bars into smaller pieces. Aim for 1-2 bars as a snack. Store extra bars in an airtight container. This keeps them fresh and ready for your next craving. Enjoy these bars in moderation to balance your diet! Yes, you can use any nut butter you like. Almond butter is tasty, but peanut butter or cashew butter works too. Each nut butter adds a unique flavor. Just make sure it is smooth for easy mixing. This way, your granola bars will still hold together well. To make these bars vegan, swap honey for pure maple syrup. This keeps the sweetness without using any animal products. Also, check that your chocolate chips are dairy-free. Many brands offer great vegan options. With these swaps, everyone can enjoy these tasty treats! These granola bars last up to two weeks when stored in an airtight container. Keep them in a cool, dry place. You can also wrap them individually for easy snacks. If you want them to last longer, store them in the fridge. Just remember to bring them to room temperature before eating. In this blog post, we explored the key ingredients for tasty snacks, from main components to optional add-ins. We detailed step-by-step instructions for preparation, mixing, and baking. You now have tips to enhance texture and keep your food fresh. We also covered flavor variations and health benefits. Remember, you can customize recipes to fit your diet. Experiment with different ingredients to find what you love most. With the right approach, you can create delicious snacks that everyone will enjoy. Your kitchen adventure starts now!

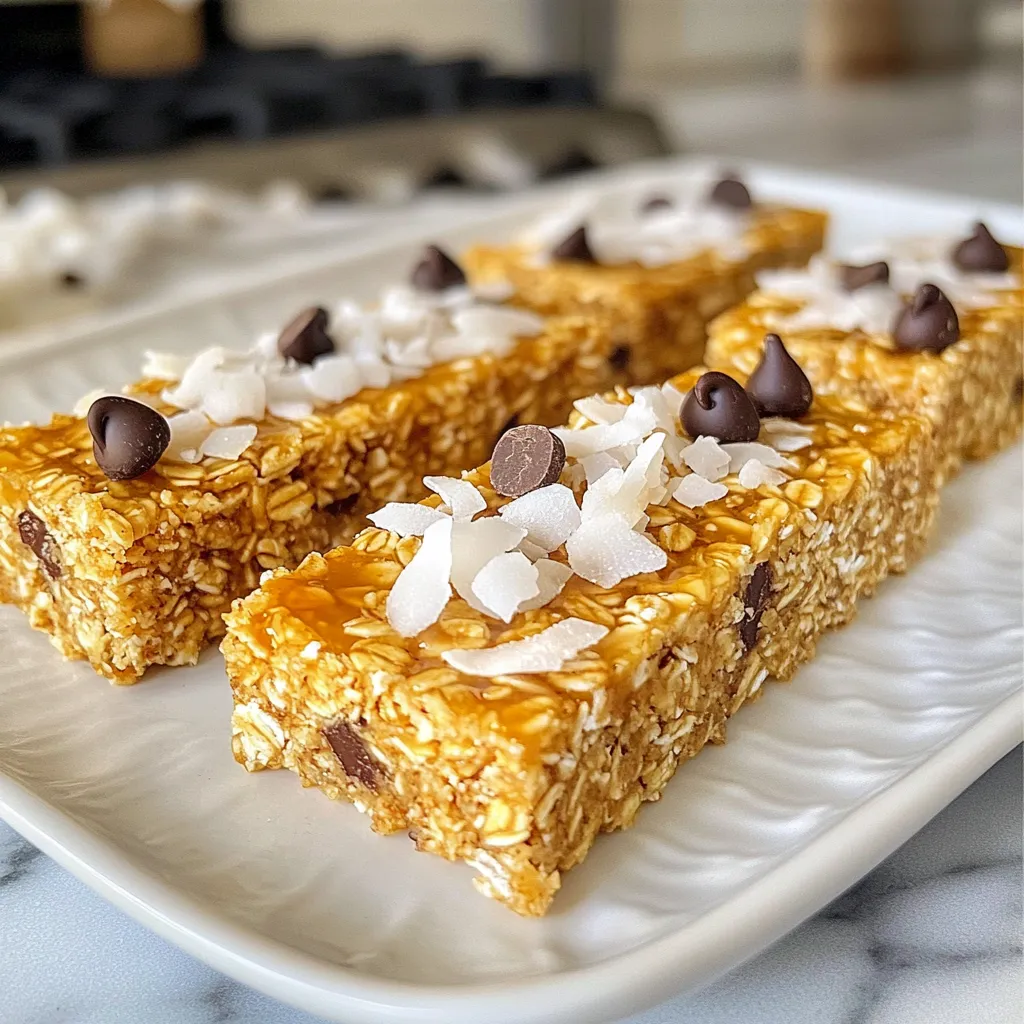
Coconut Chocolate Chip Granola Bars Easy and Tasty Treat

Are you ready for a snack that’s both easy to make and delicious? These Coconut Chocolate Chip Granola Bars are

- 2 boneless, skinless chicken breasts - 1 tablespoon olive oil - 3 cloves garlic, minced - 1 can (14 oz) diced tomatoes (with juices) - 1 cup fresh spinach, roughly chopped - 1 cup heavy cream - 1 teaspoon Italian seasoning - Salt and black pepper to taste - 1/2 cup grated Parmesan cheese - Fresh basil leaves for garnish To make this creamy tomato spinach chicken, you need a few key items: - A large skillet - A cutting board - A knife - A stirring spoon - A measuring cup for the cream - A spatula for flipping the chicken These tools help you cook the chicken evenly and mix the sauce well. Using the right equipment makes cooking easier and more fun! {{ingredient_image_2}} Start by heating the olive oil in a large skillet over medium heat. While the oil warms, season the chicken breasts with salt and black pepper on both sides. This adds flavor and enhances the dish. Carefully place the chicken in the skillet. Cook for about 6-7 minutes on each side until it turns golden brown. The chicken should be cooked through and juicy. Once done, take the chicken out of the skillet and set it aside on a plate. In the same skillet, add the minced garlic. Sauté it for about 30 seconds. Stir often until the garlic becomes fragrant and slightly golden. This step is key for great flavor. Now, pour in the can of diced tomatoes, juices included. Stir in the Italian seasoning as well. Let the mixture simmer for 3-4 minutes. This helps the flavors blend together nicely. After that, reduce the heat to low. Add the heavy cream and grated Parmesan cheese. Stir until the cheese melts and the sauce becomes creamy. Next, add the roughly chopped spinach to the skillet. Cook it gently, stirring until it wilts. This usually takes about 2-3 minutes. Once the spinach is ready, return the cooked chicken to the skillet. Spoon the creamy tomato spinach sauce over the chicken. Heat everything together for another 2-3 minutes to warm up the chicken. Finally, taste the sauce and adjust seasoning if needed. Enjoy this dish warm, garnished with fresh basil leaves for a lovely finish. To make the sauce smooth, add heavy cream slowly. Stir well as you pour it in. This helps it mix evenly. The diced tomatoes give the sauce a nice flavor. Use good-quality canned tomatoes for the best taste. If you want more flavor, add a pinch of sugar to balance the acidity. Don’t forget to taste as you go! Adjust salt and pepper based on your liking. Cook the chicken over medium heat. This helps it cook evenly. Season both sides well. Don't rush this step; a nice golden crust is key. Cook it for about 6-7 minutes on each side. Use a meat thermometer to check if it reaches 165°F. Let the chicken rest on a plate for a few minutes. This keeps it juicy. For a stunning look, use shallow bowls. Place the creamy chicken in the center and pour sauce around it. Add a sprinkle of Parmesan on top. A few basil leaves will add color and freshness. This small touch makes a big difference. Serve with a side of crusty bread for a complete meal. Pro Tips Chicken Tenderness: To ensure your chicken stays juicy and tender, avoid overcooking. Use a meat thermometer; the internal temperature should reach 165°F (75°C). Freshness Matters: Whenever possible, use fresh spinach instead of frozen for better texture and flavor in your dish. Customize Your Sauce: Experiment with herbs and spices; adding a pinch of red pepper flakes can give your creamy sauce a nice kick! Perfect Presentation: For a beautiful presentation, serve the creamy chicken in shallow bowls, garnishing with extra grated Parmesan and fresh basil leaves. {{image_4}} You can switch out chicken for other proteins. Shrimp works great in this dish. Just cook the shrimp for a few minutes until they turn pink. You can also use firm tofu for a plant-based option. Slice tofu into cubes and sauté until golden brown. Both options add a fresh twist to the creamy sauce. For a vegetarian take, skip the chicken and add more veggies. Try mushrooms, zucchini, or bell peppers. Sauté these in the olive oil until soft. You can also add chickpeas for extra protein. These swaps keep the dish hearty and satisfying without meat. Want to boost flavors? Add a pinch of red pepper flakes for heat. A splash of balsamic vinegar can add a tangy kick. Fresh herbs like thyme or oregano enhance the aroma. You can also swap regular Parmesan for a smoked variety for a deeper taste. These small changes can make a big difference in your dish! You can keep leftovers of your creamy tomato spinach chicken in the fridge. Place the chicken and sauce in an airtight container. It stays fresh for about 3 to 4 days. Make sure it cools down before sealing. This helps prevent moisture buildup and keeps your meal tasty. If you want to store it longer, freezing is a good option. To freeze, let the dish cool completely. Then, transfer it to a freezer-safe container or bag. It can last for up to 3 months in the freezer. When ready to eat, thaw it in the fridge overnight before reheating. Reheating is simple! You can use the microwave or stovetop. For the microwave, place a portion in a bowl and heat for about 2-3 minutes. Stir halfway through for even heating. If using the stovetop, warm it in a skillet over low heat. Add a splash of cream if the sauce seems thick. Enjoy your dish just like the first time! Yes, you can use other cheeses. Mozzarella or feta cheese work great too. They add a unique flavor. If you want a stronger taste, try cheddar. Just remember, the cheese should melt well to keep the sauce creamy. This dish pairs well with many sides. You can serve it with rice or pasta for a filling meal. A simple salad can add freshness. Garlic bread is also a wonderful choice to soak up the sauce. Choose what you enjoy most! To make it healthier, use less cream or a lighter version. You can swap heavy cream for Greek yogurt. This keeps the dish creamy but reduces calories. Adding more spinach or other veggies boosts nutrition too. Always feel free to adjust to fit your taste and health goals! In this post, we explored how to make a delicious creamy tomato spinach chicken skillet. We covered the key ingredients and cooking gear you need. I shared step-by-step instructions for cooking chicken and preparing the sauce. We also discussed tips for perfecting your dish and ways to add variety. Finally, we looked at how to store leftovers and answered common questions. With these insights, you'll impress yourself and others with this tasty meal. Enjoy cooking and have fun experimenting!

Creamy Tomato Spinach Chicken Skillet Simple Recipe

Looking for a quick and tasty meal? You’ve found it! This Creamy Tomato Spinach Chicken Skillet is simple to make

- 1 lb ground chicken - 1 tablespoon sesame oil - 2 cloves garlic, minced - 1 inch piece of ginger, finely grated - 1/4 cup low-sodium soy sauce - 1/4 cup honey - 1 tablespoon rice vinegar - 1 tablespoon cornstarch mixed with 2 tablespoons water (cornstarch slurry) - 1 cup carrots, shredded - 1/2 cup red bell pepper, finely chopped - 1/2 cup green onions, chopped - 1 head of butter or iceberg lettuce, leaves carefully separated - Toasted sesame seeds for garnish - Sriracha sauce for serving (optional) If you want to swap the ground chicken, use ground turkey or tofu for a lighter option. For those who avoid soy, try coconut aminos instead of soy sauce. Honey is great, but agave syrup works, too. You can also skip the cornstarch if you want a thinner sauce. For veggies, try adding diced cucumbers or scallions. Each serving has about: - Calories: 290 - Protein: 24g - Carbohydrates: 30g - Fat: 10g - Fiber: 2g - Sugar: 10g This meal is not just tasty; it also packs a good amount of protein and fiber. Plus, it’s low in saturated fat, making it a smart choice. Enjoy these wraps as a light lunch or dinner option that feels fresh and fun! {{ingredient_image_2}} To start, heat 1 tablespoon of sesame oil in a large skillet over medium heat. Once the oil is hot, add 2 cloves of minced garlic and 1 inch of finely grated ginger. Cook them for about 30 seconds until they smell great. Next, add 1 pound of ground chicken. Use a wooden spoon to break it apart. Cook the chicken for 5 to 7 minutes. Look for it to be browned and no longer pink. While the chicken cooks, prepare the sauce. In a bowl, mix 1/4 cup of low-sodium soy sauce, 1/4 cup of honey, and 1 tablespoon of rice vinegar. Whisk them well until they blend. Pour this mixture over the chicken. Stir to coat the chicken evenly. Let it simmer gently. Then, add a cornstarch slurry made with 1 tablespoon of cornstarch and 2 tablespoons of water. Stir continuously as you add it. Cook for an additional 2 to 3 minutes until the sauce thickens. Now, stir in 1 cup of shredded carrots, 1/2 cup of finely chopped red bell pepper, and 1/2 cup of chopped green onions. Mix everything well and cook for 1 to 2 more minutes. This helps all the flavors blend. Remove the skillet from heat and let the chicken mixture cool a bit. For the best browning, ensure your skillet is hot before adding the chicken. This helps create a nice crust. Avoid overcrowding the pan; cook in batches if needed. If the chicken steams, it won’t brown well. Stir the chicken often to get even color. Look for a golden brown color, which adds flavor. For a smooth sauce, combine the soy sauce, honey, and rice vinegar well before adding. The cornstarch slurry is key for thickness. Add it slowly while stirring. If the sauce is too thick, add a splash of water or more soy sauce. If it’s too thin, let it cook a bit longer. Stir continuously to prevent lumps. You want it glossy and thick enough to coat the chicken. When choosing lettuce for wraps, I recommend butter or iceberg lettuce. These types are crisp and sturdy. They hold the filling well without tearing. Butter lettuce has a soft texture and a sweet flavor. Iceberg lettuce adds a nice crunch. Both options will give your wraps a fresh taste. If you have extra filling, store it in an airtight container. It will last in the fridge for up to three days. Make sure to let it cool before sealing. To reheat, warm it in a skillet on low heat. Avoid overheating, as it can dry out the chicken. You can serve these wraps with extra sriracha for heat. A side of jasmine rice complements the meal nicely. For a fun touch, try adding sliced avocado or cucumber. You can also include a dipping sauce, like soy sauce or hoisin, for added flavor. Pro Tips Use Fresh Ingredients: Fresh garlic and ginger will enhance the flavor of your teriyaki chicken, making it more aromatic and delicious. Customize Your Wraps: Feel free to add other veggies like cucumbers or snap peas for extra crunch and nutrition in your lettuce wraps. Adjust the Sweetness: Depending on your taste, you can reduce the honey for a less sweet sauce or add more for a sweeter flavor profile. Perfecting the Sauce: Ensure to whisk the cornstarch slurry well before adding it to avoid lumps and achieve a smooth sauce consistency. {{image_4}} If you have dietary needs, you can easily change some ingredients. Here are some swaps: - Ground Chicken: You can use ground turkey or tofu for a lighter option. - Soy Sauce: Try tamari for a gluten-free version. - Honey: Use maple syrup or agave nectar for a vegan choice. - Sesame Oil: Substitute with olive oil if you prefer. These swaps keep the flavor while meeting your needs. To make this dish vegan, replace the chicken. Here are ideas: - Plant-based Ground Meat: Use a store-bought plant-based option. - Chickpeas: Mash cooked chickpeas for a protein-rich filling. - Mushrooms: Finely chop mushrooms for a savory texture. These options maintain the spirit of the dish while being meat-free. Adding extra flavors can elevate your wraps. Consider these enhancements: - Spices: A pinch of five-spice powder adds depth. - Herbs: Fresh cilantro or basil brings freshness. - Chili Flakes: For a spicy kick, add chili flakes to the chicken mix. These small tweaks can make your wraps even more exciting! To keep your Teriyaki chicken lettuce wraps fresh, place the filling in a sealed container. Store it in the fridge for up to three days. Keep the lettuce leaves in a separate bag. This helps prevent them from wilting. When you're ready to enjoy leftovers, heat the chicken filling in a skillet over medium heat. Stir occasionally until it's warm. You can also microwave it in 30-second intervals. Just make sure it’s hot all the way through. You can freeze the chicken filling for later use. Place it in an airtight container or freezer bag. It will last for about three months in the freezer. When you're ready to eat, thaw it overnight in the fridge. Reheat as mentioned earlier for tasty wraps again. Teriyaki Chicken Lettuce Wraps can last up to three days in the fridge. To keep them fresh, store the chicken mixture and lettuce leaves separately. This way, the lettuce stays crisp. Use an airtight container to prevent any odors from mixing. Before serving, check for any changes in color or smell. Yes, you can use other types of meat! Ground turkey or pork works well as substitutes. For a lighter option, try using ground beef. Adjust cooking times if the meat is thicker or leaner. Just be sure to cook it until it's no longer pink. Season as needed to keep the flavor rich. Serve the wraps on a platter for a fun presentation. Add extra sriracha on the side for those who like spice. A small bowl of toasted sesame seeds makes a nice touch. You can also include some fresh herbs like cilantro for extra flavor. Let guests build their own wraps for a fun and interactive meal! This blog post covered key ingredients and how to make Teriyaki Chicken Lettuce Wraps. You learned about helpful tips for cooking, storing, and serving these wraps. I shared ways to adapt for different diets and flavors. Remember, with simple swaps, anyone can enjoy this dish. Explore these wraps in your kitchen, and see how easy it is! Enjoy creating delicious meals that fit your needs and taste. Dive into this tasty adventure today!

Teriyaki Chicken Lettuce Wraps Fresh and Tasty Treat

Looking for a fresh and tasty meal? You’ve hit the jackpot with these Teriyaki Chicken Lettuce Wraps! They’re quick to

To make Tangy BBQ Meatball Subs, you need a few simple ingredients. Here’s what you will need: - 1 lb ground beef - 1/2 cup breadcrumbs - 1/4 cup grated Parmesan cheese - 1/4 cup fresh parsley, finely chopped - 1 large egg - 1 teaspoon garlic powder - 1 teaspoon onion powder - Salt and freshly ground black pepper, to taste - 1 cup tangy BBQ sauce (choose your preferred brand) - 4 soft sub rolls - 1 cup shredded mozzarella cheese - Optional: Pickled jalapeños, for a spicy kick These ingredients combine to create a delicious and satisfying meal. The ground beef serves as the base, while the breadcrumbs and cheese add texture. Fresh parsley brings a burst of flavor. The egg helps hold the meatballs together. Spices like garlic and onion powder enhance the taste. I love the tangy BBQ sauce because it ties everything together. The sub rolls are perfect for holding the meatballs, and the mozzarella cheese melts beautifully on top. If you like spice, pickled jalapeños are a great addition. With these ingredients, you're ready to create a tasty dish that everyone will enjoy! {{ingredient_image_2}} - Preheat your oven to 400°F (200°C). - Prepare a baking sheet by lining it with parchment paper. This keeps the meatballs from sticking. - In a large bowl, mix 1 lb ground beef, 1/2 cup breadcrumbs, 1/4 cup grated Parmesan cheese, 1/4 cup chopped parsley, 1 large egg, 1 teaspoon garlic powder, 1 teaspoon onion powder, and a pinch of salt and pepper. - Use your hands to mix until everything is well combined. - Place the baking sheet in the oven and bake for 15-20 minutes. The meatballs should be fully cooked, with a golden-brown outside. - While the meatballs bake, pour 1 cup of BBQ sauce into a saucepan. Heat it on medium until warm, stirring often. - Once the meatballs are done, take them out. Carefully move them to the saucepan with the BBQ sauce. Gently stir to coat each meatball evenly. Adjusting BBQ Sauce You can change the taste of your BBQ sauce. Add more spices to make it spicier. A splash of vinegar can give it more tang. If you want it sweeter, mix in some honey or brown sugar. Taste as you go to find your perfect blend. Recommended Meatball Seasoning For great meatballs, use garlic powder and onion powder. These spices add depth. Fresh herbs like parsley brighten up the flavor. Don't forget to add salt and pepper to enhance all the flavors. You can also try adding Italian seasoning for a twist. Best Practices for Toasting To toast sub rolls, cut them open but don’t slice all the way through. Place them cut side up on a baking sheet. Toast in the oven at 400°F for about 5 minutes. Check to avoid burning. This gives you a warm, crispy roll. Alternative Options for Crispy Rolls If you want a different crunch, try using ciabatta or hoagie rolls. These breads hold up well and add extra flavor. You can also grill the rolls for a charred taste. Just make sure they get nice and crispy for the best bite. Presentation Tips Serve your meatball subs on a large platter. Garnish with fresh parsley for a pop of color. You can also sprinkle extra cheese on top for a fancy look. Arrange pickled jalapeños on the side for those who like heat. Complementary Side Dishes Pair your subs with a fresh salad or crispy fries. Coleslaw adds a nice crunch and balances the flavors. You can also serve baked beans for some extra heartiness. These sides make your meal more complete and enjoyable. Pro Tips Use Fresh Ingredients: For the best flavor, use fresh herbs and quality ground beef. Fresh parsley will elevate the taste of your meatballs significantly. Customize Your BBQ Sauce: Experiment with different BBQ sauces or even make your own for a unique twist. Adding a bit of honey or mustard can enhance the flavor profile. Meatball Size Matters: Ensure your meatballs are uniform in size for even cooking. About 1 inch in diameter is ideal for a perfect sub. Perfectly Melted Cheese: For the best cheese melt, consider covering the subs with aluminum foil for the first few minutes in the oven before uncovering them to brown the cheese. {{image_4}} You can switch the ground beef for turkey or chicken. Both options are leaner. They will still taste great with BBQ sauce. For cheese, try cheddar or pepper jack for a fun twist. These cheeses bring a unique flavor and texture. Want more flavor? Add spices like smoked paprika or cayenne pepper to the meatball mix. This gives them a nice kick! You can also use different BBQ sauces. Choose sweet, spicy, or tangy, depending on your taste. Each sauce changes the flavor of the subs. If you're gluten-free, use gluten-free breadcrumbs. They work just as well. For vegetarians, substitute meat with lentils or black beans. You can also use store-bought veggie meatballs. These swaps keep the taste delicious for everyone! - Refrigeration Guidelines: Store leftovers in the fridge. Use an airtight container. They stay fresh for up to three days. - Recommended Storage Containers: Glass containers work best. They seal tightly and keep food safe. Plastic containers are fine too, but check for leaks. - Best Methods for Reheating: Use the oven for best results. Preheat to 350°F (175°C). Place the subs on a baking sheet. Heat for about 10 minutes. - Keeping Meatballs Moist: Add a little BBQ sauce to the meatballs. This keeps them from drying out during reheating. Cover the subs with foil for even heat. - Freezing for Later Use: You can freeze meatballs and sauce separately. Use freezer-safe bags or containers. They last up to three months. - Thawing Instructions: Thaw in the fridge overnight. For a quick option, use the microwave. Heat in short bursts to avoid cooking them. You can use oats or crushed crackers instead of breadcrumbs. Both options work well. Oats add fiber, while crackers give a nice crunch. Just replace the breadcrumbs with the same amount of your chosen substitute. This keeps your meatballs together without losing flavor. Yes! You can try marinara, teriyaki, or a spicy hot sauce. Each sauce brings a new taste. For a sweet twist, use honey mustard. Experiment with different flavors to find your favorite. You can serve meatball subs with a side salad or coleslaw. Both add freshness. Sweet potato fries or regular fries also make a great match. For a fun twist, try pickles or chips on the side. To keep meatballs juicy, do not overmix the meat. Use fresh ingredients, and don’t skip the egg. The egg helps bind and add moisture. Also, consider adding a bit of milk or broth to the meat mixture. Yes, you can make the meatballs and sauce ahead of time. Store them in the fridge for up to two days. When ready to serve, heat them and fill the subs. This saves time for busy days or gatherings. Making these BBQ meatball subs is simple and fun. We covered the right ingredients, step-by-step instructions, tips, and variations to try. You can customize your subs to fit any taste. Whether you prefer different meats or sauces, there are endless options. Remember, proper storage helps you enjoy leftovers later. These tasty subs can please any group. Don’t be afraid to experiment and make them your own. Enjoy your cooking adventure!

Tangy BBQ Meatball Subs Flavorful and Easy Recipe

Get ready to sink your teeth into the perfect comfort food: Tangy BBQ Meatball Subs! This easy recipe combines juicy

- 14 oz firm tofu, well-pressed and cut into 1-inch cubes - 2 tablespoons cornstarch - 2 tablespoons vegetable oil (plus more if needed) - 1 bell pepper (choose red or yellow for sweetness), sliced - 1 cup broccoli florets (fresh or frozen) - 1 cup snap peas (trimmed) - 3 cloves garlic, minced - 1 tablespoon fresh ginger, minced - 1/4 cup sweet chili sauce - 1 tablespoon soy sauce - 1 tablespoon rice vinegar To create a tasty Sweet Chili Tofu Stir-Fry, you need firm tofu, colorful veggies, and flavorful sauces. Start with firm tofu. Press it well to remove moisture, so it can crisp nicely. Cut it into 1-inch cubes for even cooking. Next, grab some fresh or frozen vegetables. I love using bell peppers, broccoli, and snap peas. They add both crunch and color to the dish. The sauces are key to flavor. Sweet chili sauce gives a nice kick and sweetness. Soy sauce adds saltiness, while rice vinegar adds a tangy note. These three work together to create a rich taste. - Salt and black pepper to taste - 2 green onions, finely chopped (for garnish) - Sesame seeds (for garnish) Now, let’s talk about seasoning. A pinch of salt and black pepper enhances the overall flavor. Don’t forget the garnishes! Chopped green onions add freshness, while sesame seeds give a nice crunch. These small touches elevate the final dish. Use them generously for a beautiful presentation. {{ingredient_image_2}} Start by pressing the tofu. Place it between two plates and add weight on top. Let it sit for about 15 minutes to remove excess moisture. This step is key for crispy tofu. After pressing, cut the tofu into 1-inch cubes. Sprinkle 2 tablespoons of cornstarch over the cubes. Toss gently to coat all sides evenly. In a large skillet, heat 1 tablespoon of vegetable oil over medium-high heat. Wait until the oil is hot, then add the coated tofu cubes to the pan. Fry the tofu for 5-7 minutes, turning occasionally. You want them golden brown and crispy. Once done, carefully remove the tofu and set it aside on a plate. In the same skillet, add more oil if needed. Now, add the sliced bell pepper, broccoli florets, and snap peas. Stir-fry these for about 3-4 minutes. Cook until they are bright and tender but still crisp. This keeps the veggies fresh and full of flavor. Next, introduce the minced garlic and ginger to the skillet. Stir-fry them for one more minute. This step brings out their rich flavors. Be careful not to let them burn, as that can make them bitter. Now, return the crispy tofu to the skillet with the vegetables. Pour in 1/4 cup of sweet chili sauce, 1 tablespoon of soy sauce, and 1 tablespoon of rice vinegar. Use a spatula to toss everything gently. Make sure the tofu and veggies are well coated with the sauce. Season your stir-fry with salt and black pepper to taste. Let it cook for an extra 2 minutes. This allows the sauce to thicken and the flavors to blend. Finally, remove from heat and garnish with chopped green onions and sesame seeds before serving. This adds a nice crunch and extra flavor to your dish. Tofu is great but can be soft if not cooked right. Pressing it is key. When you press tofu, you remove extra water. This makes it firm and helps it crisp up. Press it for about 15 minutes. After pressing, cut the tofu into 1-inch cubes. Next, sprinkle cornstarch over these cubes. Toss them gently to coat each one. This coating creates a crunchy texture when you fry it. For a tasty stir-fry, choose the right vegetables. Bell peppers, broccoli, and snap peas work well. They add color and crunch. Cut them into even pieces for even cooking. Stir-fry these vegetables for 3-4 minutes. You want them to be bright and crisp-tender. Avoid overcooking them, or they will become mushy. You can adjust the sauce to fit your taste. If you want it sweeter, add more sweet chili sauce. For more heat, try adding chili flakes or sriracha. You can also make your own sweet chili sauce. Combine sugar, vinegar, and chili in a pan. Simmer until thick. This way, you get a fresh flavor that fits your dish perfectly. Pro Tips Pressing Tofu: Ensure you press the tofu well to remove excess moisture. This step is crucial for achieving a crispy texture during frying. Vegetable Timing: Add vegetables to the pan based on their cooking times. Start with those that take longer to cook, like broccoli, and add quicker-cooking ones like snap peas later. Adjusting Sauce: Feel free to adjust the amount of sweet chili sauce based on your spice preference. You can add more for a sweeter dish or less for a milder flavor. Garnishing: Don’t skip the garnishing step! Fresh green onions and sesame seeds add a delightful crunch and elevate the presentation of the dish. {{image_4}} You can change the protein in this dish. Tempeh is a great choice. It has a nutty flavor and a firm texture. Seitan is another option. It mimics meat well and absorbs flavors nicely. If you prefer seafood, try shrimp. Shrimp cooks quickly and adds a sweet taste. Chicken is also a classic choice. Cut it into small pieces for even cooking. Feel free to mix up the veggies! You might like carrots or bell peppers for sweetness. Zucchini adds a nice crunch, while mushrooms bring earthiness. Seasonal veggies like asparagus or snap peas are also great. They add freshness and color to your stir-fry. Want more heat? Add chili flakes or a touch of sriracha. This will kick up the spice level. For a different taste, try mixing sauces. You could blend teriyaki with sweet chili sauce for a twist. Soy sauce with a hint of lime adds a zesty flavor. Explore these options to find your perfect balance! Store leftover sweet chili tofu stir-fry in the fridge. Use an airtight container. This helps keep the dish fresh. You can enjoy it for up to three days. If you want to keep it longer, consider freezing. You can reheat your stir-fry on the stovetop or in the microwave. The stovetop method works best for keeping texture. Heat in a pan over medium heat until warm. Stir often to avoid burning. The microwave is quicker but may make the tofu soft. If you use it, heat in short bursts, stirring in between. For freezing, place the stir-fry in a freezer-safe container. Leave some space at the top to allow for expansion. Label the container with the date. This dish can last up to three months in the freezer. When ready to eat, thaw it overnight in the fridge. Reheat it on the stovetop for the best results. Yes, this recipe is already vegan. All the ingredients are plant-based. Make sure to use a vegan sweet chili sauce. Check labels for any hidden animal products. To add more heat, try these tips: - Use fresh chili peppers, like Thai bird chilies. - Add chili flakes or sriracha sauce. - Increase the sweet chili sauce for a spicy-sweet kick. You can, but it changes the texture. Frozen tofu becomes spongy when thawed. It absorbs sauces well but won't be as crispy. Pressing it after thawing is important. This dish pairs well with: - Steamed rice or quinoa for a hearty meal. - Noodles, like rice noodles or soba. - A side salad for extra crunch and freshness. To sum up, making Sweet Chili Tofu Stir-Fry is simple and fun. You learned about key ingredients like firm tofu, fresh veggies, and tasty sauces. We walked through preparing, cooking, and seasoning to get the best flavors. Remember, tips on crispiness and storage will keep your dish great later on. You can also mix things up with veggies or proteins to fit your taste. Experiment and enjoy this tasty dish with your own twist!

Sweet Chili Tofu Stir-Fry Quick and Flavorful Dish

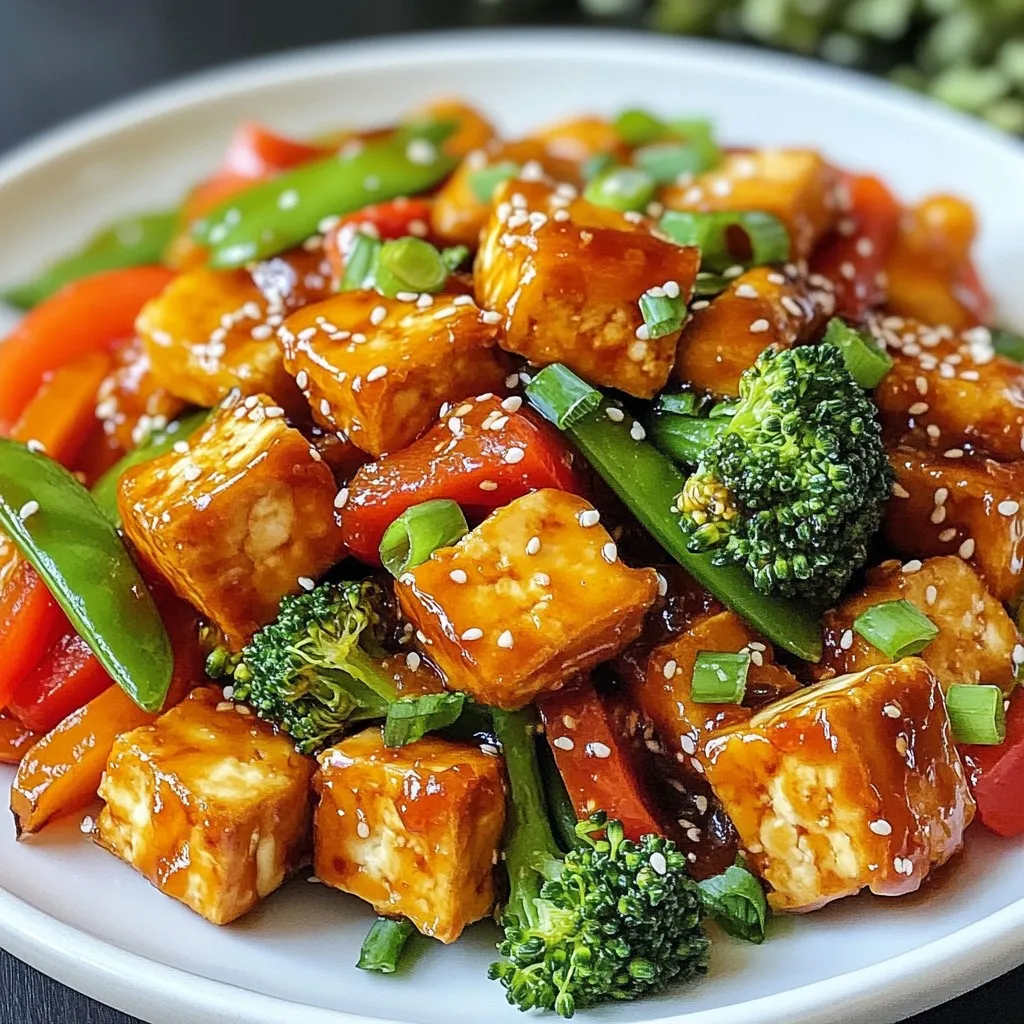
Looking for a quick and flavorful meal that’s both healthy and satisfying? My Sweet Chili Tofu Stir-Fry is just what

Here's what you need to make creamy tomato basil gnocchi. Gather these items before you start cooking: - Gnocchi (store-bought or homemade) - Olive oil - Garlic (3 cloves, finely minced) - Crushed tomatoes (1 can, 15 oz) - Heavy cream (1 cup) - Dried oregano (1 teaspoon) - Salt and pepper (to taste) - Red pepper flakes (for a spicy kick, optional) - Fresh basil leaves (1/4 cup, finely chopped) - Parmesan cheese (1/2 cup, freshly grated) Each ingredient plays a key role in building that rich, creamy flavor. Gnocchi provides a soft base, while garlic adds depth. The crushed tomatoes give a sweet and tangy taste. Heavy cream makes the dish rich, and fresh basil brightens everything up. Don’t forget the Parmesan; it brings a savory finish. If you like heat, red pepper flakes can spice things up! {{ingredient_image_2}} Start by boiling a large pot of salted water. Wait for it to reach a rolling boil. Add your gnocchi and cook according to the package instructions. Look closely; when the gnocchi float to the top, they are ready. Use a slotted spoon to take them out and place them in a colander to drain. Next, let’s make the sauce. Warm 2 tablespoons of extra virgin olive oil in a large skillet over medium heat. Once the oil is hot, add 3 minced garlic cloves. Sauté the garlic for about one minute. Stir constantly until it gets fragrant and golden. Be careful; burnt garlic can ruin your sauce. Pour in one can of crushed tomatoes. Stir to mix it with the garlic. Add 1 teaspoon of dried oregano. Raise the heat slightly and let the sauce simmer for about 5 to 7 minutes. This helps the flavors blend and the sauce thicken a bit. Now, reduce the heat to low and pour in 1 cup of heavy cream. Stir until the sauce becomes creamy. Season the sauce with salt and freshly ground black pepper. If you like a little heat, add red pepper flakes. Let it cook for another 2 minutes. Carefully add the cooked gnocchi to your sauce. Toss them gently until every piece is coated in that creamy goodness. Take the skillet off the heat and stir in 1/4 cup of finely chopped fresh basil and 1/2 cup of grated Parmesan cheese. Mix well until everything combines beautifully and the cheese melts slightly. Let the dish sit off the heat for a minute. This helps the sauce thicken just a bit more. To avoid curdling the cream, always use low heat when adding it to the sauce. High heat can cause the cream to separate, which ruins the texture. Stir constantly as you add the cream for a smooth blend. If your sauce feels too thick, add a splash of pasta water to loosen it up. This water helps keep the sauce creamy. If it’s too thin, let it simmer a bit longer to thicken. Timing is key when cooking gnocchi. Boil your water and add the gnocchi gently. They will float when they are ready, usually in 2-3 minutes. Keep an eye on them to avoid overcooking. Make sure your water is at a rolling boil before adding the gnocchi. This helps them cook evenly. If you cook too many at once, they may stick together. Cook in batches if needed. For serving, use shallow bowls to show off the creamy sauce. Ladle the gnocchi in the center, and let it shine. Garnish with fresh basil leaves and a sprinkle of Parmesan cheese. A drizzle of olive oil adds a nice touch too. These details make the dish look and taste amazing. Enjoy your beautiful creation! Pro Tips Use Fresh Ingredients: Fresh basil and quality tomatoes can elevate the flavor of your dish significantly. Always opt for the freshest ingredients you can find for the best taste. Don't Overcook the Gnocchi: Gnocchi are perfect when they float to the surface of the boiling water. Overcooking can make them mushy, so keep an eye on them! Adjust the Creaminess: If you prefer a lighter sauce, consider using half-and-half instead of heavy cream. It will still give you a creamy texture but with fewer calories. Customize the Spice Level: Feel free to adjust the amount of red pepper flakes to suit your taste. Start with a small amount and add more if you like it spicy! {{image_4}} If you need gluten-free gnocchi, look for brands made from rice or potatoes. These options work well and taste great. You can also make your own using gluten-free flour. For a dairy-free version, swap heavy cream with coconut cream or cashew cream. Nutritional yeast can replace Parmesan cheese for a cheesy flavor without dairy. Adding vegetables to your dish boosts nutrition and flavor. You can try spinach, zucchini, or bell peppers. Just sauté them with the garlic to soften before adding the tomatoes. If you like heat, consider adding fresh or dried peppers. The red pepper flakes give a mild kick, but jalapeños or serranos can spice things up. You can change the sauce to match your taste. Pesto adds a fresh twist, while Alfredo creates a rich, creamy base. If you want protein in your dish, add grilled chicken, shrimp, or sausage. This makes your meal hearty and satisfying. Mixing in these ingredients allows you to create new flavors each time you make this dish. To keep your creamy tomato basil gnocchi fresh, place it in an airtight container. You can store it in the fridge for up to three days. Make sure it cools down first to avoid steam buildup. This helps prevent sogginess. When reheating, I recommend using a skillet over low heat. This method warms the gnocchi gently. Stir regularly to keep the sauce smooth. If you use a microwave, heat it in short intervals to avoid texture loss. You want that creamy sauce to stay nice and velvety. You can freeze this dish if you want to save some for later. First, let it cool completely. Then, transfer it to a freezer-safe container. It can last up to three months in the freezer. When you’re ready to eat, thaw it in the fridge overnight. Reheat it gently on the stove, adding a splash of cream if it seems too thick. Freezing may change the texture slightly, but it will still taste great. Homemade gnocchi cooks quickly. It usually takes about 2 to 4 minutes. You know it’s done when the gnocchi rises to the surface of the water. This means they are light and fluffy. Once they float, use a slotted spoon to remove them. Drain them well in a colander. Yes, you can make this dish ahead of time. Cook the gnocchi and prepare the sauce separately. Store the gnocchi in water to keep them moist. Place the sauce in an airtight container. You can keep both in the fridge for up to 2 days. When ready to serve, reheat the sauce and add the gnocchi. Absolutely! You can use fresh tomatoes. You will need about 2 to 3 medium-sized tomatoes. First, blanch them in boiling water for about 1 minute. Then, peel and chop them. You may need to simmer them longer to reach the right sauce thickness. Adjust seasoning to taste for the best flavor. This blog post covered how to make a delicious gnocchi dish from scratch. We discussed the essential ingredients, step-by-step cooking instructions, and smart tips for success. You learned about variations to fit your diet and how to store leftovers. Remember, cooking gnocchi is fun and offers many options. Enjoy making this cream-based delight, and don’t shy away from experimenting with flavors. Your kitchen creations can be both tasty and unique!

Creamy Tomato Basil Gnocchi Simple and Savory Dish

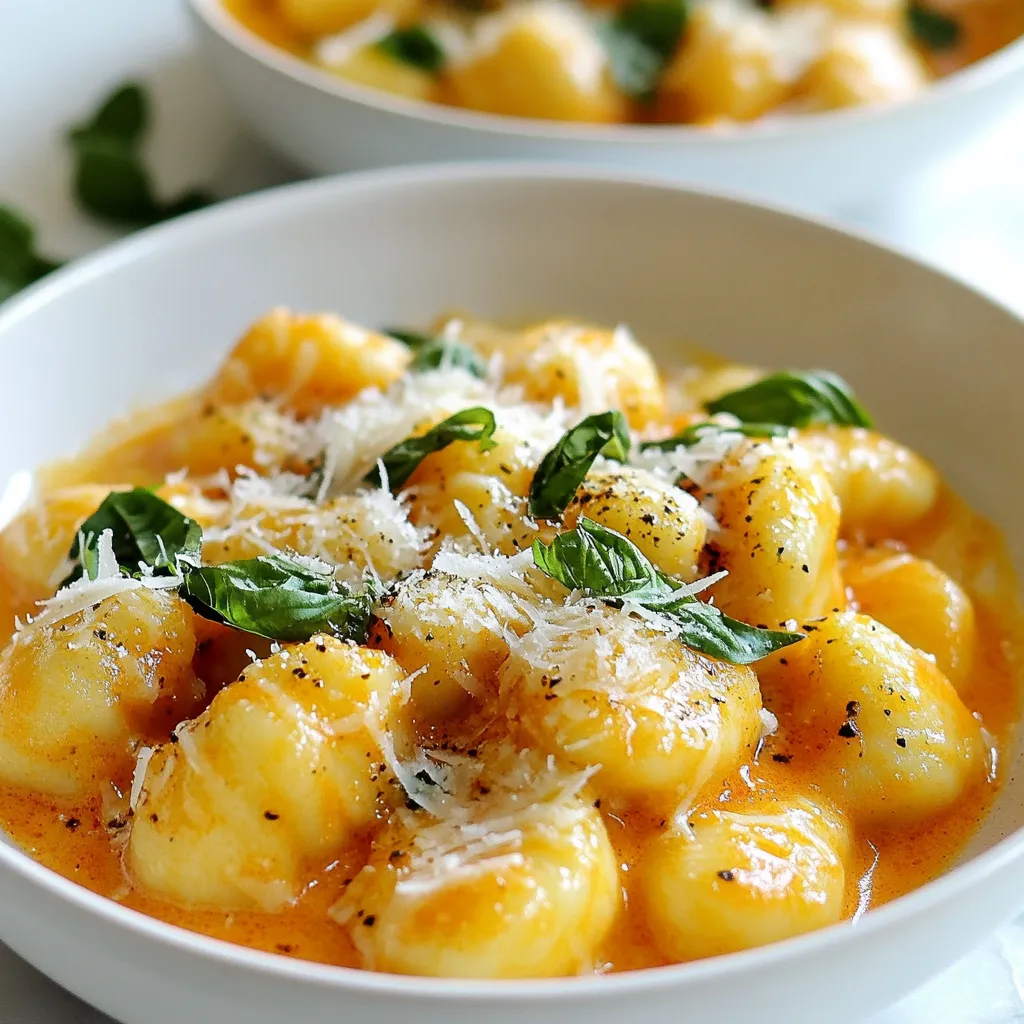
If you’re craving a cozy and delicious meal, look no further than Creamy Tomato Basil Gnocchi. This simple and savory

- Butternut squash and its preparation You need one medium butternut squash. Peel it and cut it into 1-inch cubes. This squash gives the soup a sweet and creamy base. - Coconut milk and its benefits Use one can (400ml) of creamy coconut milk. It adds a rich, smooth texture and a hint of sweetness. Coconut milk is also dairy-free, making it great for many diets. - The role of red curry paste Two tablespoons of red curry paste bring the heat and flavor. It contains spices like ginger and lemongrass, adding depth to the soup. - Aromatics: onion, garlic, and ginger A medium onion, three garlic cloves, and one inch of fresh ginger are key. They create a fragrant base that enhances the dish's overall taste. - Stock: using vegetable broth Four cups of vegetable broth provide a savory backdrop. It complements the flavors of the squash and coconut milk well. - Seasoning and garnish Use sea salt and freshly ground black pepper to taste. A sprinkle of fresh cilantro on top adds color and freshness, making the soup even more inviting. {{ingredient_image_2}} 1. Heat 1 tablespoon of extra virgin olive oil in a large pot over medium heat. 2. Add the finely diced onion and cook for about 5 minutes. Stir until it turns soft and clear. 3. Next, add 3 minced garlic cloves and 1-inch grated ginger. Cook for another 1-2 minutes. This adds rich aroma to your soup. 4. Now, add 1 medium butternut squash, cut into 1-inch cubes. Spoon in 2 tablespoons of red curry paste. Mix well so the squash is coated. Cook for 2-3 minutes to blend the flavors. 1. Pour in 4 cups of vegetable broth. Stir to combine and bring it to a boil. 2. Once boiling, reduce the heat to low. Let the soup simmer for 15-20 minutes. This makes the squash tender enough to fork easily. 3. Remove the pot from the heat. Use an immersion blender to blend the soup until creamy. If using a stand blender, do this in batches. 4. Return the blended soup to the pot. Stir in 1 can of coconut milk and juice from half a lime. Heat gently without boiling. Taste and adjust with salt and black pepper. 1. Serve the soup warm in bowls. For a pop of color, top it with fresh chopped cilantro. 2. You can pair this soup with crusty bread or a light salad. This makes a complete, satisfying meal. Cooking butternut squash can be tricky. If you overcook it, the squash turns mushy. Under-cooking means it stays hard. Aim for tender pieces you can pierce with a fork. Another mistake is not adjusting seasoning. Always taste your soup before serving. Add salt and pepper as needed. A little lime juice can enhance the flavors, too. For a creamy texture, blending is key. If you use a stand blender, blend in batches. Be careful to avoid splashes. An immersion blender works best for smooth soup. If you can't find butternut squash, use acorn or kabocha squash. They have similar textures and flavors. For a dairy-free option, coconut milk works great. It adds creaminess without dairy. You can also skip the red curry paste if you want mild flavors. Adjust the spice level by adding more or less curry paste. Start with a small amount and taste as you go. To store soup long-term, freeze it in airtight containers. Leave space for expansion when it freezes. It can last up to three months in the freezer. When reheating, do it slowly on low heat. Stir often to prevent burning. If it thickens too much, add a splash of vegetable broth or water. This keeps the flavors intact. Pro Tips Choose the Right Squash: For the best flavor and texture, select a butternut squash that feels heavy for its size and has a smooth, unblemished skin. Adjust Spice Level: If you prefer a milder soup, start with less red curry paste and gradually add more to taste. This way, you can control the heat level. Make it Creamier: For an even richer soup, consider adding an extra half can of coconut milk or blending in a small amount of cashews for extra creaminess. Garnish with Freshness: A squeeze of lime juice right before serving brightens the flavors, and a sprinkle of cilantro adds a lovely freshness to the presentation. {{image_4}} You can easily make this soup more filling by adding proteins. For vegetarian options, try chickpeas or lentils. These add a nice texture and boost nutrition. You can also add tofu for a protein-packed dish. If you prefer meat, cooked chicken or shrimp work well. Just add them to the soup during the last few minutes of cooking. This way, they heat through without getting tough. Boost the nutrition of your soup with extra veggies. Carrots, sweet potatoes, or spinach are great choices. They add color and flavor. If you want to use seasonal vegetables, consider adding zucchini or kale. These add unique tastes and are easy to find throughout the year. Feel free to get creative with whatever looks fresh at the market! Spice can transform your soup. If you like it hotter, add more red curry paste or some chili flakes. For a milder flavor, reduce the curry paste. Fresh herbs can also make a big difference. Adding cilantro or basil just before serving adds a fresh taste. You can also try a squeeze of lemon or lime for extra brightness. Each of these enhancements helps create a unique flavor profile! Coconut Curry Butternut Soup is not just tasty; it’s good for you too. One serving has about 200 calories. It packs in healthy fats, fiber, and vitamins. - Calories: 200 per serving - Protein: 3 grams - Fat: 12 grams - Carbohydrates: 24 grams - Fiber: 4 grams The main ingredients offer great health benefits. Butternut squash is high in vitamins A and C. Coconut milk adds healthy fat and is good for your skin. Red curry paste gives flavor and boosts your metabolism. This soup fits many diets. It is vegan, gluten-free, and can suit keto diets too. - Vegan: Made without animal products. - Gluten-Free: Safe for those with gluten intolerance. - Keto-Friendly: Keep carbs low by enjoying smaller portions. Coconut and butternut squash are nutrient-rich. They contain antioxidants that fight disease. These ingredients also help keep you full longer. Enjoy this creamy soup while knowing it supports your health! You can easily make this soup vegan. First, ensure you use vegetable broth instead of chicken broth. The coconut milk is already vegan, so no changes are needed there. All the ingredients, such as the butternut squash, onion, garlic, ginger, and red curry paste, are plant-based. This makes it a delicious option for vegan diets. Yes, you can prepare this soup ahead of time. Cook the soup as directed and let it cool. Store it in an airtight container in the fridge for up to three days. When you are ready to enjoy it, just reheat it on the stove. Stir well to make sure it heats evenly. Coconut Curry Butternut Soup pairs well with many sides. You might enjoy it with crusty bread for dipping. A simple green salad can also balance the flavors nicely. For a heartier meal, serve it with some rice or quinoa to soak up the rich soup. To adjust the spiciness, you have a few options. If you want it milder, use less red curry paste. You can start with one tablespoon and taste before adding more. For extra heat, add more curry paste or a pinch of cayenne pepper. Always taste before making changes! Yes, you can use frozen butternut squash in this recipe. Frozen squash is already cut and saves prep time. Just add it directly to the pot without thawing. Keep in mind that you may need to adjust cooking times slightly. Check that it becomes fork-tender before blending. This recipe for Coconut Curry Butternut Soup covers everything you need to know. You learned about the key ingredients and their roles. The step-by-step instructions guide you through cooking and serving. I shared tips to avoid common mistakes and offered nutritious variations. Remember, this soup is versatile for diets like vegan or gluten-free. Experiment with flavors and enjoy this healthy dish any time. Your kitchen can be full of warmth and great taste with this comfort meal. Dive in and delight your senses!

Coconut Curry Butternut Soup Savory Flavor Delight

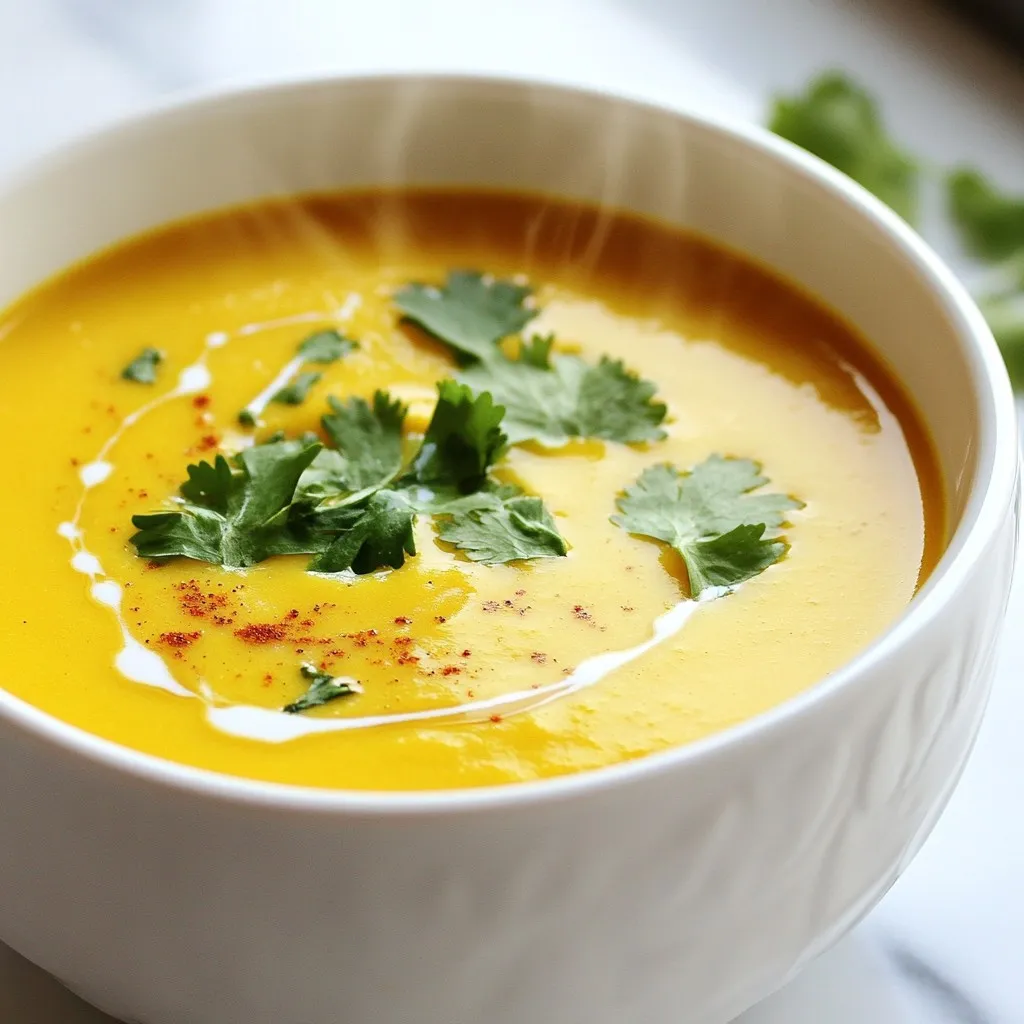
Welcome to a flavorful journey with my Coconut Curry Butternut Soup! This warm, creamy dish blends sweet squash and rich

- 2 cups cooked chicken, shredded - 1 ripe avocado, mashed until smooth - 1/4 cup plain Greek yogurt - 1 tablespoon Dijon mustard - 1 tablespoon freshly squeezed lime juice - Salt and freshly ground black pepper to taste - 1/4 cup red onion, finely diced - 1/2 cup cherry tomatoes, halved - 1/4 cup fresh cilantro, chopped - 4 cups mixed salad greens (such as romaine, spinach, and arugula) The base of this salad is simple yet satisfying. I use shredded chicken for protein. It adds flavor and texture. The ripe avocado makes it creamy and rich. To boost nutrition, I blend in Greek yogurt. This keeps it light but filling. Next, I add Dijon mustard and lime juice for a zing. They bring brightness to every bite. Don't forget the salt and pepper. These help enhance all the flavors. For crunch and color, I fold in red onion, halved cherry tomatoes, and fresh cilantro. They give the salad a fresh taste. Finally, I serve it over mixed salad greens. The greens add a nice pop of color. This creamy avocado chicken salad is fresh, healthy, and full of flavor. It is perfect for lunch or a light dinner. Enjoy the easy prep and delightful taste! {{ingredient_image_2}} Start by gathering your ingredients. In a large bowl, combine the shredded chicken, smooth mashed avocado, Greek yogurt, Dijon mustard, and lime juice. Use a fork or spatula to mix everything well. You want the mixture to be creamy and fully blended. This step is key to achieving a rich texture. Next, gently fold in the finely diced red onion, halved cherry tomatoes, and chopped cilantro. Be careful not to mash the tomatoes while mixing. After that, taste the mixture. Season it with salt and freshly ground black pepper. You can adjust the lime juice and Dijon mustard if you want a stronger flavor. Now it’s time to serve! Arrange the mixed salad greens on a platter or individual plates. This makes for a colorful base. Generously scoop the creamy avocado chicken salad over the greens. For a finishing touch, drizzle some extra lime juice on top and garnish with more cilantro. This adds a nice pop of flavor and color. - Use ripe avocados for a smoother texture. Ripe avocados blend well and add creaminess. - Experiment with different types of yogurt for unique flavors. Try Greek, coconut, or almond yogurt. - Adjust lime juice and mustard for personal taste preferences. More lime adds zing, while mustard gives depth. - Add extra herbs for additional freshness. Cilantro, parsley, or dill can brighten your salad. - Serve in clear glass bowls to showcase vibrant ingredients. This makes your dish more appealing and fun. - Include lime wedges for added zest at serving. Guests can squeeze lime for extra flavor. Pro Tips Use Fresh Ingredients: Fresh vegetables and herbs will elevate the flavor of your chicken salad. Opt for ripe avocados and crisp greens for the best taste and texture. Customize Your Seasoning: Feel free to adjust the lime juice and Dijon mustard according to your taste preferences. A little more acidity or spice can make a big difference! Make It Ahead: This salad can be prepared a few hours in advance. Just keep the dressing separate until ready to serve to avoid soggy greens. Pair with Crunch: Consider adding nuts, seeds, or even crispy tortilla strips on top for an added crunch that contrasts beautifully with the creaminess of the salad. {{image_4}} You can change up the protein in your creamy avocado chicken salad. Swap the chicken for tofu or chickpeas for a tasty vegetarian option. Tofu adds a nice texture, while chickpeas offer a hearty bite. If you want to save time, use leftover grilled chicken or rotisserie chicken. This makes meal prep quick and easy. To add some crunch to your salad, consider incorporating diced cucumbers or bell peppers. These veggies bring a fresh bite that pairs well with the creamy avocado. You can also mix in feta cheese or drizzle in avocado oil for extra richness. Both options enhance the flavor and make the salad even more satisfying. Exploring different dressings can elevate your creamy avocado chicken salad. A cilantro lime vinaigrette adds a zesty kick, while spicy ranch gives a bold flavor. You can also adjust the amount of yogurt or lime juice to achieve your desired creaminess or tanginess. Don’t be afraid to experiment until you find your perfect mix! Refrigerate your chicken salad in an airtight container for up to 3 days. This helps keep it fresh. Avoid mixing the salad greens with the chicken salad before storing. This way, your greens stay crisp. Freezing is not recommended for this salad. The texture of the avocado changes when frozen. For the best taste and quality, prepare the salad fresh when you need it. Serve the chicken salad chilled for the best flavor. If it becomes too thick, add a little yogurt or lime juice to loosen it up. If your greens dry out, refresh them with a light sprinkle of water. This keeps your salad looking great and tasting fresh. Yes, you can prepare the chicken salad a day in advance. Just store the dressing separately until you are ready to serve. You can use mayonnaise, sour cream, or a dairy-free yogurt alternative. Each option changes the taste a bit, so pick what you like best. Absolutely! You can add any vegetables you enjoy. Try corn, diced cucumbers, or shredded carrots for extra crunch and flavor. This chicken salad combines simple ingredients for a tasty dish. You start with shredded chicken and creamy avocado, then add Greek yogurt for richness. You can enhance the flavor with mustard, lime juice, and fresh veggies. The tips help you adjust the taste to your liking. Remember, it's easy to swap proteins or add different veggies. Serve it fresh for the best taste. Enjoy making this dish your own while keeping it healthy!

Creamy Avocado Chicken Salad Fresh and Healthy Delight

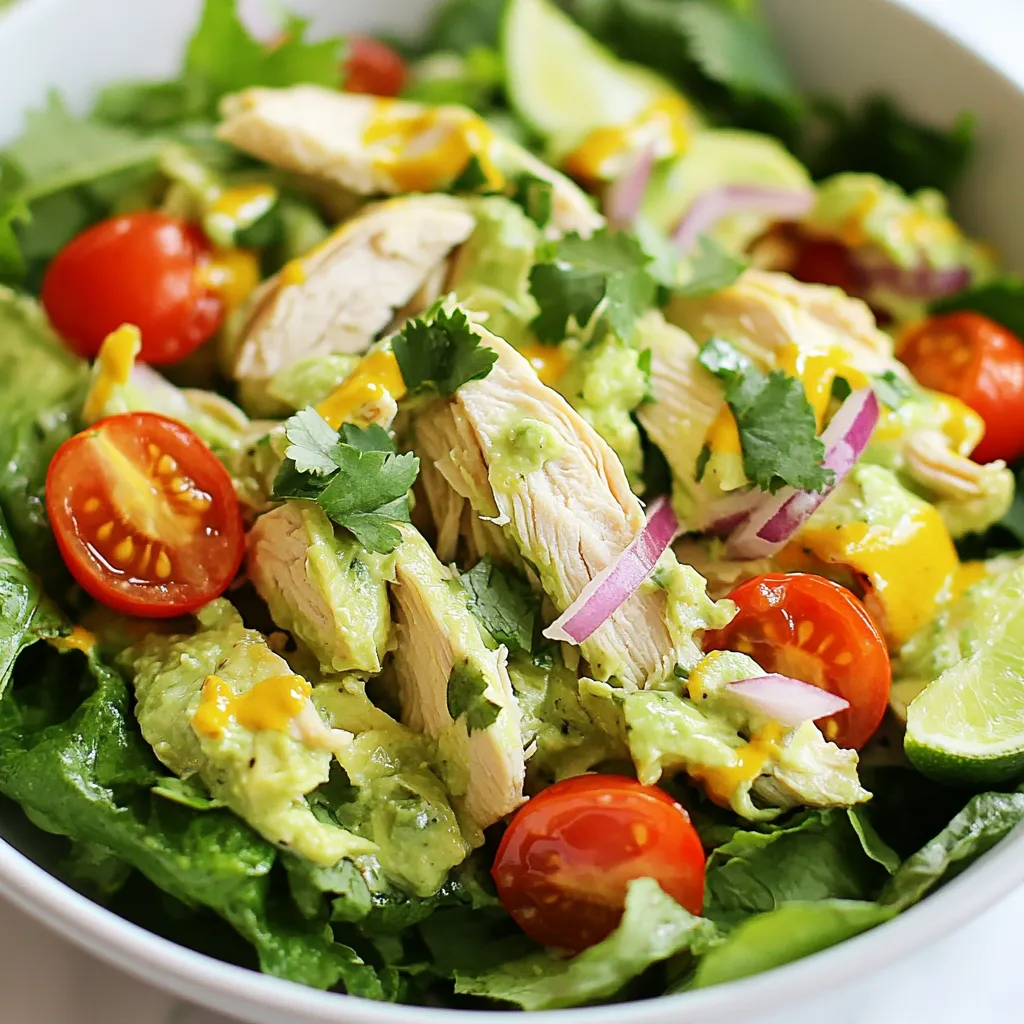
Looking for a fresh and healthy twist on the classic chicken salad? My Creamy Avocado Chicken Salad combines tender shredded

Newer posts
← Previous Page1 … Page88 Page89

dsad

© 2025 spoonfulsavory • Built with GeneratePress

Our Policies

  • Copyright Policy
  • Cookie Policy
  • GDPR Policy
  • Privacy Policy
  • Disclaimer
  • Terms Of Use

More Information

  • Home
  • About
  • Contact
  • Appetizers
  • Dessert
  • Dinner
  • Drinks
©2025, spoonfulsavory About Back To Top