![- Kale, apples, walnuts, dried cranberries, feta cheese - Olive oil, apple cider vinegar, honey (or maple syrup), ground cinnamon - Salt and pepper seasoning Kale is a superfood. It is rich in vitamins A, C, and K. These vitamins help keep your skin healthy, boost your immune system, and support bone health. Kale also has minerals like iron and calcium. Eating kale can help you feel strong and energized. Apples provide fiber and antioxidants. Fiber is good for digestion, while antioxidants help fight free radicals. They also support heart health. Eating apples regularly may lower the risk of heart disease. Choose crisp varieties like Honeycrisp for the best taste and crunch in your salad. Walnuts are packed with omega-3 fatty acids. These healthy fats support brain health and improve mood. They may also help reduce inflammation. Adding walnuts to your salad gives it a nice crunch and boosts its nutritional value. This Apple Walnut Kale Salad is a tasty way to enjoy these benefits. You can find the Full Recipe to make this nutrient-packed delight at home. Enjoy! Massaging kale is key to making it tender. This simple act helps break down tough fibers. Grab a large bowl and add chopped kale with a pinch of salt. Use your hands to knead the leaves for about 2-3 minutes. You’ll know the kale is ready when it turns a bright green and softens. This makes the kale easier to chew and enhances its taste. Once your kale is prepped, it's time to add other ingredients. Toss in diced apples, toasted walnuts, and dried cranberries or cherries. The apples add crunch, while the walnuts give a nice nutty flavor. If you want extra creaminess, sprinkle in some crumbled feta cheese. This mix of flavors and textures makes the salad exciting and tasty. A great dressing ties everything together. In a small bowl, whisk together olive oil, apple cider vinegar, honey or maple syrup, ground cinnamon, and a pinch of salt and pepper. Whisk well to ensure the flavors blend nicely. You want a balance of sweetness from the honey and a bit of tang from the vinegar. This dressing brings all the salad ingredients to life. Now, it's time to finish the salad. Drizzle the dressing over the kale and other ingredients. Toss everything together gently. You want all the leaves and toppings to be coated with the dressing. This makes each bite flavorful. Let the salad sit for 5-10 minutes. This allows the flavors to meld, making it even better. Enjoy this vibrant Apple Walnut Kale Salad as a meal or side dish. For the complete recipe, check out the [Full Recipe]. When I choose kale, I look for vibrant green leaves. They should feel crisp and firm. Avoid any wilted or yellowing leaves. For apples, go for varieties like Honeycrisp or Fuji. They should feel firm and have a bright color. Walnuts should be fresh and crunchy. Check for any signs of rancidity, like a sour smell. Seasonal changes affect the quality of your ingredients. In fall, apples are at their best. Fresh kale grows throughout the cooler months. Walnuts are usually harvested in late summer to early fall. This timing gives you the best flavor and nutrition. You can add a few optional ingredients to make the salad even better. Try a pinch of cayenne for heat or fresh herbs like parsley for freshness. You can also sprinkle some sunflower seeds for a nice crunch. For serving, pair this salad with grilled chicken or fish for a complete meal. You can also serve it with whole-grain bread for a nice touch. For a stunning look, serve the salad in a large, colorful bowl. The bright colors of the kale, apples, and walnuts really pop. Use a big spoon to toss it gently before serving. Garnish with extra walnut pieces and thin apple slices on top. A drizzle of dressing just before serving creates an inviting look. This way, your guests will be excited to dig in. {{image_4}} If you're looking to switch things up, consider some easy changes. For a vegan version, you can skip the feta cheese or use a plant-based alternative like cashew cheese. This keeps your salad creamy without any dairy. If you want a nut-free salad, just leave out the walnuts. You can replace them with seeds like pumpkin or sunflower. This keeps the crunch while ensuring it's safe for those with nut allergies. Feel free to play with flavors! Adding fruits like pears or berries can change the taste and make it more exciting. They add sweetness and a pop of color. You can also try different dressings. Balsamic vinegar brings a rich, tangy taste, while citrus dressings add a fresh zing. Each option offers a new twist on your salad, keeping it fun and tasty. For the full recipe, check the [Full Recipe] link. To keep your Apple Walnut Kale Salad fresh, store leftovers right away. First, place the salad in an airtight container. Glass containers work best, as they keep the flavors intact. Avoid plastic, as it can absorb odors. If you have dressing left, store it separately to keep the salad crisp. This way, your salad stays crunchy and tasty for the next meal. After preparing your salad, expect a shelf life of about 2-3 days. The kale can last longer, but the apples may brown. Check for signs of spoilage, like slimy leaves or an off smell. If the walnuts lose their crunch, it's time to toss them. Always trust your senses; if something seems off, it’s best to not eat it. Remember, proper storage helps maintain the salad's delicious taste and nutrient-packed goodness! For the full recipe, click here. You can make this salad ahead of time. Start by prepping the kale and dressing. Massage the kale as it softens. Store the kale in the fridge. Keep the dressing in a separate container. Mix them together just before serving. This keeps the kale fresh and crisp. You can boost protein by adding cooked chicken, chickpeas, or black beans. Each option enhances flavor and nutrition. Chicken adds a savory taste. Chickpeas are plant-based and filling. Beans offer a hearty texture. Choose what fits your meal plan best. Yes, this salad is great for meal prep. Portion the kale and toppings into separate containers. Assemble them when ready to eat. This helps keep the ingredients fresh. You can mix and match the salad throughout the week. The best apple varieties for salads are Honeycrisp and Fuji. These apples are sweet and crunchy. They add a nice contrast to the kale. Granny Smith apples work well too, adding tartness. Choose what you enjoy most for taste. Yes, you can use other leafy greens. Spinach and arugula are good options. Both have a mild flavor and work well with the dressing. You can also try collard greens for a different texture. Experiment with what you like best. Absolutely! You can use dried apricots, raisins, or figs. Each offers a unique sweetness. Dried apricots add a chewier texture. Raisins offer a classic touch. Figs bring a rich flavor. Choose what fits your taste for a delightful twist. This blog post covered a vibrant Apple Walnut Kale Salad. We highlighted key ingredients like kale, apples, and walnuts, showcasing their health benefits. I shared a simple step-by-step guide to prepare and assemble the salad, along with tips for selecting fresh ingredients. Additionally, I offered storage advice and variations to customize the recipe. In summary, this salad is not just tasty; it's also packed with nutrients. Feel free to explore your flavor preferences and make this recipe your own. Enjoying a healthy meal can be easy, fun, and rewarding.](https://spoonfulsavory.com/wp-content/uploads/2025/07/7db56e08-1695-478a-a39b-c576e1e064eb.webp)
Apple Walnut Kale Salad Nutrient-Packed Delight
Looking for a salad that’s both tasty and packed with nutrients? The Apple Walnut Kale Salad is your answer! This
Looking for a salad that’s both tasty and packed with nutrients? The Apple Walnut Kale Salad is your answer! This
![- 2 cups fresh baby spinach - 1 cup blueberries (fresh or frozen) - 1/2 cup feta cheese, crumbled - 1/4 cup walnuts, roughly chopped - 1/4 cup red onion, thinly sliced - 3 tablespoons extra virgin olive oil - 1 tablespoon balsamic vinegar - 1 tablespoon honey - Salt and freshly cracked black pepper, to taste When I think about a salad that pops with flavor, this one comes to mind. The mix of sweet blueberries and tangy feta cheese creates a taste explosion. You can use fresh or frozen blueberries, but fresh ones are my favorite. They burst with juice and flavor. The feta adds a creamy, salty touch. I love crumbling it into small bits for even distribution. The walnuts give a nice crunch. I recommend roughly chopping them to ensure the pieces are just right. The red onion adds a sharp bite that balances the sweetness. Using thin slices helps it blend well with the other flavors. For dressing, I stick to simple ingredients. Extra virgin olive oil brings richness, while balsamic vinegar adds depth. A touch of honey sweetens the mix just enough. I always season with salt and pepper to enhance all the flavors. This Blueberry Feta Salad is not only tasty but also colorful. The green spinach, blue berries, and white feta create a beautiful dish. You can find the full recipe above to guide you through the steps. Enjoy making this salad; it’s a real treat! 1. Start by picking a large salad bowl. In this bowl, combine: - 2 cups fresh baby spinach - 1 cup blueberries (fresh or frozen, thawed if frozen) - 1/2 cup feta cheese, crumbled - 1/4 cup walnuts, roughly chopped This mix creates a colorful, tasty base. 2. Next, grab a smaller bowl. Whisk together: - 3 tablespoons extra virgin olive oil - 1 tablespoon balsamic vinegar - 1 tablespoon honey - Salt and freshly cracked black pepper to taste Mix until the ingredients blend smoothly. 3. Pour the dressing over the salad in the large bowl. 4. Use tongs or a fork to toss the salad gently. Make sure everything gets coated, but be careful with the blueberries. 5. Now, add 1/4 cup thinly sliced red onion to the mix. Toss it again lightly. 6. You can serve the salad right away. If you let it rest for about 10 minutes, the flavors will mix even better. - Serve the salad right away or let it sit for 10 minutes to enhance the taste. - For a great look, arrange the salad on a big platter or in individual bowls. - Add a sprinkle of feta and walnuts on top for an extra touch. For the full recipe, check out the [Full Recipe]. To make your Blueberry Feta Salad shine, always use fresh ingredients. Fresh baby spinach is tender and full of flavor. Look for bright green leaves without any wilting. For blueberries, fresh ones burst with juice. If you choose frozen blueberries, thaw them properly. Place them in a bowl and let them sit at room temperature for about 30 minutes. This way, they regain their shape and flavor without becoming mushy. You can create your own dressings at home to suit your taste. A classic mix is equal parts olive oil and vinegar, with a dash of honey. For a twist, try adding a splash of orange juice. This will add a sweet and tangy touch. If you want more sweetness, use maple syrup instead of honey. You can adjust the flavors to fit your preference. Be bold and experiment with different ingredients. It’s all about finding what makes your salad sing. For the full recipe, check out the details above. {{image_4}} You can easily make this Blueberry Feta Salad your own. Adding protein boosts its heartiness. Try grilled chicken or shrimp for a filling meal. You can also add chickpeas for a vegetarian option. If you want to switch things up, consider changing the nuts or cheese. Walnuts add a nice crunch, but you can use pecans or almonds. For cheese, goat cheese works well. It gives a creamy texture and a tangy taste that pairs beautifully with blueberries. Seasonal fruits and vegetables can make this salad exciting all year round. In summer, you might add sliced peaches or strawberries. In fall, consider chopped apples or pears. Each fruit brings a unique flavor and keeps the salad fresh. You can also adapt the dressing based on the season. For summer, a light lemon vinaigrette refreshes the dish. In winter, a creamy dressing can warm it up. These small changes can transform your salad and keep it exciting! To keep your Blueberry Feta Salad fresh, store it correctly. Place any leftover salad in an airtight container. This method helps to prevent air from making the salad wilt. If you store it this way, it lasts for about 1 to 3 days. For the best results, keep the components separate. Store the spinach, blueberries, and feta in different containers. This keeps each ingredient fresh and tasty. Walnuts can also stay crunchy if stored in a cool, dry place. Meal prep makes salad making easy. You can wash and chop all your ingredients in advance. Store each in separate containers in the fridge. This way, you have everything ready when you want to make the salad. Assemble the salad just before serving. This keeps the flavors fresh and the textures crisp. Toss the salad with dressing right before you eat. This helps you enjoy the bright flavors of your Blueberry Feta Salad. For the full recipe, check [Full Recipe]. Blueberries are small but mighty. They are high in vitamins C and K. They also contain antioxidants, which help protect your cells. Feta cheese adds protein and calcium. This combination makes the salad both tasty and healthy. The fiber in spinach adds more health benefits, too. Together, these ingredients create a nutrient-rich dish. Yes, you can prepare the salad ahead. To keep it fresh, store the dressing separately. Mix the salad ingredients in a bowl but leave out the dressing. When you’re ready to eat, pour on the dressing and toss. This way, your salad stays crisp and colorful. If you want a different cheese, try goat cheese or ricotta. Both have a creamy texture. For a dairy-free option, use almond cheese or tofu. These choices can fit different diets and still taste great. To keep your salad crisp, follow a few tips. First, wash and dry your spinach well. Use a salad spinner if you have one. Second, add the dressing just before serving. This prevents the greens from wilting. Lastly, store extras in separate containers. This keeps everything fresh for your next meal. For a detailed recipe, check the [Full Recipe]. This salad combines fresh spinach, blueberries, and feta for a tasty treat. You learned easy steps to prepare and serve it. I shared tips to keep your ingredients fresh and how to customize the recipe for your tastes. With simple storage methods, you can enjoy leftovers too. When you create this salad, let your creativity shine while keeping it healthy. Enjoy experimenting and sharing this dish with friends!](https://spoonfulsavory.com/wp-content/uploads/2025/07/1e2403fd-7ba4-478c-8fb1-5572716cf3ec.webp)
Looking for a fresh and tasty dish that’s easy to make? My Blueberry Feta Salad is just the answer! It
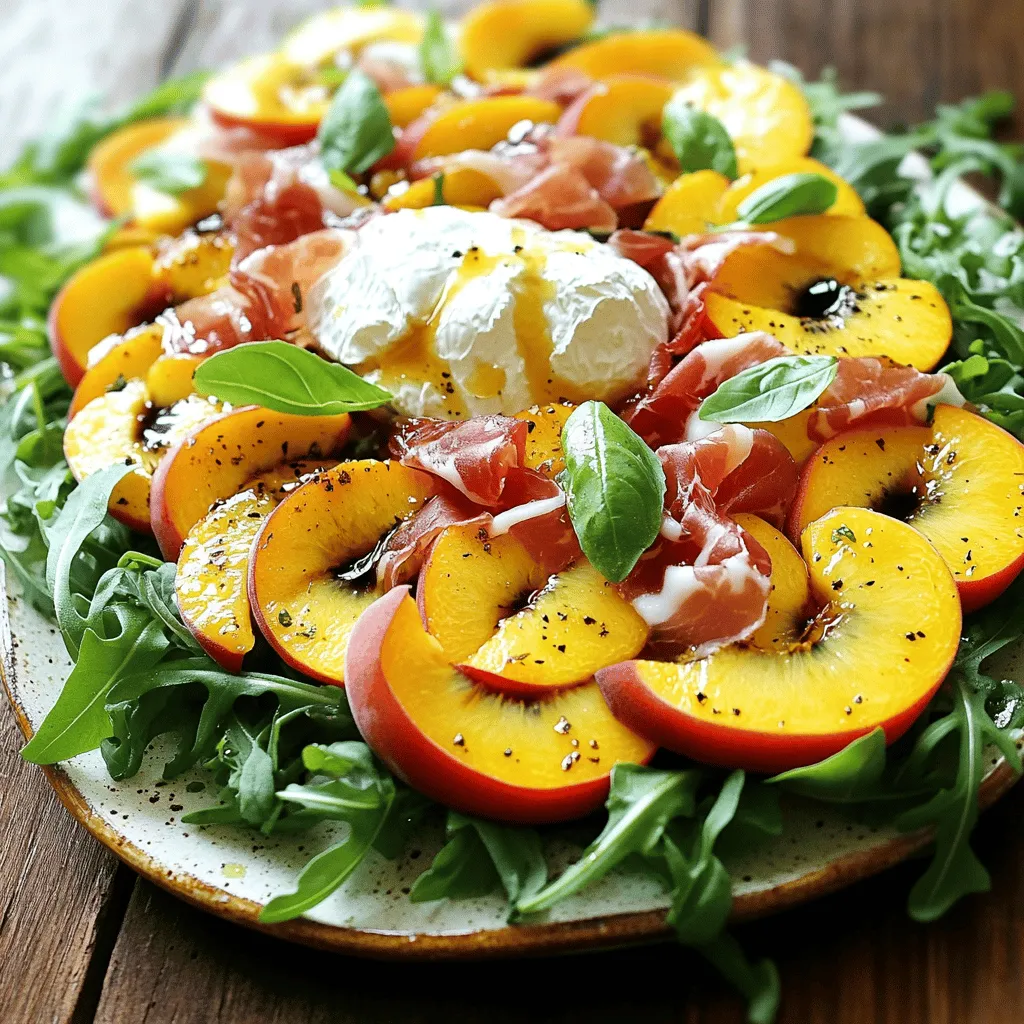
Looking for a fresh and tasty dish to impress your guests? Try my Peach Burrata Salad! This colorful mix combines
![- Spinach - Strawberries - Red Onion For this salad, fresh produce is key. I use 4 cups of baby spinach. Make sure to wash and dry it well. Next, I slice 1 cup of ripe strawberries. Their sweetness really shines in this dish. Finally, I add 1/4 cup of finely sliced red onion. This gives a nice bite and balances the sweetness. - Feta Cheese - Sliced Almonds I love adding 1/4 cup of crumbled feta cheese. It adds creaminess and saltiness. For crunch, I include 1/2 cup of sliced almonds. Toast them lightly for a richer flavor. They bring a lovely texture to the salad. - Balsamic Vinaigrette - Honey - Seasoning For the dressing, I use 1/4 cup of balsamic vinaigrette. It adds tanginess to the salad. A tablespoon of honey sweetens it up nicely. I season with salt and cracked pepper to taste. This dressing ties all the flavors together perfectly. You can find the full recipe at [Full Recipe]. - Washing and drying spinach Start by rinsing the fresh baby spinach. Use cool water to clean it well. After washing, use a salad spinner or a clean towel to dry it. This step is key to keep your salad crisp. - Slicing strawberries Take ripe strawberries and hull them first. This means you remove the green tops. Then, slice them thinly. Aim for even slices to make the salad look nice. - Mixing ingredients in a bowl Place the dried spinach in a large bowl. Add the sliced strawberries on top. Then, sprinkle the sliced almonds, crumbled feta, and red onion evenly over the salad. Each ingredient adds color and crunch. - Drizzling dressing and tossing In a small bowl, whisk together balsamic vinaigrette and honey. Once mixed well, drizzle the dressing over the salad. Use salad tongs to gently toss everything together. Make sure not to crush the strawberries while mixing. - Ideal serving vessels I recommend using clear glass bowls. This way, you can show off the beautiful colors of the salad. The layers will catch the eye of anyone at your table. - Garnish ideas for presentation For a nice touch, add a few whole strawberries on top. You can also consider adding a sprinkle of extra feta or a few almonds. This will enhance the look and make it even more appealing. Choosing ripe strawberries is key. Look for berries that are bright red and firm. Avoid any with green or white patches. These indicate they are not fully ripe. The best spinach varieties for this salad are baby spinach. It has a tender texture and a mild taste. Always choose leaves that are vibrant and free of any browning. To avoid bruising strawberries, handle them gently. After slicing, add them last to the bowl. Toss the salad softly to keep the fruit intact. For an even coating of dressing, drizzle it slowly. This helps each bite get the right amount of flavor. Use salad tongs for gentle mixing. Serve the salad right after mixing. This keeps the greens crisp and fresh. If you need to prep in advance, wash and dry the spinach earlier. Keep the strawberries and dressing separate until serving. This way, your salad stays fresh and tasty. For the best experience, enjoy your Strawberry Spinach Salad as soon as possible. For the full recipe, check out the detailed instructions above. {{image_4}} You can make your Strawberry Spinach Salad even better by adding protein. Here are two great options: - Grilled chicken: Slice up some grilled chicken breast and add it on top. This makes the salad more filling and gives you a juicy flavor. - Chickpeas: If you want a plant-based option, add chickpeas. They are high in protein and add a nice texture. Cheese can change the taste of your salad. Here are two types to try: - Goat cheese: This cheese has a creamy texture and tangy taste. Crumble it over your salad for a rich flavor. - Parmesan: Shave some Parmesan cheese on top for a salty kick. It pairs well with strawberries and spinach. You can boost the flavor of your salad with some easy changes: - Adding herbs: Fresh herbs like basil or mint can brighten up the dish. Just chop a few leaves and sprinkle them in. - Alternate dressings: Try different dressings for variety. A honey mustard or citrus vinaigrette can give a new twist. These variations help you customize the Strawberry Spinach Salad to fit your taste. For all the details, check the Full Recipe. To keep your Strawberry Spinach Salad fresh, store it in the fridge. Use an airtight container. This helps keep moisture out and keeps your salad crisp. If you have leftovers, separate the dressing from the salad. The dressing can make the greens soggy if mixed too soon. Freezing this salad is not recommended. The textures of spinach and strawberries change when frozen. Instead, plan to enjoy it fresh. To maintain freshness, use your salad within two days. Keep it covered in the fridge to slow down wilting. You do not need to reheat this salad. If the greens wilt, you can revive them. Rinse the spinach in cold water and gently dry it. This helps to restore some of its crunch. You can also add fresh spinach to refresh the salad. Just mix it in before serving. For the full recipe of this delicious dish, check out the [Full Recipe]. Yes, you can make this salad ahead. To keep it fresh, store each part separately. Place the spinach in one bowl. Keep the sliced strawberries and other toppings in separate containers. Mix everything right before serving. This way, the spinach stays crisp, and the strawberries remain juicy. If you want to switch out feta, try goat cheese. It has a creamy texture and tangy flavor. You can also use ricotta for a milder taste. For a dairy-free option, try crumbled tofu or nutritional yeast. Each choice brings a unique taste to the salad. To boost your dressing's flavor, add fresh herbs like basil or mint. A squeeze of lemon juice brightens the taste, too. You can mix in a dash of mustard for a kick. Experiment with spices like garlic powder or crushed red pepper for extra zest. This blog post covered how to make a delicious Strawberry Spinach Salad. We explored fresh ingredients, dressing options, and simple steps for preparation and serving. Quality matters, so use ripe produce. You can mix things up with proteins and cheese. Proper storage keeps your salad fresh longer. Remember, make it your own with herbs or alternative dressings. Enjoy this tasty salad today and share it with your loved ones!](https://spoonfulsavory.com/wp-content/uploads/2025/07/09668dac-20a9-4399-beed-b5ae798e00d9.webp)
Looking for a fresh and tasty dish? You’re in the right place! My Strawberry Spinach Salad combines crisp spinach with
![- Watermelon - Red Onion - Fresh Cilantro - Jalapeño Pepper - Lime Juice - Olive Oil - Chili Powder - Salt - Optional: Feta Cheese for Garnish To make a great Chili Lime Watermelon Salad, you need fresh ingredients. Start with ripe watermelon. It should be sweet and juicy. Next, use red onion for a bit of sharpness. Fresh cilantro adds a nice touch of green flavor. For heat, add jalapeño pepper. If you like it mild, remove the seeds. Lime juice brings in a tangy taste that brightens the dish. Olive oil helps blend the flavors. Chili powder adds warmth and a kick. Don't forget to season with salt to balance everything. If you want something creamy, sprinkle some feta cheese on top. It’s optional but adds a nice touch. This dish is colorful and full of fresh tastes that make it exciting. - Mixing Bowl - Whisk - Cutting Board - Knife - Serving Bowl Using the right tools helps make the cooking process easy. A mixing bowl is key for combining all your ingredients. A whisk helps mix the dressing smoothly. You will need a cutting board and knife to chop the watermelon, onion, and cilantro. Finally, use a serving bowl to show off your beautiful salad. These tools will make your cooking time fun and simple. For the full recipe, check out the details above. Enjoy making this fresh and flavorful dish! Combining the Main Ingredients Start by cutting the watermelon into bite-sized cubes. Use about 4 cups of watermelon for this salad. Next, finely dice 1/2 cup of red onion. Chop 1/4 cup of fresh cilantro. For some heat, slice 1 jalapeño pepper, but remember to remove the seeds if you want a milder taste. Place all these ingredients in a large mixing bowl. Use a spoon to mix them gently, so they mix well without crushing the watermelon. Mixing the Dressing In a small bowl, whisk together 2 tablespoons of fresh lime juice, 1 tablespoon of extra virgin olive oil, and 1 teaspoon of chili powder. Add a pinch of salt. Mix until the dressing is smooth and well-blended. This adds a zesty kick to the salad. Tossing the Salad Drizzle the dressing over the watermelon mixture. Gently toss everything together. Make sure each piece of watermelon is coated in the dressing. This step makes each bite flavorful. Seasoning to Taste After tossing, taste the salad. You may want to add more salt or chili powder. This is a great chance to adjust the flavors to suit your taste. Stir again to mix in any changes. Flavor Resting Period Let the salad rest for about 10 minutes. This short wait allows the flavors to blend. You will notice a big difference in taste after letting it sit. Presentation Ideas When you're ready to serve, think about how to make it look nice. Serve the salad in a bright bowl or in individual cups. This adds a fun touch to your meal. You can also garnish it with extra cilantro leaves and lime wedges for color. Garnishing with Feta Cheese Before serving, sprinkle crumbled feta cheese over the top. This adds a creamy finish. It pairs well with the fresh fruits and herbs, making the salad even better. Enjoy your Chili Lime Watermelon Salad! For the full recipe, check out the details above. Ripeness Indicators To find a great watermelon, look for a few signs. First, check the color. A ripe watermelon has a dark green hue. Look for a spot where it touched the ground; it should be yellow or cream. Next, tap the watermelon with your fingers. If it sounds hollow, it’s ripe. Finally, feel its weight. A heavier watermelon means it has more water inside. Choosing the Right Size Size matters when picking a watermelon. A medium to large watermelon works best for this salad. Smaller ones may lack taste, while very large ones can be too watery. Aim for one that feels full and heavy. This ensures you get the most flavor in your salad. Adjusting Heat Levels If you want more spice, add more jalapeño or chili powder. You can also leave the seeds in the jalapeño for extra heat. For a milder version, use less chili powder and remove all the seeds. Adjusting the heat makes the salad perfect for everyone's taste. Alternative Dressing Ideas While lime juice and olive oil are great, feel free to switch it up! Try adding a splash of orange juice for sweetness. You could also use a bit of honey for a sweet twist. These changes can take your salad to new flavor heights. Best Times to Serve Chili lime watermelon salad shines in warm weather. Serve it at picnics, barbecues, or summer parties. It is a refreshing side dish that pairs well with grilled meats. Enjoy it as a light lunch or a snack on hot days. Pairing Suggestions This salad goes well with many dishes. It pairs nicely with grilled chicken, fish, or tacos. Add it to a platter with other fresh items like corn salad or guacamole. The bright flavors of the salad enhance any meal. For the complete recipe, please refer to the [Full Recipe]. {{image_4}} Using Other Fruits You can swap watermelon with other fruits. Try mango for sweetness. Pineapple adds a tropical twist. Or use cantaloupe for a milder flavor. Each fruit brings its own unique taste. Mix and match to find your favorite. Herb Alternatives Cilantro is great, but other herbs work too. Mint gives a fresh kick. Basil adds a sweet touch. Use whatever you like best. Just be sure to chop the herbs finely for good flavor. Adding Avocado Avocado makes this salad creamy. It pairs well with the crisp watermelon. Cut the avocado into small cubes. Gently mix it in to keep it whole. This twist adds richness to each bite. Incorporating Nuts or Seeds Nuts or seeds add crunch. Try pumpkin seeds for a nutty flavor. Chopped almonds also work well. Sprinkle them on top before serving. This variation adds a fun texture contrast. Individual Cups For a fun presentation, serve in individual cups. Use small clear cups to show off the colors. Guests can grab their own portion easily. This style works great for parties or picnics. Party Platter Ideas A large platter is perfect for sharing. Arrange the salad in a colorful circle. Garnish with lime wedges to brighten it up. This style invites everyone to dig in together. To keep your Chili Lime Watermelon Salad fresh, store it in the fridge right away. Place the salad in an airtight container. This helps keep the flavors and textures intact. If you have leftover dressing, store it separately. This way, it won’t make the salad soggy. You can enjoy your leftovers for up to three days. After that, the salad may lose its crispness. For the best taste, eat it sooner rather than later. When you take the salad out of the fridge, give it a gentle stir. This helps revive the flavors. If it looks watery, use a slotted spoon to serve. This keeps the salad from being too soggy. If you want to brighten it up again, squeeze a bit of fresh lime juice on top. This simple step makes it taste fresh and vibrant again. To make this salad, follow these simple steps: 1. Combine Ingredients: In a big bowl, mix 4 cups of watermelon cubes, 1/2 cup diced red onion, 1/4 cup chopped cilantro, and 1 sliced jalapeño. Stir gently to mix well. 2. Make the Dressing: In a small bowl, whisk together 2 tablespoons of lime juice, 1 tablespoon of olive oil, 1 teaspoon of chili powder, and a pinch of salt until smooth. 3. Dress the Salad: Pour the dressing over the watermelon mix. Toss everything gently so each piece gets coated. 4. Taste and Adjust: Try the salad. Add more salt or chili powder if needed, and stir again. 5. Let it Rest: Allow the salad to sit for about 10 minutes. This helps the flavors blend. 6. Serve: Before serving, sprinkle crumbled feta cheese on top for extra flavor, if you like. Yes, you can make this salad in advance. Here are some tips: - Prep Ahead: You can chop the watermelon, onion, and cilantro a few hours beforehand. Store them in the fridge until you are ready to mix. - Make the Dressing: You can prepare the dressing ahead of time as well. Keep it in a sealed container in the fridge. - Mix Right Before Serving: Combine everything just before you serve. This keeps the salad fresh and crunchy. This salad pairs well with many dishes. Here are some ideas: - Grilled Meats: Serve it alongside grilled chicken or steak for a fresh contrast. - Tacos: It also goes great with tacos or burritos. The flavors balance nicely. - Picnic Dish: Bring it to a picnic. It’s refreshing and easy to share. - Enjoy Alone: You can simply enjoy it as a light snack on a hot day! For the full recipe of this delicious salad, check the [Full Recipe]. This blog post covered how to make a refreshing chili lime watermelon salad. We explored essential ingredients, tools, and step-by-step instructions. I shared tips for perfect flavor and various serving styles. Remember to adjust the heat and try different fruits for variety. Freshness is key, so store leftovers well. Enjoy this salad as a side or main dish! It’s a crowd-pleaser perfect for warm days. You’ll love how easy and delicious it is. Happy cooking!](https://spoonfulsavory.com/wp-content/uploads/2025/07/2782baeb-4ac0-47ec-aec1-5012c72dc663.webp)
Looking for a refreshing summer dish that packs a punch? Try my Chili Lime Watermelon Salad! With juicy watermelon, zesty
![- 6 large eggs - 1 cup water - Ice for ice bath - Salt and pepper for seasoning Using the right ingredients is key to perfect air fryer hard-boiled eggs. For this recipe, you need only two essential items: six large eggs and one cup of water. The eggs should be fresh for the best results. Adding an ice bath is optional but highly recommended. It cools the eggs quickly and helps with peeling. You can also sprinkle salt and pepper on your eggs for added flavor. This simple recipe allows you to enjoy hard-boiled eggs quickly and easily. For the full recipe, check [Full Recipe]. Start by preheating your air fryer to 270°F (130°C). This is the best temperature for cooking eggs evenly. Preheating ensures that the eggs cook just right, so don’t skip this step! Next, place the eggs in the basket. Make sure they have some space around them. This helps hot air flow and cook all the eggs. If they touch, some parts might not cook evenly. Now, it’s time to cook. Close the air fryer and set the timer for 15 minutes. This gives you hard-boiled eggs. If you like them softer, reduce the time slightly. Once the timer goes off, take the basket out carefully. The eggs and basket will be hot! Immediately move the eggs to an ice bath. Fill a bowl with ice and water, then add the eggs. Let them sit for 5-7 minutes. This stops cooking and makes peeling easier. When they cool, gently tap each egg on a hard surface. Peel them under cold water if needed. This helps the shell come off smoothly. For the complete recipe, check the section above titled Full Recipe. To get your eggs just right, adjust the cooking time. For soft yolks, cook the eggs for about 12 minutes. If you want hard yolks, stick to the full 15 minutes. You can also tweak it by one or two minutes based on your taste. This way, you’ll find the perfect balance. Peeling hard-boiled eggs can be tricky. To make it smoother, tap the egg on a hard surface to crack the shell. Then, roll it gently to loosen the shell. If it’s still hard to peel, rinse it under cold water. This helps to slide the shell off more easily. Make your dish pop with some simple presentation tips. Slice the eggs in half and place them on a nice platter. Sprinkle a bit of salt and pepper or add a dash of paprika for color. You can also garnish with fresh herbs like chives or parsley. These touches make your eggs not just tasty but also beautiful! {{image_4}} You can add spices or herbs to your eggs before cooking. This makes them more exciting. Try adding a pinch of salt, pepper, or garlic powder. Fresh herbs like dill or chives also work well. Just sprinkle them on the eggs in the basket. The flavors seep in as the eggs cook. You can change the taste of each batch easily! Air frying hard-boiled eggs is quick and simple. It also uses less water than boiling. In traditional boiling, eggs sit in hot water. This can lead to uneven cooking. Air frying delivers consistent heat all around. It also keeps the eggs from cracking. So, you get perfect eggs every time. Hard-boiled eggs are great on their own. You can also add them to many dishes. Try slicing them on top of salads. They add protein and flavor. You can make egg salad or deviled eggs. Both are fun snacks or party foods. Serve them with a side of fresh veggies for a healthy bite! Store hard-boiled eggs in the fridge. Keep them in their shells for best results. Place them in a covered container to avoid odors. If you peel them, store in a bowl with water. Change the water daily to keep them fresh. Hard-boiled eggs last about one week in the fridge. If they are unpeeled, they stay fresh longer. Always check for any off smells or unusual colors. If in doubt, it's best to throw them out. You can freeze hard-boiled eggs, but it's tricky. Freeze only the yolks for the best texture. To do this, remove the yolks and place them in a freezer bag. They can last for about three months. When ready to use, thaw them in the fridge overnight. Do not freeze the whites, as they become rubbery. Yes, you can cook other types of eggs in the air fryer. You can make poached eggs or scrambled eggs, too. For poached eggs, use a small oven-safe dish. Add water and crack an egg into it. Cook at 270°F for about 10 minutes. For scrambled eggs, whisk eggs in a bowl. Pour the mixture into a greased ramekin. Cook for 8 to 10 minutes, stirring halfway. The air fryer offers a fun twist on classic methods. To check if the eggs are done, look for a firm white and a yolk that feels set. When you take them out, the eggs should not jiggle. If you prefer softer yolks, check them at 12 minutes. For firmer yolks, keep them in for 15 minutes or a bit longer. Always use an ice bath right after cooking. This stops the cooking process and helps with peeling. It is best not to stack the eggs in the air fryer. Stacking can lead to uneven cooking. Instead, place the eggs in a single layer. Make sure there is space around each egg so that hot air can circulate. This helps ensure even cooking and perfect results. If you want to cook more eggs, do it in batches for the best outcome. In this guide, we explored how to cook hard-boiled eggs in an air fryer. We covered essential and optional ingredients, the step-by-step cooking method, and tips for the best results. You learned about storage, variations, and common questions. Cooking hard-boiled eggs this way is simple and fun. With practice, you can always get your desired yolk texture. Enjoy experimenting with flavors and presentation. Air-fried eggs can elevate any meal or snack!](https://spoonfulsavory.com/wp-content/uploads/2025/07/c8c404ca-10ea-45a7-86a9-3a9afc316a01.webp)
Ready to make hard-boiled eggs like a pro? In this quick and easy recipe, I’ll show you how to prepare

Are you ready to spice up your next gathering? Buffalo Deviled Eggs are a zesty twist on a classic appetizer.
![- 6 large eggs - 2 tablespoons mayonnaise - 1 teaspoon Dijon mustard - 1 teaspoon apple cider vinegar - Salt and pepper to taste - 2 tablespoons finely chopped chives - 2 tablespoons finely chopped red onion - 1 tablespoon Everything Bagel seasoning - Optional: cucumber or tomato slices for garnish You can swap mayonnaise for Greek yogurt for a lighter twist. Use yellow mustard if you don’t have Dijon. Apple cider vinegar can be replaced with lemon juice for a zesty kick. For a milder taste, try green onions instead of red onion. If you can't find Everything Bagel seasoning, make your own with sesame seeds, poppy seeds, garlic powder, and onion powder. Fresh eggs are key for great deviled eggs. Look for eggs with clean, uncracked shells. Check the sell-by date on the carton. If you can, buy local eggs or those labeled organic. You can also do the water test: place an egg in a bowl of water. Fresh eggs sink. If it floats, it's best to toss it. Fresh eggs will give you better flavor and texture in your Everything Bagel Deviled Eggs. To make perfect hard-boiled eggs, start by boiling water in a pot. Add the eggs gently. Cook them for about 10-12 minutes. This time gives you a firm yolk. After cooking, cool the eggs quickly to make peeling easy. Place them in an ice bath for 5-10 minutes. This stops the cooking and cools them down fast. Once the eggs cool, tap them on a hard surface to crack the shell. Peel the eggs under running water for ease. Cut each egg in half, lengthwise. Gently remove the yolks and place them in a bowl. Add mayonnaise, Dijon mustard, apple cider vinegar, salt, and pepper. Mash and mix until smooth. Stir in chopped chives, red onion, and half of the Everything Bagel seasoning for flavor. Now, it’s time to fill the egg whites! Use a spoon or a piping bag to put the yolk mixture into each egg white half. Make them look nice and full. After filling, sprinkle the rest of the Everything Bagel seasoning on top. This adds extra taste and visual appeal. If you want, garnish with cucumber or tomato slices for freshness. Enjoy your Everything Bagel Deviled Eggs! For the complete recipe, check out [Full Recipe]. To make these eggs shine, I suggest using homemade mayo. It tastes fresh and creamy. Store-bought mayo can work, but it may lack depth. If you have time, whip up a quick batch. Just blend egg yolks, oil, and a dash of lemon juice. This will add a special touch. Make your deviled eggs stand out! Arrange them on a colorful plate. Add fresh veggies around them for a pop of color. You can sprinkle extra Everything Bagel seasoning on top for flair. Use chopped chives to add a nice green touch. Garnishing with cucumber or tomato slices can give a fresh bite. Avoid overcooking your eggs. This can lead to a green ring around the yolk. Chill the eggs in ice water right after boiling. This makes peeling easier and helps keep them tender. Don’t rush mixing the filling. A smooth texture is key for a great taste. Lastly, be careful with seasoning. Taste as you go to ensure the right flavor balance. {{image_4}} You can easily change the taste of your Everything Bagel Deviled Eggs. Add spices like smoked paprika or cayenne for a kick. Fresh herbs, like dill or parsley, can brighten the flavor. Experiment with different mustards too. Each change can make your dish special. For a vegetarian version, skip the eggs and try chickpeas instead. Mash canned chickpeas with the same mix of mayo and spices. For a vegan option, use vegan mayo and chickpeas. This keeps the creamy texture while making it plant-based. Everyone can enjoy this dish. Pair your deviled eggs with fresh veggies like carrots or celery. They taste great with a light salad too. Enjoy them with drinks like sparkling water or a light beer. These pairings make your dish even more fun. You can find the Full Recipe to try these ideas! To keep your Everything Bagel Deviled Eggs fresh, store them in the fridge. Place them in an airtight container. This helps prevent them from drying out or absorbing other smells. Try to eat them within two days for the best taste. If you have extra filling, store it separately. This way, you can keep the egg whites intact until you're ready to serve. Can you freeze deviled eggs? I don't recommend it. Freezing changes the texture of the eggs. The filling can become watery and grainy after thawing. If you must freeze, try to freeze only the egg yolk mixture. When you are ready to use it, thaw it in the fridge overnight and mix it again before filling the egg whites. Deviled eggs last about 2 to 3 days in the fridge. After that, they may lose flavor and freshness. Always check for any off smell or changes in color before eating. For the best taste, enjoy them within the first couple of days. Everything Bagel seasoning is a mix of flavors. It has sesame seeds, poppy seeds, dried garlic, dried onion, and salt. This blend gives your dish a savory and crunchy taste. You can find it at stores or make your own. Just mix those ingredients in a bowl. It adds great depth to deviled eggs! You can make deviled eggs up to two days ahead of time. Just store them in the fridge. Keep them covered with plastic wrap or in an airtight container. This helps keep them fresh. However, it's best to fill them right before serving. This keeps the egg whites from getting soggy. Yes, you can use other mustards! Yellow mustard gives a milder taste. Spicy brown mustard adds a kick. Honey mustard can make it sweeter. Choose what you like best. Each type of mustard brings its own flavor. Experiment and find your favorite mix! Everything Bagel Deviled Eggs offer a fun twist on a classic snack. You learned how to choose fresh eggs, boil them, and mix a tasty filling. Simple tips helped you avoid common mistakes and enhance flavor. You can explore variations to suit your taste or needs. Remember, these eggs chill well and make great leftovers. Whether for a party or a snack, they impress every time. Enjoy your new skills and share this delicious recipe!](https://spoonfulsavory.com/wp-content/uploads/2025/07/159fb021-cd6b-4ac2-b69f-24cf94d8535d.webp)
Looking for a tasty twist on a classic? These Everything Bagel Deviled Eggs are both flavorful and super simple to
![- 1 cup semi-sweet chocolate chips - 1 cup milk chocolate chips - ½ cup unsweetened cocoa powder - ½ cup caramel sauce, divided - 1 cup mini marshmallows - 1 teaspoon flaky sea salt - Optional: ½ teaspoon pure vanilla extract - Optional: Additional caramel sauce for drizzling Gather these ingredients to make your salted caramel hot chocolate bombs. You will need two types of chocolate chips for a rich taste. The semi-sweet and milk chocolate chips blend well together. The cocoa powder adds depth, while the caramel sauce gives that sweet twist. Mini marshmallows create a fun texture. The flaky sea salt balances the sweetness, adding a delicious touch. If you want more flavor, vanilla extract can enhance the taste. You can even drizzle more caramel on top for added sweetness. With this list ready, you can dive into creating these irresistible treats. Don’t forget to check the [Full Recipe] for detailed steps. Enjoy the process of making these delightful bombs! - Combine 1 cup of semi-sweet chocolate chips and 1 cup of milk chocolate chips in a microwave-safe bowl. - Microwave in 30-second intervals, stirring after each until smooth. - Use a spoon or brush to coat the inside of silicone sphere molds with the melted chocolate. - Make sure to cover all surfaces evenly. - Place the coated molds in the freezer for about 10 minutes to let the chocolate harden. - In a bowl, mix ½ cup of unsweetened cocoa powder, ½ cup of caramel sauce, 1 cup of mini marshmallows, and 1 teaspoon of flaky sea salt. - If you like, add ½ teaspoon of pure vanilla extract for extra flavor. - Stir well until everything is combined. - Once the chocolate shells are firm, flex the molds to gently remove them. - Fill half of the shells with your cocoa and marshmallow mix. - Drizzle more caramel sauce on top for added sweetness. - Heat a non-stick skillet over low heat. - Place an empty chocolate shell on the skillet for a few seconds to soften the edge. - Quickly press this shell onto a filled half to seal the bomb. - Repeat this until all bombs are sealed. - Drizzle extra caramel over the tops of the bombs and sprinkle a bit more flaky sea salt for garnish. - You can package them in clear bags tied with ribbons or serve them right away. To enjoy, drop a hot chocolate bomb into a mug and pour hot milk over it. Watch as it bursts open to reveal a delicious mix of cocoa, marshmallows, and caramel. For more details, check the Full Recipe. To get a thick and even layer of chocolate, use a spoon or brush. Start with a generous amount and spread it evenly in the mold. Make sure the layer is not too thin, or it may break. Chill the molds for about 10 minutes to let the chocolate harden. This step is crucial. If you skip it, your bombs might lose shape when you remove them. You can mix up the fillings for fun. Try adding peppermint extract for a minty kick. You can also use different chocolates like dark or white. Seasonal spices like cinnamon or nutmeg add warmth in the fall. Get creative! Each bomb can have a unique flavor that fits your mood or the season. To keep your hot chocolate bombs fresh, store them in a cool, dry place. The ideal temperature is below 75°F. Use an airtight container to keep out moisture. For longer storage, you can freeze them. Just make sure to wrap them well to avoid freezer burn. When you want one, let it thaw before using. This keeps the taste and texture just right. {{image_4}} You can easily change the taste of your salted caramel hot chocolate bombs. One fun way is to add peppermint extract. Just a few drops give a fresh, minty twist. This works great around the holidays. Another option is to use dark chocolate instead of semi-sweet. Dark chocolate gives a richer flavor and pairs well with the sweet caramel. The choice is yours, and both options are delicious. Want to make it vegan-friendly? You can swap the chocolate chips for dairy-free ones. Use almond milk instead of regular milk. This way, everyone can enjoy these tasty treats. For gluten-free options, make sure your cocoa powder and caramel sauce are gluten-free. Most brands are, but it’s always best to check the label. Making these adjustments lets everyone indulge without worry. Toppings can add fun and flair to your hot chocolate bombs. You can sprinkle crushed candies or colorful sprinkles on top. This adds a pop of color and crunch. Consider drizzling options beyond caramel. Try white chocolate or dark chocolate for a nice touch. These extra steps make your bombs even more special. For the full recipe, check out the Salted Caramel Hot Chocolate Bombs section. Enjoy customizing your treats! To keep your salted caramel hot chocolate bombs fresh, store them in a cool place. A pantry or cupboard away from heat works well. Make sure they are in an airtight container. This keeps moisture and air out, which can ruin their taste and fun texture. For best results, use a glass jar or a plastic container with a tight lid. Avoid metal containers, as they can trap heat and moisture. You want to keep your treats safe and ready for cozy moments. For extended freshness, you can freeze your hot chocolate bombs. Place them in a single layer on a baking tray. After they freeze solid, transfer them to a freezer bag. Make sure to label the bag with the date. They can last up to three months in the freezer. When you're ready to enjoy one, take it out and let it thaw at room temperature for about 30 minutes. This helps keep the chocolate smooth and tasty. Once thawed, it’s time to make your hot chocolate experience magical! You can follow the Full Recipe to enjoy this delightful treat. Salted caramel hot chocolate bombs are fun treats that explode with flavor. They are made from chocolate spheres filled with cocoa, marshmallows, and caramel. When you pour hot milk over them, they melt and reveal their sweet contents. Each bomb combines rich chocolate, creamy caramel, and a hint of salt. This mix creates a perfect balance of sweet and salty. Yes, you can find pre-made salted caramel hot chocolate bombs at many stores. Look for brands that use high-quality chocolate and real ingredients. Check local bakeries, gourmet shops, or online retailers. Always read reviews to find the best options. This way, you can enjoy these treats without the hassle of making them at home. Hot chocolate bombs can last for about two to four weeks when stored properly. Keep them in a cool, dry place in an airtight container. Avoid moisture, as it can ruin the chocolate. For longer storage, you can freeze them. Just remember to wrap them well to keep them fresh. Yes, you can use different types of milk when serving hot chocolate bombs. Full-fat milk gives a rich taste, while almond or oat milk offers a lighter option. You can even use coconut milk for a fun twist. Experiment with what you like best, and enjoy your unique flavor combinations. Using a hot chocolate bomb is simple and fun. Start by placing the bomb in a mug. Then, heat your milk until it’s steaming. Pour the hot milk over the bomb and watch as it bursts open. Stir the mixture well to combine the chocolate, cocoa, and marshmallows. Enjoy your delicious drink! This blog post shares how to make delicious Salted Caramel Hot Chocolate Bombs. We covered all the steps, from melting chocolate to serving. You can even customize your bombs with different flavors or toppings. Remember, proper storage will keep them fresh. These treats are fun to make and enjoy. Whether for yourself or as a gift, they are a sweet delight. Try making them and impress your friends and family with your tasty creation. You'll love how easy they are to prepare!](https://spoonfulsavory.com/wp-content/uploads/2025/07/434ef6e6-7242-44a6-9363-0762dc4f49f3.webp)
Warm your heart and delight your taste buds with Salted Caramel Hot Chocolate Bombs! These tasty treats combine sweet and

Get ready to impress your friends and family with these Peppermint Mocha Brownies! This irresistible holiday treat combines rich chocolate,
