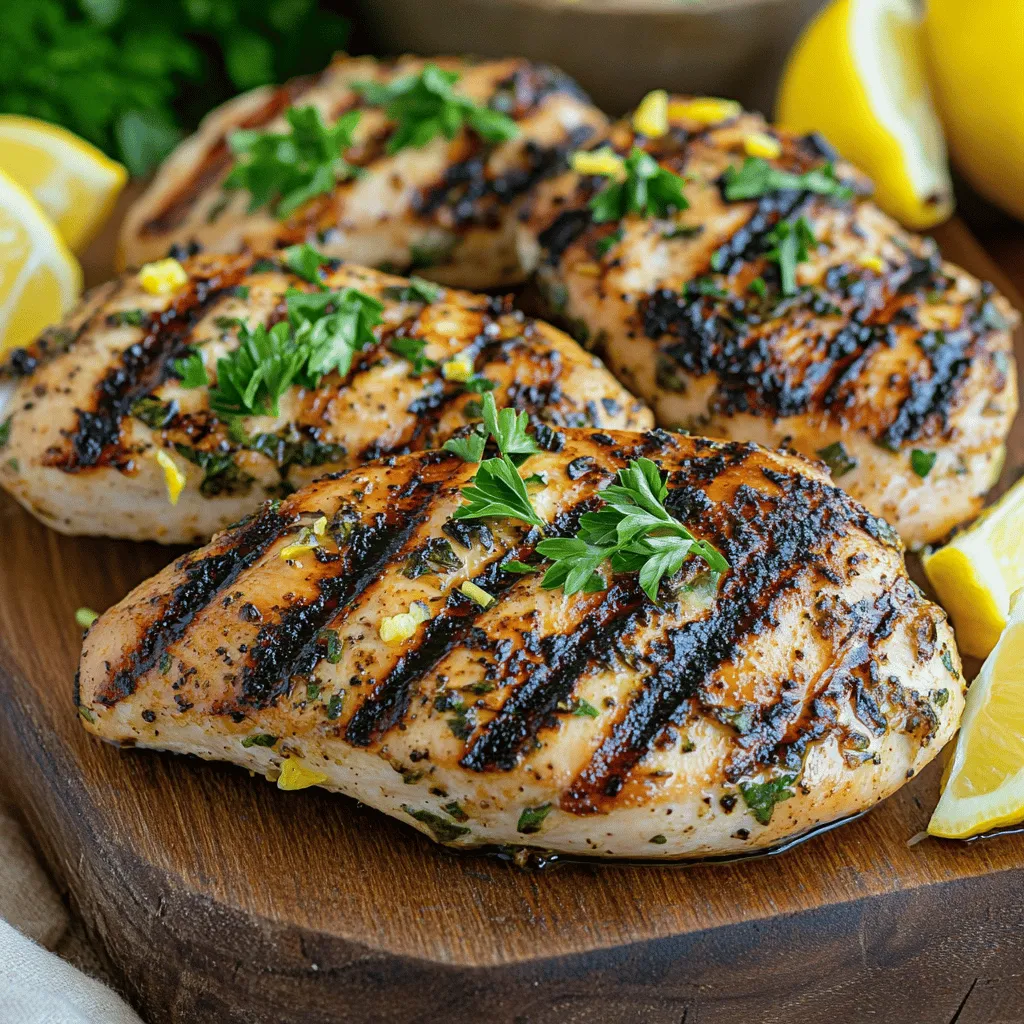
Lemon Garlic Herb Grilled Chicken Flavorful and Simple
If you’re looking for a quick, tasty dinner, you’ve come to the right place! This Lemon Garlic Herb Grilled Chicken
If you’re looking for a quick, tasty dinner, you’ve come to the right place! This Lemon Garlic Herb Grilled Chicken
![To make savory stuffed zucchini boats, you need simple ingredients. Here’s what you’ll need: - 4 medium zucchini - 1 cup cooked quinoa - 1 cup cherry tomatoes, halved - 1 cup cooked black beans, drained and rinsed - 1/2 cup corn kernels (can be frozen or fresh) - 1 teaspoon ground cumin - 1 teaspoon smoked paprika - 1/2 teaspoon garlic powder - 1/2 teaspoon onion powder - Salt and pepper, to taste - 1 cup shredded cheese (cheddar or mozzarella preferred) - Fresh cilantro or parsley, chopped, for garnish These ingredients work together to create a tasty dish that is both filling and nutritious. You can easily swap some ingredients to fit your taste or what you have at home. Here are some ideas: - Instead of quinoa, you can use cooked rice or couscous. - If you don’t have black beans, kidney beans or chickpeas work well too. - Swap cherry tomatoes for diced bell peppers for a different flavor. - Use any cheese you like, such as feta or goat cheese. - Add chopped spinach or kale to boost the greens in your meal. These swaps keep your dish fresh and exciting each time you make it. Savory stuffed zucchini boats are not just tasty; they are also healthy. Here is a quick look at the key nutrients: - Calories: About 300 per serving - Protein: 15 grams from quinoa and beans - Fiber: 10 grams from zucchini and beans - Fat: 10 grams from cheese and quinoa - Vitamins: Rich in vitamin C from tomatoes and zucchini Eating these boats gives you a good mix of nutrients. They are filling without being heavy, making them a great choice for lunch or dinner. For the full recipe, check out the section above. Start by preheating your oven to 375°F (190°C). This step warms your oven and helps cook the zucchini evenly. Next, take each zucchini and slice it in half lengthwise. Use a spoon to scoop out the seeds and flesh. This creates a hollow space for the filling. Be careful not to break the skin; it must hold the filling. In a large bowl, mix the cooked quinoa, halved cherry tomatoes, black beans, and corn. Add the spices: cumin, smoked paprika, garlic powder, onion powder, salt, and pepper. Stir the mixture well until everything is combined. Now, take a spoon or spatula to fill each zucchini half. Pack the filling gently but firmly. Make sure to fill each boat to the top for a good bite. Line a baking sheet with parchment paper. This makes cleanup easy. Place the stuffed zucchini boats on the sheet, spaced apart. Sprinkle shredded cheese over each filled zucchini. The cheese adds flavor and a nice crust. Bake in the oven for 25-30 minutes. The zucchinis should become tender, and the cheese should melt and bubble. After baking, let the boats cool for a few minutes. Garnish them with chopped cilantro or parsley before serving. This adds a lovely touch and fresh taste. For the full instructions, check the [Full Recipe]. When choosing zucchini, look for ones that are firm and shiny. Choose medium-sized zucchinis as they have the best flavor. Avoid large zucchinis; they tend to be watery and less tasty. Check for any blemishes or soft spots. Freshness matters, so buy them close to your cooking day. To boost flavor, try adding fresh herbs like basil or thyme. You can mix in some olives or sun-dried tomatoes for a tasty twist. A squeeze of lemon juice brightens the dish. If you like heat, add a pinch of red pepper flakes. Experiment with different spices like oregano or Italian seasoning for more depth. One common mistake is overcooking the zucchini. They should be tender but not mushy. Also, don’t skip the cheese topping; it adds flavor and texture. Make sure to pack the filling well, but don’t overflow the zucchini. Lastly, remember to adjust seasoning to your taste. Following these tips will make your stuffed zucchini boats shine. To see the full recipe, check out Savory Stuffed Zucchini Boats. {{image_4}} You can add meat to your stuffed zucchini boats for extra flavor. Ground turkey or chicken works well. Just cook the meat in a pan before mixing it with your stuffing. If you like beef, use ground beef or sausage. Make sure to season the meat with spices like cumin and paprika. This adds depth to your dish. Mixing in some cooked bacon bits can also give a nice smoky touch. For a twist, try using shredded rotisserie chicken. It saves time and adds a great taste. If you prefer a meatless option, there are many tasty choices. You can use lentils or chickpeas instead of meat. These ingredients give a nice texture and protein boost. Try adding diced bell peppers or mushrooms for extra veggies. For a vegan option, skip the cheese or use a dairy-free version. Nutritional yeast can add a cheesy flavor. You can also mix in some spinach or kale for added nutrients. This keeps your dish healthy and colorful. Cheese makes stuffed zucchini boats even better. While cheddar and mozzarella are popular, you can experiment with others. Try feta for a tangy flavor or goat cheese for creaminess. Parmesan adds a nice salty touch when sprinkled on top. For something unique, use blue cheese or pepper jack for a kick. Mixing different cheeses can create a rich topping. Remember to adjust the amount based on your taste. The right cheese can elevate your dish to a whole new level. For the full recipe, check out the details above. After making these savory stuffed zucchini boats, you may have some leftovers. To keep them fresh, let the boats cool to room temperature. Then, place them in an airtight container. Store them in the fridge for up to three days. This way, you can enjoy them later without losing flavor. When you want to eat your leftovers, reheating is simple. Preheat your oven to 350°F (175°C). Place the stuffed zucchini boats on a baking sheet. Cover them with foil to keep the moisture in. Heat for about 15-20 minutes, or until they are warm throughout. You can also use a microwave. Just place a boat on a microwave-safe plate and heat for about 1-2 minutes. If you want to save some for later, freezing is a great option. First, let the stuffed zucchini boats cool completely. Then, wrap each boat in plastic wrap or foil. Place them in a freezer-safe bag or container. Make sure to remove as much air as possible to avoid freezer burn. They can last in the freezer for up to three months. When you’re ready to eat, thaw them in the fridge overnight. After that, follow the reheating instructions. Enjoy your delicious meal at a later date! You can easily make Savory Stuffed Zucchini Boats gluten-free. The main ingredient to watch is quinoa, which is naturally gluten-free. Ensure you use gluten-free black beans and check the labels for any added ingredients. Avoid using regular breadcrumbs in your stuffing. Instead, you can use gluten-free breadcrumbs or simply skip them altogether. This keeps the dish light and fresh while still being filling. Yes, you can prepare stuffed zucchini in advance. After filling the zucchini, cover them tightly with plastic wrap or foil. Store them in the fridge for up to 24 hours before baking. When ready to cook, simply remove the cover and bake as instructed in the Full Recipe. This makes it a great option for meal prep or entertaining. Many sauces pair well with stuffed zucchini boats. A simple homemade tomato sauce adds a nice touch. You could also try a tangy yogurt sauce for a creamy contrast. Pesto or chimichurri adds a burst of flavor too. Drizzling a balsamic glaze can enhance the dish’s sweetness. Feel free to experiment with different sauces to find your favorite match! Savory stuffed zucchini boats offer a tasty and healthy meal option. We explored main ingredients, optional substitutions, and their nutritional values. I shared easy steps for prep, mixing, stuffing, and baking. You learned tips on selecting zucchini and flavor enhancement. We discussed meat, vegetarian, and vegan stuffing options too. Proper storage and reheating tips ensure your leftovers stay fresh. Remember, experimenting with flavors can make your dish unique. Enjoy your cooking!](https://spoonfulsavory.com/wp-content/uploads/2025/05/b1f68fe8-f931-4888-bfa1-910a811fbf2c.webp)
Looking for a tasty and easy meal that packs a punch? Savory Stuffed Zucchini Boats are just the answer! You’ll
![To make a great Spaghetti Aglio e Olio, you need these simple items: - 400g spaghetti - 6 cloves garlic, thinly sliced - 1/2 cup high-quality extra-virgin olive oil - 1/4 teaspoon red pepper flakes (or to taste) - Sea salt, to taste - 1/4 cup fresh parsley, finely chopped - Zest of 1 lemon - 1/4 cup grated Parmesan cheese (optional) - A handful of toasted pine nuts for garnish (optional) You will need a few tools to prepare this dish: - Large pot for boiling pasta - Skillet for cooking the garlic and oil - Colander for draining the spaghetti - Mixing spoon for tossing ingredients - Zester for lemon zest (optional) - Serving bowls for plating Using the best ingredients can make a big difference. Here are my tips: - Choose fresh garlic. Look for firm cloves with no sprouting. - Use high-quality extra-virgin olive oil. It should smell fruity and fresh. - Pick fresh parsley. It should be bright green and crisp. - For the best flavor, use fresh lemon. Look for ones that are firm and heavy. - If using Parmesan, select a block instead of pre-grated for better taste. These tips will help you create a flavorful and simple dish that impresses! If you want to see the full recipe, check out the [Full Recipe]. Bring a large pot of salted water to a boil. Add 400g of spaghetti. Cook it until it is al dente, following the package directions. Before you drain the pasta, save 1 cup of the starchy water. Drain the spaghetti and place it in a large bowl. In a large skillet, heat 1/2 cup of extra-virgin olive oil over medium heat. Once hot, add 6 cloves of sliced garlic and 1/4 teaspoon of red pepper flakes. Stir the mix gently for about 3 to 4 minutes. You want the garlic to turn light golden brown. Be careful not to burn it, as it can taste bitter. Turn the heat to low. Add the drained spaghetti to the skillet with the garlic oil. Toss the pasta well to coat every strand in the oil. Gradually add the saved pasta water, one tablespoon at a time, while tossing. This helps create a creamy sauce. Season with sea salt to taste. Mix in 1/4 cup of chopped parsley and the zest of 1 lemon. If you like, sprinkle 1/4 cup of grated Parmesan cheese on top. Toss again to mix everything well. Serve the spaghetti hot, garnished with extra parsley or pine nuts if desired. For the full details, check the Full Recipe. Many home cooks rush the garlic. If you cook it too fast, it burns. A burnt garlic will ruin the dish. Always cook it slowly until it’s golden. Another mistake is not reserving pasta water. This water adds creaminess to your sauce. Forgetting salt in the pasta water can also hurt flavor. Always taste your pasta as it cooks. You can boost flavor with simple seasonings. Fresh herbs like basil or oregano add depth. A squeeze of lemon juice brightens the dish. If you like spice, adjust the red pepper flakes. For a richer taste, add a bit of butter at the end. This will make your sauce even more silky. Perfect spaghetti is all about timing. Follow the package directions but check it a minute early. Al dente means the pasta should be firm but not hard. Toss the pasta in the skillet right after draining. This helps it absorb the flavors. Don’t forget to add that starchy pasta water gradually. It’s the secret to a smooth sauce. For more tips, check the Full Recipe. {{image_4}} Classic Spaghetti Aglio e Olio is a simple dish. It uses just a few key ingredients. You start with spaghetti, garlic, olive oil, and red pepper flakes. This dish shines because of its bold flavors. The garlic must be sliced thinly, and the olive oil should be high quality. Many people enjoy it for its quick prep time. It is a great meal for busy nights. If you want to make this dish vegetarian, you can easily do so. Just skip the cheese or use a plant-based option. Vegan cheese works well, too. For a fresh touch, add some veggies. Spinach or cherry tomatoes brighten the dish. You can also use mushrooms for a hearty texture. These options keep the meal light but full of flavor. Want to get creative? You can add seafood to your pasta. Shrimp or scallops pair wonderfully with garlic and oil. Simply sauté them in the garlic oil before adding the pasta. For a veggie boost, consider broccoli or asparagus. These add color and nutrition. You can also toss in olives or capers for a briny taste. The options are endless! To see all these ideas in one place, check out the Full Recipe. After enjoying spaghetti aglio e olio, you might have some left. It’s easy to store. First, let the pasta cool to room temperature. Then, place it in an airtight container. You can keep it in the fridge for up to three days. This way, the flavors stay fresh. To reheat, you have a few options. You can use the microwave, which is quick. Just add a splash of water to keep it moist. Heat in short bursts, stirring in between. If you prefer the stove, put the pasta in a skillet. Add a little olive oil and heat over low. Stir until warm. This method keeps the pasta tasty. If you want to save it for later, you can freeze it. Use a freezer-safe container, leaving some space for expansion. It can stay frozen for up to three months. To use later, thaw it overnight in the fridge. Then reheat as mentioned before. This keeps the flavors intact and ready for you to enjoy again. Spaghetti Aglio e Olio is a simple Italian dish. It comes from Naples. This dish uses just a few ingredients: spaghetti, garlic, olive oil, and red pepper flakes. The flavors are bold yet clean. You can feel the warmth from the garlic and the heat from the red pepper. It's perfect for a quick dinner or a late-night snack. Yes, you can easily make this recipe gluten-free. Just swap regular spaghetti for gluten-free pasta. Many brands offer great options that taste delicious. Cook the pasta just like you would regular spaghetti. Follow the same steps in the recipe. You will still enjoy the same rich flavor without gluten. To make Spaghetti Aglio e Olio special, you can add a few touches. Consider serving it on a nice plate with a sprig of parsley on top. A squeeze of fresh lemon juice adds brightness. You might also sprinkle some toasted pine nuts for added crunch. If you want to impress, pair it with a glass of white wine. This elevates the meal and gives your guests a delightful experience. For the full recipe, check out the detailed instructions. This blog post gives you everything you need for Spaghetti Aglio e Olio. We covered key ingredients, cooking tools, and tips for choosing the best items. You learned step-by-step instructions and how to mix flavors the right way. Common mistakes were addressed, along with ways to enhance taste and achieve perfect pasta. We also shared variations, storage tips, and answers to common questions. With this guide, you’re ready to make a tasty dish that impresses. Enjoy cooking and sharing your delicious Spaghetti Aglio e Olio!](https://spoonfulsavory.com/wp-content/uploads/2025/05/bf31048d-3b35-406e-9e49-b4d6ef078036.webp)
Are you ready to master a classic Italian dish? Spaghetti Aglio e Olio is not only easy to make but
![To make honey mustard chicken thighs, gather these simple ingredients: - 4 bone-in, skin-on chicken thighs - 1/4 cup Dijon mustard - 1/4 cup honey - 2 tablespoons olive oil - 2 tablespoons apple cider vinegar - 3 cloves garlic, minced - 1 teaspoon dried thyme - 1 teaspoon smoked paprika - Salt and freshly ground black pepper to taste - Fresh parsley, chopped (for garnish) When choosing chicken thighs, look for these key aspects: - Freshness: Check the sell-by date. Select thighs that are bright pink and moist. - Fat content: Look for thighs with a good amount of fat. This helps keep them juicy. - Size: Pick thighs that are uniform in size for even cooking. - Bone-in and skin-on: These cuts will give you the best flavor and moisture. If you need to make swaps, here are some ideas: - Honey: Use maple syrup for a different sweet taste. - Dijon mustard: Yellow mustard works too, but it may taste milder. - Apple cider vinegar: White wine vinegar can be a good substitute. - Garlic: Garlic powder can replace fresh garlic in a pinch. - Herbs: Use oregano or rosemary if you don’t have thyme. These tips and alternatives help ensure you have a great meal, no matter what! For a full recipe, check the [Full Recipe] section. To start, gather your chicken thighs and pat them dry with paper towels. This helps the skin get crispy later. Next, season both sides of the chicken with salt and pepper. Then, mix the marinade. In a bowl, combine Dijon mustard, honey, olive oil, apple cider vinegar, minced garlic, dried thyme, and smoked paprika. Whisk until smooth. Place the chicken in a large bowl or a ziplock bag. Pour the marinade over it, making sure each piece is well coated. For best flavor, let it marinate for at least 30 minutes. If you have time, refrigerate it overnight. This step makes a big difference in taste. Now, heat an oven-safe skillet over medium-high heat. Once hot, add the marinated chicken thighs skin-side down. Sear them for about 5-7 minutes. Look for a golden brown color and crispiness on the skin. This part is key to getting that nice texture. After searing, carefully flip the thighs over. Pour any remaining marinade over the chicken. This adds even more flavor as it cooks in the oven. After searing, it is time to bake. Transfer the skillet to your preheated oven set at 400°F (200°C). Bake the chicken for about 25-30 minutes. Make sure to check the internal temperature; it should reach 165°F (75°C). Once done, remove the skillet from the oven. Let the chicken rest for about 5 minutes. This allows the juices to settle back into the meat, keeping it juicy. Finally, sprinkle freshly chopped parsley over the chicken for a burst of color. For more details, check the Full Recipe. To make the best honey mustard sauce, focus on balance. You need the right mix of sweetness and tang. Start with equal parts Dijon mustard and honey. This combination gives you a strong base. Next, add olive oil for richness. Apple cider vinegar provides acidity, which brightens the sauce. Don't forget the garlic; it adds depth. For extra flavor, include dried thyme and smoked paprika. Mix well until smooth. Taste and adjust if needed. If you want a kick, add a pinch of cayenne pepper. This sauce works wonders on chicken, but it’s also great for dipping veggies or drizzling on salads. One common mistake is not patting the chicken dry. Dry skin cooks better and gets crispy. Season the chicken well on both sides. Forgetting to do this can lead to bland meat. Another error is overcrowding the pan. This lowers the heat and steams the chicken instead of searing it. Always leave space around each piece. Lastly, don’t skip the resting time after cooking. This step is key for juicy chicken, as it allows the juices to settle. Using the right tools makes cooking easier and more enjoyable. Here are some must-haves: - A sharp chef's knife for cutting and prepping. - A sturdy cutting board for safety and convenience. - A large mixing bowl for marinating the chicken. - An oven-safe skillet for searing and baking. I love using cast iron for a nice sear. - A meat thermometer to check for doneness accurately. These tools will help you achieve perfect honey mustard chicken thighs every time. For the complete recipe, check out the Full Recipe section. {{image_4}} You can change the flavor of the honey mustard marinade easily. Try using maple syrup instead of honey for a different sweetness. Soy sauce can add a nice salty kick. You can also mix in some fresh herbs, like rosemary or basil, to give it a fresh touch. Experimenting with different ingredients keeps the meal exciting. Pair your honey mustard chicken thighs with sides that complement the rich flavors. Roasted vegetables like carrots and Brussels sprouts work well. A fresh green salad with a light vinaigrette balances the meal. You can also serve it with fluffy rice or creamy mashed potatoes for a filling option. These sides enhance the dish and add color to your plate. If you like spice, add cayenne pepper or chili flakes to the marinade. It gives your chicken a nice kick. For a smoky flavor, try adding chipotle in adobo sauce. You can also mix in a bit of curry powder for a unique twist. These changes let you create a honey mustard chicken that suits your taste buds. You can store leftover honey mustard chicken thighs in an airtight container. Let the chicken cool to room temperature first. Then, place it in the fridge. Use the chicken within three to four days for best taste. If you do not eat it all, consider freezing some for later. To reheat, place the chicken thighs in a baking dish. Add a splash of chicken broth or water to keep them moist. Cover the dish with foil to trap steam. Heat in the oven at 350°F (175°C) for about 20 minutes. This method keeps the chicken juicy and flavorful. You can freeze honey mustard chicken thighs for up to three months. Wrap each thigh in plastic wrap, then place them in a freezer bag. When ready to eat, thaw the thighs in the fridge overnight. Reheat them as mentioned above for the best results. For the full recipe, check the section above. If you want a different sweetener, you can use maple syrup or agave nectar. Both will add a nice sweetness to the dish. You can also use brown sugar mixed with a bit of water for a similar effect. Each option brings its own unique flavor, so feel free to experiment! Yes, you can use boneless chicken thighs! They will cook faster than bone-in thighs. Just keep an eye on the cooking time. You want them to reach an internal temperature of 165°F (75°C). Boneless thighs will stay juicy, especially with the honey mustard marinade! For the best flavor, marinate the chicken for at least 30 minutes. You can also refrigerate it overnight for a deeper taste. The longer it sits, the more the flavors blend into the chicken. Just remember to keep it covered in the fridge! I love serving honey mustard chicken thighs with sautéed greens or roasted veggies. You can also add a side of fluffy rice or creamy mashed potatoes. Drizzle some pan juices over the chicken for added flavor. Don’t forget a slice of lemon on the side to brighten the meal! For more ideas, check out the Full Recipe. In this post, I shared how to cook tasty honey mustard chicken thighs. We explored the best ingredients, how to marinate, and tips for perfect searing. I also gave advice on storing leftovers and offered answers to common questions. Remember, the right ingredients and techniques make a big difference. Keep experimenting with flavors and enjoy delicious meals!](https://spoonfulsavory.com/wp-content/uploads/2025/05/558b58ce-605f-4a5c-a8c2-65113196f4cb.webp)
Looking for a dish that’s juicy, flavorful, and easy to make? Honey Mustard Chicken Thighs are your answer! This recipe

If you’re looking for an easy and delicious breakfast, this Cinnamon Roll Casserole is for you! Imagine warm cinnamon rolls,
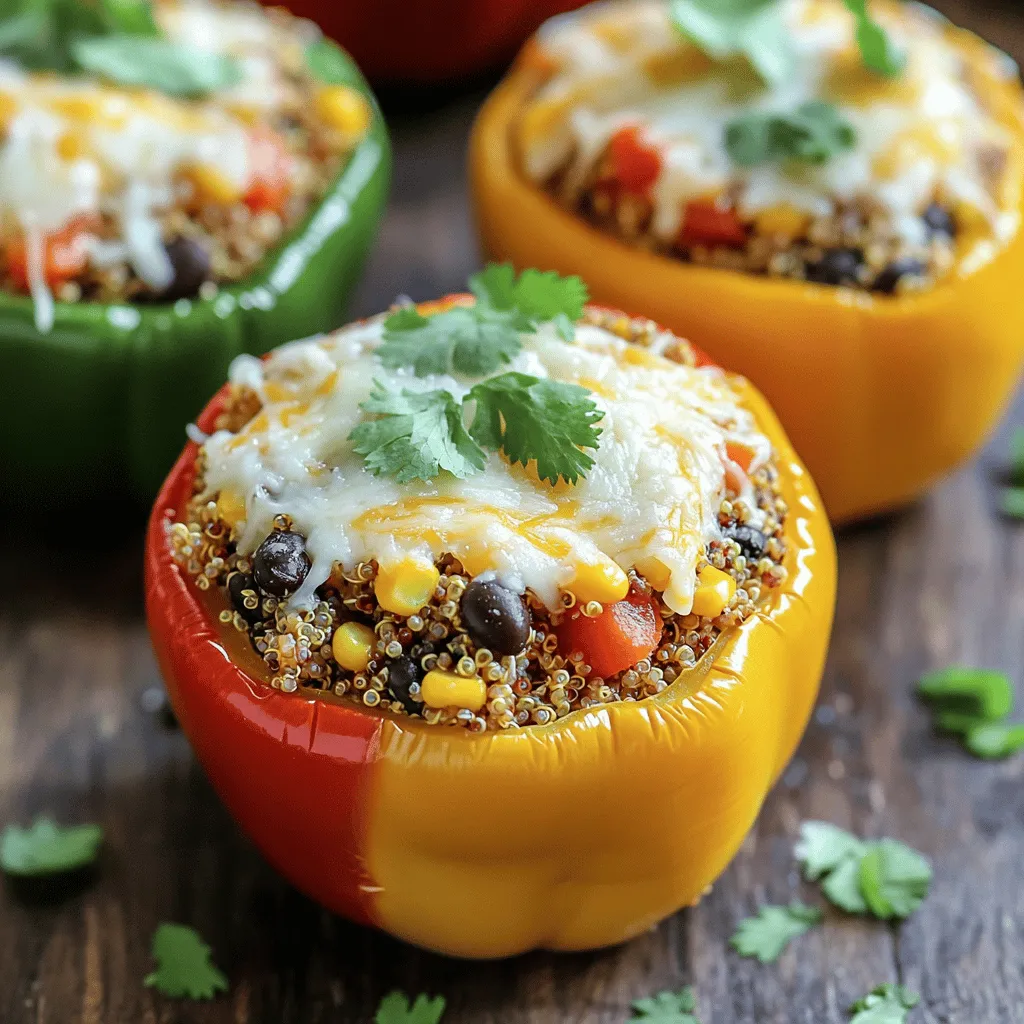
Stuffed bell peppers are not just tasty; they’re healthy too! Today, I’ll show you how to make stuffed bell peppers
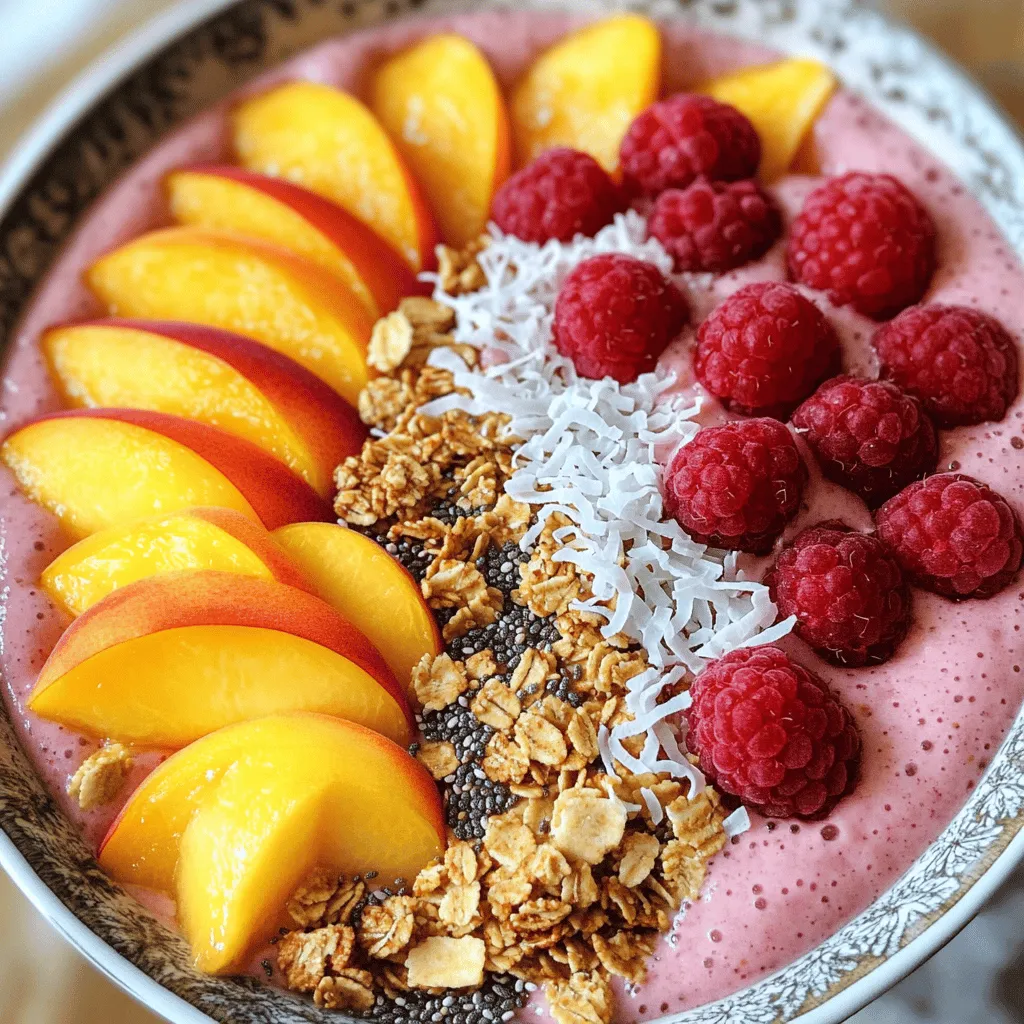
Are you ready to start your day with a refreshing twist? Our Peach Melba Smoothie Bowl is not just delicious—it’s
![To make the best chocolate avocado mousse, gather these simple ingredients: - 2 ripe avocados, peeled and pitted - 1/2 cup unsweetened cocoa powder - 1/4 cup maple syrup (or honey) - 1/4 cup almond milk (or your preferred milk) - 1 teaspoon pure vanilla extract - 1/4 teaspoon fine sea salt - Optional toppings: shaved dark chocolate, fresh berries, or chopped nuts Using ripe avocados is key. They give the mousse a creamy texture. The cocoa powder brings rich chocolate flavor. Maple syrup or honey adds sweetness, balancing the flavors. Almond milk makes it smooth, but you can use any milk you like. Vanilla extract adds a lovely aroma, while the sea salt enhances all the flavors. For toppings, you can get creative! Shaved dark chocolate will make it more decadent. Fresh berries like raspberries or strawberries add a nice touch. Chopped nuts, like almonds or walnuts, give a delightful crunch. Each ingredient plays a role in making this treat special. For the full recipe, check the details above. - Step 1: Combine ingredients in a blender. Start with the ripe avocados, cocoa powder, maple syrup, almond milk, vanilla extract, and sea salt. This mix is key for a tasty mousse. - Step 2: Blend until smooth and creamy. Use high speed to ensure everything mixes well. Stop to scrape down the sides often so no lumps are left. - Step 3: Adjust sweetness if needed. Taste your mousse after blending. If you want it sweeter, add a bit more maple syrup. Blend again to mix. - Step 4: Transfer to serving bowls. Use a spatula to help pour the mousse into each bowl. This keeps it neat and easy. - Step 5: Chill in the refrigerator. Let the mousse sit for at least 30 minutes. This helps it set and the flavors mix. - Step 6: Garnish before serving. Top each bowl with your choice of shaved dark chocolate, fresh berries, or chopped nuts. This step adds a nice touch and makes it look fancy. For the full recipe, check the delightful chocolate avocado mousse section. Enjoy your treat! To make your chocolate avocado mousse truly amazing, follow these easy tips. - Use ripe avocados for the best texture. Ripe avocados are soft and creamy. They blend smoothly, giving your mousse a rich mouthfeel. Check for ripeness by gently squeezing the avocado. It should give a little but not be mushy. - Adjust cocoa and sweetener to your preference. Everyone has different tastes. If you like it more chocolatey, add more cocoa powder. If you prefer it sweeter, add extra maple syrup or honey. Taste as you go to find your ideal mix. - Chill longer for a thicker consistency. If you want a denser mousse, let it chill for an hour or more. This sets the mousse perfectly and helps the flavors blend. The longer it sits, the richer the taste becomes. Making this mousse is simple, and these tips will help you create a perfect treat. For the complete recipe, check out the [Full Recipe]. Enjoy your cooking! {{image_4}} You can get creative with this mousse by swapping a few ingredients. Here are some ideas: - Swap maple syrup for agave nectar. This change gives a different sweet taste. - Use coconut milk for a tropical twist. This adds a light and creamy flavor. - Add espresso powder for a mocha flavor. Just a little can give rich depth. The way you serve this mousse can make it even better. Try these ideas: - Pair with a fruit salad. Fresh fruits balance the rich chocolate nicely. - Serve alongside a scoop of vegan ice cream. This adds more creaminess and fun. Feel free to explore these variations and make this mousse your own! For the full recipe, check out the delightful chocolate avocado mousse. Store your chocolate avocado mousse in an airtight container in the fridge. This keeps it fresh and tasty. You should eat it within 3-5 days for the best flavor and texture. If you wait too long, it may turn brown and lose its creaminess. You can freeze chocolate avocado mousse for up to a month. To enjoy it later, simply thaw it in the fridge before serving. The mousse may change in texture a little, but it will still be delicious. Enjoy your delightful chocolate avocado mousse with these simple storage tips! Is Chocolate Avocado Mousse healthy? Yes! Chocolate avocado mousse is healthy. It uses avocados, which are rich in good fats. These fats help your heart. The mousse is also low in sugar. You can enjoy a tasty dessert that nourishes you. Can I make this recipe vegan? Absolutely! You can make this mousse vegan. Use maple syrup instead of honey. Almond milk is already a great choice. This way, you keep it plant-based and still delicious. How do I know if avocados are ripe enough? To check avocado ripeness, squeeze gently. It should feel soft but not mushy. You can also look for dark green skin. If the stem comes off easily, it’s ripe! What can I use instead of cocoa powder? If you don’t have cocoa powder, try carob powder. It has a similar taste but is sweeter. You can also use dark chocolate. Just melt it and mix it into the mousse. Can I use other types of sweeteners? Yes! You can swap maple syrup for agave nectar or coconut sugar. Each sweetener will change the flavor a bit. Adjust to your liking for the best taste. How to make chocolate avocado mousse without a blender? You can mash the avocados with a fork. Use a whisk to mix in the cocoa and sweetener. It takes more effort, but the mousse will still taste great. What are the health benefits of avocado in desserts? Avocados add healthy fats and fiber. They help you feel full longer. They also provide vitamins like E and K. This makes your dessert not only tasty but nutritious too. For the full recipe, check the delightful chocolate avocado mousse section! You now know how to make a yummy chocolate avocado mousse using simple ingredients. The steps are easy to follow, and I shared tips for the best texture. You can even customize it with fun variations or storage options. This treat is not just tasty; it's also healthy. Enjoy making it fresh or freeze for later. Get creative, have fun, and enjoy this delicious dessert!](https://spoonfulsavory.com/wp-content/uploads/2025/05/4465ce0d-d8d3-4287-99f4-eb95d512cf6f.webp)
If you love chocolate, you’re in for a treat! Chocolate avocado mousse combines rich flavor with creamy texture. It’s simple
![- Ripe avocados - Whole grain or sourdough bread - Cherry tomatoes - Feta cheese - Olive oil - Lemon juice - Garlic powder - Fresh herbs - Red pepper flakes - Additional toppings For this delicious avocado toast, you need simple yet vibrant ingredients. Start with ripe avocados that feel slightly soft when you press them. They are key for a creamy spread. Choose whole grain or sourdough bread for toasting. The crunch pairs well with the smooth avocado. Next, you will add halved cherry tomatoes. They burst with flavor and add color to your toast. Crumbled feta cheese brings a salty and creamy touch that complements the avocado perfectly. For seasoning, olive oil adds richness. Fresh lemon juice brightens the dish. Garlic powder gives it an extra kick. Fresh herbs like basil or parsley add freshness and color. If you like a bit of heat, consider red pepper flakes as an optional topping. You can also add other toppings like radishes or poached eggs for more fun flavors. For the full recipe, check the detailed instructions to bring this tasty dish to life! - First, take two ripe avocados. Cut them in half and remove the pits. - Scoop the green flesh into a medium bowl using a spoon. - Add one tablespoon of fresh lemon juice. This keeps the avocado bright green. - Sprinkle in some garlic powder and a pinch of salt and pepper. - Now, grab a fork and gently mash the avocado until it's creamy but still slightly chunky. This adds great texture. - Next, choose your method for toasting. You can use a toaster or a skillet. - If you use a skillet, heat it on medium. Place the bread slices in the pan. - Toast until they turn a lovely golden brown. This usually takes about 3-4 minutes. The crispy bread makes the toast special. - Now, it's time to build your toast. Spread a generous layer of the mashed avocado on each slice of toasted bread. - Make sure to cover the edges for full flavor. - Next, add the halved cherry tomatoes on top. You can use fresh or sautéed, depending on your taste. - Finally, sprinkle the crumbled feta cheese over the tomatoes. This adds a creamy, salty flavor that pairs perfectly. For the complete details, refer to the Full Recipe. To make great avocado toast, you need the right texture. Avoid over-mashing your avocados. You want some chunks for a nice bite. Use ripe avocados for the best flavor. They should yield slightly when pressed. If they feel hard, they are not ready. You can use fresh tomatoes or sauté them. Sautéing gives a warm flavor, while fresh tomatoes add brightness. For fresh tomatoes, choose vibrant, firm ones. Look for ones that smell sweet. This means they are ripe and full of flavor. How you plate your toast matters! Arrange the toasts on a nice board for a rustic look. You can also use white plates for a clean contrast. Add a small bowl of extra cherry tomatoes and a side salad. This creates a lovely brunch spread. For extra flair, cut the toast diagonally before serving. This makes it look even more inviting. Feel free to check out the Full Recipe for more details! {{image_4}} You can swap out the feta cheese for goat cheese or ricotta. Both add creaminess. If you like a stronger taste, try blue cheese. For bread, use rye or gluten-free bread. Each type gives a new taste and texture. Spices can really boost your avocado toast. Try adding smoked paprika for a warm flavor. A sprinkle of cumin also works well. You can add thin slices of cucumber or radish for crunch. These add freshness and color. For a vegan option, skip the feta and use nutritional yeast. It gives a cheesy flavor. You can also use hummus as a spread. For gluten-free, use gluten-free bread. This way, everyone can enjoy this tasty dish. Try the [Full Recipe] for all the details! To keep your avocado toast fresh, store it in an airtight container. This helps to keep moisture in and air out. However, it’s best to store the ingredients separately. Store the bread in one container and the avocado spread in another. This keeps the bread from getting soggy. When reheating, use a toaster or skillet. This method restores the crispiness of the bread. Avoid using a microwave, as it can make the toast chewy. If you have leftover toppings, sprinkle them on after reheating. This keeps flavors bright and fresh. Ripe avocados can last about 2-3 days in the fridge once cut. Keep them in a container with lemon juice to slow browning. Cherry tomatoes stay fresh for about a week when stored in a cool place. Feta cheese can last up to a month in the fridge, as long as it stays sealed in its brine. Check the date on the package for freshness. To make this dish, follow these steps: 1. Prepare the Avocado: Scoop out 2 ripe avocados into a bowl. Add 1 tablespoon lemon juice, 1 teaspoon garlic powder, and salt and pepper. Mash it until creamy but still chunky. 2. Toast the Bread: Take 4 slices of whole grain or sourdough bread. Toast them until golden brown. 3. Sauté the Tomatoes (optional): Heat 1 tablespoon olive oil in a pan. Add 1 cup halved cherry tomatoes. Cook for 2-3 minutes. Set aside. 4. Assemble the Toast: Spread the avocado mix on the toasted bread. 5. Add Toppings: Place the sautéed or fresh tomatoes on top. Sprinkle 1/2 cup crumbled feta cheese. 6. Garnish and Serve: Drizzle extra olive oil and add fresh herbs like basil or parsley. Cut the toast diagonally for a nice look. For the full details, check the Full Recipe. Yes, you can prepare it ahead of time. Here are some tips: - Avocado Mixture: Store the mashed avocado in an airtight container. Add lemon juice to help prevent browning. - Bread: Toast the bread just before serving for the best crunch. - Tomatoes and Feta: Keep the tomatoes and feta separate until you are ready to eat. This keeps everything fresh. Avocados are rich in healthy fats. They contain vitamins E, C, and B6. Feta cheese adds protein and calcium. Health benefits of key ingredients: - Avocados: High in fiber and good for heart health. - Feta Cheese: Contains probiotics that support gut health. - Tomatoes: Full of antioxidants that may lower the risk of disease. This dish is not only tasty but also good for you! This post guides you through making delicious avocado toast. We covered key ingredients like avocados, whole grain bread, cherry tomatoes, and feta cheese. You learned how to prepare, toast, and assemble your dish for the best flavors. I shared tips for texture, flavor, and presentation ideas. Don't forget the variations and storage tips for leftovers. Enjoy your tasty creations and make them your own! With just a few adjustments, this versatile dish fits any meal. Happy toasting!](https://spoonfulsavory.com/wp-content/uploads/2025/05/bcd51b7f-22c0-4f1f-9585-8591d2b257ef.webp)
Are you ready to elevate your breakfast game? In this delightful recipe, we’ll create a scrumptious avocado toast topped with
![- 1 cup rolled oats - 1 ripe banana, mashed (about 1/2 cup) - 1 cup milk (dairy or plant-based) - 1 tablespoon honey or maple syrup (optional) - 1 teaspoon baking powder - 1/2 teaspoon ground cinnamon - 1/4 teaspoon salt - 1 large egg - 1 teaspoon vanilla extract - Cooking spray or oil for the skillet Alternative to rolled oats: You can use quick oats if you're in a hurry. They blend well but may create a softer pancake. Dairy-free milk options: Almond milk, soy milk, or oat milk work great. Choose the one you like best. Sweetener alternatives: If you want to skip honey or maple syrup, try mashed dates or agave syrup. Adjust based on your taste preference. To start, you need to make oat flour. Place 1 cup of rolled oats in a blender. Blend them on high until they look like fine flour. This step is key. The right consistency helps the pancakes rise and stay fluffy. If the flour is too coarse, your pancakes might turn out dense. Next, it’s time to mix the ingredients. In a large bowl, add the oat flour you made. Then, add the mashed banana, milk, and other ingredients. Mix them well using a whisk or spatula. You want a smooth batter, free of lumps. The right texture is thick but pourable. Now, let’s cook! Preheat a non-stick skillet over medium heat. Lightly grease it with cooking spray or a bit of oil. Once hot, pour about 1/4 cup of batter for each pancake. Cook for 2-3 minutes. Look for bubbles on the surface. That means it’s time to flip. When flipping, use a spatula and be gentle. Cook for another 1-2 minutes until golden brown. If you notice any burning, lower the heat a bit. Keep pancakes warm on a plate while you cook the rest. Enjoy your delicious banana oatmeal pancakes! For the full recipe, check the earlier section. To make the best banana oatmeal pancakes, focus on the batter's consistency. You want it thick but pourable. If it’s too runny, add a bit more oat flour. If it’s too thick, mix in a splash of milk. This will help you flip them easily. Using fresh ingredients also makes a big difference. A ripe banana offers great sweetness and flavor. Milk should be fresh too. Fresh eggs help the pancakes rise and stay fluffy. For toppings, the options are endless! You can try fresh fruits like sliced strawberries, blueberries, or even mango. A drizzle of maple syrup or honey adds sweetness. For a creamy touch, add a dollop of yogurt. Pair your pancakes with sides for a complete meal. Eggs add protein and go great with pancakes. Crispy bacon brings a nice salty flavor that contrasts well with the sweet pancakes. Be careful not to overcook or undercook your pancakes. If they are too dark, they can taste burnt. If they are too light, they may be raw inside. Cook them until they are golden brown and firm. Also, remember to grease the skillet well. This stops the pancakes from sticking. If they stick, they can break apart when you flip them. A light spray of oil or cooking spray works well. For the Full Recipe, look at the earlier section! {{image_4}} You can add fun twists to your banana oatmeal pancakes. Try mixing in chocolate chips for a sweet treat. Nuts like walnuts or pecans add a great crunch. You can also experiment with spices. A dash of nutmeg or ginger gives your pancakes a warm flavor. If you need gluten-free options, use certified gluten-free oats. This makes the pancakes safe for everyone. For a vegan version, swap the egg with a flaxseed meal. Mix one tablespoon of flaxseed with three tablespoons of water and let it sit to thicken. Use plant-based milk like almond or soy to keep it vegan. Using seasonal fruits can spice up your pancakes. In the fall, add pumpkin puree or spices like cinnamon and nutmeg. In spring or summer, use fresh berries or sliced peaches. Each season brings new flavors to enjoy in these delicious pancakes. To store leftover banana oatmeal pancakes, let them cool first. Place the pancakes in a single layer on a plate. Cover them with plastic wrap or foil. You can refrigerate them for up to three days. For longer storage, use an airtight container. This keeps them fresh and prevents them from drying out. For the best taste, reheat pancakes in a skillet. Heat the skillet on medium-low. Add a touch of oil or cooking spray to prevent sticking. Place pancakes in the skillet for 1-2 minutes on each side. You can also use a microwave. Heat on high for about 30 seconds to 1 minute. Check to make sure they are warm throughout. To freeze banana oatmeal pancakes, stack them with parchment paper between each one. This helps to separate them. Place the stack in a freezer-safe bag or container. Make sure to remove as much air as possible. You can freeze them for up to three months. To thaw, leave them in the fridge overnight or microwave for a few seconds. This way, you can enjoy your pancakes anytime! For the complete recipe, check [Full Recipe]. You can store banana oatmeal pancakes in the fridge for about three days. Make sure to place them in an airtight container to keep them fresh. For longer storage, consider freezing them. They can stay good in the freezer for up to two months. Just remember to separate each pancake with parchment paper to prevent sticking. Yes, you can prepare the batter a few hours in advance. Store it in the fridge until you're ready to cook. This saves time in the morning. Just give the batter a quick stir before using, as it might thicken a bit while sitting. To make your pancakes light and fluffy, be careful not to overmix the batter. Mix just until the ingredients combine. Also, let the batter rest for a few minutes. This helps the baking powder activate and creates air pockets, making your pancakes rise better. Absolutely! Doubling the recipe is easy. Just multiply each ingredient by two. This is perfect for family breakfasts or meal prep. You can store any extras for later, too. The egg helps bind the ingredients and adds some fluffiness. However, if you want to skip it, you can use a flax egg or applesauce. A flax egg is made by mixing one tablespoon of ground flaxseed with three tablespoons of water. Let it sit for five minutes to thicken. This blog post walked you through making banana oatmeal pancakes. We covered the ingredients, tips, and cooking steps in detail. You saw how to mix and match ingredients to fit your taste or diet. Perfect pancakes depend on the right texture, cooking time, and fresh flavors. Remember, these pancakes are easy to make and can be stored or frozen, too. Enjoy experimenting with variations and toppings. Happy cooking!](https://spoonfulsavory.com/wp-content/uploads/2025/05/33388564-9fc0-4347-a0fb-f286764cb2a0.webp)
Are you ready to flip your breakfast routine upside down? With my simple recipe for delicious banana oatmeal pancakes, you’ll
