Skip to content
DisclaimerTerms Of UseGDPR PolicyCookie Policy

spoonfulsavory

  • Home
  • Drinks
  • Appetizers
  • Dinner
  • Dessert
  • About
  • Contact
  • Privacy Policy
DisclaimerTerms Of UseGDPR PolicyCookie Policy

Sarah

Let’s dive into the tasty details of what you need to make spinach and feta stuffed peppers. This dish is not only healthy but also a feast for the eyes. - 4 large bell peppers (choose any bright color you like) - 2 cups fresh spinach, finely chopped - 1 cup feta cheese, crumbled - 1 cup cooked quinoa (or rice, if you prefer) - 1/2 cup cherry tomatoes, diced - 1/4 cup red onion, finely chopped - 2 cloves garlic, minced - 1 teaspoon olive oil - 1 teaspoon dried oregano - Salt and pepper to taste - Fresh parsley, chopped, for garnish You can swap feta cheese for goat cheese if you're looking for a different flavor. For a vegan option, use plant-based cheese instead. If you have a gluten allergy, ensure that your quinoa or rice is certified gluten-free. Each ingredient plays a key role. The bell peppers provide sweetness and crunch. Spinach adds nutrition and color. Feta brings a salty, creamy taste that makes each bite special. Cherry tomatoes give a pop of freshness, while garlic and onion add depth. The olive oil helps blend the flavors well, and oregano gives a nice herbal note. Salt and pepper are basic but essential for elevating the dish. Finally, the parsley adds a bright finish when you serve it. For the full recipe, you can check out the detailed cooking instructions. This meal is easy to customize, so feel free to experiment with your favorite ingredients! Start by cutting the tops off each bell pepper. Then, carefully scoop out the seeds and membranes. This step is key for a clean pepper. Make sure to wash them well. Moisture is important while baking. It keeps the peppers juicy and soft. Next, grab a large skillet. Heat olive oil over medium heat. Add minced garlic and finely chopped red onion. Sauté them for 2-3 minutes until they smell great. Then, toss in the chopped spinach. Stir until it wilts, which should take about 2 minutes. This step brings out the flavors. In a large bowl, mix the sautéed veggies with cooked quinoa or rice. Add diced cherry tomatoes and crumbled feta cheese. Sprinkle in dried oregano, salt, and pepper. Stir everything well. The texture should be moist but not runny. This balance gives a great bite. Now it’s time to stuff the peppers. Carefully spoon the filling into each pepper. Pack it in tightly but don’t overdo it. Arrange the peppers upright in a baking dish. Pour 1/4 cup of water in the bottom. This steam helps the peppers cook evenly. Cover with foil and bake for 25 minutes. After that, remove the foil and bake for another 10-15 minutes. The peppers should be tender and slightly golden. For more details, check the Full Recipe. You can make this dish your own by switching up the cheese or grains. Try swapping feta for goat cheese or mozzarella for a milder taste. If you want a fun twist, use a mix of cheeses. For grains, quinoa works well, but rice or even couscous can be just as tasty. If you follow a vegan diet, you can still enjoy these stuffed peppers. Replace feta with a vegan cheese option, like cashew cheese or nutritional yeast. For the grain, stick with quinoa or use lentils for added protein. Both options keep the flavors fresh and vibrant. You can grill or bake these stuffed peppers. If you grill, use a medium heat and place the peppers on the grill until tender. This gives them a nice smoky flavor. Baking is simple and keeps all the moisture in. Just follow the baking instructions for best results. To ensure even cooking, make sure to cut the tops off the peppers evenly. This helps them cook at the same rate. When baking, cover the dish with foil for the first half of the cooking time. This traps steam and keeps the peppers moist. After that, bake uncovered for a golden finish. For the full recipe, check out the details above! {{image_4}} You can easily change the flavor of your stuffed peppers. Adding spices or herbs can make a big difference. Try adding cumin for warmth or paprika for a smoky touch. Fresh basil or dill can brighten up the mix too. If you want to add protein, mix in shredded chicken or black beans. This makes the dish heartier and more filling. Both options pair well with the feta and spinach. You can also create themed versions of these stuffed peppers. For a Mediterranean twist, add olives and sun-dried tomatoes. This will enhance the flavors and give a taste of the region. Seasonal adaptations can also be fun. In summer, use zucchini or corn. In fall, try adding pumpkin or roasted butternut squash. Each season brings new veggies to explore. Feel free to get creative with these variations, and remember, the full recipe is just a guide! To store your spinach and feta stuffed peppers, let them cool first. Place leftovers in an airtight container. They will last in the fridge for up to four days. For longer storage, you can freeze them. Wrap each pepper tightly in plastic wrap, then place them in a freezer-safe bag. They stay good for about three months. When reheating, keep the peppers moist to preserve flavor and texture. You can reheat them in the oven at 350°F (175°C) for about 20 minutes. Add a splash of water to the dish to create steam. You can also microwave them for 2-3 minutes. Just be sure to cover them to keep the steam in. Meal prep is key for busy days. You can make the filling in advance. Cook the quinoa and sauté the veggies a day ahead. Store the filling in the fridge for up to three days. This lets you whip up stuffed peppers quickly. For portion control, use smaller peppers or reduce the amount of filling per pepper. This way, you can enjoy them as a healthy snack or a light meal during the week. Stuffed peppers usually take about 35 to 40 minutes to cook. First, bake them covered for 25 minutes. This helps them soften. After that, remove the cover and bake for another 10 to 15 minutes. Check for doneness by poking a pepper with a fork. It should be tender but not mushy. Yes, you can prepare stuffed peppers ahead of time! Stuff the peppers, then place them in the fridge for up to 24 hours before baking. If you want to freeze them, wrap each pepper tightly in plastic wrap. You can store them in the freezer for up to three months. When ready to eat, bake them straight from the freezer, adding a few extra minutes to the cooking time. You can serve several tasty sides with spinach and feta stuffed peppers. Here are some ideas: - A fresh green salad with a light vinaigrette. - Quinoa or rice for a hearty addition. - Roasted vegetables like zucchini or carrots for extra flavor. - A tangy yogurt sauce to drizzle on top. - Garlic bread for a comforting touch. Feel free to mix and match to create a meal that suits your taste! For the full recipe, refer back to the earlier sections. In this blog post, I walked you through everything you need to make stuffed peppers. We covered the ingredients, step-by-step instructions, tips for customization, and even storage options. These peppers are tasty, easy to make, and adaptable for any diet. Try new flavors and find what you love. With these steps, you can serve a delicious meal any time. Now, get cooking and enjoy!

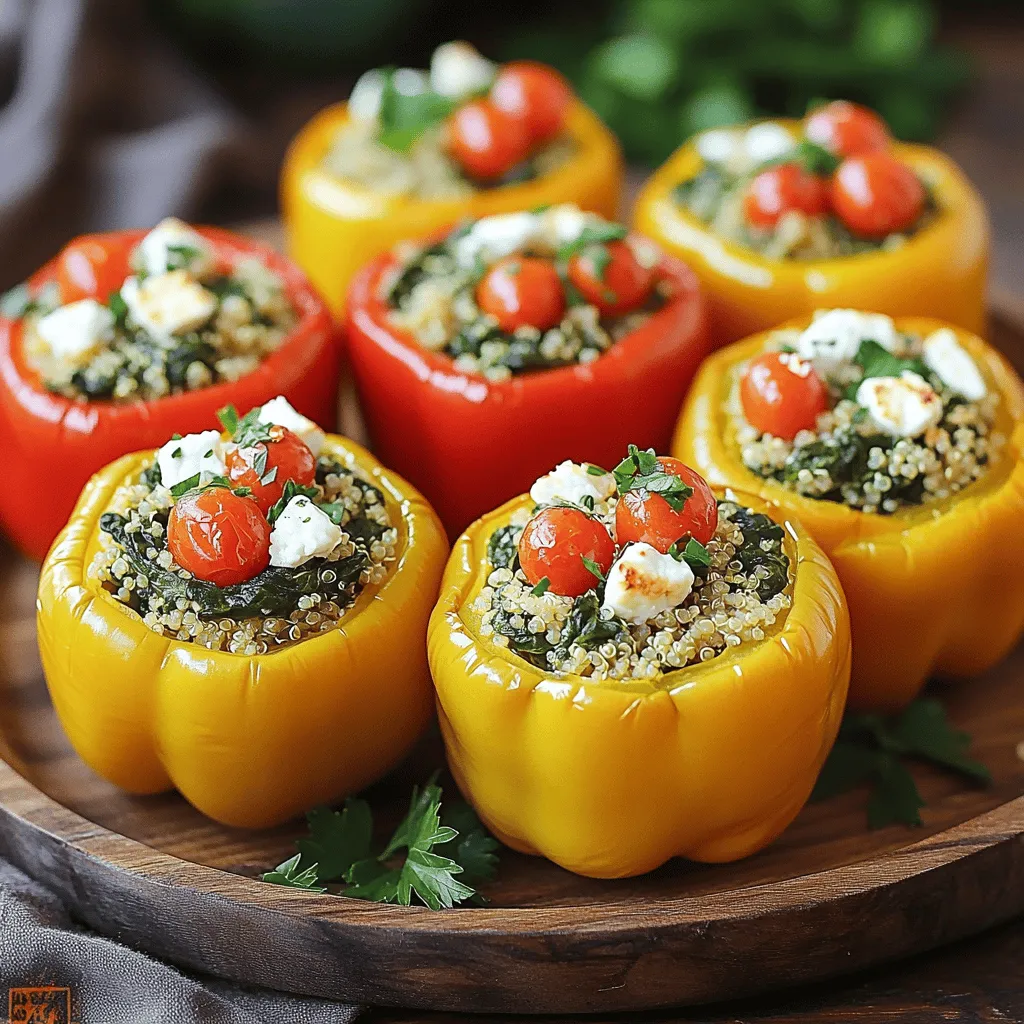
Spinach & Feta Stuffed Peppers Tasty and Healthy Meal

If you’re seeking a delicious and healthy meal, look no further than Spinach & Feta Stuffed Peppers! This dish is

To make a savory vegetable frittata, you will need some fresh and simple items. Here's what you need: - 6 large eggs - 1 cup fresh spinach, chopped - 1/2 cup assorted bell peppers, diced - 1/2 cup cherry tomatoes, halved - 1/4 cup red onion, finely chopped - 1/4 cup feta cheese, crumbled - 1/4 cup milk or dairy-free alternative - 2 tablespoons extra-virgin olive oil - 1 teaspoon garlic powder - 1 teaspoon dried oregano - Salt and freshly ground black pepper to taste - Fresh herbs for garnish Each ingredient brings its own taste and color. The eggs form the base, while the vegetables add texture and nutrients. The feta cheese gives a creamy touch. Using fresh herbs as a garnish adds a pop of flavor and beauty to your dish. When you gather these ingredients, you set the stage for a delicious meal that is both satisfying and healthy. For the full recipe, check out the link above. First, set your oven to 350°F (175°C). This temperature helps cook the frittata evenly. A warm oven gives it a nice golden color. Next, take a large skillet and heat 2 tablespoons of extra-virgin olive oil over medium heat. When the oil shines, add 1/4 cup of finely chopped red onion and 1/2 cup of diced bell peppers. Sauté for about 3-4 minutes. You want the veggies to be soft and smell great. Now, stir in 1 cup of chopped fresh spinach and 1/2 cup of halved cherry tomatoes. Cook for an additional 2-3 minutes. The spinach should wilt and turn bright green. Remove the skillet from the heat. In a bowl, crack 6 large eggs and add 1/4 cup of milk, 1 teaspoon of garlic powder, 1 teaspoon of dried oregano, salt, and pepper. Whisk this mix until it's smooth and a bit frothy. Pour the egg mixture over your sautéed vegetables in the skillet. Stir gently to mix everything. Then sprinkle 1/4 cup of crumbled feta cheese on top. Put the skillet back on the stove over medium heat. Cook for about 3-5 minutes. The edges will start to firm up but the middle will still be soft. Carefully transfer the skillet to the preheated oven. Bake for 15-20 minutes or until the frittata is set and the top is golden. For the full recipe, refer to the recipe section above. Enjoy making this dish! To avoid a soggy bottom, cook your veggies well. Start with the onion and bell peppers. Sauté them until soft. If you add too much moisture, your frittata will not set right. Always drain excess liquid from tomatoes or other watery veggies. To check for doneness, look for a firm center. You can gently shake the skillet. If it wobbles a lot, it needs more time. A fully cooked frittata should bounce back when you touch it lightly. Choosing the right skillet is key. Use an oven-safe skillet for best results. Cast iron or non-stick pans work well. They help with even cooking and easy serving. Utilizing herbs and spices can elevate your frittata. Fresh herbs like basil and parsley add flavor. You can also use spices such as paprika or chili powder for a kick. Experiment with different combinations to find your favorite. Arranging the frittata on a platter makes it look inviting. Cut it into wedges for easy serving. A colorful platter adds to the visual appeal. Garnishing can enhance both look and taste. Sprinkle fresh herbs on top before serving. A side of mixed greens dressed in lemon vinaigrette brightens the plate. This adds color and freshness to your meal. For the full recipe, check out the details above. {{image_4}} You can mix in many vegetables for your frittata. Broccoli adds crunch and color. Zucchini brings a mild taste and great texture. Mushrooms give a savory depth. Feel free to get creative! The more veggies, the better the flavor and nutrition. Cheese can change the whole vibe of your frittata. Swiss cheese melts well and offers a nutty taste. Cheddar brings a sharp flavor that many love. Goat cheese adds creaminess and tang, making it special. Try different blends to find your favorite! Need some extra protein? Cooked bacon or sausage can make your frittata more filling. Just chop and add them when mixing in your vegetables. You could also use diced ham or even cooked chicken. This adds heartiness and keeps you satisfied longer. For a full recipe, check out the details above! To keep your savory vegetable frittata fresh, use airtight containers. Glass or plastic containers with tight lids work best. Store your frittata in the fridge for up to 3 days. After that, it may lose its taste and texture. When you want to enjoy leftovers, reheat your frittata gently. The best method is using the oven. Preheat your oven to 350°F (175°C). Place the frittata on a baking sheet and cover it with foil to prevent drying. Heat for about 10-15 minutes until warm. You can also use a microwave, but do so in short bursts to avoid drying it out. Yes, you can freeze frittata slices! To freeze, let the frittata cool completely. Slice it into wedges. Wrap each slice tightly in plastic wrap, then place them in a freezer-safe bag. Label the bag with the date. You can freeze slices for up to 2 months. When ready to eat, thaw in the fridge overnight and reheat as mentioned above. Don't forget to check the Full Recipe for more tips on making the perfect frittata! You can tell the frittata is done when the center is fully set. Look for a golden top. It should not jiggle when you shake the pan. You can also insert a knife into the center. If it comes out clean, your frittata is ready. Yes, you can make a frittata ahead of time. Cook it, then let it cool. Once cool, slice it and store it in an airtight container. You can keep it in the fridge for up to four days. For longer storage, freeze individual slices. Just wrap them well and store in a freezer-safe bag. Frittatas pair well with many sides. A light salad with mixed greens is great. You might also enjoy sliced avocado or fresh fruit on the side. Toast or crusty bread can add a nice crunch. A frittata and an omelet are not the same. An omelet is cooked quickly and folded. A frittata cooks slowly and is baked. Frittatas include more fillings and are thicker. Both are tasty, but they offer different textures and experiences. For the full recipe, check out the Flavor-Packed Vegetable Frittata. This blog post covers the simple and tasty recipe for a frittata. We explored key ingredients, easy steps, helpful tips, and delicious variations. If you follow these steps, your frittata will be flavorful and satisfying. You can customize it with your favorite veggies and cheeses. Lastly, remember to store it well for the best taste later. Enjoy your cooking journey and bring joy to your meals!

Savory Vegetable Frittata Flavorful and Easy Recipe

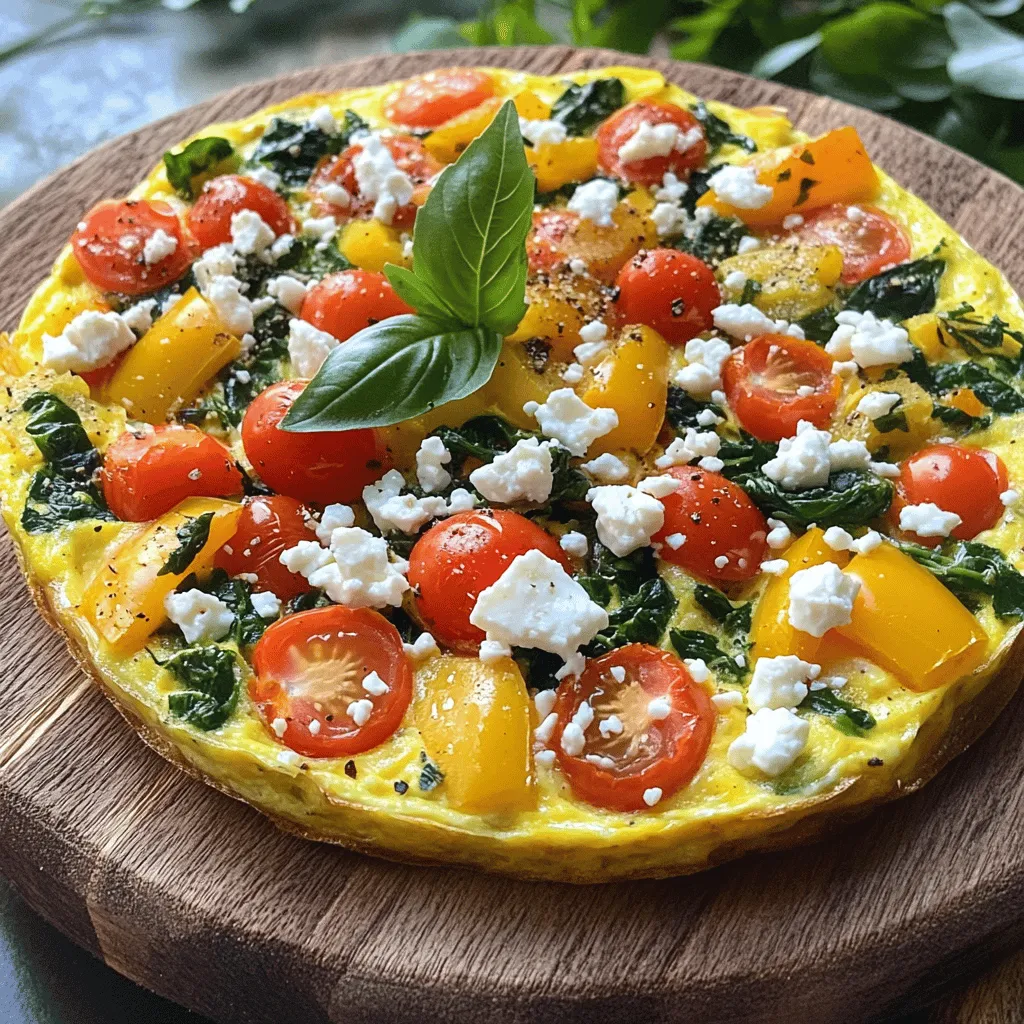
Craving a quick and tasty meal? A savory vegetable frittata is the answer! This dish is simple to make and

- 4 boneless, skinless chicken breasts - 1 pound asparagus, trimmed - 4 cloves garlic, minced - 1 lemon, zested and juiced - 3 tablespoons olive oil - 1 teaspoon dried thyme - 1 teaspoon smoked paprika - Salt and pepper to taste - ¼ cup grated Parmesan cheese (optional) - Fresh parsley, chopped (for garnish) To elevate the taste, consider adding: - A pinch of red pepper flakes for heat. - Fresh rosemary or oregano for herbal notes. - Cherry tomatoes for a burst of sweetness. - Bell peppers for added crunch. You can also swap out asparagus for: - Green beans for a crisp texture. - Broccoli florets for a hearty bite. - Zucchini slices for a mild flavor. These add-ins and swaps can make the dish truly yours, adding layers of flavor and fun. The main goal is to keep it simple while enhancing the taste. When you choose your add-ins, think about how they will pair with the garlic and lemon. Each ingredient plays a role in creating a balanced dish. For the full recipe, refer to the earlier section. - Preheat your oven to 400°F (200°C). This step is key for even cooking. - Grab a large mixing bowl. Whisk together olive oil, minced garlic, lemon zest, lemon juice, dried thyme, smoked paprika, salt, and pepper. Mix well to create a tasty marinade. - Add the chicken breasts to the marinade. Make sure each piece is well-coated. Use your hands to rub the marinade all over the chicken. - For the best flavor, marinate the chicken for at least 15 minutes. If you can, marinate for up to 2 hours in the fridge. This helps the flavors soak in deeply. - Line a large baking sheet with parchment paper. This makes cleanup easy and helps the chicken cook evenly. Place the marinated chicken in the center of the sheet, spaced out nicely. - Arrange the trimmed asparagus around the chicken. Drizzle any leftover marinade over the asparagus for extra flavor. - If you like cheese, sprinkle grated Parmesan over the chicken and asparagus for a rich touch. - Put the baking sheet in the oven and bake for 25-30 minutes. Check the chicken with a meat thermometer; it should reach 165°F (75°C). The asparagus should look bright and tender. - Take the baking sheet out of the oven. Let the dish rest for 5 minutes. This lets the juices settle, making the chicken juicy. - Before serving, sprinkle fresh parsley on top. This adds color and a fresh vibe to your meal. For the full recipe, check out the One-Pan Garlic Chicken and Asparagus. To make your garlic chicken stand out, try marinating it longer. You can use different flavors in your marinade. Add some honey for sweetness or mustard for a bit of zing. For juicy chicken, choose thighs instead of breasts. Thighs have more fat, which keeps them moist. Always pat your chicken dry before marinating. This helps the marinade stick better. When cooking the asparagus, be sure to keep the stalks even. Cut them to a similar length for even cooking. Toss them in the leftover marinade for extra flavor. This simple step makes your asparagus taste great and keeps it tender. Aim for a bright green color and a slight crunch to get the best texture. A nice plate makes your meal look more inviting. Serve the chicken and asparagus on a large platter. Drizzle any pan juices over the top to add shine. For a pop of color, add lemon wedges on the side. Fresh herbs like parsley also add a nice touch. They give your dish a vibrant look and fresh taste. If you want, you can use a bit of grated Parmesan cheese on top. It adds a layer of flavor and a touch of elegance. Remember, how you present your food can make it taste better. People eat with their eyes first! {{image_4}} To make this dish fit your needs, you can try some easy swaps. For gluten-free options, use tamari instead of regular soy sauce in your marinade. This keeps the flavors rich while ensuring it's safe for those with gluten issues. If you want a low-carb meal, skip the Parmesan cheese. You can also use zucchini or bell peppers instead of asparagus. These veggies roast well and add good flavor. If you want to swap proteins, chicken is not your only choice. Shrimp works great in this recipe. It cooks fast and soaks up the garlic and lemon flavors. Fish like salmon or cod is also a tasty option. Just adjust the cooking time. Fish usually cooks faster than chicken. To spice things up, try adding new herbs and spices. Fresh rosemary or basil can brighten the dish. If you prefer a bolder taste, mix in some chili flakes. They add heat without overpowering the garlic and lemon. You can also drizzle some hot sauce over the chicken before serving. This makes each bite exciting. Experimenting with flavors keeps meals fun. The Full Recipe gives you a solid base, but don’t hesitate to make it your own. You can create a dish that suits your taste and impresses your guests. To keep your One-Pan Garlic Chicken and Asparagus fresh, follow these tips: - Cool down: Let the dish cool to room temperature before storing. - Use airtight containers: Choose containers that seal tightly to keep moisture in. - Refrigeration: Store in the fridge for up to 3 days. Using glass or BPA-free plastic containers helps maintain flavor. If you want to save space, try stacking smaller containers. When reheating, you want to keep the chicken juicy and the asparagus tender. Here are the best methods: - Oven: Preheat to 350°F (175°C). Place the chicken and asparagus on a baking sheet. Heat for 10-15 minutes. - Microwave: Place on a microwave-safe plate. Cover with a damp paper towel. Heat for 1-2 minutes, checking often. This helps avoid drying out your meal. Adjust time based on your microwave's power. Enjoy the flavors, just like when it was fresh! Cooking chicken in the oven usually takes about 25 to 30 minutes at 400°F (200°C). Oven types can change timing. A convection oven may cook faster. Always check the chicken's internal temperature. It should reach 165°F (75°C) for safe eating. Yes, you can use frozen chicken, but it needs extra time. It is best to thaw chicken first. If you use frozen fillets, add about 10 to 15 minutes to the cooking time. Make sure to check the temperature. The center must reach 165°F (75°C) as well. Garlic chicken and asparagus pair well with many side dishes. Here are some great options: - Rice: White, brown, or even lemon rice add a nice touch. - Potatoes: Mashed or roasted potatoes bring comfort to the meal. - Salad: A fresh green salad can lighten the dish. - Quinoa: This grain is healthy and easy to prepare. For more ideas, check the Full Recipe. This post outlined a simple and tasty garlic chicken and asparagus dish. You learned about the required ingredients, step-by-step cooking methods, and tips for perfection. There are also ways to modify the recipe for different diets and flavor preferences. With the right techniques and ideas, you can create a delicious meal that impresses. Enjoy experimenting with flavors and make it your own! Remember, cooking is fun, and practice makes perfect.

One-Pan Garlic Chicken and Asparagus Flavor Boost

Looking for a simple, tasty dinner? One-Pan Garlic Chicken and Asparagus packs tons of flavor while making cleanup a breeze.

- 2 cups cooked white rice - 3 cups broccoli florets (fresh or frozen) - 1 cup shredded sharp cheddar cheese - 1 cup cream of mushroom soup (or homemade equivalent) - 1/2 cup milk - 1/4 cup grated Parmesan cheese - 1/2 teaspoon garlic powder - 1/2 teaspoon onion powder - Salt and pepper to taste - 1 cup crispy fried onions (for topping) Using precise measurements helps create the best results. For example, if you use too much rice, the casserole may become dry. Too little cheese can lead to a less cheesy flavor. Always level off your measuring cups. If you need to make substitutions for dietary needs, consider using brown rice for a healthier option or a gluten-free cream of mushroom soup. Each serving has about 300 calories. You get around 10 grams of protein and 15 grams of fat. The carbs come mainly from rice and broccoli. This dish is not just tasty but also fills you up. It's a great way to enjoy vegetables in a fun and cheesy way. - Preheat your oven to 350°F (175°C). - Grease a 9x13 inch baking dish. - In a big bowl, mix the cooked rice, broccoli, cheddar cheese, soup, and milk. - Stir until all the ingredients blend well. - Add garlic powder, onion powder, salt, and pepper. Mix well to combine. - Place the casserole in the oven for 30 minutes. Check it halfway to ensure it heats evenly. - After 30 minutes, take it out and sprinkle crispy onions on top. - Return it to the oven for another 10-15 minutes until the onions turn golden brown. - Let it cool for about 5 minutes before serving. This helps the dish set. For the full recipe, check the link above. Enjoy your cheesy broccoli rice casserole! To get your casserole just right, ensure even cooking. Mix all ingredients well. This helps the cheese melt smoothly. After baking, let it rest for about five minutes. This time allows the flavors to blend and the dish to set. Avoid overcooking or undercooking the broccoli. Overcooked broccoli can turn mushy, while undercooked can be tough. Always check the texture before mixing. Also, be careful with ingredient swaps. Using different soups or cheeses can change the flavor. Stick to the recipe for best results. You can boost the flavor with spices or herbs. A dash of paprika adds warmth, while thyme can bring freshness. Mixing different cheeses also creates a unique taste. Try adding mozzarella for creaminess or pepper jack for spice. Experimenting can lead to delightful surprises! {{image_4}} You can make this dish healthier with just a few swaps. - Use brown rice or quinoa instead of white rice. These grains add fiber and nutrients. - Opt for low-fat cheese or plant-based options. This change cuts calories but keeps flavor. Adding proteins or new veggies can change the taste. - Add chicken or tofu for a protein boost. It makes the dish more filling and tasty. - Try different veggie mix-ins. Carrots, bell peppers, or peas can add color and crunch. You can change this casserole with seasonal veggies. - Use what is fresh in your area. Asparagus in spring or squash in fall can add unique flavors. - Adapt the recipe for holidays, like adding cranberries for Thanksgiving. This twist makes your casserole special for any occasion. For the full recipe, refer to the section above. After you enjoy your cheesy broccoli rice casserole, store leftovers in the fridge. Use an airtight container to keep the dish fresh. Aim to refrigerate within two hours of cooking. This helps keep harmful bacteria at bay. When reheating, use your oven or microwave. For the oven, heat to 350°F (175°C) and warm for about 15-20 minutes. In the microwave, heat in short bursts. Stir between intervals to ensure even warming. You can freeze the casserole before or after baking. If you freeze it before baking, assemble the dish and wrap it tightly with plastic wrap. Then, cover it with foil to prevent freezer burn. If you freeze it after baking, let it cool first. Transfer it to a freezer-safe container. To thaw, place it in the fridge overnight. For reheating, bake from frozen at 350°F (175°C) for about 45-60 minutes. Check that it is hot all the way through before serving. In the fridge, the leftovers last about 3-5 days. Always check for signs of spoilage. If you see mold or the smell is off, throw it away. If the casserole seems dry or has changed color, these are also signs it has gone bad. It's best to be safe with food storage! You can use several options. One choice is cream of chicken soup. Another is cream of celery soup. You can also make a homemade version. Just mix milk, flour, and sautéed mushrooms. This gives a fresh taste without canned soup. Yes, you can prepare it in advance. Mix all ingredients and store in the fridge. Just cover the dish tightly with plastic wrap. When ready to bake, add about 10 more minutes to the cooking time. This way, it stays delicious and fresh. Absolutely! Use gluten-free cream of mushroom soup. You can find many brands at stores. Also, check your rice for gluten-free labels. This helps keep the dish safe for those who avoid gluten. There are many easy ideas. Substitute cream of mushroom soup with a vegetable version. You can also add more veggies like carrots or bell peppers. These will add flavor and texture. Consider adding cooked lentils or chickpeas for extra protein. This keeps it filling and meatless. This blog post covered a delicious Cheesy Broccoli Rice Casserole. We discussed the main ingredients, helpful measurement tips, and nutritional information. You learned step-by-step instructions for preparation, baking, and how to avoid common mistakes. We explored variations, storage options, and answered frequent questions. In closing, this dish is flexible and easy to make. Use it as a base and personalize it to your taste. Enjoy creating your own version of this comforting casserole. Happy cooking!

Cheesy Broccoli Rice Casserole Simple and Delicious Meal

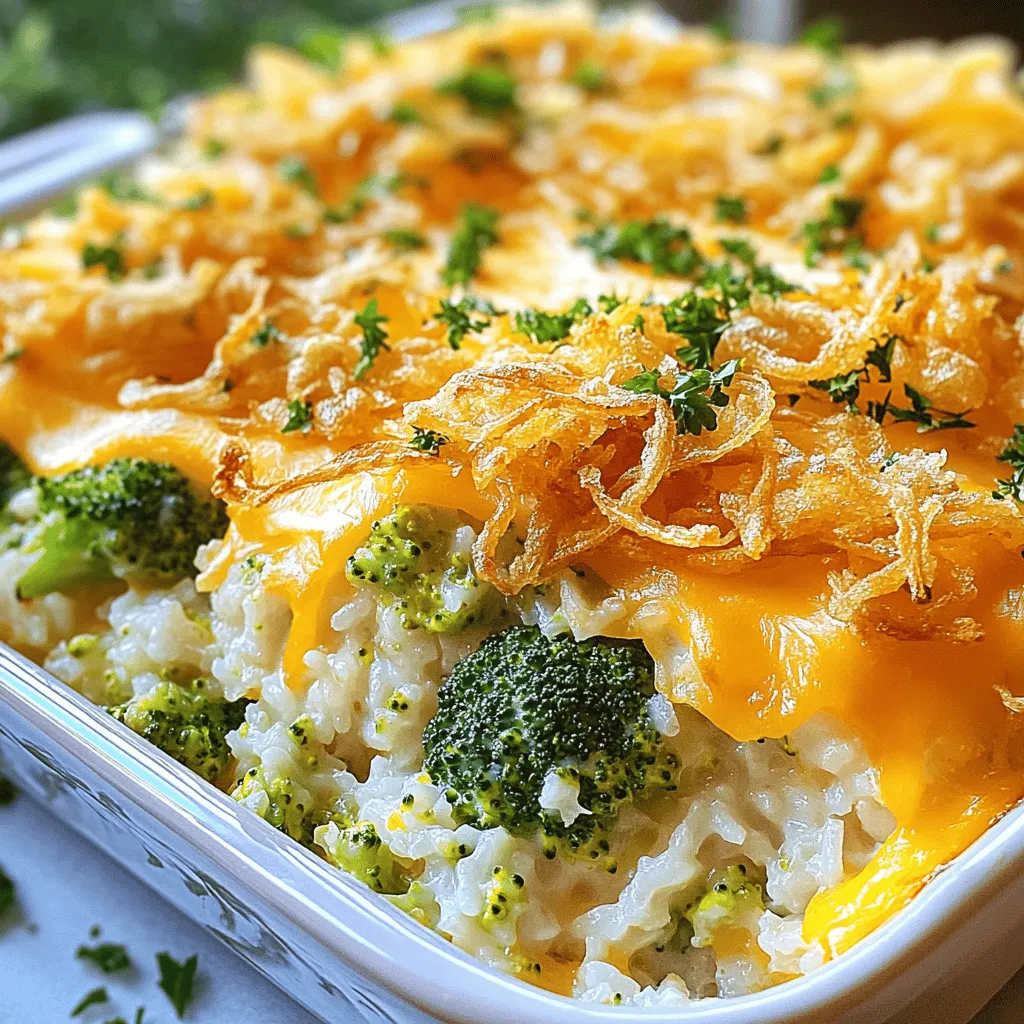
Are you ready to make a warm and creamy dish that brings comfort to the dinner table? This Cheesy Broccoli

- 1 cup quinoa - 1 ripe mango - 2 ripe avocados - 1 red bell pepper - 1/2 red onion - 1 cup cherry tomatoes - 1/4 cup fresh cilantro - Juice of 1 lime - 2 tablespoons olive oil - Salt and black pepper - Use 1 cup of quinoa for a hearty base. - One ripe mango adds sweetness and flavor. - Two ripe avocados give creaminess. - One red bell pepper adds crunch and color. - Half a red onion gives a nice bite. - One cup of cherry tomatoes adds freshness. - One-fourth cup of chopped cilantro adds herbiness. - Juice from one lime adds zesty brightness. - Two tablespoons of olive oil provide richness. - Season with salt and black pepper to taste. - Add one small jalapeño for heat. - Consider cheese like feta for creaminess. - Nuts like almonds can add crunch. This salad, bursting with fresh ingredients, is easy to prepare. Find the Full Recipe for step-by-step instructions to create this vibrant dish. To make quinoa, start by rinsing it under cold water. This step removes any bitterness. Then, in a medium pot, mix 1 cup of rinsed quinoa with 2 cups of water or vegetable broth. Bring it to a boil, then lower the heat and cover. Let it simmer for about 15 minutes. When done, the quinoa should be fluffy and the liquid absorbed. Remove it from heat and keep the lid on for a few minutes. This helps it steam. Tips for fluffy quinoa: - Use a fine-mesh strainer to rinse. - Let it sit covered after cooking. While the quinoa cooks, chop your veggies. Cut the mango and avocados into small, even pieces. This helps with taste and texture. Use a sharp knife for clean cuts. Chop the red bell pepper and red onion finely. Halve the cherry tomatoes and chop the cilantro. Keep your ingredients fresh by storing them in a cool place until ready. For the dressing, grab a small bowl. Whisk together the lime juice, olive oil, salt, and black pepper. If you want some spice, add minced jalapeño. Taste it to see if you need to adjust the flavors. You want it bright and balanced. In a large bowl, add the cooled quinoa. Then, add the chopped mango, avocado, red bell pepper, red onion, cherry tomatoes, and cilantro. Gently mix everything together. Be careful not to crush the avocado. This keeps the salad looking fresh. Let the salad chill for at least 15 minutes. This waiting time helps the flavors blend well. Serve it cold or at room temperature. For a lovely presentation, use a big bowl or a colorful platter. You can garnish with extra cilantro and lime wedges for a nice look. Enjoy your Mango Avocado Quinoa Salad with your favorite meal or as a refreshing snack. For the full recipe, check out the detailed instructions above. To make the best mango avocado quinoa salad, you need ripe fruits. Here is how to choose them: - Mango: Look for a mango that feels slightly soft when you press it. The skin should have a golden-yellow color. A few dark spots are okay. They show the mango is sweet. - Avocado: Choose avocados that yield to gentle pressure. They should be dark green to black. If they feel too hard, they are not ripe yet. Preparing ahead makes cooking easier. Here are some meal prep tips: - Chop Ahead: You can chop the mango, avocado, and other veggies a day before. Keep them in airtight containers. This saves time when you make the salad. - Storage Tips: Store leftovers in a sealed container. Add some lime juice to prevent browning. The salad tastes best within two days. Spice up your salad with these tips: - Herbs and Spices: Try adding fresh mint or basil for a twist. A pinch of cumin can add warmth. - Pairing Suggestions: This salad goes well with grilled chicken or shrimp. You can serve it with tortilla chips for a crunchy side. {{image_4}} You can boost your Mango Avocado Quinoa Salad with proteins. Chickpeas are a great choice. They add texture and flavor. Grilled chicken is another option. It brings a savory note. If you want a seafood twist, try shrimp. The shrimp pairs well with the fresh flavors. Just cook the shrimp until pink, then toss it in. This makes the salad filling and nutritious. You can easily make this salad vegan. Just skip the shrimp or chicken. It’s already packed with plant-based goodness. For gluten-free options, ensure your quinoa is pure. Quinoa is naturally gluten-free. If you want a low-carb version, use cauliflower rice instead of quinoa. This keeps the salad low in carbs while still delicious. Fruits can change with the seasons. In summer, use peaches or nectarines. These add a sweet twist. In fall, consider apples or pears for crunch. Each fruit brings a unique taste. Mix and match based on what is fresh. This keeps your salad exciting year-round. For the full recipe, check the previous section. To keep your Mango Avocado Quinoa Salad fresh, store it in an airtight container. Place it in the fridge right after you finish eating. This helps maintain its vibrant flavors and crisp textures. You can enjoy the salad for up to three days. However, the avocado may brown a bit. To slow this down, sprinkle some lime juice over the avocado pieces before storing. If you want to save the salad for a longer time, consider freezing it. However, the texture of the avocado will change after freezing. Instead, try freezing the quinoa and dressing separately. You can store the quinoa in a freezer-safe bag for up to three months. The dressing can also go in a small jar in the freezer. When you're ready to eat, just thaw them in the fridge overnight. To refresh the salad before serving, take it out of the fridge. If it seems a bit dry, add a splash of lime juice or olive oil. This will help revive the flavors and moisture. Gently toss the salad with your hands or a spoon. Be careful not to mash the avocado. Serve it chilled or at room temperature for the best taste. For more detailed steps, check the Full Recipe. Yes, you can make this salad ahead of time! It keeps well in the fridge for up to two days. To prep in advance, cook the quinoa first and let it cool. Chop the veggies and store them separately. Mix all ingredients just before serving for the best taste. This way, you keep everything fresh and bright. Mango Avocado Quinoa Salad is great with many dishes! It pairs well with grilled chicken or shrimp for extra protein. You can also serve it with a side of crusty bread or tortilla chips. This salad is versatile and complements any meal. To keep your avocado fresh, add lime juice right after cutting it. The acid slows down browning. You can also store the salad in an airtight container. Cover it tightly to limit air exposure. If you have leftovers, eat them within a day for the best flavor. Yes! This salad is perfect for meal prep. Store the quinoa and veggies in separate containers. Mix them together when you're ready to eat. This keeps everything fresh. You can also make the dressing ahead of time and store it in a jar. Just shake it before using! In this blog post, we covered how to create a fresh and vibrant Mango Avocado Quinoa Salad. We explored the ingredients, including quinoa, fruits, and spices, along with precise measurements. I shared step-by-step cooking tips, from quinoa preparation to dressing making. As you try this salad, remember to select ripe ingredients for the best flavor. Enjoy experimenting with variations and options. This salad is perfect for meal prep and can easily fit your dietary needs. Give it a try and enjoy a nutritious meal!

Mango Avocado Quinoa Salad Fresh and Flavorful Meal

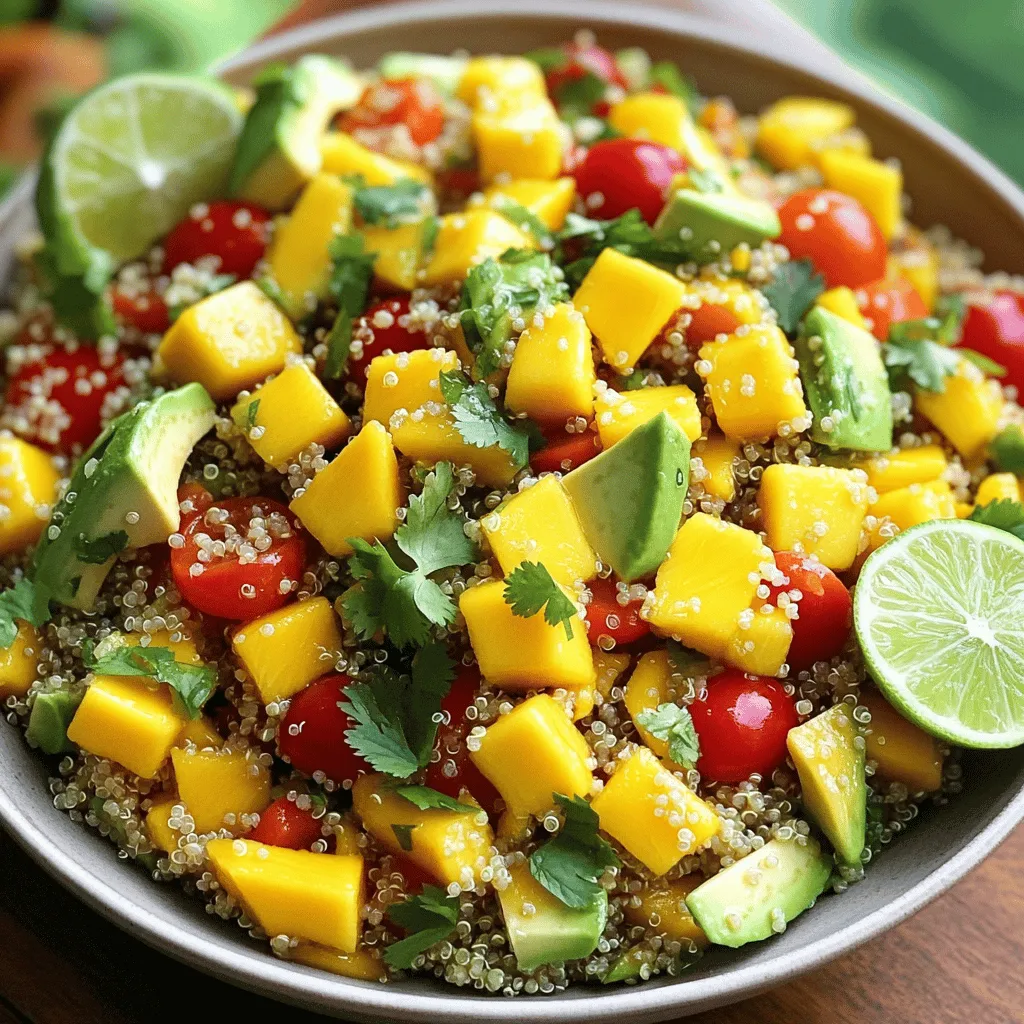
Looking for a bright and tasty meal? This Mango Avocado Quinoa Salad is the perfect choice! It’s fresh, flavorful, and

To make Lemon Basil Chicken Skewers, you need a few simple ingredients. Each one plays a role in the flavor and texture of the dish. Here’s the list of ingredients you'll need: - 1 lb boneless, skinless chicken breasts, cut into 1-inch cubes - 2 large lemons (zest and juice) - 1/4 cup fresh basil leaves, finely chopped - 4 cloves garlic, minced - 1/4 cup extra-virgin olive oil - 1 teaspoon honey - 1 teaspoon salt - 1/2 teaspoon freshly ground black pepper - 1 teaspoon red pepper flakes (optional for heat) - Skewers (either wooden or metal) Each ingredient adds a unique flavor. The chicken is tender and juicy. The lemons bring brightness and zing. Fresh basil gives a fragrant touch. Garlic adds depth, while olive oil keeps everything moist. Honey balances the flavors with a hint of sweetness. Salt and pepper enhance all the tastes. If you want to add some spice, the red pepper flakes are a great choice. They provide warmth without overpowering the dish. Remember, using fresh ingredients makes a big difference. They ensure your skewers are vibrant and full of flavor. For the full recipe, make sure to check the cooking instructions. It’s all about bringing these ingredients together for a delightful meal. To start, grab a big bowl. Whisk together the juice and zest from two lemons. Then, add finely chopped basil, minced garlic, olive oil, honey, salt, and any spices you choose. Mix all these ingredients until they are well combined. This marinade will pack a punch of flavor for the chicken. Now, it’s time to add the chicken. Cut the chicken breasts into 1-inch cubes. Toss these pieces into the marinade. Make sure each piece is coated well. Cover the bowl with plastic wrap and refrigerate. Let it marinate for at least 30 minutes. You can leave it for up to 2 hours for stronger flavors. If you use wooden skewers, soak them in water for 30 minutes before grilling. This helps stop them from burning. Preheat your grill. Brush the grates lightly with oil to keep the chicken from sticking. Thread the marinated chicken onto the skewers, leaving some space between each piece. Grill the skewers for 10-15 minutes. Turn them for even cooking until the chicken reaches 165°F. This method ensures juicy chicken with a nice char. For the full recipe, check the earlier section. Enjoy your flavorful grilled delight! For the best flavor, marinate your chicken for at least 30 minutes. You can go up to 2 hours for more depth in taste. To make coating easy, use a plastic bag. Just add the chicken and marinade, seal the bag, and shake. This method ensures every piece gets the flavor. To cook evenly and avoid sticking, preheat your grill to medium-high heat. Lightly brush oil on the grill grates before adding skewers. Cook the chicken for 10-15 minutes, turning them often. Make sure the chicken reaches an internal temperature of 165°F for safe eating. To impress your guests, arrange the skewers on a large platter. You can garnish with fresh basil leaves and lemon wedges for color. For an extra touch, serve with a side of creamy tzatziki sauce or a crisp cucumber salad. This adds both taste and visual appeal to your meal. {{image_4}} If you want to switch things up, try different proteins. Shrimp works great and cooks fast. Tofu is a fantastic choice for a vegetarian option. Just use firm tofu and marinate it the same way as chicken. You can also change the herbs. Fresh parsley or cilantro can add unique flavors. Experimenting with these swaps keeps your meals fun and exciting. You can grill or bake the skewers. Grilling gives a lovely smoky flavor. You get nice char marks, too. Baking is easier and can be less messy. Just place the skewers on a baking sheet and cook in the oven. If you prefer crispy skewers, an air fryer is a smart choice. Set it to 400°F and cook for about 10-12 minutes. This method makes them crispy and delicious. Want to change the taste a bit? Adding soy sauce can create a savory twist. Mustard can also add a nice tang. You can even add vegetables to your skewers. Bell peppers, zucchini, or cherry tomatoes all work well. These additions not only boost flavor but also add color and nutrition. For the full recipe, check out the main article. After enjoying your lemon basil chicken skewers, store any leftovers in the fridge. Place them in an airtight container. The chicken stays juicy this way. Try to eat them within three days. For marinated chicken, store it in the fridge before grilling. Keep it covered in plastic wrap or a sealed bag. Marinating for up to two hours is best. This keeps the chicken tender and packed with flavor. When reheating, avoid drying out the chicken. Use the oven or stovetop for best results. If using the oven, set it to 350°F. Place the skewers on a baking sheet and cover with foil. Heat for about 10 minutes. If using the stovetop, add a splash of water or broth in a pan. Warm the chicken over low heat, turning often. Serve leftovers with fresh lemon wedges or over a salad for a tasty twist. I recommend marinating the chicken for at least 30 minutes. For the best flavor, aim for up to 2 hours. This allows the chicken to soak up the lemon and basil goodness. The acid in the lemon helps tenderize the meat, making it juicy and full of flavor. Yes, you can use frozen chicken. Just remember to thaw it first for even cooking. Thaw it overnight in the fridge or use the microwave. If using frozen chicken, add a few extra minutes to the cooking time to ensure it cooks through. Great side dishes include: - Fresh cucumber salad - Grilled vegetables - Quinoa or rice - Garlic bread - A light green salad These sides complement the bright flavors of the skewers and balance the meal. Yes, this recipe is great for meal prep. You can marinate the chicken ahead of time and store it in the fridge. Cooked skewers store well too. Keep them in an airtight container in the fridge for up to 4 days. Reheat them gently to keep them moist and tasty. You can find the Full Recipe to get started! In this blog post, we explored how to make delicious Lemon Basil Chicken Skewers. We covered essential ingredients, step-by-step instructions, and tips for grilling. You can enhance this dish with easy variations and learn about storage and reheating. Cooking should be fun and simple. Try this recipe at your next gathering. Enjoy flavorful meals that impress with ease. Happy grilling!

Lemon Basil Chicken Skewers Flavorful Grilled Delight

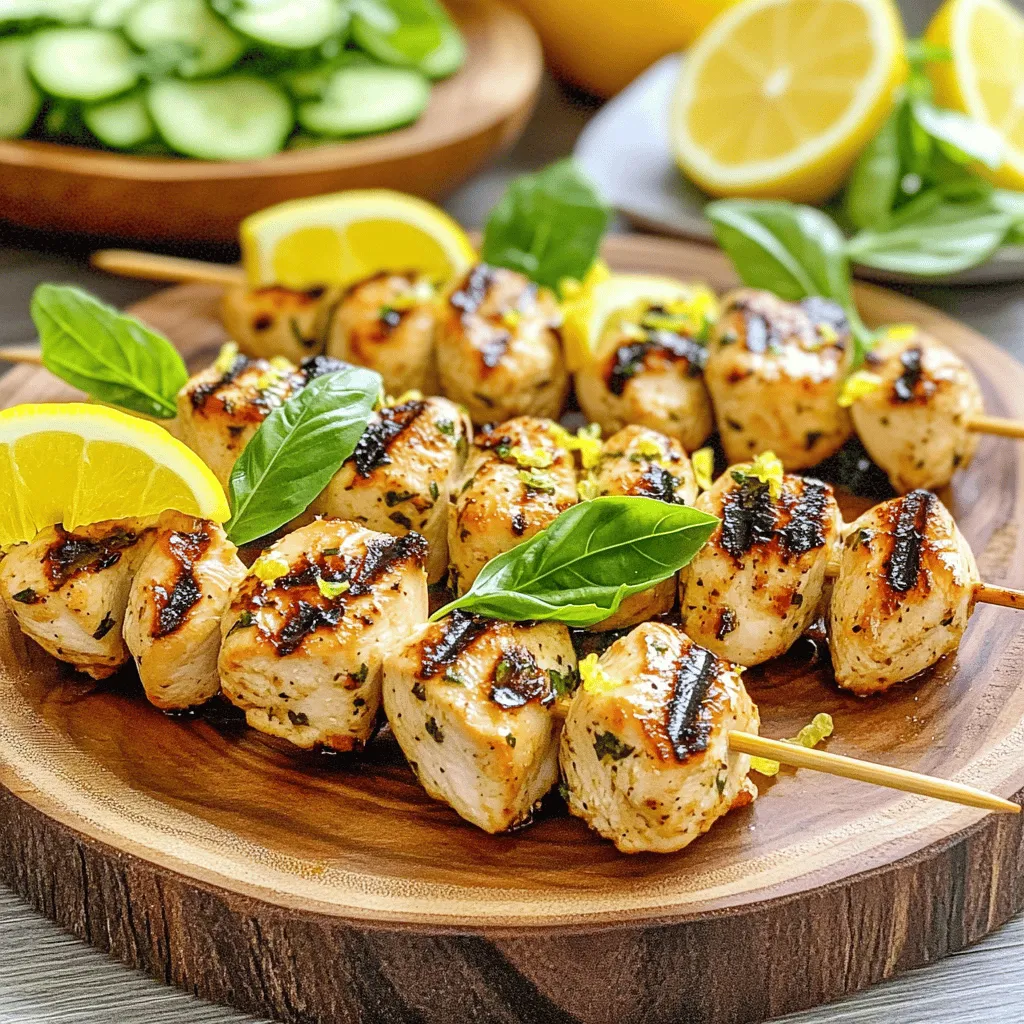
Looking for a simple way to elevate your grilling game? Lemon Basil Chicken Skewers pack a punch of flavor and

To make easy chicken enchiladas, gather these ingredients: - 2 cups cooked chicken, shredded - 1 cup black beans, drained and rinsed - 1 cup corn (frozen or fresh) - 1 cup shredded cheese (cheddar or Monterey Jack) - 1/2 cup diced onion - 1 tablespoon olive oil - 1 teaspoon garlic powder - 1 teaspoon cumin - 1/2 teaspoon chili powder - 8 flour tortillas - 2 cups enchilada sauce (store-bought or homemade) - Fresh cilantro, chopped, for garnish - Sour cream, for serving If you need to swap ingredients, here are some ideas: - Use rotisserie chicken for quick prep. - Swap black beans for pinto beans or kidney beans. - Try different cheeses like pepper jack for a kick. - Use corn tortillas if you prefer their taste. - Replace olive oil with any cooking oil. - For a fresh onion taste, use green onions instead. Using fresh ingredients often gives the best flavor. Fresh corn and onions add crunch and taste. However, frozen corn works well and saves time. Canned black beans are also a great choice. They are quick to use and still taste good. Always rinse canned beans to cut down on sodium. You can mix fresh and frozen items based on what's available. This way, you keep your meal tasty and quick. Check the full recipe for more details on preparation. To make the filling, start by heating olive oil in a large skillet over medium heat. Add the diced onion and cook for about 3-4 minutes until it is soft and clear. Then, take a big bowl and mix the cooked chicken, black beans, corn, half of the cheese, garlic powder, cumin, and chili powder. Stir well until everything blends together nicely. This step is key. A great filling makes your enchiladas shine! Now it’s time to assemble! Pour about 1 cup of enchilada sauce into the bottom of a 9x13 inch baking dish. This helps to keep the tortillas from sticking. Take one tortilla and place a scoop of the chicken mixture in the center. Roll it up tightly and place it seam-side down in the dish. Repeat this process for all the tortillas. Once they are all in the dish, pour the rest of the enchilada sauce on top. Don’t forget to sprinkle the remaining cheese over everything for that perfect cheesy finish! Preheat your oven to 375°F (190°C). Cover the baking dish with aluminum foil and bake for 20 minutes. After that, carefully remove the foil and bake for another 10-15 minutes. You want the cheese to be bubbly and just starting to turn golden. When it’s done, take it out and let it cool for a few minutes. Garnish with fresh cilantro before serving. This adds a nice touch and flavor! For the full recipe, you can check the earlier section. To get that perfect cheese melt, use a mix of cheeses. I love combining cheddar and Monterey Jack. This mix gives a nice flavor and texture. Shred your cheese instead of using pre-shredded. Freshly shredded cheese melts better. For the best melt, cover the enchiladas with foil during the first part of baking. This traps heat and helps the cheese get gooey. Want to save time? Use rotisserie chicken instead of cooking your own. It’s already cooked and flavorful. You can also prep your filling while the oven preheats. This way, you can start baking much faster. If you want to speed it up even more, assemble the enchiladas ahead of time. Store them in the fridge until you’re ready to bake. For serving, a dollop of sour cream adds creaminess. Fresh cilantro brightens the flavors. You can also offer lime wedges on the side. This gives a zingy taste that complements the enchiladas. Pair your meal with a simple salad or some rice. It makes for a well-rounded dinner. You can check out the Full Recipe to explore more options! {{image_4}} You can easily make a vegetarian version of enchiladas. Replace the chicken with veggies. Use 2 cups of your favorite vegetables. Bell peppers, zucchini, and spinach work well. Add black beans and corn for protein. Mix in some cheese and spices for flavor. This way, you still enjoy great taste without the meat. Want to kick up the heat? Use spicy chicken for your enchiladas. Add 1-2 chopped jalapeños to the filling. You can also use spicy enchilada sauce instead of regular. If you like it extra hot, sprinkle crushed red pepper on top. This will give your dish a fiery twist that many will love. While enchilada sauce is classic, you can try other sauces. Tomatillo sauce gives a tangy flavor. You could also use green chili sauce for a milder taste. For a creamy touch, try a sour cream sauce. Each option gives a unique spin on this dish. Don't hesitate to mix and match to find your favorite! For the full recipe, check the Easy Chicken Enchiladas Delicious and Quick Recipe. After you cook the chicken enchiladas, let them cool. Store leftovers in airtight containers. Keep them in the fridge for up to three days. When you want to eat them, check for any signs of spoilage. To freeze enchiladas, place them in a freezer-safe dish. Cover tightly with plastic wrap and then aluminum foil. They can last in the freezer for up to three months. When ready to eat, thaw them overnight in the fridge before reheating. To reheat, use the oven for the best results. Preheat it to 350°F (175°C). Place the enchiladas in a baking dish and cover with foil. Heat for about 20 minutes or until warm. You can also microwave them for a quicker option. Heat on medium power in 1-minute intervals until hot. Enjoy your meal! For the full recipe, check out the detailed steps provided. To boost flavor, use fresh herbs like cilantro. Add lime juice for brightness. You can also mix spices like smoked paprika or oregano into the filling. Consider sautéing bell peppers with the onions for extra taste. Don’t forget to season your chicken well before using it. Also, top with a good amount of enchilada sauce and cheese to enhance the flavor. Yes, you can use corn tortillas! They add a nice texture and flavor. Corn tortillas are gluten-free, making them a great option. Just be sure to warm them up in a pan or microwave first. This helps prevent them from breaking when you roll them. If you find them too stiff, you can dip them in warm enchilada sauce for added softness. You have many tasty options! A fresh salad with avocado and lime dressing works well. Refried beans or Mexican rice are classic sides. You can also serve corn on the cob or a side of guacamole for a fun twist. For something light, try a simple cucumber and tomato salad. These sides will complement your enchiladas perfectly. In this blog post, we explored the key ingredients for enchiladas, including fresh choices and substitutions. I shared step-by-step instructions for making delicious filling, assembling, and baking. You learned tips for cheese melting and speeding up cooking. We covered tasty variations, like vegetarian and spicy options, and discussed storage and reheating methods. In conclusion, making enchiladas is easy and fun. Try different flavors to find your favorite! Enjoy sharing this dish with loved ones.

Easy Chicken Enchiladas Delicious and Quick Recipe

Are you craving a tasty meal that’s quick and easy? Let’s whip up some Easy Chicken Enchiladas! This simple recipe

To make this tasty dip, you need these key ingredients: - 1 cup frozen spinach, thoroughly thawed and drained - 1 cup canned artichoke hearts, finely chopped - 1 cup cream cheese, softened to room temperature - 1/2 cup sour cream - 1/2 cup mayonnaise - 1 cup shredded mozzarella cheese, plus more for topping - 1/2 cup grated Parmesan cheese - 2 cloves garlic, minced - 1 teaspoon fresh lemon juice - Salt and pepper to taste These ingredients create a rich and creamy base. The spinach and artichokes add a nice texture and flavor. The cheeses blend perfectly to give that gooey goodness we all love. You can add a few optional ingredients to kick up the taste: - Red pepper flakes for added heat These tiny flakes can really make the dip pop. If you like spice, sprinkle some in. You can always adjust the amount based on your taste. You can easily swap some ingredients for dietary needs: - Use Greek yogurt instead of sour cream for a healthier option. - Replace mayonnaise with an avocado mash for a creamy twist. - For a dairy-free version, try using cashew cream instead of cheese. With these changes, you can still enjoy the dip while meeting your dietary needs. This flexibility makes it easy for everyone to join in on the fun. For the complete recipe, check out the Full Recipe section. Start by gathering all your ingredients. You need frozen spinach, artichoke hearts, cream cheese, sour cream, mayonnaise, mozzarella cheese, Parmesan cheese, garlic, lemon juice, salt, and pepper. Make sure to thaw and drain the spinach well. Chop the artichoke hearts into smaller pieces. This helps distribute the flavors evenly. In a large bowl, mix the softened cream cheese, sour cream, and mayonnaise. Use an electric mixer or a whisk to get a smooth mix. Add the minced garlic and lemon juice. Season with salt and pepper. Taste it and adjust if needed. Now, gently fold in the spinach, artichoke hearts, mozzarella, and Parmesan. Mix until everything is well combined. Preheat your oven to 375°F (190°C). Grease your baking dish with olive oil or non-stick spray. Transfer the dip mixture into the dish and spread it out. Top with extra mozzarella cheese for a gooey finish. Bake for 25 to 30 minutes, or until it’s hot, bubbly, and golden. When it's done, let it sit for a few minutes before serving. - Full Recipe Overview: This creamy spinach artichoke dip takes about 10 minutes to prep and 40 minutes total to make. It serves 6 to 8 people. For a great presentation, serve it warm in a rustic bowl. Add a sprinkle of red pepper flakes on top and pair it with chips, veggies, or toasted baguette slices. To get a great texture in your creamy spinach artichoke dip, start with softened cream cheese. It mixes better and makes the dip smooth. Ensure you drain the spinach well. Excess water can make the dip runny. Mix the dip until it's creamy, with no lumps. Baking it until golden brown helps achieve a nice crust. This makes each scoop a delight. This dip shines when served warm. Use a rustic bowl for a cozy look. Pair it with crispy tortilla chips for crunch. Fresh veggies like bell peppers and carrots add color and health. Crispy toasted baguette slices are a great choice too. For a fun twist, add some red pepper flakes on top. This adds a pop of flavor and color. Flavor is key to making this dip special. Garlic adds depth, while lemon juice brightens the taste. Experiment with spices like smoked paprika or onion powder for more flavor. For a kick, add red pepper flakes. This dip is also good with fresh herbs like parsley or basil. These small changes can really elevate your dish. For the full recipe, check out the detailed instructions above. {{image_4}} Try mixing in different cheeses for a unique taste. You can use sharp cheddar for a bold flavor. Creamy goat cheese gives a rich, tangy twist. You can also add fontina for a smooth melt. Each cheese adds its own character. Feel free to mix and match until you find your favorite blend. Adding proteins makes this dip heartier. Shredded chicken works well and adds protein. Cooked bacon gives a smoky, savory bite. Just fold these ingredients into the mix. This easy change makes your dip even more filling and delicious. If you like heat, add some spice! Diced jalapeños bring a fresh kick. A few dashes of Tabasco or hot sauce can do the trick, too. You can also mix in red pepper flakes for extra warmth. Adjust the heat level to match your taste. Everyone at your party will love the added zing! For the full recipe, check out Creamy Spinach Artichoke Dip. After your party, store any leftover creamy spinach artichoke dip in an airtight container. Make sure to let it cool completely before sealing. It will stay fresh for about three to four days in the fridge. When you want to enjoy it again, simply take it out and check for freshness. You can freeze the dip if you have a lot left. First, let it cool down. Then, place it in a freezer-safe container. Make sure to leave some space at the top, as it may expand. You can freeze it for up to three months. When you are ready to eat it, thaw it in the fridge overnight. To reheat, place the dip in a baking dish. Preheat your oven to 350°F (175°C). Bake for about 20 minutes or until it is warm throughout. You can also microwave it in a microwave-safe bowl. Heat in short bursts, stirring in between. This way, you keep the creamy texture and great taste. Enjoy your dip warm with your favorite dippers! Yes, you can make this dip ahead of time. It’s a great party hack! Prepare the dip, cover it, and store it in the fridge. You can keep it there for up to two days. When you're ready to serve, just pop it in the oven. Bake it until it’s hot and bubbly. This saves you time and lets you enjoy your guests. If you need a substitute for cream cheese, try using Greek yogurt. It gives a similar texture but adds a tangy flavor. Cottage cheese is another option. Just blend it until smooth first. For a dairy-free option, use cashew cream. Soak cashews in water, blend them until creamy, and use that in your dip. Yes, this dip is gluten-free! All the ingredients listed, like spinach and artichokes, are safe for a gluten-free diet. Just make sure your dippers are gluten-free too. Use fresh veggies, corn chips, or gluten-free bread for the best experience. Enjoy this creamy goodness without worry! You learned the key ingredients for creamy spinach artichoke dip and how to prepare it. I also shared helpful tips for the best taste and texture. Finally, we explored tasty variations and storage methods. This dip is easy to customize to fit your needs. Feel free to experiment and find your perfect blend. Enjoy dipping with family and friends!

Creamy Spinach Artichoke Dip Tasty Party Essential

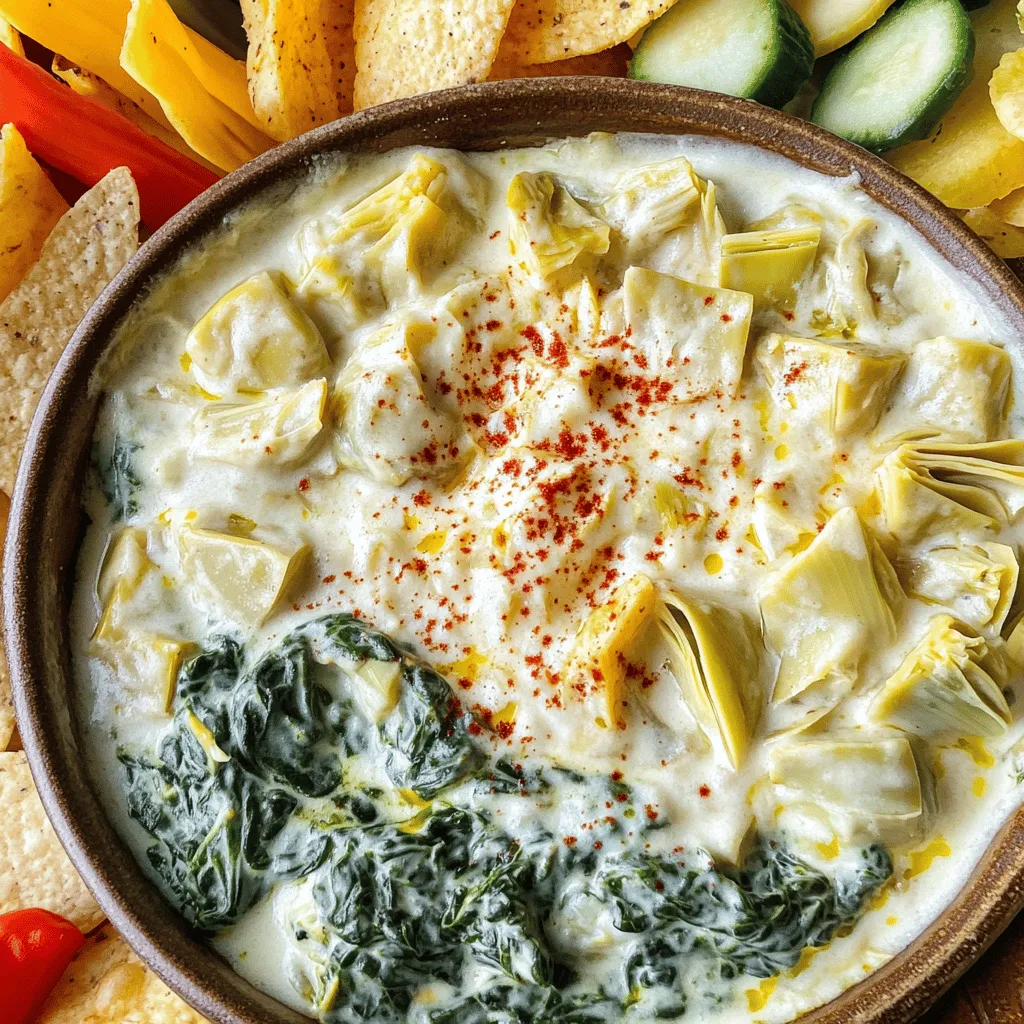
Are you ready to impress your guests with a crowd-pleasing treat? My Creamy Spinach Artichoke Dip is a tasty party

- 1 cup all-purpose flour - 1 cup whole wheat flour - 1 tablespoon baking powder - 1/2 teaspoon baking soda - 1/2 teaspoon salt - 1/4 teaspoon black pepper - 1 teaspoon dried oregano These ingredients form the base of your muffins. The flour gives structure, while baking powder and baking soda help them rise. Salt and pepper add essential flavor, and oregano brings a nice herbal note. - 1 cup buttermilk - 1/4 cup extra virgin olive oil - 2 large eggs - 1 cup cooked breakfast sausage, crumbled (or a vegetarian alternative, like tempeh sausage) - 1/2 cup shredded sharp cheddar cheese Buttermilk adds moisture and tang. The olive oil keeps muffins soft and adds richness. Eggs bind the ingredients together. Sausage brings heartiness, and cheddar adds a sharp flavor that balances well with the other ingredients. - 1/4 cup finely chopped green onions - 1/4 cup sun-dried tomatoes, chopped (optional) - Additional herbs or spices You can customize these muffins with add-ins. Green onions give freshness, while sun-dried tomatoes add a sweet and tangy burst. Consider herbs like basil or spices like cayenne for extra excitement. This combination of ingredients makes your savory breakfast muffins both tasty and satisfying. For the complete recipe, check the Full Recipe section. - Preheating the oven: First, set your oven to 375°F (190°C). This step is key for even baking. - Preparing the muffin tin: Line a standard 12-cup muffin tin with paper liners. You can also lightly grease it with cooking spray. This helps prevent the muffins from sticking. - Whisking flour and leavening agents: In a large bowl, whisk together the all-purpose flour, whole wheat flour, baking powder, baking soda, salt, black pepper, and dried oregano. This helps the leavening agents spread evenly. - Incorporating spices evenly: Make sure to mix well so that every bite has that wonderful flavor. - Mixing buttermilk, oil, and eggs: In another bowl, combine the buttermilk, extra virgin olive oil, and eggs. Whisk until the mixture is smooth. - Achieving a smooth mixture: This ensures that the wet ingredients blend well with the dry ones later. - Folding wet and dry mixtures: Make a well in the center of the dry mix and pour in the wet mix. Gently fold the two mixtures together with a spatula until just combined. - Adding fillings like sausage and cheese: Carefully fold in the cooked sausage, shredded cheese, green onions, and optional sun-dried tomatoes. Make sure everything is mixed well. - Dividing batter among muffin cups: Use a scoop or spoon to fill each muffin cup about three-quarters full. This gives them room to rise. - Baking time and doneness test: Place the muffin tin in the oven and bake for 18 to 22 minutes. They are done when golden brown and a toothpick comes out clean. - Cooling tips: Let the muffins cool in the tin for about 5 minutes. Then, move them to a wire rack to cool completely. This keeps them from becoming soggy. - Presentation suggestions: Serve them warm with a dollop of Greek yogurt or drizzle hot sauce on top. Add a sprig of parsley or chives for color. Enjoy your savory breakfast muffins! For the full recipe, check out the details above. To make your muffins perfect, avoid overmixing the batter. Mixing too much makes them tough. Instead, mix just until you see no dry flour. Leave some lumps; they are okay! Even baking is key to great muffins. Rotate your muffin tin halfway through baking. This helps them bake evenly. Use an oven thermometer to check your oven temperature, too. Pair your muffins with creamy yogurt or a drizzle of hot sauce. This adds flavor and spice to your breakfast. Garnish each muffin with fresh herbs like parsley or chives. It makes your dish look beautiful and fresh! For mixing, use large bowls and sturdy spoons. A good spatula helps fold in ingredients gently. Choose a non-stick muffin tin for easy removal. Silicone muffin pans are great too; they pop out muffins easily. You can find all the details in the Full Recipe to make these savory breakfast muffins delicious and fun! {{image_4}} You can easily make savory breakfast muffins vegetarian. One great way is to swap sausage for tempeh. Tempeh adds protein and a nutty flavor. It’s a perfect substitute. Just crumble it like sausage and mix it in. You can also use different types of cheese. Sharp cheddar is tasty, but you can try feta or pepper jack. Each cheese adds its own unique flavor. Experiment with what you like best! Adding spinach or other vegetables brings extra nutrition and taste. Spinach is mild and mixes well. You could also add bell peppers or zucchini. Just chop them small. They blend into the muffins nicely. If you want some heat, spice it up with jalapeños. Finely chop them and add them to the batter. This will give your muffins a kick. Adjust the amount based on your spice preference. For gluten-free muffins, utilize gluten-free flour blends. These blends work just like regular flour. Check the package for measurements, as they can vary. You may need to adapt baking times too. Gluten-free muffins can bake faster or slower. Keep an eye on them and use a toothpick to test for doneness. These variations make the savory breakfast muffins fun and unique. You can find the full recipe to start baking today! To keep your savory muffins fresh, follow these tips: - Let the muffins cool completely. - Place them in an airtight container. - Store in the fridge for up to one week. Using a glass or plastic container works well. If you have many muffins, stack them with parchment paper between layers. This helps prevent sticking. Freezing muffins is a great way to save them for later. - First, let the muffins cool fully. - Wrap each muffin tightly in plastic wrap. - Place wrapped muffins in a freezer-safe bag. This keeps out air and moisture. When you're ready to enjoy them, thaw muffins in the fridge overnight. For best taste, reheat them after thawing. They can last up to three months in the freezer. To bring back the freshness of your savory muffins, reheating is key. You have two great methods: - Oven: Preheat your oven to 350°F (175°C). Place muffins on a baking sheet. Heat for 10-15 minutes until warm. - Microwave: Place a muffin on a microwave-safe plate. Heat for 15-20 seconds. Check if it's warm enough. The oven method gives a crispier texture, while the microwave is quicker. Choose what fits your time best. Enjoy your muffins just like when they were fresh! You can use regular milk mixed with vinegar or lemon juice. For every cup of buttermilk, add 1 tablespoon of vinegar or lemon juice to 1 cup of milk. Let it sit for about 5 minutes before using. You can also use plain yogurt or sour cream mixed with water for a similar taste. Yes, you can prep these muffins in advance. Mix the dry ingredients and store them in a jar. Combine the wet ingredients in another container. On baking day, just mix them together and bake. This saves time in the morning, and you get fresh muffins! These muffins can last about 3 to 4 days at room temperature if stored in an airtight container. If you see mold or the muffins smell off, it’s best to toss them. For longer storage, refrigerate or freeze them. Absolutely! You can add extras like chopped bell peppers, spinach, or even crumbled feta cheese. Just make sure not to add too much liquid, as it can change the muffin's texture. Get creative with your mix-ins! These muffins pair well with Greek yogurt, fresh fruit, or a light salad. You can also enjoy them with a drizzle of hot sauce or your favorite dip. They make a great addition to brunch with eggs or a refreshing smoothie. Check out the Full Recipe for more ideas! Savory breakfast muffins are fun and easy to make. Using simple ingredients, you can create a flavorful dish. The blog outlined key ingredients, step-by-step instructions, and helpful tips. Remember to avoid overmixing for best results. Experiment with flavors and variations to keep things exciting. Store extras properly to enjoy your muffins longer. From meal prep to pairing ideas, these muffins fit every need. Try these recipes and make breakfast enjoyable every day!

Savory Breakfast Muffins Flavorful and Easy Recipe

Are you tired of the same old breakfast routine? Savory breakfast muffins can change your mornings! They are packed with

To make a delicious teriyaki chicken bowl, you need a few key ingredients. Here’s what you will use: - 1 lb (450g) chicken breast, thinly sliced - 1 cup broccoli florets - 1 cup bell pepper (any color), sliced into strips - 1/2 cup carrot, julienned - 1 cup cooked jasmine rice - 1 tablespoon sesame oil - 1 tablespoon olive oil These ingredients come together to form a colorful and tasty meal. The teriyaki sauce is what makes this dish shine. You’ll need: - 3 tablespoons low sodium soy sauce - 2 tablespoons honey - 1 tablespoon rice vinegar - 1 teaspoon fresh ginger, minced - 1 garlic clove, minced This sauce adds a sweet and savory flavor that pairs perfectly with the chicken and veggies. Garnishes make your dish look and taste even better. Here’s what you can use: - Sesame seeds for garnish - Chopped green onions for garnish These small touches add a burst of flavor and a nice crunch. You can find the full recipe for a detailed cooking guide. Enjoy making your teriyaki chicken bowls! To start, you will mix the sauce. In a medium bowl, combine: - 3 tablespoons low sodium soy sauce - 2 tablespoons honey - 1 tablespoon rice vinegar - 1 teaspoon fresh ginger, minced - 1 garlic clove, minced - 1 tablespoon sesame oil Whisk these ingredients together until smooth. This will be your base sauce. Next, set aside half of this sauce in a separate bowl. You will drizzle this on top later for extra flavor. Now, heat a large skillet or wok over medium-high heat. Add 1 tablespoon of olive oil. Once the oil is hot, add the thinly sliced chicken breast. Cook the chicken for about 5-7 minutes. Stir it often to avoid burning. You want it to turn golden-brown and be fully cooked. After the chicken is cooked, it's time for the veggies. Add 1 cup of broccoli florets, 1 cup of sliced bell pepper, and 1/2 cup of julienned carrot into the skillet. Stir-fry these vegetables with the chicken for 3-4 minutes. They should be tender but still crisp. Next, pour the prepared teriyaki sauce over the chicken and veggies. Bring it to a gentle simmer. Now, add 1 tablespoon of cornstarch mixed with 2 tablespoons of water. Stir it in. Cook for another 2-3 minutes until the sauce thickens nicely. To serve, take 1 cup of cooked jasmine rice and divide it among serving bowls. Spoon the teriyaki chicken and veggies over the rice. Drizzle the reserved teriyaki sauce on top for more flavor. For garnish, sprinkle sesame seeds and chopped green onions over each bowl. Serve immediately while hot. You can also add lime wedges on the side for a zesty kick. Enjoy your beautiful and tasty teriyaki chicken bowls! To avoid dryness, choose chicken breasts that are fresh. Cut them into thin slices for even cooking. Make sure to heat your pan well before adding the chicken. This helps lock in moisture. Cook the chicken until it's just done, about 5-7 minutes. If you overcook it, it may dry out. To achieve that golden-brown color, do not crowd the pan. Give each piece space to sear properly. Let the chicken sit for a moment before stirring. This helps create that nice crust. You can also use a bit of sesame oil for extra flavor and color. For crispiness, cook vegetables for 3-4 minutes. You want them tender but still crunchy. Start with the chicken first, then add the broccoli, bell pepper, and carrot. This order ensures that everything cooks perfectly. Choosing the right vegetables is key. Broccoli and bell peppers add great color and crunch. Carrots bring sweetness and texture. You can also mix in snap peas or zucchini for more variety. To adjust sweetness in the teriyaki sauce, start with less honey. You can always add more if needed. Taste as you go to find the right balance. For extra flavor, add some crushed red pepper or black pepper. A touch of garlic powder can also enhance the sauce. If you like a bit of zing, consider adding a splash of lime juice. This brightens up the dish and adds depth. Try these tips to create the best teriyaki chicken bowls. For a complete guide, check the Full Recipe. {{image_4}} You can switch the chicken for beef or pork. Thinly slice flank steak or pork tenderloin for a tasty twist. These meats soak up the teriyaki sauce well and add rich flavor. For vegetarian or vegan options, try tofu or tempeh. Both are great protein sources. Press tofu to remove moisture, then cube it before cooking. Marinate it in the teriyaki sauce for extra flavor. Feel free to change the vegetables based on what’s in season. Snap peas, zucchini, or mushrooms work great. You can also add baby corn or bok choy for a fun texture. Get creative with your add-ins! Try adding cashews or peanuts for crunch. You can even toss in some pineapple chunks for a sweet touch. You can use brown rice instead of jasmine rice. Brown rice is heartier and adds more fiber. It complements the teriyaki chicken nicely. If you want a healthy twist, quinoa is a fantastic choice. It cooks quickly and has a nutty flavor. Quinoa also packs a protein punch, making your meal even better! For a complete guide on making these tasty bowls, check out the Full Recipe. To keep your teriyaki chicken bowls fresh, store leftovers promptly. Place the chicken and veggies in a sealed container. Use glass or BPA-free plastic containers for best results. Always let the food cool before sealing. This helps prevent moisture buildup and keeps your meal tasty. Refrigerate your leftovers within two hours to ensure food safety. When reheating, you want to keep your chicken moist and tender. The stovetop method works best. Heat a skillet over low heat. Add a splash of water or broth to help steam the chicken. Stir gently until heated through. If using a microwave, cover the bowl with a damp paper towel. This helps trap steam and keep moisture in. Heat in short bursts, checking every 30 seconds. For busy days, meal prep is a lifesaver. You can cook chicken and veggies in advance. Store them separately from the rice. Prepare the teriyaki sauce ahead of time and keep it in the fridge. When ready to eat, just reheat everything and assemble your bowl. This way, you can enjoy a quick and healthy meal anytime. To make Teriyaki Chicken Bowls, start with these steps and ingredients: - 1 lb chicken breast, thinly sliced - 1 cup broccoli florets - 1 cup bell pepper, sliced into strips - 1/2 cup carrot, julienned - 1 cup cooked jasmine rice - 1 tablespoon sesame oil - 1 tablespoon olive oil - 3 tablespoons low sodium soy sauce - 2 tablespoons honey - 1 tablespoon rice vinegar - 1 teaspoon fresh ginger, minced - 1 garlic clove, minced - 1 tablespoon cornstarch mixed with 2 tablespoons water - Sesame seeds for garnish - Chopped green onions for garnish 1. Make the Teriyaki sauce by mixing soy sauce, honey, rice vinegar, ginger, garlic, and sesame oil in a bowl. Set aside some for later. 2. Heat olive oil in a skillet over medium-high heat. Cook the chicken until golden and fully done, about 5-7 minutes. 3. Add broccoli, bell pepper, and carrot to the skillet. Stir-fry for 3-4 minutes until they are tender but still crisp. 4. Pour the teriyaki sauce over the chicken and veggies. Let it simmer and add the cornstarch slurry. Stir until the sauce thickens, around 2-3 minutes. 5. Serve over cooked jasmine rice, drizzle with the reserved sauce, and finish with sesame seeds and green onions. You can find the Full Recipe for more details. You can pair Teriyaki Chicken Bowls with various side dishes. Here are some ideas: - Steamed edamame for a healthy snack. - Crispy seaweed salad for a crunchy texture. - Miso soup for a warm, savory addition. - Cucumber salad to add freshness. These sides enhance the meal and add different flavors. Teriyaki Chicken can be a healthy meal option. Here’s a quick breakdown: - Protein: Chicken breast is lean and provides good protein. - Vitamins: The veggies add fiber, vitamins, and minerals. - Sodium: Using low sodium soy sauce helps lower salt intake. - Sugar: Honey adds sweetness but can be adjusted to your taste. To make it healthier, use more vegetables and less sauce. Yes, you can freeze Teriyaki Chicken Bowls. Here are some guidelines: - Cool the dish completely before freezing. - Use airtight containers or freezer bags to prevent freezer burn. - Label with the date for easy tracking. When ready to eat, thaw overnight in the fridge and reheat thoroughly. Enjoy your meal! In this post, we explored how to make delicious Teriyaki Chicken Bowls. We covered key ingredients like chicken, veggies, and sauce components. I shared step-by-step cooking instructions, helpful tips for perfect chicken, and variations to suit your taste. You now have the tools to create a tasty meal at home. Enjoy experimenting with flavors and make it your own. With these simple steps, your Teriyaki Chicken Bowls will impress everyone!

Teriyaki Chicken Bowls Flavorful and Quick Dinner Meal

If you’re craving a quick and tasty dinner idea, look no further than Teriyaki Chicken Bowls! This dish packs delicious

Older posts
Newer posts
← Previous Page1 … Page65 Page66 Page67 … Page71 Next →

dsad

© 2025 spoonfulsavory • Built with GeneratePress

Our Policies

  • Copyright Policy
  • Cookie Policy
  • GDPR Policy
  • Privacy Policy
  • Disclaimer
  • Terms Of Use

More Information

  • Home
  • About
  • Contact
  • Appetizers
  • Dessert
  • Dinner
  • Drinks
©2025, spoonfulsavory About Back To Top