![To make your no-bake cheesecake jars, you need some key ingredients. Here’s what you’ll need: - 1 cup graham cracker crumbs - 1/4 cup unsalted butter, melted - 2 (8 oz) packages cream cheese, softened - 1 cup powdered sugar - 1 teaspoon pure vanilla extract - 1 cup heavy whipping cream These ingredients create a creamy and rich cheesecake filling. The graham cracker crumbs form a tasty crust that holds everything together. You can mix things up by adding optional ingredients. Here are some ideas: - 1/4 cup freshly squeezed lemon juice for a tangy twist - 1/2 cup melted chocolate for a chocolate cheesecake - 1 teaspoon almond extract for a nutty flavor - 1/2 cup crushed cookies for a fun crunch These options let you customize your cheesecake jars to suit your taste. Garnishing your cheesecake jars makes them look and taste even better. Here are some great ideas: - 1/2 cup fresh berries (strawberries, blueberries, or raspberries) - A drizzle of chocolate or caramel sauce - A sprinkle of crushed nuts or cookies - Fresh mint leaves for a pop of color These toppings add flavor and make your dessert visually appealing. You’ll impress your friends and family with these beautiful no-bake cheesecake jars. For a complete recipe, check the [Full Recipe]. To make the crust, grab a medium bowl. Add 1 cup of graham cracker crumbs and 1/4 cup of melted butter. Mix them well until the crumbs look like wet sand. This mix should hold together when you press it. Take about 2 tablespoons of this mixture and put it in each jar. Press down gently with a spoon or your fingers. Aim for an even layer at the bottom. Set the jars aside while you prepare the filling. Next, we will make the cheesecake filling. In a large bowl, beat 2 packages of softened cream cheese using an electric mixer. Mix on medium speed until it’s smooth. Add 1 cup of powdered sugar and 1 teaspoon of vanilla extract. Keep mixing until fluffy. In another bowl, whip 1 cup of heavy cream until stiff peaks form. Gently fold the whipped cream into the cream cheese mix using a spatula. If you want a tangy twist, fold in 1/4 cup of fresh lemon juice. Now, it’s time to assemble the jars. Use a spoon or a piping bag to fill each jar with the cheesecake filling. Layer it over the crust until the jars are about three-quarters full. Cover each jar with a lid or plastic wrap. Place them in the fridge to chill for at least 4 hours. If you want a firmer cheesecake, refrigerate overnight. When ready to serve, top each jar with fresh berries. This adds color and flavor to your dessert. Enjoy your no-bake cheesecake jars! For the full recipe, check out the complete instructions. To get a smooth filling, first ensure your cream cheese is soft. Let it sit at room temperature for at least 30 minutes before mixing. Use an electric mixer on medium speed to beat the cream cheese until there are no lumps. Gradually add powdered sugar and vanilla, mixing well. This step is key for a creamy texture. For perfect whipped cream, start with cold heavy cream. Use a chilled bowl and whisk. Beat the cream until stiff peaks form. Be careful not to overwhip; it can turn grainy. Gently fold the whipped cream into the cream cheese mixture. This keeps the filling light and airy, making it delightful! Avoid using cold cream cheese. It makes lumps impossible to mix out. Don’t rush the whipping process. Take your time to get stiff peaks. Also, don’t skip chilling the jars. Chilling helps the flavors meld and firms up the filling. These small tips will help you create a perfect no-bake cheesecake every time! {{image_4}} You can easily change the flavor of your no-bake cheesecake jars. Try adding chocolate for a rich twist. Just mix in melted chocolate with the cream cheese. For a fresh taste, use lemon juice and zest. It adds brightness and pairs well with fresh berries. Other fruit purees, like mango or raspberry, work great too. Each flavor brings something unique to the dessert. Need a gluten-free option? Just swap graham crackers for gluten-free cookies. For a vegan treat, use vegan cream cheese and coconut cream instead of heavy cream. You can also use maple syrup as a sweetener. This way, everyone can enjoy these delicious jars, no matter their diet. Serve these jars at parties or family gatherings. They look lovely on a dessert table. For a fun touch, add a scoop of ice cream on top. You can also sprinkle some crushed nuts for texture. If you want to impress, drizzle chocolate or caramel sauce over the top. These small tweaks make each jar a delightful treat! Explore the full recipe for more ideas. To keep your no-bake cheesecake jars fresh, store them in the fridge. Use airtight lids or plastic wrap to cover each jar. This keeps them safe from odors and moisture. Make sure your jars sit flat on a shelf. Avoid stacking them to prevent spills. No-bake cheesecake jars last about 4 to 5 days in the fridge. The flavors get better as they sit. However, for the best taste and texture, enjoy them within 3 days. After that, the crust may get a bit soggy. You can freeze these jars for up to 2 months. Before freezing, leave off the fresh berries. They do not freeze well. Instead, add them just before serving. To freeze, wrap each jar tightly in plastic wrap and then in foil. This prevents freezer burn. For best results, thaw them in the fridge overnight before serving. Enjoy your no-bake cheesecake anytime! No-Bake Cheesecake Jars last about 5 days in the fridge. They stay fresh and tasty during this time. Make sure you store them in an airtight container. This keeps them safe from absorbing other smells in the fridge. If you want the best taste, enjoy them within the first few days. Yes, you can use low-fat cream cheese for this recipe. The texture might be slightly different, but it still works well. Low-fat cream cheese may make the cheesecake a bit less rich. If you prefer a lighter option, this is a good choice. You’ll still enjoy a yummy dessert without all the calories. If you don’t have graham crackers, you can use other options. Try crushed cookies like Oreos or vanilla wafers. You can also use crushed nuts for a gluten-free option. Another choice is to use crushed crackers, such as saltines or digestive biscuits. Just remember to adjust the sugar based on the sweetness of your substitute. No-bake cheesecake jars are simple and fun to make. We covered essential ingredients, different flavors, and tasty toppings. I shared step-by-step instructions to help you prepare the crust, filling, and assembly. You learned useful tips for a smooth mix and whipped cream too. Variations allow you to customize this dessert for any diet or taste. Finally, I shared smart storage tips to keep them fresh. Enjoy creating your own delicious jars!](https://spoonfulsavory.com/wp-content/uploads/2025/04/c431b6df-6275-4c93-bea6-15af88f48812.webp)
No-Bake Cheesecake Jars Delightful and Easy Recipe
Dive into the world of dessert with my simple and fun No-Bake Cheesecake Jars! This delightful recipe is perfect for
Dive into the world of dessert with my simple and fun No-Bake Cheesecake Jars! This delightful recipe is perfect for

If you’ve been searching for the perfect side dish, look no further! This Sweet Potato Casserole with Marshmallows Delight brings
 for all the details to make this dish shine. {{image_4}} You can easily switch the chicken in this dish. If you have leftover turkey, use that instead. It gives a nice twist to the flavor. You can also grab a rotisserie chicken from the store. Just shred it up and mix it in. If you want a vegetarian option, think about using mushrooms or chickpeas. Both add a hearty feel. You can also try tofu for a plant-based protein boost. To change the taste, try adding Italian herbs like basil or oregano. They bring a fresh taste that pairs well with the creamy sauce. For a bit of heat, sprinkle in some red pepper flakes. This adds a spicy kick that makes the dish exciting. You can use different sauces if you want a twist. Try a creamy mushroom sauce for a fun change. If you want to keep it light, look for dairy-free options. Coconut milk or cashew cream works great. They create a rich sauce without dairy. For the full recipe, check the link provided. Keep your Chicken Alfredo Pasta Bake in an airtight container. This helps keep it fresh. Store it in the fridge for up to four days. Make sure to allow it to cool before sealing it. This step prevents moisture buildup, which can make your dish soggy. To freeze your pasta bake, let it cool completely. Cut it into individual servings for easy thawing. Wrap each piece tightly in plastic wrap, then place them in a freezer bag. This way, you save space and keep them fresh. It will last for up to three months. When you’re ready to eat, simply take one out to thaw. Reheat your Chicken Alfredo Pasta Bake using an oven for best results. Preheat the oven to 350°F (175°C). Place the pasta in an oven-safe dish, cover it with foil, and heat for about 20 minutes. This method keeps the cheese melty and the pasta moist. If you prefer the microwave, use a microwave-safe bowl. Heat in short intervals of 1-2 minutes, stirring in between. This helps distribute the heat evenly, so every bite is warm and tasty. Yes, you can make this dish ahead of time. Prepare the pasta bake and layer it in a dish. Cover it tightly and store it in the fridge. You can bake it later when you are ready to eat. Just add a few extra minutes to the bake time. This makes it easy for busy nights or potlucks. If you want to skip store-bought Alfredo, you can make your own. Use heavy cream, butter, and Parmesan cheese. Heat the cream in a pot, add butter, and whisk in cheese until it melts. You can also add garlic for extra flavor. This will give you a fresh and tasty sauce. Yes, this recipe is great for meal prep. You can divide it into individual portions after baking. Store each portion in airtight containers. This way, you have easy meals for the week. Just reheat them in the microwave or oven when you're ready to eat. Absolutely! You can mix and match cheeses. Try adding cheddar for a sharper taste. You can also use gouda or fontina for a creamy texture. Just keep the total amount of cheese the same to maintain the dish's balance. To make it healthier, you can swap out some ingredients. Use whole wheat pasta for more fiber. You can also add more veggies, like spinach or bell peppers, for added nutrients. Try low-fat cheese or a light Alfredo sauce to cut calories while keeping the flavor. This blog post shared a simple and tasty chicken pasta bake recipe. We covered the main ingredients, optional add-ins, and essential cooking tips. You learned how to assemble and bake the dish for a perfect cheesy top. I also shared variations and storage tips. Cooking can be fun and easy. With a few tweaks, you can make it your own. Enjoy this dish with friends and family!](https://spoonfulsavory.com/wp-content/uploads/2025/04/dcf35f73-fb54-4660-8f1f-b125299b1e1c.webp)
Looking for a cozy meal that’s easy to make? My Easy Chicken Alfredo Pasta Bake is just the ticket! This
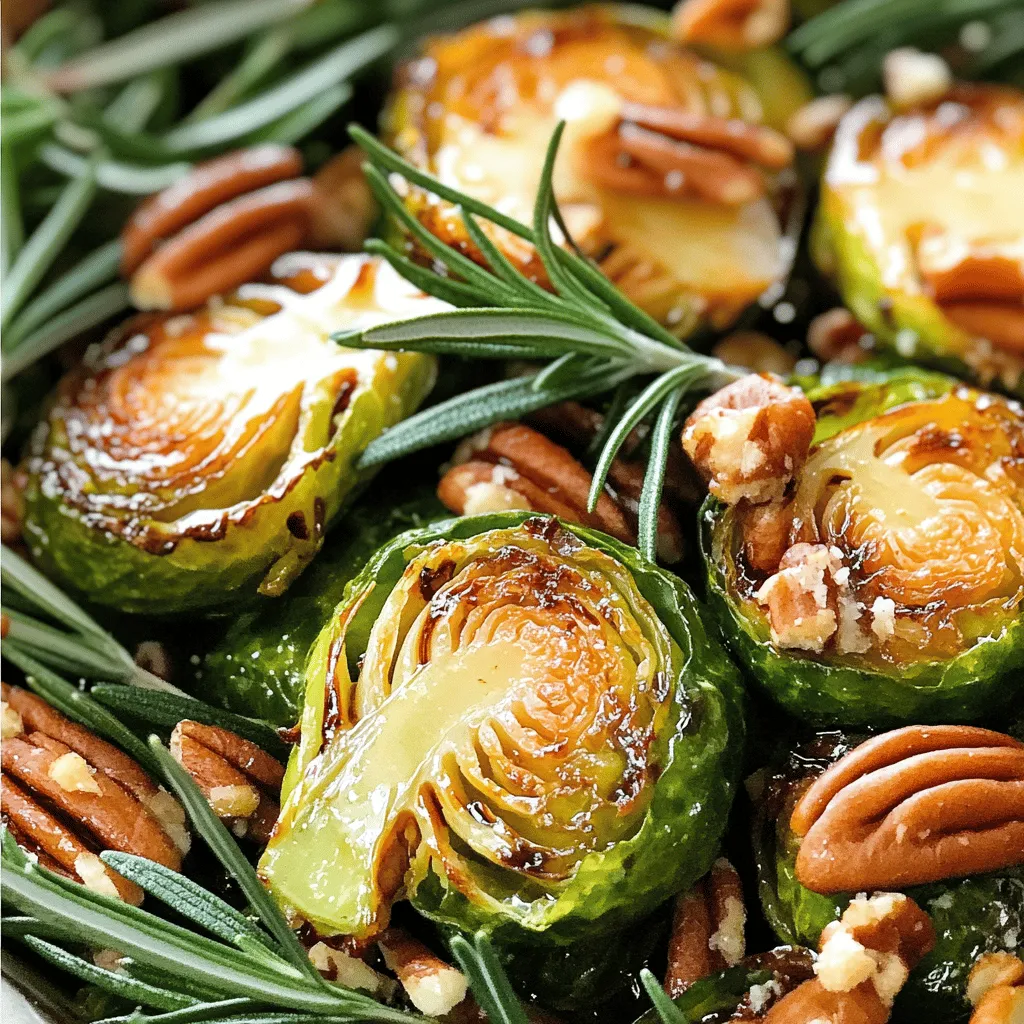
Looking for a side dish that’s both tasty and easy to make? You’re in the right place! Balsamic Glazed Brussels
![For this tasty dish, you will need: - 2 lbs boneless, skinless chicken thighs, cut into bite-sized pieces - 1 cup plain yogurt - 4 cloves garlic, minced - 1 inch piece of ginger, grated - 1 large onion, finely chopped - 1 can (14 oz) crushed tomatoes - 1 cup coconut cream - 1 tablespoon fresh lemon juice - 2 tablespoons vegetable oil - Salt and pepper, to taste The magic lies in the spices: - 2 tablespoons garam masala - 1 teaspoon ground cumin - 1 teaspoon ground coriander - 1 teaspoon turmeric powder - 1 teaspoon cayenne pepper (adjust based on desired spice level) These spices create that rich, warm flavor in your Chicken Tikka Masala. To make your dish special, consider these garnishes: - Fresh cilantro, chopped Adding cilantro adds a burst of color and freshness. Serving the dish with fluffy basmati rice or warm naan makes it even better. You can find the Full Recipe for more detailed steps and tips. First, grab a medium bowl. Add 1 cup of plain yogurt. Then, mix in 2 tablespoons of garam masala. Next, add 1 teaspoon each of ground cumin, ground coriander, and turmeric powder. For some heat, include 1 teaspoon of cayenne pepper. You can adjust this to your taste. Now, add 4 minced garlic cloves and 1 inch of grated ginger. Stir everything together until it's well mixed. Set your slow cooker to high and pour in 2 tablespoons of vegetable oil. Let it heat for about 10 minutes. Then, add 1 finely chopped large onion. Sauté the onion for around 5 minutes until it turns translucent. If your slow cooker can't sauté, do this step on the stovetop. Once the onions are ready, add your marinated chicken to the slow cooker. Stir well to coat the chicken with the onions. Now, pour in 1 can of crushed tomatoes and 1 cup of coconut cream. Stir everything together until combined. Make sure the chicken is covered in the sauce. Season with salt and pepper to your liking. Cover the slow cooker and set it on low for 6-8 hours or high for 3-4 hours. This slow cooking makes the chicken tender and flavorful. Once it's done, add 1 tablespoon of fresh lemon juice and stir gently. Taste to see if you need more seasoning. To get the best flavor in your Chicken Tikka Masala, start with marinating the chicken. Use yogurt and spices like garam masala, cumin, and cayenne. Let the chicken sit in the marinade for at least one hour, but overnight is even better. This step lets the chicken soak up all those wonderful spices. Also, don't skip the sautéing of onions. This builds a rich flavor base for your dish. One common mistake is rushing the marination process. If you don’t marinate long enough, your chicken won’t absorb the flavors well. Another mistake is not sautéing the onions. This step enhances the taste and adds depth. Lastly, avoid overcooking. Keep an eye on the time, as chicken can become dry if cooked too long. Always brown your onions before adding other ingredients. This simple step adds great flavor. Ensure the chicken is fully submerged in the sauce for even cooking. Adjust your cooking time based on your slow cooker. If you have more than one setting, use low for a longer, richer flavor. Finally, finish with fresh lemon juice just before serving. This brightens the dish and adds a lovely zing. For the full recipe, check out the details above! {{image_4}} You can easily make a vegetarian version of Chicken Tikka Masala. Start by using chickpeas or paneer instead of chicken. Both options soak up the spices well. You can add extra veggies like bell peppers, spinach, or cauliflower for added nutrition and flavor. Just follow the same steps in the [Full Recipe] and enjoy a delicious meat-free meal. Do you like it spicy or mild? The spice level is easy to adjust. If you want a mild dish, use less cayenne pepper. For more heat, increase the cayenne or add chopped green chilies. Remember, you can always add more spice later, but it’s hard to take it away. Taste your dish as it cooks to find the right balance for you. If you don’t have some ingredients, don't worry. You can swap items easily. For instance, use Greek yogurt instead of plain yogurt for a thicker texture. If you don’t have coconut cream, heavy cream works too. For a fresh twist, add a bit of lime juice instead of lemon. These swaps keep the dish tasty and fun! After enjoying your Slow Cooker Chicken Tikka Masala, let it cool. Place leftovers in an airtight container. Store it in the fridge. It will stay fresh for about 3 to 4 days. Make sure to label the container with the date. This way, you can keep track of how long it has been stored. If you want to save it for later, freezing is a great option. Use a freezer-safe container or bag. Leave some space at the top for expansion. Chicken Tikka Masala can last up to 3 months in the freezer. When you are ready to eat it, just thaw it overnight in the fridge. To reheat, you have a few options. For quick warming, use a microwave. Heat in short bursts, stirring in between. If you prefer, you can also reheat it on the stove. Just add a splash of water or coconut cream to keep it moist. Heat it gently over low heat, stirring often. Enjoy this dish as if it were fresh! You can serve Chicken Tikka Masala with several tasty sides. I love pairing it with fluffy basmati rice. Naan bread is also a great choice for dipping. You might consider a fresh salad or some steamed veggies. These options balance the rich flavors of the dish. Yes, you can use chicken breasts. However, chicken thighs offer more flavor and stay juicy. If you choose breasts, watch the cooking time. They may cook faster and can dry out if overcooked. Chicken Tikka Masala can last in the fridge for about 3 to 4 days. Make sure to store it in an airtight container. If you want to keep it longer, consider freezing it. Yes, you can cook this recipe on the stovetop. Sauté the onions in a pot first, then add the marinated chicken. Pour in the crushed tomatoes and coconut cream. Let it simmer for about 30 minutes until the chicken is tender. Follow the same seasoning steps as in the slow cooker method. For the full experience, check out the Full Recipe. This Chicken Tikka Masala recipe is easy and tasty. We covered the main ingredients and spices, plus tips for making it perfect. I shared steps for cooking in a slow cooker and variations for everyone. Don't forget to store your leftovers properly! You can serve this dish with rice or naan for a full meal. Enjoy making it your own by adjusting flavors and ingredients. With these tips, you will create a dish that impresses every time. Happy cooking!](https://spoonfulsavory.com/wp-content/uploads/2025/04/3056828d-910e-4a1d-a31a-f67bac3247a8.webp)
Ready to savor a dish that brings Indian flavors right to your kitchen? My Savory Slow Cooker Chicken Tikka Masala
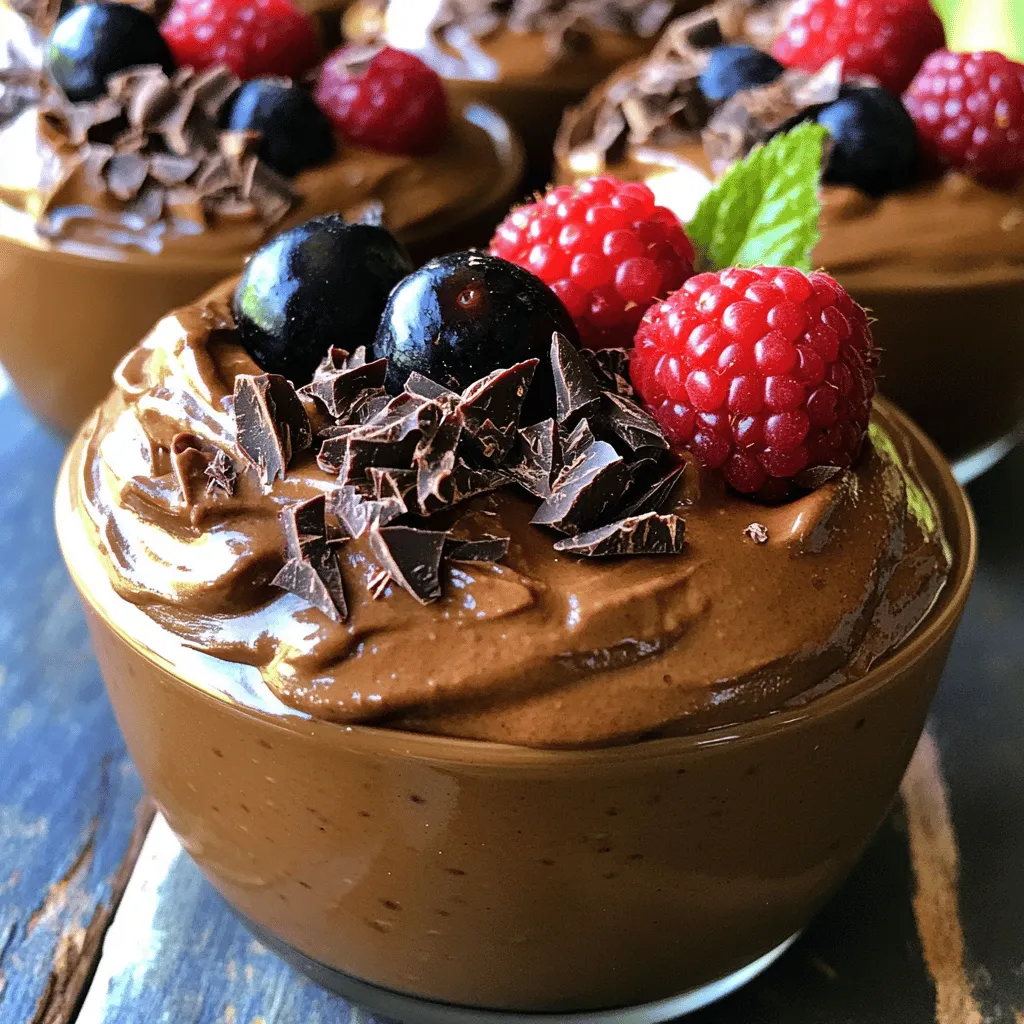
If you’re craving a dessert that’s both rich and healthy, you must try Chocolate Avocado Mousse! This creamy delight combines
![- 1 pound boneless, skinless chicken thighs, cut into bite-sized pieces - 1 cup long-grain white rice, rinsed and drained - 1 medium onion, finely chopped - 2 cloves garlic, minced - 1 cup frozen mixed vegetables (peas, carrots, corn) I love using chicken thighs for this dish. They stay juicy and tender. The rice absorbs all the flavors. The onion and garlic add a nice base. Frozen vegetables make it easy and quick. - 2 cups low-sodium chicken broth - 1 cup cream of mushroom soup (store-bought or homemade) - 1 teaspoon garlic powder - 1 teaspoon onion powder - 1 teaspoon dried thyme - 1 teaspoon paprika - Salt and freshly ground black pepper, to taste - 2 tablespoons olive oil The broth gives rich flavor. Cream of mushroom soup adds creaminess. Garlic and onion powders boost the taste. Thyme and paprika add depth. Adjust salt and pepper for your taste. - Fresh parsley, chopped, for garnish Garnishing with fresh parsley adds color and brightness. You can also add more herbs if you like. A sprinkle of paprika on top looks nice too. For the full recipe, check out the [Full Recipe]. - Sautéing Until Golden Brown Set your Instant Pot to the sauté function. Pour in the olive oil and let it heat. Add the chicken pieces and season them with salt, pepper, garlic powder, and onion powder. Sauté the chicken for about 5 minutes until it turns golden brown. This step locks in flavor and adds a nice crust. - Seasoning Tips Using fresh herbs can enhance flavor. Try adding dried thyme and paprika for a warm, earthy taste. Adjust the amount of salt based on your preference and dietary needs. - Softening Onion and Garlic After removing the chicken, add chopped onion and minced garlic to the pot. Sauté them for 2 to 3 minutes. Stir often until the onions are soft and see-through. This builds a tasty base for your casserole. - Importance of Base Flavors Onion and garlic are key to creating depth in your dish. They add richness that complements the chicken and rice. - Mixing Rice and Broth Return the chicken to the pot. Add the rinsed rice and low-sodium chicken broth. Sprinkle in dried thyme and paprika. Stir gently to ensure the rice is covered with liquid. This step is crucial for even cooking. - Adding Vegetables and Soup Now, mix in the frozen vegetables and the cream of mushroom soup. Stir until everything is well combined. This adds creaminess and nutrition to your meal. - Setting Up Pressure Cooking Close the lid and check the steam release valve. Make sure it’s set to sealing. Select the Manual or Pressure Cook setting for 10 minutes. This locks in moisture and flavors. - Natural Pressure Release Once the timer goes off, let the pressure release naturally for 10 minutes. This helps the rice finish cooking and keeps it fluffy. After that, carefully switch the valve to venting to let out any remaining steam. - Fluffing the Casserole Open the lid and use a fork to fluff the casserole. Mix gently so the rice stays intact. This gives your dish a light and airy texture. - Adjusting Seasoning and Serving Taste your casserole and adjust the seasoning as needed. You may want to add more salt or pepper. Serve in colorful bowls and garnish with fresh parsley for a lovely presentation. For the full recipe, check the earlier section. To make your casserole burst with flavor, use fresh herbs. I love adding thyme and parsley. They bring brightness to the dish. If you don’t have fresh herbs, use dried ones. Just remember that dried herbs are stronger. Use less than you would of fresh. For depth, consider adding a splash of soy sauce or Worcestershire sauce. It adds a savory kick. You can also swap chicken thighs for breasts if you prefer. However, thighs stay juicier, which helps with flavor. Always check the sealing ring on your Instant Pot. If it’s damaged, you won’t get a proper seal. This can lead to uneven cooking. Proper sealing is key for pressure cooking to work well. If you see a burn notice, do not panic. It often means food stuck to the bottom. Make sure to scrape up any bits after sautéing. This helps prevent that issue and keeps your casserole from burning. When serving, I recommend using colorful bowls. They make the dish pop. A large platter works too if you’re serving a crowd. For garnishing, sprinkle extra parsley on top. A bit of paprika can also add color. These small touches make your casserole look fancy and inviting. {{image_4}} When you cook Instant Pot chicken and rice casserole, you can switch it up in fun ways. Here are some ideas to make your dish unique and tasty. - Brown Rice or Quinoa Options: Instead of white rice, try brown rice or quinoa. These grains add more fiber and nutrients. Brown rice takes longer to cook, so adjust your time to 22 minutes. Quinoa cooks in about 8 minutes, but rinse it well first. - Low-Fat Soups and Creams: Use low-fat cream of mushroom soup or even a homemade version. You can blend cooked mushrooms with broth to create a lighter base. This keeps your casserole creamy without extra calories. - Different Vegetables to Include: You can add fresh or frozen veggies like bell peppers, spinach, or broccoli. This adds color and nutrition to your dish. Just remember to chop them small for even cooking. - Alternative Protein Sources: If chicken isn’t your thing, swap it out for turkey or tofu. These options provide different flavors and textures. For tofu, press it to remove moisture and cube it before cooking. - Inspiration from Global Flavors: Try adding spices like curry powder or cumin for an Indian twist. You can also use soy sauce and ginger for an Asian flair. This makes your casserole exciting and new. - Adding Heat or Sweetness: For spice, toss in some diced jalapeños or red pepper flakes. If you like it sweet, add a touch of honey or maple syrup. Both options change the taste profile and make your meal stand out. For the full recipe, check the detailed instructions and enjoy the journey of cooking! - Refrigeration Guidelines: Allow your casserole to cool completely. Store it in an airtight container. It will last for 3 to 4 days in the fridge. Make sure to keep it tightly sealed to prevent drying out. - Freezing for Future Meals: For longer storage, you can freeze the casserole. Place it in a freezer-safe container or bag. It will stay fresh for up to 3 months. Label the container with the date for easy reference. - Best Methods for Microwaving: To reheat in the microwave, place a portion on a microwave-safe plate. Cover it with a damp paper towel. Heat in short intervals, stirring in between, until hot. This method keeps the rice from drying out. - Oven Reheating Techniques: For oven reheating, preheat your oven to 350°F (175°C). Place the casserole in an oven-safe dish. Cover it with aluminum foil to retain moisture. Heat for about 20-30 minutes, checking frequently to avoid overcooking. This dish takes about 30 minutes total. You will spend 15 minutes prepping. The Instant Pot cooks the casserole in about 10 minutes. Yes, you can use brown rice. However, you need to adjust the cooking time. Use 22 minutes instead of 10 minutes. Brown rice takes longer to cook but adds a nice chewy texture. Absolutely! This recipe is great for meal prep. You can make a big batch and store it in the fridge. It keeps well for up to four days. For sides, consider fresh salad or steamed broccoli. These dishes add color and nutrients. You can also serve it with crusty bread for a complete meal. This post covers how to make a delicious Instant Pot Chicken and Rice Casserole. We discussed the key ingredients, seasonings, and optional garnishes. I provided step-by-step instructions and tips for perfect flavor. You learned about variations and how to store leftovers effectively. In the end, this dish is versatile and easy to prepare. Enjoy experimenting with flavors and ingredients. Your next family meal can be simple and tasty!](https://spoonfulsavory.com/wp-content/uploads/2025/04/c9ee0597-b7db-4965-b684-3012dfdd0f5b.webp)
Looking for a quick and tasty dinner option? You’ve come to the right place! In this post, I’ll show you
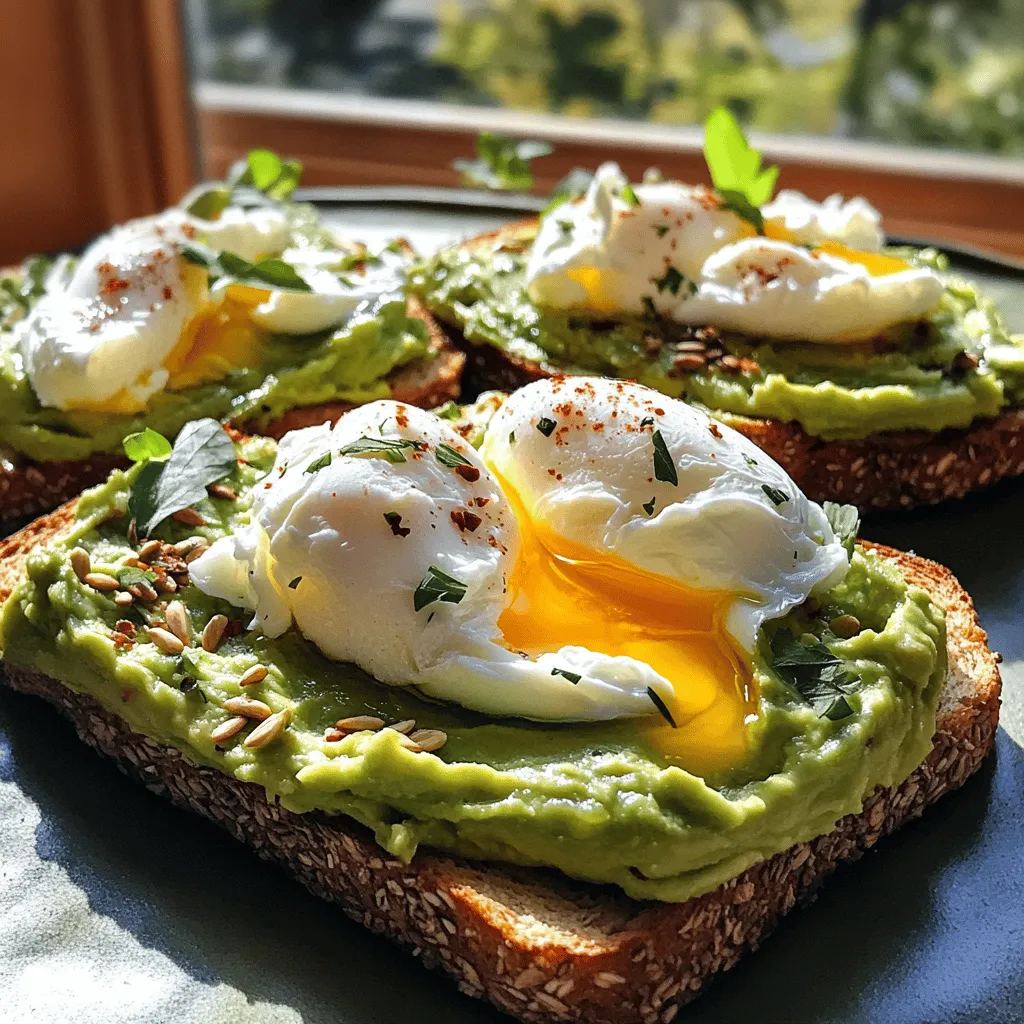
Are you ready to elevate your breakfast game? This Incredible Avocado Toast with Poached Egg Delight packs flavor, nutrition, and
![To make creamy tomato basil soup, gather these ingredients: - 2 tablespoons olive oil - 1 medium onion, finely chopped - 3 cloves garlic, minced - 2 (14-ounce) cans of diced tomatoes (preferably fire-roasted) - 1 cup vegetable broth - 1 teaspoon sugar - 1 teaspoon dried basil - 1/2 teaspoon salt - 1/4 teaspoon ground black pepper - 1 cup heavy cream (or coconut milk for a dairy-free alternative) - 1/4 cup fresh basil, chopped For a touch of flair, you can use: - Croutons - Fresh basil leaves These add texture and color to the soup. They also enhance the flavor of every spoonful. If you have allergies, here are some simple swaps: - Use coconut milk instead of heavy cream for dairy allergies. - Replace olive oil with avocado oil if you're sensitive to olives. - For a gluten-free option, ensure your vegetable broth is gluten-free. These swaps help you enjoy this creamy tomato basil soup without worry. For the full recipe, check out the detailed steps! Start by heating 2 tablespoons of olive oil in a large stock pot over medium heat. Once the oil is warm, add 1 medium onion, finely chopped. Sauté it for about 5 minutes. You want the onion to be soft and clear. Next, add 3 cloves of minced garlic. Cook it for about 1 minute. Stir it often until the garlic smells nice and turns light brown. Now, carefully pour in 2 (14-ounce) cans of diced tomatoes. I like to use fire-roasted tomatoes for added flavor. Then, add 1 cup of vegetable broth. Mix in 1 teaspoon of sugar, 1 teaspoon of dried basil, 1/2 teaspoon of salt, and 1/4 teaspoon of ground black pepper. Stir everything together and let it simmer gently for 15 minutes. This step helps all the flavors blend nicely. After the soup has simmered, remove the pot from the heat. For a smooth texture, use an immersion blender to blend the soup. If you don’t have one, you can use a countertop blender. Just remember to let the soup cool for a few minutes before blending. This avoids hot soup splattering everywhere. Blend until it looks creamy and smooth. Return the blended soup to low heat. Stir in 1 cup of heavy cream or coconut milk for a dairy-free option. Also, add 1/4 cup of chopped fresh basil. Let it warm up for about 5 minutes but do not let it boil. Taste the soup and adjust the seasoning if needed. For serving, I suggest using warm bowls. Drizzle a bit of extra olive oil on top. Add croutons and fresh basil leaves for a beautiful look. This soup not only tastes good but also looks great on the table. Enjoy this velvety tomato basil bliss! For the complete experience, check out the Full Recipe. To boost the flavor of your creamy tomato basil soup, try a few simple tricks. First, use fire-roasted tomatoes. They add a deep, smoky taste. Next, add a splash of balsamic vinegar. This will brighten the flavors. You can also mix in fresh herbs. Thyme or oregano pairs well with basil. For a kick, sprinkle in some red pepper flakes. This will give your soup a nice warmth. Many people make mistakes when cooking this soup. One common error is not sautéing the onion long enough. You want it soft and sweet. If you skip the sugar, the soup can taste too acidic. Be sure to blend the soup until smooth. Chunky soup can feel unappealing. Lastly, don’t let the soup boil after adding cream. It can curdle, ruining the texture. You don’t need fancy tools to make this soup. A large stockpot is a must. An immersion blender makes blending easy and fast. If you don’t have one, a countertop blender works well too. Just remember to cool the soup a bit first. A good cutting board and sharp knife will help with chopping. Lastly, use measuring cups for accuracy. This ensures you get the right flavors. For the Full Recipe, follow the steps carefully for the best results. {{image_4}} To make this creamy tomato basil soup vegan, simply swap the heavy cream with coconut milk. Coconut milk gives the soup a rich texture without dairy. You can also add nutritional yeast for a cheesy flavor. This option tastes great and keeps it plant-based. This soup is naturally gluten-free since it uses no flour or gluten ingredients. Just check your canned tomatoes to ensure they are gluten-free. You can enjoy this dish without worry, and it still tastes amazing. Want to pack more nutrients? You can add extra veggies! Try diced carrots, bell peppers, or spinach. Just chop them small and add them when you sauté the onion. These additions boost flavor and nutrition without losing the creamy texture. For the full recipe, check out the Velvety Tomato Basil Bliss section. To keep your creamy tomato basil soup fresh, let it cool first. Pour it into an airtight container. It keeps well in the fridge for up to 4 days. Always label your container. This helps you track how long it's been stored. When you're ready to enjoy your leftovers, reheat them gently. Pour the soup into a pot over medium heat. Stir it often to prevent sticking. Heat until warm, but do not let it boil. This keeps the flavors fresh and the cream smooth. If you want to save the soup for later, freezing works great. Use freezer-safe containers or bags. Leave a little space at the top for expansion. The soup can last up to 3 months in the freezer. When ready to eat, thaw it in the fridge overnight before reheating. Yes, you can use fresh tomatoes. You will need about 6-8 medium tomatoes. Start by blanching them in boiling water for 1-2 minutes. This makes it easier to peel the skin off. Once peeled, chop them and add them to your pot. Fresh tomatoes will give your soup a bright, fresh taste. Just remember, it may take longer to cook down fresh tomatoes than canned. If you want a lighter option, use coconut milk. It adds creaminess without dairy. You can also use Greek yogurt for a tangy twist. If you want a lower-calorie choice, try cashew cream. Just soak raw cashews in water for a few hours, blend until smooth, and stir it in. Each option gives the soup a unique flavor. To add heat, mix in red pepper flakes or a dash of hot sauce. You can also add diced jalapeños while cooking the onions. Another great option is to use chipotle in adobo sauce for a smoky flavor. Start with a small amount and taste as you go. Adjust to fit your spice level. Yes, this soup freezes well. Cool it completely and pour it into airtight containers. Leave some space at the top of each container. This allows the soup to expand as it freezes. It can stay in the freezer for up to three months. When you're ready, thaw it in the fridge overnight before reheating. This creamy tomato basil soup keeps well in the fridge. Store it in an airtight container for about 4-5 days. Just give it a good stir before serving. If the soup thickens too much, add a splash of broth or water when reheating. This helps restore its creamy texture. Absolutely! Fresh herbs like thyme or oregano work great. You can also try adding a bay leaf during cooking for more depth. Just remember to remove it before blending the soup. Add herbs at the end to keep their flavor bright and fresh. Enjoy experimenting with different combinations! For the full recipe, check out the [Full Recipe]. You've learned the key ingredients and steps to create a delicious dish. We explored optional garnishes and tips for dietary substitutions. Following that, we went through step-by-step instructions for making a creamy base and serving it perfectly. Also, we shared tips to enhance flavor and avoid common mistakes. We even discussed variations like vegan and gluten-free options. Finally, we covered how to store leftovers and warm them up later. Enjoy using these insights to impress your family and friends!](https://spoonfulsavory.com/wp-content/uploads/2025/04/774980e8-4172-4fc5-ae24-73df531cf278.webp)
Are you ready to warm up with a bowl of creamy tomato basil soup? This simple and healthy recipe is
![- 4 salmon fillets (skin-on or skinless, approximately 6 oz each) - 4 tablespoons unsalted butter - 4 cloves garlic, finely minced - 2 tablespoons freshly squeezed lemon juice - Zest of 1 lemon - 1 teaspoon dried thyme - 1 teaspoon smoked paprika - Sea salt and freshly cracked black pepper, to taste - Fresh parsley, finely chopped (for garnish) Gathering the right ingredients makes this recipe shine. Salmon fillets are the star. They are rich in flavor and healthy fats. Unsalted butter adds creaminess and depth. Garlic gives a strong, savory punch. Lemon juice and zest bring brightness. They balance the richness of the butter and salmon. Dried thyme and smoked paprika add warmth and complexity. These ingredients turn a simple dish into something special. For seasoning, use sea salt and black pepper. They enhance all the other flavors. Fresh parsley makes a beautiful garnish. It adds a pop of color and freshness. This recipe is not just tasty. It is also quick. You can whip it up in just 25 minutes. For the full recipe, check the details provided above. 1. Preheat your oven to 400°F (200°C). This high heat helps cook the salmon quickly. 2. Line a medium-sized baking sheet with parchment paper. This makes cleanup easy and helps prevent sticking. 1. In a small saucepan, melt 4 tablespoons of unsalted butter over medium heat. 2. Once the butter is melted, add 4 finely minced garlic cloves. Sauté for 1-2 minutes. Stir often to avoid browning the garlic. It should smell great, but not burn. 3. Remove the saucepan from heat. Stir in 2 tablespoons of freshly squeezed lemon juice and the zest of 1 lemon. 4. Add 1 teaspoon of dried thyme and 1 teaspoon of smoked paprika. Season with sea salt and freshly cracked black pepper. Mix well to combine all flavors. 1. Arrange 4 salmon fillets on the prepared baking sheet, skin-side down if they have skin. 2. Using a brush, coat each fillet generously with the lemon garlic butter mixture. Save some for drizzling later. 3. Place the baking sheet in the oven. Bake for 12-15 minutes. The salmon should flake easily with a fork when done. Cooking time may change based on fillet thickness. 4. After baking, drizzle the reserved lemon garlic butter over the salmon. Let it rest for a couple of minutes to enhance the flavor. 5. For a pretty finish, garnish with finely chopped parsley and serve with lemon slices. Squeezing the lemon adds a nice zing! For the full recipe, check out the detailed guide. The cook time for salmon can change based on a few things. - Thickness: Thicker fillets take longer to cook. - Temperature: The oven's heat level affects the time. - Freshness: Fresh salmon cooks differently than frozen. To test if your salmon is done, gently poke it with a fork. If it flakes easily, it's ready. If it’s still tough, give it a few more minutes. If you have leftover salmon, store it properly to keep it fresh. - Storage method: Place salmon in an airtight container. - Refrigeration: It lasts up to 3 days in the fridge. When you're ready to eat it again, reheat it gently. Use the oven or a skillet. Avoid the microwave, as it can dry out the fish. You can boost the flavor of your salmon with some extras. - Herbs and spices: Try dill, basil, or red pepper flakes for a kick. - Pairing suggestions: Enjoy it with rice, quinoa, or a fresh salad. You can also squeeze some lemon juice on top for a zesty touch. This way, you can make your lemon garlic butter salmon even more delicious! For the complete recipe, check [Full Recipe]. {{image_4}} You can swap salmon for other fish. Try trout, cod, or tilapia. Each has its taste and texture. Adjust cooking times based on thickness. Thinner fish may cook faster, so watch closely. Aim for that flakiness we love in salmon. Pair your fish with sides that shine. Roasted veggies add color and crunch. Think asparagus, broccoli, or carrots. They bring out the lemon flavor too. For a fresh twist, serve with a salad. A simple green salad works well. Add some cherry tomatoes and cucumbers for freshness. Feel free to get creative with the sauce! Add capers for a briny kick. A splash of soy sauce can give it an Asian flair. If you want creaminess, mix in some sour cream or Greek yogurt. For a spicy kick, add red pepper flakes or hot sauce. The options are endless! Each serving of lemon garlic butter salmon has about 350 calories. It has a good mix of protein, fat, and carbs. Here’s the breakdown: - Calories: 350 - Protein: 34g - Fat: 22g - Carbohydrates: 2g Salmon is packed with vitamins and minerals. It has vitamin B12, selenium, and omega-3 fatty acids. These nutrients help your body work well and stay healthy. Salmon is a star in this dish. Here’s why: - Omega-3 Fatty Acids: These fats help your heart and brain. - Protein: Salmon gives you strong muscles and energy. Garlic and lemon also shine in this recipe: - Garlic: It may lower blood pressure and boost your immunity. - Lemon: This fruit is high in vitamin C, which helps your skin and boosts your immune system. This dish is perfect for many diets. It is low-carb and gluten-free. - Low-Carb: With only 2g of carbs, it works well for keto diets. - Gluten-Free: There are no gluten ingredients, making it safe for those with gluten allergies. You can enjoy lemon garlic butter salmon whether you’re on a special diet or just want a healthy meal. You can tell if salmon is cooked by looking at its color and texture. Cooked salmon turns from bright pink to a pale, opaque color. It should also flake easily when you poke it with a fork. If it breaks apart easily, it is ready to eat. Always check the thickest part of the fillet for doneness. Yes, you can prepare this dish ahead of time. Cook the salmon and let it cool. Store it in an airtight container in the fridge for up to two days. To reheat, place the salmon on a baking sheet and warm it in the oven at 350°F (175°C) for about 10 minutes. This keeps the salmon moist and tasty. If you want a dairy-free option, you can use olive oil or coconut oil. These oils add good flavor and keep the dish rich. For a vegan choice, try using vegan butter. Each option will change the taste slightly, but they work well. Serve the salmon on a nice plate for a pretty look. You can add fresh parsley on top for color. Lemon slices on the side brighten the dish and add flavor. Pair it with green veggies or rice for a complete meal that looks great. For the full recipe and more details, check out the [Full Recipe]. In this article, we explored how to make Lemon Garlic Butter Salmon from start to finish. We covered key ingredients like salmon fillets, butter, and garlic, plus flavor enhancers such as lemon juice and thyme. You learned step-by-step how to prepare, cook, and store your dish. With tips on variations and health benefits, you can personalize your meal. Don't shy away from adding your twist. Enjoy the cooking process and savor the results. Your culinary skills will shine with this easy recipe!](https://spoonfulsavory.com/wp-content/uploads/2025/04/1575a6f7-4075-4669-ad10-965952a9e04d.webp)
Looking for a fast and tasty meal? Lemon Garlic Butter Salmon is your go-to dish! This recipe is simple, packed
