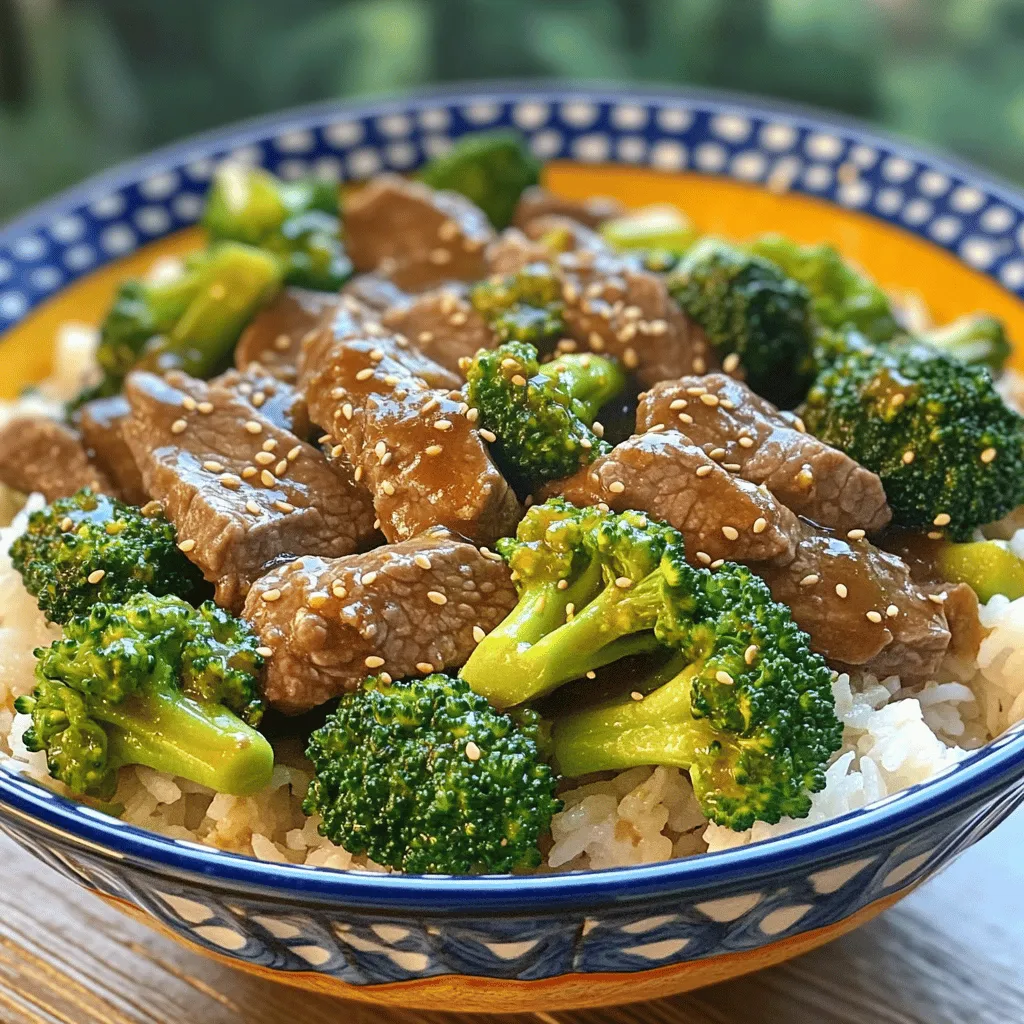
Easy Beef and Broccoli Stir-Fry Quick and Tasty Meal
If you’re craving a quick and tasty meal, my Easy Beef and Broccoli Stir-Fry is perfect for you! This dish
If you’re craving a quick and tasty meal, my Easy Beef and Broccoli Stir-Fry is perfect for you! This dish
![- 2 medium sweet potatoes - 1 can black beans - Red bell pepper and red onion - Garlic, cumin, paprika, and chili powder - Corn tortillas and avocado - Fresh cilantro - Lime wedges - Calories per serving: About 350 calories - Breakdown of macronutrients: - Protein: 12g - Carbohydrates: 58g - Fat: 10g When making these savory sweet potato and black bean tacos, you want to ensure you have the right ingredients. Sweet potatoes give the dish a rich, natural sweetness. Black beans add protein and creaminess. Red bell pepper and red onion contribute a nice crunch and flavor. Garlic, cumin, paprika, and chili powder enhance the taste, creating a warm and inviting aroma. Corn tortillas provide the perfect base for the filling. Avocado adds creaminess and freshness. For those who love to add a pop of color and flavor, fresh cilantro and lime wedges make excellent garnishes. These ingredients not only elevate the dish but also offer a burst of freshness that complements the tacos beautifully. Understanding the nutritional values helps you appreciate what you eat. Each serving has a balance of protein, carbs, and healthy fats, making these tacos not only tasty but also nutritious. If you want the full recipe, check out the link provided. - Preheat the oven to 400°F. - Dice and season sweet potatoes. Start by preheating your oven. This helps the sweet potatoes roast perfectly. Next, take your two medium sweet potatoes, peel them, and cut them into 1-inch cubes. In a large bowl, add the diced sweet potatoes. Drizzle two tablespoons of extra virgin olive oil over them. Then, sprinkle in one teaspoon of ground cumin, one teaspoon of smoked paprika, and half a teaspoon of chili powder. Season with salt and freshly ground pepper. Toss everything well so the sweet potatoes are coated in the spices. - Roast sweet potatoes until golden. - Sauté red onion and red bell pepper. - Incorporate black beans and mix. Spread the seasoned sweet potatoes on a baking sheet in a single layer. Roast them in the oven for 25 to 30 minutes. Stir halfway through to ensure they cook evenly. While the sweet potatoes roast, heat a skillet over medium heat. Add one small diced red onion and one chopped red bell pepper. Sauté these for about 5 to 7 minutes. Cook until the onion is soft and clear. Stir in two minced garlic cloves and cook for one more minute. After that, add one can of drained and rinsed black beans into the skillet. Cook for another 2 to 3 minutes, allowing the beans to warm up. Taste and adjust the seasoning if needed. - Warm corn tortillas. - Fill and garnish tacos. In another skillet, warm each corn tortilla for about 30 seconds on each side. This makes them soft and easy to fill. Now, take a warm tortilla and add a generous amount of the sweet potato and black bean mixture. Top it with a few slices of avocado and a sprinkle of fresh cilantro. Serve lime wedges on the side for a zesty kick. You can find the full recipe to achieve this delicious meal. To achieve perfectly roasted sweet potatoes, follow these steps: - Choose the Right Potatoes: Select firm sweet potatoes with smooth skin. - Uniform Cuts: Cut them into even 1-inch cubes for even cooking. - Season Well: Use olive oil, salt, and spices to coat them. - Preheat the Oven: Set your oven to 400°F (200°C) to ensure they roast well. - Stir Once: Halfway through, stir the sweet potatoes for even browning. For sautéing vegetables, try these tips: - Heat Your Skillet: Use medium heat to warm your skillet before adding oil. - Use Fresh Ingredients: Fresh veggies add better flavor and texture. - Don't Crowd the Pan: Sauté in batches if needed to avoid steaming. - Keep it Moving: Stir often for even cooking and to avoid burning. Pair your tacos with simple sides to enhance the meal: - Rice: A light cilantro-lime rice complements the flavors. - Salad: A fresh green salad adds a crisp texture. - Salsa: Serve with a fresh salsa for a zesty kick. For beverages, consider these options: - Lemonade: A refreshing lemonade balances the savory tacos. - Iced Tea: Unsweetened iced tea pairs well with the meal. - Craft Beer: A light beer highlights the flavors of the tacos. To present your tacos beautifully: - Use a Colorful Platter: Arrange tacos on a vibrant dish to catch the eye. - Garnish Generously: Add lime wedges and cilantro for color. - Layering: Stack the tacos slightly for height and interest. For attractive plating ideas: - Use Small Bowls: Serve toppings like avocado and salsa in small bowls for a fun touch. - Add Texture: Sprinkle some crushed tortilla chips for crunch. - Serve with Style: Place a few tacos leaning against each other for a casual look. Enjoy making these savory sweet potato and black bean tacos your own with these tips! For the full recipe, check out [Full Recipe]. {{image_4}} You can easily switch out the beans or vegetables in this recipe. Try using pinto beans or kidney beans. Roasted corn or zucchini add nice flavor too. For those who need gluten-free options, corn tortillas work great. You can also find gluten-free wraps at most stores. To spice things up, add cayenne pepper or fresh jalapeños. They bring a nice heat to the dish. You can also mix in cheese like feta or cheddar for richness. A dollop of sour cream adds creaminess and balances the spices. You can serve this as a taco bowl instead of in tortillas. Just layer the sweet potato and bean mix over rice or quinoa. This gives it a hearty twist. If you want something different, use the filling for burritos or enchiladas. Simply wrap it up in a larger tortilla and bake with sauce. For the full recipe, check the section above. To store leftover tacos, wrap them tightly in plastic wrap. This keeps them fresh. Place the wrapped tacos in an airtight container. You can also use a glass dish with a lid. This method helps to keep moisture in and prevents them from drying out. The best way to reheat tacos is in the oven. Set your oven to 350°F (175°C). Place the tacos on a baking sheet and heat for about 10 minutes. This keeps the tortillas crisp. You can also use a skillet on medium heat. Heat each taco for about 2-3 minutes on each side. This method helps the sweet potatoes stay soft. To maintain the texture of sweet potatoes, cover the skillet with a lid. This traps steam and warms everything evenly. Avoid microwaving them, as this makes the tortillas soggy. You can freeze assembled tacos or separate components. If you freeze assembled tacos, wrap them well in foil. Place them in a freezer bag to avoid freezer burn. This method works for short-term storage. For longer storage, freeze the sweet potato and black bean mixture separately. This keeps the flavors fresh. The ideal storage duration for frozen tacos is up to 3 months. Just remember to label your bags with the date! Can I make Sweet Potato and Black Bean Tacos ahead of time? Yes, you can make these tacos ahead. Cook the sweet potatoes and beans, then store them in the fridge. Warm them up before serving. This saves time on busy days. What's the best way to prevent my tortillas from tearing? To keep tortillas intact, warm them first. Heat them in a dry skillet for 30 seconds on each side. This makes them soft and easy to fold. Are these tacos vegan and gluten-free? Yes! These tacos are both vegan and gluten-free. They use plant-based ingredients, like sweet potatoes and black beans, along with corn tortillas. How can I make this recipe low-carb? To make this recipe low-carb, skip the corn tortillas. Use lettuce leaves as a wrap instead. This keeps the fresh taste while lowering carbs. What's the best method to cook sweet potatoes? Roasting sweet potatoes brings out their natural sweetness. Cut them into cubes, toss with oil and spices, and roast at 400°F. This makes them tender and caramelized. Can I use canned sweet potatoes instead? You can use canned sweet potatoes, but fresh ones taste better. Canned sweet potatoes are already soft. If you use them, skip the roasting step and just heat them in a skillet. For the full recipe, check out the details above. In this blog post, we explored how to make delicious Sweet Potato and Black Bean Tacos. We covered the main ingredients and optional garnishes, along with step-by-step preparation and cooking instructions. I shared tips for perfect cooking and ways to make your tacos visually appealing. You can mix flavors and try new variations while storing leftovers properly. That's all you need for a tasty, easy meal! Enjoy your cooking, and don’t hesitate to try different ideas for your tacos!](https://spoonfulsavory.com/wp-content/uploads/2025/04/00c146df-fb20-4295-8649-61a0e6215b65.webp)
Looking for a delicious, easy meal? Try my savory Sweet Potato and Black Bean Tacos! These tacos are packed with

If you’re craving a dessert that’s quick, simple, and downright delicious, then you’ll love this No-Bake Nutella Cheesecake. Imagine creamy
![- 1 cup unsalted butter, melted - 2 cups granulated sugar - 1 cup packed brown sugar - 4 large eggs - 2 teaspoons vanilla extract - 1 cup all-purpose flour - 1 cup unsweetened cocoa powder - 1/2 teaspoon baking powder - 1/4 teaspoon salt - 1 cup semi-sweet chocolate chips - 1/2 cup unsalted butter, softened - 3/4 cup granulated sugar - 1/4 cup packed brown sugar - 2 tablespoons milk - 1 teaspoon vanilla extract - 1 cup all-purpose flour - 1/2 cup semi-sweet chocolate chips When making Chocolate Chip Cookie Dough Brownies, you need quality ingredients. The brownie layer starts with melted butter, giving a rich base. Granulated and brown sugars add sweetness and depth. Eggs help bind the mixture, while vanilla adds flavor. Next, all-purpose flour and cocoa powder create that fudgy texture. Baking powder helps the brownies rise, and salt enhances the flavor. Semi-sweet chocolate chips add bursts of chocolate goodness. For the cookie dough layer, softened butter is key. It blends well with both sugars, creating a fluffy mix. Milk and vanilla add moisture and taste. All-purpose flour gives the dough structure, and more chocolate chips make it irresistible. With these ingredients, you craft a dessert that layers rich brownie and sweet cookie dough. You can find the full recipe in the article to make this tasty treat. - Preheat the oven to 350°F (175°C). - Grease a 9x13 inch baking pan and line it with parchment paper. - Combine melted butter, granulated sugar, and brown sugar in a bowl. - Incorporate eggs, one at a time, and stir in vanilla extract. - Gradually add the dry ingredients and fold in chocolate chips. - Cream together softened butter, granulated sugar, and brown sugar until fluffy. - Mix in milk and vanilla extract until smooth and creamy. - Gradually incorporate flour and fold in chocolate chips. - Spread half of the brownie batter in the prepared pan. - Drop spoonfuls of cookie dough evenly over the brownie layer. - Pour the remaining brownie batter over the cookie dough layer. - Bake for 30-35 minutes in the preheated oven. - Use a toothpick to check for doneness; it should have moist crumbs attached. - Allow brownies to cool in the pan for 15 minutes after baking. - Lift out using the parchment paper and cool completely on a wire rack. For the full recipe, check out the detailed instructions above. Enjoy these delicious treats! To get the best texture in your brownies, avoid overmixing the batter. Overmixing can make the brownies tough. Mix just until the dry and wet ingredients blend. For the cookie dough, use room temperature ingredients. This helps the dough come together smoothly and makes it easier to scoop. Serve your brownies on a decorative platter for a lovely look. You can dust the tops with powdered sugar for a sweet touch. Another option is to drizzle melted chocolate over the brownies. This adds style and makes them even more tempting. Always preheat your oven fully before baking. A hot oven ensures even baking. To check if your brownies are done, use a toothpick. Insert it into the center; it should come out with moist crumbs, not wet batter. This trick helps you achieve that perfect bake every time. For the full recipe, check here: [Full Recipe]. {{image_4}} You can easily change the Chocolate Chip Cookie Dough Brownies to fit your needs. Here are some great options: To make these brownies gluten-free, just swap the all-purpose flour for a gluten-free flour blend. Many blends work well. They will still taste amazing, and no one will know! If you want a vegan treat, you can use flax eggs instead of regular eggs. Just mix 1 tablespoon of ground flaxseed with 2.5 tablespoons of water for each egg. You can also use dairy-free butter alternatives to keep it vegan. This way, everyone can enjoy these delicious brownies. You can make your brownies even better by adding different flavors. Try mixing in nuts like walnuts or pecans for some crunch. You can also use white chocolate chips or dark chocolate chips instead of semi-sweet ones. This gives a fun twist to the classic recipe. Store your brownies in an airtight container at room temperature. They stay fresh for up to 5 days. This way, you can enjoy them daily without losing flavor or texture. If you have leftovers, freeze them in an airtight container. They can last for up to 3 months. Just make sure to wrap them well to avoid freezer burn. This method lets you enjoy these treats later without any fuss. To bring back the warm, gooey goodness, warm the brownies in the microwave. Just a few seconds will do the trick. You want them warm, not hot, to keep the texture just right. Yes, you can prepare them a day in advance. Just store them in an airtight container. This helps keep them fresh and ready to enjoy when you are. Look for set edges and a toothpick test for moist crumbs. Insert a toothpick in the center. If it comes out with moist crumbs, they are ready! Yes, there are multiple variations for different dietary needs. You can use gluten-free flour or swap in dairy-free butter. Just make sure to use the same amounts. Use a sharp knife and clean it between cuts for neat squares. This keeps them looking great and makes serving easier! This blog post laid out a simple recipe for delicious brownie-cookie dough bars. You learned how to make both layers, assemble them, and bake them to perfection. I shared tips for the best texture and ways to customize your bars. Finally, I covered storage options and answered common questions. Enjoy baking these treats! You won’t just please your taste buds but also impress your friends and family. Happy baking!](https://spoonfulsavory.com/wp-content/uploads/2025/04/f1bfa978-a64f-44c9-9908-36a23539376e.webp)
Get ready for a dessert that blends two favorites into one dreamy treat! These Chocolate Chip Cookie Dough Brownies are
![- 1 pound large shrimp, peeled and deveined - 4 tablespoons unsalted butter - 4 cloves garlic, finely minced - 1 tablespoon freshly squeezed lemon juice - 1/4 cup fresh parsley, coarsely chopped To make this dish shine, you need just five simple ingredients. The large shrimp are the star. Use good quality shrimp, as they make a big difference. Peel and devein them for the best texture. Next, the unsalted butter adds richness. It melts beautifully and brings all the flavors together. Garlic is key in this recipe. Mince it finely so it releases its strong flavor. Fresh lemon juice brightens the dish and adds a burst of flavor. Lastly, fresh parsley not only adds color but also freshness. It complements the richness of the butter and shrimp. - Salt and pepper to taste - Red pepper flakes for heat - Parmesan cheese for added flavor For those who like a kick, add red pepper flakes. They give your garlic butter shrimp a nice heat. You can adjust the amount based on your taste. Also, sprinkle some salt and pepper to enhance the flavors. If you want an extra layer of taste, try adding grated Parmesan cheese. It melts into the dish and adds a wonderful depth of flavor. For the full recipe, check out the Garlic Butter Shrimp Delight 🧄. To prepare shrimp for cooking, you start with fresh, large shrimp. Ensure they are peeled and deveined. This process helps remove the shell and the dark vein on the back. Rinse the shrimp under cold water and pat them dry with a paper towel. This step is crucial for even cooking. Fresh garlic and parsley are key to this dish. Garlic adds a rich flavor, while parsley brings a fresh note. Use four cloves of garlic, finely minced. For parsley, a quarter cup coarsely chopped will do. Fresh ingredients make your dish taste better and look appealing. Begin by heating your large skillet over medium heat. Add four tablespoons of unsalted butter. Let it melt completely, swirling the pan gently. This step ensures the butter coats the skillet well. Once the butter is bubbling, add the minced garlic. Sauté the garlic for one to two minutes, stirring constantly. You want it fragrant and slightly golden, but not burnt. Burnt garlic tastes bitter and ruins the dish. Next, add the shrimp in a single layer. Let them cook undisturbed for two to three minutes. Watch as they turn a lovely pink color. This means they are cooking well. Flip the shrimp over using tongs or a spatula. Drizzle one tablespoon of lemon juice over them. Stir gently to coat the shrimp in the garlic butter. Cook for another two to three minutes until they are firm and fully cooked. Once done, remove the skillet from heat. Sprinkle the chopped parsley over the shrimp. Toss gently to mix. This adds freshness and color to your dish. Serve the garlic butter shrimp immediately. You can place them over a bed of white rice or next to a fresh green salad. This adds volume and makes the dish more filling. For a nice touch, include lemon wedges on the side. Guests love squeezing lemon juice over their shrimp for an added zing. With these steps, you can create a dish that looks and tastes like restaurant-quality food. For the full recipe, check out the complete guide. To avoid overcooking shrimp, watch the color closely. Shrimp cook fast. They turn pink and opaque when done. Cook them for about 2-3 minutes on each side. If they curl tightly, they might be overdone. Remove them from heat quickly. For sautéing garlic without burning, keep the heat low. Start with medium heat and add the garlic once the butter is bubbling. Stir constantly for 1-2 minutes. If it turns brown, it can taste bitter. You want it fragrant and just golden. To add flavor, consider fresh herbs. Parsley is great, but you can also use basil or thyme. These herbs add freshness. Red pepper flakes bring some heat if you like spicy. A sprinkle of lemon zest can also brighten the dish. You can vary the garlic butter recipe too. Try adding a splash of white wine for depth. For a richer taste, mix in a bit of cream. You can also swap out butter for olive oil for a lighter version. For even cooking, use a heavy skillet. A cast-iron skillet works well. It holds heat nicely and cooks shrimp evenly. A non-stick pan is another good choice if you want easy cleanup. When prepping shrimp, a good pair of kitchen shears helps. They make it easy to cut off shells. A sharp knife is also useful for mincing garlic finely. Fresh garlic gives the best taste, so always use whole cloves instead of jarred. {{image_4}} You can easily swap shrimp for other seafood. Scallops or fish work great. Just adjust cooking time based on the seafood you choose. For a lighter dish, try using olive oil instead of butter. It adds a nice flavor while keeping it healthy. Adding herbs can change the taste a lot. Try thyme or cilantro for a twist. If you like heat, add red pepper flakes or chopped chilies. This makes a spicy garlic butter shrimp that packs a punch. For those with dietary needs, you can find alternatives. Use coconut oil instead of butter for a dairy-free option. Always check labels to ensure that your items are gluten-free. This way, you can enjoy a meal that fits your needs without missing out on flavor. After enjoying your garlic butter shrimp, store leftovers in an airtight container. Make sure to cool them to room temperature first. Refrigerate them right away to keep them fresh. You can store them for up to three days. If you want to save them for longer, freeze the shrimp. Place them in a freezer-safe bag, removing as much air as possible. This helps prevent freezer burn. They can last in the freezer for up to three months. To reheat your shrimp, use a skillet over low heat. This method helps retain the shrimp's flavor and texture. You can add a little butter or olive oil to keep them moist. Stir gently to avoid overcooking. If you want to use a microwave, place the shrimp in a microwave-safe dish. Cover it with a damp paper towel to keep moisture in. Heat for short bursts, checking often. Avoid high heat to prevent rubbery shrimp. Garlic butter shrimp can safely stay in the fridge for about three days. If you freeze them, they can last for three months. Always check for signs of spoilage. Look for a sour smell or changes in color. If anything seems off, it’s best to toss it. Enjoy your garlic butter shrimp from the [Full Recipe] with confidence, knowing how to store and reheat them! How long does it take to cook shrimp? Cooking shrimp is quick. It takes about 5 to 6 minutes. You want them to turn pink and opaque. This shows they are done. Overcooking makes them tough, so watch closely. Can I use frozen shrimp for this recipe? Yes, you can use frozen shrimp! Just thaw them first. Place them in cold water for 15 to 20 minutes. This helps them cook evenly. Is garlic butter shrimp healthy? Garlic butter shrimp can be healthy. Shrimp is low in calories and high in protein. Garlic adds flavor and may help your heart. Just watch the butter, as it adds fat. How many calories are in garlic butter shrimp? A serving typically has about 250 to 300 calories. This can change with added sides like rice. Always check your portion size when you serve it. What can I use instead of shrimp? If you don’t like shrimp, use chicken or tofu. Both soak up the garlic butter flavor well. Adjust cooking times as needed for different proteins. Alternatives for butter in a garlic sauce recipe You can replace butter with olive oil. It gives a nice flavor and is healthier. Coconut oil is another option for a different taste. Garlic butter shrimp is simple and tasty, using fresh shrimp, garlic, and butter. You can add flavors with seasonings, herbs, or cheese. Pay attention to cooking times to keep shrimp tender. Explore variations to adapt the dish for different diets or personal tastes. Proper storage helps keep leftovers fresh. Now you have the tools to impress at your next meal. Enjoy creating your own garlic butter shrimp masterpiece!](https://spoonfulsavory.com/wp-content/uploads/2025/04/c3e8626f-7b27-40bc-b5e4-dabaa25986bd.webp)
Looking for a quick meal that’s packed with flavor? This 5-Ingredient Garlic Butter Shrimp recipe is just what you need!
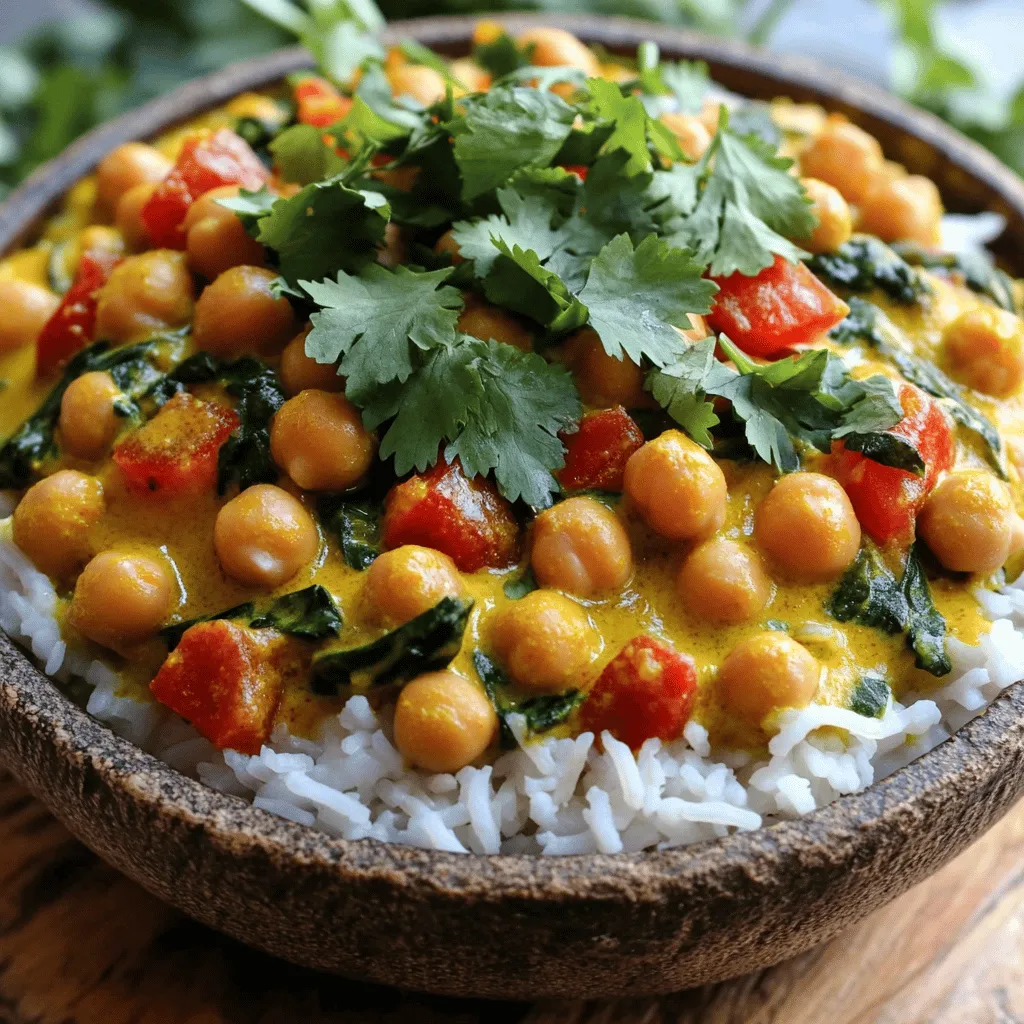
Are you ready to spice up your dinner routine? My Vegan Chickpea Curry is simple, delicious, and packed with flavor!
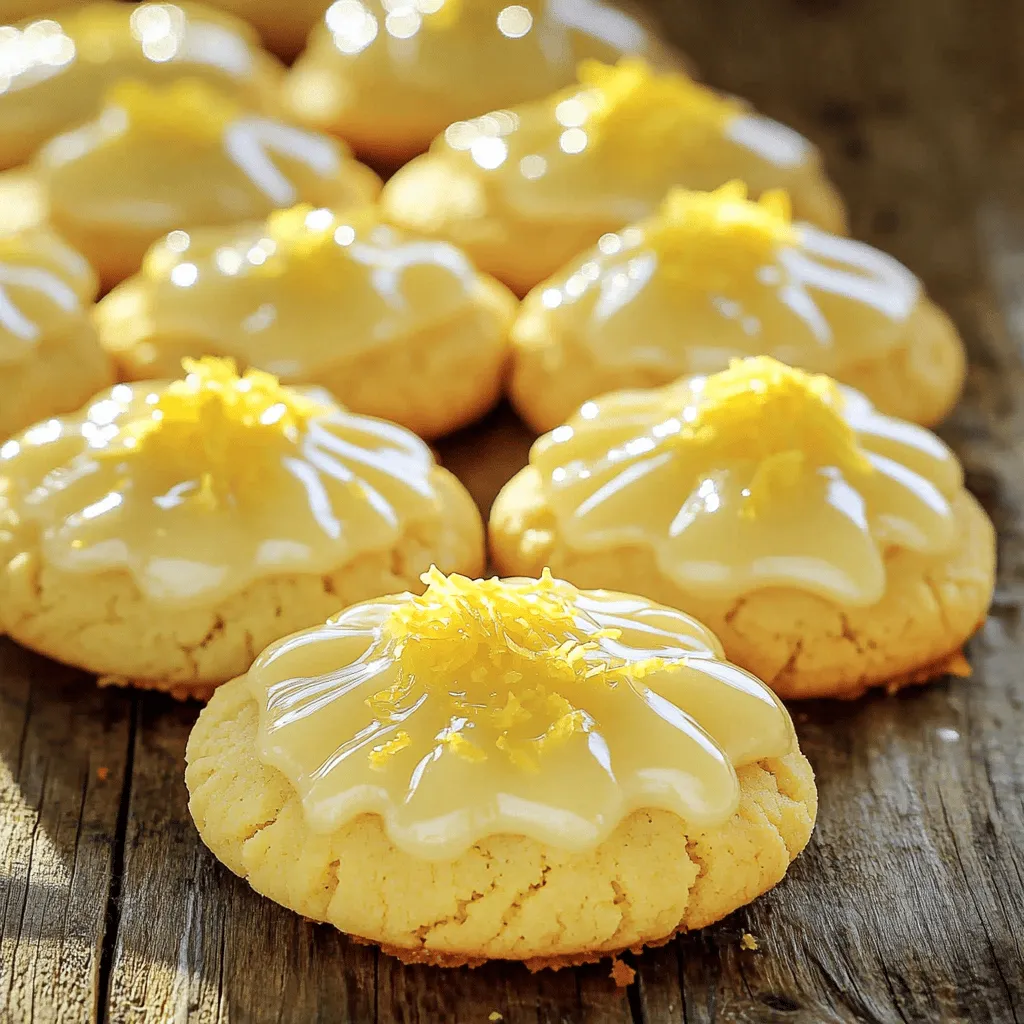
If you love cookies that burst with bright flavor, you’ll adore these Glazed Lemon Sugar Cookies! They are not just

Are you ready to indulge in a dessert that combines two classics? This Apple Pie Stuffed Cheesecake marries the warm,
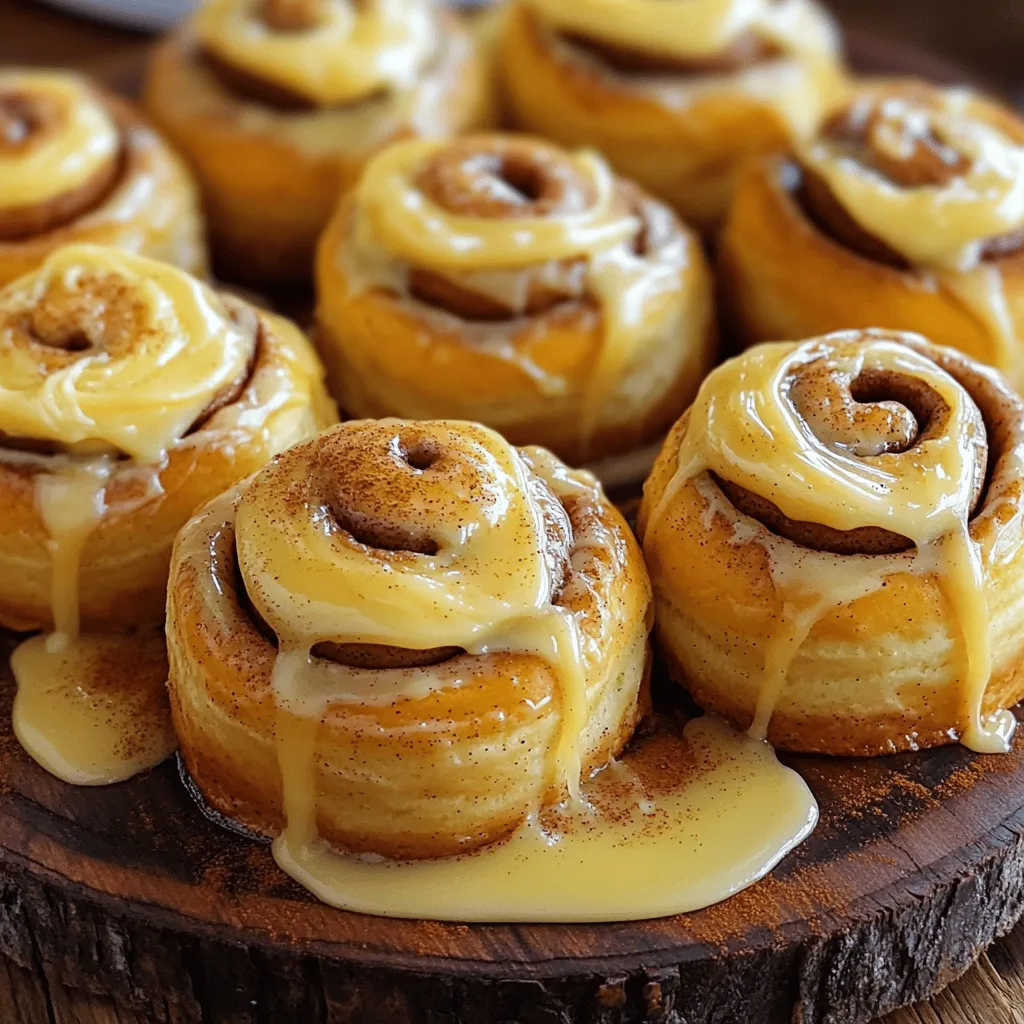
Craving warm, gooey cinnamon rolls? You’ve come to the right place! In this guide, I will show you how to

Craving the best strawberry pie that’s both simple and delicious? You’re in the right place! I’m excited to share my
