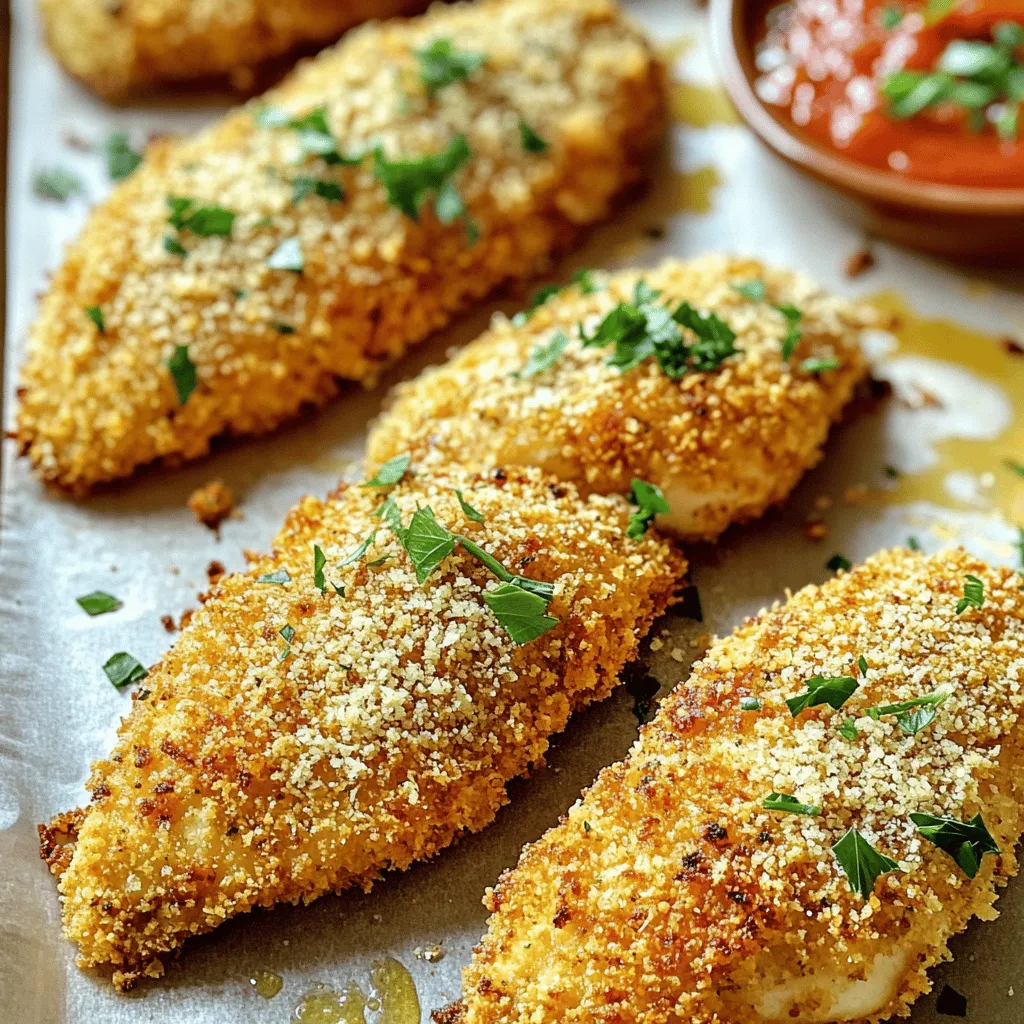
Looking for a tasty and easy meal? You’ve found it! This Baked Garlic Parmesan Chicken Tenders recipe is simple and delicious. With crispy, flavorful coating and tender chicken, it’s sure to please everyone at the table. I’ll guide you through each step, from mixing the ingredients to baking the perfect tenders. Get ready to impress your family with this quick dish that’s packed with flavor! Let’s dive in!
Ingredients
Chicken and Coating Essentials
For this recipe, you’ll need a few key items to make the chicken tenders shine. Gather the following:
– 1 pound chicken breast tenders
– 1 cup panko breadcrumbs
– ½ cup freshly grated Parmesan cheese
– 2 large eggs
– 2 tablespoons high-quality olive oil
These ingredients create a crispy and tasty coating for your chicken tenders. The panko breadcrumbs provide that delightful crunch, while the Parmesan adds a rich, cheesy flavor.
Seasoning Ingredients
Next, we add the seasonings that make these tenders pop. Here’s what you need:
– 2 teaspoons garlic powder
– 1 teaspoon onion powder
– 1 teaspoon dried Italian herbs (a mix of oregano, basil, and thyme)
– ½ teaspoon salt
– ½ teaspoon freshly ground black pepper
These seasonings blend well. They give each bite a burst of flavor. Garlic powder brings a strong, savory taste, while the Italian herbs add a hint of freshness.
Additional Garnishes
Lastly, let’s talk about garnishes that make the dish visually appealing. You’ll want:
– Fresh parsley, finely chopped
This garnish not only adds color but also a fresh flavor. Sprinkling parsley on top just before serving makes the dish look even more inviting.
Step-by-Step Instructions
Preparing the Oven and Baking Sheet
First, preheat your oven to 400°F (200°C). This step is key for crispy chicken. Line a baking sheet with parchment paper. This makes cleanup easy and helps the tenders cook evenly.
Mixing the Coating Ingredients
In a large bowl, mix the panko breadcrumbs, Parmesan cheese, garlic powder, onion powder, dried Italian herbs, salt, and black pepper. Stir well to combine. This mixture gives your chicken a delicious flavor and crispy texture.
Breading the Chicken Tenders
Take a chicken tender and dip it into the egg mixture. Make sure it gets fully coated. Then, transfer it to the breadcrumb mixture. Press down gently so the crumbs stick well. Repeat this for all the chicken tenders until they are coated.
Baking Instructions
Place the breaded chicken tenders on the lined baking sheet. Space them out to ensure even cooking. Bake them in the preheated oven for about 20-25 minutes. They should be golden brown and cooked through. For extra crispiness, flip them halfway through baking. After baking, let them rest for a few minutes before serving. Sprinkle some freshly chopped parsley on top for a nice touch!
Tips & Tricks
Achieving the Perfect Crispiness
To get that perfect crispy texture, use panko breadcrumbs. Panko gives a light and airy crunch. Make sure you coat the chicken tenders well with the egg and breadcrumb mix. Press the breadcrumbs onto the chicken firmly. This helps them stick during baking. Bake at a high temperature, around 400°F (200°C). Flipping the tenders halfway through baking can also help them crisp evenly.
Common Mistakes to Avoid
One common mistake is not preheating the oven. Always preheat your oven to ensure even cooking. Another mistake is overcrowding the baking sheet. Space the chicken tenders apart to let hot air circulate. This helps them get crispy. Avoid using too much oil; just enough to coat the breadcrumbs will do. Too much can make them soggy instead of crispy.
Serving Suggestions and Pairings
Baked garlic Parmesan chicken tenders pair well with many sides. Try serving them with a fresh salad for a light meal. You can also add some roasted veggies for a hearty dinner. Dipping sauces are a must! Marinara sauce or ranch dressing are great choices. For a fun twist, serve with sweet chili sauce for a spicy kick.
Variations
Spicy Garlic Parmesan Chicken Tenders
To add a kick to your meal, try spicy garlic Parmesan chicken tenders. You can mix in some cayenne pepper or crushed red pepper flakes into the breadcrumb mix. Start with a half teaspoon, and taste as you go. This small change makes a big difference. The heat pairs well with the garlic and cheese flavors.
Herb-Infused Changes
You can easily switch up the herbs for a new taste. For a fresh twist, use fresh herbs like rosemary or thyme instead of dried. You can also add fresh minced garlic for more flavor. Mixing in lemon zest gives a bright touch too. Try different combinations to find your favorite mix.
Alternative Dipping Sauces
Dipping sauces can change the game for your chicken tenders. Instead of marinara, try a spicy ranch or honey mustard. You can also make a garlic aioli by mixing mayonnaise, garlic, lemon juice, and a pinch of salt. Each sauce brings a new flavor to the meal. This way, you can make each bite unique and fun.
Storage Info
How to Store Leftovers
After enjoying your baked garlic Parmesan chicken tenders, you might have some left. Store them in an airtight container. This helps keep them fresh. Make sure to let them cool before sealing. You can keep them in the fridge for up to three days. For best taste, try to eat them sooner.
Reheating Tips
To reheat your chicken tenders, use an oven for the best results. Preheat the oven to 375°F (190°C). Place the tenders on a baking sheet. Heat them for about 10-15 minutes. This keeps them crispy. You can also use a microwave if you’re in a hurry. Just remember, it might not be as crispy.
Freezing and Thawing Instructions
If you want to save some for later, freezing works great. Place the cooled chicken tenders in a freezer bag. Squeeze out as much air as you can. They will stay good for up to three months in the freezer. When you’re ready to eat, thaw them in the fridge overnight. Then, reheat them in the oven for the best taste.
FAQs
How long do baked chicken tenders last in the fridge?
Baked chicken tenders can last in the fridge for about three to four days. Make sure to store them in an airtight container to keep them fresh. You can also wrap them tightly in plastic wrap. This will help prevent them from drying out.
Can I use regular breadcrumbs instead of panko?
Yes, you can use regular breadcrumbs instead of panko. However, panko gives a crispier texture. Regular breadcrumbs are more fine and may not create the same crunch. If you want that extra crisp, stick with panko.
What’s the best way to reheat leftover chicken tenders?
To reheat chicken tenders, use the oven. Preheat your oven to 375°F (190°C). Place the tenders on a baking sheet and heat for about 10-15 minutes. This method helps keep them crispy. You can also use an air fryer if you have one. It works well and keeps the crunch.
Can I make these chicken tenders gluten-free?
Yes, you can make these chicken tenders gluten-free. Simply use gluten-free breadcrumbs instead of panko. Make sure to check labels on all other ingredients, like the chicken and seasonings, to ensure they are gluten-free. This way, everyone can enjoy them!
You’ve learned how to make tasty baked chicken tenders from scratch. We covered the key ingredients, step-by-step instructions, and helpful tips for the best results. Remember to try variations for extra flavor and check storage tips for leftovers. With these insights, you can enjoy delicious, crispy chicken tenders anytime. Keep experimenting and have fun in the kitchen!