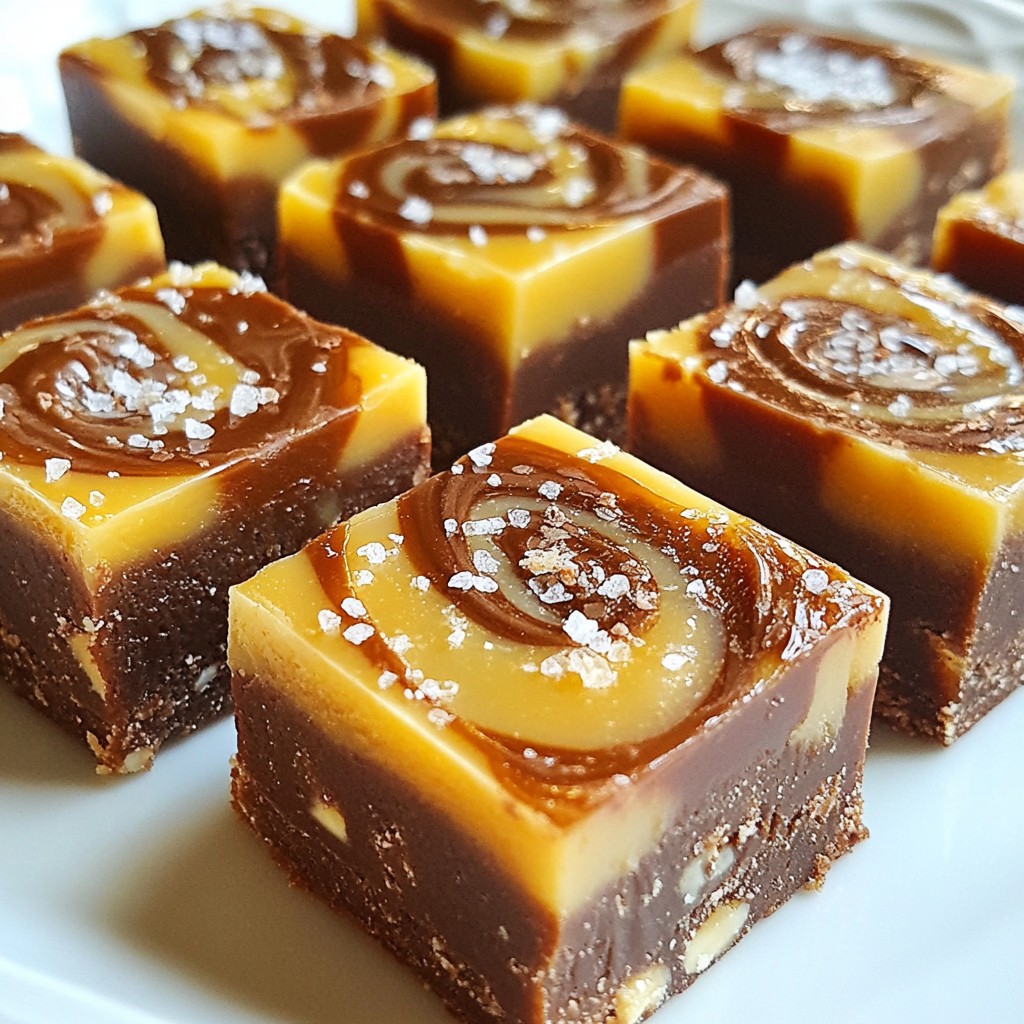
If you’re searching for a dessert that will make your taste buds dance, look no further! My Caramel Chocolate Chip Fudge is an easy treat that blends sweet, creamy chocolate with gooey caramel. With just a few simple ingredients and tools, you can whip up this indulgent dessert that everyone will love. Let’s dive into the steps and secrets that make this fudge truly irresistible!
Why I Love This Recipe
- Decadent Flavor: This fudge combines the rich taste of chocolate with the sweet, buttery notes of caramel, creating a mouthwatering treat that is hard to resist.
- Easy to Make: With just a few simple ingredients and quick steps, this recipe is perfect for both novice and experienced bakers.
- Customizable: The addition of nuts is optional, allowing you to tailor the fudge to your taste preferences or dietary needs.
- Perfect for Sharing: This recipe yields 16 squares, making it ideal for parties, holiday gatherings, or as a thoughtful gift for friends and family.
Ingredients
List of Main Ingredients
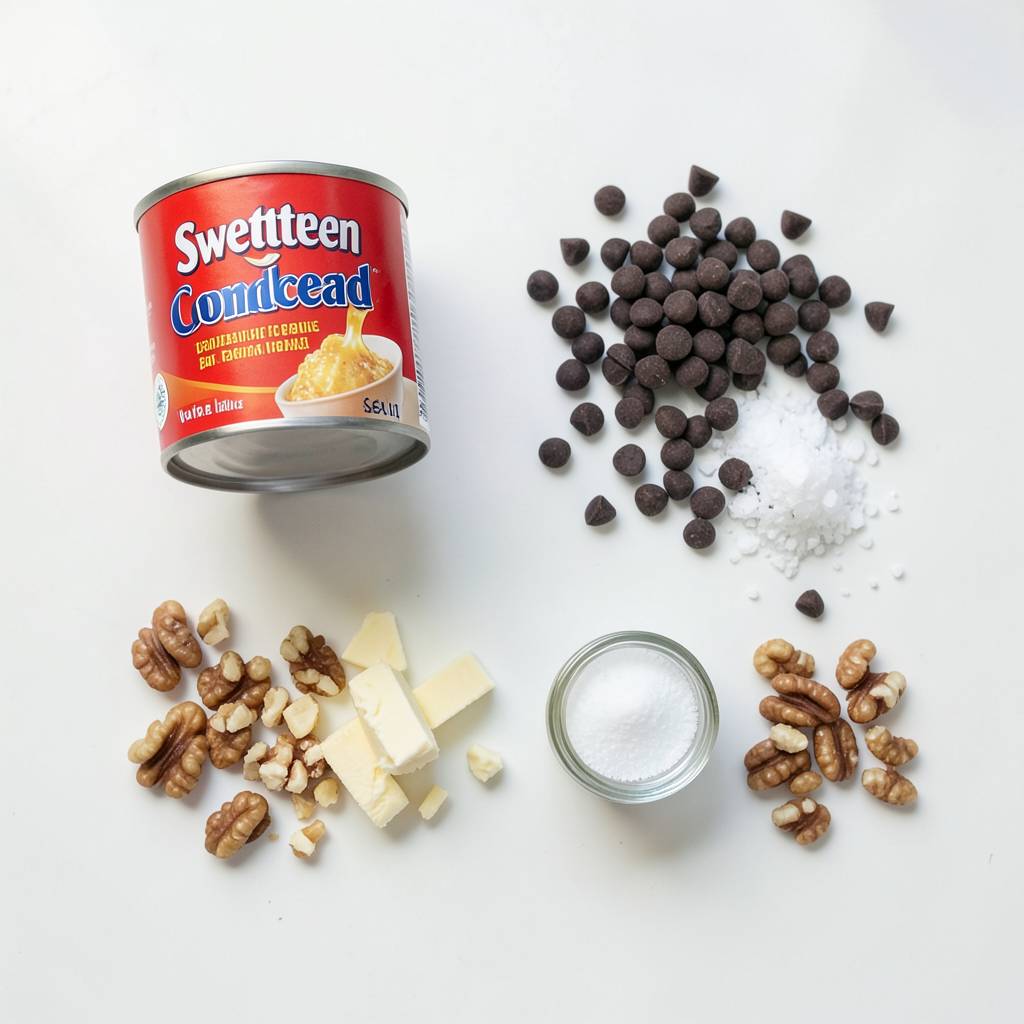
- 1 can (14 oz) sweetened condensed milk
- 2 cups semi-sweet chocolate chips
- 1 cup caramel bits
- 1/4 cup unsalted butter
- 1 teaspoon vanilla extract
- 1/2 teaspoon sea salt
- 1 cup finely chopped nuts (optional)
These ingredients come together to create a rich and creamy fudge. Sweetened condensed milk acts as a base, providing sweetness and creaminess. Semi-sweet chocolate chips lend a rich chocolate flavor that pairs perfectly with the caramel bits. The caramel adds a gooey, decadent layer, while butter helps to blend everything smoothly. Vanilla extract enhances the overall taste, and a sprinkle of sea salt amplifies the flavors. If you want a bit of crunch, adding finely chopped nuts makes it even better.
Recommended Tools
- 8x8 inch square baking pan
- Parchment paper
- Medium saucepan
- Silicone spatula or wooden spoon
- Microwave-safe bowl
Using the right tools makes a big difference in your cooking process. An 8x8 inch square baking pan is perfect for shaping the fudge. Parchment paper helps with easy removal of the fudge once it sets. A medium saucepan allows for even heating of the ingredients. A silicone spatula or wooden spoon is great for stirring, ensuring nothing sticks to the bottom. Lastly, a microwave-safe bowl is essential for melting the caramel bits without burning them.
Step-by-Step Instructions
Preparing the Baking Pan
- Line with parchment paper
- Ensure proper overhang for easy removal
Start by grabbing an 8x8 inch square baking pan. Line it with parchment paper. This allows for easy lifting of the fudge later. Make sure to let some paper hang over the edges. This overhang helps lift out the fudge without making a mess.
Melting the Fudge Mixture
- Combine ingredients in a saucepan
- Stir continuously over low heat
Next, take a medium saucepan. Add the sweetened condensed milk, butter, and semi-sweet chocolate chips. Turn the heat to low and stir constantly. You want everything to melt together into a smooth mixture. This takes some time, but it's worth it.
Layering the Fudge and Caramel
- Pour and spread first fudge layer
- Melt and drizzle caramel
- Add final fudge layer and optional sea salt sprinkle
Once the fudge mixture is smooth, remove it from the heat. Pour half of this fudge into the lined pan. Spread it evenly across the bottom. Next, melt the caramel bits in a microwave-safe bowl. Heat them in 30-second intervals, stirring in between. When it's smooth, drizzle it over the first fudge layer.
Finally, pour the rest of the fudge over the caramel layer. Smooth it out gently. For a fun twist, sprinkle some sea salt on top. This adds a great flavor contrast. Now, place the pan in the fridge for at least 2 hours. This helps the fudge set properly. Once set, lift it out using the parchment paper. Cut it into squares, and enjoy your treat!
Tips & Tricks
Perfecting the Texture
Stirring is very important when making fudge. It helps mix the sweetened condensed milk, butter, and chocolate chips. If you stop stirring, the mixture may burn or clump. Keep the heat low and stir until it is smooth. This will give you that perfect fudge texture. A smooth mixture means a rich taste.
Storage Tips
Store your fudge in the refrigerator. This keeps it firm and fresh. Use an airtight container to prevent it from drying out. If you plan to keep it longer, wrap it tightly in plastic wrap. This will help keep the flavors in.
Presentation Suggestions
For a stunning display, place your fudge squares on a nice plate. You can add a sprinkle of chopped nuts on top. A drizzle of melted chocolate adds a lovely touch. These small details make your fudge not just tasty but also beautiful.
Pro Tips
- Use High-Quality Chocolate: The better the chocolate, the richer the flavor of your fudge. Opt for premium semi-sweet chocolate chips for a decadent result.
- Let the Caramel Cool Slightly: Allow the melted caramel to cool for a couple of minutes before drizzling it over the fudge. This helps prevent it from melting the fudge layer underneath.
- Experiment with Flavors: Feel free to add flavor extracts like almond or mint for a unique twist. Just a few drops can enhance the overall taste of your fudge.
- Store Properly: Keep your fudge in an airtight container at room temperature for up to a week, or refrigerate for longer freshness. Just be sure to let it come to room temperature before serving for the best texture.
Variations
Flavor Additions
You can make this fudge even more fun. Try adding sea salt for a sweet and salty mix. This makes every bite pop with flavor. You might also swap in other nuts or chocolate types. Use walnuts or pecans for crunch. You can even add white chocolate chips for a twist.
Dietary Substitutions
If you need dairy-free options, use coconut milk instead of sweetened condensed milk. There are also dairy-free chocolate chips that work well. For gluten-free alternatives, ensure all ingredients are gluten-free. The fudge will taste just as rich and delicious!
Seasonal Variations
Change the look and taste for special events. During holidays, you can add festive colors or shapes. Use red and green sprinkles for Christmas or pastel colors for Easter. Try adding pumpkin spice or peppermint extract for fun seasonal flavors. Your fudge can fit any occasion and impress your guests!
Storage Info
How to Store Caramel Chocolate Chip Fudge
To keep your fudge fresh, use an airtight container. Glass or plastic containers work well. You can also wrap the fudge tightly in plastic wrap. This helps to keep moisture out and flavor in. Store it in the fridge for best results. The fudge will stay fresh for about two weeks. After that, it may start to lose flavor and texture.
Freezing Instructions
If you want to keep it longer, you can freeze your fudge. First, cut it into squares. Then, place them in a single layer on a baking sheet. Put the baking sheet in the freezer until the fudge is firm. After that, transfer the squares to an airtight container or freezer bag. Make sure to separate layers with parchment paper. This prevents sticking.
When you want to enjoy it, take the fudge out of the freezer. Let it thaw in the fridge for a few hours. This keeps the texture smooth. Serve it chilled or at room temperature for the best taste. Enjoy your sweet treat!
FAQs
What can I substitute for sweetened condensed milk?
You can use evaporated milk as a substitute. It is less sweet, so add sugar to taste. Coconut milk works too, adding a nice flavor. Almond milk can also work, but it's thinner. Each option changes the fudge's sweetness and creaminess.
Can I use chocolate chunks instead of chocolate chips?
Yes, you can use chocolate chunks. They will make the fudge a bit chunkier. This change can enhance the texture and add a fun bite. The flavor remains rich and chocolatey, just like chocolate chips.
How long does caramel chocolate chip fudge last?
Caramel chocolate chip fudge lasts about two weeks when stored in the fridge. Keep it in an airtight container to maintain freshness. If you freeze it, it lasts up to three months. Just thaw it in the fridge before serving.
Now you know how to make delicious caramel chocolate chip fudge. You learned about key ingredients, tools, and step-by-step instructions. I shared tips to perfect texture and ideas for storing your fudge. Don’t forget to explore fun variations and how to keep it fresh. Experimenting can lead to tasty results. Enjoy sharing this treat at gatherings or as a special snack. Happy baking!