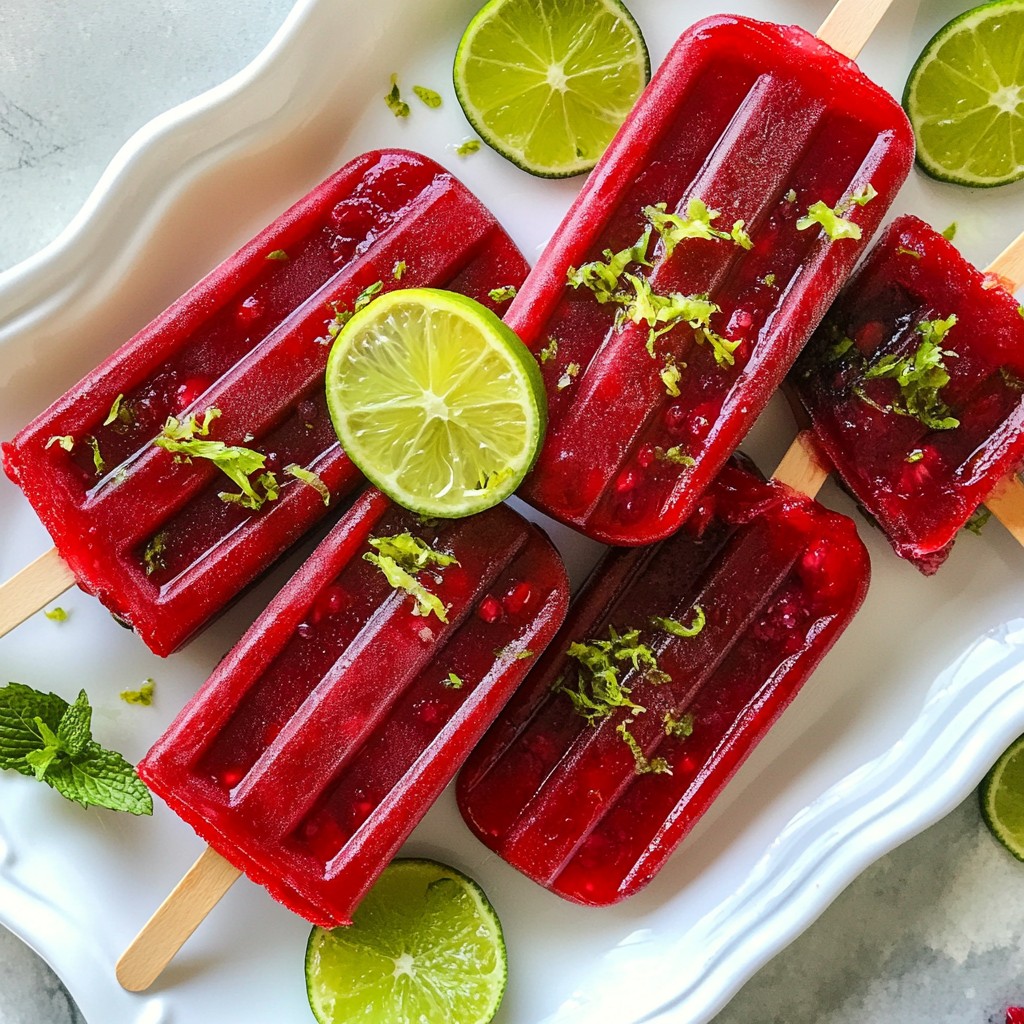
Looking for a cool treat to beat the summer heat? These Cherry Limeade Popsicles are just what you need! With fresh cherries and zesty lime, they burst with flavor and fun. I'll guide you through every step, from mixing to freezing. Plus, I'll share tips for the perfect popsicle experience. Get ready to impress your friends and family with this refreshing snack that's easy to make!
Why I Love This Recipe
- Refreshing Summer Treat: These popsicles are the perfect way to cool down on a hot summer day, combining the sweetness of cherries with the tangy zest of lime.
- Simple Ingredients: Made with just a few fresh ingredients, this recipe is easy to whip up and provides a delightful homemade option to store-bought treats.
- Customizable Sweetness: You have control over the sweetness by adjusting the amount of honey or agave syrup, making it perfect for any palate.
- Beautiful Presentation: The vibrant colors of the cherries and limes make for a stunning visual treat, especially when garnished with fresh mint leaves.
Ingredients
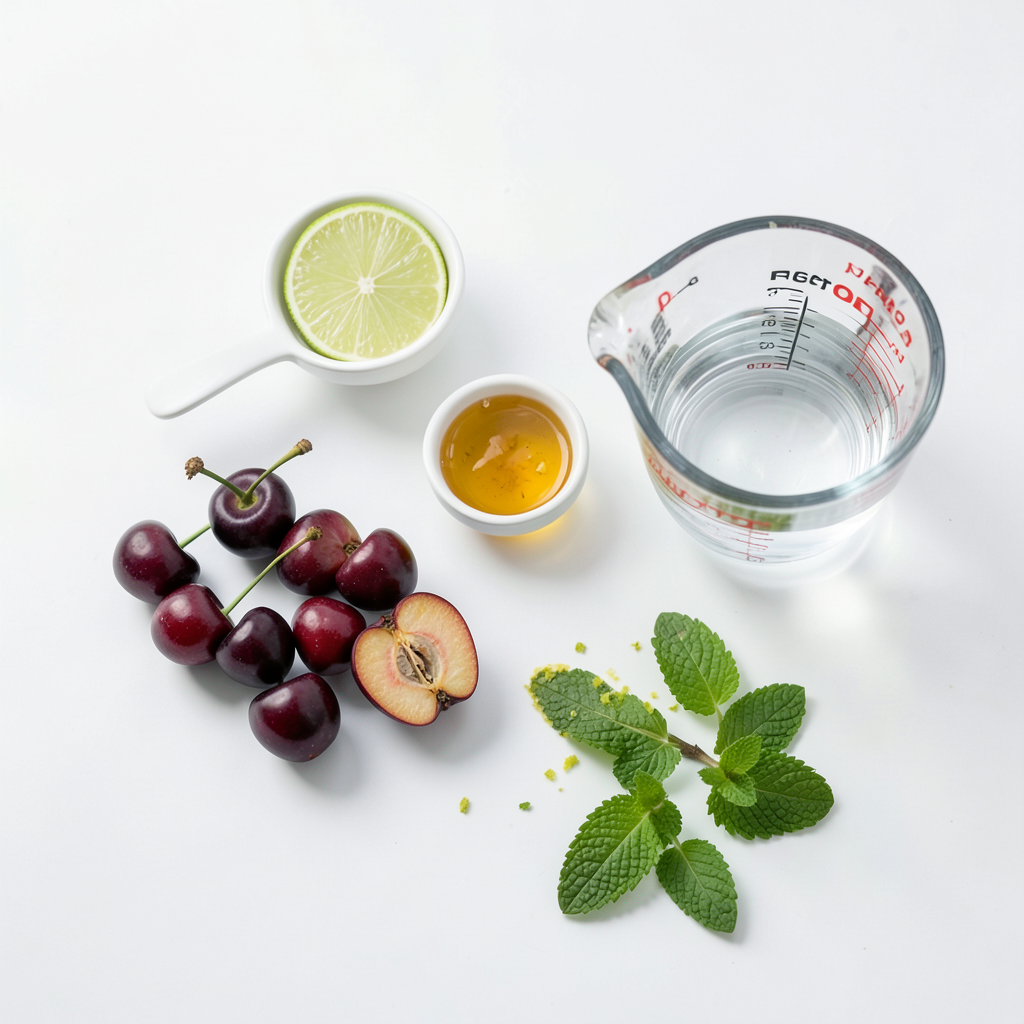
Fresh Cherries
For these popsicles, fresh cherries are a must. You need 2 cups of ripe cherries. Make sure to pit and halve them. This step is key, as the cherries add sweetness and flavor to the popsicles. Cherries bring a beautiful red color that makes the popsicles look great too.
Lime Juice and Zest
Next, we use lime juice and zest. You will need 1 cup of freshly squeezed lime juice. This usually comes from about 5-6 limes. The juice gives the popsicles a tangy kick. Don't forget the zest! Adding zest from 2 limes boosts the lime flavor. It makes every bite refreshing and bright.
Sweetener Options
For sweetness, you can choose honey or agave syrup. You will need 1/2 cup, but you can adjust this based on your taste. If you like it sweeter, add more sweetener. This option allows you to control the taste of your popsicles. Use what you love!
Step-by-Step Instructions
Preparing the Cherry-Lime Mixture
Start by gathering your ingredients. You need fresh cherries, lime juice, sweetener, and water. In a blender, combine 2 cups of halved cherries, 1 cup of lime juice, 1/2 cup of honey or agave syrup, and 1 cup of water. Blend on high until smooth. The cherries should mix well with the lime juice. Taste the mixture. If it needs more sweetness, add more honey or agave syrup, and blend again.
Straining for Smooth Texture
To make your popsicles smooth, you must strain the mixture. Pour the blended liquid through a fine mesh strainer into a clean bowl. This step removes any bits of skin or pulp. You want a silky texture for your popsicles. Once strained, add the zest of 2 limes to the mixture. Stir gently to spread the zest evenly throughout. This will boost the citrus flavor.
Freezing and Serving Instructions
Now it’s time to freeze your cherry limeade mixture. Carefully pour it into your popsicle molds. Leave a little space at the top to allow for expansion. Insert popsicle sticks into the molds, making sure they are centered. Place the molds in the freezer. Freeze for at least 4 to 6 hours, or until they are solid. When ready to serve, run warm water over the molds for a few seconds. This will help release the popsicles easily. Enjoy your refreshing cherry limeade popsicles!
Tips & Tricks
Achieving the Perfect Sweetness
To get the right sweetness, start with honey or agave syrup. Use half a cup as a base. After blending, taste the mixture. If it’s too tart, add more sweetener, a little at a time. Blend again after each addition. This way, you control the flavor to fit your taste perfectly.
Ensuring Smooth Popsicles
For smooth popsicles, blend the mixture well until it's silky. After that, pour it through a fine mesh strainer into a bowl. This step removes any skins or pulp. You want a clean, smooth base for your popsicles. Take your time with this. It makes a big difference in texture.
Presentation Suggestions
Make your popsicles look as good as they taste. Once frozen, place them on a nice platter. Garnish with fresh mint leaves or thin lime slices on top. This not only adds color but also a refreshing touch. A pretty presentation impresses everyone. It makes your summer treat even more special!
Pro Tips
- Sweetness Level Adjustment: Taste the mixture before freezing. Adjust the sweetness with honey or agave syrup to suit your preference, blending well after each addition.
- Straining for Smoothness: Always strain the blended mixture through a fine mesh strainer to achieve a silky texture, removing any bits of cherry skin or pulp.
- Optimal Freezing Time: For best results, freeze the popsicles for at least 4-6 hours or until they are completely solid to ensure easy removal from the molds.
- Creative Garnishing: Enhance presentation by garnishing with fresh mint leaves or thin lime slices, adding a pop of color and flavor to your popsicles.
Variations
Using Different Fruits
You can swap cherries for other fruits. Strawberries, raspberries, or blueberries work well. Use the same amount as the cherries. Blend them just like the cherries. Each fruit gives a new taste. You can mix fruits too! A blend of berries can be a fun choice.
Adding Herbal Flavors
Herbs can add a fresh twist. Mint and basil are great options. Add a few leaves to the blender. Blend them with the fruit and lime juice. This gives your popsicles a nice, herbal note. Mint pairs well with lime, creating a refreshing taste.
Sugar-Free Options
If you want a sugar-free treat, use a sugar substitute. Stevia or erythritol can work well. Adjust the amount to your taste. You can also use ripe bananas for sweetness. Blend them with the fruit for a natural sweet flavor. This keeps the popsicles tasty without added sugar.
Storage Info
How to Store Popsicles
Store your Cherry Limeade Popsicles in a sealed container. Use a plastic bag or a popsicle storage box. This keeps them fresh and helps avoid freezer burn. Make sure they are fully frozen before storing. If you leave them out too long, they may melt and lose their shape.
Best Practices for Freezing
For best results, freeze your popsicles for at least 4-6 hours. This ensures they are solid and easy to remove from the molds. Avoid opening the freezer too often. Each time you do, warm air enters, which can affect the freezing process.
Shelf Life of Homemade Popsicles
Homemade popsicles can last up to two months in the freezer. However, they taste best within the first month. After that, they may lose flavor or texture. Always check for ice crystals or changes in color before eating. If they look strange, it’s best to toss them out.
FAQs
Can I use frozen cherries instead of fresh?
Yes, you can use frozen cherries. They work great in this recipe. Just ensure they are pitted before blending. Frozen cherries may make the mixture colder and thicker, so blend them well. You might need to add a bit more water if the blend is too thick.
How do I make popsicles without molds?
No molds? No problem! You can use small cups or ice cube trays instead. Just pour the cherry limeade mix into them. Insert a stick or a spoon into the center. Freeze them the same way. Once frozen, run warm water over the outside to help release them.
Are Cherry Limeade Popsicles healthy?
Yes, these popsicles are a healthy treat! They are made with fresh fruit and natural sweeteners. You control the sweetness by choosing how much honey or agave syrup to add. They also provide vitamins and hydration, making them a great summer snack.
To sum up, you can create tasty homemade cherry-lime popsicles using fresh cherries, lime juice, and sweeteners. Follow the easy steps to prepare and freeze your popsicles. Use tips to get the right sweetness and a smooth texture. Don’t forget to try different fruits or add herbs for fun twists. Lastly, store them properly for the best taste. Enjoy making these refreshing treats!