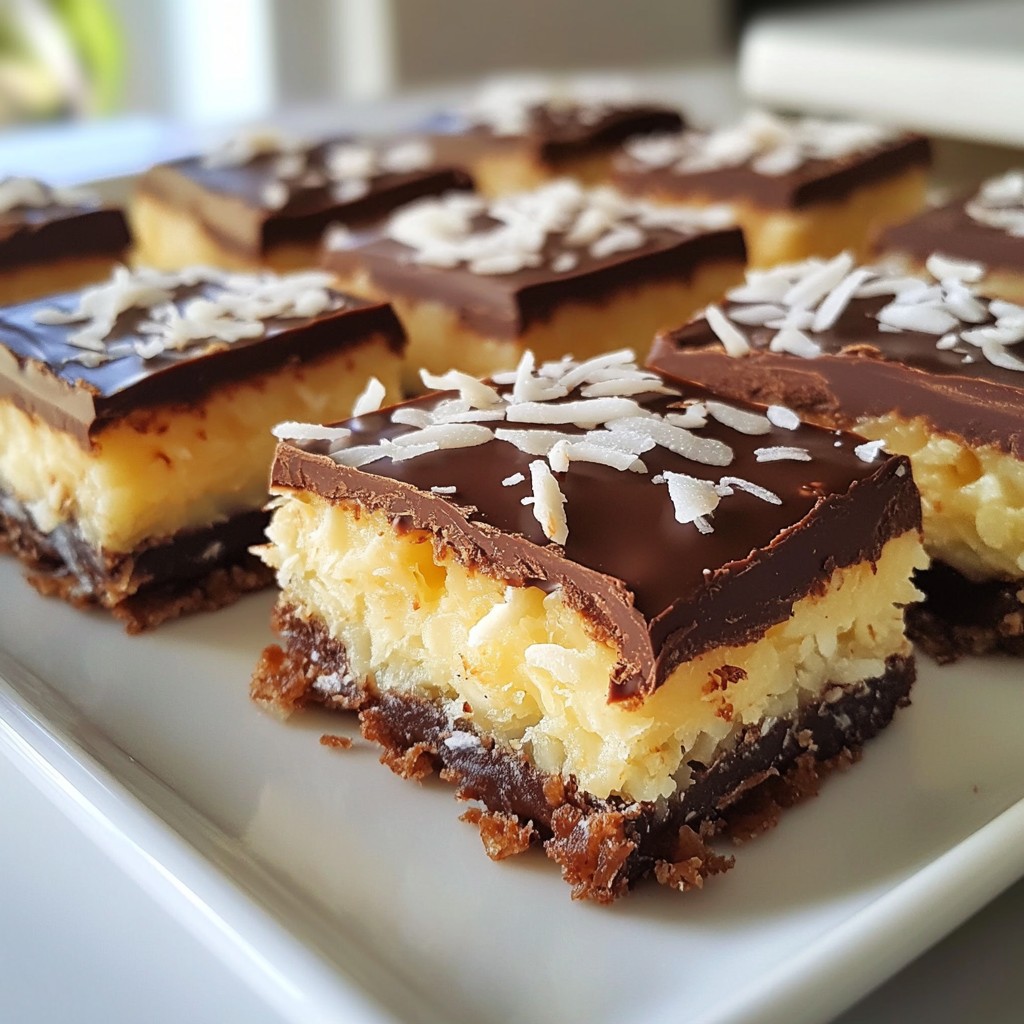
If you love sweet treats, you’ll adore these Chocolate Covered Coconut Bars. They are easy to make and taste amazing! With just a few key ingredients, you can whip up a delightful snack that satisfies your chocolate craving. In this article, I’ll guide you through each step, offering tips, tricks, and tasty variations. Get ready to dive into a simple dessert that’s sure to impress your friends and family!
Why I Love This Recipe
- Indulgent Flavor: These chocolate-covered coconut bars offer a rich and satisfying taste that combines the sweetness of coconut with the deep flavor of dark chocolate.
- Easy to Make: With minimal ingredients and straightforward steps, this recipe is perfect for both novice and experienced bakers, making it a hassle-free treat.
- Healthier Option: Using natural sweeteners like honey or maple syrup and dark chocolate, these bars provide a guilt-free indulgence that satisfies your sweet tooth.
- Perfect for Sharing: Cut into convenient bars, these treats are ideal for parties, gatherings, or as a delightful homemade gift for friends and family.
Ingredients
Main Ingredients for Chocolate Covered Coconut Bars
To make these tasty bars, you need some simple ingredients. Here’s what you will need:
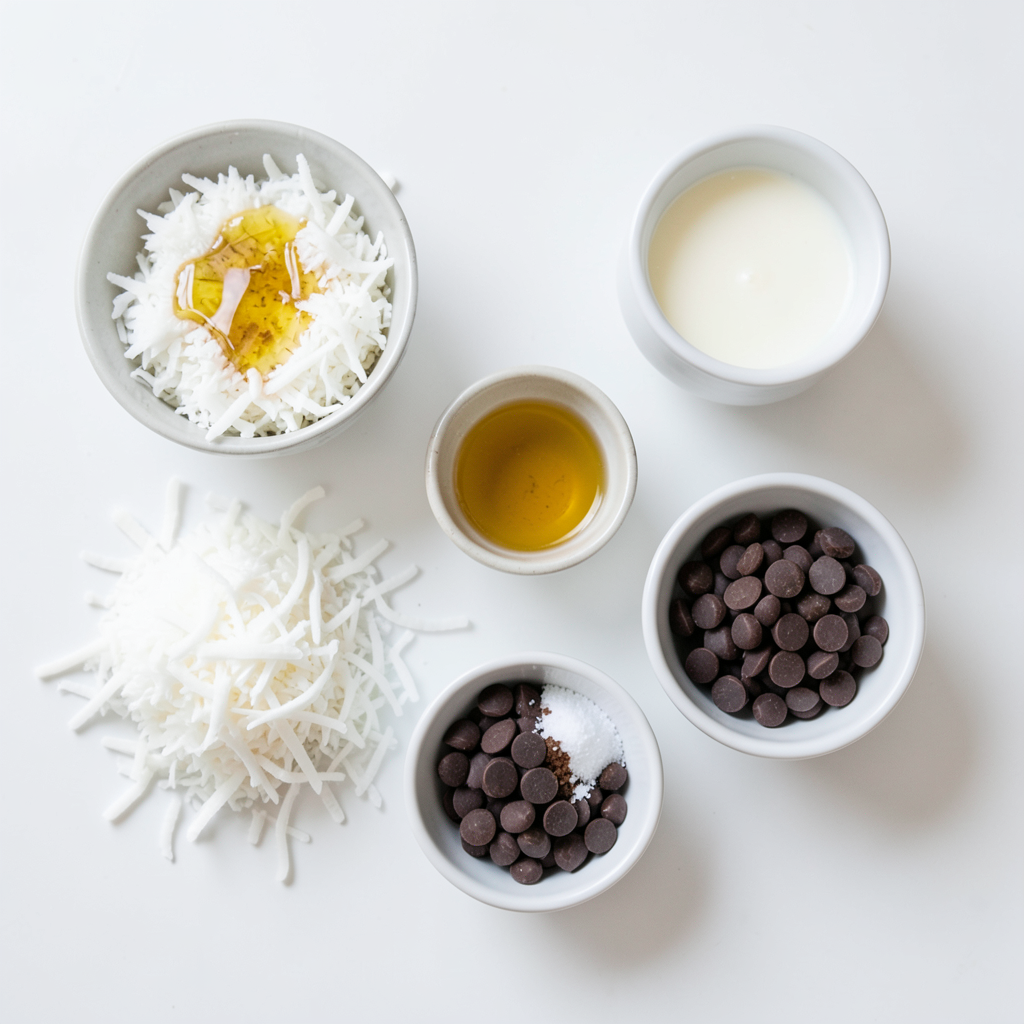
- 1 cup shredded unsweetened coconut
- 1/2 cup coconut oil, gently melted
- 1/4 cup honey or pure maple syrup
- 1 teaspoon vanilla extract
- 1/4 teaspoon sea salt
- 1 cup dark chocolate chips (minimum 70% cocoa for richness)
- 1 tablespoon coconut milk (optional, for added creaminess)
These ingredients come together to create a rich and sweet treat. The unsweetened coconut gives a nice texture. Coconut oil adds smoothness, while honey or maple syrup sweetens the mix. Dark chocolate chips offer a bold flavor.
Optional Ingredients for Variations
You can make your bars even more fun by adding some optional ingredients. Here are a few ideas:
- Chopped nuts (like almonds or walnuts)
- Dried fruit (like raisins or cranberries)
- A dash of cinnamon for warmth
- A sprinkle of sea salt on top for contrast
These additions can change the bars’ flavor and texture. Feel free to mix and match!
Tips for Quality Ingredients
When you choose your ingredients, think about quality. Here are some tips:
- Coconut: Use unsweetened coconut for the best taste.
- Coconut Oil: Look for cold-pressed coconut oil. It has a better flavor.
- Sweeteners: Choose pure honey or maple syrup for a natural taste.
- Chocolate: Pick dark chocolate with at least 70% cocoa. It tastes richer and better.
Quality ingredients make a big difference. They ensure your bars taste fresh and delightful.
Step-by-Step Instructions
Preparation of Coconut Mixture
To start, gather your ingredients. In a mixing bowl, add 1 cup of shredded unsweetened coconut, 1/2 cup of gently melted coconut oil, and 1/4 cup of honey or pure maple syrup. Add 1 teaspoon of vanilla extract and 1/4 teaspoon of sea salt. Mix these together well. You want a sticky mixture that holds together. This step is key for the bars to stay firm.
Freezing Process for Firmness
Next, line an 8x8 inch square baking dish with parchment paper. Make sure the paper hangs over the sides. This helps lift the bars out later. Transfer your coconut mixture into the dish. Press it down firmly with your hands or a spatula. Make it smooth and even. Now, freeze the dish for at least 30 minutes. This hardens the bars, making them easy to cut.
Melting and Coating with Chocolate
While the bars freeze, prepare the chocolate coating. In a microwave-safe bowl, add 1 cup of dark chocolate chips. Melt them in 30-second intervals. Stir after each interval until the chocolate is smooth. If you want creaminess, add 1 tablespoon of coconut milk.
Once the bars are firm, remove the dish from the freezer. Lift the bars out using the parchment overhang. Slice them into bar-sized pieces with a sharp knife.
Final Touches and Setting
Dip each bar into the melted chocolate. Use a fork to coat each bar fully. Let any excess chocolate drip off. Place the bars on the parchment-lined baking sheet. Repeat this for all bars. For a nice touch, sprinkle some shredded coconut on top of the chocolate while it’s still soft.
Finally, put the chocolate-covered bars back in the fridge for 15-20 minutes. This allows the chocolate to set and harden. Enjoy your simple yet delicious treat!
Tips & Tricks
Best Practices for Dipping in Chocolate
When you dip the coconut bars in chocolate, start with a fork. This helps each bar get an even coat. Use a deep bowl for the melted chocolate. A deeper bowl lets you dip without splashing. Make sure the chocolate is warm and melted. This keeps the coating smooth. After dipping, let the excess chocolate drip off. This step avoids a thick layer of chocolate. Place the bars on parchment paper right after dipping. This prevents sticking.
How to Achieve a Creamy Chocolate Coating
To get creamy chocolate, add coconut milk to the melted chocolate. Stir well until it mixes in. Choose dark chocolate with at least 70% cocoa. This gives a rich flavor and texture. You can also use a double boiler. This method helps melt the chocolate gently and evenly. If you don't have one, use the microwave in 30-second bursts. Always stir after each burst to avoid burning.
Presentation Ideas for Serving
Serving chocolate-covered coconut bars can be fun! Use a nice platter for an elegant look. You can sprinkle whole coconut flakes on top for decoration. A fresh mint sprig adds a pop of color. Arrange the bars in a neat row or a circle. This makes them easy to grab. Adding some tropical fruits like pineapple or mango next to the bars can brighten the display.
Pro Tips
- Use Fresh Coconut: If possible, use fresh coconut for a more vibrant flavor and texture. You can grate it yourself for the best results!
- Chocolate Quality Matters: Opt for high-quality dark chocolate with at least 70% cocoa for a richer taste and smoother texture.
- Chill for Perfect Coating: Make sure the coconut bars are well-chilled before dipping in chocolate; this will help the chocolate to set quickly and evenly.
- Experiment with Toppings: Feel free to get creative with toppings! Consider adding crushed nuts, sea salt, or sprinkles for extra flair.
Variations
Using Different Types of Chocolate
You can change the chocolate for your bars. Dark chocolate gives a rich taste. You can also use milk chocolate if you prefer a sweeter flavor. White chocolate adds a creamy finish. Each type brings its own unique flavor to the bars. Experiment with different chocolates to find your favorite.
Adding Nuts or Other Mix-Ins
Want to add some crunch? Try mixing in nuts like almonds or walnuts. You can also add seeds like sunflower or pumpkin seeds. Dried fruits like cranberries or apricots work well too. These add flavor and texture, making every bite exciting. Customize the bars to suit your taste.
Sugar-Free or Vegan Alternatives
If you need a sugar-free option, use a sugar substitute like stevia or erythritol. For a vegan treat, replace honey with maple syrup or agave nectar. Make sure to choose dairy-free chocolate chips. These swaps keep the bars tasty while fitting dietary needs. Enjoy a guilt-free version of this delicious snack.
Storage Info
How to Store Chocolate Covered Coconut Bars
Store chocolate covered coconut bars in an airtight container. This keeps them fresh and tasty. Place a layer of parchment paper between the bars if stacking. This prevents sticking. Keep them in a cool, dry place. If your kitchen is warm, the fridge is best.
Freezing for Long-Term Storage
You can freeze chocolate covered coconut bars for longer storage. Wrap each bar tightly in plastic wrap. Then, place them in a freezer-safe bag. This helps prevent freezer burn. They can last up to three months in the freezer. When you're ready, thaw them in the fridge overnight.
Best Containers for Freshness
Use a glass or plastic container with a tight seal for storage. These containers keep moisture out and flavors in. Avoid metal containers, as they can affect taste. Always label your container with the date. This way, you know when to enjoy your bars at their best.
FAQs
Can I use sweetened coconut instead of unsweetened?
Yes, you can use sweetened coconut. It will make the bars sweeter. Just remember, it may change the taste. If you like a sweeter treat, go for it! If not, stick with unsweetened coconut for a more balanced flavor.
How long do chocolate covered coconut bars last?
These bars can last about one week in the fridge. Make sure to store them in an airtight container. If you freeze them, they can last for up to three months. Just let them thaw in the fridge before enjoying.
Can I use dairy-free chocolate chips?
Absolutely! Dairy-free chocolate chips work great. They melt well and taste delicious. This option is perfect for anyone who is vegan or lactose intolerant. Just be sure to check the labels for quality.
What can I pair these bars with for a dessert platter?
You can pair these bars with fresh fruit, like strawberries or bananas. They also go well with whipped cream or yogurt. For a fun touch, add some nuts or chocolate-covered pretzels. This makes a colorful and tasty dessert platter!
In this article, we explored how to make chocolate-covered coconut bars. We discussed main and optional ingredients, plus tips for quality. You learned step-by-step instructions for making these treats, from preparing the coconut mixture to dipping in chocolate. We shared helpful tips for presentation and variations like using different chocolates. Finally, we covered storage methods to keep your bars fresh. With this guide, you can create tasty bars tailored to your taste. Enjoy your sweet creations any time!