Chocolate Lava Cake Delightful and Rich Dessert Recipe

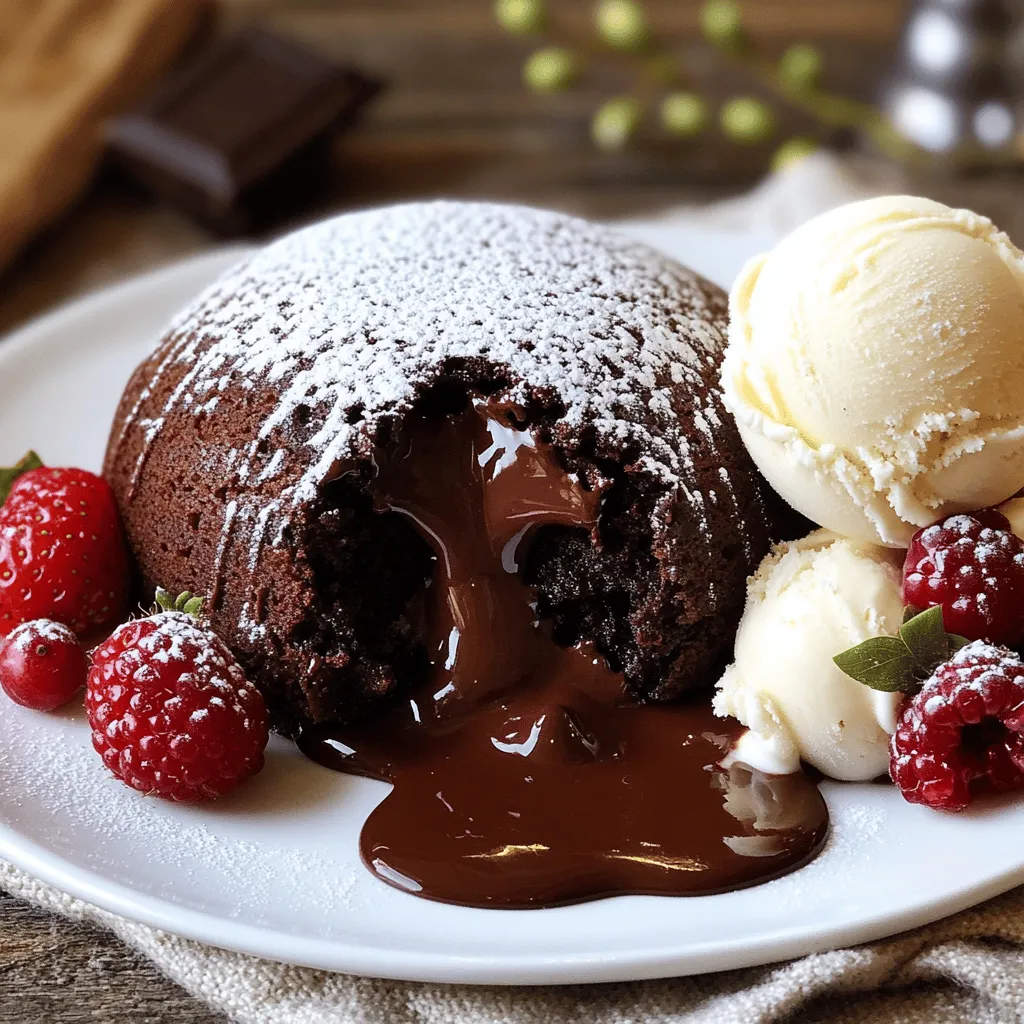
Indulging in a rich, gooey chocolate lava cake is a dessert dream come true. Imagine slicing through a warm cake to reveal a melting center of chocolate bliss. In this post, I’ll guide you through a simple recipe that will impress your family and friends. From the essential ingredients and tools to handy tips for baking, let’s create a dessert that’s as delightful as it is delicious. Ready to dive into chocolate heaven?

Ingredients

List of Required Ingredients

– 1/2 cup unsalted butter (plus extra for greasing)

– 1 cup semi-sweet chocolate chips

– 2 large eggs

– 2 large egg yolks

– 1/4 cup granulated sugar

– 2 tablespoons all-purpose flour

– 1 teaspoon vanilla extract

– Pinch of salt

– Powdered sugar (for dusting)

– Vanilla ice cream (for serving)

Chocolate lava cake needs simple yet rich ingredients. Start with unsalted butter and semi-sweet chocolate chips. These two create the heart of the cake. The eggs and egg yolks add richness and help the cake rise.

Granulated sugar sweetens the mix. All-purpose flour gives the cake structure. A touch of vanilla adds depth, while a pinch of salt enhances all the flavors. Dusting with powdered sugar adds a nice finish, and pairing with vanilla ice cream makes it even better.

Recommended Tools

– Ramekins

– Baking sheet

– Microwave-safe bowl

– Whisk

For this recipe, you’ll need a few essential tools. Ramekins are key for baking and serving the cake. A baking sheet makes it easy to move the ramekins in and out of the oven. A microwave-safe bowl helps melt the chocolate with ease. Finally, a whisk is perfect for mixing the eggs and sugar until they are fluffy and light.

If you want to impress your guests, this chocolate lava cake recipe is an excellent choice. For the full recipe, make sure to check out the details!

Step-by-Step Instructions

Preparation Steps

– Preheat your oven to 425°F (220°C).

– Generously grease four ramekins with unsalted butter.

– Place the ramekins on a baking sheet for easy handling.

Mixing the Ingredients

– In a microwave-safe bowl, melt the chocolate and butter together.

– Heat in 30-second bursts, stirring well each time until smooth.

– In another bowl, whisk the eggs, egg yolks, and sugar until thick.

– This should take about 2-3 minutes.

– Carefully pour the melted chocolate into the egg mixture.

– Stir gently until the mixtures are smooth and well combined.

Baking the Cakes

– Add the flour, vanilla, and a pinch of salt to the mixture.

– Fold gently to keep the batter light.

– Evenly fill each ramekin about three-quarters full with the batter.

– Bake in the preheated oven for 12-14 minutes.

– The edges should be firm while the centers stay soft and jiggly.

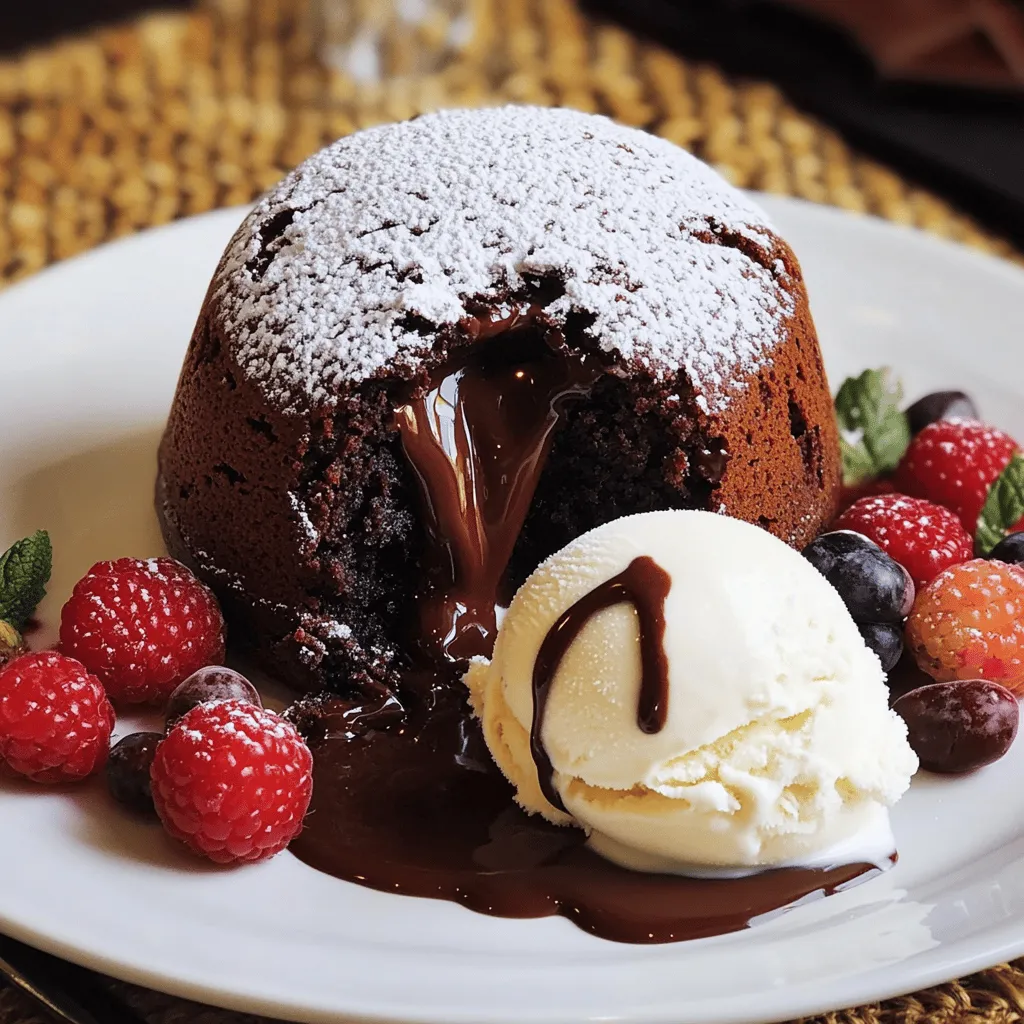
Serving the Lava Cakes

– After baking, let the cakes cool for 1 minute.

– Carefully invert each ramekin onto a dessert plate.

– Dust with powdered sugar for a lovely finish.

– Serve with vanilla ice cream to enhance the rich chocolate flavor.

– For a pretty touch, add fresh berries or mint leaves.

For the complete guide, check the Full Recipe.

Tips & Tricks

Perfecting the Lava Flow

To achieve that perfect gooey center, timing is key. Bake the cakes for 12-14 minutes. Keep an eye on them. The edges should be firm, but the center must remain soft and slightly jiggly. If you see a little wiggle, that’s a good sign. You want that luscious flow when you cut into the cake.

Common Mistakes to Avoid

One common mistake is overmixing the batter. Mix just until combined; this keeps the cake light. Another issue is not greasing the ramekins well. If they stick, your beautiful cakes won’t come out right. Use plenty of butter to coat the ramekins. This ensures they release easily.

Flavor Enhancements

You can add spices or extracts to change the flavor. A pinch of cinnamon or a splash of orange extract makes a huge difference. Try adding a surprise filling, like peanut butter or caramel. This adds a unique twist and boosts the joy of each bite. Experiment and find your favorite flavors!

Variations

Alternative Chocolate Types

You can switch up the chocolate for your lava cake. Here are two great options:

Dark chocolate version: Use dark chocolate for a richer taste. It adds depth and a slight bitterness, balancing the sweetness.

White chocolate lava cake: For a sweeter twist, try white chocolate. It creates a creamy, smooth lava that melts in your mouth.

Different Fillings

Adding different fillings can make your lava cake even more exciting. Here are some ideas:

Peanut butter or caramel center: Replace the chocolate center with creamy peanut butter or luscious caramel. This adds a nutty or sweet surprise that will delight everyone.

Fruit-infused variations: You can add fruit puree to the center. Raspberry or strawberry puree gives a fresh, fruity burst alongside the rich chocolate.

Dietary Adjustments

You can still enjoy lava cake if you have dietary needs. Here are some ideas:

Gluten-free alternatives: Replace all-purpose flour with gluten-free flour. It works just as well and keeps your cake delicious.

Vegan lava cake options: Use flax eggs in place of regular eggs and coconut oil instead of butter. This way, you can make a tasty vegan version without losing the molten center.

For more ways to make this dessert, check out the Full Recipe.

Storage Info

Storing Leftover Lava Cakes

To keep leftover chocolate lava cakes fresh, follow these steps. First, let the cakes cool completely at room temperature. This helps avoid condensation. Next, wrap each cake tightly in plastic wrap. You can also place them in an airtight container. Store them in the fridge for up to three days. If you want to save them longer, freeze them for up to two months. Just make sure to label them with the date. When you’re ready to enjoy them, thaw in the fridge overnight if frozen.

Reheating Tips

To reheat your lava cakes and keep that gooey center, start with your oven. Preheat it to 350°F (175°C). Place the ramekins on a baking sheet. Heat them for about 10-12 minutes. Check the cakes to ensure they are warm but not overcooked. You want that molten center to flow perfectly. If you’re in a rush, you can also use the microwave. Heat each cake for about 20-30 seconds. Be careful not to overheat, as this can cook the center. Enjoy your delicious lava cakes warm!

FAQs

What is a chocolate lava cake?

A chocolate lava cake is a small cake with a gooey, molten center. When you cut into it, warm chocolate flows out. This cake is often rich and soft, making it a favorite dessert. Many people love it because it mixes the textures of cake and molten chocolate. The inside stays soft while the outside is firm. It is a delightful treat that brings joy to every party.

Can I make lava cake in advance?

Yes, you can make the batter ahead of time. Prepare the batter and fill the ramekins. Cover them with plastic wrap and store them in the fridge. When you are ready to bake, just remove them from the fridge and bake them straight away. This saves time and allows you to enjoy the moment without stress.

How do I know when the lava cake is done?

Check for firm edges and a soft, jiggly center. The top should look set, but the middle needs to move slightly when you shake it. If you bake it too long, the center will not be gooey. Follow the baking time in the recipe closely for the best results.

Is it safe to eat undercooked lava cake?

Eating undercooked lava cake can be risky due to eggs. The center may not be fully cooked. Make sure to use fresh eggs to lower the risk of foodborne illness. If you prefer, you can cook the cake a bit longer. This way, you can enjoy a firmer center while still keeping it warm and delicious.

Where can I find the best chocolate lava cake?

Many bakeries and restaurants serve excellent chocolate lava cake. Look for places that are known for their desserts. Some popular chains offer great versions too. If you want to try making it at home, follow the Full Recipe for a delightful experience. You’ll impress your friends and family with your baking skills!

You learned how to make rich chocolate lava cakes from scratch. We covered the key ingredients, tools, and step-by-step instructions. You also discovered tips for perfecting your cakes and variations to try. Remember to avoid common mistakes and store any leftovers properly. With practice, you can enjoy warm, gooey goodness at home. So, grab your ramekins and get baking! Your delicious dessert awaits.

- 1/2 cup unsalted butter (plus extra for greasing) - 1 cup semi-sweet chocolate chips - 2 large eggs - 2 large egg yolks - 1/4 cup granulated sugar - 2 tablespoons all-purpose flour - 1 teaspoon vanilla extract - Pinch of salt - Powdered sugar (for dusting) - Vanilla ice cream (for serving) Chocolate lava cake needs simple yet rich ingredients. Start with unsalted butter and semi-sweet chocolate chips. These two create the heart of the cake. The eggs and egg yolks add richness and help the cake rise. Granulated sugar sweetens the mix. All-purpose flour gives the cake structure. A touch of vanilla adds depth, while a pinch of salt enhances all the flavors. Dusting with powdered sugar adds a nice finish, and pairing with vanilla ice cream makes it even better. - Ramekins - Baking sheet - Microwave-safe bowl - Whisk For this recipe, you'll need a few essential tools. Ramekins are key for baking and serving the cake. A baking sheet makes it easy to move the ramekins in and out of the oven. A microwave-safe bowl helps melt the chocolate with ease. Finally, a whisk is perfect for mixing the eggs and sugar until they are fluffy and light. If you want to impress your guests, this chocolate lava cake recipe is an excellent choice. For the full recipe, make sure to check out the details! - Preheat your oven to 425°F (220°C). - Generously grease four ramekins with unsalted butter. - Place the ramekins on a baking sheet for easy handling. - In a microwave-safe bowl, melt the chocolate and butter together. - Heat in 30-second bursts, stirring well each time until smooth. - In another bowl, whisk the eggs, egg yolks, and sugar until thick. - This should take about 2-3 minutes. - Carefully pour the melted chocolate into the egg mixture. - Stir gently until the mixtures are smooth and well combined. - Add the flour, vanilla, and a pinch of salt to the mixture. - Fold gently to keep the batter light. - Evenly fill each ramekin about three-quarters full with the batter. - Bake in the preheated oven for 12-14 minutes. - The edges should be firm while the centers stay soft and jiggly. - After baking, let the cakes cool for 1 minute. - Carefully invert each ramekin onto a dessert plate. - Dust with powdered sugar for a lovely finish. - Serve with vanilla ice cream to enhance the rich chocolate flavor. - For a pretty touch, add fresh berries or mint leaves. For the complete guide, check the Full Recipe. To achieve that perfect gooey center, timing is key. Bake the cakes for 12-14 minutes. Keep an eye on them. The edges should be firm, but the center must remain soft and slightly jiggly. If you see a little wiggle, that’s a good sign. You want that luscious flow when you cut into the cake. One common mistake is overmixing the batter. Mix just until combined; this keeps the cake light. Another issue is not greasing the ramekins well. If they stick, your beautiful cakes won’t come out right. Use plenty of butter to coat the ramekins. This ensures they release easily. You can add spices or extracts to change the flavor. A pinch of cinnamon or a splash of orange extract makes a huge difference. Try adding a surprise filling, like peanut butter or caramel. This adds a unique twist and boosts the joy of each bite. Experiment and find your favorite flavors! {{image_4}} You can switch up the chocolate for your lava cake. Here are two great options: - Dark chocolate version: Use dark chocolate for a richer taste. It adds depth and a slight bitterness, balancing the sweetness. - White chocolate lava cake: For a sweeter twist, try white chocolate. It creates a creamy, smooth lava that melts in your mouth. Adding different fillings can make your lava cake even more exciting. Here are some ideas: - Peanut butter or caramel center: Replace the chocolate center with creamy peanut butter or luscious caramel. This adds a nutty or sweet surprise that will delight everyone. - Fruit-infused variations: You can add fruit puree to the center. Raspberry or strawberry puree gives a fresh, fruity burst alongside the rich chocolate. You can still enjoy lava cake if you have dietary needs. Here are some ideas: - Gluten-free alternatives: Replace all-purpose flour with gluten-free flour. It works just as well and keeps your cake delicious. - Vegan lava cake options: Use flax eggs in place of regular eggs and coconut oil instead of butter. This way, you can make a tasty vegan version without losing the molten center. For more ways to make this dessert, check out the Full Recipe. To keep leftover chocolate lava cakes fresh, follow these steps. First, let the cakes cool completely at room temperature. This helps avoid condensation. Next, wrap each cake tightly in plastic wrap. You can also place them in an airtight container. Store them in the fridge for up to three days. If you want to save them longer, freeze them for up to two months. Just make sure to label them with the date. When you're ready to enjoy them, thaw in the fridge overnight if frozen. To reheat your lava cakes and keep that gooey center, start with your oven. Preheat it to 350°F (175°C). Place the ramekins on a baking sheet. Heat them for about 10-12 minutes. Check the cakes to ensure they are warm but not overcooked. You want that molten center to flow perfectly. If you're in a rush, you can also use the microwave. Heat each cake for about 20-30 seconds. Be careful not to overheat, as this can cook the center. Enjoy your delicious lava cakes warm! A chocolate lava cake is a small cake with a gooey, molten center. When you cut into it, warm chocolate flows out. This cake is often rich and soft, making it a favorite dessert. Many people love it because it mixes the textures of cake and molten chocolate. The inside stays soft while the outside is firm. It is a delightful treat that brings joy to every party. Yes, you can make the batter ahead of time. Prepare the batter and fill the ramekins. Cover them with plastic wrap and store them in the fridge. When you are ready to bake, just remove them from the fridge and bake them straight away. This saves time and allows you to enjoy the moment without stress. Check for firm edges and a soft, jiggly center. The top should look set, but the middle needs to move slightly when you shake it. If you bake it too long, the center will not be gooey. Follow the baking time in the recipe closely for the best results. Eating undercooked lava cake can be risky due to eggs. The center may not be fully cooked. Make sure to use fresh eggs to lower the risk of foodborne illness. If you prefer, you can cook the cake a bit longer. This way, you can enjoy a firmer center while still keeping it warm and delicious. Many bakeries and restaurants serve excellent chocolate lava cake. Look for places that are known for their desserts. Some popular chains offer great versions too. If you want to try making it at home, follow the Full Recipe for a delightful experience. You’ll impress your friends and family with your baking skills! You learned how to make rich chocolate lava cakes from scratch. We covered the key ingredients, tools, and step-by-step instructions. You also discovered tips for perfecting your cakes and variations to try. Remember to avoid common mistakes and store any leftovers properly. With practice, you can enjoy warm, gooey goodness at home. So, grab your ramekins and get baking! Your delicious dessert awaits.

Chocolate Lava Cake

Dive into a world of flavor with this delectable chocolate lava cake recipe that will satisfy all your sweet cravings! Discover how to create a warm, gooey center that flows with rich chocolate goodness. This easy-to-follow guide covers everything from key ingredients to essential baking tips, ensuring you’ll impress everyone with your baking skills. Don't wait—click through now to explore the full recipe and elevate your dessert game!

Ingredients
  

1/2 cup unsalted butter (plus extra for greasing)

1 cup semi-sweet chocolate chips

2 large eggs

2 large egg yolks

1/4 cup granulated sugar

2 tablespoons all-purpose flour

1 teaspoon vanilla extract

Pinch of salt

Powdered sugar (for dusting)

Vanilla ice cream (for serving)

Instructions
 

Preheat and Prepare Ramekins: Preheat your oven to 425°F (220°C). Generously grease four ramekins with unsalted butter and arrange them on a baking sheet. This will make it easier to transfer them in and out of the oven.

    Melt the Chocolate: In a microwave-safe bowl, combine the unsalted butter and semi-sweet chocolate chips. Heat in the microwave in 30-second intervals, stirring well after each interval, until the mixture is completely melted and silky smooth.

      Whisk the Eggs: In a separate mixing bowl, vigorously whisk together the large eggs, egg yolks, and granulated sugar until the mixture turns pale and thickens, which should take about 2-3 minutes.

        Combine Mixtures: Carefully pour the melted chocolate mixture into the egg mixture. Stir gently until both mixtures are fully combined and smooth.

          Add Dry Ingredients: Using a spatula, gently fold in the all-purpose flour, vanilla extract, and a pinch of salt. Mix until just combined, taking care not to over-mix to maintain a light texture.

            Fill Ramekins: Evenly divide the batter among the prepared ramekins, filling each one about three-quarters full for the perfect lava flow.

              Bake to Perfection: Place the baking sheet with ramekins in the preheated oven and bake for 12-14 minutes. The edges should be firm while the centers remain soft and slightly jiggly to achieve that molten core.

                Cool and Serve: Once baked, remove the ramekins from the oven and let the cakes cool for around 1 minute. Carefully invert each ramekin onto an individual dessert plate. The cakes should release easily.

                  Finishing Touches: Dust the warm lava cakes with powdered sugar for a beautiful presentation. Serve immediately with a generous scoop of vanilla ice cream on the side to complement the rich chocolate.

                    Prep Time, Total Time, Servings: 15 mins | 20 mins | 4 servings

                      - Presentation Tips: For an elegant touch, garnish each dish with fresh berries or a sprig of mint. Drizzle a little chocolate sauce artfully around the plate to elevate the visual appeal and enhance that indulgent experience. Enjoy!

                        Leave a Comment

                        Recipe Rating