Chocolate Peanut Butter Fudge Easy Delightful Treat

WANT TO SAVE THIS RECIPE?

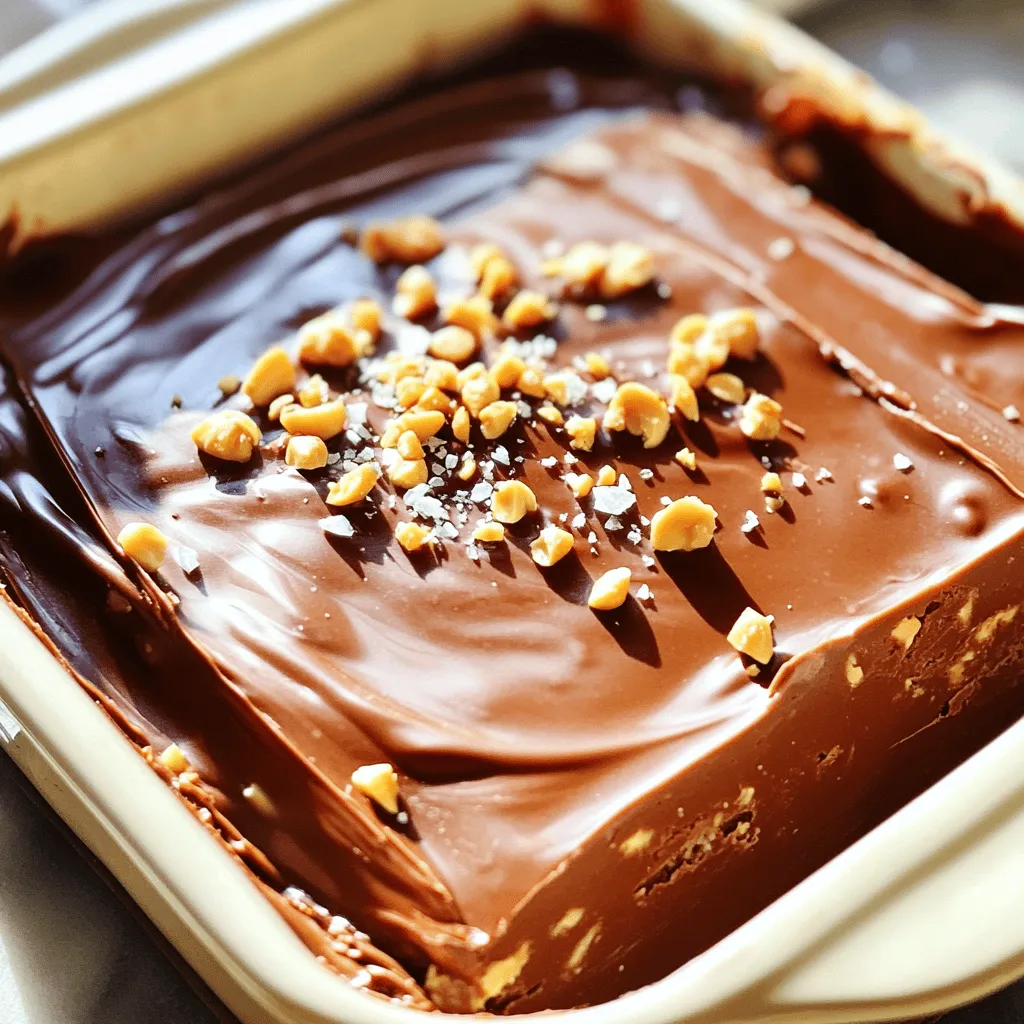
Looking for a sweet treat that’s both easy to make and utterly delicious? You’ve come to the right place! This Chocolate Peanut Butter Fudge recipe combines creamy peanut butter with rich chocolate for a perfect indulgence. With just a handful of simple ingredients, you’ll whip up a delightful dessert that everyone will love. Stay with me as we dive into this easy recipe that promises to satisfy your sweet tooth!

Ingredients

Main Ingredients

– 2 cups semi-sweet chocolate chips

– 1 cup creamy peanut butter

– 1 cup sweetened condensed milk

– 1 teaspoon vanilla extract

– 1/4 teaspoon salt

The main ingredients create a rich and creamy fudge. The semi-sweet chocolate chips give the fudge its deep flavor. Creamy peanut butter adds a smooth texture and nutty taste. Sweetened condensed milk makes it sweet and helps bind the fudge together. The vanilla extract adds a nice hint of flavor, while salt enhances the chocolate and peanut butter notes.

Optional Toppings

– Chopped peanuts

– Sea salt for garnish

These toppings are not required but add extra fun. Chopped peanuts provide crunch and a burst of peanut flavor. A sprinkle of sea salt on top balances the sweetness. You can mix and match these toppings based on your taste.

Step-by-Step Instructions

Preparation Steps

Prepare the baking dish: Start by lining an 8×8 inch baking dish with parchment paper. Leave some overhang. This helps lift the fudge out easily later.

Melt the mixture: In a medium saucepan, mix 2 cups of semi-sweet chocolate chips, 1 cup of creamy peanut butter, and 1 cup of sweetened condensed milk. Place the saucepan over low heat. Stir this mix continuously. This keeps it from burning and helps it melt smoothly.

Enhance the flavor: Once the mixture melts and is smooth, remove it from heat. Stir in 1 teaspoon of vanilla extract and 1/4 teaspoon of salt. Mix well until all is combined.

Assembly Steps

Transfer mixture to dish: Pour the creamy fudge mixture into your prepared baking dish. Use a spatula to spread it evenly. This helps create a uniform thickness.

Add toppings: If you want some crunch, sprinkle chopped peanuts and a light dusting of sea salt on top before it sets. This adds extra flavor and texture.

Cool and set: Let the fudge cool at room temperature for about 30 minutes. Then, transfer it to the fridge. Chill for at least 2 hours or until firm.

Serving Steps

Cut and serve: Once the fudge is firm, grab the parchment overhang. Lift the fudge out of the dish and place it on a cutting board. Cut into 16 squares for serving.

Presentation tips: Serve the fudge squares on a decorative platter. For an elegant touch, drizzle with melted chocolate or add more chopped peanuts for garnish.

Tips & Tricks

Achieving the Perfect Consistency

To make your fudge just right, avoid some common mistakes. First, don’t rush the melting process. If you heat the mix too fast, it can burn. Always keep the heat low and stir gently. This helps the chocolate chips and peanut butter blend smoothly.

If your fudge turns out runny, do not worry. You can fix this! Simply place it back on low heat and stir in a bit more chocolate. Melt it until thick, then pour it back into the dish. This will help it set up nicely when cooled.

Storage and Freshness

To keep your fudge fresh, store it in an airtight container. This prevents it from drying out or picking up fridge smells. Make sure to layer parchment paper between the fudge squares. This keeps them from sticking together.

For the best freshness, store your fudge in the fridge. It can last up to two weeks this way. If you want to keep it longer, consider freezing it. Wrap it in plastic wrap and then place it in a freezer bag. When you’re ready to eat, just thaw it in the fridge overnight. Enjoy that sweet treat!

Variations

Dietary Modifications

You can easily make this fudge vegan. Use dairy-free chocolate chips instead of semi-sweet ones. These chips melt just as well and taste great. Make sure your peanut butter is also dairy-free. This way, you can enjoy a rich treat without any animal products.

If you need a gluten-free option, you’re in luck! The main ingredients in this fudge are already gluten-free. Just check the labels on your chocolate chips and peanut butter to ensure they don’t contain gluten. This fudge can be a safe treat for those with gluten sensitivities.

Flavor Enhancements

Want to mix things up? You can add different flavor extracts to your fudge. Almond or hazelnut extracts can give your fudge a unique twist. Just a few drops will do. Stir them in after melting the mixture for added depth.

You can also get creative with mix-ins. Try adding caramel for a sweet contrast. Chopped marshmallows can add a chewy texture. These mix-ins can make your fudge even more delightful. Let your taste buds guide your choices!

Storage Info

Short-term Storage

Store your fudge in an airtight container. Keep it at room temperature for up to a week. If it’s hot, place it in the fridge to avoid melting. The cool air helps maintain the fudge’s texture. Make sure the container seals well to keep moisture out and flavors in.

Long-term Storage

To enjoy your fudge longer, freeze it. Cut the fudge into squares and wrap each piece in plastic wrap. Place the wrapped squares in a freezer bag. This keeps them fresh for up to three months.

To thaw, take out a piece and let it sit at room temperature for about 15 minutes. The fudge will soften, and you can enjoy it again. Avoid using a microwave, as it may change the texture.

FAQs

How long does Chocolate Peanut Butter Fudge last?

Chocolate peanut butter fudge lasts about one week in the fridge. Store it in an airtight container to keep it fresh. You can also leave it at room temperature for three days. Just make sure it stays cool and dry.

Can I use chunky peanut butter?

Yes, you can use chunky peanut butter! It adds a fun texture. The chunks give a nice crunch to each bite. Just remember, this will change the smoothness of the fudge. If you like a bit of texture, go for it!

What is the best way to cut fudge?

To cut fudge neatly, chill it well first. Use a sharp knife for clean cuts. You can dip the knife in hot water, then dry it off. This helps the knife glide through without sticking. For great presentation, cut into even squares.

This blog post covers how to make delicious chocolate peanut butter fudge. You learned about key ingredients, preparation steps, and the best ways to store and serve your treat. I’ve shared tips to help you avoid common mistakes and variations to customize your fudge.

Remember, creating your fudge can be fun. With simple steps, you can impress your friends and family with this tasty treat. Enjoy making your fudge, and let your creativity shine!

- 2 cups semi-sweet chocolate chips - 1 cup creamy peanut butter - 1 cup sweetened condensed milk - 1 teaspoon vanilla extract - 1/4 teaspoon salt The main ingredients create a rich and creamy fudge. The semi-sweet chocolate chips give the fudge its deep flavor. Creamy peanut butter adds a smooth texture and nutty taste. Sweetened condensed milk makes it sweet and helps bind the fudge together. The vanilla extract adds a nice hint of flavor, while salt enhances the chocolate and peanut butter notes. - Chopped peanuts - Sea salt for garnish These toppings are not required but add extra fun. Chopped peanuts provide crunch and a burst of peanut flavor. A sprinkle of sea salt on top balances the sweetness. You can mix and match these toppings based on your taste. - Prepare the baking dish: Start by lining an 8x8 inch baking dish with parchment paper. Leave some overhang. This helps lift the fudge out easily later. - Melt the mixture: In a medium saucepan, mix 2 cups of semi-sweet chocolate chips, 1 cup of creamy peanut butter, and 1 cup of sweetened condensed milk. Place the saucepan over low heat. Stir this mix continuously. This keeps it from burning and helps it melt smoothly. - Enhance the flavor: Once the mixture melts and is smooth, remove it from heat. Stir in 1 teaspoon of vanilla extract and 1/4 teaspoon of salt. Mix well until all is combined. - Transfer mixture to dish: Pour the creamy fudge mixture into your prepared baking dish. Use a spatula to spread it evenly. This helps create a uniform thickness. - Add toppings: If you want some crunch, sprinkle chopped peanuts and a light dusting of sea salt on top before it sets. This adds extra flavor and texture. - Cool and set: Let the fudge cool at room temperature for about 30 minutes. Then, transfer it to the fridge. Chill for at least 2 hours or until firm. - Cut and serve: Once the fudge is firm, grab the parchment overhang. Lift the fudge out of the dish and place it on a cutting board. Cut into 16 squares for serving. - Presentation tips: Serve the fudge squares on a decorative platter. For an elegant touch, drizzle with melted chocolate or add more chopped peanuts for garnish. To make your fudge just right, avoid some common mistakes. First, don't rush the melting process. If you heat the mix too fast, it can burn. Always keep the heat low and stir gently. This helps the chocolate chips and peanut butter blend smoothly. If your fudge turns out runny, do not worry. You can fix this! Simply place it back on low heat and stir in a bit more chocolate. Melt it until thick, then pour it back into the dish. This will help it set up nicely when cooled. To keep your fudge fresh, store it in an airtight container. This prevents it from drying out or picking up fridge smells. Make sure to layer parchment paper between the fudge squares. This keeps them from sticking together. For the best freshness, store your fudge in the fridge. It can last up to two weeks this way. If you want to keep it longer, consider freezing it. Wrap it in plastic wrap and then place it in a freezer bag. When you’re ready to eat, just thaw it in the fridge overnight. Enjoy that sweet treat! {{image_4}} You can easily make this fudge vegan. Use dairy-free chocolate chips instead of semi-sweet ones. These chips melt just as well and taste great. Make sure your peanut butter is also dairy-free. This way, you can enjoy a rich treat without any animal products. If you need a gluten-free option, you're in luck! The main ingredients in this fudge are already gluten-free. Just check the labels on your chocolate chips and peanut butter to ensure they don't contain gluten. This fudge can be a safe treat for those with gluten sensitivities. Want to mix things up? You can add different flavor extracts to your fudge. Almond or hazelnut extracts can give your fudge a unique twist. Just a few drops will do. Stir them in after melting the mixture for added depth. You can also get creative with mix-ins. Try adding caramel for a sweet contrast. Chopped marshmallows can add a chewy texture. These mix-ins can make your fudge even more delightful. Let your taste buds guide your choices! Store your fudge in an airtight container. Keep it at room temperature for up to a week. If it's hot, place it in the fridge to avoid melting. The cool air helps maintain the fudge's texture. Make sure the container seals well to keep moisture out and flavors in. To enjoy your fudge longer, freeze it. Cut the fudge into squares and wrap each piece in plastic wrap. Place the wrapped squares in a freezer bag. This keeps them fresh for up to three months. To thaw, take out a piece and let it sit at room temperature for about 15 minutes. The fudge will soften, and you can enjoy it again. Avoid using a microwave, as it may change the texture. Chocolate peanut butter fudge lasts about one week in the fridge. Store it in an airtight container to keep it fresh. You can also leave it at room temperature for three days. Just make sure it stays cool and dry. Yes, you can use chunky peanut butter! It adds a fun texture. The chunks give a nice crunch to each bite. Just remember, this will change the smoothness of the fudge. If you like a bit of texture, go for it! To cut fudge neatly, chill it well first. Use a sharp knife for clean cuts. You can dip the knife in hot water, then dry it off. This helps the knife glide through without sticking. For great presentation, cut into even squares. This blog post covers how to make delicious chocolate peanut butter fudge. You learned about key ingredients, preparation steps, and the best ways to store and serve your treat. I’ve shared tips to help you avoid common mistakes and variations to customize your fudge. Remember, creating your fudge can be fun. With simple steps, you can impress your friends and family with this tasty treat. Enjoy making your fudge, and let your creativity shine!

Chocolate Peanut Butter Fudge

Indulge in the ultimate treat with this easy recipe for decadent chocolate peanut butter fudge! Perfectly creamy and rich, this fudge combines semi-sweet chocolate chips and creamy peanut butter for an irresistible dessert. Follow simple steps to melt, mix, and set this delightful treat, and impress your family and friends with a sweet homemade gift.

Ingredients
  

2 cups semi-sweet chocolate chips

1 cup creamy peanut butter

1 cup sweetened condensed milk

1 teaspoon vanilla extract

1/4 teaspoon salt

Chopped peanuts and a sprinkle of sea salt for garnish (optional)

Instructions
 

Prepare the Baking Dish: Start by lining an 8x8 inch baking dish with parchment paper. Ensure to leave some overhang, which will make it easy to lift the fudge out when it's set.

    Melt the Mixture: In a medium saucepan, mix together the semi-sweet chocolate chips, creamy peanut butter, and sweetened condensed milk. Place the saucepan over low heat and stir continuously. This will help the mixture melt evenly and achieve a smooth consistency without burning.

      Enhance the Flavor: Once the mixture has completely melted and is smooth, remove it from the heat. Stir in the vanilla extract and salt, mixing thoroughly until all ingredients are well combined.

        Transfer to Dish: Pour the creamy fudge mixture into your prepared baking dish. Use a spatula to spread the mixture evenly across the dish for uniform thickness.

          Add Toppings: If you'd like to add some extra crunch and flavor, sprinkle the chopped peanuts and a light dusting of sea salt on top of the fudge mixture before it sets.

            Cool and Set: Allow the fudge to cool at room temperature for about 30 minutes. After that, transfer it to the refrigerator and chill for at least 2 hours, or until it has completely firmed up.

              Cut and Serve: Once the fudge is firm, grab the overhanging parchment paper and gently lift the fudge out of the baking dish. Place it on a cutting board and cut into 16 squares for serving.

                Prep Time: 10 minutes | Total Time: 2 hours 40 minutes | Servings: 16 squares

                  - Presentation Tips: Serve the fudge squares on a decorative platter. For an elegant touch, you can drizzle with melted chocolate or garnish with additional chopped peanuts.

                    WANT TO SAVE THIS RECIPE?

                    Leave a Comment

                    Recipe Rating