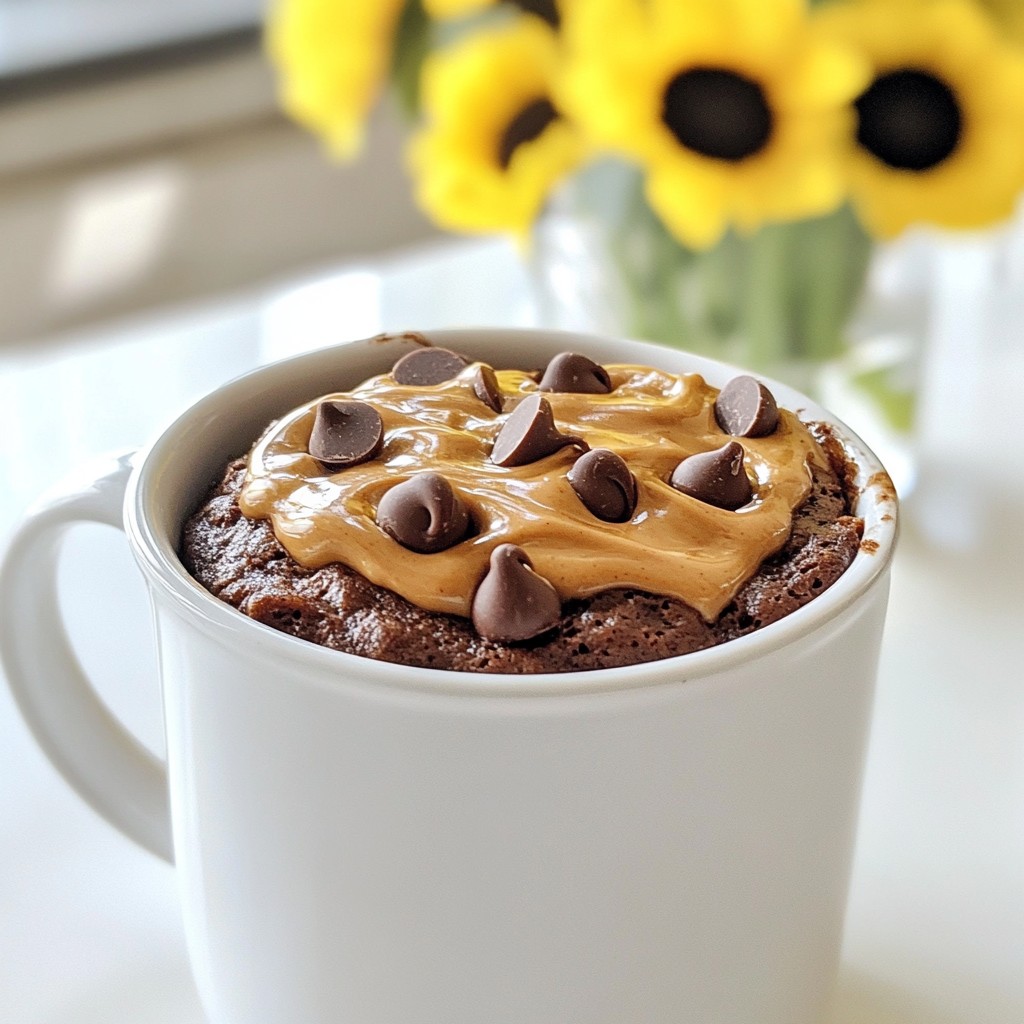
Craving a quick and tasty treat? Look no further! I’m excited to share my easy Chocolate Peanut Butter Mug Cake recipe. This delightful dessert comes together in just minutes. With a few simple ingredients, you’ll create a warm, gooey cake that blends rich chocolate with creamy peanut butter. Don't wait! Let’s dive into the deliciousness and make your next sweet craving a breeze.
Why I Love This Recipe
- Quick and Easy: This mug cake takes only 5 minutes to prepare and cook, making it a perfect last-minute dessert.
- Decadent Flavor: The combination of chocolate and peanut butter creates a rich and indulgent treat that satisfies any sweet tooth.
- Customizable: You can easily modify the recipe by adding your favorite mix-ins or toppings, such as nuts or whipped cream.
- Single Serving: This recipe is designed for one, so you can enjoy a delightful dessert without the temptation of leftovers.
Ingredients
Essential Ingredients List
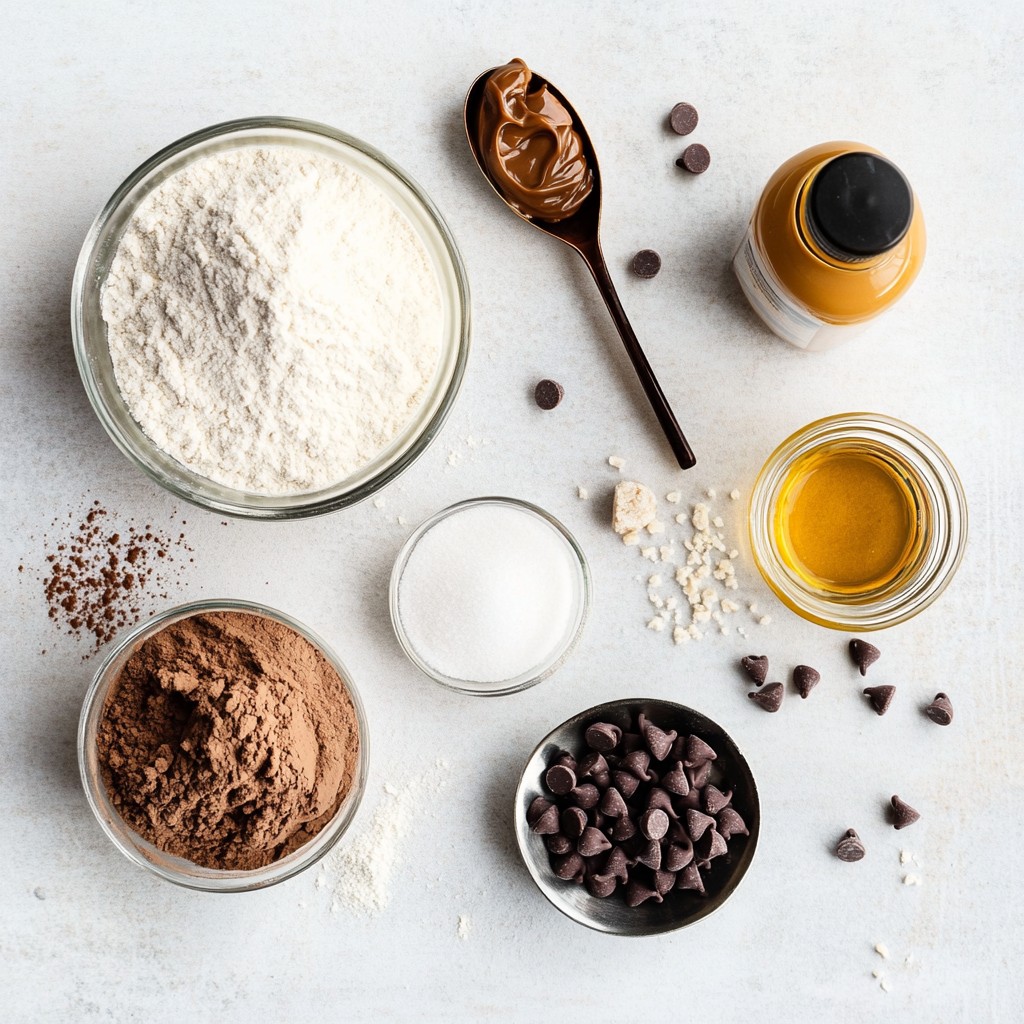
- 4 tablespoons all-purpose flour
- 3 tablespoons granulated sugar
- 1 tablespoon unsweetened cocoa powder
- 1/8 teaspoon baking powder
- 1/8 teaspoon fine sea salt
For this chocolate peanut butter mug cake, you need a few key dry ingredients. First, all-purpose flour gives the cake its body. Granulated sugar adds sweetness, while unsweetened cocoa powder brings that rich chocolate flavor. A pinch of baking powder helps the cake rise, and sea salt balances the sweetness.
Liquid Components
- 3 tablespoons milk (your choice: dairy or non-dairy)
- 1 tablespoon vegetable oil
- 1 tablespoon creamy peanut butter
- 1/2 teaspoon vanilla extract
Next, you'll mix in the wet ingredients. Milk, whether dairy or non-dairy, helps blend everything smoothly. Vegetable oil keeps the cake moist. Creamy peanut butter adds that delicious nutty flavor. Lastly, vanilla extract enhances the overall taste, making it even more inviting.
Optional Add-ins
- A handful of chocolate chips for garnish
To make your mug cake even better, consider adding chocolate chips. These little bits will melt and create gooey pockets of chocolate throughout. You can also serve the cake with extra peanut butter on top or a sprinkle of chocolate chips for a fun finish.
Step-by-Step Instructions
Preparing the Mug
Choosing the Right Mug Pick a microwave-safe mug. A larger mug works best to avoid spills. I like to use one that holds at least 12 ounces. This gives the cake room to rise.
Preparing for Microwave Cooking Make sure your mug is clean. No old food or drink left inside. This keeps your cake tasty and safe to eat.
Mixing the Ingredients
Dry Ingredients Combination In your mug, mix these dry ingredients:
- 4 tablespoons all-purpose flour
- 3 tablespoons granulated sugar
- 1 tablespoon unsweetened cocoa powder
- 1/8 teaspoon baking powder
- 1/8 teaspoon fine sea salt
Use a whisk or fork to blend them well. This step is key to avoid lumps.
Adding Wet Ingredients Now, pour in these wet ingredients:
- 3 tablespoons milk
- 1 tablespoon vegetable oil
- 1 tablespoon creamy peanut butter
- 1/2 teaspoon vanilla extract
Stir until the mix is smooth. This gives the cake a nice texture.
Incorporating Chocolate Chips For a tasty twist, add a handful of chocolate chips. Gently fold them in. This adds delicious bites of chocolate in every mouthful.
Cooking the Mug Cake
Microwave Cooking Times Place the mug in the microwave and cook for 40 to 60 seconds. Start checking at 40 seconds. Every microwave is different, so keep an eye on it.
Signs of Doneness The cake should rise and look set. It’s okay if the center is moist. This gives a rich, fudge-like taste. Enjoy your warm treat right from the mug!
Tips & Tricks
Ingredient Substitutions
Dairy-Free Options You can easily make this cake dairy-free. Just use almond milk, soy milk, or coconut milk instead of regular milk. These options work well and keep the cake moist.
Sugar Alternatives If you want less sugar, try using honey or maple syrup. You can also use a sugar substitute like stevia. Adjust the amounts since these can be sweeter than regular sugar.
Achieving the Perfect Texture
Monitoring Cooking Time Microwave power varies, so keep an eye on your cake. Start checking at 40 seconds. You want the cake to rise and set but still feel soft in the middle.
Adjusting Ingredients for Density If your cake is too dense, add a little more milk. If it's too wet, try a bit more flour. Each microwave is different, and small tweaks can make a big difference.
Garnishing Suggestions
Topping with Extra Peanut Butter For a richer taste, add a dollop of peanut butter on top. It melts into the warm cake, creating a delicious layer.
Adding Whipped Cream or Ice Cream You can also add whipped cream or a scoop of ice cream. This adds a creamy contrast and makes your treat even more special.
Pro Tips
- Mix Thoroughly: Ensure that the dry ingredients are well combined before adding wet ingredients to avoid clumps in your cake.
- Monitor Microwave Time: Every microwave is different; start checking your mug cake at the 40-second mark to prevent overcooking.
- Experiment with Add-ins: Try adding crushed nuts or a sprinkle of sea salt on top for an extra flavor dimension!
- Serve Warm: Enjoy your mug cake warm for the best texture and flavor. A scoop of ice cream on top can elevate it even further!
Variations
Nut-Free Alternative
You can enjoy this cake without nuts. Use sunflower seed butter instead of peanut butter. This swap gives a similar creamy texture and rich taste. Sunflower seed butter is safe for those with nut allergies. It also adds a unique flavor. You won’t miss the peanut butter!
Flavor Twists
Want to switch things up? You can add a few drops of mint extract. This gives your cake a fresh flavor. If you love coffee, add some espresso powder. It adds depth and richness. You can also change the cocoa powder. Try using carob powder or a different cocoa blend. This can give you a new taste each time.
Serving Ideas
To make it extra special, pair your mug cake with fresh fruits. Sliced bananas or berries add a nice touch. You can also sprinkle some sugary toppings. Try powdered sugar or a drizzle of chocolate sauce. This can change the theme of your treat. It makes it look great and taste even better!
Storage Info
Best Practices for Leftovers
To keep your mug cake fresh, store it in the fridge. Place it in an airtight container. It will stay good for up to two days.
To reheat, use the microwave. Heat the mug cake for about 10 to 15 seconds. Check if it’s warm enough. If not, heat a bit more.
Making Ahead Options
You can prepare some ingredients in advance. Measure out the dry mix ahead of time. This way, you can whip it up quickly when you want a treat.
Store the dry mix in an airtight jar. Keep it in a cool, dry place. This makes it easy to grab when you need it.
Longevity of Ingredients
Check the best before dates on key ingredients. All-purpose flour lasts about a year. Sugar can last indefinitely if stored well. Cocoa powder is good for about two to three years.
Keep an eye on your baking powder. It stays fresh for about six months after opening. Always check these dates to ensure you have the best flavors in your mug cake.
FAQs
Can I make this mug cake gluten-free?
Yes, you can make this mug cake gluten-free! Use gluten-free flour blends made from rice flour or almond flour. These options work well and give a great texture. Just ensure that the blend you choose includes a binding agent, like xanthan gum, for the best results. Always check the label to confirm it's gluten-free.
How can I adjust the sweetness of the cake?
To adjust the sweetness, you can reduce the sugar. Start by cutting the sugar in half. You could also use alternatives like honey or maple syrup. If you prefer, try using a sugar substitute like stevia or monk fruit. Each option changes the flavor, so experiment until you find what you like best!
Is it safe to microwave a mug that has metal?
No, it is not safe to microwave metal. Always use a microwave-safe mug made from ceramic or glass. Check for any labels or markings that say it is microwave-safe. If unsure, avoid any mug with metal accents to keep cooking safe and worry-free.
This blog post showed you how to make a yummy mug cake. We covered the key ingredients, from flour to peanut butter, and tips and tricks for a great bake. You learned how to mix and cook the cake, plus ways to add flavors and toppings. Don’t forget to store any leftovers properly. Now you can enjoy a quick treat anytime. Try different variations to find your favorite. Baking should be fun and easy, so let your creativity shine!