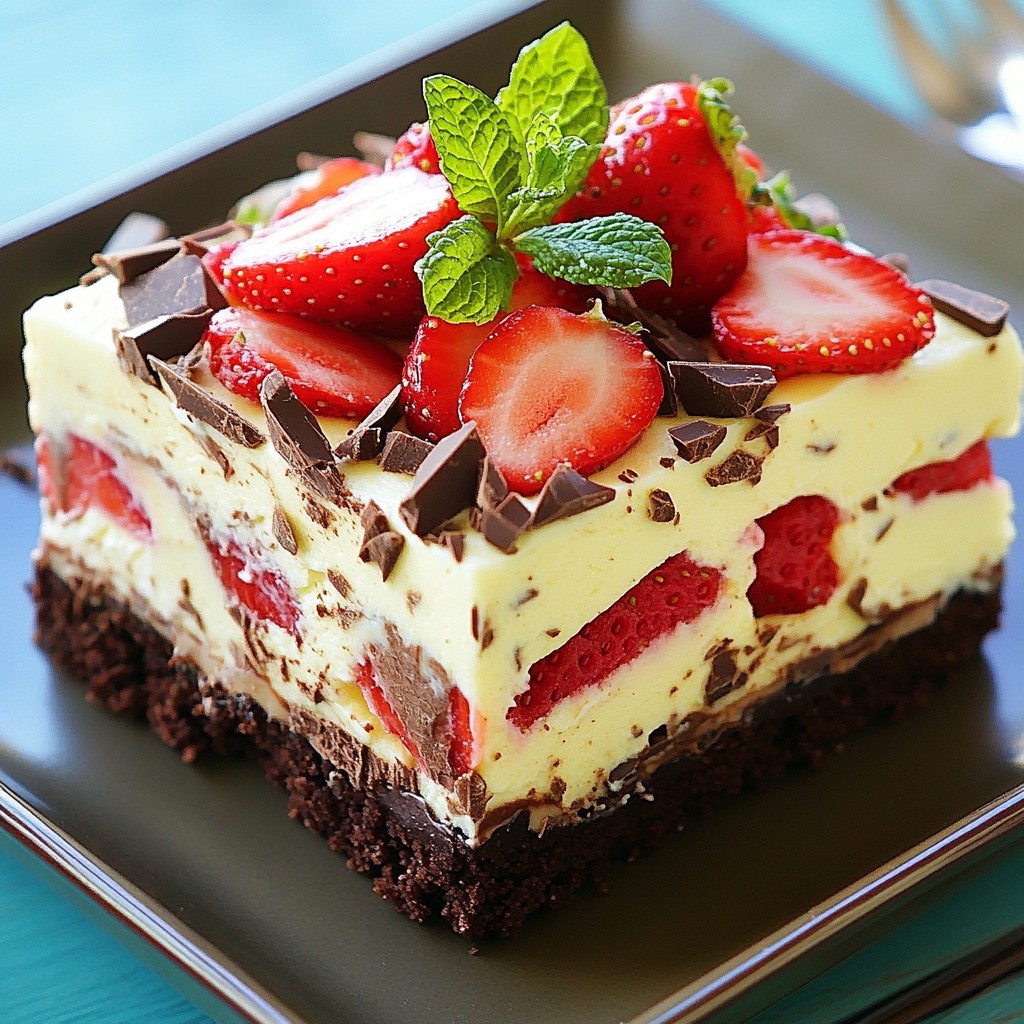
Are you ready to indulge in a sweet delight? This Chocolate Strawberry Icebox Cake is an easy and dreamy dessert perfect for any occasion. Layers of creamy goodness come together with fresh strawberries and rich chocolate for a treat that will impress everyone. You won’t believe how simple it is to make this no-bake dessert. Let’s dive into the delicious details and start your mouth watering!
Why I Love This Recipe
- Decadent Flavor: This Chocolate Strawberry Icebox Cake combines rich chocolate with the freshness of strawberries, creating an irresistible dessert that delights the palate.
- No-Bake Convenience: Perfect for warm days, this recipe requires no baking, making it a hassle-free option for entertaining or casual family gatherings.
- Visual Appeal: The vibrant layers of chocolate and strawberries make this cake a stunning centerpiece for any occasion, sure to impress guests.
- Make-Ahead Delight: With the ability to prepare this cake in advance and let it chill, it’s a great time-saver for busy hosts wanting to enjoy their own party.
Ingredients
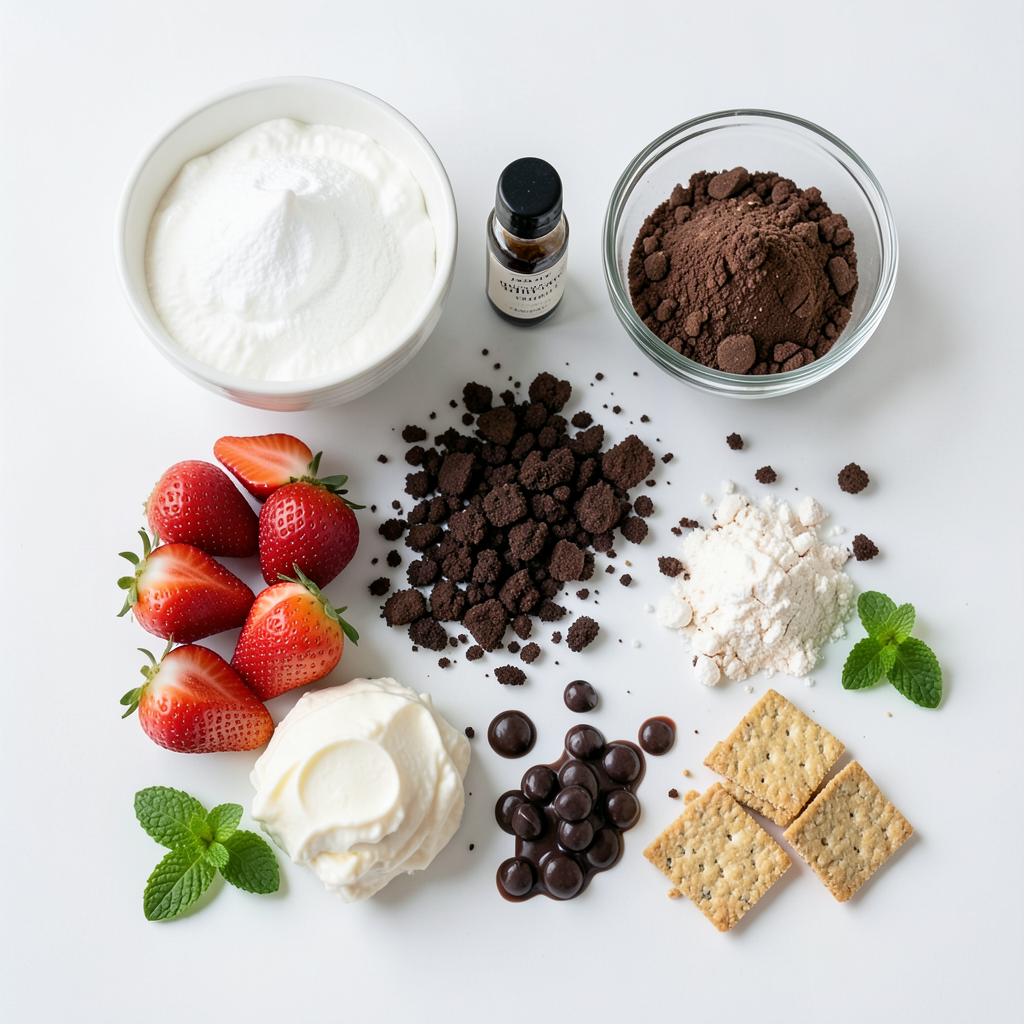
To make a delicious Chocolate Strawberry Icebox Cake, gather these simple ingredients:
- 2 cups heavy whipping cream
- 1/2 cup powdered sugar
- 1 teaspoon vanilla extract
- 1 cup chocolate cookie crumbs (like crushed Oreo cookies)
- 2 cups fresh strawberries, hulled and sliced
- 8 ounces cream cheese, softened to room temperature
- 1/2 cup dark chocolate chips, melted
- 1 cup graham crackers, finely crushed
- Fresh mint leaves for garnish
These ingredients come together to create a dessert that is rich, creamy, and bursting with flavor. Each item plays a key role. The heavy whipping cream adds a light and fluffy texture. The powdered sugar sweetens the mix, while the vanilla extract brings warmth. The chocolate cookie crumbs give a crunchy contrast. Fresh strawberries add a juicy, tart note, balancing the sweetness. Cream cheese adds creaminess and depth. Dark chocolate chips enhance the chocolate flavor, and graham crackers provide a solid base. Finally, fresh mint leaves bring a pop of color and freshness.
Now, let’s get ready to whip up this amazing cake!
Step-by-Step Instructions
Whipping the Cream
To start, grab a large mixing bowl. Use an electric mixer to beat the heavy whipping cream. Mix until it thickens, then add the powdered sugar and vanilla extract. Keep mixing until soft peaks form. This will give your cake a light and fluffy texture. Set the whipped cream aside.
Preparing the Chocolate Mixture
In another bowl, blend the softened cream cheese with the melted dark chocolate chips. You can use a whisk or the electric mixer. Mix until it becomes smooth and there are no lumps. This rich chocolate mixture is key to your cake’s flavor.
Combining Components
Now, you need to fold the whipped cream into the chocolate mixture. Grab a spatula and gently incorporate the whipped cream. Be careful to keep the mixture airy. This step is vital for a light cake that melts in your mouth.
Layering the Cake
Take an 8x8-inch dish for layering. Start by spreading a thin layer of the chocolate mixture on the bottom. Next, add a layer of chocolate cookie crumbs. Then, place a layer of sliced strawberries on top. Repeat this process: another layer of chocolate mixture, followed by cookie crumbs, and then strawberries. Finish with a final layer of the chocolate mixture on top.
Chilling the Cake
Cover the dish with plastic wrap and put it in the fridge. Allow the cake to chill for at least 4 hours, but overnight is best. This helps the cake set and makes slicing easier later. The wait will be worth it!
Garnishing for Presentation
When you're ready to serve, take the cake out of the fridge. Remove the plastic wrap and garnish the top. Add more sliced strawberries and fresh mint leaves for a pop of color. This makes your cake look as good as it tastes!
Tips & Tricks
Best Cream for Whipping
For the best results, use heavy whipping cream. It has a high fat content, which helps create rich and fluffy whipped cream. When you whip it, aim for soft peaks. This means it should hold some shape but not be too stiff. Cold cream whips better, so chill your bowl and beaters before you start.
Achieving the Perfect Chocolate Mixture
To make a smooth chocolate mixture, blend softened cream cheese with melted dark chocolate chips. Use a whisk or an electric mixer to mix them well. This step is key. You want no lumps in your mixture. Mix until it's creamy and smooth. This helps the chocolate flavor shine through when you combine it with whipped cream.
Layering Techniques
Layering is fun and important. Start with a thin layer of chocolate mixture at the bottom of your dish. Then, add a layer of chocolate cookie crumbs, followed by sliced strawberries. Repeat these layers until you use all your ingredients. Finish with a layer of chocolate mixture on top. This creates a beautiful look when you slice it.
- Tips for Slicing: To slice the cake easily, chill it for at least four hours. For best results, chill overnight. This helps the layers firm up. Use a sharp knife to cut through the layers. Wipe the knife with a damp cloth between slices for clean cuts.
Pro Tips
- Chill for Better Texture: Make sure to chill the cake overnight if possible. This allows the layers to set firmly, making it easier to slice and enhancing the overall flavor.
- Use Fresh Strawberries: Always opt for fresh, ripe strawberries for the best taste. They add a vibrant flavor that complements the chocolate beautifully.
- Experiment with Flavors: Feel free to add a splash of orange or almond extract to the whipped cream or chocolate mixture for a unique flavor twist.
- Presentation Matters: For a stunning presentation, drizzle some melted chocolate sauce over the top just before serving, and garnish with additional mint leaves.
Variations
Alternative Cookie Options
You can change the cookie base for your icebox cake. Try using graham crackers or vanilla wafers instead of chocolate cookie crumbs. These options add a different flavor while keeping the dessert delicious. If you want a gluten-free version, use gluten-free cookies. This keeps the cake light and still tasty.
Using Different Fruits
While strawberries are a favorite, feel free to mix in other fruits. Ripe bananas, tart raspberries, or sweet blueberries work great. You can even use a mix of fruits for added flavor. Each fruit brings its own taste, making the dessert unique. Just make sure to slice the fruits thinly for easy layering.
Vegan-Friendly Adjustments
You can make this cake vegan by substituting key ingredients. Use coconut cream instead of heavy whipping cream. Replace cream cheese with a vegan cream cheese option. For the chocolate, ensure it’s dairy-free. Use maple syrup instead of powdered sugar for sweetness. These swaps keep the cake creamy and satisfying without any animal products.
Storage Information
How to Store Leftovers
Store leftover Chocolate Strawberry Icebox Cake in the fridge. Use an airtight container to keep it fresh. If you leave it uncovered, it can dry out. The cake stays good for about 3 to 4 days. Make sure to slice pieces as needed to avoid air exposure.
Freezing Instructions
You can freeze this cake for longer storage. First, wrap it tightly in plastic wrap. Then, place it in a freezer-safe container. It can last up to 2 months in the freezer. When ready to eat, thaw it in the fridge overnight. Avoid refreezing once thawed.
Shelf Life Tips
To enjoy the best taste, eat the cake within the first few days. The strawberries can lose their texture over time. The whipped cream can separate if stored too long. Keep an eye on it, especially if you added extra strawberries on top. The cake looks best within the first few days after making it.
FAQs
Can I make this Chocolate Strawberry Icebox Cake ahead of time?
Yes, you can make this cake ahead of time. In fact, it tastes better after chilling overnight. This allows the flavors to meld together and makes the cake firmer. Just cover it well with plastic wrap before storing it in the fridge.
What are the best strawberries to use for this recipe?
Choose ripe, fresh strawberries without blemishes. Look for deep red color and a sweet aroma. Organic strawberries are great, too, as they often have better flavor. Always wash and hull them right before using them in the recipe.
Can I replace the cream cheese with another ingredient?
Yes, you can replace cream cheese with Greek yogurt or mascarpone cheese. Both options will give a creamy texture. If using yogurt, choose plain, full-fat yogurt for the best results. This swap keeps your cake smooth and tasty.
How long does the cake need to chill before serving?
The cake needs at least 4 hours to chill, but overnight is best. Chilling helps the layers set well, making it easier to slice. The longer it chills, the more the flavors blend and the texture improves.
What is the best way to cut and serve the icebox cake?
Use a sharp knife to cut the cake into squares. Dip the knife in warm water and wipe it dry for clean cuts. Serve the cake chilled, and consider drizzling chocolate sauce on top for extra flavor. Garnish with sliced strawberries and mint leaves for a pretty touch.
This chocolate strawberry icebox cake combines rich flavors and simple steps. We covered ingredients like heavy cream, strawberries, and chocolate. I shared tips for whipping cream and layering the cake perfectly. You can also try different cookie options or fruits for fun twists. Remember to store leftovers well to enjoy later. With these methods, your cake will impress everyone. Enjoy creating this sweet treat!