Classic Chicken Tenders Crispy and Easy Recipe

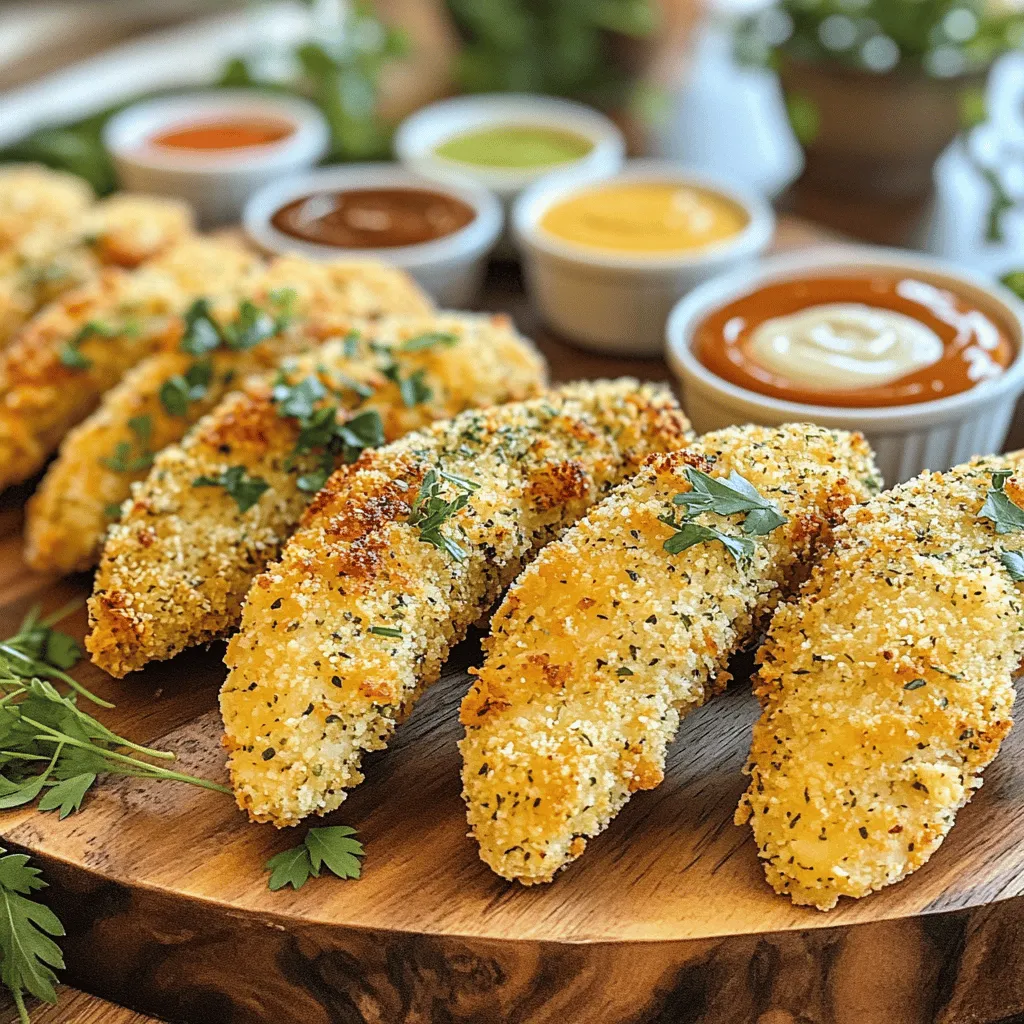
If you’re craving something crispy, juicy, and downright delicious, you’re in for a treat! My Classic Chicken Tenders recipe is simple and satisfying. With the right ingredients and techniques, you can whip up this family favorite in no time. Let’s dive into the steps that will make your chicken tenders perfectly crisp and full of flavor, ensuring you never reach for the takeout menu again!

Ingredients

When making classic chicken tenders, you need simple yet key ingredients for great taste. Here’s what you’ll need:

– 2 boneless, skinless chicken breasts

– 1 cup buttermilk

– 1 teaspoon garlic powder

– 1 teaspoon onion powder

– 1 teaspoon smoked paprika

– 1 teaspoon dried oregano

– 1 teaspoon dried thyme

– 1 cup all-purpose flour

– 1 cup breadcrumbs (preferably panko for extra crunch)

– Salt and pepper to taste

– Vegetable oil for frying

Each ingredient plays a role in creating the perfect tender. The chicken gives us the main flavor and protein. Buttermilk adds moisture and tenderness. The spices mix with the buttermilk to create a tasty marinade. Flour and breadcrumbs deliver the crispy coating we all love.

Using panko breadcrumbs will make your tenders extra crunchy. This detail makes a big difference in texture. Don’t forget about salt and pepper; they enhance every bite.

Gather all these ingredients before you start. This way, you will feel ready and organized. Trust me, it makes cooking much easier! You can find the full recipe above for detailed steps on how to make these crispy delights.

Step-by-Step Instructions

Marinating the Chicken

To start, you need to make a tasty marinade. In a large bowl, mix 1 cup of buttermilk with the spices. Use 1 teaspoon of garlic powder, onion powder, smoked paprika, dried oregano, and dried thyme. Stir until everything blends well. This will give your chicken great flavor.

Next, add your sliced chicken strips to the marinade. Make sure they are all covered. Cover the bowl with plastic wrap. Let the chicken marinate in the fridge for at least 1 hour. If you have time, marinate it overnight. This gives the chicken more flavor.

Preparing the Breading Station

Now, let’s set up your breading station. In a shallow bowl, mix 1 cup of all-purpose flour with some salt and pepper. In another bowl, add 1 cup of breadcrumbs. I suggest using panko for extra crunch.

Once your chicken is done marinating, take it out. Let the excess marinade drip off each strip. First, dip the chicken in the seasoned flour. Shake off any extra flour. Then, dip it back into the buttermilk. Finally, coat it with the breadcrumbs. Press the breadcrumbs onto the chicken to help them stick.

Frying the Chicken Tenders

For frying, grab a large frying pan. Add about 1 inch of vegetable oil and heat it over medium heat. You want the oil to reach 350°F (175°C).

When the oil is ready, carefully place the chicken tenders in the hot oil. Do this in batches to avoid overcrowding. Fry each batch for about 4-5 minutes per side. You want them to be golden brown and cooked through.

After frying, remove the tenders and place them on a plate lined with paper towels. This will help soak up extra oil. Enjoy your crispy chicken tenders hot, with your favorite dipping sauces for extra flavor! For the full recipe, check out the details above.

Tips & Tricks

Achieving Maximum Crispiness

To get the best crunch, I always recommend using panko breadcrumbs. Panko gives a light, airy texture, which makes your chicken tenders extra crispy. Regular breadcrumbs work too, but they won’t be as crunchy.

Do not overcrowd the pan while frying. If you add too many tenders at once, the oil temperature drops. This can lead to soggy chicken. Fry in small batches to keep the oil hot. It helps the tenders cook evenly and maintain their crispiness.

Flavor Enhancements

Spicing up your flour or breadcrumb mix can add great flavor. Try adding garlic powder or cayenne pepper for a kick. You can also mix in dried herbs like basil or parsley. This step makes a big difference in taste.

For alternative marinades, you can use yogurt or even pickle juice. Both add a tangy flavor that pairs well with chicken. Letting the chicken soak longer will give you a deeper taste. Experiment to find your favorite combination!

Variations

Oven-Baked Chicken Tenders

Oven-baked chicken tenders can be a great choice for a healthier meal. To make them, preheat your oven to 400°F (200°C). Line a baking sheet with parchment paper for easy cleanup.

1. After marinating your chicken, set up your breading station as usual.

2. Instead of frying, place the coated chicken strips on the prepared baking sheet.

3. Lightly spray the chicken with cooking spray or drizzle a little oil on top. This helps them crisp up in the oven.

For seasoning, you can use the same spices from the original recipe. Or try new blends, like Italian herbs or a spicy Cajun mix, for a tasty twist.

Flavorful Coating Alternatives

You can switch up the coating for unique flavors. Instead of breadcrumbs, try using crushed cornflakes or nuts like almonds or pecans.

– For cornflakes, crush them into small pieces before coating. They add a nice crunch and a slight sweetness.

– For nuts, finely chop them to create a flavorful and crunchy layer.

You can also mix different spices into your coating. Try adding cayenne for heat, or a pinch of curry powder for a warm flavor. Each option makes your chicken tenders truly special.

For the full recipe, check out the Crispy Herb-Infused Chicken Tenders.

Storage Info

Refrigeration Guidelines

To keep your chicken tenders fresh, store them in an airtight container. This prevents moisture loss and keeps out odors. You can also wrap them tightly in plastic wrap or foil.

For best taste, eat your chicken tenders within 3 days. If you leave them in the fridge too long, they might lose flavor and texture.

Freezing Chicken Tenders

To freeze your chicken tenders, allow them to cool completely after cooking. Then, place them in a single layer on a baking sheet. Freeze until solid, then transfer them to a freezer bag. Make sure to remove as much air as possible to prevent freezer burn.

You can freeze chicken tenders for up to 3 months. When ready to eat, reheat them in the oven at 400°F (200°C) for about 15-20 minutes. This method keeps them crispy. You can also use an air fryer for a faster option, just 10-12 minutes at 375°F (190°C) works well.

For more details on making these tenders, check out the Full Recipe.

FAQs

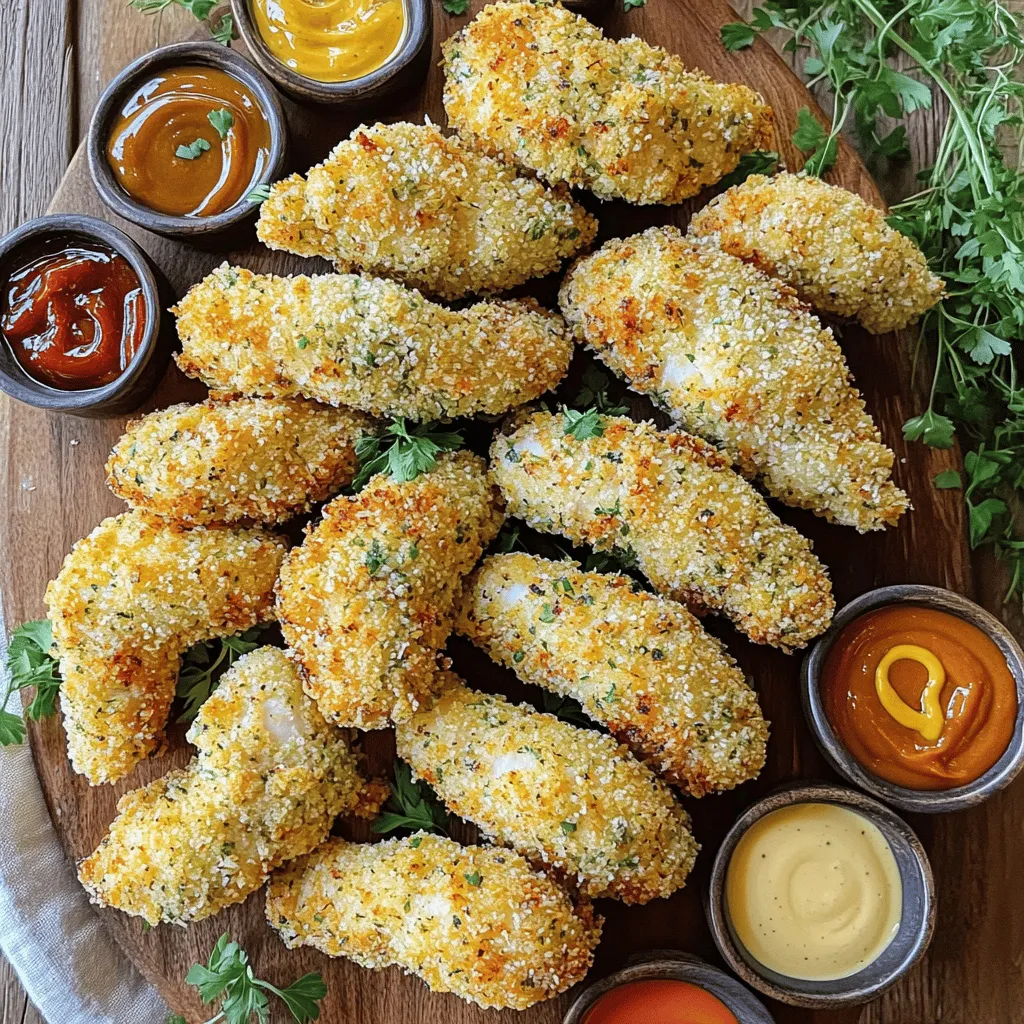
What are the best dipping sauces for chicken tenders?

You have many choices for dipping sauces. Some popular options include:

– Honey mustard

– Ranch dressing

– Barbecue sauce

– Sweet and sour sauce

– Garlic aioli

Each sauce adds a unique flavor. Honey mustard is sweet and tangy. Ranch offers a creamy, herby taste. Barbecue sauce brings a smoky flavor. Experiment with different sauces to find your favorites!

Can I use chicken thighs instead of breasts?

Yes, you can use chicken thighs instead of breasts. Chicken thighs have more fat. This means they stay moist and juicy. The flavor of thighs is richer than breasts. If you like a tender bite, thighs are a good choice. Just remember to adjust the cooking time slightly. Thighs may take a bit longer to cook.

How do I know when chicken tenders are fully cooked?

To ensure chicken tenders are fully cooked:

– Use a meat thermometer. Check that the internal temperature reaches 165°F (74°C).

– Cut into one tender. The meat should be white, not pink.

– Juices should run clear, not red or pink.

These tips help keep your chicken safe to eat. Enjoy your crispy chicken tenders with confidence! For the full recipe, check out the recipe guide above.

This blog post detailed how to make delicious chicken tenders. We covered the ingredients, from chicken breasts to buttermilk. I shared the marinating, breading, and frying steps for crispy results. You learned tips for maximum crunch and flavor boosts. We also explored oven-baked options and tasty variations. Lastly, I provided storage guidelines and answered common questions.

Now, you’re ready to enjoy tasty chicken tenders at home. Happy cooking!

When making classic chicken tenders, you need simple yet key ingredients for great taste. Here’s what you'll need: - 2 boneless, skinless chicken breasts - 1 cup buttermilk - 1 teaspoon garlic powder - 1 teaspoon onion powder - 1 teaspoon smoked paprika - 1 teaspoon dried oregano - 1 teaspoon dried thyme - 1 cup all-purpose flour - 1 cup breadcrumbs (preferably panko for extra crunch) - Salt and pepper to taste - Vegetable oil for frying Each ingredient plays a role in creating the perfect tender. The chicken gives us the main flavor and protein. Buttermilk adds moisture and tenderness. The spices mix with the buttermilk to create a tasty marinade. Flour and breadcrumbs deliver the crispy coating we all love. Using panko breadcrumbs will make your tenders extra crunchy. This detail makes a big difference in texture. Don’t forget about salt and pepper; they enhance every bite. Gather all these ingredients before you start. This way, you will feel ready and organized. Trust me, it makes cooking much easier! You can find the full recipe above for detailed steps on how to make these crispy delights. To start, you need to make a tasty marinade. In a large bowl, mix 1 cup of buttermilk with the spices. Use 1 teaspoon of garlic powder, onion powder, smoked paprika, dried oregano, and dried thyme. Stir until everything blends well. This will give your chicken great flavor. Next, add your sliced chicken strips to the marinade. Make sure they are all covered. Cover the bowl with plastic wrap. Let the chicken marinate in the fridge for at least 1 hour. If you have time, marinate it overnight. This gives the chicken more flavor. Now, let’s set up your breading station. In a shallow bowl, mix 1 cup of all-purpose flour with some salt and pepper. In another bowl, add 1 cup of breadcrumbs. I suggest using panko for extra crunch. Once your chicken is done marinating, take it out. Let the excess marinade drip off each strip. First, dip the chicken in the seasoned flour. Shake off any extra flour. Then, dip it back into the buttermilk. Finally, coat it with the breadcrumbs. Press the breadcrumbs onto the chicken to help them stick. For frying, grab a large frying pan. Add about 1 inch of vegetable oil and heat it over medium heat. You want the oil to reach 350°F (175°C). When the oil is ready, carefully place the chicken tenders in the hot oil. Do this in batches to avoid overcrowding. Fry each batch for about 4-5 minutes per side. You want them to be golden brown and cooked through. After frying, remove the tenders and place them on a plate lined with paper towels. This will help soak up extra oil. Enjoy your crispy chicken tenders hot, with your favorite dipping sauces for extra flavor! For the full recipe, check out the details above. To get the best crunch, I always recommend using panko breadcrumbs. Panko gives a light, airy texture, which makes your chicken tenders extra crispy. Regular breadcrumbs work too, but they won't be as crunchy. Do not overcrowd the pan while frying. If you add too many tenders at once, the oil temperature drops. This can lead to soggy chicken. Fry in small batches to keep the oil hot. It helps the tenders cook evenly and maintain their crispiness. Spicing up your flour or breadcrumb mix can add great flavor. Try adding garlic powder or cayenne pepper for a kick. You can also mix in dried herbs like basil or parsley. This step makes a big difference in taste. For alternative marinades, you can use yogurt or even pickle juice. Both add a tangy flavor that pairs well with chicken. Letting the chicken soak longer will give you a deeper taste. Experiment to find your favorite combination! {{image_4}} Oven-baked chicken tenders can be a great choice for a healthier meal. To make them, preheat your oven to 400°F (200°C). Line a baking sheet with parchment paper for easy cleanup. 1. After marinating your chicken, set up your breading station as usual. 2. Instead of frying, place the coated chicken strips on the prepared baking sheet. 3. Lightly spray the chicken with cooking spray or drizzle a little oil on top. This helps them crisp up in the oven. For seasoning, you can use the same spices from the original recipe. Or try new blends, like Italian herbs or a spicy Cajun mix, for a tasty twist. You can switch up the coating for unique flavors. Instead of breadcrumbs, try using crushed cornflakes or nuts like almonds or pecans. - For cornflakes, crush them into small pieces before coating. They add a nice crunch and a slight sweetness. - For nuts, finely chop them to create a flavorful and crunchy layer. You can also mix different spices into your coating. Try adding cayenne for heat, or a pinch of curry powder for a warm flavor. Each option makes your chicken tenders truly special. For the full recipe, check out the Crispy Herb-Infused Chicken Tenders. To keep your chicken tenders fresh, store them in an airtight container. This prevents moisture loss and keeps out odors. You can also wrap them tightly in plastic wrap or foil. For best taste, eat your chicken tenders within 3 days. If you leave them in the fridge too long, they might lose flavor and texture. To freeze your chicken tenders, allow them to cool completely after cooking. Then, place them in a single layer on a baking sheet. Freeze until solid, then transfer them to a freezer bag. Make sure to remove as much air as possible to prevent freezer burn. You can freeze chicken tenders for up to 3 months. When ready to eat, reheat them in the oven at 400°F (200°C) for about 15-20 minutes. This method keeps them crispy. You can also use an air fryer for a faster option, just 10-12 minutes at 375°F (190°C) works well. For more details on making these tenders, check out the Full Recipe. You have many choices for dipping sauces. Some popular options include: - Honey mustard - Ranch dressing - Barbecue sauce - Sweet and sour sauce - Garlic aioli Each sauce adds a unique flavor. Honey mustard is sweet and tangy. Ranch offers a creamy, herby taste. Barbecue sauce brings a smoky flavor. Experiment with different sauces to find your favorites! Yes, you can use chicken thighs instead of breasts. Chicken thighs have more fat. This means they stay moist and juicy. The flavor of thighs is richer than breasts. If you like a tender bite, thighs are a good choice. Just remember to adjust the cooking time slightly. Thighs may take a bit longer to cook. To ensure chicken tenders are fully cooked: - Use a meat thermometer. Check that the internal temperature reaches 165°F (74°C). - Cut into one tender. The meat should be white, not pink. - Juices should run clear, not red or pink. These tips help keep your chicken safe to eat. Enjoy your crispy chicken tenders with confidence! For the full recipe, check out the recipe guide above. This blog post detailed how to make delicious chicken tenders. We covered the ingredients, from chicken breasts to buttermilk. I shared the marinating, breading, and frying steps for crispy results. You learned tips for maximum crunch and flavor boosts. We also explored oven-baked options and tasty variations. Lastly, I provided storage guidelines and answered common questions. Now, you’re ready to enjoy tasty chicken tenders at home. Happy cooking!

Classic Chicken Tenders

Discover the secret to irresistible crispy herb-infused chicken tenders that will impress your family and friends! This easy recipe features juicy chicken marinated in a flavorful blend of spices, then fried to golden perfection. With just a few simple ingredients and steps, you can create the perfect crunchy treat to pair with your favorite dipping sauces. Click through to explore the full recipe and elevate your chicken game today!

Ingredients
  

2 boneless, skinless chicken breasts, sliced into strips

1 cup buttermilk

1 teaspoon garlic powder

1 teaspoon onion powder

1 teaspoon smoked paprika

1 teaspoon dried oregano

1 teaspoon dried thyme

1 cup all-purpose flour

1 cup breadcrumbs (preferably panko for extra crunch)

Salt and pepper to taste

Vegetable oil for frying

Instructions
 

In a large mixing bowl, whisk together the buttermilk, garlic powder, onion powder, smoked paprika, dried oregano, and dried thyme until well combined. This mixture will serve as a flavorful marinade for the chicken.

    Add the sliced chicken strips to the marinade, ensuring they are fully submerged. Cover the bowl with plastic wrap and refrigerate for a minimum of 1 hour (or overnight if you want a more intense flavor).

      Prepare your breading station: In a shallow bowl, combine the all-purpose flour with a generous sprinkle of salt and freshly cracked pepper. In a separate bowl, place the breadcrumbs for coating.

        After marinating, remove the chicken from the refrigerator. Allow the excess marinade to drip off each strip, then first dip it into the seasoned flour, coating well and shaking off any extra flour.

          Next, dip the floured chicken strip back into the buttermilk marinade briefly, allowing any excess to drip away again, and then coat it thoroughly in the breadcrumbs, pressing gently to ensure adherence.

            In a large frying pan, add about 1 inch of vegetable oil and heat over medium heat until it reaches 350°F (175°C). Carefully place the chicken tenders into the hot oil in batches, avoiding overcrowding to ensure even cooking. Fry the tenders for approximately 4-5 minutes per side, or until they turn a beautiful golden brown and are cooked through.

              Once cooked, remove the chicken tenders from the oil and place them on a plate lined with paper towels to absorb any excess oil.

                Serve the chicken tenders hot, paired with your choice of dipping sauces such as honey mustard, ranch, or barbecue sauce to enhance the flavor experience.

                  Prep Time: 15 minutes | Total Time: 1 hour 15 minutes (includes marinating time) | Servings: 4

                    - Presentation Tips: Arrange the crispy chicken tenders on a rustic wooden platter, sprinkle with fresh herbs like parsley or thyme for a pop of color, and serve with a vibrant assortment of colorful dipping sauces presented in small bowls around the tenders for an inviting and delightful display.

                      Leave a Comment

                      Recipe Rating