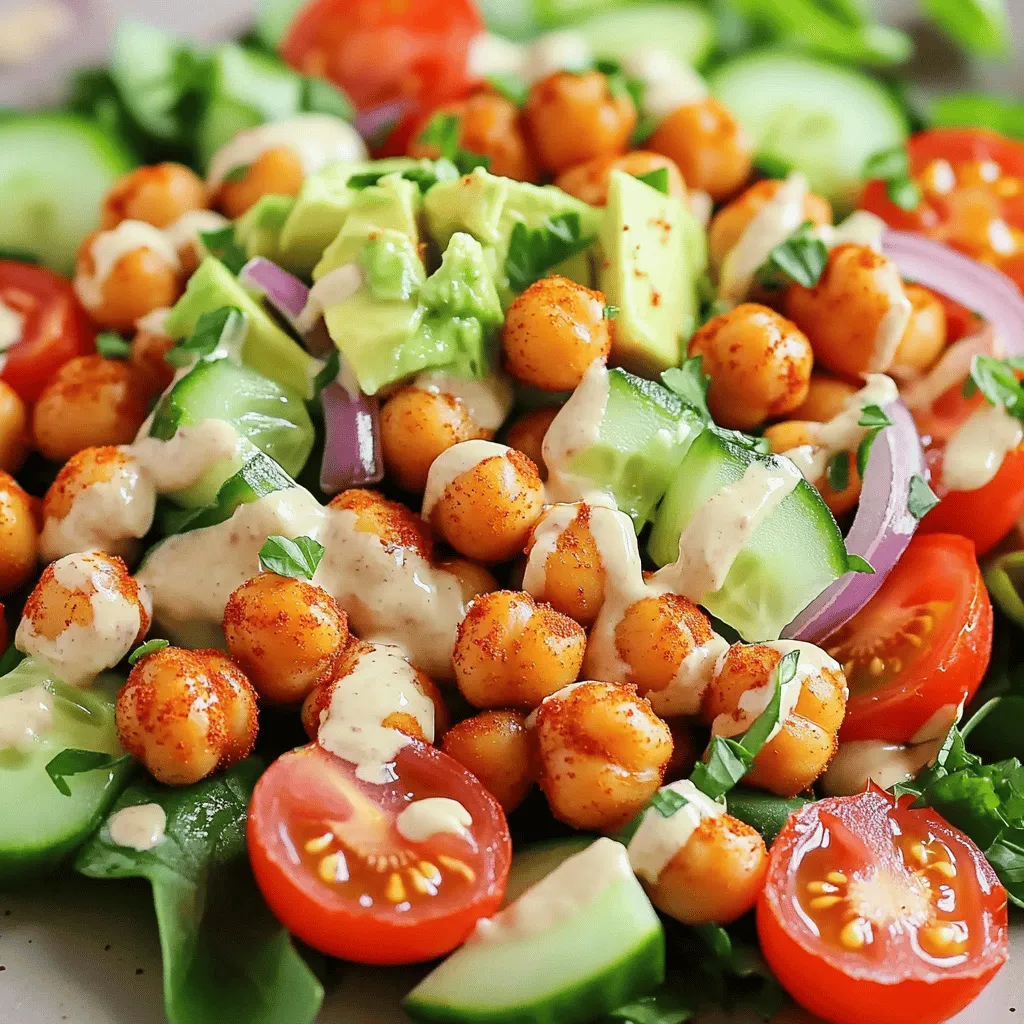
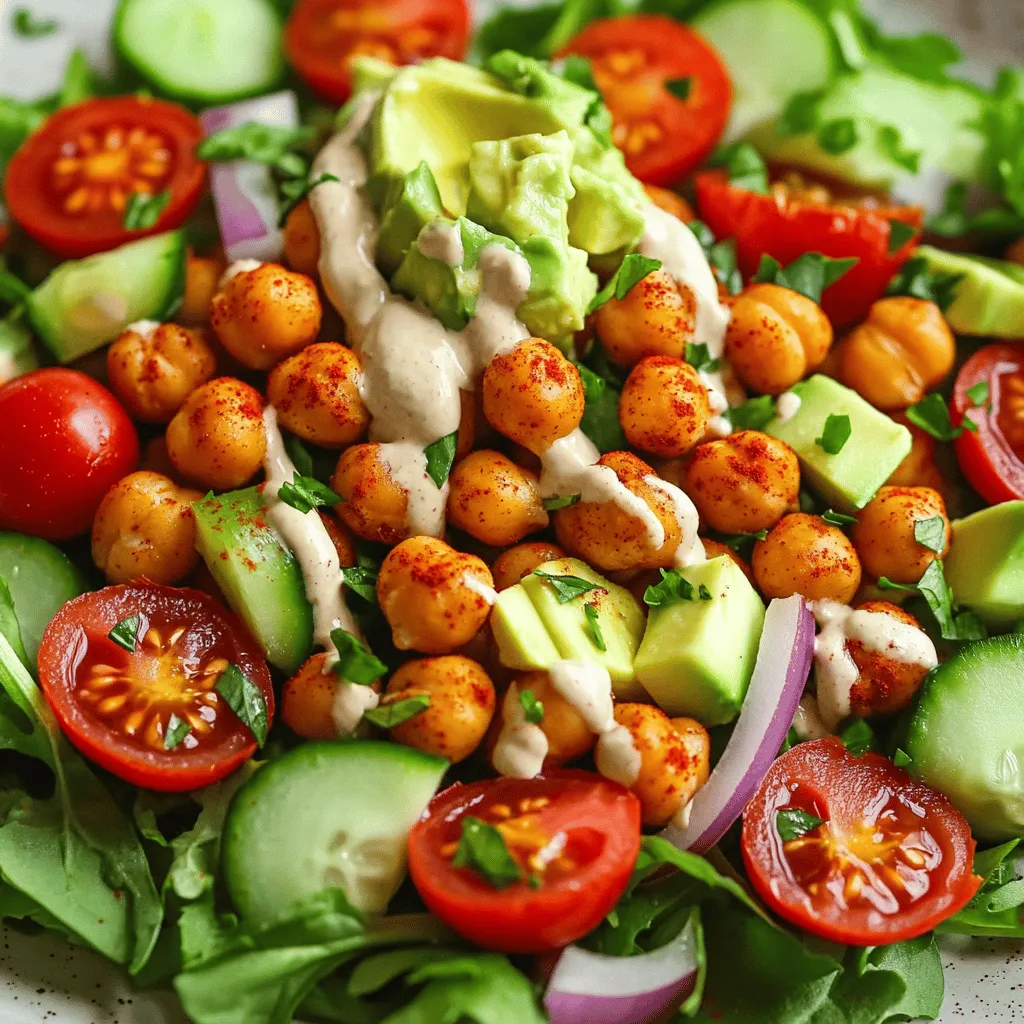
Are you ready for a salad that’s both crunchy and healthy? This Crispy Chickpea Salad packs a flavorful punch with simple ingredients you likely already have. You’ll learn how to roast chickpeas to perfection and whip up a creamy tahini dressing. Plus, I’ll share tips to customize your salad to fit your taste. Let’s dive into this delightful dish that’s great for any meal!
Ingredients
List of Primary Ingredients
– 1 can (15 oz) chickpeas, thoroughly drained and rinsed
– 2 tablespoons extra virgin olive oil
– 1 teaspoon smoked paprika
– 1/2 teaspoon garlic powder
– 1/2 teaspoon ground cumin
– Sea salt and freshly cracked black pepper, to taste
– 1 cup cherry tomatoes, cut in half
– 1 medium cucumber, diced
– 1/4 medium red onion, finely chopped
– 2 cups mixed salad greens
– 1 ripe avocado, diced
– 2 tablespoons freshly squeezed lemon juice
– 2 tablespoons tahini (sesame seed paste)
– 1 tablespoon cool water
– Fresh parsley, finely chopped (for garnish)
Chickpeas are the star of this salad. They add protein and fiber, making it filling. Olive oil gives a rich taste and helps the spices stick to the chickpeas. Smoked paprika, garlic powder, and cumin bring warmth and depth to the dish.
The fresh veggies add crunch and color. Cherry tomatoes burst with flavor, while cucumbers provide a refreshing bite. Red onion gives a slight kick, and mixed greens round out the salad with a crisp base.
Avocado adds creaminess and healthy fats. The tahini dressing ties everything together with its nutty flavor. Fresh lemon juice brightens the dish, making it zesty.
This salad is a perfect blend of flavors and textures. You can easily customize it to suit your taste.
Nutritional Information
Each serving packs around 300 calories. Here’s a breakdown of the key nutrients:
– Protein: Chickpeas are high in protein, making this salad a great vegetarian option.
– Fiber: Both chickpeas and veggies help you feel full and aid digestion.
– Healthy Fats: Avocado and olive oil provide good fats that support heart health.
Chickpeas also contain vitamins and minerals. They are rich in folate, iron, and magnesium. Together, these ingredients create a nutritious meal that is both tasty and satisfying.
Step-by-Step Instructions
Preparation of Chickpeas
– Preheat the oven to 400°F (200°C).
– In a bowl, mix the drained chickpeas with olive oil, smoked paprika, garlic powder, and cumin.
– Add sea salt and pepper to taste. Toss well to coat the chickpeas.
Roasting Instructions
– Spread the seasoned chickpeas out on a baking sheet.
– Roast them in the oven for 25-30 minutes until crispy.
– Shake the pan halfway through to ensure they cook evenly.
Salad Assembly
– In a large bowl, combine halved cherry tomatoes, diced cucumber, red onion, and mixed greens.
– Toss gently to mix everything together.
– In a small bowl, whisk tahini with lemon juice and water until smooth.
Final Assembly
– Once the chickpeas are roasted, let them cool slightly.
– Add the crispy chickpeas and diced avocado to the salad.
– Drizzle the tahini dressing over the salad and toss gently.
– Garnish with fresh parsley before serving.Enjoy this delightful dish!
Tips & Tricks
Making the Chickpeas Crispier
To get crispy chickpeas, start by drying them well. After draining, pat them dry with a towel. This removes extra moisture. The less water on the chickpeas, the crispier they will get.
For seasoning, mix smoked paprika, garlic powder, and cumin. These spices add great flavor. Use sea salt and freshly cracked pepper to taste. Toss the chickpeas until they are fully coated with the spices. This step is key to a tasty crunch.
Dressing Variations
You can try different dressings for your salad. A simple vinaigrette works well. Just mix olive oil, lemon juice, and a pinch of salt. You can also blend tahini with lemon juice and water. This gives a creamy texture.
Want a kick? Add some hot sauce or chili flakes. Each dressing can change the salad’s flavor. Feel free to mix and match based on what you like!
Serving Suggestions
This salad pairs well with proteins like grilled chicken or shrimp. It makes a great side for a barbecue or picnic. You can also serve it as a light lunch.
For special occasions, present it on a colorful platter. Add some nuts or seeds for extra crunch. This salad is not just a dish; it’s a way to impress your guests. Enjoy this colorful and nutritious salad as a light lunch or a delicious side dish!
Variations
Ingredient Swaps
You can change the veggies in your salad. Try using bell peppers, radishes, or carrots. These add crunch and color. You can also swap chickpeas for black beans, kidney beans, or lentils. Each type of bean gives a unique taste and texture.
Dietary Options
This salad is vegan and gluten-free. For more vegan flair, add nutritional yeast for a cheesy taste. You can also use gluten-free grains like quinoa or brown rice in place of chickpeas. This adds bulk and keeps the salad filling.
Flavor Enhancements
Spices can change the whole dish! Add curry powder, chili flakes, or fresh herbs like basil or cilantro. Fruits like diced apples or pomegranate seeds can add sweetness. Nuts or seeds, such as sunflower seeds or walnuts, add crunch and healthy fats.
Storage Info
Storing Leftovers
To keep your crispy chickpea salad fresh, store it in an airtight container. This prevents moisture from making the salad soggy. Place the salad in the fridge right away. For the dressing, store it separately in a small jar. This way, your salad stays crunchy and tasty.
Reheating Options
If you want to reheat the chickpeas, use an oven or air fryer. Heat them at 350°F (175°C) for about 10 minutes. This keeps them crispy. Avoid microwaving, as it can make them soft and chewy.
Shelf Life
In the fridge, your salad stays fresh for about 3 days. Look for signs of spoilage like an off smell or wilted greens. If you see these signs, it’s best to toss the salad. Enjoy your crispy chickpea salad while it’s at its best!
FAQs
How to make crispy chickpea salad from scratch?
To make crispy chickpea salad, follow these key steps:
– Preheat your oven to 400°F (200°C).
– Rinse and drain one can of chickpeas.
– Toss chickpeas with olive oil, smoked paprika, garlic powder, cumin, salt, and pepper.
– Spread them on a baking sheet and roast for 25-30 minutes.
– While the chickpeas roast, mix cherry tomatoes, cucumber, red onion, and salad greens in a bowl.
– For the dressing, whisk lemon juice, tahini, and water until smooth.
– Once chickpeas are crispy, add them to the salad with diced avocado.
– Drizzle the tahini dressing, toss gently, and garnish with parsley.
This process makes a crunchy, healthy salad.
Can I prepare this salad in advance?
Yes, you can prepare this salad in advance. For meal prep:
– Roast chickpeas ahead of time and store them in an airtight container.
– Chop veggies and mix them in a bowl without dressing.
– Keep the tahini dressing in a separate container.
When ready to eat, combine everything. This keeps the salad fresh and crunchy.
What can I substitute for tahini in the dressing?
If you have allergies or can’t find tahini, consider these options:
– Use peanut butter for a nutty flavor.
– Greek yogurt adds creaminess without nuts.
– Sunflower seed butter is a great nut-free choice.
These alternatives give you a tasty dressing while keeping it safe for all diets.
Is this salad suitable for meal prep?
Yes, this salad is great for meal prep. To make it last longer:
– Store crispy chickpeas separately from the salad.
– Keep veggies and greens in a sealed container.
– Add dressing just before serving to prevent sogginess.
Following these tips helps maintain the salad’s fresh taste and texture.
This blog post covered everything you need to make a delicious crispy chickpea salad. We discussed the key ingredients, gave step-by-step instructions, and shared helpful tips for best results. You learned how to customize flavors and keep the salad fresh for later. Remember, this salad is not only tasty but also packed with nutrients. Try it out and enjoy all its benefits. Happy cooking!