Dive into the world of dessert with my simple and fun No-Bake Cheesecake Jars! This delightful recipe is perfect for anyone craving a sweet treat without the fuss of baking. I’ll guide you through easy steps to create creamy, luscious cheesecakes piled high in jars. From the essential ingredients to clever tips, you’ll be ready to impress friends and family in no time. Let’s get started on this tasty journey together!
Ingredients
Essential Ingredients for No-Bake Cheesecake Jars
To make your no-bake cheesecake jars, you need some key ingredients. Here’s what you’ll need:
– 1 cup graham cracker crumbs
– 1/4 cup unsalted butter, melted
– 2 (8 oz) packages cream cheese, softened
– 1 cup powdered sugar
– 1 teaspoon pure vanilla extract
– 1 cup heavy whipping cream
These ingredients create a creamy and rich cheesecake filling. The graham cracker crumbs form a tasty crust that holds everything together.
Optional Ingredients for Different Flavors
You can mix things up by adding optional ingredients. Here are some ideas:
– 1/4 cup freshly squeezed lemon juice for a tangy twist
– 1/2 cup melted chocolate for a chocolate cheesecake
– 1 teaspoon almond extract for a nutty flavor
– 1/2 cup crushed cookies for a fun crunch
These options let you customize your cheesecake jars to suit your taste.
Recommended Garnishes and Toppings
Garnishing your cheesecake jars makes them look and taste even better. Here are some great ideas:
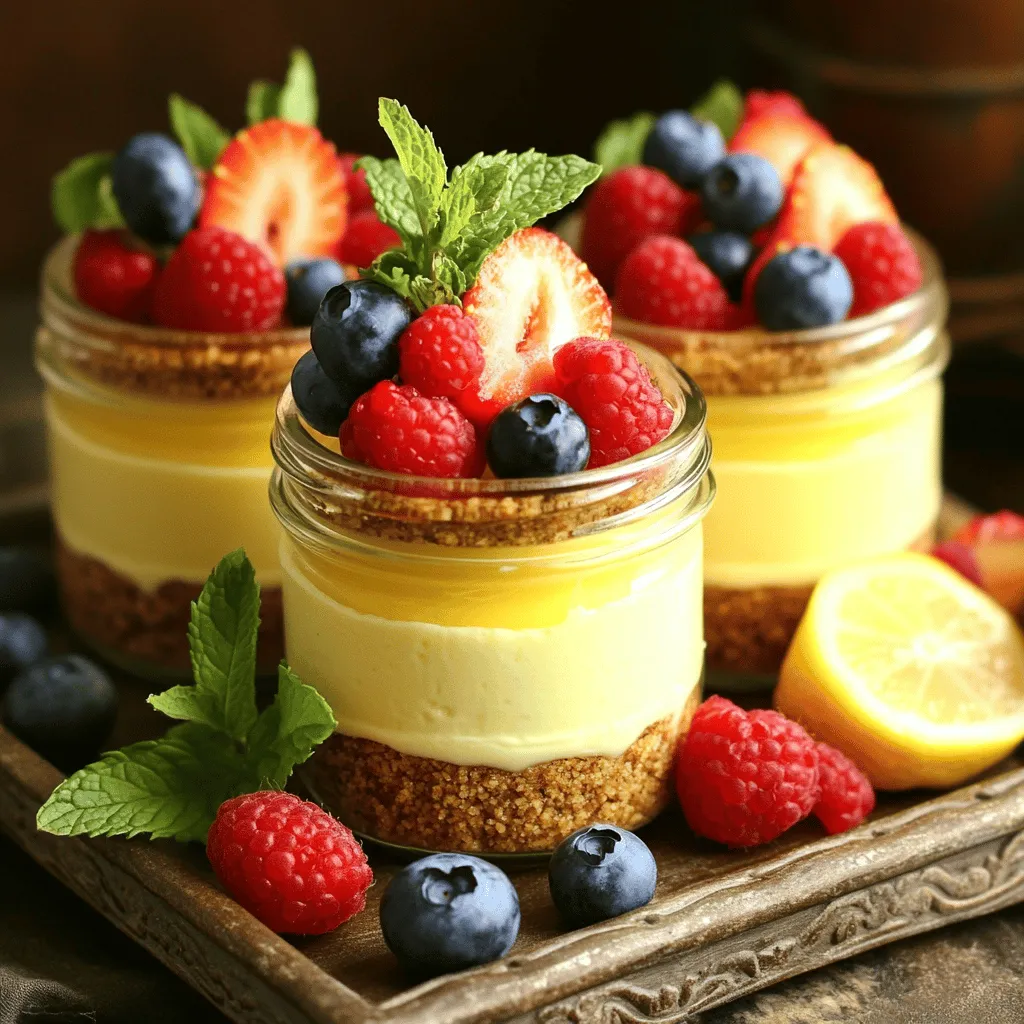
– 1/2 cup fresh berries (strawberries, blueberries, or raspberries)
– A drizzle of chocolate or caramel sauce
– A sprinkle of crushed nuts or cookies
– Fresh mint leaves for a pop of color
These toppings add flavor and make your dessert visually appealing. You’ll impress your friends and family with these beautiful no-bake cheesecake jars.
Step-by-Step Instructions
Preparing the Crust
To make the crust, grab a medium bowl. Add 1 cup of graham cracker crumbs and 1/4 cup of melted butter. Mix them well until the crumbs look like wet sand. This mix should hold together when you press it. Take about 2 tablespoons of this mixture and put it in each jar. Press down gently with a spoon or your fingers. Aim for an even layer at the bottom. Set the jars aside while you prepare the filling.
Making the Cheesecake Filling
Next, we will make the cheesecake filling. In a large bowl, beat 2 packages of softened cream cheese using an electric mixer. Mix on medium speed until it’s smooth. Add 1 cup of powdered sugar and 1 teaspoon of vanilla extract. Keep mixing until fluffy. In another bowl, whip 1 cup of heavy cream until stiff peaks form. Gently fold the whipped cream into the cream cheese mix using a spatula. If you want a tangy twist, fold in 1/4 cup of fresh lemon juice.
Assembling the Jars
Now, it’s time to assemble the jars. Use a spoon or a piping bag to fill each jar with the cheesecake filling. Layer it over the crust until the jars are about three-quarters full. Cover each jar with a lid or plastic wrap. Place them in the fridge to chill for at least 4 hours. If you want a firmer cheesecake, refrigerate overnight. When ready to serve, top each jar with fresh berries. This adds color and flavor to your dessert. Enjoy your no-bake cheesecake jars!
Tips & Tricks
Best Practices for a Smooth Filling
To get a smooth filling, first ensure your cream cheese is soft. Let it sit at room temperature for at least 30 minutes before mixing. Use an electric mixer on medium speed to beat the cream cheese until there are no lumps. Gradually add powdered sugar and vanilla, mixing well. This step is key for a creamy texture.
How to Achieve the Perfect Whipped Cream
For perfect whipped cream, start with cold heavy cream. Use a chilled bowl and whisk. Beat the cream until stiff peaks form. Be careful not to overwhip; it can turn grainy. Gently fold the whipped cream into the cream cheese mixture. This keeps the filling light and airy, making it delightful!
Common Mistakes to Avoid
Avoid using cold cream cheese. It makes lumps impossible to mix out. Don’t rush the whipping process. Take your time to get stiff peaks. Also, don’t skip chilling the jars. Chilling helps the flavors meld and firms up the filling. These small tips will help you create a perfect no-bake cheesecake every time!
Variations
Flavor Variations
You can easily change the flavor of your no-bake cheesecake jars. Try adding chocolate for a rich twist. Just mix in melted chocolate with the cream cheese. For a fresh taste, use lemon juice and zest. It adds brightness and pairs well with fresh berries. Other fruit purees, like mango or raspberry, work great too. Each flavor brings something unique to the dessert.
Dietary Modifications
Need a gluten-free option? Just swap graham crackers for gluten-free cookies. For a vegan treat, use vegan cream cheese and coconut cream instead of heavy cream. You can also use maple syrup as a sweetener. This way, everyone can enjoy these delicious jars, no matter their diet.
Serving Suggestions
Serve these jars at parties or family gatherings. They look lovely on a dessert table. For a fun touch, add a scoop of ice cream on top. You can also sprinkle some crushed nuts for texture. If you want to impress, drizzle chocolate or caramel sauce over the top. These small tweaks make each jar a delightful treat!
Storage Info
Best Practices for Storing No-Bake Cheesecake Jars
To keep your no-bake cheesecake jars fresh, store them in the fridge. Use airtight lids or plastic wrap to cover each jar. This keeps them safe from odors and moisture. Make sure your jars sit flat on a shelf. Avoid stacking them to prevent spills.
Shelf Life in the Refrigerator
No-bake cheesecake jars last about 4 to 5 days in the fridge. The flavors get better as they sit. However, for the best taste and texture, enjoy them within 3 days. After that, the crust may get a bit soggy.
Freezing Tips for Longer Storage
You can freeze these jars for up to 2 months. Before freezing, leave off the fresh berries. They do not freeze well. Instead, add them just before serving. To freeze, wrap each jar tightly in plastic wrap and then in foil. This prevents freezer burn. For best results, thaw them in the fridge overnight before serving. Enjoy your no-bake cheesecake anytime!
FAQs
How long do No-Bake Cheesecake Jars last in the fridge?
No-Bake Cheesecake Jars last about 5 days in the fridge. They stay fresh and tasty during this time. Make sure you store them in an airtight container. This keeps them safe from absorbing other smells in the fridge. If you want the best taste, enjoy them within the first few days.
Can I use low-fat cream cheese for this recipe?
Yes, you can use low-fat cream cheese for this recipe. The texture might be slightly different, but it still works well. Low-fat cream cheese may make the cheesecake a bit less rich. If you prefer a lighter option, this is a good choice. You’ll still enjoy a yummy dessert without all the calories.
What can I substitute for graham cracker crumbs?
If you don’t have graham crackers, you can use other options. Try crushed cookies like Oreos or vanilla wafers. You can also use crushed nuts for a gluten-free option. Another choice is to use crushed crackers, such as saltines or digestive biscuits. Just remember to adjust the sugar based on the sweetness of your substitute.
No-bake cheesecake jars are simple and fun to make. We covered essential ingredients, different flavors, and tasty toppings. I shared step-by-step instructions to help you prepare the crust, filling, and assembly. You learned useful tips for a smooth mix and whipped cream too. Variations allow you to customize this dessert for any diet or taste. Finally, I shared smart storage tips to keep them fresh. Enjoy creating your own delicious jars!